

Hallo Ihr Lieben!
Interactive Card - das ist das Thema der LawnFawnatics Challenge #142. Ich habe eine Shaker Card gemacht. Vielleicht nicht unbedingt die innoviativste interaktive Karte, aber irgendwie kam mir diese Idee und da bot sich ein Shaker an.
Hello everyone!
Interactive card - that's the theme of LawnFawnatics Challenge #142. I made a shaker card. That's maybe not the most innovative interactive card type, but I had that idea in mind and a shaker worked best with it.
Für den Hintergrund habe ich ein Stück hellgrünen Cardstocks mit dem Clover Background Stencil Set sowie Distress Ink Bundled Sage und Mowed Lawn die Kleeblätter aufgewischt. Dann habe ich weiße und goldene Metallic Watercolor aufgespritzt und von der Rändern her noch etwas Distress Ink Rustic Wilderness aufgetragen.
For the background I inked the clovers onto a piece of light green cardstock using the Clover Background stencil set and Distress Ink Bundled Sage and Mowed Lawn. Then I spritzed white and gold metallic watercolor onto the cardstock and also darkened up the edges a bit with Distress Ink Rustic Wilderness.

Es gibt ja einige tolle Rahmen von LawnFawn, an denen außen Blumen oder Blätter oder Schneeflocken etc. angebracht sind. Ich habe mir einen mit Kleeblättern gebastelt. Dafür habe ich mit einer der Stitched Rectangle Frames Stanzen wieder aus dem hellgrünen Cardstock einen Rahmen gestanzt und ihn an den Ecken wieder mit Rustic Wilderness ein wenig gewischt. Von hinten habe ich dann Kleeblätter am inneren Rand entlang aufgeklebt. Die habe ich mit den Lucky Clover Stanzen aus Cardstock in drei verschiedenen Grüntönen gestanzt, jeweils an den Rändern ebenfalls ein wenig gewischt und mit einem weißen Gelstift einige Details aufgemalt.
Zwischen die Kleeblätter habe ich dann viele Marienkäfer aus dem Set Hey, Lady verteilt.
LawnFawn has a few great frame dies, where there are little flowers or leaves or snowflakes cut at the inner edge of the frame. I created one with clovers myself. I die cut one of the Stitched Rectangle Frames from the light green cardstock again and again inked up the corners a bit with Rustic Wilderness. Then I glued lots of clovers along the inner edge of the frame, attaching them to the back of the frame. I had die cut the clovers from three different shades of green cardstock using the Lucky Clovers dies, then darkened the edges again just a bit and added a few white details using a white gel pen.
Between the clovers I attached quite a few ladybugs from the Hey Lady stamp set.

Der Text auf meiner Karte ist gleichzeitig auch die Deko.
Zuerst habe ich den Hexenkessel aus dem Purrfectly Wicked Stempelset abgestempelt und die Goldmünzen aus der Schatztruhe aus dem Set Ahoy Matey hineingestempelt. Dann habe ich ihn, ebenso wie die Marienkäfer, mit Copics coloriert und ausgeschnitten.
Mit Stanzen aus dem Set Finley's ABC habe ich dann die Buchstaben L, C und K dreimal aus schwarzem und einmal aus gelbem Cardstock ausgestanzt und aufeinander geklebt. Die gelbe Lage habe ich dabei ein wenig nach oben rechts versetzt, so dass ein schmaler Schatten darunter sichtbar bleibt. Mit dem Hexenkessel als U konnte ich so das Wort Luck schreiben.
Mit weißem Embossingpulver habe ich dann das good aus dem Set My Lucky Charm auf schwarzen Cardstock embosst und ausgeschnitten.
Für den Regenbogen, der aus dem Goldtopf kommen sollte, musste ich "fremdgehen". Von LawnFawn gibt es nur einen normal gebogenen Regenbogen, ich wollte aber unbedingt einen, der Richtung Kartenrand - und darüber hinaus - geht. Also habe ich eine Stanze von MFT benutzt. Die war ein wenig zu breit für den Hexenkessel, so dass ich statt der 6 nur 5 Bögen benutzt habe. Da auf der Karte schon genug grün vorhanden ist, habe ich diese Farbe ausgelassen und stattdessen zwischen gelb und blau einen grün-grau-blauen Bogen gesetzt.
Ich habe alle Dekoelemente auf ein Stück Acetate geklebt - das Wort good ist mit 3D Tape befestigt - und das Acetate dann von hinten gegen den Kleeblatt-Rahmen geklebt. Am K habe ich dann noch einen weiteren kleinen Marienkäfer befestigt.
The text on this card is also the decoration.
I first stamped the cauldron from the Purrfectly Wicked stamp set and stamped the coins of the treasure chest from the Ahoy Matey stamp set "into" it. Then I colored it with Copics, just like I did the ladybugs before, and cut everything out.
Using dies from the Finley's ABC die set I cut the letters L, C and K three times from black and once from yellow cardstock and stacked them. I moved the yellow layer a bit to the top right to have a thin black shadow behind it. Using the cauldron as the U I was now able to write the word luck.
Using white embossing powder I heat embossed the word good from the My Lucky Charm stamp set onto black cardstock and cut it out.
For the rainbow that I wanted to come out of the cauldron I had to use a die by MFT. There's only a "normal" shaped one y LawnFawn, but I really wanted mine to reach the edge of the card, making it look like it continues outside the card. This die I used was a bit too wide for behind my cauldron so I only used 5 of the 6 arches. Since there is already lots of green on my card, I left out this color from my rainbow and used a kind of green-grey-blue arch between the yellow and the blue one.
I attached all decorative elements to a piece of acetate - I used foam tape behind the word good - and then adhered the acetate to the back of my clover frame. Then I added one more little ladybug to the K.
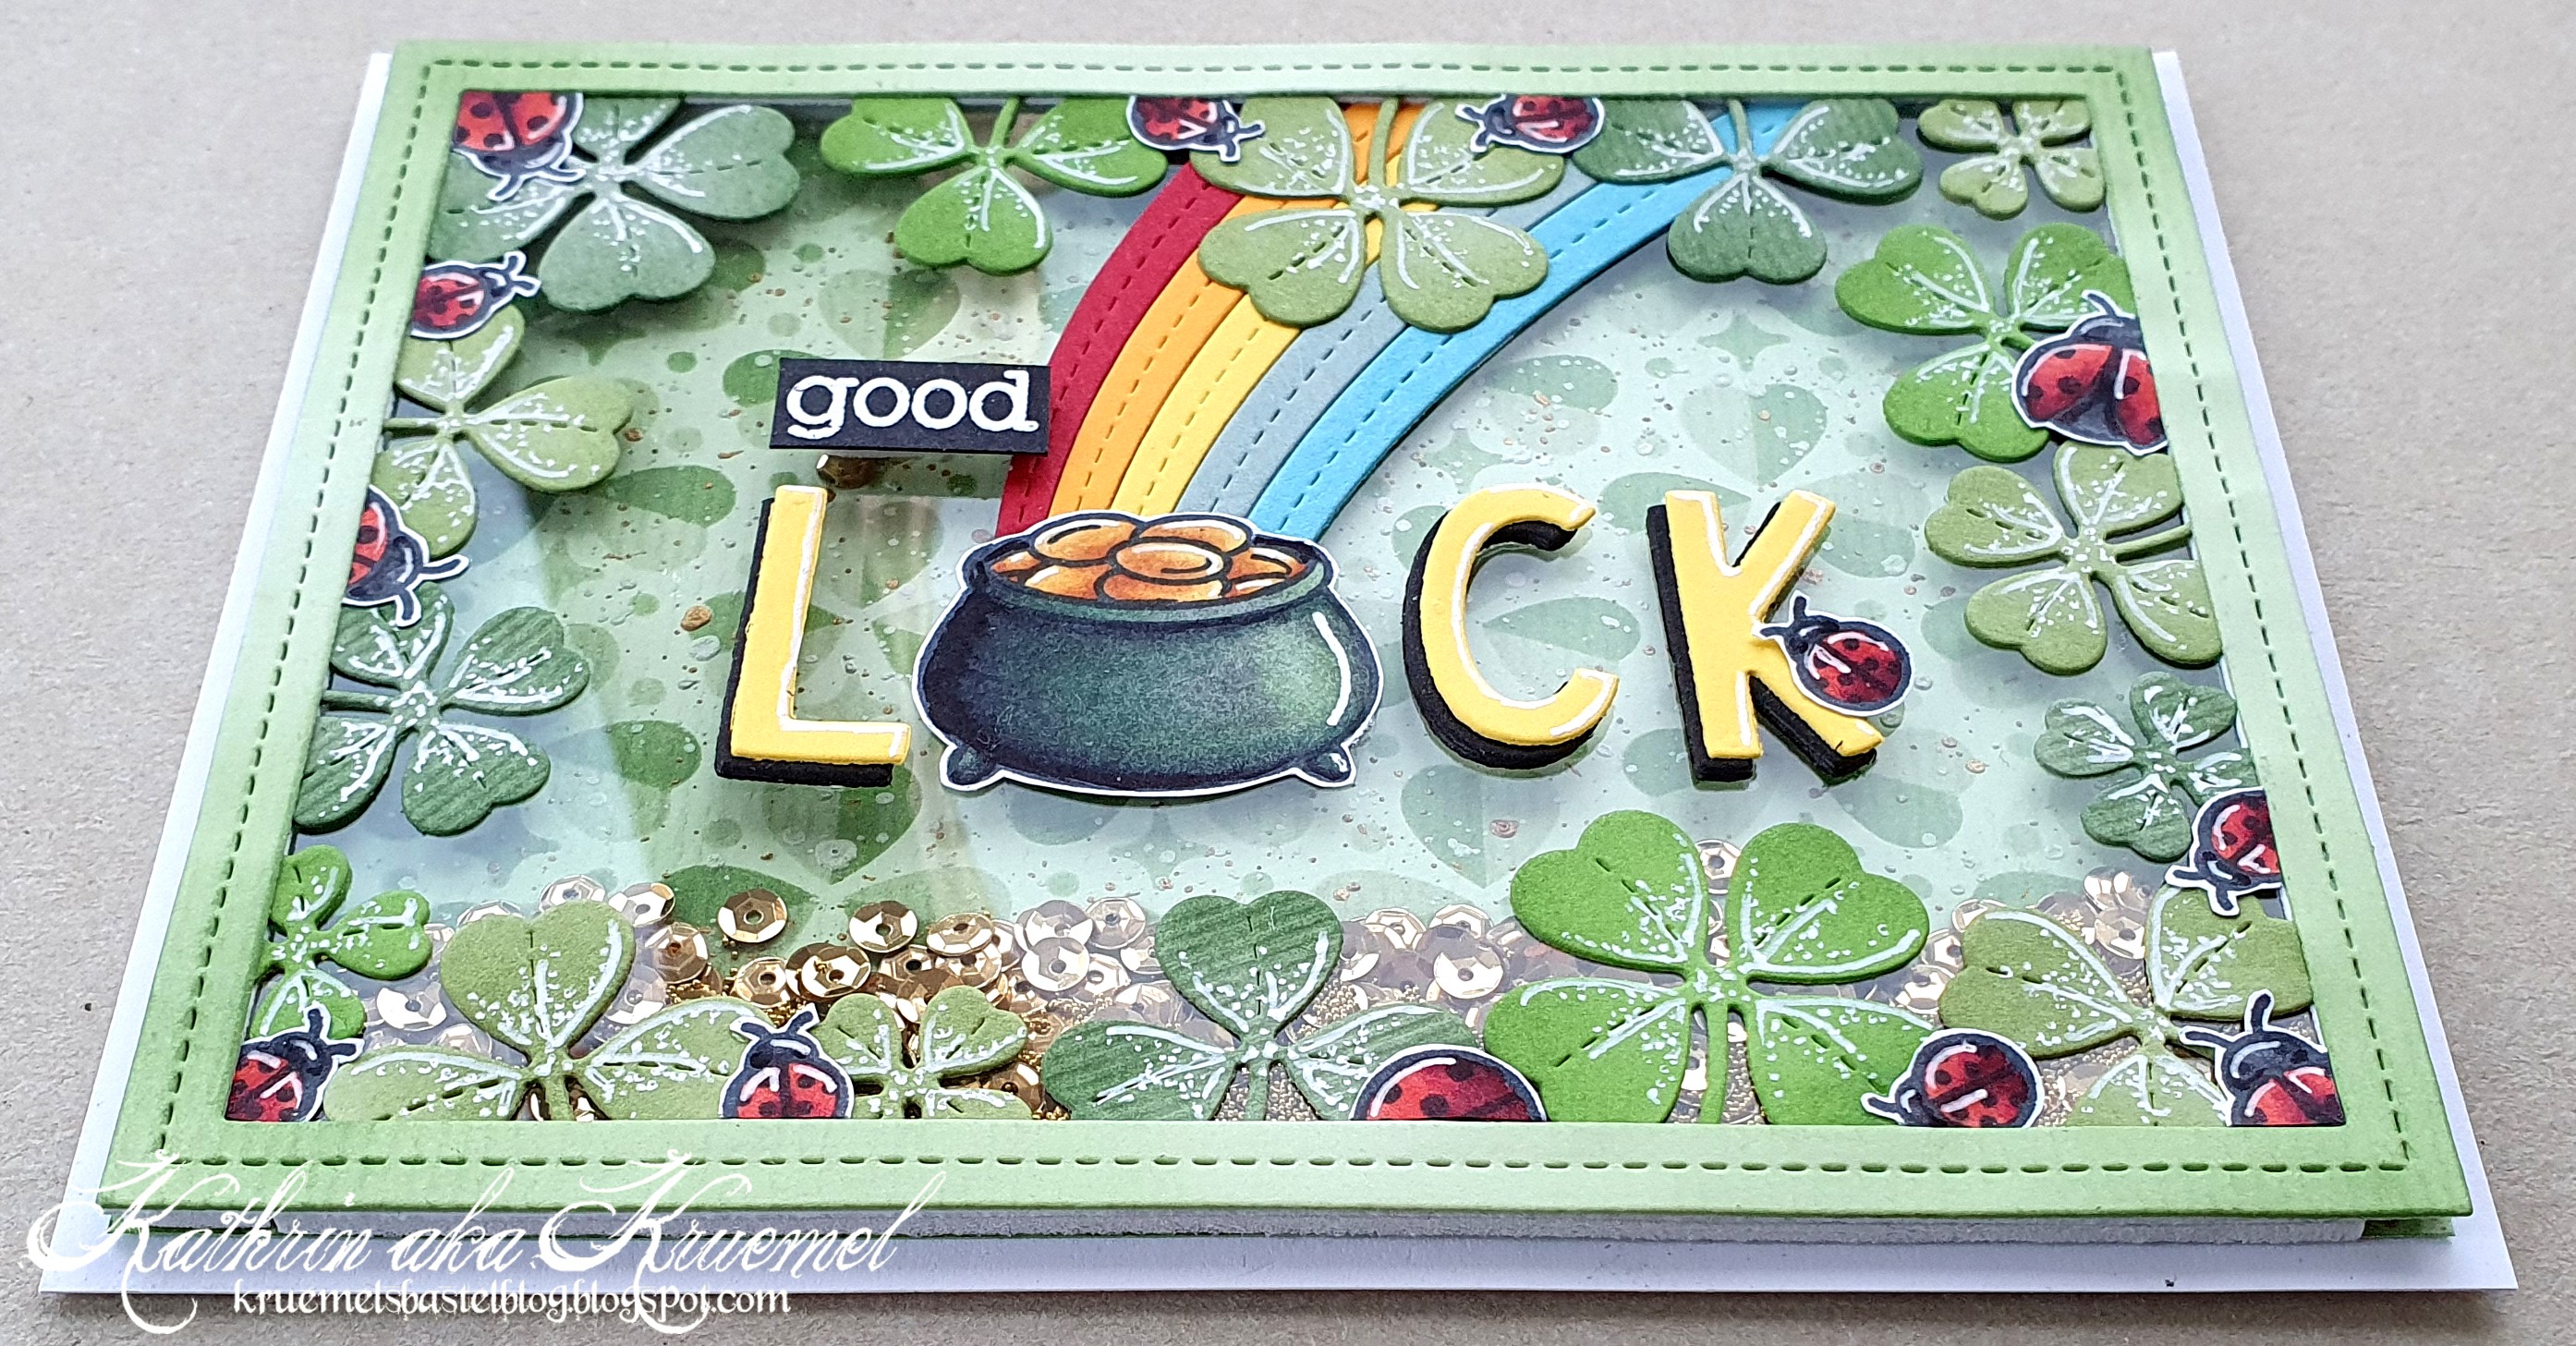
Zum Schluss habe ich den Rahmen mit goldenen Pailetten und winzig-kleinen goldenen Kügelchen gefüllt und mit 3D Tape auf den Hintergrund geklebt.
To finish the card I filled the frame with gold sequins and gold micro beads and attached it to the background using foam tape.