Mittwoch, 14. August 2024

Manchmal steckt mehr dahinter....

 
Hallo Ihr Lieben!
Heute  habe ich mal eine etwas andere und eher schlichte Karte für Euch.

Hello everyone!
Today I have a kind of different and quite simple card to share with you.
 
Nun habe ich es ja schon im Posttitel erwähnt - man sollte eine Karte nicht nach dem ersten Eindruck bewerten.... 
Eigentlich bin ich ja der "je mehr, desto besser" Typ an Bastler, aber ich will ja auch niemanden überfordern. Und als ich vor kurzem in einem Geschäft eine ähnliche Karte gesehen habe, war mir klar, dass die Langen Freunde von Create a Smile perfekt wären, um auch so eine Karte zu werkeln.
Die Kartenbasis besteht aus kraft farbenem Cardstock und das Motiv ist tatsächlich per No-Line Coloring direkt auf die Karte gestempelt/coloriert. In diesem Fall musste das so sein.
Natürlich kann man auch mit Copics auf Kraft colorieren, ich wollte aber nicht, dass meine Kartenbasis von hinten unschön wird, und Copics bluten ja durch. Also habe ich hier einen Mix aus Polychromos und Prismacolor zum Colorieren verwendet.

Well, you should never judge a card by your first impression...
Most times I am a "the more, the better" type of crafter, but I don't want to overwhelm people in my tutorial. And when I saw a similar card a little ago in a store I realized, that the Lange Freunde stamp set by Create a Smile is perfect to kind of re-create it. 
I made the card base from craft colored cardstock and did some no-line coloring directly on the card base. That's just what worked best here.
Of course you can use Copics to color on craft, but I wanted the back of my card to stay nice. Copics will bleed through the paper so I went with a mix of Polychromos and Prismacolor here.


Ich habe den Dackel aus dem Lange Freunde Set benutzt - mit seinem quasi geraden Körper funktioniert der am einfachsten. Aber mit ein wenig mehr Aufwand könnt Ihr natürlich jedes Motiv zu dieser Karte passend abwandeln.

I went with the dachshund from the Lange Freunde stamp set - with its nearly straight body it works easiest for this card. But with a bit more effort of course you can use any image to make it work for this type of card.


So, und jetzt habe ich lange genug drumherum geredet - so sieht die geöffnete Karte aus.
Die Kartenbasis ist eine Gatefold Card, über deren komplette Breite sich der Dackel ausbreitet. Dafür habe ich den mittleren Teil des Dackels einfach ein paar Mal aneinander gestempelt. Und weil er eben nicht absolut gerade ist, hilft die No-Line Technik, kleinere Unterschiede bei den Übergängen auszugleichen.
Rundum habe ich einen Rahmen mit einem weißen Gelstift aufgemalt, so wirkt alles noch einheitlicher.

And now I've talked enough about the card - this is what it looks opened.
The card base is a gatefold card here, and the dachshund goes all the way across it. I simply stamped the center of the dachshund several times next to each other. And since it is not perfectly straight the no-line coloring helps to cover some slight differences in the outlines.
I also used a white gel pen to draw a frame all around the card, that brings it together even more.


Und da es sich hier um eine Geburtstagskarte handelt, dürfen neben einem passenden Text auch Luftballons, eine Torte und ein Geschenk nicht fehlen. Die trägt der laaaange Dackel auf seinem Rücken. Auch sie habe ich in No-Line Technik coloriert, es soll ja alles zusammenpassen.
Der Luftballon und die Torte sind aus dem Set Verrücktes Huhn, das Geschenk aus dem Set Einpacken. Beim Abstempeln habe ich den Dackel mit Masking Tape abgedeckt und das Geschenk so etwas dünner gemacht. 
Mit einem weißen Gelstift habe ich einige Konfetti dazugemalt, außerdem habe ich damit erst Strahlen von der Kerze aus abstrahlend aufgemalt und sie und die Kerzenflamme dann mit einem klaren Glitter-Gelstift nachgemalt.
Den Text habe ich mit weißem Embossing-Pulver auf die Karte embosst. Das Hurra ist aus dem Set Es Schneit, der Text darunter aus dem Stempelset Du.

And since this is a birthday card of course it not only needs a matching text but also some balloons, a birthday cake and a present. The looooong dachshund is carrying those on his back. Again I colored those in the no-line technique because I wanted everything to match.
The balloon and the cake are from the set Verrücktes Huhn, the present from the Einpacken set. I masked off the dog when stamping the gift and made it a bit less tall.
I added a few confetti with a white gel pen, I also used it to draw the light radiating from the candle, then covered those rays and the flame of the candle with a clear glitter gel pen.
The text means "hooray, it's your birthday". I white heat embossed it directly onto the card base.

Montag, 12. August 2024

You look tasty

 
Hallo Ihr Lieben!
Ich war mal wieder shoppen - unter anderem  habe ich mir die Rainbow Slice Tunnel Stanzen von Spellbinders und das Roarsome Rex Stempelset von WhimsyStamps gegönnt. Und ich fand, die lassen sich super kombinieren. So super sogar, dass ich mich nicht entscheiden konnte und Euch in ein paar Tagen noch eine weitere Karte mit dieser Kombi zeigen werde. Aber heute habe ich diesen hungrig aussehen Dino für Euch.

Hello everyone!
I did some shopping and - besides some other stuff - I ordered the Rainbow Slice Tunnel dies by Spellbinders and the Roarsome Rex stamp set by WhimsyStamps. I though, those would make a great combo - and it did, actually so well, that I couldn't decide on an image and will share another one with this combo in a few days. But today I have this quite hungry looking dino for you.

Von den Rainbow Slice Tunnel Stanzen sieht man hier gar nicht mehr so viel - denn der Dino schaut daraus hervor. Ich habe sie nacheinander aus grünem Cardstock gestanzt, je kleiner der "Schlitz", desto dunkler der Cardstock. Ganz hinten habe ich eine Lage schwarzen Cardstocks gelegt.
Auf die oberste, hellste Lage habe ich mit Distress Ink Mowed Lawn den Fern Background gestempelt und dann den Rand des Cardstocks mit Rustic Wilderness abgedunkelt. 
Aus noch heller grünem Cardstock habe ich dann noch den Tropical Leaves Backdrop von LawnFawn gestanzt und mit Twisted Citron und Mowed Lawn gewischt. 
Auf beiden Teilen habe ich den Blättern Highlights mit einem weißen Gelstift verpasst.

You don't see that much from the Rainbow Slice Tunnel dies anymore here - the dino is looking out of that tunnel. I die cut them from different shades of green cardstock - the smaller the "slice" the darker the cardstock I cut it from. As the very back layer I used a piece of black cardstock.
Onto the top most, lightest layer I stamped the Fern Background with Distress Ink Mowed Lawn, then darkened the edges of the cardstock with Rustic Wilderness.
From an even lighter shade of green I die cut the Tropical Leaves Backdrop by LawnFawn and darkened the edges with Twisted Citron and Mowed Lawn.
I used a white gel pen to add hightlights to the leaves and ferns on both layers.


Den Dino habe ich mit Copics in grün mit roten Akzenten coloriert. Dabei habe ich die Hände extra abgestempelt und einzeln ausgeschnitten. So konnte ich sie später so an den Hintergrund/Schlitz kleben, dass es so aussieht, als hätte der Dino die Risse im Cardstock verursacht und sich dabei durch die verschiedenen Lagen gearbeitet. Die Augen habe ich außerdem mit Glossy Accents überzogen.
Und weil das Motiv hier nur aus Kopf und Händen besteht, der Dino ohne Körper aber komisch aussah, habe ich den kleinen Teil Bauch von einem der anderen Motive aus dem Roarsome Rex Set ein paar Mal übereinander gestempelt, auch diesen Teil ausgeschnitten und hinter den obersten Schlitz geklebt. Außerdem habe ich von demselben Dino noch die Zunge abgestempelt, coloriert, ausgeschnitten und dem Dino an den Mund geklebt. So passt er gleich noch besser zu dem Text.
Auch der Text ist aus dem Roarsome Rex Set. Ich habe ihn mit weißem Embossingpulver auf schwarzen Cardstock embosst. 

I colored the dino green with some red accents. I stamped the image twice, using just the head of one of them and the hands of the other one. I cut those out individually and glued them next to the slit, making it look like the dino just tore that tunnel into the paper, working through the different layers. Onto the eyes I put some Glossy Accents.
And since the image here is only made from the head and hands I used the small belly part of another image from the same Roarsome Rex set, stamped it a few times then cut it out and glued it behind the top most slit. The dino really looked strange without that body there.
I also stamped, colored and cut out the tongue of this same dino and glued it to this dinosaur's mouth. Now he goes even better with the text.
The text is also from the Roarsome Rex set. I white heat embosst it onto black cardstock.


Und so ein Dino muss natürlich ordentlich brüllen. Ich habe hier das Roarsome Word and Shadow Stanzenset benutzt, allerdings nur den Wortteil Roar auf die Karte geklebt. Die Buchstaben habe ich aus rotem, die Schattenlage aus schwarzem Cardstock gestanzt. Dann habe ich beides aufeinander geklebt und den Rest der schwarzen Schattenlage mit der Schere passend zu den Buchstaben ausgeschnitten.

And of course a dinosaur has to roar. I used the Roarsome Word and Shadow die set here but only adhered the roar to the card. I die cut the letters from red, the shadow layer from black cardstock. Then I glued them on top of each other and used my scissors to cut off the rest of the shadow layer.


Durch die vielen Lagen der Tunnel Slice Stanzen hat die Karte bereits jede Menge Tiefe. Ich habe nur hinter den Dinokopf, das ausgestanzte Roar und den Blätterrahmen 3D Tape gesetzt. 
Mit dem Cutter habe ich einen dünnen Rahmen aus schwarzem Cardstock geschnitten und aufgeklebt, dann habe ich alles auf einem weißen Kartenrohling angebracht.

Due to the many layers of the Tunnel Slice die cuts the card already has a lot of depth. So I only put foam tape behind the dino's head, the die cut roar and the leafy frame.
Using my cutter I cut a thin frame from black cardstock and glued it down as the top layer, then I attached my card panel to a white note card.

Samstag, 10. August 2024

Hope your Birthday is a Hit

 
Hallo Ihr Lieben!
Die heutige Geburtstagskarte ist mal so richtig bunt ausgefallen, aber zu einem Geburtstag passt das ja super.

Hello everyone!
Today's birthday card turned out really colorful, but that's perfect for a birthday, right?

Ich habe hier eine Karte nach einer Anleitung/Idee von Jennifer McGuire gemacht. Der komplette Rahmen, in meinem Fall sogar zwei davon aufeinander, ist an beiden Seiten mit M-förmig gefalteten Cardstockstreifen befestigt. So lassen sie sich zum Versenden ganz einfach herunterdrücken, nach dem Herausnehmen aus dem Umschlag poppt sie dann von selbst auf und es zeigt sich eine tolle dreidimensionale Szene.

I made this card after a tutorial/idea by Jennifer McGuire. The complete frame, I even put two on top of each other, is attached to the card with m-shaped folded cardstock strips on both sides. They can be put down easily to send them, once you take the card out of the envelope it pops up and shows a wonderful dimensional scene.


Damit die Karte auch gut aufzustellen ist, habe ich einen oben gefalteten Kartenrohling verwendet. Auf den habe ich erstmal ganz viele bunte Girlanden aufgehängt. Die sind mit der Scallop Fringe Border von LawnFawn gemacht und ich habe sie aus verschiedenen Gelb-, Rot-, Orange- und Rosatönen gestanzt. Die habe ich aufeinander gelegt und dazwischen einige Bannner gelegt, die ich aus goldenem Glitter-Cardstock gestanzt habe. 
Dann habe ich aus weißem Cardstock zweimal den Let's Celebrate Backdrop ausgestanzt und zusätzlich einen Stitched Rectangle Frame, ebenfalls aus weißem Cardstock. 
Auf die Bordüren habe ich direkt erst einen der Rahmen mit Konfetti aufgeklebt, darauf kam dann, jeweils mit diesen m-förmigen Streifen hinterlegt, erst der blanke Rahmen, darauf der zweite Rahmen mit Konfetti. Den habe ich um 180 Grad gedreht, so dass die Konfetti unterschiedlich liegen, und außerdem die Konfetti am unteren Rand weggeschnitten, um einen geraden Boden für meine Motive zu erhalten. 
Im Let's Celebrate Backdrop sind auch Stanzen enthalten, um die innen offenen Konfetti mit andersfarbigem Cardstock zu hinterlegt. Das wurde mir dann doch zu bunt, ganz offen wollte ich sie aber auch nicht lassen. Also habe ich sie mit Vellum hinterlegt.

To make sure the card can be put on display nicely I used a top folding card base. Onto that I first glued a bunch of colorful banners. I made those with the Scallop Fringe Border die by LawnFawn from different shades of yellow, orange, red and pink cardstock. I put those on top of each other and added a few ones cut from gold glitter cardstock in between.
Then I die cut the Let's Celebrate Backdrop twice from white cardstock and also one Stitched Rectangle Frame.
Onto the border background I adhered one of the confetti frames first, then - backed up with the m-shaped strips, first the blank frame and then the second confetti frame. I turned that 180 degrees so the confetti look different, and also cut off the confetti at the bottom here to recieve a straight ground for my images.
In the Let's Celebrate Backdrop set there are also dies included to back the open confetti with cardstock, but using colored cardstock would have made the whole card - even more - busy. Since I didn't want to leave them open also, I put vellum behind them.


Der Hintergrund hat mich sofort an eine Pinata erinnert. Also habe ich die aus dem Year Seven abgestempelt und farblich zum Hintergrund passend mit Copics coloriert. Außerdem habe ich goldene Linien mit Stickles aufgetragen. 
Da ich von den Streifen hinter den Rahmen kleine Stücke übrig hatte, habe ich eines davon hinter die Pinata gesetzt. So ist sie ebenfalls erhöht, ohne dass ich jede Menge 3D Tape verwenden musste. 
Von der Pinata zum blanken Rahmen habe ich dann ein Stück weißes Twine gespannt. 
Und oben hinter der Pinata habe ich noch ein paar Luftballons geklebt. Die sind aus den Stempelsets Really High Five und Elephant Parade Add-On. Die  habe ich dann aber tatsächlich mit 3D Tape hinterlegt. So sind sie zwar etwas höher als der Hintergrund aber natürlich nicht so hoch wie die Pinata.
Unten auf der Karte könnt Ihr einen Blick auf die Partygäste erhaschen. Und natürlich musste ich einfach wieder die kleinen Mäuse benutzen. Ich habe hier welche aus den Sets Sew Very Mice, Dandy Day, Bubbles of Joy und Whoosh Kites benutzt. Sie alle tragen Partyhüte aus den Sets Really High Five und Party Animal. Die habe ich jeweils nur in einer Farbe coloriert und als zweite Farbe wieder goldene Stickles benutzt. So passt alles zum Hintergrund.
Die kleine Maus, die gerade dran ist, auf die Pinata einzuschlagen, steht auf einem Hocker aus dem Set Merry Mice und hält den Baseballschläger aus dem Set All Star. Etwas überdimensioniert vielleicht, aber schließlich soll die Pinata auch ganz sicher bei einem Treffer aufgehen und ihren süßen Inhalt freigeben. Das ist offenbar bereits einmal passiert, denn einige der Mäuse halten bereits Bonbons und Lutscher in der Hand. Die sind aus dem Set Year Seven. Nur eine der Mäuse schleckt lieber an einem Eis aus dem Set Crazy Antics. 
Und damit die Maus auf dem Hocker auch nichts sieht, habe ich ihr frei Hand eine Augenbinde verpasst. 
 
The background reminded me of a Pinata. So I stamped the one from the Year Seven stamp set and colored it with Copics, using colors I had also used for the background. I also added gold lines with Stickles.
Since I had little pieces from the folded strips behind the frames left over, I put one of them behind the Pinata so I didn't have to use foam tape behind it and it is still raised up from the background. I attached a piece of white twine behind the Pinata and glued the other end to the simple frame.
Behind the pinata, a bit above it, I added a few balloons. Those are from the sets Really High Five and Elephant Parade Add-On. Behind those I did put some foam tape. Now they are a bit higher than the background but not as high as the Pinata.
At the bottom of the card you can get a look at the party guests. And of course I had to use those little mice again. The ones I used here come from the sets Sew Very Mice, Dandy Day, Bubbles of Joy and Whoos Kites. All of them are wearing party hats from the sets Really High Five and Party Animal. I used only one color on each of them and then added gold Stickles as the second color. Now they all go perfectly with the background.
The little mouse, that's about to hit the Pinata, is standing on a little stool from the Merry Mice set and is holding a baseball bat from the All Star set. It might be a bit large, but I wanted to make sure the Pinata cracks open when the bat hits it - and gives free the sweet content. It actually seems like it has already happened because some of the mice are already holding candies. Those are from the Year Seven stamp set. Only one of the mice prefers a popsicle from the Crazy Antics set.
And to make sure the mouse on the stool doesn't see anything I drew a bandana around her head to cover her eyes.


Die Maus auf dem Hocker und die Maus mit dem Eis habe ich wieder mit kleinen M-förmigen Streifen hinterlegt, allerdings habe ich diese hier so gefaltet, dass die Motive etwas weiter als die Pinata hervorragen.
Die übrigen Motive habe ich, teilweise mit 3D Tape, direkt auf den oberen Rahmen geklebt.

The mouse on the stool and the one with the ice I backed again with small pieces of those m-shaped strips, but this time folding them so the images are raised a bit more than the Pinata.
The other images I adhered to the frame, some of them backing with thin foam tape.


Und wo sollte ich nun meinen Text anbringen? Ich habe mich entschieden, ihn auf Vellum zu embossen und oben quer über den Rahmen zu kleben. Der Text ist aus dem Set All Star. Ich habe ihn erst mit schwarzer Tinte gestempelt und dann mit klarem Embossingpulver embosst.

And where was room for my text? I decided, to emboss it onto vellum and then put it across the top of the card. The text is from the All Star set. I first stamped it with black ink, then covered it with clear embossing powder.


Zum Schluss habe ich dann noch einige wenige Luftschlangen, gemacht mit weiteren Zubehörstanzen aus dem Let's Celebrate Backdrop Stanzenset aus weißem Cardstock, aufgeklebt. Die Sterne des oberen Rahmens habe ich außerdem mit Stickles beglittert und damit auch noch ganz am Rand einen Rahmen aufgetragen. 

As the last steps I added a few streamers to the background, made from white cardstock with another accessoire die from the Let's Celebrate Backdrop die set. I added gold Stickles to the stars on the top frame and also used it to draw a thin frame here along the outer edges of the card.

Freitag, 9. August 2024

LawnFawnatics Challenge #178

 
Hallo Ihr Lieben!
Ich muss Euch jetzt mal was gestehen: ich bin gerne vorbereitet und mache meine Karten gerne mit etwas Vorlauf. Das stammt wohl  noch aus der Zeit, zu der ich in vielen DTs war - und es kann immer unverhergesehen etwas dazwischen kommen. Auf den letzten Drücker fertig werden, das mochte ich nie. Und so ist es tatsächlich so, dass die meisten Karten, die Ihr hier seht, bereits vor mindestens 2 Wochen entstanden sind. Aktuelles, wie zum Beispiel eine Challenge-Karte, schiebe ich dann spontan ein. Und so ist es nicht verwunderlich, dass ich bei der doch eher sommerlichen Farbkombi hell- und dunkelrosa, hell- und dunkeltürkis, die das Thema der neuen LawnFawnatics Challenge ist, auf die Idee gekommen, eine Herbstkarte zu machen. Basteltechnisch bin ich nämlich bereits mitten im September angekommen. Aber wie man sieht, klappt diese auf den ersten Blick vielleicht etwas abwegige Kombi, super auf einer Herbstkarte. Und es sieht fast ein wenig so aus, als würde der Sommer den Herbst begrüßen.

Hello everyone!
I have to admit something: I love to be prepared and make most of my cards way before they get posted here. Guess that's from back when I was part of many DTs - there's always something that can happen and keep me from crafting. And I never liked finishing something last minute. And so most of the cards are at least two weeks old until the post with them goes online. Special cards, like challenge entries, I simply post inbetween spontaneously. And so it might not be so surprising, that I ended up with a fall card with the quite summer-ish color combo of light and dark pink, light and dark aqua and black, which is the theme of the new LawnFawnatics challenge. Craftwise I am already in the middle of september. But as you can see, that this color combo, that might not be your first pick for a fall card, works great on one. And it nearly looks like summer is welcoming fall.

 Der Hintergrund für die Karte hat mich einige Zeit gekostet - ich fand einfach nichts passendes. Ich hatte bereits alle möglichen Designpapiere ausprobiert, aber nichts gefiel mir. Dann fiel mir das Gingham Backdrop Stempelset ein - und damit habe ich den karierten Hintergrund einfach schwarz auf weißen Cardstock gestempelt.
Darauf kam dann der aus Vellum gestanzte Stitched Windy Backdrop, den ich etwas kleiner geschnitten habe. 

The background took me quite some time - I just wasn't able to find anything I liked. I had already tried different patterned papers but none of them felt right. Then I remembered the Gingham Backdrop stamp set - and I simply stamped it black onto white cardstock.
I die cut the Stitched Windy Backdrop from vellum, cut it a bit smaller and put it onto the stamped background.


Meine Deko ist zum Großteil mit Stanzteilen gemacht.
Die Kürbisse aus den Sets Stitched Pumpkins und Stitched Gourds habe ich aus verschiedenen Tönen pinken Cardstocks gestanzt und dann mit Distress Ink Picked Raspberry sowie Distress Oxides Spun Sugar, Kitsch Flamingo und Picked Raspberry gewischt.
Die Blätter an den Kürbissen sind aus dem Set Stitched Pumpkin House - übrigens aus die Swirls an den Kürbissen -, die Eichenblätter aus dem Set Fall Leaves Backdrop, die Pilze aus dem Mushroom Border Set und die Blumen aus dem Set Floral Backdrop. Die habe ich aus hellem und dunklem türkisfarbenem Cardstock gestanzt und mit Distress Ink Uncharted Mariner sowie Peacock Feathers gewischt. 
Und einige kleinere Teile sowie den Magic Iris Fall Leaves Add-On habe ich aus schwarzem Cardstock gestanzt. Die kleinen Elemente der Deko habe ich dann an den Kanten ein wenig mit Distress Oxide Hickory Smoke aufgehellt, den Kranz habe ich einfach schwarz gelassen.
 
The decoration on this card is mainly made from die cuts.
I cut the pumpkins from the Stitched Pumpkins and the Stitched Gourds sets from different shades of pink cardstock and then shaded them with Distress Ink Picked Raspberry and Distress Oxide Spun Sugar, Kitsch Flamingo and Picked Raspberry.
The leaves and the pumpkins are from the Stitched Pumpkin House set - as are the little swirls -, the oak leaves from the Set Fall Leaves Backdrop, the mushroom from the Mushroom Border set and the flowers from the Floral Backdrop set. I die cut them from light and dark aqua cardstock and shaded them with Distress Ink Uncharted Mariner and Peacock Feathers.
A few of the smaller elements and the Magic Iris Fall Leaves Add-On I cut from black cardstock. The small pieces I lightened with a bit of Distress Oxide Hickory Smoke, just along the edges, the wreath I just left plain.

 
Für meinen Text habe ich das Wort autumn aus dem Scripty Autumn Sentiments Set weiß auf schwarzen Cardstock embosst und anschließend mit der dazugehörigen Stanze ausgestanzt. Dann habe ich es mit vier weiteren schwarzen Lagen, bei denen ich den oberen Teil des T sowie die Bögen des M und N weggeschnitten habe weil sie später auf den Motiven aufliegen, hinterlegt.
Außerdem habe ich ein kleines Hello aus dem selben Set schwarz auf helltürkisen Cardstock gestempelt.
Und weil mir doch noch irgendetwas auf der Karte fehlte, habe ich noch einige Schmetterlinge aus den Sets Butterfly Kisses und Butterfly Kisses Flip-Flop abgestempelt, helltürkis coloriert und ausgeschnitten.
 
For my text I white heat embossed the word autumn from the Scripty Autumn Sentiments set onto black cardstock and cut it out with the matching die. Then I backed it with four more black layers, from which I cut off the top of the T and the M and N, because those parts will be on top of the images later. I also stamped a small hello from the same set with black ink onto light aqua cardstock.
And since I felt like something is missing on this card, so I stamped some butterflies from the Butterfly Kisses and the Butterfly Kisses Flip-Flop sets, colored them a light aqua and cut them out.
 
 
Mit einem weißen Gelstift habe ich Highlights auf die Stanzteile aufgemalt.
 Mit dickem und dünnem 3D Tape habe ich alle Elemente auf das Vellum geklebt und für etwas Schimmer noch weißes Perfect Pearls, gemischt mit Wasser, aufgespritzt. Auch das Vellum habe ich mit 3D Tape hinterlegt, dann habe ich alles auf einen weißen Kartenrohling geklebt.

With a white gel pen I added highlights to the die cut elements.
Using thin and thick foam tape I glued the pieces to the vellum and splattered some white Perfect Pearls, mixed with water over everything for a bit of shimmer. I also backed the vellum with foam tape, then adhered everything to a white note card.

Donnerstag, 8. August 2024

Moin!

 
Hallo Ihr Lieben!
Ich bin als Bayer jemand, für den maritime Motive hauptsächlich im Sommer funktionieren. Und so zeige ich heute auf dem Stampcorner Blog noch eine weitere maritime Karte, bevor der Herbst so langsam Einzug hält....

Hello everyone!
I live in Bavaria, far away from any coast. And that means, that maritime cards only "work" for my during the summer months. So today I am sharing this maritime card over on the Stampcorner Blog, before it is time to start thinking about fall....

Im Hintergrund habe ich hier ein Stück Designpapier aus dem Happy Patterns Paper Pack von MFT verwendet - eigentlich ein Holzmuster, aber quer genommen erinnerte es mich an Wellen. Der eigentlich Plan war, hier einfarbig weißen Cardstock zu benutzen, aber das sah zu fad aus. Also habe ich mich umentschieden.
Darauf, als Boden, habe ich einen Strand gestaltet. Den habe ich mit der Stitched Wavy Backdrop Stanze von LawnFawn aus hellbraunen Cardstock gemacht. Die Ränder habe ich ein wenig mit Frayed Burlap gewischt, dann habe ich feine Spritzer mit Walnut Stain und weißer Acrylfarbe aufgespritzt. 

In the background I used a piece of patterned paper from the Happy Patterns Paper Pack by MFT - it's a wooden pattern, but turned 90 degrees it reminded me of waves. My original plan was to just use white cardstock there, but that looked too plain. So I changed my mind.
On top of that as the ground of my scene I created a beach. I die cut the Stitched Wavy Backdrop from light brown cardstock, inked the edgdes with a bit of Frayed Burlap and then added fine splatters of some Walnut Stain and a bit of white acrylic paint on top.


Das Motiv auf meiner Karte ist wieder ein etwas älteres - es ist die süße Fischer-Katze aus dem Set Beste Freunde. Ich habe sie mit Copics coloriert und per Hand ausgeschnitten. Die Highlights sind mit einem weißen Gelstift gemacht, außerem habe ich die Fische etwas mit Stickles beglittert.
Hinter der Katze - und dem Text, aber dazu gleich mehr - befindet sich der Zaun von MarianneDesign, dahinter habe ich etwas Gras und einige Rohrkolben gepflanzt. Die waren eigentlich zu hoch, aber ich wollte sie nicht weiter nach unten schieben, da sie sonst von der Katze verdeckt worden wären. Und es macht mir gar nichts, dass sich über den Rand der Karte überstehen. 
Hinter diesen Elementen wollte ich dann noch einen kleine einfarbige Fläche, um hier etwas Ruhe auf die Karte zu bringen. Also habe ich den Innenteil des Wonky Stitch Windows aus hellblauem Cardstock gestanzt und als eine Art Himmel aufgeklebt.

The image is on this card is again a little older one - it's the cute fisherman cat from the Beste Freunde set. I colored it with Copics and cut it out with my scissors. I added hightlights with a white gel pen and also put some Stickles onto the fish.
Behind the cat - and the text but more about that next - I put up a fence by MarianneDesign and planted some grass and cattails behind it. Those cattails were too tall for my scene but I didn't want to move them down since they'd get covered by the cat then. And actually I don't really mind them standing over the top edge of the card. 
Behind those elements I wanted some small solid colored area to make the whole scene less busy. So I die cut the inner piece from the Wonky Stitch Window from light blue cardstock and adhered it as some kind of sky.


Der Text war eigentlich das, womit die ganze Kartenidee entstand. Ich habe die Buchstaben für das Wort Moin mit dem Striped Alphabet von StudioLight aus dunkelblauem Cardstock gestanzt und die passenden Schattenlagen aus weißem Cardstock. Die habe ich dann in den Sand gesteckt und ein paar Muscheln dazwischen geschoben. Auch die sind mit Stickles beglittert.
Die Schattenlage für das O ist eigentlich ein kompletter Kreis, aber mich störte die große weiße Fläche im Inneren. Also habe ich die kurzerhand heausgeschnitten und stattdessen ein kleines weißes Herz aufgeklebt.
Und auf dem M sitzt noch ein kleines Vögelchen, das aus dem Stempelset Mia stammt.

The text - a norther german way to say hello - what started the whole card ide. I die cut the letters from dark blue cardstock using the Striped Alphabet die set by StudioLight, the shadow layers I cut from white cardstock. Then I tucked the letters into the sand and added a few seashells. Those I also covered with a bit of Stickles.
The shadow layer for the O is a solid circle, but that large white area in the center of the letter somehow bothered me. So I simply cut it out and added a little white heart to the center.
On top of the M there's a little birdie, that comes in the Mia stamp set.


Zum Zusammensetzen der Karte habe ich hier tatsächlich mal auf 3D Tape verzichtet - durch die vielen Lagen wirkt die Karte schon dreidimensional. 
Zum Schluss habe ich alles auf einen weißen Kartenrohling geklebt.

To put the scene together I didn't use any foam tape for a change - since there are quite a few layers the scene already looks dimensional.
Then I just adhered the card panel to a white note card.

Mittwoch, 7. August 2024

Slimline-Karte mit Möwen

 
Hallo Ihr Lieben!
Vor einiger Zeit hatte ich Euch ja eine Karte gezeigt, auf der ich kurzerhand die Möwen aus dem Inquisitive Seagulls Set von WaffleFlower grob per Hand geschnitten hatte, denn für die Stanze war ich zu langsam. Das ging, war aber nicht optimal. Jetzt war sie dann wieder in einem Shop auf Lager und ich habe sie gleich bestellt - und auf dieser Karte ausgiebig genutzt. 

Hello everyone!
A little ago I shared a card with you, where I cut the seagull from the Inquisitive Seagulls set by WaffleFlower quite simple by hand because I wasn't able to order the die before it was sold out. It worked, but wasn't the best option. So when the die was back in stock in the store I order from I ordered it - and used it quite good on this card.

Auf dieser Slimline-Karte hat sich eine ganze Möwengang eingefunden. 
Man kann es hier bereits erkennen - die Kartenfront besteht aus Folie. An die habe ich oben eine Lasche gefalzt und sie zwischen dem blauen Cardstock im Hintergrund und einem weiteren Stück weißen Cardstocks eingefasst. Die Elemente der Karte habe ich auf die Folie geklebt.

On this slimline card gathered a whole gull gang.
You can already see it here, the card front is made from acetate. I scored a flap at the top edge and put it between the blue cardstock in the background and another piece of white cardstock behind that. The elements I glued onto the acetate.


Ich habe hier die kleine Möwe fünfmal, die große viermal aus weißem Cardstock gestanzt. Die Augen habe ich mit einem schwarzen Copic angemalt und wieder an Ort und Stelle geklebt.
Die Schnäbel habe ich aus orangefarbenem Cardstock gestanzt und ein wenig mit Distress Oxide Spiced Marmalde gewischt. Dann habe ich auch sie aufgeklebt und den Möwen außerdem rosafarbene Bäckchen aufgewischt. 
Zwischen den Möwen habe ich ein paar dunkelblaue und orangefarbene Luftballons - letztere wieder mit Spiced Marmalade gewischt - verteilt. Und die eine kleine Möwe hat doch tatsächlich einen dunkelblauen Sandeimer auf dem Kopf. Der ist aus dem Happy Seagull Stanzenset von WaffleFlower. Außerdem habe ich noch ein paar Luftschlangen aus goldenem Hologrammcardstock aufgeklebt.
Über jeder Möwe befindet sich eine Sprechblase mit einem aufgestempelten Happy. Die beiden "happy" sind aus dem Reveal Wheel Holiday Sentiments von LawnFawn. Ich habe sie auf hellblauen Cardstock gestempelt und dann mit Sprechblasenstanzen von MamaElephant ausgestanzt.

I die cut the small seagull five, the large one four times from white cardstock. I colored the cut out eyes with a black Copic and then glued them back in place.
The beaks I die cut from orange cardstock and lightly inked them with Distress Oxide Spiced Marmalade. Then I glued them on as well and used some light pink ink to add some rosy cheeks to the birds.
Between the birds I added a few dark blue and orange balloons - the orange ones I again shaded with Spiced Marmalade. And one of the little seagulls is really wearing a dark blue bucket. It's from the Happy Seagull die set by WaffleFlower.
I also added a few streamers, cut from gold holographic cardstock.
Above each seagull's head I placed a speech bubble with a stamped on "happy". Those two word stamps are from the Reveal Wheel Holiday Sentiments set by LawnFawn. I stamped them onto light blue cardstock, then cut them out with speech bubble dies by MamaElephant.


Die Elemente habe ich dann alle auf die Folienfront der Karte geklebt. Eigentlich wollte ich hinter die kleinen Möwen 3D Tape setzen, aber das sah dann auf der Rückseite noch unschöner aus, also habe ich mich dagegen entschieden.

I glued all the elements onto the acetate front of the card. I had planned to put foam tape behind the smaller birds, but that looked even uglier on the back, so I decided against it.


So sieht dann die geöffnete Karte aus. Man sieht den Flüssigkleber hinter den Motiven etwas, aber das macht nichts.
Und hier sieht man dann auch, dass die Wolken, die bei geschlossener Karte hinter den Möwen sichtbar sind, innen in die Karte geklebt sind.

This is the opened card. You can see the liquid glue behind the images a bit, but it doesn't bother me too much.
And here you can also see, that the clouds, that are visible behind the seagulls when the card is closed, are actually glued to the inside of the card.


Und hier seht Ihr den Grund, warum ich eine Slimline Card gemacht habe. Mit den Möwen war auch diese Swirly Birthday Stanze von TrinityStamps in meinen Warenkorb gehüpft. Ich hatte zwar gesehen, dass sie recht lang ist, aber ich war schon länger auf der Suche nach einer schön geschwungenen Birthday-Textstanze. Aber als ich die dann ausgepackt habe, war ich doch überrascht. Das Ding ist 21 cm lang! Da blieb dann nur eine Slimline Card. 
Ich habe das Wort aus orangefarbenem Cardstock gestanzt, wieder mit Spiced Marmalade gewischt und es dann ins Innere der Karte geklebt
Der kleine Untertext ist mit Stempeln aus den Sets The Whole Herd und Anything But Basic Friendship zusammengesetzt. Ich habe sie weiß auf dunkelblauen Cardstock embosst und den Textstreifen aufgeklebt. Drumherum habe ich dann einige weitere Luftschlangen verteilt.

And here you see the reason why I made this a slimline card. With the seagulls I also ordered this Swirly Birthday die by TrinityStamps. I had seen that it is a bit larger, but I was looking for a nice birthday die for quite some time. But when I unpacked it I was really surprised how large it really is - 21 cm! So I had to make a slimline card to be able to use it.
I die cut the word from orange cardstock, again shaded it with Spiced Marmalade and then glued it inside the card.
The small subtext is put together using stamps from the sets The Whole Herd and Anything but Basic Friendship by MFT. I white heat embossed it onto dark blue cardstock and adhered the strip under the die cut word. Then I added a few more gold streamers.

Montag, 5. August 2024

When life gives you lemons...

 
Hallo Ihr Lieben!
Als mit dem letzten Release von LawnFawn das Treat Cart Set rund um das Thema Eis rauskam, habe ich mir auch das I Scream, You Scream Set gegönnt. Das stanzt jede Menge verschiedene Eis-Arten - na und Eis und Sommer passen perfekt zusammen. Also gibt es heute einige sommerlich eisige Karte.

Hello everyone!
When LawnFawn release the Treat Cart stamp set, that revolves all around ice cream, I also ordered the I Scream, You Scream die set. It cuts all different kinds of ice creams - and summer and ice cream just belong together. So today I am sharing this summer-ish icy card with you.

Hier habe ich für den Hintergrund erst ein Stück blauen Cardstocks mit Distress Oxide Salty Ocean gewischt und dann mit weißer Pigment-Tinte einige Strahlen aufgewischt. 
Dann habe ich den Fancy Lattice Backdrop aus weißem Cardstock gestanzt und mit Salvaged Patina gewischt. 
Auf beide Teile habe ich dann noch weiße Acrylfarbe aufgespritzt.

Here I first cut a piece of blue cardstock the size of my card and inked the edges with Distress Oxide Salty Ocean, then I added some rays with white pigment ink.
Then I die cut the Fancy Lattice Backdrop from white cardstock and inked it with Salvaged Patina. Onto both pieces I splattered some white acrylic paint.

 
Alle Deko-Elemente auf der Karte habe ich aus Watercolor Cardstock gestanzt und dann per Ink Smooshing mit Distress Inks eingefärbt.
Die Wassereis habe ich mit Antique Linen und ein klein wenig Squeezed Lemonade eingefärbt, die Streifen darauf bestehen aus extra Cardstockstücken.
Aus Vellum habe ich eine Art Zuckerüberzug gestanzt und darauf dann Streusel aufgeklebt, die ich mit Worn Lipstick eingefärbt habe. Hinter den Streuseln konnte ich dann auch den Kleber verstecken, mit dem ich das Vellum auf die Eis geklebt habe.
Die Stiele habe ich aus craft farbenem Cardstock gestanzt.

All elements on this card I die cut from watercolor cardstock and then colored them in by doing ink smooshing with Distress Ink.
I used Antique Linen and a bit of Squeezed Lemonade to color the popsicles in, the individual strips on top I colored the same way.
From vellum I die cut some kind of sugar coating and then glued sprinkles, that I had inked with Worn Lipstick, on top. Under those sprinkles I was also able to hid the glue that I used to glue the vellum onto the popsicles.
The little wooden pieces I die cut from kraft colored cardstock.


Für die Deko am unteren Rand der Karte habe ich mich für Zitronen entschieden - Zitroneneis ist im Sommer so schön erfrischend.
Ich habe die Teile mit Stanzen aus dem Set Zesty Lemon gemacht und dann mit Squeezed Lemonade, Mustard Seed, Wild Honey, Twisted Citron, Vintage Photo und Worn Lipstick eingefärbt. 

For the decorations along the bottom edge of the card I went with lemons - lemon ice is always so wonderfully refreshing.
I die cut all the pieces with dies from the Zesty Lemon die set and then inked them with Squeezed Lemonade, Mustard Seed, Wild Honey, Twisted Citron, Vintage Photo and Worn Lipstick.


Mein Text ist ein Zusammenspiel aus Stempeln und Stanzteilen. 
Den Text "when life gives you" habe ich mit einem Stempelteil aus dem Set Bubbles of Joy schwarz auf weißen Cardstock gestempelt, das "make" ist aus dem Set Beary Happy Holidays. Dazwischen habe ich zwei Zitronen-Motive geklebt. Die sind aus dem Set Make Lemonade und schwarz auf ein Stück Watercolor Cardstock gestempelt, das ich zuvor mit Squeezed Lemonade und Mustard Seed eingefärbt habe. 
Das Wort Popsicles besteht aus Buchstaben, die ich mit dem Set Henry's ABCs aus Watercolor Cardstock gestanzt habe, den ich zuvor wieder per Ink Smooshing mit Worn Lipstick eingefärbt habe. Jeder Buchstabe ist mit zwei weißen Buchstaben hinterlegt.

The text on my card is a mix of stamps and dies.
The text "when life gives you" is made using part of a sentiment from the Bubbles of Joy set, stamped black onto white cardstock. The "make" is from the Beary Happy Holidays set. Between those two text parts I put two lemons. Those are from the Make Lemonade set and I stamped them black onto a piece of watercolor cardstock that I had inked with Squeezed Lemonade and Mustard Seed.
The word Popsicles I created from letters, cut with the Henry's ABCs set from watercolor cardstock, that I had colored by doing ink smooshing with Worn Lipstick. Each letter is backed with two more, cut from white cardstock.


Rund um die "Szene" habe ich dann noch einen Rahmen, gestanzt aus goldenem Glitter-Cardstock, aufgeklebt.
Beim Zusammenkleben der Karte habe ich wieder 3D Tape verwendet, das zwischen dem Hintergrund und dem unterbrochenen Cardstock, hinter einigen der Zitronen, dem Rahmen und dem Text zum Einsatz kam. 
Und dann habe ich beschlossen, dass die Karte noch ein wenig Glitter braucht. Also habe ich auf einigen Elementen Stickles aufgetragen. 
Zum Schluss habe ich alles auf einen weißen Kartenrohling geklebt.

I added a frame around my "scene", I die cut that from gold glitter cardstock.
When putting the card together I partly used foam tape - it's behind the background and the lattice background, behind some of the lemons, behind and frame and also behind the text.
And then I decided, that the card needed a bit of glitter, so I added Stickles to a few elements.
As the last step I adhered the card panel to a white card base.
 

Samstag, 3. August 2024

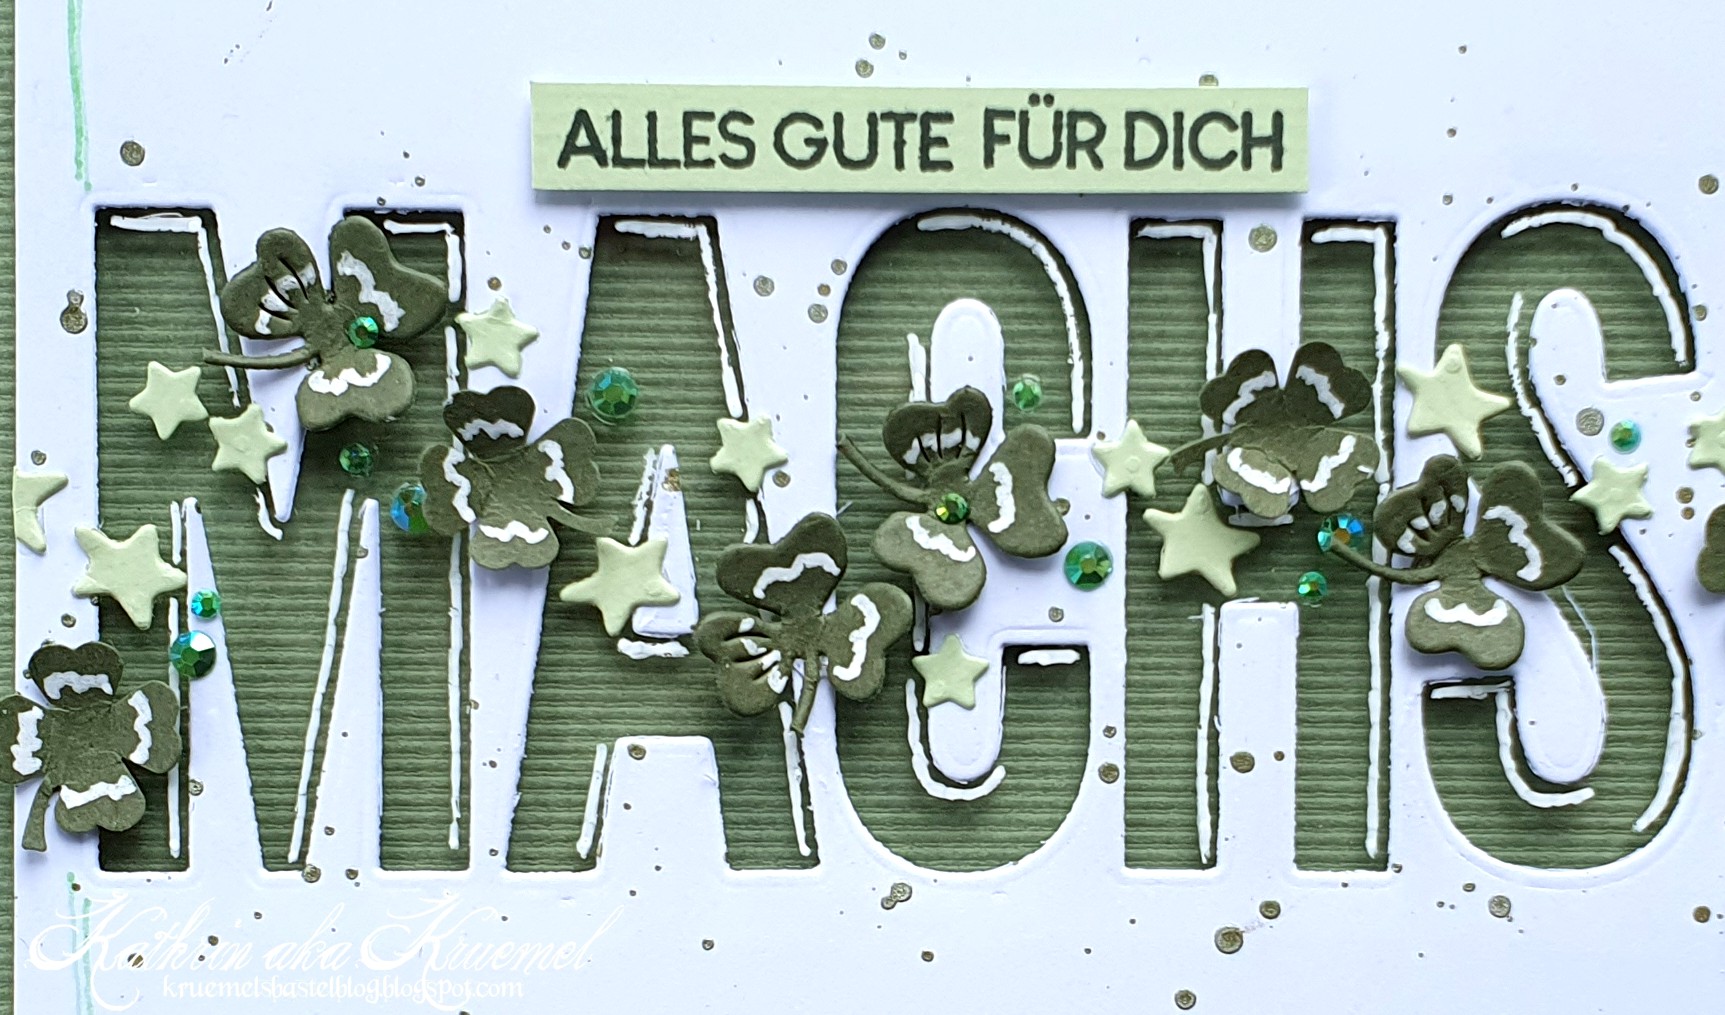
Machs Guad

 
Hallo Ihr Lieben!
Heute zeige ich Euch eine Karte, die zum Abschied einer Kollegin entstanden ist. Die Farben und der Text waren mir vorgegeben - und bei dem großen Haupttext stand dann auch ziemlich schnell fest, dass ich eine Slimline Card mache. 

Hello everyone!
Today I am sharing with you this card, that I made as a farewell card for a co-worker. I was given the colors and text - and due to the size of the main text I knew pretty soon, that I have to make a slimline card.

Mit dem Impact Alphabet von MFT habe ich das "machs guad" aus einem Stück weißen Cardstocks gestanzt und den dann mit salbeigrüner Metallic Watercolor bespritzt. 
Hinter die Buchstaben habe ich dann eine Lage Acetate geklebt und dann später dickes 3D Tape benutzt, um den Cardstock auf ein etwas größeres Stück grünen Cardstocks zu kleben. Der ist leicht geriffelt und ich finde, der Effekt lässt die Buchstaben viel interessanter wirken.

I used the Impact Alphabet die set by MFT to die cut a "machs guad" - bavarian for farewell - from a piece of white cardstock and then splattered some sage color metallic watercolor onto it.
I glued a piece of acetate behind the white cardstock and later used some thick foam tape to adhere the panel to a slightly larger piece of green cardstock. It has some ribbed structure and I think, that adds a great look to the letters.


Auf die Folie habe ich mit einem weißen Gelstift Highlights auf die Buchstaben gemalt. Dann habe ich Kleeblätter aus einem leicht dunkleren Grün gestanzt, sie leicht gebogen und über den Buchstaben verteilt. Dazwischen habe ich kleine Sterne aus hellgrünem Cardstock gestanzt.
 
I used a white gel pen to draw some highlights onto the acetate behind the letters. Then I die cut clovers from a slightly darker tone of green cardstock, rounded them and scattered them across the text. Inbetween I put some small stars, cut from light green cardstock.
 

 Auf die Kleeblätter habe ich, ebenfalls mit einem weißen Gelstift, ein Muster aufgemalt.
Links über dem Haupttext habe ich einen kleinen Wunsch für die Zukunft aufgeklebt. Den habe ich mit dunkelgrüner Tinte auf hellgrünen Cardstock gestempelt.

Again I used a white gel pen to draw a pattern onto the clovers.
On the left I added some wishes for the future. I stamped them with dark green ink onto light green cardstock.


Unter dem Haupttext sollte noch der Name Monika stehen. Ich habe die Buchstaben mit einer Stanze von CraftEmotions aus hellgrünem Cardstock gemacht und dabei absichtlich das M mit einem Kleinbuchstaben geschrieben. Das sah einfach besser aus. Auch hier habe ich Highlights aufgemalt und die Buchstaben aneinander geklebt.

I was asked to also put the name of the leaving colleague onto the card - I placed it under the main text. I die cut the letters from light green cardstock using a die by CraftEmotions and chose a lowercase M as for the first letter on purpose - it just looked better this way. Again I added highlights to the letters and attached them to each other.


Den gestempelten Text und auch den gestanzten Namen habe ich jeweils mit dünnem 3D Tape aufgeklebt. 
Zwischen die Kleeblätter und Sterne habe ich noch einige kleine grüne Glitzersteinchen gesetzt.
Zum Schluss habe ich alles auf einem weißen Slimline-Kartenrohling befestigt.

I used thin foam tape to adhere the stamped text and the die cut name.
Between the clovers and stars I added some small green rhinestones.
Then I adhered the card panel onto a white slimline card.

Donnerstag, 1. August 2024

Ich höre, Du hast Geburtstag

 
Hallo Ihr Lieben!
Für meinen heutigen Post auf dem Stampcorner Blog habe ich wieder eine Geburtstagskarte gemacht, davon kann man ja nie zu viele auf Vorrat haben.
 
Hello everyone!
For my post over on the Stampcorner Blog today I made another birthday card - you can never have too many of those at hand.
 
 Und hier kam dann auch endlich der Stencil aus dem Juli-Release zum Einsatz. Er fertigt ganz viele Sprechblasen in unterschiedlichen Formen.
Ich habe erst ein Stück weißen Cardstocks von unten links nach oben rechts mit Distress Ink Salvaged Patina gewischt. Dann habe ich den Stencil aufgelegt. In dem Bereich, den ich weiß gelassen habe, habe ich die Sprechblasen mit Salvaged Patina aufgewischt, auf den dunkleren Bereichen habe ich Broken China benutzt. Dann habe ich goldene Metallic Watercolor aufgespritzt.
In einige der Sprechblasen habe ich dann die Worte Hurra und Party aus dem Stempelset Kleine Worte mit dem Broken China aufgestempelt. 

And here I finally used the new stencil from the july release. It creates a background full of speech bubbles in different shapes.
I started with a piece of white cardstock and inked it from the bottom left to the top right with Distress Ink Salvaged Patina. I put the stencil on top. Where the white of the cardstock was still visible I inked the speechbubbles down with Salvaged Patina, in the darker areas I used Broken China. Then I added splatters with gold metallic watercolor.
I used the Broken China ink again to stamp the words "hooray" and "party" into a few of those speech bubbles.


Als Motiv habe ich mich für den süßen Hund aus dem Set Wir Gratulieren entschieden. Er spitzt die Ohren und bekommt gerade ein kleines Geheimnis verraten.
Den Hund habe ich mit Copics coloriert und Highlights mit einem weißen Gelstift hinzugefügt. Dann habe ich ihn ausgeschnitten. Als Boden habe ich ein Oval aus schwarzem Cardstock gestanzt und den Hund darauf geklebt.
Die "Welle", in die ich mit den Hand einen Text geschrieben habe, habe ich mit einer Regenbogenstanze aus dem Array of Rainbows Set von WhimsyStamps aus weißem Cardstock gestanzt. Natürlich kann man ihn genauso gut per Hand schneiden. Den Text habe ich mit einem schwarzen Fineliner hineingeschrieben.
Damit sich der Hund ein wenig besser vom Hintergrund absetzt, habe ich das Innenteil der Wonky Stitch Window Stanze aus Vellum gestanzt, den Hund mit dünnem 3D Tape darauf und dann alles wieder mit dünnem 3D Tape auf den Hintergrund geklebt.
Einen Teil meines Textes habe ich, wieder mit einem Stempel aus dem Set Kleine Worte, mit goldenem Embossingpulver auf das Vellum embosst. Das Wort Glückwunsch ist mit der Herzlichen Glückwunsch Stanze gemacht. Ich habe es einmal aus weißem und einmal aus schwarzem Cardstock gestanzt, das weiße Stanzteil mit Mustard Seed eingefärbt und beide Teile leicht versetzt aufeinander geklebt. Die Highlights habe ich diesmal mit einem goldenen Gelstift gemacht.

For the image I've chosen the cute bear from the new Wir Gratulieren set. He's listening closely to not miss the secret someone is whispering in his ear.
I colored him with Copics and added highlights with a white gel pen. Then I cut him out. As a ground for him to sit on I've die cut an oval from black carstdock and glued him onto it.
The "wave", in which I've written the text by hand, is made using a die from the Array of Rainbows set by WhimsyStamps. I die cut it from white cardstock, of course you can also simply cut it by hand. Then I wrote the text onto it with a black finerliner.
To tone down the background a bit behind the image I die cut the inner part of the Wonky Stitch Window die from vellum, attached the dog with thin foam tape and then used the same thin foam tape to adhere both onto the background.
The text at the bottom of the card means "happy birthday". I gold heat embossed part of it onto the vellum. The rest I die cut from both white and black cardstock, inked the white piece with Mustard Seed and then glued them onto each other a bit offset. Here I made my highlights with a gold gel pen.


Oben auf der Karte war Platz für einen weiteren Text, der aus dem selben Set wie der Hund ist. Nun hatte ich ja Anfang des Monats geschrieben, dass ich erstmal nur die Digis zur Verfügung hatte. Sie waren alle ausgedruckt und ich fand es dann Verschwendung, sie nicht auch zu nutzen. Leider hat beim Einfärben des Cardstocks mit Mustard Seed die Tinte ein wenig geschmiert. Aber ich finde, das geht schon noch so.

At the top of the card there was room for another text, that means "I've heard it's your birthday". At the beginning of the month I had mentioned, that I only had the digis first. I had printed them all and decided to use those instead of stamping them again. Unfortunately the ink smeared a bit when I inked the white cardstock with Mustard Seed. But I think it's still okay like this.


Auch die Texte habe ich mit 3D Tape aufgeklebt. 
Als Deko habe ich einige braune Enamel Dots aufgeklebt und außerdem einen Rahmen mit dem goldenen Gelstift aufgemalt. Dann habe ich den Cardstock schwarz gemattet und auf einen weißen Kartenrohling geklebt.

I used foam tape again to adhere the texts.
As decoration I added a few brown Enamel Dots and also used the gold gel pen again to draw a gold frame. Then I matted the card panel black and adhered it to a white note card.