Sonntag, 8. August 2021

LawnFawnatics Challenge #106

 
Hallo Ihr Lieben!
Challenge #106 auf dem LawnFawnatics Challenge Blog ist ein Sketch. Vom Sketch her war meine erste Idee, den Bogen, der darauf abgebildet ist, durch einen Regenbogen darzustellen. Aber das war mir dann irgendwie zu offensichtlich. Und dann kam mir die Idee zu dieser Karte.

Hello everyone!
Challenge #106 over at the LawnFawnatics Challenge Blog is a sketch. My first idea was to use the arch, that's drawn in the sketch, for a rainbow. But that seemed a bit obvious to me. And then I had the idea for this card.

Ich liebe die Stempel und Stanzen von LawnFawn hauptsächlich wegen ihrer süßen und wundervoll detailreichen Motive - da kann man sich so richtig beim Basteln drin verlieren. Jetzt ist es aber so, dass wir wohl alle diesen einen Freund/eine Freundin haben, die mit der Niedlich-Richtung so gar nichts anfangen kann, auch wenn das für mich absolut unverständlich ist. Naja, sie deswegen von der Karten-Liste zu streichen wäre auch nicht fair, und so muss hin und wieder auch eine solche Karte gemacht werden. Bei mir war es soweit. Und ich habe mir selbst die Challenge gesetzt, diese nicht-niedliche Karte nach dem LawnFawn Sketch zu machen. 
 
I love LawnFawn's stamps and dies especially for their cute and wonderfully detailed images - I can totally get lost in those scenes when creating with these products. Well, I guess we all have that one friend, that just doesn't get the hang of all the cuteness. And even if I don't really underestand that, it wouldn't be fair to cross his/her name from your cardmaking list just because of that. And so every now and then we have to make a card for him/her. That time had come for me. So I challengend myself with making this card after the sketch.
 

Ich habe ein Stück Watercolor Cardstock als Basis genommen und frei hand einen etwas unebenen Kreis aus Masking Paper geschnitten. Dann habe ich mit dem Negativ des Kreises erst mal den restlichen Cardstock abgedeckt und durch "Matschen" den großen Kreis im Hintergrund mit Distress Ink Spiced Marmalade und Wild Honey gestaltet. Wenn schon raus aus der Komfortzone, dann richtig, oder?
Für die Palmen, die den Bogen auf der Karte bilden sollen, habe ich zuerst die Plamen mit der  Tropical Backdrop Stanze aus Watercolor Cardstock ausgestanzt und aus der Szene herausgeschnitten. Die Baumstämme habe ich dabei ein wenig verlängert. Zuerst hatte ich sie nur aus schwarzem Cardstock gestanzt, das war aber zu düster, ein klein wenig Farbe durften die Bäume dann doch haben, auch wenn sie gegen die Sonne eher dunkel aussehen. Die Palmenblätter habe ich nochmal extra mit einer weiteren Stanze aus dem Set ausgestanzt. Dann habe ich alles mit ZIG Markern eingefärbt und dabei bewusst dunkle Farben benutzt. Auch das feine Verblenden habe ich bewusst nicht gemacht, damit die Motive optisch zum Hintergrund passen. Die Palmblätter habe ich ein wenig gedreht auf die Palmen aufgeklebt. 
Die Grasbüschel am Fuß der Palmen sind dann wirklich aus schwarzem Carstock gestanzt.
Quer über den Sketch gehen drei Streifen - und die waren für mich eine weitere Herausforderung. Ich konnte keine (Design-)Papierstreifen aufkleben, da dann der Übergang zur Sonne komisch ausgesehen hätte. Also habe ich mir drei Linien skizziert, die einzelnen Streifen maskiert und ebenfalls mit ZIG Markern in hellblau, türkis und etwas kräftigerem Blau coloriert. Rund um die Sonne, die ich dafür mit dem ausgeschnittenen Kreis aus Masking Paper abgedeckt habe, habe ich türkisfarbene Schimmer-Wasserfarbe aufgespritzt.
Die Ananas ist aus dem Stempelset Aloha - auch sie habe ich mit ZIG Markern coloriert und dann ausgeschnitten.
Ich habe alle Motive auf den Hintergrund geklebt.
Das Wort Aloha ist mit der Scripty Aloha Stanze gemacht. Ich habe es viermal aus schwarzem Cardstock gestanzt und diese Teile aufeinander geklebt. Für die oberste Lage habe ich die Stanze nochmal aus einem der blauen Papiere aus dem Watercolor Wishes Rainbow PaperPad ausgestanzt und als oberste Lage aufgeklebt. Die einzelnen Streifen des 6 x 6 PaperPads waren genau hoch genug, um das Wort aus nur einer Farbe zu stanzen. Die Highlights habe ich dann mit einem weißen Gel Pen dazugemalt.
Unter das a am Anfang des Wortes habe ich noch zwei tropische Blätter aufgeklebt. Die sind aus schwarzem Cardstock mit zwei Stanzen aus dem Tropical Leaves Backdrop Stanzenset gestanzt. Das Schwarz war dann aber doch zu heftig, also habe ich sie ein paar Mal in mein Distress Oxide Peeled Paint Kissen gedrückt und die Farbe getrocknet. Damit nicht beide absolut gleich sind, habe ich da längere Blatt im Hintergrund noch ein wenig mit Wasser bespritzt. 

I took a piece of watercolor paper for the base of my card and cut a wonky circle free hand from a sheet of masking paper. I then covered the watercolor cardstock with the negative piece of this circle and did some ink smushing with Distress Ink Spiced Marmalade and Wild Honey to create that big circle in the background. Well, I thought, when I go outside my comfort zone then I should do it properly, right?
For the palm trees, that are meant to represent the arch in the sketch, I've die cut the Tropical Backdrop from watercolor cardstock and cut out the trees from the scene. First I had die cut them from black cardstock, but that looked too dark. I think they could use some color, even if they look quite dark against the sun. I die cut the palm tree leaves individually from watercolor as well, then colored everything with ZIG markers, using quite dark colors. Also the not perfectly blended look happened on purpose since I wanted the trees to match the look of the sun behind them. I glued the leaves onto the whole palm trees a bit turned. 
The grass at the bottom of the palm trees are really die cut from black cardstock. 
Across the sketch there are drawn three lines - and those were another challenge to me. I couldn't use patterned paper or cardstock for those since I' have to cut them off at the beginning and end of the sun, what would have looked strange. So I've drawn three lines across the card, masked the individual sections off and colored them again with my ZIG marker in a light blue, turquoise and a bit darker blue. Then I splattered some turquoise shimmer watercolor around the sun, masking the sun off while doing that with the hand cut mask I created at the beginning.
The ananas is from the Aloha stamp set and also colored with ZIG markers. 
I glued all images onto the background. 
The word Aloha is die cut with the Scripty Aloha die. I've die cut it four times from black cardstock and stacked those on top of each other. For the top layer I've die cut the word again from a blue sheet from the Watercolor Wishes Rainbow paper pad. The height of strips on the 6 x 6 paper pad was just enough to cut the word from one single color. Then I added some highlights with a white gel pen.
Under the beginning of the word I've tucked two tropical leaves. I've die cut them with dies from the Tropial Leaves Backdrop die set from black cardstock. But then I thought, the black was too hard. So I pressed the cut out leaves a few times on my Distress Oxide Peeled Paint ink pad and dried the color. To make them look slightly different I also spritzed a bit of water onto the longer leave.


Hier kann man die verschiedenen Höhen auf der Karte besser sehen. Die Blätter der Palmen sind nur in der Mitte aufgeklebt, so dass die Enden ein wenig abstehen und ein wenig für Höhe sorgen.
Der Text ist aus dem Stempelsest On the Beach, mit weißem Embossingpulver auf schwarzen Cardstock embosst und dann mit 3D Tape unter das Wort Aloha geklebt.
Ganz zum Schluss habe ich noch ein paar dunkel golden-glitzernde Nuvo Drops neben den Texten verteilt, um dort das gelb nochmal aufzugreifen.

Here you get a better look at the different heights of my card. The leaves are glued to the trees only in the center so the ends bend up a bit and a for some dimension there.
The text is from the On the Beach stamp set. I've white heat embossed it with white embossing powder onto a strip of black cardstock and glued that with foam tape undere the word aloha.
In the end I added a few golden glittering Nuvo Drops next to the text to repeat the  dark gold/yellow color down there again.

Samstag, 7. August 2021

Eine Explosionbox zur Hochzeit


 Hallo Ihr Lieben!
Einer meiner Kollegen hat geheiratet - da musste natürlich eine passende Verpackung für den Gutschein her. Entstanden ist - mal wieder - eine Explosionbox. Die sind aber auch zu genial....

Hello everyone!
One of my co-workers got married - and of course we needed something to put a giftcard in. Once again I made an explosion box. These are just too perfect for these kind of occasions.
 
Die Box selbst ist aus weißem Cardstock gewerkelt. Ich habe das Explosionbox Punch Board von We'R'Memory Keepers verwendet. Das nimmt einem einfach die ganze Rechnerei ab, vor allem beim Deckel habe ich schon mal zwei oder drei Anläufe gebraucht, weil er einfach nicht 100 Prozent passte. Mit dem Punch Board kein Problem mehr. Ich habe hier die mit dem Board größtmögliche Box gemacht, die fertige Box hat eine Größe von etwa 10 x 10 x 10 cm und ist damit vollkommen ausreichend, finde ich.
Ich habe die Seitenteile mit einem Stück rotem Cardstock beklebt, darauf kam eine weitere Lage weißen Cardstocks. Auf den habe ich zuvor mit klarem Embossingpulver und dem Scattered Hearts Background von MFT die Herzen aufembosst und dann von unten her Distress Ink Pumice Stone aufgewischt. 
 
The box is made from white cardstock. I used the Explosion Box Punch Board by We'R'Memory Keepers here. It just takes all the calculating away, especially with the lid I sometimes needed two or three tries because they didn't fit perfectly. With the board this never happens. I made the biggest box possible with the board and the box is about 4 x 4 x 4 Inches big - a wonderful size, I'd say!
I covered all sides with a piece of red cardstock, then put another smaller one cut from white cardstock on top. Before glueing these down I heat embossed the hearts onto it, using clear embossing powder and the Scattered Hearts Background by MFT. Then I inked these squares up with Distress Ink Pumice Stone, letting the ink fade into the white after a little more than half of the squares.
 

 Den Deckel habe ich aus grauem Cardstock gewerkelt, um den Rand habe ich weißes Organzaband gewickelt und vorne zur Schleife gebunden. 

I made the lid from grey cardstock, put some white organdy ribbon around it and tied it to a bow at the front.


Auf dem Deckel der Box befindet sich ein kleiner Shaker. Ich habe mit einer Herzstanze mit gestitchtem Rand ein Herz aus mehreren Lagen weißen Cardstocks gestanzt und zwischen die beiden oberen Lagen eine Lage Folie eingeklebt. Gefüllt ist der Shaker mit kleinen Herz-Pailetten sowie einigen weißen Herzen aus Clay. 
Das ausgestanzte Ja ist ebenfalls 3mal gestanzt und aufeinandergeklebt, dann habe ich es etwas nach rechts versetzt auf den Shaker geklebt. Oben links habe ich zwei dunkelrote Rosen aufgeklebt. Außerdem kamen hier noch ein paar weiße Halbperlen zum Einsatz.

On top of the lid I added a little shaker element. I die cut a heart with a stitched outline from a few layers of white cardstock and added some acetate between the two top layers. I filled the shaker with some small heartshaped sequins and a few white clay hearts.
The die cut word means "I do". I've die cut it three times from red cardstock, stacked these die cuts and then glued the word onto the shaker, moving it a bit more to the right. To the top left I added two dark red roses and also glued down a few white pearls.


Und so sieht die Box geöffnet aus. 
In der Tasche, hier unten im Bild, befindet sich der Geschenkgutschein, auf dem Quadrat oben war Platz für die Unterschriften aller Kollegen.

And this is the opened Box.
In the pocket, here at the bottom of the pic, is the giftcard, on the empty square on top all of us co-workers signed the box.


Auf die anderen beiden weißen Quadrate habe ich erst passende Glüschwunschtexte von SU aufgestempelt, dann habe ich wieder die Herzen klar darüber embosst und den Cardstock von unten her grau gewischt.

Onto the other two squares I stamped matching texts and whises for a wedding by SU, then clear heat embossed the hearts over it again and put down some grey ink - just as I did on the squares on the outsides of the box.


Und die Mitte der Box zierht das Hochzeitsauto. Ich habe hier grauen Cardstock auf den Boden der Box geklebt, darauf kam das Auto in weiß. 
Die Motorhaube des Autos ziehrt ein Herz aus silbernem Spiegelcardstock sowie zwei rote Rosen. Auch Lichter und Nummernschild dürfen natürlich nicht fehlen. Auf das kamen noch die Initialen des Brautpaares - das hatte ich im Eifer des Gefechts ganz vergessen.

In the middle of the box you can see the wedding car. I glued some grey cardstock onto the center of the box, then put down the white car onto it.
The hood of the card is decorated with a heart, cut from silver mirror cardstock, and two red roses.
Of course it also needed some lights and a license plate. I added the initials of the bride and groom to this, I just had forgotten to do so when I took the pictures.


Als Türgriffe habe ich jeweils eine kleine silberne Perle aufgeklebt.

As door knobs I used some tiny silver pearls.


Von hinten sieht das Auto dann so aus. Der Herzluftballon und der Just married Text sind aus dem Loads of Love Stempelset von HoneyBeeStamps. Der Luftballon ist rot coloriert - und zwar von beiden Seiten, damit er auch noch schön aussieht, wenn man das Auto von vorne sieht. 
Und auch ein paar Dosen dürfen hinten am Auto natürlich nicht fehlen! Dafür habe ich kleine Stücke von Papierstrohhalmen mit Alutape überzogen, ewas rotes Twine innen in die Strohhalme geklebt und das andere Ende des Twines unten am Auto befestigt.

This is what the reer of the car looks like. The heart shaped balloon and the just married text are from the Loads of Love stamp set by HoneyBeeStamps. I colored the balloon in a dark red - from both sides since I also wanted it to look like a balloon when you look at the car from the front.
And of course I also had to add a few tins here. I simply covered a paper straw with aluminium tape, cut off three small pieces and glued a piece of red twine into each "can". The other end of the twine I've glued to the bottom of the car.

Freitag, 6. August 2021

MFT Camp Create 2021 - Tag 3 und 4


 Hallo Ihr Lieben!
Camp Create geht weiter - bisher habe ich Euch meine Werke zu den Themen von Tag 1 und 2 gezeigt Das hier ist meine Karte zu Tag 3 - "emboss resist"

Hello everyone! 
Camp Create continues - so far I've shared my cards for the themes of ay 1 and 2. This is my card for day 3 - "emboss resist"

Emboss Resist habe ich schon oft gemacht - hier wollte ich es als Hauptelement auf der Karte einsetzen und daher den Hintergrund der Karte danach gestaltet. Dafür habe ich den Marble Background klar auf weißen Cardstock embosst und diesen anschließend eingefärbt. Im Beispiel-Video wird eine tolle Distress Oxide Farbkombi aus Mermaid Lagoon, Prize Ribbon und Chipped Sapphire verwendet. Da ich mit Prize Ribbon noch nicht gearbeitet hatte und mir der Hintergrund super gefallen hat, habe ich mich dafür entschieden, sie ebenfalls zu verwenden. Die Kombi an sich ist super - für meine Karte ist der Hintergrund aber irgendwie zu dunkel. Ich habe versucht, ihn noch mit einem feuchten Tuch aufzuhellen, aber das ging mit aufgeklebter Deko nicht mehr sonderlich gut. Also habe ich eben einen dunklen Hintergrund. Dafür habe ich ihn nicht mehr gemattet und einen breiteren Rand auf der Karte, auf die ich ihn geklebt habe, stehenlassen. 

I've done emboss resist quite often - here I wanted it to make the main element on my card and so used it for the background. I clear heat embossed the Marble Background onto some white cardstock and then inked that up. In the video about today's theme they used a great color combination of Distress Oxide Mermaid Lagoon, Prize Ribbon and Chipped Sapphire. Since I hadn't used my Prize Ribbon ink pad yet and really liked the look of this combo I've decided to use it as well. The combo itself is amazing - but it's way too dark for my card. I've tried to lighten it with a wet cloth, but with the decorations already glued down that wasn't the easiest thing to do. So well, I had to live with the dark color. Due to it I didn't mat the background and left a quite large white border of my white note card, that I glued the background onto, visible. 


Da der marmorierte Hintergrund ein wenig wie ein Himmel mit Schleierwolken aussieht, habe ich mit der Sunshine Die einen Sonne aus weißem Cardstock gestanzt. Und dann habe ich mal ein wenig gematscht - etwas, das ich ganz ganz selten tue. Ich habe die Distress Ink Farben erst auf meine Glass Media Mat aufgetragen, mit Wasser besprüht und dann den weißen Cardstock hindurchgezogen. Zwischen den Farben habe ich den Cardstock jeweils getrocknet. Es kamen Squeezed Lemonade, Mustard Seed und Wild Honey zum Einsatz. Und auch ein paar fast schon obligatorische Spritzer goldener Metallik-Wasserfarbe durften nicht fehlen. 
Die Sonne habe ich dann auf meinen Hintergrund aufgeklebt.
Der Hauptteil des Textes ist mit der Sunshine Stanze von MFT gemacht. Ich habe das Wort ein paar Mal aus weißem Cardstock gestanzt, die Ausstanzungen aufeinander geklebt und als oberste Lage das Wort einmal aus gelb-orangenem Hologramm-Cardstock gestanzt aufgeklebt. Den I-Punkt habe ich durch ein kleines Herz ersetzt. Auch das ist ein paar Mal aus normalem roten Cardstock gestanzt, die oberste Lage bildet ein Herz aus rotem Hologramm-Cardstock. 
Den Rest des Textes - gemacht mit Stempeln aus dem Set Well, hello - habe ich golden auf schwarzen Cardstock embosst, ausgeschnitten und mit 3D Tape auf die Karte aufgeklebt.
Zum Schluss habe ich noch ein paar dunkel-gold glitzernde Nuvo Drops hinzugefügt.

Since the marbled background kind of looks like a sky with thin white clouds I've die cut a sun with the sunshine from white cardstock. And then I did some ink smushing - something I really do very rarely. I put down some ink onto my Glass Media Mat, spritzed some water over it and then dragged the cardstock through the color. Inbetween each layer I dried the cardstock. I've used Squeezed Lemonade, Mustard Seed and Wild Honey here. And I also just had to add some of my much loved splatters of golden metallic watercolor.
Then I glued the sun onto the background.
Main element of the text is a die cut word sunshine, made with the sunshine die by MFT. I've die cut it several times from white cardstock, stacked the words on top of each other and added one die cut from an orange-yellow holographic cardstock. I replaced the dot on the i with a small heart. Also this is cut several times from regular red cardstock, then I added one cut from red holographic cardstock as the top layer. 
The rest of the text - made with stamps from the Well, Hello set - is golden heat embossed onto black cardstock, cut out and glued onto the card with dimensionals.
In the end I added a few dark-golden glitter Nuvo Drops.
 
Das Thema für Tag 4 war Background Bonanza. Diesmal ist der Hintergrund mit ein Hauptelement der Karte. Ehrlich gesagt, bin ich mit dieser Karte nicht zu 100 % zufrieden - und auf dem Bild sieht die Karte noch komischer aus. Aber seht selbst:
 
The theme for day 4 was Background Bonanza - it's the background that should be a main focus on the card. Honestly, I am not 100 % happy with this card - and it looks even worse on the photo. But look for yourself:
 

 Ich habe hier den Honeycomb Background von MFT benutzt - der ist so alt, dass ich damals beim Archivieren meiner Stempel nicht mal ein Bild davon finden konnte. Ich habe die Stanze nur in den weißen Cardstock geprägt und sie nicht ausgestanzt. Mit einem Cutter habe ich per Hand anschließend ein paar der Sechsecke herausgeschnitten. Über da weiße Panel habe ich ein paar goldene Spritzer Schimmer-Watercolor verteilt, dann habe ich dunkelorangefarbenen Cardstock hinter die ausgeschnittenen Sechsecke geklebt. Aber die Farbe des Carstocks passte irgendwie nicht so ganz, also habe ich sie mit Copics etwas dunkler eingefärbt.
Dann habe ich mit der Stanze einige Sechsecke aus goldenem Spiegelcardstock ausgestanzt und oben auf den geprägten Hintergrund geklebt. Auf dem Bild sehen einige der Sechsecke dunkelbraun aus, aber die sind alle aus dem Spiegelcardstock, der einfach so blöd zu fotografieren ist.
Außen um die Karte fehlte mir etwas, also habe ich einen gestitchten Rahmen aus dunkelbraunem Cardstock gestanzt und aufgeklebt.

Here I used the Honeycomb Background by MFT - it's such an old die that I even didn't find a picture of it back then when I put all my stamps and dies in Evernote. I only embossed the die into the white cardstock and didn't cut it. Then I used a cutter to cut out a few of the hexagons by hand. Over the white panel I spritzed some golden shimmer watercolor. I glued some dark orange colored cardstock behind the cut out hexagons, but the color looked wrong somehow so I used my Copics to shade 
them a bit.
 Then I die cut a few of the hexagons from golden mirror cardstock using the same background die and then glued them on top of the white cardstock. On the picture it looks like there are some ark brown hexagons - but those are all cut from golden mirror cardstock that's just so hard to take a picture of.
Since I feld there was some frame missing, I've die cut a stitched frame from dark brown cardstock and glued it onto the background.


Auch das Stempelset, das ich zum Dekorieren der Karte verwendet habe, dürfte längst retired sein. Es ist das Set Meant to Bee - aber ich fand, der Honigkorb und die Bienen passen wunderbar zum Hintergrund mit den Waben. 
Die Motive sind mit Copics coloriert und per Hand ausgeschnitten. 
Das Sweet mit dem Schatten ist mit der Sweet Stanze gemacht. Der Schatten ist aus dunkelbraunem Cardstock, das Wort selbst aus weißem Cardstock gestanzt. Dann habe ich das Wort passend zu meinen anderen Colorationen mit Copics eingefärbt. Der Schatten ist hinter der Honigwabe, das Wort dann obenauf geklebt.
Für den Rest des Textes habe ich dann zwei Texte aus dem Stempelset Sweet Sentiments mit weißem Embossingpulver auf braunen Cardstock embosst und die Streifen ober- und unterhalb des gestanzten Wortes aufgeklebt.
Zum Schluss habe ich noch ein paar braune Enamel Dots auf der Karte verteilt.

Also the stamp set, that I used to decorate my card, is most likely retired by now. It's the Meant to Bee stamp set - but I thought, the bees and beehive were just perfect to go with the honeycomb background.
The images are colored with Copics and cut out by hand.
The sweet with the shadow is made with the Sweet die set. I've die cut the shadow from cark brown and the word itself from white cardstock. Then I colored the white word in with Copics matching the coloring of the other images. The shadow is glued behind the beehive, the word itself on top of it.
For the rest of the text I combined two stamps from the Sweet Sentiments stamp set. They are white heat embossed onto some dark brown cardstock, then I glued the strips over and under the die cut word.
In the end I added a few brown Enamel Dots to my card.

Und hier sind die mit diesen Karten verdiente Badges:

And here are the badges I've earned with these cards:

Donnerstag, 5. August 2021

Tropische Grüße

 
Hallo Ihr Lieben!
Auf dem Stampcorner Blog zeige ich heute diese tropische Slimline Card, auf der ich jede Menge Stempel und Stanzen aus dem letzten Release von LawnFawn verwendet habe. Das fand ich absolut sensationell, und ich konnte mich einfach nicht entscheiden, was auf die Karte darf und was nicht. Also wurde sie etwas voller...
 
Hello everyone!
Over at the Stampcorner Blog I am sharing this tropical Slimline Card today, on which I've used a lot of stamps and dies from LawnFawn's last release. I think this was just sensational and I just couldn't decide what to use and what not. So my card turned out a bit more on the overloaded side...
 
 Fangen wir mit dem Hintergrund an. Ich habe hier die Tropical Leaves Background Stencil benutzt. Da ich ja eine Slimline Card gemacht habe, der Stencil aber dafür nicht lang genug war, habe ich ihn so platziert, dass die Nahtstellen vom dem Blätter-Kreis verdeckt werden und musste dabei nur darauf achten, am Rand keine halben Blättern zu haben. Hat super geklappt. Den einen Teil der Blätter habe ich mit Distress Oxide Bundled Sage, den anderen mit Iced Spruce auf meinen türkisfarbenen Cardstock aufgewischt. Mit einem weißen Gelpen habe ich dann noch ein paar Highlights gesetzt. Dann habe ich noch türkis- und goldfarbene Metallik-Wasserfarbe über den Hintergrund gespritzt.

Let's start with the background. I used the Tropical Leaves Background Stencil here. Since I made a Slimline Card for which the stencil isn't long enough I put it down so the seams would be covered by the circle of leaves, just making sure to not end up with any half leaves on the visible areas at the edges. It worked great! I used Distress Oxide Bundled Sage for the leaves the first stencil creates and Iced Spruce for the other ones and put them on a strip of turquoise cardstock. With a white gel pen I added some details to the leaves. Then I also splattered some golden and turquoise metallic watercolor over the background.


Ich habe drei Bilder gemacht, auf denen ich die Länge der Karte aufgeteilt habe. So könnt Ihr die Details auch alle sehen. 
Auf der linken Seite der Karte - und nicht nur dort, sondern über die komplette Breite der Karte - habe ich einige der Tropical Vines Borders von oben herunterhängen lassen. Die sind aus grünem Cardstock gestanzt und mit Distress Ink Peeled Paint ein wenig gewischt. 
Quer über die Karte verläuft mein Text. Ich habe mit den Finley's ABCs Stanzen die Buchstaben für das Wort tropical gestanzt, wobei ich das O durch den Blätterkreis ersetzt habe. Die Buchstaben habe ich jeweils aus hell- und dunkelgrünem Cardstock gestanzt, versetzt aufeinander geklebt und mit 3D Tape auf die Karte geklebt. 
Das Wort summer ist aus dem Stempelset Tree Before 'n' Afters. Ich habe es mit weißem Embossingpulver auf dunkelgrünen Cardstock embosst, schwarz mattet und unter die Buchstaben geklebt, wieder mit 3D Tape. 
Auf den Buchstaben sitzt einer der Tukane aus dem Stempelset Toucan Do It, coloriert mit Copics. 
Und dann war noch Platz für einige Hibiskusblüten. Die sind aus dem Stanzenset Magic Iris Tropical Leaves Add-On und aus dem rosafarbenen Bogen aus dem Watercolor Wishes Rainbow gestanzt. So haben sie nicht alle dieselbe Einheitsfarbe. Für die Mitte der Blumen habe ich dunkelrosafarbenen Cardstock, für die Stempel orangefarbenen Cardstock benutzt. 

I took three close ups so you can see all the details better.
On the left side of the card - and not only there but across the whole top edge - I let hang a few of the Tropical Vines Borders down from the top edge. I've die cut those from green cardstock and shaded them a bit with Distress Ink Peeled Paint.
Across the card I put down the text on this card. I've die cut the word tropical using the Finley's ABCs dies, replacing the O with the leafy circle. I've die cut the letters from both light and dark green cardstock, glued them on top of each other a bit off and then glued them onto the background with dimensionals. 
The word summer ist from the Tree Before 'n' After stamp set. I've white heat embossed it onto a strip of dark green cardstock, matted it black and again used dimensionals to glue the strip under the die cut letters.
One of the toucans from the Toucan Do It stamp set decided to take a rest on top of the letters here. I've colored him with Copics.
And then there was room for some hibiscus flowers. Those are from the Magic Iris Tropical Leaves Add-On die set and cut from a pink sheet from the Watercolor Wishes Rainbow paper pad. This way they don't have the same color. For the center of the flowers I used somd dark pink and for the steamens some orange cardstock.


Sicherlich das auffälligste Element auf der Karte ist der Blätterkreis. Wie schon erwähnt, habe ich dafür die Magic Iris Tropical Leaves Add-On Stanze benutzt und den Kreis aus grünem Cardstock gestanzt. Dann habe ich ihn mit Distress Ink Peeled Paint und Fores Moss schattiert. Ich habe hier bewusst die Inks statt die Oxides verwendet, da die Grüntöne einfach satter und in meinen Augen tropischer sind. Auch über den Kreis habe ich goldene Metallik-Wasserfarbe gespritzt. 
Auf den Blättern befinden sich die Eidechse aus dem Toucan Do It Stempelset und unten rechts die Schlange aus dem Set Critters in the Jungle. Bei der war ich ein wenig unsicher, ich verrate Euch später warum. Außerdem sind hier weitere Hibiskusblüten auf und unter den Blättern aufgeklebt.
Im Kreis versteckt sich eine Magic Iris. Ich habe die Magic Iris Add-On Stanze von LawnFawn für die Ausstanzung in der Mitte meiner Karte benutzt und musste ein wenig mit Partial Diecutting tricksen, damit sie auch auf meine Slimline Card passte. Aber es hat dann doch funktioniert - das einzige, woran man das wirklich erkennt, ist die tatsache, dass die gestitchten Linien nur oben am Tab sowie jeweils ein kleines Stück ober- und unterhalb des Blätterkreises zu sehen sind. Darum habe ich einfach mit einem Fineliner einen schwarzen Rand rund um die Karte gemalt und so fallen die gestitchten Details nicht mehr so auf.
Für den Mechanismus habe ich natürlich die Magic Iris Stanze benutzt und alle Teile aus dem selben türkisfarbenen Cardstock gestanzt, den ich auch für den Hintergrund benutzt habe. Ich habe den Mechanismus zusammengebaut, geschlossen und dann auf die geschlossene Linse ebenfalls Blätter aufgewischt. So passt die Linse in geschlossenem Zustand perfekt zum Hintergrund.
 
Main element on this card for sure is the leafy circle. As mentioned before did I die cut this with the Magic Iris Tropical Leaves Add-On die to die cut it from green cardstock. Then I inked it up with Distress Ink Peeled Paint and Forest Moss. I've chosen the inks over the Oxides in this case because the greens just looked more vibrant and more tropical to me. Then I added some golden metallic watercolor over the leaves as well.
On the leaves there's the lizzard from the Toucan Do It stamp set and at the top right the snake from the Critters in the Jungle stamp set. I was a bit unsure if I should add this and will tell you why a little later. I also added more hibiscus flowers on top and under the leaves.
Inside the circle I've hidden a magic iris. I used the Magic Iris Add-On die to cut the opening into my card and had to do some partial die cutting to make it fit onto my Slimline Card. It worked and the only detail you can tell I didn't use a slimline sized die are the stitched details that are only around the tab and at the top and bottom edges in the area of the cut out circle. I used a black fineliner to draw a frame around the hole card and those stitched details kind of vanished or blended into the card design.
For the mechanism I used the Magic Iris die, cutting all pieces from the same turquoise cardstock that I used for the background. I put the magic iris together, closed the mechanism and then stenciled more leaves onto the lense. When it's closed it blends perfectly into the background.


Auf der rechten Seiten der Karte setzt sich der Text fort. Hier habe ich die restlichen Buchstaben für das Wort tropical aufgeklebt, das Wort Greetings aus dem Stempelset Special Delivery ist wieder weiß auf dunkelgrünen Cardstock embosst und schwarz gemattet.
Ein weiterer Tukan sowie ein  Schmetterling, beide aus dem Toucan Do It Stempelset, fliegen hier herum, es gibt weitere Hibiskusblüten und noch mehr der Tropical Vines hängen vom oberen Rand der Karte herab.

On the right side of the card the text continues. I glued down the left over letters of the word tropical, the word greetings is from the Special Delivery stamp set. Again it's white heat embossed onto dark green cardstock and matted black. 
Another toucan and a butterfly, both from the Toucan Do It stamp set, are flying around here, there are more hibiscus flowers and also more of the Tropical Vines hanging down from the top edge of the card.


Und so sieht die Karte dann mit geöffneter Linse aus - für mich gehört türkisfarbenes Meer einfach auch in die Tropen. Und so habe ich das hinter der Magic Iris versteckt. Außerdem bin ich momentan im Flamingo-Fieber, also musste auch davon einer mit auf die Karte.

And this is the card with the lense opened - to me turquoise water just belongs into the tropics. And so I've hidden that behind the magic iris. I am also in a flamingo fever at the moment, so I just had to add one here as well.


Hier eine weitere Nahaufnahme. Ich war mir erst nicht sicher, ob es bei geöffneter Linse so aussehen würde, als ob die Schlange dem Flamingo gleich ins Bein beißen würde, deswegen wollte ich sie anfangs gar nicht verwenden. Aber bei geschlossener Linse fehlte dort unten einfach etwas auf der Karte. Und nach einigem Hin- und Herschieben der Motive, fand ich, dass es doch passt. Außerdem schaut die Schlange so freundlich, die beißt bestimmt nicht. Ist wohl eine Würgeschlange.... ;)
Der Flamingo und die Palme sind aus dem Stempelset Flamingo Together, die Sonne mit der Wolke aus dem Set Happy Village. Hinter den Ausschnitt im Kartenaufleger habe ich erst hellblauen Cardstock geklebt, darüber kam dann hell-türkisfarbener Cardstock, dessen obere Kante ich mit einer der Ocean Wave Accents Stanze wellenförmig zugeschnitten habe. Darauf kamen dann Flamingo und Palme.

Here's another close up. I wasn't sure if it'd look like the snake would take a bite at the flamingo when the lense is opened and so I didn't want to use it at first. But when the lense was closed something was missing in this spot on the card. After moving the images around a bit I decided it would work. And this snake looks so friendly, I don't think she'll bite anyone. Guess it's a choke snake... ;)
The flamingo and the palm tree are from the Flamingo Together, the sun with the cloud from the Happy Village stamp set. Behind the cut out in the background I've glued down some light blue cardstock, then added  a piece of light turquoise cardstock for the water, die cutting the top edge with one of the Ocean Wave Accents dies first. Then I put the flamingo and palm tree on top.

Mittwoch, 4. August 2021

Es kommt auf den Blickwinkel an....

 
Hallo Ihr Lieben!
Alles Käse? Normalerweise steht das ja für nicht so tolle Aussichten. Aber es kommt auf den Blickwinkel an - für eine kleine Maus ist alles Käse natürlich ein Traum! Und so habe ich hier eine Aufmunterungskarte gemacht, die mit einem kleinen Augenzwinkern zu betrachten ist.

Hello everyone!
Here in Germany we say that "everything is cheese"when a situation isn't going as planned. But well, I guess it just depends on who you are - for a little mouse "everything cheese" is a dream coming true! And so I made this card to perk someone up, and yes, it is meaned to put a smile on the recipient's face so that's why I had to include this saying and comine it with a mouse.

Für meine Karte habe ich ein Stück schwarzen Cardstock auf einen weißen Kartenrohling geklebt. Darauf habe ich dann ganz viele Käsestücke arrangiert. Die habe ich aus hellgelbem Cardstock mit dem Aufleger der Käsekuchen-Stanze ausgestanzt und dann passend dazu jeweils Rechtecke aus dunkler gelbem Cardstock geschnitten. Die habe ich dann mit dünnem 3D Tape hinter die löchrigen Stücke geklebt. 
Da die Käsestreifen nicht die komplette Mattung der Karte abdecken, habe ich sie einfach zerschnitten. Das abgeschnittene Stück einer Reihe habe ich dann gleich für die nächste Reihe verwendet, so sind nicht alle Teilungen untereinander und die komplette Mattung ist mit Käse gefüllt. Die Käsestreifen habe ich dann einfach direkt auf die Mattung aufgeklebt.
Die Texte im unteren Bereich der Karte sind aus verschiedenen Stempelsets zusammen"gesammelt". Das Hmmm! kommt mit der neuen Maus, das Super ist aus dem Set Du bist... Super und dann noch das #denkpositiv aus dem Set Chamäleon. Sie sind alle weiß auf schwarzen Cardstock embosst und mit dünnem 3D Tape auf den Käse geklebt.
 
For my card I glued a piece of black cardstock onto a white note card. On top I glued a lot of pieces of cheese. There's a "cheese cake box die" by JM Creation that cuts a box in the shape of a piece of cake. This set also includes toppers in the style of cheese and I used one of them here, die cutting them from light yellow cardstock. Then I die cut rectangles the same size form a darker yellow cardstock and glued the pieces with the holes on top of the solid ones with thin foam tape.  
Since the lengths of my matting and of the cheese weren't the same I simply cut the strips apart, using the left over from one row as a starter for the next. That way I was able to cover the whole black cardstock and also don't have the endings/beginnings of those strips all at the same place.
The text under the image are all white heat embossed onto black cardstock and glued onto the cheese strips with thin foam tape again. The top ones I don't need to translate, I think. The long word means "think positive". 


Und hier könnt Ihr die Maus nochmal genauer sehen. Ich habe sie mit Copics coloriert, ausgeschnitten und mit dickem 3D Tape auf die Karte geklebt. Damit sie nicht in Luft schwebt, habe ich das kleinste der Stitched Ovale als Boden hinter die Maus geklebt.
Für den Text oberhalb habe ich das Alles von einem der Stempel aus dem Stempelset Texte für Banner wieder weiß auf schwarz embosst und ausgeschnitten. Für den Rest des Textes habe ich das ABC mit Rand verwendet. Die Füllung der Buchstaben ist aus einem noch dunkleren gelbem Cardstock gestanzt, der Rand aus schwarzem Cardstock. Mit einem weißen Gelpen habe ich noch Highlights aufgemalt. 

And here you get a closer look at the mouse. I colored her with Copics, cut her out and glued her onto the cheese strips with a thicker foam tape. And since I didn't want her to float in the air I've die cut an oval from black cardstock and glued it behind her.
For the text above the mouse - which is the said "everything is cheese", I combined a stamp and die cut letters. For the solid letters I used a even darker yellow cardstock, the outlines are die cut from black cardstock. I added a few highlights with a white gel pen.

Dienstag, 3. August 2021

Sending you Sunshine

 
Hallo Ihr Lieben!
Es ist wieder Zeit für eine Karte aus der Kategorie "jeden Monat ein alter Stempel" - und die zeige ich heute auf dem Stamping-Fairies Blog.

Hello everyone!
It's time again for a card in my "each month an old stamp" series - and this I'm sharing over at the Stamping-Fairies Blog today.

Hier habe ich nicht nur ein altes Stempelset, sondern auch noch eine alte Stanze benutzt: die Snow Drifts Cover-Up Stanze von MFT. Ich mag diese vollflächigen Stanzen zur Zeit besonders gerne. Da ich aber den Sommer viel zu sehr liebe, um jetzt eine Winterkarte zu machen, habe ich die Schneehügel benutzt, um daraus eine Strandszene zu werkeln.
Ich habe die Snow Drifts Stanze zwei mal aus weißem Cardstock gestantzt und die Rahmen-Teile aufeinander geklebt. Dann habe ich die obersten Querlinien herausgeschnitten, um einen vollflächigen Bereich Himmel zu erhalten.
Ein Stück weißen Cardstock, den ich im Maß des Rahmens zugeschnitten habe, habe ich im oberen Bereich mit Distress Oxide Tumbled Glass und Broken China gewischt. Darauf kam die Sonne mit Scattered Straw, von der ich mit der Radiating Rays Stencil ein paar Strahlen habe ausgehen lassen. Über den Himmel habe ich ein paar Wassertropfen und anschließend verdünnte weiße Acrylfarbe aufgespritzt. Und nur auf die Bereiche der Sonne und ihrer Strahlen kamen noch ein paar goldene Metallic-Watercolor-Spritzer.
Die beiden Streifen unterhalb des Himmels habe ich mit Distress Oxide Salvaged Patina und Peacock Feathers gewischt, türkisblaue Metallic-Wasserfarbe aufgespritzt und ein paar Reflektionen mit einem weißen Gelpen aufgemalt.Dann habe ich die Meerstreifen in die Bereiche, aus denen sie ausgestanzt wurden, eingeklebt.
Und dann habe ich die untersten zwei Streifen als Strand gestaltet. Dafür habe ich die weißen Streifen mit Distress Oxide Gathered Twigs gewischt, und auch hier weiße Acrylfarbe sowie goldene Matallik-Wasserfarbe aufgespritzt. Diese Bereiche habe ich mit jeweils einer der übrigen weißen Ausstanzungen hinterlegt und ebenfalls wieder in den Rahmen geklebt. Durch das Hinterlegen habe ich nun drei verschieden hohe Ebenen, die etwas mehr Tiefe in die Karte bringen. 
Der Text ist aus dem ebenfalls alten Sweet Forest Friends Stempelset. Ich habe ihn mit weißem Embossingpulver auf einen Streifen schwarzen Cardstocks embosst und über den Himmel geklebt.

I did not only use an older stamp set here, but also an older die: the Snow Drifts Cover-Up die by MFT. I just love those card sized background/frame dies lately. Since I love summer way too much to make a winter card now, I used this Snow Drift die to turn it into a beach.
I've die cut the Snow Drifts die twice from white cardstock and glued the frame pieces on top of each other. Then I cut off the upper drift lines to end up with one area for the sky.
I've cut a piece of white cardstock the size of the frame and inked up the upper area with Distress Oxide Tumbled Glass and Broken China. I used Scattered Straw for the sun and also to add some sun rays using the Radiating Rays stencil. Across the inked up sky I splattered some drops of water, some white acrylic paint and - only onto the sun and its rays - some golden metallic watercolor.
I inked up the two strips under the sky with Distress Oxide Salvaged Patina and Peacock Feathers for the water, spritzed some turquoise metallic watercolor on top and added a few reflections with a white gel pen. Then I glued these two stripes back in their place in the frame.
I used the lower two strips to create a beach. I inked the white pieces up with Distress Oxide Gathered Twigs and spritzed some white acrylic paint and golden metallic watercolor onto that area. Then I glued one of the left over white die cuts behind those strips and then put them back into the frame. Due to the layering I end up with some more depth on this card.
The text is from the also older Sweet Forest Friends stamp set. I white heat embossed it onto a strip of black cardstock and glued it across the sky. 


Als Hauptmotiv habe ich die Palme und den Flamingo aus dem Stempelset Flamazing, aus dem auch die Blumen sind. Ich habe die Motive mit dem No-Line Coloring Stempelkissen von InkOn3 abgestempelt, mit Copics coloriert und dann ein paar Details mit Polychromos hinzugefügt. Eigentlich war der Plan, den Flamingo ins Wasser und die Palme in den Vordergrund zu setzen. Aber das hat aufgrund der gleichen Größe der Motive sehr eigenartig ausgesehen. Deswegen steht der Flamingo nun im Sand. 
Die Muscheln sind aus mit zwei der Stanzen aus dem Set Beach Scene Builder gemacht. Ich habe sie aus weißem Cardstock gestanzt und ebenfalls mit Copics und Polychromos coloriert. 
Zum Schluss habe ich noch ein paar gold-gelbe Glitzersteine auf dem Strand verteilt, die Szene schwarz gemattet und auf einen weißen Kartenrohling geklebt.

For the main imageI used the palm tree and flamingo from the Flamazing stamp set, from which the flowers are as well. I stamped the images with the No-Line Coloring ink pad by InkOn3, colored them with Copics and then added a few details with Polychromos. I originally had planned to put the flamingo in the water and the palm tree in the foreground, but due to the same size of those two images that looked wrong. So now the flamingo is standing in the sand.
The sea shells are made with two of the dies from the Beach Scene Builder die set. I've die cut them from white cardstock and colored them with Copics and Polychromos, too.
In the end I added a few golden-yellow rhinestones to the beach, matted the whole scene black and glued it onto a white note card.

Montag, 2. August 2021

Camp Create 2021 - Day 1 and 2

Hallo Ihr Lieben!
Auf dem MFT Blog ist wieder Camp Create. Jeden Tag gibt es ein Thema mit einer kurzen und einfachen Anleitung und passend dazu soll eine Karte gewerkelt werden. Die Anleitungen/Themen sind nicht unbedingt etwas Neues und die meisten haben es bestimmt schon mal gemacht, aber trotzdem macht das Camp Create jedes Jahr aufs Neue Spaß. 
In meinem heutigen Blogpost zeige ich meine Karten zu den Themen von Tag 1 und 2. Und weil die Zeit definitiv zu kurz ist, um super komplizierte Karten zu werkeln, sind meine Karten relativ einfach. Aber das ist auch mal schön zu machen!
 
Hello everyone!
It's time for Camp Create over at the MFT Blog again. There's a new theme with a short and simple tutorial for each day and you have to make a card after it. The themes/tutorials aren't anything fancy and never-see-before and for sure most of us have already made something like that. But each year Camp Create is just a lot of fun.
In today's blog post I am sharing my cards for the themes of day 1 and 2. Since the time is definately too short to make some super fancy and complicated cards, mine are pretty simple. But it's nice to make those for  a change.
 
An Tag 1 lautete das Thema Spectacular Shakers - genau, es sollte eine Shaker Card gemacht werden. Und so sieht meine aus.  

The theme for day 1 is spectacular shakers - and yes, we are asked to make a Shaker Card. And this is mine.


Ich habe die Watercolor Wash Free Form Stencil von MFT auf ein Stück weißen Cardstock gelegt und den inneren Bereich mit Distress Ink Broken China gewischt. Dann habe ich die Farbe mit einem nassen Pinsel verteilt. Nach dem Trocknen habe ich den Happy Birthday Background mit ganz heller grauer Tinte über den kompletten Cardstock gestempelt.

I put the Watercolor Wash Free Form stencil by MFT onto a piece of white cardstock and inked up the inner area with Distress Ink Broken China. Then I used a wet paint brush to move the color. After the background had dried I stamped the Happy Birthday Background onto the cardstock using very light grey ink.


Mit den Buchstaben aus dem Spell Anything Alphabet Stanzenset habe ich aus dem Hintergrund das Wort Happy ausgestanzt. Das praktische an diesem Wort ist, dass man das d auf den Kopf gestellt auch als weiteres p benutzen und so das ganze Wort "in einem Rutsch" stanzen kann. Hinterher habe ich mich zwar etwas schwer getan, herauszufinden, was jetzt p und was d ist - die Stanzen sind minimal unterschiedlich - aber dann habe ich es doch herausgefunden und konnte alles wieder richtig aufräumen. 
Hinter jeden Buchstaben habe ich Cardstock in einer anderen Farbe - pink, rot, orange, gelb und grün - geklebt und jeweils ein eigenes Shaker-Abteil darumherum gestaltet. Dann habe ich jeweils zum Cardstock passende kleine Perlen in die Shaker-Bereiche gefüllt. 
Die mittleren Teile der Buchstaben habe ich von oben auf die Folie geklebt.
Für den Text auf der Karte habe ich Stempel aus dem Set Bitty Birthday Wishes verwendet. Eigentlich wollte ich "very happy birthday to you" schreiben, aber es ist tatsächlich kein very in dieser Schrift in einem der vielen Stempelsets, die ich von MFT habe. Also habe ich stattdessen belated benutzt. Den Text habe ich weiß auf schwarzen Cardstock embosst und mit 3D Tape über und unter dem happy aufgeklebt.
Zum Schluss habe ich ein paar dunkelgraue Enamel Dots - schwarze hatte ich gerade keine zur Hand - auf der Karte verteilt, den Cardstock mit dem Shaker schwarz gemattet und auf einen weißen Kartenrohling geklebt.

I used the letters from the Spell Anything Alphabet die set to die cut the word happy from the background. The great thing is, that you can use the d upside down to die cut another p so you can die cut the whole word with one run through the die cutting machine. Afterwards it took me a bit to figure out which one was the d and which one the p - they are slightly different - but I found it out and was able to put everything back in its place.
Behind each letter I glued a piece of cardstock in a different color - pink, red, orange, yellow and green - and created an individual shaker element around each letter. I filled each with tiny pearls matching the color of cardstock I glued behind the letter/shaker. 
The inner parts of the letters are glued on top of the acetate.
For the text I used stamps from the Bitty Birthday Wishes stamp set. I had planned to write "very happy birthday to you" but in all those MFT stamp sets I have, and these are many, I didn't find a "very" in the same font. So I went with "belated" instead, white heat embossed the words onto black cardstock and glued it above and under the "happy" using dimensionals.
In the end I added a few dark grey Enamel Dots - I didn't have any black ones - matted the cardstock with the shaker black and glued it onto a white note card.

Für Tag 2 lautet das Thema Wonderful Watercolor. Dazu gab es ein Video mit ganz rudimentärer Coloration mit Watercolor - und das bewusst nicht perfekt Schattierte/Colorierte des Motives hat mir total gut gefallen. Ich bin bei bestem Willen kein Profi mit Watercolors, habe aber einiges an Material dazu da und für diese Karte meine ZIG Marker ausgepackt.

For day 2 the theme is wonderful watercolor. They have a video with a very simple watercoloring - and the not perfectly shaded/colored way there really catched my eye. I really am no pro when it comes to watercolor but of course I have quite some stuff in my stash and brought out the ZIG marker for this card.


Ja, der Herbst ist auch bald da... und ich freue mich auf Kürbisse! 
Ich wollte keinen einfachen weißen Hintergrund für diese Karte. Also habe ich mit der Leafy Layers Cover-Up Stanze den Hintergrund aus Masking Paper ausgestanzt, auf den Watercolor Cardstock geklebt und mit einem grün-grauen ZIG Marker und Wasser die Zwischenräume dieses Die Cuts eingefärbt. Nach dem Trocknen habe ich noch goldene Metallik-Watercolor aufgespritzt.
Den Hintergrund habe ich dunkelgrün gemattet und auf einen weißen Kartenrohling geklebt.

Yes, fall will be here soon... and I am looking forward to fresh pumpkins!
I didn't want a plain white background for this card. So I die cut the Leafy Layers Cover-Up die from some masking paper, glued that onto a piece of watercolor cardstock and then filled the free areas of this die cut with a greyish green ZIG marker and water. After the color had dried I sprinkled some golden shimmer watercolor over the background.
I matted the cardstock dark green and glued it onto a white note card.


Die Kürbisse und Blätter habe ich mittels Masking zusammengestempelt und ebenfalls mit ZIG Markern coloriert. Dabei habe ich für die Blätter zwei verschiedene, für die Kürbisse je 3 verschiedene Marker in verschiedener Intensität benutzt, um den Motiven Tiefe zu verleihen. Dabei habe ich darauf geachtet, dass die Farben nicht richtig ineinander verblendet werden. 
Die Texte sind, ebenso wie die Motive, aus dem Stempelset Autumn Blessings. Ich habe sie einfach über und unter dem Motiv direkt auf den Hintergrund aufgestempelt.
Als Deko habe ich dann noch ein paar kleine goldene Pailetten auf der Karte verteilt.

I did some masking to create this scene with the leaves and pumpkins and also used ZIG markers to color them in. I used two different shades of green for the leaves and 3 different shades for the pumkins to add some depth to the images. I made sure to not blend the colors too much.
The sentiments on this card are from the Autumn Blessings stamp set, as are the images. I simply stamped the sentiments above and under the images directly onto the background.
For embellishments I added a few small golden sequins.
 
Und mit diesen beiden Karten habe ich mir die ersten beiden Badges für das Camp Create 2021 verdient, die ich dann natürlich auch posten möchte:
 
And with these two cards I've earned my first two badges for Camp Create 2021, and of course I want to post them here:
 

Sonntag, 1. August 2021

Let's talk about....

 
Hallo Ihr Lieben!
Ja, let's talk about what? Den Titel dieses Blogpostes hätte ich gleich mit mehreren Worten beenden können, sie hätten alle gepasst. Last minute, food und auch fiesta. 
Last minute, weil ich diese Karte wirklich last minute vor der Deadline der Challenge #105 der LawnFawnatics fertig bekommen habe. Die Challenges gehen zwei Wochen. In der ersten Woche denkt man noch "oh, ich habe noch viel Zeit", dann beginnt die zweite Woche - und wenn die ungeplanterweise so vollgepackt mit allem Möglichen ist, dass man kaum zum Basteln kommt, ist die Deadline plötzlich ganz nah! Aber ich habe es ja gerade noch geschafft.
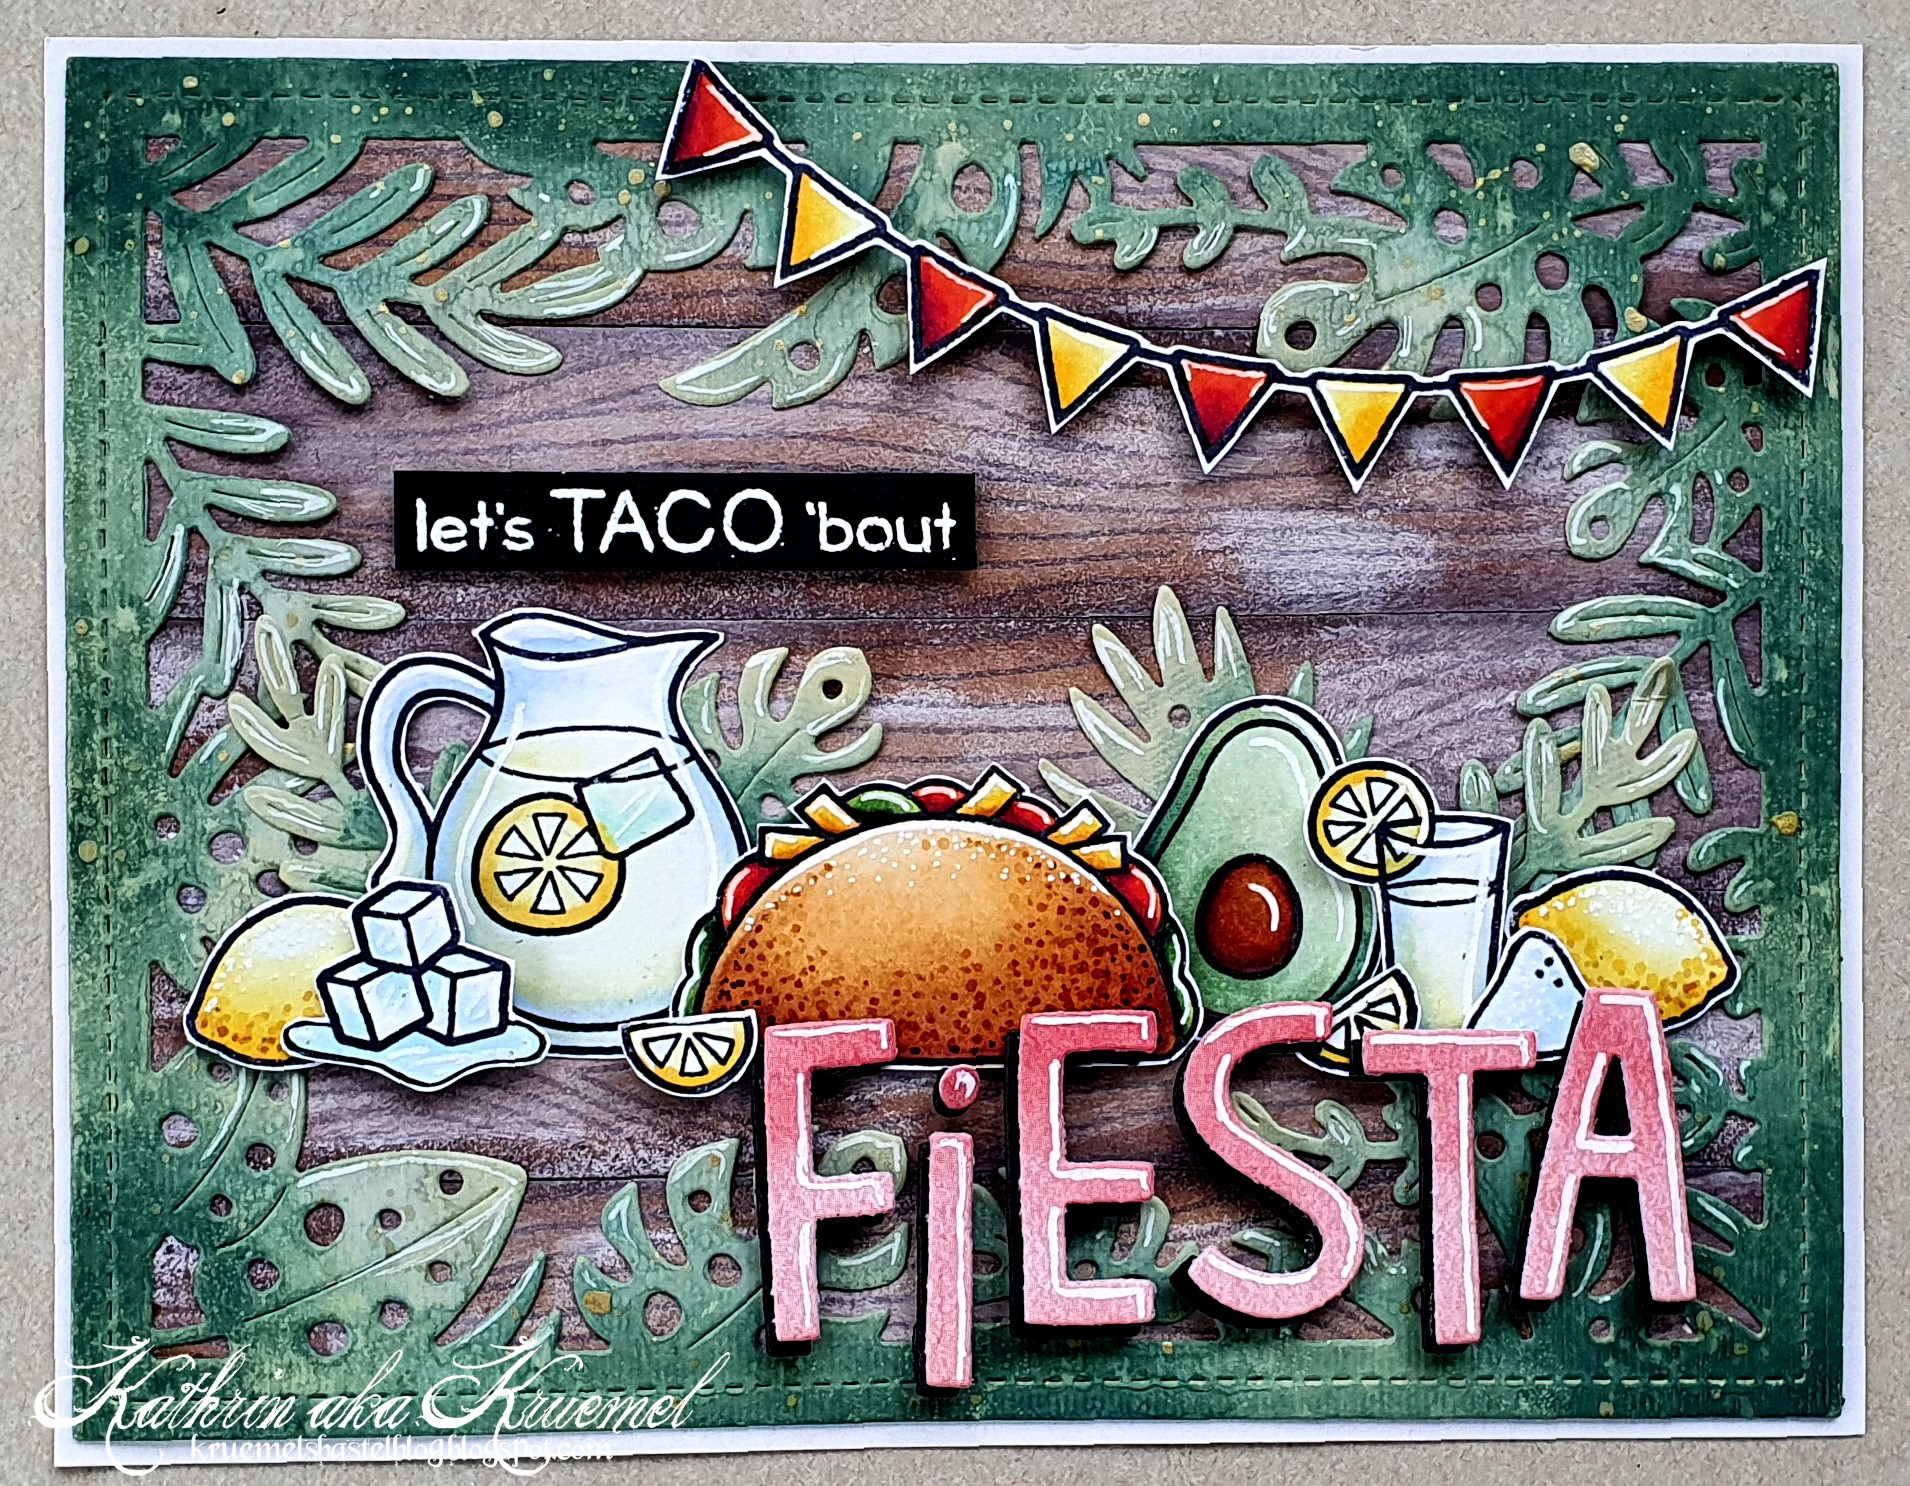
Food, weil das das Thema der Challenge ist "Fun with Food". Oh je, das macht es ja nicht gerade einfach. Es gibt so viele tolle Stempelsets mit Essen, und die kann man alle mit den süßen Tieren kombinieren. Mir war aber mal nach einer Karte ohne Tierchen, und so ist diese Szene entstanden - und "no critters" hat mir die Auswahl auch einfacher gemacht.
Und zu guter Letzt "fiesta", weil das der Spruch auf meiner Karte ist. Wenn auch, passend zum Motiv, mit einem kleinen Wortspiel darin.

Hello everyone!
Well, let's talk about what? I could have used several words to finish the title for this blog post, they all would have fit. Last minute, food and even fiesta.
Last minute, because I really finished this card last minute before the challenge #105 over at LawnFawnatics ended. Those challenges are open for two weeks. During week one you think "I still have lots of time left", then week two starts. And when, like in my cases, is packed with appointments you didn't know about the week before and you hardly have any time to craft, then all of a sudden the deadline is pretty close! But I made it just in time.
Food, because that's the theme of this challenge: "fun with food". Oh well, that made finishing this card not a bit easier. There are so many great stamp sets with food, and most of them can be pared with all their critters so wonderfully. But I felt like making a card without any critters for a change, and that's how this scene came together - and "no critters" made picking the images a lot easier.
And last but not least fiesta, because that's what I used in the text on my card. Even if it is changed into a pun, matching the image on my card.

Für den Hintergrund habe ich packpapierfarbenen Cardstock in der Größe des Auflegers mit den Blättern zugeschnitten und quer in 5 gleiche Streifen geschnitten. Ja, ich habe die Stripe Stanzen von LawnFawn noch nicht und musste mir so behelfen. Die einzelnen Streifen habe ich an den Rändern mit Distress Oxide Vintage Photo gewischt, dann mit Walnut Stain das Holzmuster aus dem Woodgrain Background aufgestempelt und dann alle Streifen nochmal ganz am Rand mit Ground Espresso gewischt. Und weil ich einen shabby oder beachy look für mein Holz haben wollte, ein wenig wie Treibholz, habe ich nach dem Trocknen noch ein ziemlich trockenes weißes Stempelkissen auf die Cardstockstreifen gedrückt.
Auf die wieder zusammengesetzten Streifen habe ich dann den Rahmen mit den Blättern, gemacht mit der Tropical Leaves Backdrop Stanze, aufgeklebt. Den habe ich aus hellgrünem Cardstock gestanzt und mit Distress Oxide Bundled Sage Evergreen Bough und Rustic Wilderness vom Rand her eingefärbt. Und ein paar goldene Metallik-Wasserfarben-Tropfen durften auch nicht fehlen. 

For the background I cut a piece of kraft colored cardstock the size of the Frame with the leaves, then cut it into 5 even strips horizontally with my paper trimmer. Yes, I don't own those new Stripe dies by LawnFawn yet and so had to do it this way. I inked up the edges of each individual strip with Distress Oxide Vintage Photo, then stamped the wood pattern from the Woodgrain Background stamp set onto it with Walnut Stain. Next I used Ground Espresso to darken just the edges even more. I was after a kind of shabby or beachy look for my wood panels, just like thriftwood, and so after the Oxide inks had dried I used a fairly dry white ink pad and pressed it onto the paper strips.
Onto those strips, put together to one panel again, I glued the frame with the leaves, die cut from light green cardstock with the Tropical Leaves Backdrop die. I inked this up with Distress Oxide Bundled Sage, Evergreen Bough and Rustic Wilderness and once again I just had to add a few droplets of golden metallic watercolor.


Und dann kommt das Essen ins Spiel. Ich habe hier den Taco aus dem Stempelset Year Nine, die Zitronen, das Glas und den Krug aus dem Set Make Lemonade, die Avocado aus dem Set Let's Toast, die Eiswürfel aus dem Set So Smooth und das Salzhäufchen, das eigentlich Zucker oder Mehl ist, aus dem Set Baked with Love verwendet. Ich fand, zusammen mit den Zitronenspalten, für die ich einfach nur die halbe Zitronenscheibe am Limonadenglas verwendet habe, könnte dieses Häufchen ein wenig nach Tequila aussehen, was ja prima zu meinem mexikanischen Thema passt. Unter die Eiswürfel habe ich noch eine kleine Wasserpfütze gemalt. 
Alle Motive sind mit Copics coloriert und mit 3D Tape aufeinander geklebt.
Hinter die Motive habe ich noch ein paar einzelne Blätter, die ebenfalls mit der Tropical Leaves Backdrop Stanze gemacht sind, geklebt.
Der Text-Teil "let's TACO 'bout" ist ebenfalls aus dem Set Year Nine und weiß auf schwarzen Cardstock embosst. Zu Ende geschrieben habe ich meinen Text mit einem ausgestanzten Fiesta. Dafür habe ich Finley's ABCs Stanzenset benutzt und die Buchstaben einmal aus schwarzem Cardstdock und einmal aus einem roten Bogen des Watercolor Wishes Rainbow Stanzenset gestanzt. Beide habe ich wieder ein wenig versetzt aufeinander und dann mit weiterem 3D Tape auf die Karte geklebt, so dass die Buchstaben bündig mit den am höchsten gelegenen Motiven ist.
Und dann hatte ich das Gefühl, dass oben rechts in der Ecke noch etwas fehlt. Also habe ich noch das Partybanner aus dem Stempelset Virtual Friends Add-On abgestempelt. Da es so, wie es im Set ist, zu kurz für meine Karte war, habe ich es einfach zweimal aneinander gestempelt und dabei die Enden der Schnüre nicht mit abgestempelt. Ich habe es rot und gelb coloriert und dann ebenfalls mit 3D Tape oben auf die Karte aufgeklebt.

And now we add the food. I used the taco stamp from the Year Nine set, the lemons, glass and pitcher from the Make Lemonade set, the Avocado from the Let's Toast set, the ice cubes from the So Smooth set and the little pile of salt - that's actually sugar or flour - from the Baked with Love set. I think, together with the lemon wedges, I simply used only half of the lemon attached to the glass for those, this little pile could indicate that there's Tequila included in this fiesta. And that goes perfectly with my mexican theme. Under the ice cubes I added a little puddle of water.
All images are colored with Copics and then glued together with foam tape to add some dimension.
Behind the images I added a few more leaves, die cut also with the Tropical Leaves Backdrop die.
The part of the text that says "let's TACO 'bout" is also from the Year Nine stamp set and white heat embossed onto  a strip of black cardstock. I finished my text with a die cut word fiesta. I die cut the letters with the Finley's ABCs die set from black cardstock and a red sheet from the Watercolor Wishes Rainbow paper pad. I glued them on top of each other a bit off and then added them under the scene to my card, again using foam tape so they are the same height as the top images of the scene.
Well, and then I feld like there was something missing in the top right corner of my card. So I stamped the party banner from theVirtual Friends Add-On stamp set onto white paper and colored it in red and yellow. The length of this banner was too short for my card so I stamped it twice and left out the ends of the strings. Also this banner is glued down with foam tape.