Montag, 23. Oktober 2023

Zum 100. Geburtstag

 
Hallo Ihr Lieben!
Heute habe ich eine Explosionbox zu einem 100. Geburtstag zu zeigen. Okay, eigentlich ist es der 50. von Zwillingen, und der Scherz mit dem 100. Geburtstag dürfte inzwischen fast ein wenig ausgelutscht sein. Wenn die Zwillinge aber selbst zu ihrem 100. Geburtstag einladen, dann darf das auch auf der Explosionbox umgesetzt werden, oder?

 Hello everyone!
Today I am sharing an explosion box I made for a 100th birthday. Well, actually it is the 50th birthday of twins, and the joke of the 100th birthday may be a bit old by now. But when those twins invited to their 100th birthday, using this joke themselves, than it is legit to use it on a box, right?

Eine Kollegin hatte mich um die Box gebeten. Sie sollte erst ein Teil,  dann aber teilbar sein, so dass jeder eine Box mit nach Hause nehmen kann. Hm, schlußendlich kam mir dann diese Idee.

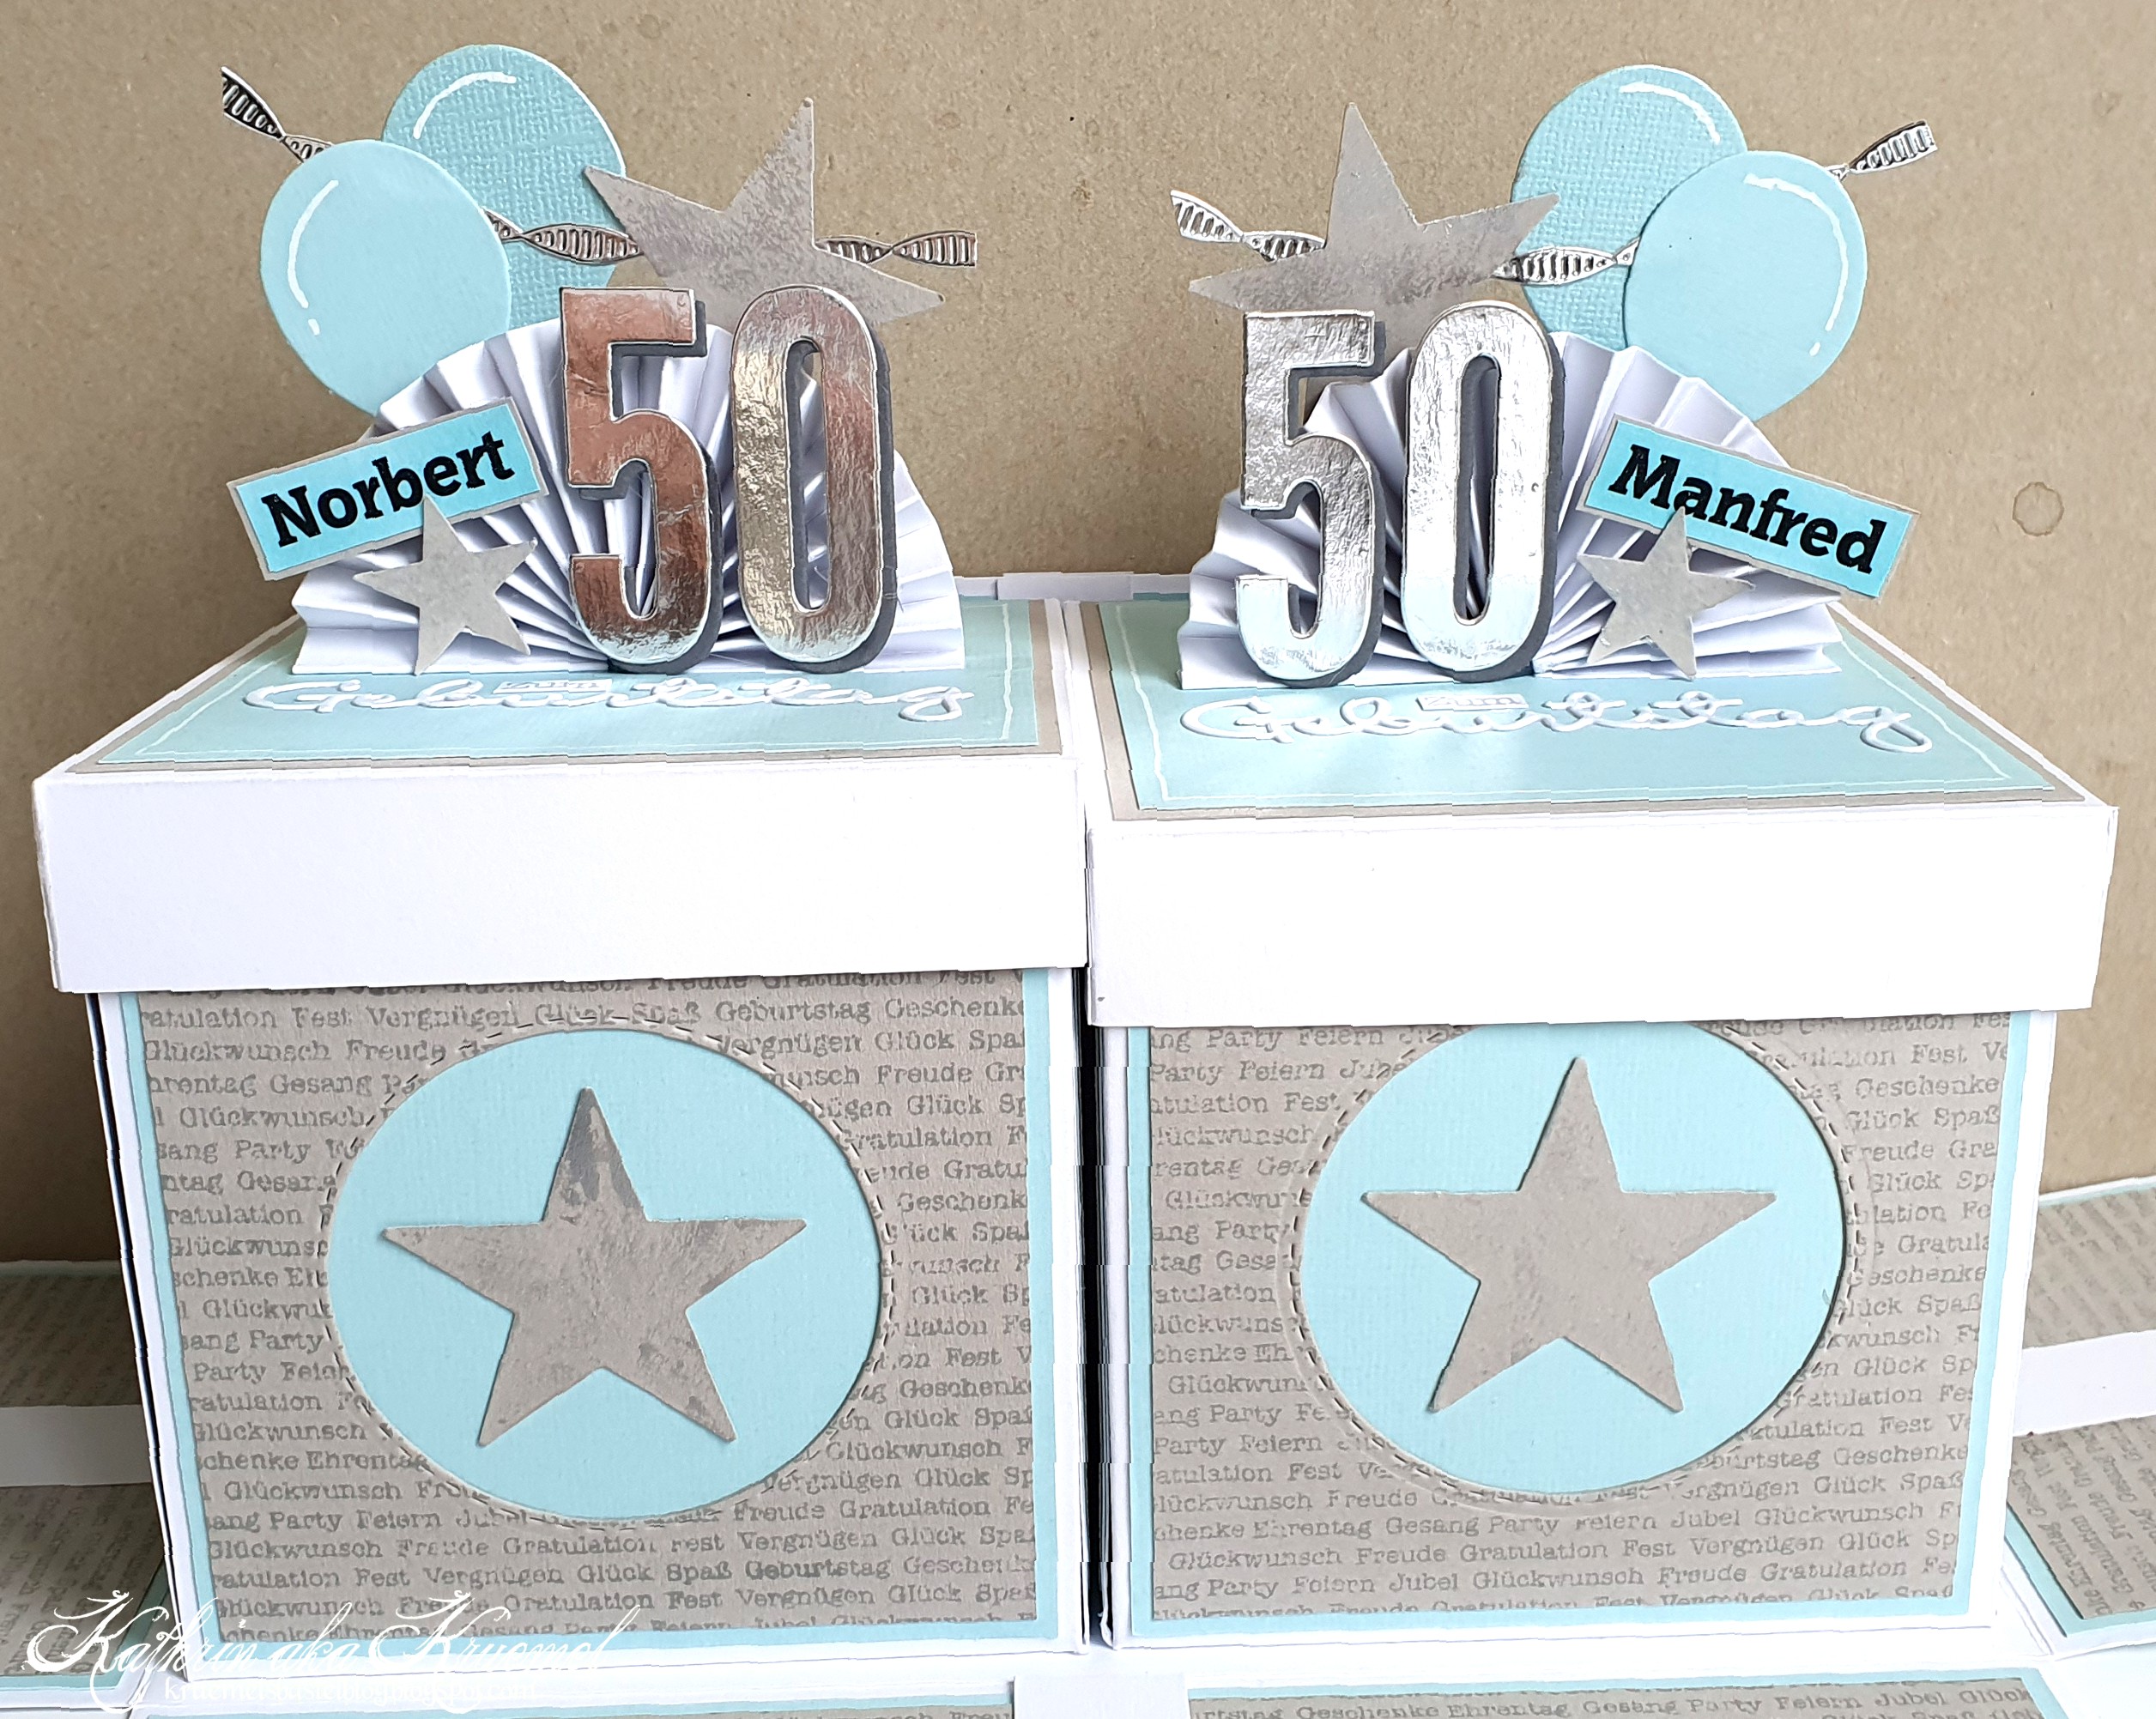
A co-worker asked me to make this box. She wanted it to be one piece first, then being seperated into two pieces so each of the twins could take one box with him. Finally I came up with this idea.


Ich habe eine große Box - 22 x 11 cm - aus weißem Cardstock gewerkelt. Die Seitenteile sind erst mit helltürkisfarbennem, darauf mit hellgrauem Cardstock beklebt. Auf den grauen Cardstock habe ich mit grauer Tinte den Freude und Jubel Hintergrund von Create a Smile aufgestempelt. Da der zu schmal war, um die komplette Breite der Box abzudecken, habe ich ihn jeweils zweimal nebeneinander abgestempelt und die Nahtstelle später mit einem Streifen weißen Cardstocks überklebt. Mit einer weißen Schleife, die ich über den Streifen an den Deckelrand geklebt habe, sieht das dann aus wie ein großes Geschenk.
 
I made a large box - 22 x 11 cm - from white cardstock. The sides are covered with light aqua cardstock and then I put a piece of light grey cardstock on top. Onto the grey cardstock  I had stamped the Freude und Jubel background by Create a Smile with grey ink. It wasn't wide enough to cover the whole cardstock piece. So I stamped a part onto each side and later covered the seam with a strip of white cardstock. With a white bow, that I attached to the side of the lid, it now looks like a big present.


Oben auf der Box befindet sich ein riesige Rosette aus weißem Cardstock. Die habe ich mit einigen Luftballons, Sternen und Partygirlanden dekoriert. Außerdem befindet sich hier eine gestanzte 100 - gemacht aus gelayertem dunkelgrauem Cardstock und silberfarbenem Spiegelcardstock. Auf die Sterne habe ich silbernes Gilding Wax getupft, bewusst fleckig aufgetragen.
Rechts und links der Zahl befinden sich die Namen der Geburtstagskinder. Die habe ich am PC geschrieben, ausgedruckt und das weiße Papier mit Distress Ink Salvaged Patina gewischt, so dass es zum türkisfarbenen Cardstock in der Deko passt.
Um die Kante der aufgeklebten Rosette zu verdecken, habe ich davor einige silber und weiße "Papierschredder" (und wieder weiß ich nicht, wie die heißen!) sowie einen weiteren Stern auf den Boxendeckel geklebt.
 
On top of the lid there's a giant rosette made from white cardstock. I decorated it with a few balloons, stars and garlands. There's also a die cut 100 - made from layered dark grey cardstock and silver mirror cardstock. Onto the stars I dabbed some silver gilding wax.
To the left and right of the number I adhered the names of the birthday boys. I printed those from my PC and then inked the white copy paper with Distress Ink Salvaged Patina to make it match the aqua cardstock.
To cover the edge of the glued on rosette I glued some silver and white "frilled paper strip" (and again I've forgotten the name of those!) and another star onto the lid.


Nimmt man den Deckel der großen Box ab, zeigt sich, dass das eine Explosionbox ist. Und im Inneren befinden sich zwei weitere, kleinere Explosionboxen. 
Im Deckel der großen Box, direkt hinter der Rosette, habe ich einen 2 cm breiten Schlitz eingeschnitten, durch den die Deko auf den kleineren Boxen hindurchschlüpfen kann, sonst hätte man den Deckel ja nicht aufsetzen können. Und das ist auch der Grund, warum die Rosette so groß war - sie sollte die Deko der kleineren Boxen verdecken. 
 
When you take off the lid of the big box you discover, that this is an explosion box. And on the insider there are two smaller explosion boxes.
I cut a 2 cm wide slit into the lid, directly behind the rosette, to be able to put the decorations of the smaller boxes through it and be able to close the lid. And that's also the reason, why this rosette is that gigantic - I wanted it to hide the decorations on the smaller boxes.


Die Deko der kleineren Boxen ist an die der großen Box angelehnt - okay, es war umgekehrt, denn erst hatte ich die kleinen Boxen gewerkelt und sie mit einer Banderole verbunden, auf der die große Rosette angebracht war. Das war aber viel zu wackelig, also habe ich die große äußere Box anschließend noch gewerkelt. 
Hier habe ich auf den Seitenteilen der Box jeweils noch einen Kreis aus dem grauen Cardstock gestanzt und einen großen Stern hineingeklebt.
 
I made the decorations of the smaller boxes match the one on the large box - okay, actually it was the other way around. I had made the smaller boxes first, then used a sleeve, that I had glued the large rosette onto, to hold them together. But that didn't work so well, so I created the large outer box instead.  
Here I die cut a circle from the grey cardstock on the sides of the boxes and put a large die cut star into the cut outs.


Auf den Deckeln der kleinen Boxen befindet sich jeweils eine kleinere Rosette, diesmal mit einer aufgeklebten 50. Die Zahl und die Girlanden im Hintergrund sind aus silbernem Spiegelcardstock gestanzt. Und natürlich befindet sich jetzt auf jeder Box nur ein Name.
 
On the lids of each of the smaller boxes there's a smaller rosette, this time with a 50 glued onto it. The numbers and the garlands in the background are cut from silver mirror cardstock. And of course there's only one name on each of the boxes.


Vor die Rosetten auf den Deckeln konnte ich nur flache Deko anbringen, da hier ja der Deckel der großen Box aufliegt. Also habe ich ein gestempeltes "zum" und ein gestanztes "Geburtstag" aufgeklebt.
 
I was able to only attach any flat decoration in front of the rosettes, because that's where the lid of the outer box is laying on. So I added a stamped "for your" and a die cut "birthday".


So sehen die Boxen geöffnet aus. Ich habe nur eine davon fotografiert, da beide identisch, nur spiegelverkehrt sind.
 
This is what the smaller boxes look on the inside. I only took pictures of one because they are both made identically, I just mirrored them.


Verschenkt wird jeweils ein Gutschein für ein Restaurant. Ich kannte das nicht, also habe ich es gegoogelt und eine Ecke des Gastraumes anhand eines der Bilder nachgebaut. Es handelt sich um ein japanisches Restaurant. An jedem Tisch befindet sich eine große beheizbare Platte (und ja, die zieht sich auf den Bildern genauso bis fast zum Boden), auf denen ein Koch direkt am Tisch die Speisen zubereitet. 
Oben quer über die Box habe ich den Namen des Restaurants, wieder am PC geschrieben, auf einem Banner an einer Schnur aufgehängt. Ich habe es mit Candied Apple gewischt und passend dazu auch die Servietten auf den Tellern aus rotem Cardstock gemacht. So war es tatsächlich auch auf dem Bild im Netz zu sehen. 
 
The gifts for the boys is a voucher for a  restaurant. I didn't know the restaurant, so I googled it and re-created a corner of it using one of the pictures online as a guide.  It's a japanese restaurant. On each table there's a large heatable plate (and yes, on the pictures it really goes down that much on the side of the table) where the chef is cooking your meal right on your table.
At the top of the box I hung up a bannner with the name of the restaurant, again created on my PC and printed out. I inked that with Candied Apple and to pick up the red again I also made the napkins on the table red. And actually that's also how the tables were decorated on the pictures online.


An den Wänden befindet sich eine schwarze Vertäfelung sowie Dekopanele. Die habe ich mit einer Fensterstanze aus schwarzem Cardstock nachgewerkelt, mit Vellum hinterklebt und dann mit 3D Tape auf den Wänden befestigt. Aus einem Teil des selben Fensters habe ich dann auch die Stühle gemacht. Den dunkelgrauen Cardstock für den Boden habe ich mit einem Mauer-Embossingfolder geprägt.
 
On the sides there's a black paneling and some wooden decorations. I re-created these from black cardstock using a window die, put some vellum behind them and then adhered them with foam tape. And I used a part of the same window die cut to create the chairs. 
The dark grey cardstock I used as the floor I dry embossed with a brick wall embossing folder.


In die beiden aufklappenden Teile der Box habe ich jeweils eine dreieckige Tasche eingearbeitet. Auf einer befindet sich ein Glückwunschtext, gemacht mit einem Stempeln von Kulricke, sowie einige Sterne als Deko. In der Tasche steckt eine kleine Karte für persönliche Worte.
 
I included a little pocket on each of the sides that flap open. On one I attached a stamped birthday greeting and a few stars. Inside the pocket I put a little card with room for some personal words.


Auf die andere Tasche habe ich ein gestanztes Gutschein geklebt und daneben ein für dich aufgestempelt. 
 
Onto the other pocket I glued a die cut word "gift card" and stamped a "for you" next to it.

Samstag, 21. Oktober 2023

Hello, Pumpkin!

 
Hallo Ihr Lieben!
Ich hoffe, Ihr mögt noch Halloween-Karten sehen. Falls nicht - der Oktober ist bald geschafft... ;) Und heute gibt es dafür zur Abwechslung mal eine andere Farbkombi.

Hello everyone!
I hope you're not tired  of all the Halloween cards I post. If you are - october will be over soon.... ;) And on today's card I went with a different color for a change.

Mein Hotfoil-Equipment steht nicht dauerhaft auf meinem Schreibtisch, wenn ich also folieren will, muss ich alles aus dem Schrank nehmen, anstöpseln etc. Da soll sich das dann auch lohnen! Und so habe ich beim letzten Mal gleich mehrere Hintergründe foliert. Auch hier habe ich eine No-Name Plate benutzt, ich hatte mir die alle bereits letztes Jahr bestellt, sie kamen aber erst nach Halloween bei mir an. Also lagen sie bis jetzt im Schrank. Diesmal habe ich lauter (Kürbis)Fratzen in Gold auf ein Stück weißen Cardstock foliert. 
Gerade für Halloween mag ich die satteren Töne der Distress Inks lieber als die Oxides. Außerdem war ich mir nicht sicher, ob die Oxides nicht einen weißen Film auf der Folierung hinterlassen. Also habe ich zum Wischen des Cardstocks wieder die Inks verwendet - hier Wild Honey, Crackling Campfire, Fired Brick und Black Soot. Und diesmal habe ich statt der Schwämmchen Blending Brushes verwendet. Damit gingen die Farbübergänge so viel einfacher auf dem Hammermill Cardstock. Anschließend habe ich noch weiße Acrylfarbe aufgespritzt.

I don't have my hotfoil stuff on my desk all the time, so when I want to do some hotfoiling I have to take everything out of a drawer, plug it in etc. So when I do some foiling, I like to do a few at a time wo all the prep work is worth the hassle. So last time I did more than just the one background with the ghosts. Again I used a no-name plate here, that I all ordered last october. But they didn't arrive in time so they have all been waiting in said drawer for a new Halloween season. This time I hotfoiled a bunch of pumpkin faces with gold foil onto some white cardstock.
Especially for Halloween I prefer the rich colors of the Distress Inks to the Oxides. I also wasn't sure if the Oxides leave a white coating on my foiling. So I went with the Inks again - here Wild Honey, Crackling Campfire, Fired Brick and Black soot. And this time I used Blending Brushes instead of the little foams - getting nice color blending was so much easier on the Hammermill cardstock! Then I flicked some white acrylic paint onto the background.


Auch die kleinen Mäuse aus dem Halloween Mice Set von Impronte d'Autore hatte ich bis jetzt - glaube ich zumindest - noch nicht eingeweiht. Dafür durften hier gleich zwei davon auf die Karte, zusammen mit einem großen Kürbis aus dem Set Enchanted Forest. Auf dem steht die Vampir-Maus und scheint sich elegant vor der Maus im Kürbis zu verbeugen. Ich glaube ja, die beiden sind verliebt!
Coloriert habe ich mit Copics, dann die Motive ausgeschnitten und als Schatten unter jedes einen der Oval Shadows von MFT, gestanzt aus schwarzem Cardstock, gesetzt. 
Da die Kürbis-Motive auf dem Hintergrund wohl ziemlich untergegangen wären, habe ich einige Farne als Hintergrund gewählt. Die sind aus dem Mushrooms and Fern Set von HeroArts und aus schwarzem Cardstock gestanzt. Die Spitzen habe ich mit goldenem Gilding Wax betupft. 
Und während des Hervorholens meines Klebebands fiel mir das Cheesecloth in die Hand. Wenn nicht zu Halloween, wann dann bitte? Also habe ich auch davon noch ein Stück hinter die Motive und Farne gesetzt.
Außerdem habe ich hier einen meiner Texte aufgeklebt. Er ist aus dem Set Itty Bitty Boos von MFT und ich fand, er passt einfach perfekt zur Vampir-Maus. Deswegen musste er auch in deren Nähe aufgeklebt werden. Ich habe den Text weiß auf schwarzen Cardstock embosst.

Also the little mice from the Halloween Mice set by Impronte d'Autore hadn't seen any ink yet (at least I think so). So I used both of them on this card, together with a large pumpkin from the Enchanted Forest set. The vampire mouse is standing on this pumpkin, bowing to the little mouse that uses a jack o lantern as her dress. I really think, those two are in love!
I colored them with Copics, then cut the images out and put a shadow, die cut with the Oval Shadows by MFT from black cardstock, under each image.
Since the pumpkin images would have melted into the background pretty much I added a few ferns in the background. They are from the Mushrooms and Fern set by HeroArts and die cut from black cardstock. Onto the tips of the leaves I dabbed some gold gilding wax.
And while I brought out my foam tape I came across my cheesecloth. Well, when should I used it if not for Halloween? So I put a piece of that behind the images as ferns.
I also added one of my texts here. It's from the Itty Bitty Boos set by MFT and I think, it goes perfectly with the vampire mouse. That's why I had to place it close to him. I white heat embossed the text onto black cardstock.


Zwei weitere Texte aus dem selben Set von MFT habe ich oben auf die Karte geklebt. Eigentlich wollte ich das "hello, pumpkin" ja so platzieren, dass es so aussieht, als würde die Vampir-Maus es sagen. Aber da sah die Platzierung einfach komisch aus. Also habe ich beide Texte oben links auf den Hintergrund geklebt.

I placed two more texts from the same stamp set by MFT onto the top of my card. Originally I had planned to place the "hello, pumpkin" so, that it looks as if the vampire mouse is saying it. But that just didn't work out. So instead I adhered both texts to the top left of my background.


Und wie immer, sieht man den Glanz der Folierung und des Gilding Waxes erst, wenn man die Karte etwas schräg ins Licht hält. Und hier kann man erkennen, dass ich die Maus im Kürbis sowie die Tete jeweils mit 3D Tape aufgeklebt habe.
Passend zu den verliebten Mäusen habe ich noch drei kleine weiße Herzen auf die Karte geklebt. Dann habe ich den Cardstock schwarz gemattet und alles auf einen weißen Kartenrohling geklebt. 

As always you can only see the shine of the foiling and the gilding wax when you tilt the card a bit in the light. And here you can also see, that I used foam tape behind the mouse in the pumpkin and the texts.
Going great with the mice in love I added three little white hearts. Than I matted the background black and adhered everything to a white note card.

Freitag, 20. Oktober 2023

Ghostly Greetings


 Hallo Ihr Lieben!
Heute sind auf meinem Blog ganz viele Geister zu Besuch. Einige sind nicht echt, wobei man sich bei einem da nicht so ganz sicher sein kann....

Hello everyone!
Today I got a visit from a whole bunch of ghosts here on my blog. A few of them aren't real, and with one of them you can't be sure...

Hier habe ich eine weitere No-Name Hotfoil Plate mit vielen Geistern benutzt. Ich habe sie mit silber-holografischer Folie auf weißen Cardstock foliert und dann den Cardstock mit Distress Inks gewischt. Hier habe ich mal wieder vor Augen geführt bekommen, wie unterschiedlich verschiedene Cardstocks auf die Farben reagieren. Hotfoiling soll ja am besten mit super glattem Papier klappen, also bin ich der Empfehlung von Jennifer McGuire gefolgt und habe mir eine Packung des Hammermill Premium Color Copy Cover Cardstocks gekauft - die Packung mit dem Chamäleon. Ich hatte Glück, es zu einem noch vertretbaren Preis bei A....zon zu finden und ich muss sagen, zum Folieren ist es einfach einmalig und bis jetzt ist wirklich jede Folierung damit perfekt geworden. Aber gewischt hatte ich es noch nie. Ich finde, das Papier saugt wahnsinnig, zumindest mit den "normalen" Distress Farben, mit Oxides habe ich es noch nicht probiert. Ich habe hier Salvaged Patina, Peacock Feathers, Uncharted Mariner und Black Soot benutzt und obwohl die Farben doch recht ähnlich sind, hat es mich mehr Mühe als sonst gekostet, eine saubere Verblendung hinzubekommen. Auch das dann aufgespritzte Wasser hat nicht so intensive Flecken kreiert, aber das macht nichts. 

I used another no-name hotfoil plate with lots of ghosts here. I used some silver holographic foil and then inked the white cardstock with Distress Ink. And once again I was surprised how differently different papers react to ink. I learned that hotfoiling works best on super smooth cardstock, so I followed Jennifer McGuires advice and ordered a pack of the Hammermill Premium Color Copy Cover - the one with the chameleon. I was lucky to find a pack on A....zon for a reasonable price with shipping etc to Germany. And I have to admit, that each and every single foiling I did on it so far turned out perfectly! But I had never inked it yet. I think, this paper really soaks in a lot of the ink, at least with the regular Distress Inks, I haven't tried Oxides yet. I used Salvaged Patina, Peacock Feathers, Uncharted Mariner and Black Soot. And even with the colors being very close to each other, it took me more effort than usual to get a nice blend. Also the water I flicked onto the cardstock after I was done with the inking didn't create as light speckles, but I don't mind. 


Anschließend habe ich einen kleinen Blending Brush genommen und damit nur auf die Geister weiße Stempelfarbe aufgetragen - nur so viel, dass sie leicht milchig und durchscheinend aussehen, wie Geister das eben tun, und dadurch auch ein wenig besser erkennbar sind.
Aus grauem Cardstock habe ich dann Birkenstämme gestanzt. Deren eine Seite habe ich mit Black Soot schattiert, auf die andere etwas weiße Stempelfarbe aufgetupft. Auf der hellen Seite habe ich dann auch noch Details mit einem weißen Gelstift aufgemalt. Den habe ich auch verwendet, um nach dem Aufkleben der Bäume auf den Hintergrund einige Sterne zwischen den Geistern zu verteilen. Aufspritzen konnte ich sie nicht, da sie ja dann auch auf den Geistern gelandet wären. Aber ich finde es lustig, wie einige der Geister hinter den Bäumen hervorschauen. 
Oben links auf der Karte habe ich den Text meiner Karte untergebracht. Sie sind aus dem Set Itty Bitty Boo von MFT und weiß auf schwarzen Cardstock embosst.

Then I used a fine blending brush to put some white pigment ink only onto the ghosts - just enough to make them a bit milky and look transparent, just as ghosts do, and also are a bit better visible. 
From grey cardstock I die cut some birch trees. I inked one side with Black Soot, onto the edge of the other side I dabbed some more of the white ink. On the light side I also added some details with a white gel pen. I used this to also paint a few stars between the ghosts after I had glued down the trees. I wasn't able to spatter them because the ink would have landed on top of the ghosts as well. And I really love how the ghosts seem to peek from behind the trees.
To the top left of the card I also added my texts. They are from the Itty Bitty Boo by MFT and white heat embossed onto black cardstock.


Star der Karte sind natürlich die drei als Geister verkleideten Kinder im Vordergrund. Aber sind es wirklich drei....? Ich liebe diesen Stempel - er ist noch von Whiff of Joy, also bestimmt 10 Jahre alt. Ich habe die Motive mit Copics coloriert und ausgeschnitten. Und hier zeigt sich, warum ich gerne eine nicht mehr ganz so gut funktionierenden weißen Gelstift aufhebe. Ich habe damit die schwarzen Stempellinien um den weißen Geisterbereich nachgemalt. Dabei wollte ich sie nicht komplett überdecken, nur abschwächen, was die Geister noch echter wirken lässt. Trotzdem habe ich am Rest der Motive die gut erkennbaren schwarzen Stempellinien. 
Unter die Motive habe ich drei kleine Ovale, gemacht mit den Oval Shadows von MFT gesetzt. 
Aus grauem Cardstock habe ich mit einer leicht welligen Stanze - ich habe hier einfach den Überblick verloren, von wem welche dieser Stanzen ist, ich glaube, diese hier ist von MFT - den Boden gestanzt und von unten her ein wenig mit Black Soot gewischt. Auf die obere Kante habe ich wieder weiße Stempelfarbe aufgetupft. Dann habe ich grün-graue Metallic Watercolor aufgespritzt, da der Boden sonst zu fad ausgesehen hätte.
Hinter den Boden habe ich noch Büsche gesetzt. Die sind mit den Mountain High Stanzen von MFT aus schwarzem Cardstock gestanzt. Ich habe sie ein wenit mit Distress Oxide Salvaged Patina betupft.

Star of this card are of course the three kids that dressed as ghosts. But are there really three of them...? I just love this image - it's one by Whiff of Joy, a brand that doesn't exist anymore for several years now, so this stamp is at least 10 years old. I colored it with Copics, then cut the ghosts out. And here I also show you why I like to keep a white gel pen, that isn't working too well anymore. I used it on top of the stamped lines on the white ghost parts. I didn't want to completly cover them, just tone them down, what makes the ghosts look even more realistic. And I still have the crisp black lines on the other parts of the image.
Under the image I put three little oval shadows, made using the Oval Shadows by MFT.
I used a slightly wavy border die - I simply have lost track which of all of these are which brand, I think, this one is MFT as well - to cut the ground from grey cardstock and then shaded it with Black Soot. Along the top edge I dabbed more of the white ink. Then I flicked some green-grey metallic watercolor onto the cardstock, since the ground looked too plain without those spatters.
Behind the ground I planted some bushes. Those I die cut from black cardstock with the Mountain High dies by MFT and dabbed some Distress Oxide Salvaged Patina onto them.


Bis auf die Motive und die Texte, die ich mit 3D Tape aufgeklebt habe, habe ich alle Teile direkt mit Flüssigkleber aufeinander geklebt. Dann habe ich den Cardstock schwarz gemattet und auf einen weißen Kartenrohling geklebt.

Except for the images and the text, that I adhered with foam tape, I glued all elements onto each other with liquid glue. Then I matted the cardstock black and attached everything to a white note card.

Donnerstag, 19. Oktober 2023

Noch eine Halloween-Karte


 Hallo Ihr Lieben!
Letzte Woche habe ich auf dem Stampcorner-Blog ja bereits eine Halloween-Box gezeigt. Aber die Fledermaus und die Katze aus dem Stempelset Süßes oder Saures haben mich so vorwurfsvoll angeschaut, dass ich doch noch eine Halloweenkarte damit gemacht habe. Und der kleine Kürbis ist einfach noch mal mit aufs Werk gehüpft.

Hello everyone!
Last week I already shared a Halloween gift box over on the Stampcorner Blog. But the bat and the cat from the Süßes oder Saures stamp set looked at me with such accusing eyes that I decided to make a Halloween card using those. And the little pumpkin just jumped onto the project as well.

Ich wollte eine Art altes Industrie-Fenster gestalten, hatte aber keine entsprechende Stanze. Also habe ich mir anders beholfen. Aus schwarzem Cardstock habe ich eine der Elegant Stitched Stax sowie den Stitched Tall Rainbow, beide von MFT, gestanzt. Dann habe ich den zweitgrößten Bogen des Regenbogens auf das gestanzte Fenster gelegt, den Außenrand mit einem Bleistift nachgefahren und diese Linie verwendet, um den inneren Teil meines Fensters herauszuschneiden. Natürlich habe ich die Spitze ebenfalls ausgeschnitten und unten einen Querbalken in der selben Dicke stehen lassen. Dort hinein habe ich dann den Regenbogen - in der Länge etwas gekürzt - gesetzt und aus den geraden Stücken der übrigen Regenbogen-Teile die Sprossen im Fenster kreiert. Schon war mein Fenster fertig. Aus einem Stück dunkelgrauem Cardstock habe ich dann erneut die Elegant Stitched Stax Stanze ausgestanzt. Und damit der Cardstock nicht so fad aussieht, habe ich mit Distress Oxide Lost Shadow noch den Mauer 2 Hintergrund daraufgestempelt. Außerdem habe ich etwas Hickory Smoke, verdünnt mit ein wenig Wasser, aufgespritzt.
Hinter das Fenster habe ich dann ein Stück eines der Papiere aus dem neuen 12" Paper Pad 1 geklebt, auf das ich einige Sterne mit hellgrüner Metallic-Watercolor aufgespritzt habe.

I wanted some kind of old industrial window, but didn't have a die like that. So I did some thinking outside the box and came up with my own design. From black cardstock I die cut one of the Elegant Stitched Stax and the Stitched Tall Rainbow, both by MFT. Then I laid the second largest piece of the rainbow onto my window, traced the outline with a pencil and used that line as a guideline for where to cut out the inner piece of my window, of course also cutting next to the pointed top and leaving a strip at the bottom. Into this frame I put the rainbow piece, making it a bit shorter at the bottom, and then used the straight pieces of the left over rainbow pieces to build the lattice in my window. 
From a piece of dark grey cardstock I die cut the Elegant Stitched Stax die again. And since the cardstock looked a bit too plain to me I stamped the Mauer 2 background onto it with Distress Oxide Lost Shadow. Then I flicked some Hickory Smoke, thinned with a bit of water, onto the cardstock.
Behind the window I put a piece of one of the sheets from the new 12" paper pad, that I flicked some light green metallic watercolor onto.


Im oberen Bereich schaut die kleine Fledermaus, die gemütlich von ihrem Ast hängt, zum Fenster herein. Sie ist, wie alle Motive auf der Karte, mit Copics coloriert. Für die Highlights habe ich einen weißen Gelstift benutzt.
Für den Mond habe ich einfach einen 1,5" großen Kreis aus weißem Cardstock ausgestanzt und mit Copics in einem giftigen Grün-Gelb coloriert. 

In the upper area the little bat, that's dangling from a branch, is looking through the window. Like all the images on this card I colored her with Copics and added highlights with a white gel pen.
For the moon I simply die cut a 1 1/2" circle from white paper and colored it with Copics in a bright yellow-ish green.


Unten vor dem Fenster sitzen Katze und Kürbis - hier mal in türkis coloriert. Dahinter steht ein Hexenkessel. Den habe ich aus dunkelgrauem Cardstock gestanzt, mit Black Soot etwas gewischt und dann habe ich silberfarbenes Gilding Wax mit dem Finger aufgewischt. Oben aus dem Kessel blubbert grünes Gebräu - dafür habe ich einige Pailetten hinter und auf den Kessel geklebt.
Für den Text habe ich das Boo! aus dem Süßes oder Saures Stempelset mit Versafine Clair Verdant auf weißen Cardstock gestempelt und klar darüber embosst. Das habe ich einmal wiederholt, damit die Embossingschicht auch schön geschlossen ist. Dann habe ich den weißen Cardstock mit Black Soot gewischt und das Wort ausgeschnitten. Dahinter habe ich ein weiteres Regenbogen-Reststück als Stempen geklebt und so ein Schild gestaltet. Das habe ich schräg hinter den Kürbis gesetzt.

At the bottom of the card the cat and pumpkin are sitting in front of the window - for a change I went with turquoise to color these in. Behind those there's a cauldron standing. I die cut that from dark grey cardstock, shaded it with Black Soot and then added some silver Gilding Wax using my finger. At the top some green potion is bubbling out of the cauldron - I simply put some green sequins behind and on top of the cauldron.
For the text I stamped the Boo! from the Süßes oder Saures stamp set onto white cardstock with Versafine Clair Verdant and put a layer of clear embossing powder on top. Then I repeated this step to make sure the embossing is sealing the green ink perfectly. I inked the white cardstock with Black Soot and cut the word out. From another left over rainbow piece I cut a stem to create a sign, that I put a bit slanted behind the pumpkin.


Bis auf die Katze und den Kürbis, die ich mit dünnem 3D Tape befestigt habe, sind hier alle Teile der Karte direkt aufeinander geklebt. Dann habe ich alles schwarz gemattet und auf einen weißen Kartenrohling geklebt.

Except for the cat and pumpkin, that I attached with some thin foam tape, I glued all the elements of this card directly onto each other. Then I matted the grey cardstock black and adhered it to a white note card.

Mittwoch, 18. Oktober 2023

LawnFawnatics Challenge #159

 
Hallo Ihr Lieben!
Heute  habe ich mal keine Halloween Karte für Euch. Stattdessen zeige ich Euch die Karte, die ich für die LawnFawnatics Challenge #159 gemacht habe. Das Thema ist monochromatic und ich habe mich für warme Brauntöne, passend zum Herbst, entschieden.

Hello eveyone!
Today I don't have a Halloween card to share with you. Instead I am sharing with you the card I made for the LawnFawnatics challenge #159. The theme is "monochromatic" and I decided to go with warm browns, perfect for fall.

Die Karte besteht mal wieder aus mehreren Lagen.
Ganz hinten habe ich ein Stück rotbraunen Cardstock mit dem Stitched Woodgrain Backdrop ausgestanzt und die Ränder mit Distress Ink Ground Espresso etwas abgedunkelt. 
Darauf befindet sich ein Blätterrahmen, den ich mit dem Fall Leaves Backdrop aus weißem Cardstock gestanzt habe. Dann habe ich den Cardstock mit Distress Oxide Tea Dye und Vintage Photo gewischt.
Auf das Holzmuster habe ich dann orange-braune, auf den Blätterrahmen champagnerfarbene Metallic Watercolor aufgespritzt.

Again I made a card with different layers.
In the very back I put a piece of reddish brown cardstock, that I had die cut with the Stitched Woodgrain Backdrop die, then darkened the edges with some Distress Ink Ground Espresso.
On top I adhered a leafy frame, that I had die cut from white cardstock using the Fall Leaves Backdrop die. I inked the cardstock with Distress Oxide Tea Dye and Vintage Photo.
Onto the woodgrain pattern I flicked some orange-brown, onto the leaves some champagne metallic watercolor.


Auch ein kleines Motiv hat, neben dem großen Text, Platz auf der Karte gefunden. Dafür habe ich das Auto aus dem Car Critters Set in einen mit Kürbissen beladenen Truck verwandelt, das hat nur ein wenig Masking verlangt. 
Zuerst habe ich die obere Hälfte des Anhängers aus dem Hay There Hayrides Set abgestempelt und maskiert, dahinter kamen dann die Kürbisse aus dem selben Set. Auch die habe ich mit Masking Tape abgedeckt. Dann habe ich das Auto darübergestempelt - die größeren runden Lichter habe ich nicht mit eingefärbt, da die zu hoch gestanden hätten. Nach dem Entfernen der Masken habe ich dann noch mit einem schwarzen Fineliner eine Linie knapp oberhalb der Kürbisse gezogen, so sieht es mehr wie eine Ladefläche bzw. ein von hinten gesehener Truck aus.
Ins Nummernschild habe ich ein Yippee! gestempelt, alles mit Copics coloriert und auf die kleinen Rücklichter etwas Glossy Accents aufgetragen. Dann habe ich alles ausgeschnitten und später über dem Text auf die Karte geklebt. Dabei habe ich die Buchstaben des Wortes Happy als "Boden" benutzt und den Truck absichtlich etwas schief aufgeklebt. Ich finde, nun wirkt es so, als würde er über einen holprigen Feldweg fahren.
Neben dem Truck habe ich auch noch ein kleines Schild, ebenfalls aus dem Hay There Hayrides Stempelset, aufgeklebt, das den Weg zum Kürbisfeld und dem Maislabyrinth weist. 

Beside the large text there was also space for a small image. I changed the car from the Car Critters stamp set to make it look like a truck loaded with pumpking. It only took a bit of masking.
First I stamped only the upper half of the trailer from the Hay There Hayrides set and covered it with masking tape. Behind it I stamped the pumpkins from the same set and put masking tape on those as well. On top I stamped the car - I didn't stamp the larger lights since they were too high up. After removing the masks I used a black fineliner to draw a line just above the pumpkins. This way it looks more like the bed of a truck or a truck seen from the back.
Onto the number plate I stamped a Yippee!, colored everything with Copics and put some Glossy Accents onto the small back lights. I cut the car out and later adhered it on top of my text. I used the letters of the word happy as the "ground" and adhered the car a bit at an angle. I think, it now looks like it's driving over a bumpy road along a field.
Next to the truck I attached a little sign, also from the Hay There Hayrides set, that's leading the way to the pumpkin patch and the corn maze.


Für den Text, der den meisten Platz auf der Karte einnimmt, habe ich die Giant Happy Fall Stanze verwendet und sie mehrfach ausgestanzt. Ganz oben befindet sich eine aus weißem Cardstock gestanzte Lage, die ich mit Distress Oxide Dried Marygold, Rusty Hinge, Crackling Campfire, Fired Brick und, nur über dem Rot um es etwas abzuschwächen, ein wenig Vintage Photo. Die Highlights sind, wie auch auf den colorierten Motiven, mit einem weißen Gelstift gemacht. 
Unter der gewischten Lage befindet sich ein Text, den ich aus orange-braunem Glittercardstock gestanzt habe. Diese Lage habe ich ein wenig versetzt aufgeklebt, so dass ein glitzernder Schatten entsteht. Hinterlegt habe ich diese Lage dann noch mit vier Lagen aus schwarzem Cardstock, um den Text auf der Karte hervorzuheben.
Den Text habe ich mit einigen Blättern und Eicheln coloriert. Die sind mit den kleineren Stanzen aus dem Fall Leaves Backdrop Set aus weißem Cardstock gestanzt und mit Copics coloriert.

I used the Giant Happy Fall die for the text, that takes up the most space on this card, die cutting it several times. The top layer is cut from white cardstock, then I inked it with Distress Oxide Dried Marygold, Rusty Hinge, Crackling Campfire, Fired Brick and, just on top of the red to tone it down some, a bit of  Vintage Photo. The highlights, also on the images, are made with a white gel pen.
Under the inked layer I put a text die cut from orange-brown glitter cardstock. I stacked both texts a bit off to have a glittery shadow behind the inked words. Then I put four more die cuts, cut from black cardstock, behind the glitter one to bring up the text a bit on my card.
I decorated the text with some leaves and acorns. I used some of the smaller dies from the Fall Leaves Backdrop set to cut them from white cardstock and again colored them with Copics.


Damit der Höhenunterschied zwischen Motive und Text nicht zu groß wird, habe ich hinter das Auto und das Schild dünnes 3D Tape gesetzt. 
Als Deko habe ich noch einige rosè-goldene Pailetten auf der Karte verteilt, dann habe ich alles auf einen weißen Kartenrohling geklebt.

To not have too much of a height difference between the images and the text I put some thin foam tape behind the car and the sign.
I decorated the card with some rose gold sequins, then attached everything to a white note card.

Montag, 16. Oktober 2023

Mal wieder was zum Gruseln

 
Hallo Ihr Lieben!
Ich hatte Euch ja schon gewarnt, dass es noch mehr Halloweenkarten zu sehen geben wird. Und heute ist es schon so weit. Diese Karte ist mal richtig gruselig ausgefallen....

Hello everyone!
I already warned you that there will be more Halloween cards. Today I'm sharing already the next one, and this one turned out really scary...

Für den Hintergrund habe ich eine Moon Stencil auf ein Stück weißen Cardstock gelegt und den Himmel drumherum mit Distress Oxide Milled Lavender, Seedless Preserves, Villainous Potion und Black Soot gewischt. Dann wollte ich die Farbe so cool in den Mond hineinziehen. Das erreicht man, wenn man einfach auf den Mond ein wenig Wasser sprüht. Allerdings wusste ich bereits zuvor, dass ich auch Hotfoiling machen wollte und habe daher eher glatten Cardstock verwendet. Die erwähnte Technik funktioniert aber am besten mit Watercolor Cardstock. Und weil zudem mein Sprayer kaputt ist - er verursacht nur noch dicke Tropfen - hat das mit dem Hinverlaufen der Farbe nicht so geklappt. Stattdessen habe ich einen oxidierten Effekt rund um den Mond und ein paar hell-lila Flecken auf dem Mond. Mir gefällt er trotzdem. Und damit der Bereich rund um den Mond nicht so komisch wirkt, habe ich auf den Rest des Hintergrunds ebenfalls eher große Wassertropfen aufgespritzt. 

For the background I put a moon stencil onto a piece of white cardstock and inked the sky around it with Distress Oxide Milled Lavender, Seedless Preserves, Villainous Potion and Black Soot. Then I wanted to let the sky color kind of soak into the moon. You can get this effect by simply spritzing some water onto the moon. But I knew ahead that I also wanted to do some hotfoiling and so I've chosen some smooth cardstock. The technique mentioned works best with watercolor cardstock. And since also my sprayer is broken - it only produces really big blobs of water anymore - pulling the color into the moon didn't work so well. Instead I have an oxidezed halo around the moon and a few light purple spot on it. I still like it. And to make sure the halo doesn't look weird I put some more large water droplets onto the rest of the background.


Auf den Mond habe ich dann, wieder mit Milled Lavender und der zweiten Stencil mit den Mondkratern, die Details aufgewischt. 
Mit goldener Glitterfolie und einer Blitz Hotfoil Plate habe ich dann den Blitz auffoliert. Nun, ich kaufe bestimmt keine geraubten Motive in China, aber Kleinigkeiten wie Glitzersteine etc. bestelle ich da hin und wieder mal. Und ganz selten auch mal Stanzen und Hotfoil-Plates, denn auch dort gibt es Verkäufer, die eigene Motive vertreiben. Naja, eine solche Bestellung kam gerade bei mir an. Und so ist neben der Blitz-Hotfoil-Plate auch das Grinsegesicht im Mond und der Tod mit einem No-Name Produkt gemacht. 
Das Gruselgesicht im Mond habe ich aus weißem Cardstock gestanzt und mit Copics coloriert. Dann habe ich es aufgeklebt und an den Stellen, an denen es dann den Blitz verdeckt, die Bereicht mit einem goldenen Sakura-Pen wieder aufgemalt. Schließlich soll der Blitz vor und nicht hinter dem Mond herabgehen. 

Then I used Milled Lavender again and the second moon stencil with the craters to add some details to it.
With gold glitter foil and a flash hotfoil plate I then foiled the flash on top. Well, I for sure don't buy any knock-offs in China, but small things like rhinestones etc I like to order from there every now and then. And very rarely I also buy dies or hotfoil plates, because there are also sellers that sell their own designs. One of these orders just arrived. And so not only the flash hotfoil plate, but also the dies with the scary face I used on the moon and the Grim Reaper are no-name products.
The face in the moon I die cut from white cardstock and colored it with my Copics. Then I glued it onto the stenciled moon and used a gold Sakura pen to re-draw the lines of the flash that were now covered by the face because I wanted my flash to go down in front of the moon and not behind it.


Unten quer über die Karte habe ich einen Hügel, gemacht mit einer der Slimline Stitched Hillside Borders Stanzen von LawnFawn, aufgeklebt. Darauf steht ein Baum aus dem Spooky House Set von MFT und das kleine Geisterhaus aus dem Shadow Box Halloween Add-On Set von LawnFawn. Alle Teile habe ich aus schwarzem Cardstock gestanzt und mit Distress Oxide Milled Lavender an den Rändern etwas aufgehellt, so dass sich die einzelnen Teile besser voneinander abheben. 
Auch der Tod ist größtenteils aus schwarzem Cardstock gestanzt. Die rote Innenseite der Kapuze und des Ärmels sind mit Distress Ink Black Soot schattiert, den Schädel habe ich mit Hickory Smoke schattiert. Die Augen und Nase, die ich aus weißem Cardstock gestanzt hatte, habe ich dann mit Copics eingefärbt und wieder eingeklebt. Außerem habe ich um die Augen mit einem Fineliner schwarze Ränder aufgemalt. 
Die Schneide der Sense ist aus silbernem Spiegelcardstock gestanzt. Für das Blut habe ich einige Bereiche mit einem Versamarkstift "angemalt" und dann Distress Embossing Glaze Lumberjack Plaid aufgetragen. Das ergibt ein tolles Blutrot. 
Für den Text habe ich die Boo-Stanze von Pretty Pink Posh verwendet. Ich habe es einmal aus weißem und dreimal aus schwarzem Cardstock gestanzt, die Teile aufeinander geklebt und dann die oberste Lage mit den selben Copics, die ich bereits für das Gesicht im Mond verwendet habe, coloriert. 
Zwischen die einzelnen Motive habe ich dann noch Nebelschwaden aus Vellum, gemacht mit der Cloud Cover Stanze von MFT, gesetzt.

Across the bottom of the card I glued a hill, made with one of the Slimline Stitched Hillside Borders by LawnFawn. On top of it there's a tree from the Spooky House set by MFT and the small spooky house from the Shadow Box Halloween Add-On set by LawnFawn. I die cut all pieces from black cardstock and inked the edges with some Distress Oxide Milled Lavender so there's more contrast between the individual pieces. 
Also the Grim Reaper is mostly cut from black cardstock. I used Distress Ink Black Soot to shade the red inside of his hood and the inside of his sleeve, on the skull I used some Hickory Smoke. I used Copoics to color the inner pieces of the eyes and nose, that I had cut from white cardstock, then glued them back in place. With a black fineliner I also drew some lines around the eyes.
The blade of the scythe is cut from silver mirror cardstock. I dabbed some Versamark onto a few of the areas and then covered them with Distress Embossing Glaze Lumberjack Plaid. That's a wonderful dark, blood like color.
The text is die cut with the Boo die by Pretty Pink Posh. I cut it once from white and three times from black cardstock, stacked them and then used the same Copic colors, that I had also used to color the face of the moon, to give it a purple shading. 
Between the elements of my scene I then put some wafts of fog, die cut from vellum with the Cloud Cover die by MFT.


Der glitzernde Blitz gibt der Karte nochmal einen besonderen Touch, finde ich. 
Ich habe alle Elemente auf den Hintergrund geklebt, den Cardstock schwarz gemattet und dann alles auf einem weißen Kartenrohling befestigt. 

I think, the glittery flash adds a really special touch to the card.
I attached all elements to the background, matted the cardstock black and then adhered it to a white note card.
 

Samstag, 14. Oktober 2023

Doing a happy dance

 
Hallo Ihr Lieben!
Ich habe so viele Halloween-Stempel und -Stanzen und deswegen "müsst" ihr noch so einige Halloweenkarten anschauen. Ich liebe einfach, sie zu machen, einfach so zum Spaß. Denn verschicken tu ich sie nicht.... Heute gibt es mal eine Karte mit einer kleinen Mumie.

Hello everyone!
I have so my Halloween stamps and dies and so you "have" to look at quite a few Halloween cards. I love to make them, just for the fun of making them, because I don't send cards out for Halloween... Today I have one with a little mummy.

Der Hintergrund ist mit der Mummy Wrap Stencil von SimonSaysStamp und Distress Ink Antique Linen, Lost Shadow, Bundled Sage und einem Hauch Black Soot gemacht. Der Stencil ist eigentlich Slimline, so dass ich links etwas stückeln musste, aber ich bin sicher, das wäre Euch so gar nicht aufgefallen. Dann habe ich noch eines der dunkelgrünen Distress Mica Sprays aufgespritzt. 

The background I made with the Mummy Wrap Stencil by SimonSaysStamps and Distress Ink Antique Linen, Lost Shadow, Bundled Sage and a bit of Black Soot. The stencil has a slimline size so I had to add a little strip on the left side, but I'm sure you wouldn't have noticed if I didn't tell you. Then I flicked a bit of one of the dark green Distress Mica Sprays onto the background.


Die süße Mummy ist mit der Dancin' Mummy Stanze von Spellbinders gemacht. Ich habe alle Teile aus weißem Cardstock gestanzt und mit den Ohuhu-Markern eingefärbt, dann habe ich die Mumie zusammengesetzt.
Im Hintergrund befinden sich Grabsteine, ein Spinnennetz und eine Fledermaus aus dem Halloween Wonder Stanzenset von Spellbinders, Gras - gemacht mit einer Stanze von Leanne Creatief -, einige Farne aus dem Mushroom and Ferns Set von HeroArts und ein schmales Oval aus dem Oval Shadows Set von MFT als Boden. Die grauen Teile habe ich mit Black Soot etwas schattiert, dann habe ich darauf sowie auf einige der schwarzen Teile silbernes Gilding Was aufgetragen. 

The cute mummy is made usinig the Dancin' Mummy die set by Spellbinders. I cut all pieces from white cardstock, then colored them with my Ohuhu markers and put the mummy together.
In the background there are some tombstones, a spider web and a bat from the Halloween Wonder die set by Spellbinders, grass - made with a die by Leanne Creatief -, a few ferns from the Mushroom and Ferns set by HeroArts and a skinny oval from the Oval Shadows die set by MFT as the ground. I shaded the grey pieces a bit with Black Soot, then dabbed some silver Gilding Wax onto the grey and some of the black parts.


Das tolle an der Mumienstanze ist aber, dass sie tanzen kann! Es ist nämlich nur der Körper fest auf der Karte angeklebt, die Beine hängen frei und werden mit einem runden Klebeblatt mittig oben durch ein Loch fixiert. Ich liebe den Effekt - und so war mir auch klar, welchen Text ich auf die Karte bringen wollte.

The great about this mummy die is, that the mummy can dance! Only the body is attached to the card, the legs are dangling free and get held in place by a round foam pad, that's put through a whole, centered above the legs. I just love this effect - and due to that effect I also knew exactly, what I wanted as the text for this card.


It's Halloween - doing a happy dance! 
Die Buchstaben für das Wort Halloween habe ich mit einem Alphabet-Stanzenset von CC Design aus schwarem Cardstock gestanzt und dann mit einem grau-goldenen Distress Mica Spray bespritzt. Sorry, die Namen der Sprays habe ich einfach noch nicht im Kopf und habe gerade erst angefangen sie - endlich - zu benutzen.
Das kleine It's und der Doing a happy Dance Text sind weiß auf schwarzen Cardstock embosst. Sie sind aus den Sets Itty Bitty Baby und Itty Bitty Celebrations von MFT. 

It's Halloween - doing a happy dance!
I die ct the letters for the word Halloween from black cardstock, using an alphabet die set by CC Designs. Then I spritzed some grey-gold Distress Mica Spray onto the letters. Sorry, I just don't have the names of all the Mica Spray colors in my head, and I - finally- just started using them. 
The small it's and the doing the happy adnce text are white heat embossed onto black cardstock. They are from the Itty Bitty Baby and the Itty Bitty Celebrations sets by MFT.


Um sicherzustellen, dass die Beine nirgends hängenbleiben, habe ich alle Elemente direkt auf den Hintergrund geklebt. Nur für den Körper habe ich 3D Tape benutzt. 
Zum Schluss habe ich alles schwarz gemattet und auf einen weißen Kartenrohling geklebt.

To make sure that the legs don't get caught on any of the elements on the card I glued everything directly onto the background. Only behind the mummy's body I used some foam tape.
At the end I matted the cardstock black and adhered everything to a white note card.

Freitag, 13. Oktober 2023

Du bist toll

 
Hallo Ihr Lieben!
Die heutige Karte fällt mal wieder unter die Kategorie "kranke Ideen", aber ich bin da nicht ganz alleine drauf gekommen. Ich weiß gar icht mehr, wie wir drauf kamen, aber während eines Gesprächs mit meinem Mann kam der Kommentar "solange es keine in Streifen geschnittenen Karten gibt", es ging also wohl ums Abendessen. Ich habe dann versucht, ihm das schmackhaft zu machen: schöne dünne, gecrimpte Papierstreifen mit Sternchensauce und Glitterparmesan. Da kam dann ein Kommentar "und dann glitzert es, wenn ich pupse" woraufhin ich anmerkte, dann wäre er ja ein Einhorn. Und direkt darauf meinte er, das wäre doch mal eine coole Kartenidee. Mir fiel sofort das pupsende Stinktier von Create a Smile ein, das sich hier als Einhorn verkleidet hat. Naja, und so kam eins zum anderen und zum Schluss lag diese Karte auf meinem Tisch... 

Hello everyone!
Today's card is once again one of the "weird moment idea" cards, but actually I didn't come up with it all by myself. I have no idea how we ended there, but during a conversation with my hubby he said "as long as I don't have to eat cards cut into strips", so I guess we were debating about what we will have for dinner. I tried to make this idea sound a bit more tasteful: very fine and crimped strips of cardstock, some star confetti sauce and glitter as the cheese on top. He just said "and when I fart it glitters", what led to an "then you're a unicorn" statement from me. Then he suddenly said, that would make a great card and I immediately had the farting skunk by Create a Smile in mind, that dressed as a unicorn on this card. Well, one thing led to another and in the end I had this card laying on my desk....

Den Hintergrund habe ich erst mit Distress Ink Salvaged Patina, Squeezed Lemonade, Carved Pumpkin und ein bisschen Picked Raspberry  auf weißen Cardstock gewischt und den Cardstock mit einigen Wassertropfen besprenkelt. Dann habe ich einen Strahlenstencil darauf gelegt und mit weißer Stempeltinte die Strahlen aufgewischt. Und damit auch der Hintergrund ein wenig einhornig glitzert, habe ich noch weißes und hellpinkes Perfect Pearls mit ein wenig Wasser gemischt und aufgespritzt.
Aus weißem Cardstock und aus Vellum habe ich dann Wolkenbordüren gestanzt und die unten quer über den Cardstock geklebt.

For the background I inked a piece of white cardstock with Salvaged Patina, Squeezed Lemonade, Carved Pumpkin and a bit of Picked Raspberry and scattered some droplets of water onto it. Then I put the rays stencil on top and inked the rays onto the dried cardstock with white pigment ink. To make the background glitter a bit unicorn-ish I mixed some white and light pink Perfect Pearls with water and spattered that onto the background.
From white cardstock and vellum I die cut two cloud borders and glued that across the bottom of the cardstock. 


Für den Text habe ich die Du bist Toll Stanze von Create a Smile benutzt - den Schatten habe ich aus schwarzem Cardstock, den Text aus einem Stück Cardstock mit Regenbogenverlauf gestanzt. Beim Text habe ich darauf geachtet, dass ich eher auf der kühlen Seite des Regenbogens bleibe, da die warme Hälfte ja bereits stärker im Hintergrund enthalten ist. Dann habe ich beide Lagen auf die Vellum- und unter die weißen Cardstockwolken geklebt.

For the text I used the Du bist Toll die - you are great - by Create a Smile - I cut the shadow from black cardstock, the text from a piece of rainbow colored cardstock. I made sure to stick to the cooler tones of the rainbow for my text since the warm colors are already visible on the background. Then I glued the text layers on top of the vellum and behind the white cardstock clouds.


Und hier ist das Stinktier-Einhorn. Ich habe es mit Copics coloriert und dabei die eigentlich weißen Streifen in Regenbogenverlauf gehalten. Auf die gleiche Weise habe ich auch den Pups sowie das Einhorn-Horn coloriert. Für das Horn musste die Nase des Schneemanns aus dem Set Expresslieferung herhalten. Und weil das Stinktier selbst mit dem Horn immer noch ein Stinktier und kein echte Einhorn ist, habe ich das Gummiband, mit dem das Horn am Kopf gehalten wird, mit einem weißen Gelstift dazugemalt. Horn und Pups habe ich außerdem mit Stickles beglittert. 
Dann habe ich die mittelgroße Wolke aus dem Stanzenset Weather aus weißem Cardstock gestanzt, das Einhorn darauf und dann alles hinter den Text geklebt.

And here's the unicorn skunk. I colored it with Copics and did the usually white stripe on the back and tail in a rainbow look. The same I also did for the fart and the unicorn horn. For the horn I used the nose from the snowman from the Expresslieferung set. And since the skunk is still a skunk, even with a  rainbow horn, I used a white gel pen to draw the rubber band that the skunk used to keep the horn in place. I covere the horn and the fart with some Stickles. 
Then I die cut the middle sized cloud from the Weather die set from white cardstock, glued the unicorn on top and then both under the text.


Hier könnt Ihr den ganzen Schimmer und Glitzer auf der Karte nochmal besser sehen.
Als Deko habe ich drei kleine weiße Herzen aufgeklebt, dann den Cardstock schwarz gemattet und alles auf einen weißen Kartenrohling geklebt.

Here you can see all the shimmer and glitter on this card better.
As decoration I added three white hearts, then matted the cardstock black and adhered everything onto a white note card.