Hallo Ihr Lieben!
Heute startet die Mai-Challenge bei Stampcorner. Und diesmal haben wir uns das Thema "Nimm 2" überlegt. Kombiniert also Stampcorner-Stempel mit Stempeln und/oder Stanzen einer anderen Firma, die es im Shop gibt. Normalerweise tut man das ja eh gerne, aber wenn es mal im Fokus steht, geht man doch etwas anders an die Sache ran. Und so ist diese Karte entstanden.
Hello everyone!
Today starts the may challenge of Stampcorner. And this time we've chosen the theme of "take 2". It's about teaming up Stampcorner stamps with stamps and/or dies of a different brand. I guess most of us do it all the time, but when it's the theme we might approach this a bit differently. And so this card was created.
Im Hintergrund habe ich den tollen Sternen-Strahlen-Kranz aus dem Träumen Stempelset verwendet. Ich habe ihn mit weißer Stempeltinte auf schwarzen Cardstock gestempelt und dann mit Distress Glaze in Fossilized Amber, Saltwater Taffy, Crackling Campfire und Fired Brick bestreut - gelb innen und nach außen dunkler werdend. Da das ganze nicht so decken war, wie ich mir das vorgestellt hatte, habe ich den Vorgang einfach nochmal wiederholt. Anschließend habe ich goldene Metallic Watercolor über den schwarzen Cardstock gespritzt.
Mit einer der Deckle Edge Stanzen habe ich aus der Mitte des Cardstocks ein Stück herausgestanzt. Das habe ich dann weiß hinterlegt und mit 3D Tape wieder zurück an seinen Platz geklebt. Zuvor habe ich den äußeren Teil auf einen weißen Kartenrohling geklebt.
In the background I used the great star-rays-wreath from the Träumen stamp set. I've stamped it onto black cardstock with white ink, then sprinkled Distress Glaze in Fossilized Amber, Saltwater Taffy, Crackling Campfire and Fired Brick onto the white ink - yellow in the center and getting darker towards the outer circle of stars. It didn't turn out as bright as I had hoped so I simply repeated the whole process. Then I also spritzed some golden metallic watercolor over the cardstock.
I used one of the Deckle Edge dies to cut the wonky rectangle from the center of my background. I matted that white and then glued it back into place using foam tape. Before I had glued the background onto a white note card.
Über den Sternenkranz kam dann dieser Luftballonstrauß. Der ist aus dem Stempelset Balloon Bouquet von MFT. Ich habe ihn mit weißem Embossingpulver auf Vellum embosst und anschließend mit der dazugehörigen Stanze ausgestanzt.
Um die Ballons zu colorieren, habe ich Polychromos verwendet und anschließend die Highlights mit einem weißen Gelpen gesetzt. Beim Colorieren habe ich mich an den Farben orientiert, die ich jeweils für den Sternenkreis verwendet habe - also auch hier von Gelb in der Mitte zu Rot im Außenbereich.
On top of the star-ray-wreath I've put this balloon bouquet. It's from the Balloon Bouquet by MFT. I've white heat embossed it onto vellum and then cut it out with the matching die.
To color the balloons I've used my Polychromos and then added the highlights with a white gel pen. When coloring the balloons I picked the same color scheme as I did for the wreath behind it - from yellow in the center to red on the outer edges.
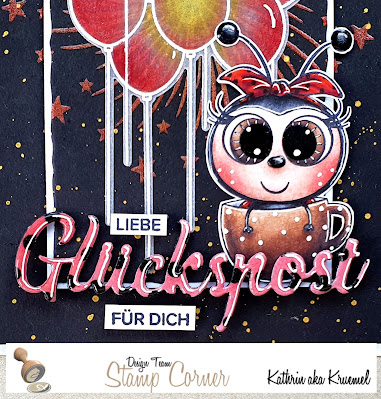
Hauptmotiv auf der Karte ist diese süße Marienkäfer-Dame in einer Tasse. Der ist aus dem Mai-Release von Stampcorner. Ich habe ihn mit Copics coloriert. Da man die schwarzen Punkte auf der braunen Tasse nicht mehr so doll sehen konnte, habe ich sie einfach mit einem weißen Gelstift nachgemalt. Die Bommel an den Fühlern und die Nase sind mit Glossy Accents überzogen. Anschließend habe ich auch dieses Motiv ausgeschnitten.
Das Hauptwort hier ist mit der Glückspost-Stanze von Stampcorner gemacht. Ich habe das Wort ein paar Mal aus schwarzem Cardstock und für die oberste Lage aus einem der Papiere aus dem Paper Pack 02 von Stampcorner ausgestanzt. Damit es besser zum Marienkäfer passt, habe ich dann die eigentlich weißen Punkte mit einem Copicmarker schwarz eingefärbt. Außerdem habe ich auch diese Lage mit Glossy Accents überzogen.
Ich habe alle gestanzten Worte aufeinander- und dann das Wort an den unteren Rand des ausgestanzten Rechteckes auf der Karte geklebt. Dazwischen habe ich dann das süße Motiv gesetzt.
Als kleine Zusatztexte habe ich ein "hip hip hurra", ein "für dich" und das Wort liebe schwarz auf weißen Carstock gestempelt. Dann habe ich die Worte ausgeschnitten und ebenfalls mit 3D Tape auf die Karte geklebt, so dass insgesamt der Text "hip, hip, hurra, liebe Glückspost für dich" entstanden ist.
Main image on my card is this cute lady bug in a mug. It's an image from Stampcorner's may release. I colored it with Copics. Since the black dots on the mug were hardly visible on the brown mug I used a white gel pen and re-drew them. The ends of the antennas and the nose are covered with Glossy Accents. Then I've cut the image out.
The main word here means "happy mail" and is made with a die by Stampcorner. I've die cut it several times from black cardstock and used some patterned paper for my top layer. This is originally red with white dots. To make it go better with the ladybug image I used a black Copic to color the white dots black. Also the word is covered with a layer of Glossy Accents.
I stacked all of the die cut words and then glued them onto the lower edge of the rectangle, cut from the background, and then tucked the image under the word.
As subtexts I stamped a "hip, hip, hooray", a "lovely" and a "for you" with black ink onto white cardstock. I cut the words out and glued them onto the card, again using foam tape, so in the end the text means "hip, hip, hooray, lovely happy mail for you".


