

Hallo Ihr Lieben!
Heute wird es schon wieder blumig - aber da wir Euch beim Stempeleinmaleins heute eine Vasenbox zeigen, muss das wohl auch!
Hello everyone!
Today's project is full of flowers again - but since we're sharing the tutorial for this vase box over at Stempeleinmaleins today, I guess that's just the way it has to be!
Die Vase besteht aus einer Grundbox, die mit Designpapier dekoriert ist. Ich habe die Grundbox aus türkisfarbenem Papier gewerkelt.
The vase is made from a box base that get's decorated with patterned paper. I've used turquoise cardstock to make the box base.
.jpg)
Die Box wird mit leicht gebogenem Designpapier dekoriert und erhält so die Vasenoptik.
Da am oberen Rand und teilweise auch durch die gebogenen Schlitze auch die Rückseite des Designpapier zu sehen ist, wollte ich natürlich doppelseitiges Papier, das auf beiden Seiten in mein Farbkonzept passt. Und da fingen die Probleme an. Ich weiß nicht, wie lange ich durch all meine doppelseitigen Designpapiere geblättert habe, um endlich ein passendes Papier zu finden, das auf der Rückseite nicht komplett andersfarbig ist! Ich habe da ja die wildesten Kombinationen in meinem Vorrat entdeckt. Schließlich kam mir dann aber dieses Papier mit dem dezenten Rosendruck auf der einen und einer fast einfarbig rosafarbenen Fläche auf der anderen Seite in die Finger. Das passte dann endlich.
Um den oberen Rand der Vase habe ich ein Stück türkis-weißes Twine gewickelt, zur Schleife gebunden und dort zwei kleine Tags angebunden. Das untere ist aus bordeauxfarbenem Cardstock gestanzt, das obere habe ich aus Vellum gestanzt und den Rand sowie den Text weiß aufembosst.
The box is decorated with patterned paper that is bended a bit in the center and that's how the vase look gets created.
Since you can see the back of the patterned paper at the top of the box and also get glimpses of it through the slits at the bended areas I wanted to use some doublesided paper that goes with my color concept. And that's where the problems started. I can't tell how long I went through my stacks of paper unti I finally found one where the back isn't done in completly different colors! I really found the wildest combinations there in my stash. But then I came across this shee with some tiny roses on the back and a nearly solid light pink on the back.
Around the top of my vase I've tied some turquoise and white twine, tied it to a bow and tied two tags to it. The bottom one is made from burgundy colored cardstock, the top one is made from vellum. I white heat embossed the dotted edge and the text onto it.

Ich weiß, in der Anleitung ist der Deckel der Box anders dekoriert. Aber ich dachte mir, wenn sie schon Vasenbox heißt, sollte sie auch mit einem schönen Blumenstrauß "gefüllt" sein.
Und sehr Ihr hier das rosafarbene Stück Band zwischen den beiden Rosen vorne? Das habe ich durch den Deckel gezogen, so dass die Box trotz des Blumenstraußes einfach geöffnet werden kann. Optisch verschwindet es nahezu zwischen den Blumen.
I know, in the tutorial the top of the box is decorated differently. But I thought, since this is called a vase box it should also be "filled" with a flower bouquet.
Can you see the small piece of pink twine between the two roses in the front? I've tied that through the lid of the box to make opening it easy, even with all those flowers. And it is nearly invisible between all of them.

Für die Blätter außen am Strauß habe ich die Magic Iris Tropical Leaves Add-On Stanze von LawnFawn benutzt, den Kranz aufgeschnitten und enger zusammen geklebt. So passte er erstens auf die Box und zweitens konnte ich ihn so etwas aufstellen. Die Blattspitzen habe ich dann noch nach unten gebogen.
In den Kranz habe ich dann verschiedene Blüten geklebt. Damit der Strauß etwas höher kommt, habe ich mittig auf den Boxdeckel eine kleine Styroporkugel geklebt, auf der die größte Blume sitzt.
For the leaves around the bouquet I've used the Magic Iris Tropical Leaves Add-On die by LawnFawn, cut the wreath apart and then glued it back together a little tighter. That way it fits onto the lid and I was also able to give it a bit of dimension. Then I also bend the tips of the leaves down.
Into the wreath I've glued different flowers and blooms. To make the bouquet a bit taller I glued a small styrofoam ball onto the center of the lid and glued the biggest flower onto it.
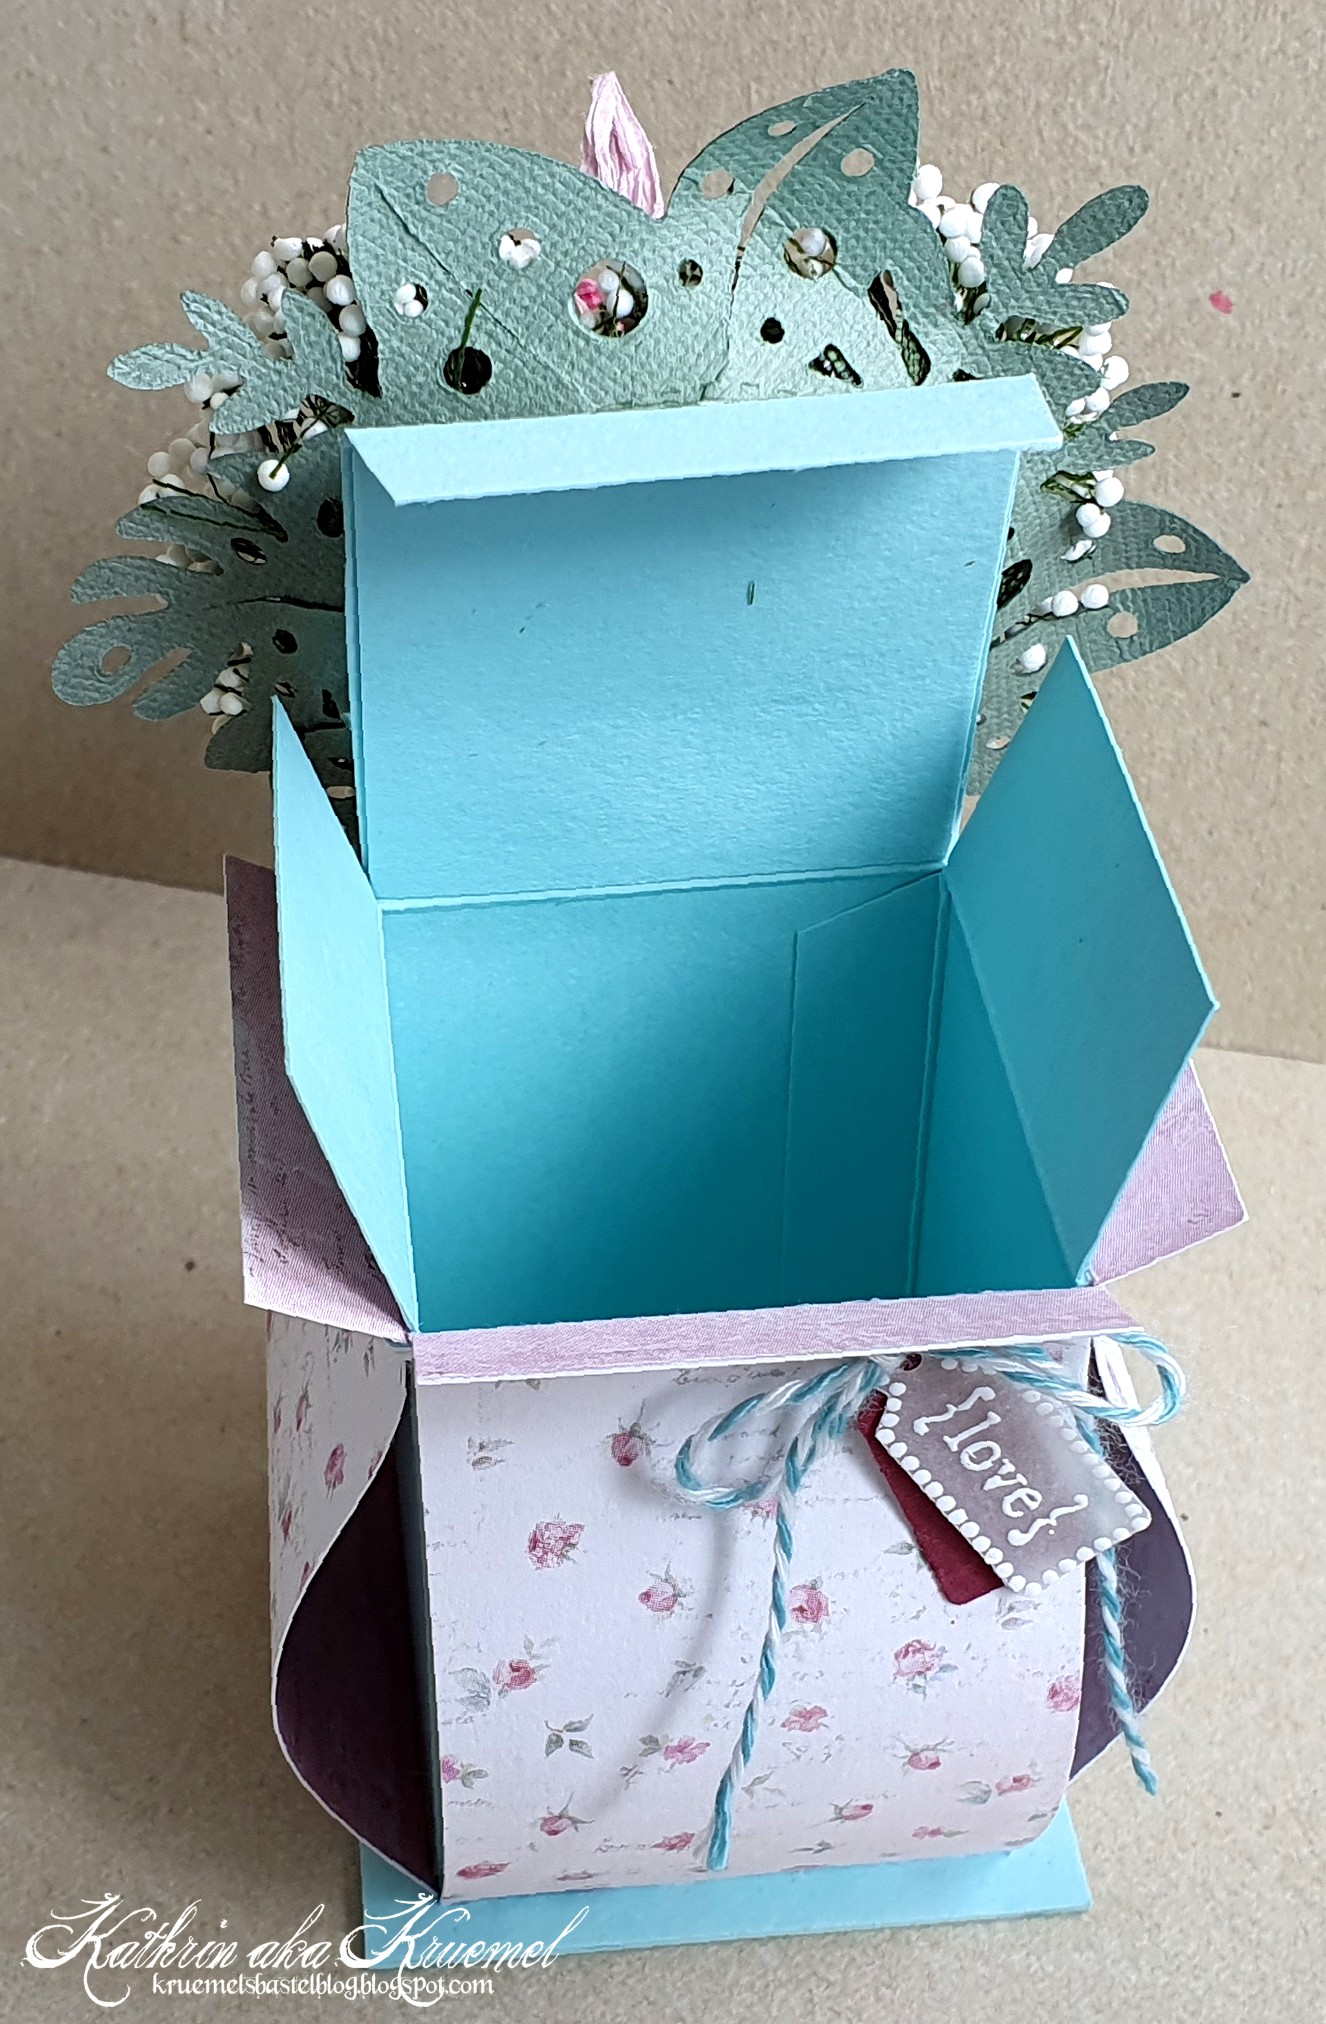
Und so sieht die geöffnet Vasenbox aus.
Ich hatte ja durch den Deckel ein Loch gemacht und dort das Twine zum Öffnen durchgezogen. Die Enden habe ich mit Tesa fixiert und um diese unschöne Stelle zu verdecken, habe ich einfach noch ein kleines Quadrat aus dem türkisfarbenen Cardstock von innen gegen den Deckel geklebt.
And this is the opened vase box.
As mentioned I had poked a little hole into the lid of the box to tie the twine to opened it through. I fixed the ends with some tape to the back of the lid and to cover this not so pretty look I've simply cut another square from the turquoise paper and glued it to the inside/back of the lid.