

Hallo Ihr Lieben!
Keine Angst ob des Blog-Titels - ich bin nicht unter die Food-Blogger gegangen und bleibe dem Basteln treu. Aber "gekocht" habe ich trotzdem.... Bei Create a Smile gibt es dieses Jahr etwas neues: jeden Monat gibt es ein neues "Rezept" für eine Karte, das einer Bestellung beigelegt wird. Es ist eine bebilderte Schritt-für-Schritt-Anleitung von Christine. Und als ich vor kurzem nicht so recht wusste, was ich basteln wollte, habe ich das Rezept "nachgekocht".
Hello everyone!
This post is titled "cooking with Christine" - but don't worry, I haven't changed into a food blogger and keep on papercrafting. But I still did some "cooking".... At Create a Smile they came up with something new beginning of the year. Each month there is a new "recipe" for a card, that will be sent with an order. It's a step by step tutorial with pictures, made by Christine. And last week, when I was unsure what I wanted to make, I followed the recipe.
Nun wollte ich die Karte natürlich nicht einfach kopieren - könnte ich auch gar nicht, denn das verwendete Stempelset habe ich nicht. Außerdem war es so kalt, dass ich mir die Tropen ins Haus geholt habe...
Die Karte an sich habe ich aus hellgrünem Cardstock gemacht und ein Oval aus der Front gestanzt. Darauf kam dann ein Stück weißen Cardstocks, aus dem ich ebenfalls ein Oval an der selben Stelle gestanzt habe. Durch den Aufleger konnte ich nämlich die Ränder der Folie, die über - bzw. im Rezept hinter - dem Fenster angeklebt ist, verstecken. Das finde ich einfach schöner. Den weißen Cardstock habe ich mit der Monstera-Stencil mit Blättern gefüllt. Allerdings habe ich die nicht gewischt, sondern nur die Außenlinien mit einem Fineliner nachgemalt. Zuerst habe ich das einmal mit einem hellgrünen Marker gemacht, dann habe ich die Stencil gedreht, erneut aufgelegt und weitere Blätter mit einem dunkelgrünen Marker aufgemalt, und zwar so, dass sie optisch hinter den hellgrünen Blättern liegen. Dann habe ich noch goldene Metallic-Watercolor aufgespritzt.
Of course I didn't want to just copy her card - and even if, I couldn't because I don't have the stamp set Chrstine used. It was so cold outside, that I've decided to bring the tropics into my home....
I made my card base from light green cardstock and cut an oval from the front. Then I put a piece of white cardstock on top, from which I had die cut another oval in the exact same spot. The white piece of cardstock gave me the chance to hide the edges and glue of the acetate, that's put over - or in the recipe behind - the window. I just liked that better. I used the Monstera stencil to fill the white cardstock with leaves. But I didn't ink them on, instead I used pens to trace the outlines. First I added leaves with a light green marker, then turned the stencil and added leaves with a dark green marker, making it look like those dark leaves are behind the light ones. I also flicked some gold metallic watercolor onto the cardstock.

Der süße Kakadu aus dem Stempelset Taa-Da balanciert auf einem Stück schwarzen Twines. Den Kakadu habe ich mit Copics coloriert und ausgeschnitten.
Der Text aus dem selben Stempelset ist mit schwarzer Tinte auf weißen Cardstock gestempelt, mit einer Sprechblasenstanze ausgestanzt und schwarz hinterlegt.
This cute cockatoo from the Taa-Da stamp set is balancing on a piece of black twine. I colored the bird with Copics and cut him out.
The text is from the same stamp set. I stamped it with black ink onto white cardstdock, cut it out with a speechblubble die and put some black cardstock behind it.

Die Motive habe ich dann auf der Folie, die, wie schon erwähnt, das Fenster abdeckt, aufgeklebt.
Als Deko habe ich noch ein paar sonnengelbe Enamel Dots aufgeklebt.
I adhered the images to the acetate, that - as I already mentioned - is covering the oval window. 
So sieht die geöffnete Karte aus - den Text im Inneren der Karte sieht man bei geschlossener Karte durch das Fenster hindurch und es bildet so den Hintergrund für das Motiv. Den habe ich mit Stempeln aus den Sets Konfetti und Taa-Da (hier habe ich zwei Textstempel zerschnitten um sie partiell verwenden zu können) mit grüner Tinte gestempelt. Dann habe ich auch hier goldene Metallic Watercolor aufgespritzt.


I added some Enamel Dots in a sunny yellow as decoration.

So sieht die geöffnete Karte aus - den Text im Inneren der Karte sieht man bei geschlossener Karte durch das Fenster hindurch und es bildet so den Hintergrund für das Motiv. Den habe ich mit Stempeln aus den Sets Konfetti und Taa-Da (hier habe ich zwei Textstempel zerschnitten um sie partiell verwenden zu können) mit grüner Tinte gestempelt. Dann habe ich auch hier goldene Metallic Watercolor aufgespritzt.
Und hier habe ich noch eine weitere Änderung vorgenommen: Da es mir nicht gefallen hat, dass man den Kleber hinter dem Kakadu sowie das von der Farbe getränke Papier von hinten im Fenster gesehen hat, habe ich den Kakadu einfach nochmal ausgeschnitten und von hinten gegen das Fenster geklebt.
This is the opened card - the text on the inside can be seen through the window when the card is closed and makes the backdrop for the image. I used stamps from the sets Konfetti and Taa-Da (I cut two texts from this set apart to be able to use them partially) and stamped them with green ink. Then I flicked some gold metallic watercolor also on the inside.
And here's another change I did: I didn't like that you could see the glue behind the image and the paper saturated by my markers through the window. So I simply cut another cockatoo and glued it exactly behind the colored bird on the inside of the card.
So, und jetzt muss ich Euch gestehen, dass mir die Karte oben echt schwer gefallen ist! Vielleicht weil sie eigentlich ja doch eher einfach und das ja nicht unbedingt mein bevorzugter Stil ist. Deswegen ist auch eine weitere Karte,die ich bereits angefangen hatte, bis jetzt nicht fertig geworden. Mal sehen, ob das noch was wird.... Aber ich war herausgefordert - so schwer kann das ja nicht sein! Also habe ich beschlossen, noch eine Mini-Karte nach dem Rezept zu kochen, und hier ging alles ganz schnell. Mein Problem ist offenbar der viele freie Raum auf einer normalgroßen Karte. ;)
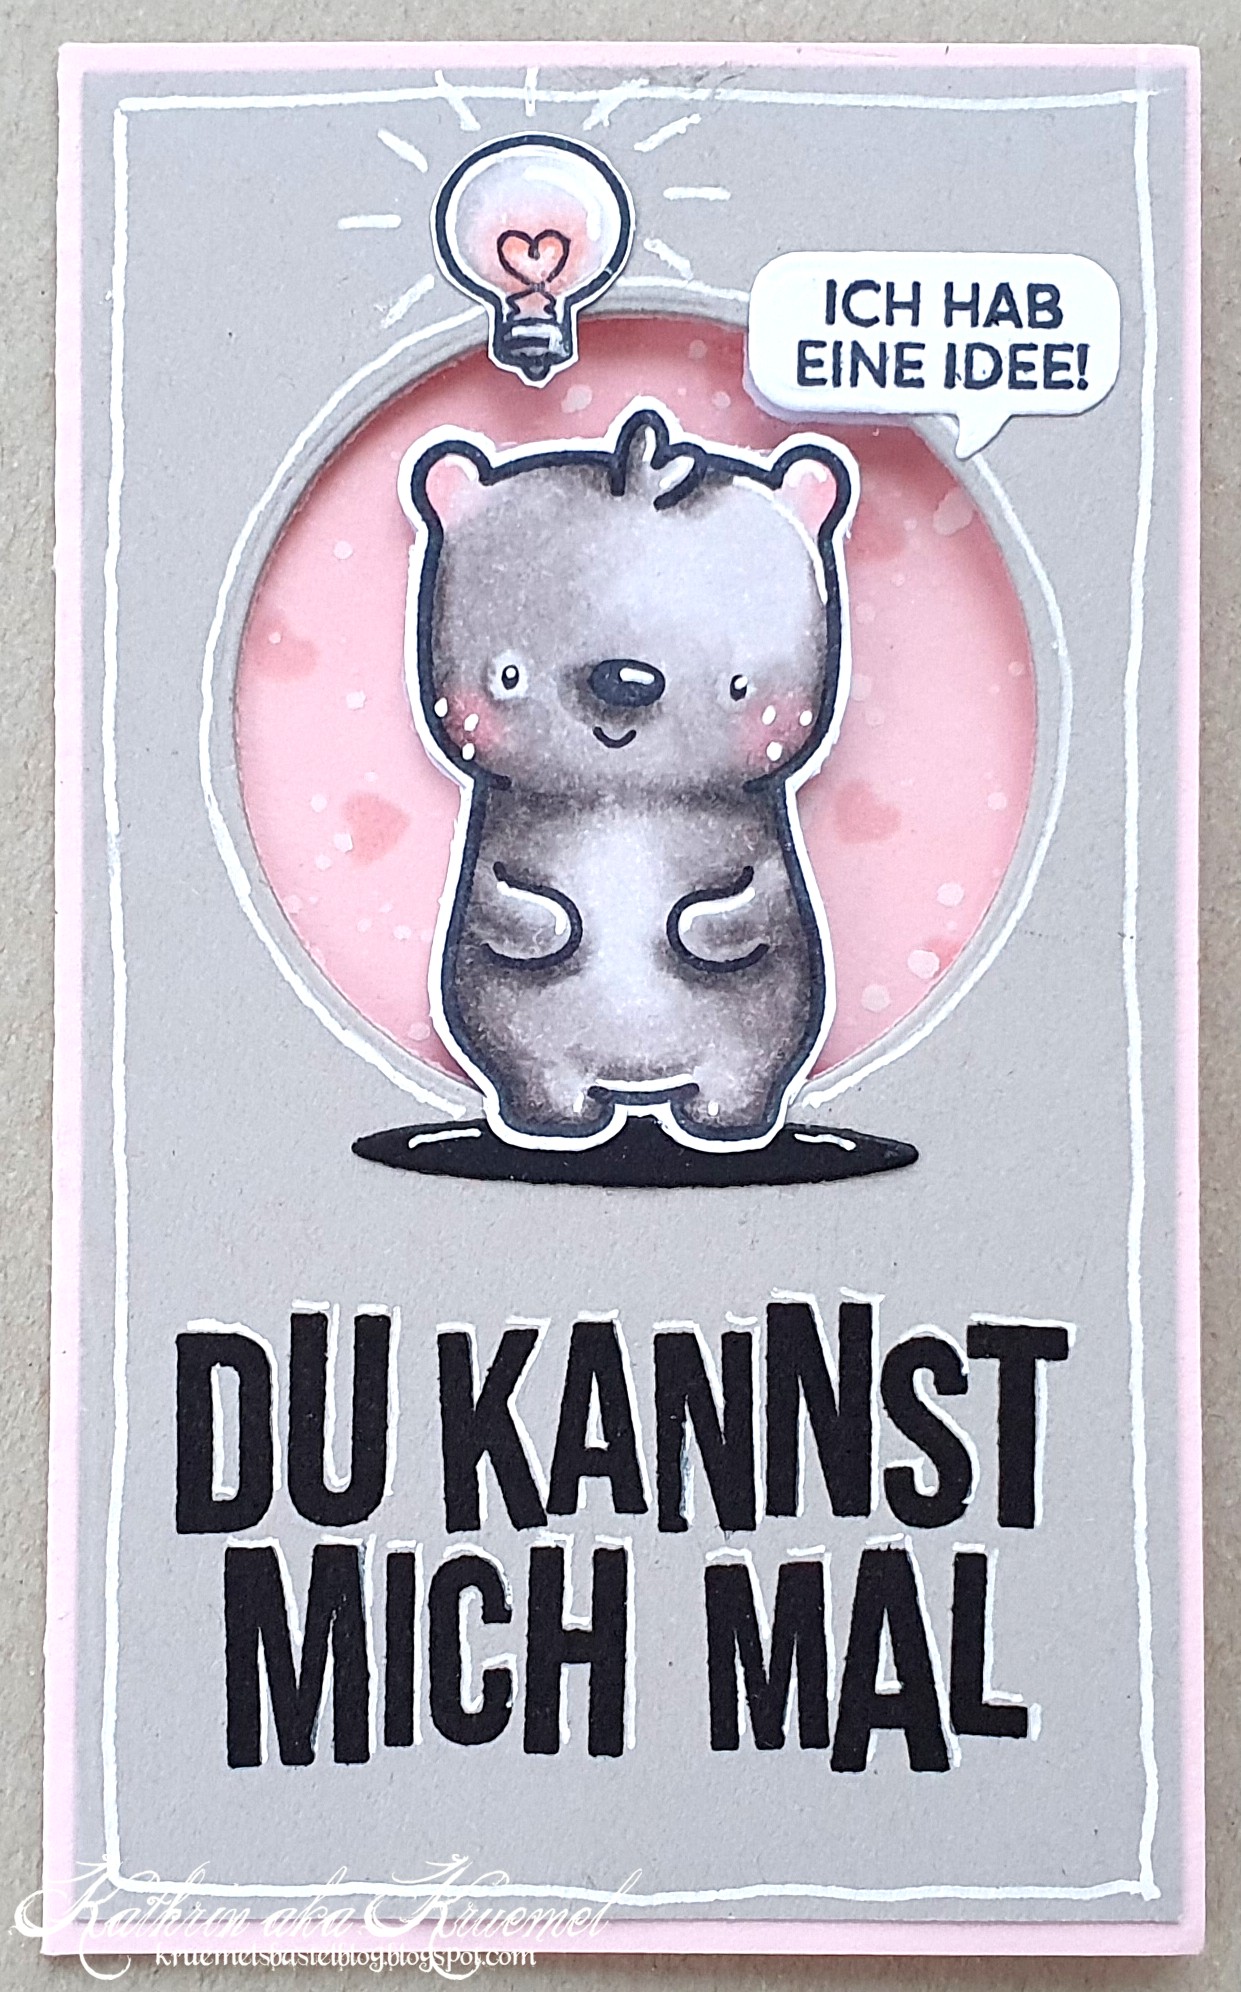
Und das hier ist mein Mini-Kärtchen. Es hat die Maße von 6,5 x 12 cm. Die Grundkarte habe ich diesmal aus rosafarbenem, den Aufleger aus grauem Cardstock gemacht. Und für das Fenster habe ich einen Kreis gewählt.
And now I have to admit that I really had a hard time putting this first card together! Maybe because it's some kind of simple design and that's not my preferred crafting style. That's also, why another card idea after this recipe, that I had already started, still isn't finished. We'll see if it ever will... But now I felt challenged - it can't be that hard! So I've decided to make another card in a mini size, and this was really put together quickly and easily. Seems like my problem was all that empty space on the regular sized card. ;)
And this is my mini card, it measures 6,5 x 12 cm. The base card I made from light pink, the topper from grey cardstock. And for my window I've chosen a circle here.

Als Motiv kam diesmal der kleine Bär aus dem Set Tierisch Vielseitig zum Einsatz - auch er ist mit Copics coloriert. Darüber befindet sich eine Glühbirne aus dem Set Licht An, und die passt dann perfekt zum Text in der Sprechblase. Der ist aus dem Set Kleine Sprüche. Unter dem Bären habe ich ein Oval, gemacht aus schwarzem Cardstock mit einer der Shadows and Flowers Stanzen, als Boden aufgeklebt. Die Glühbirne ist außerdem mit Glossy Accents überzogen.
Und darunter kam dann ein großer Text, der den Raum unter den Motiv fast komplett ausfüllt. Ich habe ihn mit schwarzer Tinte direkt auf den grauen Cardstock gestempelt und mit einem weißen Gelstift Linien rechts und oberhalb der einzelnen Buchstaben aufgemalt. So wirkt er nicht gar so langweilig. Mit dem weißen Gelstift habe ich dann auch noch einen Rahmen um das Fenster sowie entlang der Außenkanten des grauen Cardstocks gemalt.
As my image I picked this little bear from the Tierisch Vielseitig stamp set - again I used Copics to color him in. I put a little light bulb from the Licht An set above his head and stamped an "I have an idea" into a small speech bubble. Under the bear I placed an oval, die cut from black cardstock with one of the Shadows and Flowers dies, as a ground. The light bulb I also covered with a layer of Glossy Accents.
Underneath there war room for a large text, that fills that space nearly entirely. I stamped it with black ink onto the grey cardstock and used a white gel pen to draw a line on the right and top of each letter. This way it doesn't look so plain. Then I drew a frame around the circle window and also along the outer edges of the grey cardstock with the white gel pen.

Und hier ist die Mini-Karte in geöffnetem Zustand. Hinter den Bären auf der Vorderseite habe ich wieder einen aus weißem Cardstock geschnittenen aufgeklebt, um den Kleber zu verdecken.
And here's the opened mini card. Again I glued a bear cut from white cardstock onto the inside left of the card to hide the adhesive, that's visible through the window.

Und auch auf der rechten Innenseite befindet sich ein Bär. Der hält ein Herz in der Hand und ist identisch zu dem auf der Kartenfront coloriert. Auch der Boden aus schwarzem Cardstock findet sich hier wieder. Beide Teile und auch die Sprechblase, die ich mit einem weiteren Text aus dem Set Kleine Sprüche bestempelt habe, sind deckungsgleich mit den Motiven auf der Vorderseite aufgeklebt, so dass sie erst zu sehen sind, wenn die Karte geöffnet wird.
Für den Hintergrund, der ja auch durch das Fenster sichtbar ist, habe ich hier mit rosa Tinte kleine Herzen aufgewischt, auch den Bereich hinter dem Bären etwas eingefärbt und außerdem weiße Acrylfarbe aufgespritzt.
Und unter dem Bären setzt sich der Text von der Kartenfront fort - natürlich will ich mit meiner Karte niemanden beleidigen! Lieb haben klingt natürlich viel besser. Beide Texte sind aus dem Set Du kannst mich Mal.
And also on the inner right side there's a bear. He's holding a heart and is colored just like the one on the outside of the card. Also the ground cut from black cardstock can be found here again. Both pieces and the speech bubble are adhered matching exactly there positions on the outside of the card so you can only see them when the card is opened.
For the background, that can also be seen through the window, I inked some small hearts with pink ink onto the cardstock and also darkened the area behind the bear a bit. I also flicked some white acrylic paint onto this area of the inside.
And under the bear you can find the rest of the text on the front. The one on the front means "kiss my ass" but in german we say "you can .... me". Since I for sure don't want to send out any cards to offend someone, I stamped a "love" on the inside. So the full text means "you can love me". And I am not sure if this makes sense the way I described it. But love me sounds so much better and nicer than "kiss my....".