Samstag, 31. Juli 2021

Stempeleinmaleins - Ausgabe vom 31. Juli 2021

 
Hallo Ihr Lieben!
Mit einem neuen Sketch verabschiedet sich das Stempeleinmaleins bis Ende August in die Sommerpause, Ende August werden wir mit einem neuen Sketch zurück sein und dann wie gewohnt samstags für Euch eine Anleitung bereit haben. 
 
Hello everyone!
With a new sketch Stempeleinmaleins is taking a summer break until the end of august. End of august we will be back with a new sketch and then have weekly tutorials on saturdays as usual.
 
Für meine Karte habe ich ein Stück schwarzen Cardstock mit einem Herz-Embossingfolder dry embosst, darüber habe ich ein paar pinkfarbene Spritzer Schimmer-Wasserfarbe verteilt. Den Hintergrund habe ich dann auf einen weißen Kartenrohling geklebt.
Als Deko habe ich Stifte und Pinsel und Wachsmalkreiden mit dem tollen Stempelset Color my World von SunnyStudio verwendet. Das Set hatte ich gesehen und wollte es unbedingt haben. Und da es nirgends in Deutschland auf Vorrat war, habe ich es sogar extra in den USA bestellt. 
 
For my card I dry embossed a piece of black cardstock with a heart embossing folder, then spritzed some light pink metallic watercolor over it. Then I glued the background onto a white note card.
For decorations I stamped pencils and brushes and crayons with the great stamp set Color my World by SunnyStudio. I saw this set and wanted it so badly. Since it was no where in stock here in Germany I went ahead and placed an order in the US to get my hands on it.


Hier könnt Ihr einige der Malutensilien genauer sehen. Es ist ein Step-Stamping Stempelset. Es gibt jede Menge Teile zu stempeln, ich brauchte jeweils 3 Farben, die zusammenpassen. Für die Wachsmalkreiden bräuchte man sogar vier, das ist mir aber erst später aufgefallen und so habe ich die dunkelste Farbe einfach noch zweimal aufgestempelt. Das Set hätte mich bestimmt in den Wahnsinn getrieben, gäbe es da nicht ein grandioses Video von Jennifer McGuire, die ein paar Tips verrät, wie es viel schneller geht. Und ehrlich gesagt war es auch dieses Video, das mich das Stempelset so sehr haben wollen machte. Es war trotzdem noch einiges an Stempelei zu tun.
Ich habe zwei verschiedene Grünkombis, Gelb, Blau und Türkis verwendet. Die grau gestempelten Metall-Bereiche habe ich mit einem klaren Glitter-Gelpen von Sakura noch beglittert, so sehen sie noch realistischer aus. 
Ich habe alle Stifte und Co so auf den schwarzen Hintergrund geklebt, dass sie rechts über den Rand hinausstanden und dann den Überstand bündig mit dem Cardstock abgeschnitten.

Here you get a better look at a few of all the art accessoires. This stamp set is a step stamping set. And there's a bunch of steps for each image, I needed 3 matching colors for each image. Acutally, for the crayon I'd have needed 4 but didn't realise that in time. So I simply used the darkest tone again and stamped the last step twice with this one. This set for sure would have driven me crazy if there wouldn't have been an amazing video by Jennifer McGuire where she shares a few tips for how to do step stamping quite faster. And honestly, it was this video that made me want this set so badly. But it was still quite some stamping to do.
I used two different combinations of greens, yellows, blues and turquoise. The grey stamped metallic parts of the pencils and brushes are also covered with a clear glitter gel pen by Sakura, what makes them look even more realistic.
 I glued all the pencils and co onto the black background, making them overhang the edge of the cardstock, then cut off the excess.


Eigentlich wollte ich kein rot, rosa etc. für die Karte verwenden, aber die Radiergummis an den Enden der Stifte mussten einfach rosa werden. Um die Farbe wieder aufzugreifen, habe ich die gestanzten Buchstaben meines Textes aus zwei verschiedenen Rosa-Tönen gestanzt. Ich habe die Finley's ABCs Stanzen von LawnFawn benutzt, die beiden Buchstaben jeweils leicht versetzt aufeinander und dann quer über die Karte geklebt. 
Auch die Spritzer auf dem Hintergrund habe ich deshalb rosa gemacht, um diesen Farbton nochmal aufzugreifen.
Der gestempelte Text ist Teil eines Stempels aus dem Stempelset Coaster Critters von LawnFawn. Ich habe ihn schwarz auf einen Streifen weißen Cardstocks gestempelt und dann über dem Wort colors aufgeklebt.
Die Highlights auf den gestanzten Buchstaben habe ich wieder mit dem klaren Glitter-Gelpen gemacht, der hier aber fast silbern wirkt. Also habe ich noch ein paar klare Glitzersteine mit aufgeklebt.

I had planned to not use any pinks, reds etc. on this card. But the rubbers on the end of the pencils just had to be pink. To pick up that color again I die cut the letters for my text from two different shades of pink. I used the Finley's ABCs dies by LawnFawn, glued the two letters on top of each other a bit offset and then glued them across the card.
Also the speckles on the background I've made with a pink color to bring in that color again.
The stamped part of the text is made using part of a stamp from the Coaster Critters stamp set by LawnFawn. I stamped it black onto a strip of white cardstock and then glued it down above the die cut letters.
The highlights on those die cut letters are once again made with the clear glitter gel pen, but it kind of looks silver here. So I also added a few clear rhinestones around the word colors.


Und hier habe ich noch ein Bild, das ich ein wenig schräg aufgenommen habe. Auf dem könnt Ihr den embossten Hintergrund und auch den Schimmer des Gelpens besser sehen.

And here I have one last picture taken from an angle, on which you can see the embossed background and the shimmer of the gel pen a bit better.


Donnerstag, 29. Juli 2021

Kaffee? Ist alle!

 
Hallo Ihr Lieben!
Es gibt so Sätze, wenn die fallen, ist der komplette Tag im Eimer. So geht es auch dem kleinen Hippo auf dieser Karte, die ich heute auf dem Stampcorner Blog zeige. 

Hello everyone!
There are sentences, when you hear those you just know the day is ruined. That's what's happening to the little hippo on this card, that I'm sharing over at the Stampcorner Blog today. 
 
Ich habe hier eine Slimline Card gemacht und darauf einen Filmstrip, gestanzt mit der  Comic Film Strip Stanze von WhimsyStamps aus schwarzem Cardstock, aufgeklebt. Den Rahmen habe ich mit dickerem 3D Tape auf dem Kartenrohling befestigt, die einzelnen Szenen in der Karte sind direkt auf den Rohling oder aber mit dünnerem 3D Tape auf das Designpapier aufgeklebt.

I made a slimline card here and put a film strip die cut, cut from black cardstock with the Comic Film Strip die by WhimsyStamps, on top of it. I used thicker foam to glue down the frame, the individual scenes inside them are glued directly onto the card base or onto the patterned paper with a thinner foam.


Das Designpapier in den drei einzelnen Rahmen ist aus dem Paper Pack 03 von Stampcorner. Ich habe zwei der 12 Designs ausgewählt und rechts und links jeweil das selbe Designpapier verwendet. 
Die genialen Motive sind wieder aus dem Stempelset Echt Jetzt!?, ebenfalls eine Eigenproduktion von Stampcorner. Ich liebe dieses Set! 
Damit alles schön zum Kaffee-Thema der Karte passt, habe ich zum Colorieren der Motive Copics in verschiedenen Brauntönen, kombiniert mit den W-Tönen, verwendet. 
Und hier im ersten Fenster nimmt das Drama schon seinen Lauf. Kaffee? Ist Alle! Wer möchte das schön hören? Den Text habe ich aus verschiedenen Stempeln zusammengesetzt. Das Kaffee sowie das Fragezeichen sind Stempel aus dem Set Kaffee 3. Ich habe jeweils den Rest der Texte nicht mit abgestempelt und meine zusammengebauten Texte jeweils auf Sprechblasen aus dem Stanzenset Let's Chat von MamaElephant gestempelt. 
Das "ist" ist Teil eines Stempels aus dem Set Geburtstag 2, das Alle ist der Anfang des Alles-Gute-Textes aus dem Fauli-Stempelset. 

The patterned paper in those three individual frames is from a paper pad by Stampcorner. I picked two of the 12 designs of the pad and used the same one on the left and right, putting the second design into the middle window.
And those great images are once again from Stampcorner's Echt Jetzt!? stamp set. I just love this one!
To make everything fit the coffee scene of this card I went with different shades of browns for my Copic coloring and added a bit of the W tones.
And in this first window the drama already starts. The text here means "Coffee? We're out of it!". Who wants to here that? I mixed different stamps to create this custom text and stamped them onto some of the speech bubbles from the Let's Chat die set by MamaElephant.


Im mittleren Fenster kann man buchstäblich die entsetzte Reaktion auf die Aussage aus Fenster eins sehen. Ich habe hier eine der Stanzen aus dem Set Comic Speech Bubble Dies von WhimsyStamps aus weißem Cardstock gestanzt und mit einem weiteren aus schwarzem Cardstock hinterlegt. Dabei habe ich das schwarze Stanzteil ein wenig nach links verschoben. 
Für das What habe ich das Mini Alphabet and Numbers von CC Designs benutzt. Ich habe die Buchstaben aus hellbraunem Cardstock gestanzt, sie auf die Sprechblase geklebt und ein paar Highlights mit einem weißen Gelpen hinzugefügt. 
Die Blitze sind aus dem Weather Icons Stanzenset von XCut. 
Auf die Sprechblase und die Blitze habe ich noch Highlights mit einem goldenen Gelpen aufgemalt.
 
In the middle window you can literally see the reaction on the text inside the first frame. Here I used one of the dies from the Comic Speech Bubble Dies set by  WhimsyStamps, die cut it from white cardstock and once again from black cardstock. I glued both on top of each other, moving the black one a bit to the left.
For the "what" I used the Mini Alphabet and Numbers die set by CC Designs. I've die cut the letters from light brown cardstock, glued them onto the speech bubble and added a few highlights with a white gel pen.
The flashes are made with a die from the Weather Icons die set by XCut. 
Onto the speech bubble and the flashes I added a few highlights with a golden gel pen.


Und hier ist der süße Hippo - kurz davor, in Tränen auszubrechen. Ich wollte ihm schon von Anfang an Tränen in die großen Augen malen, mir fehlte aber bisher die Idee, warum er denn weinen sollte. Nun, hier war sie. 
Ich habe die Tränen einfach beim Colorieren ins Motiv mit integriert, die Outlines mit einem schwarzen Fineliner gemalt und die Tränen dann noch dick mit Glossy Accents überzogen.
Und der Text hier, der wieder auf eine der Sprechblasen von MamaElephant gestempelt ist, ist aus dem selben Set, in dem auch die Motive kommen. 
Zum Schluss habe ich  noch einige cremefarbene Pailetten in den Fenstern verteilt.

And here's the cute hippo - very closely to burst out in tears. I wanted to add some tears to his big eyes right from the moment when I saw the image first. But until now I didn't see a reason for him to cry. Well, here it is.
I just added the tears while doing the coloring, made some outlines with a black fineliner and then covered them with a thick layer of Glossy Accents.
The text here means "for real!?" and ist again stamped onto one of the speech bubbles by MamaElephant. 
In the end I added a few cream colored sequins to the inside of the frames.

Mittwoch, 28. Juli 2021

Hallo Sommer

 
Hallo Ihr Lieben!
Der Sommer ist da! Also zumindest hoffe ich, dass er das inzwischen auch wettertechnisch ist, denn laut Kalender sollte er das ja. Und ehrlich gesagt - diese Karte habe ich bereits kurz nach Pfingsten gewerkelt. Das Wetter war kalt und nass, ich hatte Urlaub und verreisen wollten wir einfach noch nicht, da gerade erst alle Grenzen wieder geöffnet waren. Also habe ich mir den Sommer gebastelt. 

Hello everyone!
Summer is here! Well, at least I hope that it is weather related since the beginning of summer was already over a month ago. And honestly - I made this card end of may. The weather was cold and rainy, I had 2 weeks off work and we didn't want to travel yet since borders were just re-opened. So I crafted my own summer feeling.

Hier habe ich ein Stück weißen Cardstock leicht mit Distress Oxide Gathered Twigs gewischt. Dann habe ich mit derselben Tinte den Holzhintergrund von JM-Creation quer über die Karte gestempelt. 
Auf die untere Hälfte des Cardstocks habe ich dann den Text aufgeklebt. Dafür habe ich das Hallo, das neben dem Motiv des Stempelsets Glückspost abgestempelt wird, auf ein Stück weißen Cardstock gestempelt, ausgeschnitten und aufgeklebt. Darunter kam ein ausgestanztes Sommer. Es ist aus weißem und hellblauem Cardstock gestanzt, versetzt übereinander und dann auf die Karte geklebt. Darunter kam noch ein Herzliche Grüße, für das ich zwei der "Stanzen" aus dem Set Geprägte Grüße 2 verwendet habe. Ich habe die Worte in weißen Cardstock geprägt und die Streifen dann mit Distress Oxide Salvaged Patina eingefärbt.

Here I lightly inked up a piece of white cardstock with Distress Oxide Gathered Twigs and then used the same ink pad to stamp the wood pattern all across the cardstock.
Onto the lower half I added a text. It means "hello summer - greetings from the heart" and is made from a combo of stamps and dies. The two words on the blue strips get cut into the cardstock. I used two strips of white cardstock and then inked those up with Distress Oxide Salvaged Patina.


Für das Urlaubsfeeling habe ich ein Bullauge samt Flaschenpost auf der Karte aufgeklebt. 
Das Bullauge ist aus goldenem Spiegelcardstock gestanzt, durch die Löcher außenrum habe ich goldene Brads gesteckt. Zuvor habe ich eine Lage Folie hinter das Bullauge geklebt. Das Bullauge ist mit dünnem 3D Tape auf den Holzhintergrund geklebt.
Für die Szene im Bullauge habe ich erst einen Kreis, ein klein wenig größer als der Ausschnitt im Bullauge, aus dem Hintergrund ausgestanzt. Dahitner habe ich einen weißen Kreis gesetzt. Da ich das Wasser aus zwei Lagen Vellum, das ich mit Distress Oxide Salvaged Patina eingefärbt habe, gemacht habe, brauchte ich einen weißen Hintegrund, da sonst die schwarze Mattung des Holzhintergrundes das Wasser zu dunkel gemacht hätte. Oberhalb des Wassers habe ich ein Stück hellblauen Cardstocks geklebt. In die Ecke oben links kam eine Wolke, unter die ich die Sonnenstrahlen gesteckt habe. 
Die Flaschenpost aus dem Stempelset Maritimes Set habe ich mit Copics coloriert und dann mit einer Schicht Glossy Accents überzogen. Dann habe ich sie zwischen die beiden Lagen Vellum geklebt.
Die Spiegelungen auf dem Wasser sowie die beiden Vögel am Himmel sind per Hand gezeichnet.

For a vacation feeling I added a porthole and a message in a bottle. 
The porthole is die cut from golden mirror cardstock. I glued a circle cut from acetate behind it and then put some golden brads through the holes. To glue it onto the card I used thin foam tape.
For the scene inside the porthole I've die cut a circle from white cardstock, making it a bit larger than the cut out in the window. Since I made my water from two layers of vellum that I colored with Distress Oxide Salvaged Patina, I had to put a white circle behind it or the black matting of the wood background would have darkened the water too much.
Over the water I added a piece of light blue cardstock. In the top left corner I glued down a cloud and put some sun rays behind it. 
The bottle with the message is colored with Copics and then covered with a layer of Glossy Accents. Then I glued it behind the two layers of  vellum.
The reflections on the water and the two birds in the sky are drawn by hand.

 
Und hier habe ich noch ein Bild, auf dem man die Folie im Bullauge und auch das Glossy Accents auf der Flasche ganz gut erkennen kann. 

And here I've taken a picture on which you can see the acetate behind the porthole and the Glossy Accents on the bottle pretty well.

Dienstag, 27. Juli 2021

Soaking Up Some Fun

 
Hallo Ihr Lieben!
Diese sommerliche Karte zeige ich heute auf dem Stamping-Fairies Blog. Und wie man sieht, genießen nicht nur die Menschen das tolle und heiße Wetter!

Hello everyone!
Today I am sharing this card over at the Stamping-Faires Blog. And as you can see, not only humans enjoy the hot and wonderful summer weather!

Hier habe ich für den Hintergrund ein Stück weißen Cardstocks mit Distress Oxide Scattered Straw, Tumbled Glass und Salty Ocean gewischt. Dabei habe ich den Bereich, an dem später der Teich sein sollte, weiß gelassen. Dann habe ich ein paar Wassertropfen darüber gespritzt. 
Für die Sonne mitsamt ihren Strahlen kam der Sunray Backdrop von LawnFawn zum Einsatz. Den habe ich aus hellgelbem Cardstock gestanzt und mit Distress Oxide Scattered Straw und Wild Honey gewischt, so dass die Strahlen zum Ende hin immer heller werden.
Rund um die Szene kam ein gestitchter Rahmen, den ich aus schwarzem Cardstock gestanzt habe.
Der Text und fast alle Motive sind aus dem Stempelset Swimming Hole Friends von MFT. Den Text habe ich mit weißem Embossingpulver auf einen Streifen schwarzen Cardstocks embosst und oben rechts auf der Karte unter den Rahmen geschoben. 

Here I inked up a piece of white cardstock with Distress Oxide Scattered Straw, Tumbled Glass and Salty Ocean, leaving the area where I had planned to put the swimming hole white. Then I splattered some droplets of water over the background.
For the sun with its rays I used the Sunray Backdrop die by LawnFawn. I've die cut it from light yellow cardstock and inked it up a bit with Distress Oxide Scattered Straw and Wild Honey so the rays get lighter the further away from the sun they are.
Around the scene I've put a stitched frame, die cut from black cardstock.
The text and nearly all the images are from the Swimming Hole Friends stamp set by MFT. I white heat embossed the text onto a strip of black cardstock and tucked it under the frame in the top right area of the card.


Und hier seht Ihr die genialen Frösche, die den Tag am See genießen. Ehrlich gesagt waren die es, weswegen ich das Set unbedingt haben musste, ich finde die einfach herrlich! 
Für das Gras habe ich eine der Grassy Hills Edges benutzt und damit den oberen Rand eines Stück grünen Cardstocks gestanzt. Dann habe ich ihn von den Ecken her ein wenig mit Distress Oxide Mowed Lawn abgedunkelt. 
Den Bereich für den Teich habe ich ausgeschnitten. Dafür habe ich den Teich einfach auf den grünen Cardstock gestempelt und außerhalb der Stempellinien ausgeschnitten. Hinter den Ausschnitt kam dann ein Stück blaue Folie auf die ich den Teich weiß aufembosst habe. Durch die blaue Folie verändert sich der Teil des Frosches, der im Wasser ist, und ebenso der Hintergrund. So sieht das Wasser echter aus.
Alle Motive habe ich mit Copics coloriert, ausgeschnitten und auf den Hintergrund geklebt. Auf dem Bauch des sich sonnenden Frosches hat ein kleiner Vogel Platz genommen, oben am Himmel schweben zwei kleine Wolken. Oh, und die Rohrkolben hinter dem rechten Stein sind aus dem Stempelset Splendid Swans. Ob Rohrkolben und Palmen wirklich zusammen vorkommen, kann ich nicht sagen, aber für meine Szene hat es mir gefallen. 

And here you see the great frogs enjoying their free time at the lake. Honestly, it was these frogs that sold the stamp set to me. I just love them!
For the grass I've die cut the top edge of the piece of green cardstock with one of the Grassy Hills dies, then darkened this cardstock up a bit from the corners with Distress Oxide Mowed Lawn.
The area for the swimming hole is cut out. I simply stamped the swimming hole onto the green cardstock, then cut it out outside the stamped lines. Behind the cut out I've placed a piece of blue acetate onto which I white heat embossed the swimming hole image. Due to the blue acetate, the area of the frog that's under water and also the sunrays behind it change color and the water looks more realistic. 
I colored all images with Copics, cut them out and glued them onto the background. A little birdie sat down on the frog that's laying in the sun, there are two fluffy white clouds floating in the sky. The cattails behind the stone on the right are from the Splendid Swans stamp set. I have no idea if cattails and palm trees grow in the same area, but I liked the combination for my scene. 

Montag, 26. Juli 2021

Have a magical day!

 
Hallo Ihr Lieben!
Bereits letzte Woche habe ich ja angekündigt, dass ich beim Machen meiner MamaElephant Karte so viele Stempelsets wieder zur Hand genommen habe, die schon länger nicht mehr im Einsatz waren, dass ich gleich noch eine weitere Karte gewerkelt habe. Und die zeige ich Euch nun heute. 

Hello everyone!
I already told you last week, that while making my MamaElephant card, I came across so many stamp sets I hadn't used in quite some time, that I decided to make another one. And this is what I'm sharing with you today. 

Es ist wieder eine Slimline Card geworden, ich mag den extra Raum, den dieses Format für eine Szene bietet. Basis war die Woodland Slim Stanze, auch wenn man das hier kaum noch erkennt. Ich wollte nur einen Baum auf der linken Seite und habe den rechts einfach weggeschnitten. Dadurch sah der etwas gewellte Himmel - eigentlich stanzt die Stanze mittig einen Bereich mit Schneeflocken, die für meine Karte aber nicht gepasst haben - komisch aus, so dass ich auch die Ränder des Ausstanzung mit einem Cutter begradigt habe.
Die Karte besteht aus vielen Lagen, die alle mit 3D Tape aufeinander geklebt sind. Und diejenigen unter Euch, die mich kennen, sind bestimmt erstaunt über die Pink und Lila Kombi, denn die geht bei mir ja eigentlich gar nicht. Hier hat es sich aber so ergeben. Ich wollte einen etwas mystischen Himmel, also habe ich ein Stück weißen Carstock mit Distress Oxide Dried Marigold, Kitsch Flamingo, Shaded Lilac und Chipped Sapphire gewischt. Und so war ich farblich festgenagelt, denn grün oder blau wollte ich dann nicht auch noch ins Spiel bringen... 
Auf den fertig gewischten Himmel habe ich noch weiße und silberfarbene Metallik-Aquarellfarbe aufgespritzt. Außerdem habe ich hier ein paar silberne und irisierende, kleine Stern-Pailetten und einen Planeten aus dem Stempelset Me and my Dragon aufgeklebt.

Again I've made a slimline card, I love the extra space this size of card offers for a scene. Base for this card was the Woodland Slim die, even if you can't comletly tell this at first sight. I only wanted a tree on the left, so I cut off the one on the right. And then the kind of wonky inner edges - the die cuts some kind of oval with snowflakes from the center of the sky, but those snowflakes didn't go with my card theme - looked strange and I took a cutter to cut the inner edges straight. 
This card is made from lots of layers, all glued on top of each other with foam tape. And those of you that know me might be surprised about the pink and purple color scheme I used here, because I really don't like this, it's so "little girl" like. Here I wanted to create some kind of mystic sky and so I inked up a piece of white cardstock with Distress Oxide Dried Marigold, Kitsch Flamingo, Shaded Lilac and Chipped Sapphire. And so I was stuck on those colors. I just didn't want to bring in blues and greens as well.
Onto the finished inked sky I splattered some white and silver metallic watercolor and also glued down a few starshaped small silver and iridescent sequins and a planet from the Me and my Dragon stamp set here.


Die Berge und die Märchenstadt-Silhouette sind mit zwei Stanzen aus dem Kingdom Trio Stanzenset gemacht. Die hintere Bergkette ist aus dunkelgrauem Cardstock, die vordere aus silbernen Shimmercardsdtock gestanzt. Außerdem habe ich mit einem weißen und silbernen Gelpen Highlights aufgemalt. Die Stadt habe ich aus hellgrauem Cardstock und irisierendem Vellum gestanzt und beide Teile aufeinander geklebt. So hat sie einen mystischen Schimmer, den man auf dem Bild oben ganz gut sehen kann. Auch hier habe ich mit einem silbernen Gelpen Hightlights aufgemalt. 

The mountains and the fairytale like skyline are made with two dies from the Kingdom Trio die set. The back row of mountains is die cut from dark grey cardstock, the front one from silver shimmer cardstock. I also added some highlights with a white and silver gel pen. The skyline is die cut from light grey cardstock and iridescent vellum, then I glued bloth on top of each other. Now this skyline has some kind of mystic shimmer, that you can see pretty well on the pic above. Also here I used a silver gel pen for a few highlights. 


Die Hügel vor der Stadt habe ich aus schwarzem Cardtsock, die vordere aus hellgrauem Cardstock gestanzt. Sie sind einfach aus der kompletten Woodland Slim Szene ausgesschnitten, zwischen die beiden Lagen kam eine braune Lage mit dem Baum auf der linken Seite. 
Die schwarzen Hügel sind mit Shaded Lilac, die hellgrauen mit Kitsch Flamingo gewischt, dann habe ich wieder farblich passende Metallik-Wasserfarbe darüber gespritzt. Das sieht ein wenig aus wie Blüten in einer andersfarbigen Wiese. 
Dem Baum habe ich ein paar Blätter verpasst - da die Szene ja eigentlich im Winter ist, hat er kein Laub. Dafür  habe ich die Wolkenstanze aus dem Offset Rainbow Stanzenset verwendet und zweimal ausgestanzt. Dann habe ich sie mit kleinen Punkten in Lila eingefärbt und einige weitere Punkte mit einem lilafarbenen Spica-Pen und einem weißen Gelpen hinzugefügt. Beide Wolken habe ich oben an den Baum geklebt und den Überstand weggeschnitten.
Am Himmel fliegt ein großer pinkfarbener Drache, auf seinem Hals reitet ein Mädchen. Und unten am Boden warten ihr Bruder, ein Fuchs und ein Einhorn darauf, dass sie landen.  Ich denke, ihr Bruder möchte auch eine Runde mitfliegen.
Die Motive auf meiner Karte sind aus dem Stempelsets Little Unicorn Agenda, Me and my Dragon, Dragon Wishes, Dandelion Wishes und Corner Flowers (die lezten beiden habe ich für die Blumen in der unteren rechten Ecke der Karte verwendet). Alle sind mit Copics coloriert, den Drachen habe ich zudem mit ein paar kleinen Punkten mit einem Spica-Pen etwas Struktur auf die Haut gezaubert. 
Und weil ich finde, dass Schmetterlinge perfekt in so eine märchenhafte Szene passen, habe ich auch davon noch ein paar hinzugefügt. Die habe ich mit einer der Stanzen aus dem Slim Window Dressing Stanzenset aus weißem Cardstock gestanzt, mit Copics oloriert und über der Karte verteilt.

The hill in front of the skyline is die cut from black, the front ones from light grey cardstock. I simply cut those out of the complete Woodland Slim scene, inbetween them I've added a brown layer with a tree on the left side. 
The black hills are inked with Shaded Lilac, the light grey ones with Kitsch Flamingo, then I splattered some metallic watercolor in matching colors onto these hills. I think those splatters look a bit like flowers in a differently colored meadow.
I added some leaves to the tree - the scene the die cuts is a winter scene, so the tree doesn't have any leaves. I used the cloud die from the Offset Rainbow die set and cut it out twice. Then I colored it in purple, laying down a lot of small dots and adding a few more dots with a purple Spica pen and a white gel pen. I glued both clouds to the top of the tree and cut off the excess.
In the center of the card a large pink dragon is flying, a little girl is riding on his neck. And down on the ground her brother, a fox and an unicorn are waiting for them to land. Guess the brother wants to go on a ride as well. 
The images on this card are from the Little Unicorn Agenda, Me and my Dragon, Dragon Wishes, Dandelion Wishes and Corner Flowers stamp set, the latter two were used to create the little spot of flowers in the bottom right corner of the card. All images are colored with Copics, I used some Spica pens to add some structure to the drangons' skin.
And since I think butterflies are perfect for such a magical fairytale scene, I also added a few of those. I used a die from the Slim Window Dressing die set to cut them from white cardstock, colored them with Copics and glued them across the card.


Und hier ist noch die rechte Seite der Karte mit den schon erwähnten Blumen unten rechts. Da ich ja auf Grün verzichten wollte, habe ich auch die Blumenstängel -blätter in lila coloriert, wie auch das Laub des Baumes. 
Hier fliegt ein weiterer, kleinerer Drache aus dem Dragon Wishes Stempelset über die Stadt im Hintergrund. 
Das einzige Element auf der Karte, das nicht mit Produkten von MamaElephant gemacht ist, ist der Text. Da hatte ich partout keinen passenden. Also habe ich zu einem aus dem Tiny Fairytale Stempelset von LawnFawn gegriffen, ihn silber auf einen Streifen schwarzen Cardstocks embosst und neben den Blumen auf den pinkfarbenen Hügel geklebt.

And here is the right side of the card with the already mentioned flowers in the bottom right corner. Since I didn't want to add any greens I went with purple for the leaves and stems of the flowers - as I did for the leaves on the tree.
Here another smaller dragon from the Dragon Wishes stamp set is flying above the city in the background.
The only element on this card that isn't made with a product by MamaElephant is the text. I just didn't have a matching one. So I used this one from the Tiny Fairytale stamp set by LawnFawn. I silver heat embossed it onto a strip of black cardstock and glued it next to the flowers onto the pink hill.

Samstag, 24. Juli 2021

Stempeleinmaleins - Ausgabe vom 24. Juli 2021

 
Hallo Ihr Lieben!
Das heutige Thema beim Stempeleinmaleins ist die One Layer Card, also eine Karte ohne aufgeklebte Elemente. Ich liebe ja das Layern und Matten, so sind One Layer Cards fast immer eine Herausforderung für mich. Aber diese hier ist genau so geworden, wie ich sie von Anfang an im Kopf hatte. 
Ganz Kritische könnten jetzt behaupten, dass das ja gar keine One Layer Card ist, weil ich den Kartenaufleger gemattet habe. Aber das ist vollkommen in Ordnung so, finde ich. Einen kleinen Rahmen braucht meine Karte dann doch. 

Hello everyone!
Out theme this week over at Stempeleinmaleins is the One Layer Card, which is a card with no glued on elements. I love layering and matting and so those One Layer Cards are a real challenge for me - most of the times. But this one turned out exactly how I had it in mind and I love it.
Those critical ones among you might say this isn't a real One Layer Card since I matted the decorated cardstock. But that's okay - and my card needed some kind of frame.

Basis meiner Karte war ein Stück hellblauer Cardstock. Den habe ich nach dem Dekorieren, wie schon erwähnt, schwarz gemattet und auf einen weißen Kartenrohling geklebt. 

I went with a piece of light blue cardstock as the base of my card. After decorating it I matted it black - as mentioned above - and then glued it onto a white note card.


Hier auf diesem Bild könnt Ihr die echte Farbe des blauen Cardstocks besser sehen. Auf dem Bild oben wirkt er irgendwie viel kräftiger....
Ich habe mit dem Cloudy Day Stempel von Create A Smile und hellgrauer Tinte die tollen Wolken aufgestempelt. Die Wolken mit kompletten Outlines habe ich mit hellgrauen Polychromos, die mit den gepunkteten Linien nur in weiß ein wenig schattiert.
Über die Wolken kamen dann die Seifenblasen. Dafür habe ich die Bubbles Stencil von LawnFawn benutzt und sie erstmal ganz leicht mit weißer Stempelfarbe eingefärbt. Dann habe ich Distress Ink Squeezed Lemonade, Wilted Violet und Peacock Feathers von außen her ganz leicht aufgetragen und alles mit mehr weißer Stempelfarbe verwischt. Ich habe bewusst die Distress Ink und nicht die Oxides verwendet, da die viel deckender sind. Mit den Inks sieht man durch die weiße Tinte noch die Wolken im Hintergrund durch, was den Look der Seifenblasen noch realistischer macht. 
Mit einem weißen Gelmarker habe ich einige Details aufmalt und anschließend mit der weißen Stempelfarbe, übrigens das Yeti von LawnFawn, habe ich dann noch die zerplatzten Blasen aus dem Bubbles of Joy Stmepelset von LawnFawn dazugestempelt.

On this picture you can see the real color of the light blue cardstock. For some reason it looks a lot brighter on the first one...
I used the Cloudy Day stamp by Create a Smile and grey ink to stamp this great cloud background. I shaded the ones with a solid outline with grey Polychromos, the ones with dotted lines just with a white one.
Then I added the soap bubbles on top of the clouds. I used the Bubbles stencil by LawnFawn and started with just putting down the bubbles on the cardstock by filling them lightly with white ink. Then I added Distress Ink Squeezed Lemonade, Wilted Violet and Peacock Feathers to just the outer edge, blending them a bit into each other. Then I added more of the white ink and blended the colors together even more. I decided to go with Distress Ink instead the Oxides since those are pretty opaque. With the Inks you can still see the clouds through the colors and that makes the soap bubble look even more realistic.
I added a few details with a white gel pen and stamped some of the bursting bubbles from the Bubbles of Joy stamp set between the bubbles, using the same ink I used to fill in the bubbles, which by the way is the Yeti ink by LawnFawn. 


So, jetzt müssen die Blasen ja auch irgendwoher kommen! Also habe ich diesen süßen Hasen aus dem Dandelion Wishes Stempelset von MamaElephant verwendet. Ich habe ihn mit dem No-Line Stempelkissen von Ink On 3 auf den blauen Cardstock gestempelt und dann mit Polychromos coloriert. Dabei habe ich dann die Pusteblume, die der Hase eigentlich in den Händen hält, durch einen Stab zum Seifenblasenpusten ersetzt.
Der Text ist aus dem Stempelset Soda Pop von MFT und mit schwarzer Tinte direkt aufgestempelt.
Als letztes habe ich dann noch einen Rahmen mit einem weißen Gelpen aufgemalt.

Well, all those bubbles have to come from somewhere. So I picked this cute bunny from the Dandelion Wishes stamp set by MamaElephant and stamped him with the no-line ink pad by Ink on 3 onto the blue cardstock. Then I colored him in with Polychromos and while doing that I replaced the dandelion he's originally holding with a wand.
The text on the card is from the Soda Pop stamp set by MFT and stamped with black ink.
As a finishing touch I've drawn a frame with a white gel pen.

Donnerstag, 22. Juli 2021

Wir gehen auf Weltreise!

 
Hallo Ihr Lieben!
Bei MamaElephant gibt es einen Gastdesigner-Call für ihren diesjährige Anniversary Release. Und dafür habe auch ich eine Karte gewerkelt. Das Thema ist "anything goes", man kann also aus dem Vollen schöpfen.

Hello everyone!
Over at MamaElephant they are having a GD call for their 2021 anniversary release. And also I have made a card for it. The theme is "anything goes", so it's easy to pick your favorites from all the great stamps they released so far.

Da ja die Urlaubszeit vor der Tür steht, habe ich eine Karte zum Thema Reisen gemacht. Und weil es so viele tolle Orte auf der Welt gibt, habe ich eine Slimline Card gemacht, damit mehr draufpasst. 
Der Rahmen mit den vier Fenstern habe ich mit der Slim Comic Strip Stanze von MamaElephant aus schwarzem Cardstock gestanzt. Hinter die Fenster habe ich ein etwas größeres Stück weißen Cardstock gesetzt und mir die Fenster markiert, um darin die einzelnen Szenen zu gestalten. 
Der süße Hase mit dem Globus aus dem School Rules Stempelset passte so perfekt zum Thema meiner Karte, dass ich ihn außen auf den Rahmen geklebt habe. Und weil er da allein ein wenig verloren wirkte, habe ich noch einen Streifen weißen Cardstocks daneben gesetzt, auf den ich ebenfalls einen zum Thema Reisen passenden Spruch gestempelt habe. Da es einen Stempel mit dem Text, der mir vorschwebte und der auch noch die passende Länge hat, nicht gibt, habe ich einfach die einzelnen Buchstaben aus dem Set Little Signage Agenda verwendet, um den Text zu stempeln.

Since it's summer, and that means vacation time, I made a card with a travel theme. And since there are so many wonderful places on planet earth I decided to make a slimline card to fit more of them onto my card.
The frame with the four windows is made from black cardstock with the Slim Comic Strip die by MamaElephant. Behind the frame I've put a slightly larger piece of white cardstock and marked the frames on it so I knew where to create the individual scenes.
The cute bunny with the globe from the School Rules stamp set was so perfect for the theme I've picked that I just had to glue him down to the frame. And since he looked a bit lost I added a strip of white cardstock onto which I've stamped a text that goes with my travel theme. Well, there isn't a stamp with the text I had in mind and also none that would have been long enough so I simply used the individual letter stamps from the Little Signage stamp set to stamp my text.


Damit man die einzelnen Szenen besser sehen kann, habe ich noch zwei Nahaufnahmen geschossen.
Das linke Fenster ist Paris gewidmet. Alle Stadt-/Skylinestempel sind aus dem Stempelset Snow Globe Scenes. Ich habe sie jeweils aufgestempelt, coloriert und per Hand ausgeschnitten. Dann habe ich sie in das jeweilige Fenster geklebt und die Straße - gemacht mit einer Stanze von WhimsyStamps, aus demselben Set ist auch das Flugzeug über London - vor die Stadt geklebt. Die verdeckt dann auch die unteren Ränder des Motives, an dem man zu gut sehen konnte, dass die Motive ausgeschnitten und aufgeklebt sind. Dann habe ich jeweils mit einer Wolkenschablone und Distress Ink Salty Ocean den Himmel in den Fenstern gewischt und etwas weiße Acrylfarbe sowie blaue Metallik-Wasserfarbe darübergespritzt.
Zurück nach Paris! Es gibt so viele tolle Little Agenda Stempelsets, so dass ich zu jedem Ort auf meiner Karte ein passendes kleines Motiv gefunden habe. Der kleine Hase mit der Weinflasche - und ja, ich bediene mit der Wahl der Motive doch einige Klischees - ist aus dem Set Little Bunny Agenda. Alle Motive sind wie immer mit Copics coloriert. Da Paris ja die Stadt der Liebe ist, habe ich noch die kleine Sprechblase mit dem Herz aus dem Set Little Bear Agenda mit aufgeklebt. Der Text im oberen Teil des Rahmens ist mit einem der Stempel aus dem Set Occasional Labels gemacht.
Vo Paris geht es weiter nach London - und ja, dort regnet es natürlich. Dem kleinen Hund aus dem Little Dog Agenda Stempelset macht das aber gar nichts!

To make you see the individual scenes better I took two close ups of my card.
The window on the very left is dedicated to Paris. All city/skyline images are from the Snow Globe Scenes stamp set. I've stamped them, colored them and cut them out by hand. Then I glued them into the individual windows and glued the street - made with a die by WhimsyStamps, as is the plane above London - in front of the city. The street also covers the bottom edges of my cities, where it was plain to see that they were glued onto the card. Then I used a cloud stencil and Distress Ink Salty Ocean to ink up the sky above the cities and spritzed some white acrylic paint and blue metallic watercolor on top of it. 
Back to Paris! There are so many great Little Agenda stamp sets that it was easy to find a little image to match all the cities. The little bunny with the wine bottle - and yes, I am playing with all the clichees here on purpose! - is from the Little Bunny Agenda stamp set. As nearly always all images are colored with Copics. Since Paris is the city of love I also added a little speech bubble with a heart from the Little Bear Agenda to this window. The text in the top area of this window is from the Occasional Label stamp set.
From Paris we're traveling on to London - and yes, of course it's raining there. But that doesn't bother the little dog from the Little Dog Agenda stamp set.

Der nächste Halt auf unserer Reise ist ein kleines verschneites Dorf in den Alpen. Und weil es einfach aussieht wie ein kleiner Ort in den bayrischen Alpen war der kleine Hund mit dem Bierglas einfach perfekt. Nun ja, als bayrisches Mädel muss ich wohl so denken.... ;)
In dieses Fenster habe ich auf den Himmel einen größeren Text gestempelt, um dem Empfänger der Karte viel Glück für seine Reise zu wünschen. Der Text aus dem Little Agenda Spaceship Stempelset ist schwarz auf den Himmel aufembosst.
Und der letzte Stop dieser Reise ist New York. Ich weiß wirklich nicht, was typisch new-york-anisch gewesen wäre, aber natürlich macht man auf Reisen immer Fotos. Und so habe ich die kleine Katze mit der Kamera aus dem Little Cat Agenda Stempelset in diesem Fenster verwendet. Nun ja, und nachdem New York ja auch "the big apple" genannt wird, dachte ich, ein weiterer Text aus dem Stempelset Occasional Labels mit den Worten "dream big" würde hier doch prima passen.

Next stop on our tour is a snowy little village in the Alps. And since I think these houses and mountains look like they could be somewhere in the south of Bavaria I think the little dog with the beer just fits perfectly into this scene. As a  bavarian girl that's just how I think. ;)
Here I added a larger text from the Little Agenda Spaceship stamp set to wish the recipient of this card all the best for his travels. I've black heat embossed the text onto the sky. 
And the last stop on our trip is New York. I have no idea what'd be typialls new-york-anish but taking pictures during travels is always a good thing! So I added the little cat with the camera from the Little Cat Agenda stamp set to this scene. And since New York is also called the Big Apple I thought another text from the Occasional Labels stamp set saying "dream big" would be the perfect pick to add to the sky above New York.

Nachdem ich für diese Karte wirklich viele Stempelsets hervorgeholt hatte und beim Durchschauen nach passenden Motiven doch so viele Sets (wieder-)gefunden habe, die ich schon länger nicht mehr benutzt habe, habe ich gleich noch eine weitere Karte gemacht. Schließlich hatte ich die Stempel schon alle auf dem Tisch liegen. Aber die zeige ich Euch in den nächsten Tage hier.

Since I brought out a lot of stamp sets for this card I (re-)found quite a few sets I hadn't used for a while I decided to make another card. I already had all the sets on my table, right? But this second card I'm going to share with you one of the coming days.

Mittwoch, 21. Juli 2021

Eine Karte mit Gutschein

 
Hallo Ihr Lieben!
Letzten Monat hatten wir Euch beim Stempeleinmaleins die "selbstschließende Karte" gezeigt. Damals bin ich nicht dazugekommen, ebenfalls eine dieser Karten zu machen, ausprobieren wollte ich sie aber dennoch. Also hole ich das heute mit dieser Karte nach.

Hello everyone!
Last month we shared a tutorial for a "selfclosing card". I didn't have the time to make one back then but I really wanted to try it. So I'm doing it with today's card.

Hier habe ich grünen Cardstock für die Kartenbasis verwendet. Ich habe alle Teile/Klappen erst mit schwarzem Cardstock beklebt und dann weißen Cardstock daraufgeklebt. Den habe ich zuvor rundum mit Blumen/Flecken im 70er Jahre Look bestempelt, die ich grün coloriert habe. An den inneren Rand habe ich ein paar kleine Punkte gestempelt, für die ich einfach zwei der Punkte aus dem Stempel Schneeflocken Hintergrund ausgeschnitten habe.
Auf eine der der Klappen habe ich den Text Post für Dich mit schwarzer Tinte aufgestempelt. Und weil die anderen drei Teile dann nur mit den Blumen und Punkten im Vergleich zu fad aussahen, habe ich noch drei Pfeile aus dem Stanzenset Tag Groß aus schwarzem Cardstock gestanzt und so aufgeklebt, dass sie auf das Post für dich zeigen.

Here I used green cardstock for my cardbase. I glued black cardstock on all the flaps and then white cardstock on top. Onto the white cardstock I stamped those flowers in a 70ies look all around the edge with black ink and colored them green. To the inner edge of the flowers I added a few black dots.
Onto one of the flaps I stamped a "post for you" text with black ink. And since the other three flaps looked too plain with just the flowers on the edge I've die cut three arrows from black cardstock and glued them on those flaps, letting them point towards the text.


Und so sieht die geöffnete Karte aus - die vier Klappen lassen Platz für Deko während im mittleren großen Teil genug Platz für einen persönlichen Text ist. Wer die Karten aus unserem Tutorial des SEME kennt, dem fällt vielleicht auf, dass bei mir die Klappen von der Größe her ein wenig verändert sind. Ich habe die Breite der seitlichen Klappen geändert, so dass das tolle Motiv darauf passte und gleichzeitig auf der anderen Seite Platz für eine Gutscheinkarte war.

And this is the opened card - the four flaps leave enough room for decorations while there's plenty of room for a personal message in the large middle part of the card. If you've seen the tutorial on Stempeleinmaleins you might realize that my flaps are a bit different in size. I changed the width of the side flaps so the image would fit on one while there's enough room for a giftcard on the other one.


Dieser wunderschöne Stempel ist neu von JM-Creation. Ich fand, grün würde ihr super stehen - also habe ich sie mit Copics coloriert und dabei das Shirt und die Brille jeweils in recht kräftigem Grün coloriert. Die Brillengläser und auch der Mund sind mit Glossy Accents überzogen.
Die Blumen, die ich auch hier jeweils am Rand aufgestempelt habe, kommen ebenfalls mit dem Mädel im Set. Ich habe die Blumen innen auf der Karte mit grüner Tinte gestempelt und nicht coloriert. So wirkt das Motiv besser.

This beautiful image is a new one by JM-Creation. I thought, green would fit her great - so I colored her with my Copics and picked a quite brigth green color combo for her shirt and glasses. The glasses and her mouth are covered with a thick layer of Glossy Accents.
The flowers, that I stamped onto the white cardstock all around the inside as well, come in the same set as the girl. I stamped those with green ink on the inside and left them uncolored so they wouldn't draw too much attention from the image.


Wie schon erwähnt, habe ich auf der anderen seitlichen Klappe eine Gutscheinkarte eingebaut. Dafür habe ich einfach ein weiteres Stück grünen Cardstock als Tasche aufgeklebt. Darauf habe ich ebenfalls ein paar Blumen aufgestempelt und außerdem einen Streifen schwarzen Cardstocks quer über die Tasche geklebt, auf den ich zuvor den Text weiß aufembosst habe. 
Der Stempel Shopping Gutschein ist aus einem weiteren neuen Set, aus dem auch der andere Text auf meiner Karte ist.

As mentnioned above I included a giftcard on the other side flap of the inside of the card. I simply glued a piece of green cardstock down there as a pocket and stamped a few flowers onto it. Then I glued a strip of blac cardstock across it on which I white heat embossed a "shopping giftcard" text.


Hier ist der bereits erwähnte text. Ich habe ihn einfach mit schwarzer Tinte direkt auf den weißen Cardstock gestempelt.

Here's another text I stamped onto the inside of the card with black ink. It means "there's no such thing as too many pair of shoes for a woman, only too little space in the closet". 


Und zu dem Text auf der gegenüberliegenden Klappe passen natürlich perfekt ein Paar High Heels. Die habe ich mit einer der Stanzen aus dem Schuh-Set aus grünem Cardstock gestanzt, die Sohle, den Absatz und das innere des Schuhs schwarz angemalt und dann auch die Schuhe mit Glossy Accents überzogen, damit sie schön glänzen. Dann habe ich sie übereinander auf die Karte geklebt.

And of course the card needed a pair of high heels after that saying on the bottom flap. I've die cut those from green cardstock, used a black marker to color the sole, inside and heel and then covered them with Glossy Accents to give them a nice shine. Then I glued them onto the card on top of each other.

Dienstag, 20. Juli 2021

Ein bisschen Wellness...

 
Hallo Ihr Lieben!
Mir selbst war es ja auch neu, aber auch Bären gehen auf Wellness-Trip! Den Beweis trete ich mit dieser Karte an, die ich heute auf dem Stamping-Fairies Blog zeige.

Hello everyone!
It was new to me as well, but bears enjoy a spa day, too! I am sharing the proof with this card, that I'm sharing over at the Stamping-Fairies Blog today. 

Ich habe hier den Brick Wall Cover-Up Hintergrund aus hellgrauem Cardstock geschnitten und mit dunkelgrauem Cardstock hinterlegt. Mit den Motiven darauf, war mir das dann aber doch ein wenig zu unruhig, so dass ich noch eine Lage Vellum darüber gelegt habe. Nun sieht es aus wie ein Paravent, finde ich. 
Um die Szene habe ich einen  gestitchten Rahmen aus kraftfarbenem Cardstock gelegt. 
Oben links in der Ecke habe ich den Text untergebracht. Der ist aus dem Stempelset Always Bring a Smile. Ich habe ihn schwarz auf ebenfalls kraftfarbenen Cardstock gestempelt, zu einem Banner geschnitten und mit einem Banner aus schwarzem Cardstock hinterlegt.
Die Blumen oben rechts auf dem Rahmen sind aus dem Stempelset Polynesian Paradise. Irgendwie brauchte meine Karte noch ein wenig tropischen Flair, und irgendwie verbinde ich diese Blüten mit den Bildern aus Wellnesshotel-Werbungen...
Links unter den Rahmen habe ich die Badewanne aus dem Stempelset Spa Day geschoben und zwar genau so weit, dass der Hase, der eigentlich in der Wanne sitzt, nicht mehr zu sehen ist. Den Überstand habe ich weggeschnitten.

Here I've die cut the Brick Wall Cover-Up background from light grey cardstock and put a piece of dark grey cardstock behind it. Well, with the images on top that looked too busy so I've placed a layer of vellum over the background and think, it now looks like one of those paravents.
Around the scene I've glued a stitched rectangle frame, die cut from craft colored cardstock.
In the top left area I've glued down the text. It's from the Always Bring a Smile stamp set. I've stamped it black onto some craft colored cardstock, cut it into a banner and then put a black banner behind it as a matting.
The flowers in the top right corner are from the Polynesian Paradise stamp set. I felt like my card needed a bit of a tropical touch and somehow I always think of a spa resort advertising when I look at this type of flowers.
In the lower left corner I've tucked the bath tub from the Spa Day stamp set under the frame, far enough so the bunny that's sitting in this tub, can't be seen anymore. Then I've cut off the excess.


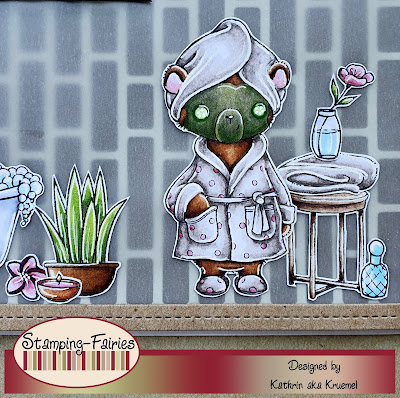
Und hier ist der Bär, der sich einen Tag Auszeit gönnt. Ich konnte nicht anders, als ihm eine schlammfarbene Gesichtsmaske und ein paar Gurkenscheiben auf den Augen zu verpassen. 
Fast alle Motive sind ebenfalls aus dem Spa Day Stempelset, nur die Pflanze ist aus dem Set Sittin' Pretty. Außerdem habe ich eine weitere Blume, die eigentlich als Haarschmuck für das Mädchen aus dem Set Polynesian Paradise dient, mit aufgeklebt. Coloriert habe ich mit Copics.
Und keine Angst, es ist natürlich jemand in der Nähe, der sicherstellt, dass der Bär sicher den Weg in die Wanne findet, wo er doch mit den Gurkenscheiben nichts sieht...

And here's the bear that's enjoying a day off. I just couldn't resist to give him a  mud colored facial and some cucumber on his eyes. 
Nearly all images are from the Spa Day stamp set, only the pot plant is from the Sittin' Pretty stamp set. I also added another one of those flowers that's originally worn in the Polynesian Paradise girl's hair. Coloring was done with Copics.
And don't worry, there's someone close by making sure the bear finds his way into the tub safely since he can't see anything with those cucumbers covering his eyes...

Samstag, 17. Juli 2021

Stempeleinmaleins - Ausgabe vom 17. Juli 2021

 
Hallo Ihr Lieben!
Beim Stempeleinmaleins haben wir heute mal wieder eine Box für Euch - und zwar eine Verpackung für eine Handcreme. Also eigentlich.... ;) 

Hello everyone!
Over at Stempeleinmaleins we are sharing a tutorial for another box this week. It's a box to put some hand lotion in. Well, originally... ;)


Ich habe meine Box aus weißem Cardstock gewerkelt und mit für die Deko an den Farben der "Handcreme" orientiert. Warum in Anführungszeichen? Nun, ich hasse Handcreme. Ich mag das Gefühl auf der Haut nicht. Und außerdem bin ich wahnsinnig geruchsempfindlich. Ich bekomme keine Kopfschmerzen, zumindest nur von den wenigsten, aber ein Geruch hängt mir stundenlang in der Nase. Und da die Hände ja doch recht nah am Kopf bzw. auch oft im Gesicht sind, packe ich das nicht. Da sind die Füße schon sehr viel weiter entfernt! Also habe ich einfach ein Fußbalsam verpackt. ;)
Die Außenseiten der Box habe ich mit blauem Designpapier mit weißen Doilies dekoriert. Oben um den Deckel habe ich orangefarbenes Twine gewickelt um das Orange auf der Tube wieder aufzugreifen und zwei ausgestanzte Herzen aus Designpapier an die unteren Enden des Twines gebunden.

I made my box from white cardstock and used the colors of the "hand lotion" to pick my decorations. Well, acutally I hate hand lotions. I don't like the way it makes my hands feel. And also I am very picky when it comes to scents. It's not that I get a headacke from them - at least not from many - but they seem to stick to my nose for hours. Since the hands are pretty close to the head and we also touch our faces a 100 times per hour I just can't stand it. The feet are so much farther apart from our heads! So I simply put a tube of foot lotion in my box. ;)
I covered the outsides of my box with blue designer's paper with white doilies printed on. Around the lid I wrapped some orange twine to pick up the orange on the tube again and then glued two punched out hearts from orange patterned paper to the ends of the twine.


Auch den Deckel habe ich mit etwas Cheesecloth, zwei blauen und einer orangefarbenen Blüte ein wenig verziert.

I also decorated the lid a bit with some cheesecloth, two blue and one orange blossom.


Bei dieser Box ist es so, dass der Deckel nach hintengeklappt wird - und dann öffnet sich die komplette Front nach vorne. Im Fenster in der Vorderseite befindet sich Folie, so dass auch nichts herausfallen kann. 
Drei Seiten des Inneren der Box habe ich wieder mit dem blauen Designpapier beklebt, die vordere mit dem orangefarbenen, das ich auch schon für die Herzen verwendet habe. 
In der Box befindet sich eine kleine Stütze, um die Handcreme an ihrem Platz zu halten. Auch die habe ich aus dem orangefarbenen Designpapier gewerkelt und um den Ausschnitt für die Tube noch einen Ring aus dem blauen Papier geklebt.

The lid of this box gets folded up - and then the complete front of the box pops open. There's some acetate between the layers of the window cut out so nothing can fall out.
I glued the same blue patterned paper to the three inner sides of my box and covered the front flap with the same orange one that I also used to punch out the hearts from. 
Inside the box there's a little platform that keeps the tube in place. I made this from the orange patterned paper and glued a ring made from the blue one around the circle cut out that holds the tube.


Ich wollte unbedingt einen Text in meine Box kleben - hatte aber absolut nichts, das zu Füßen bzw. dem Fußbalsam gepasst hätte. Also habe ich einen Text am PC geschrieben, ausgedruckt und innen aufgeklebt.

I really wanted to add some text - but had absolutly nothing in my stash that would go in any way with this foot lotion. So I wrote this text on my computer, printed it out and glued it inside the box. It means "Do something good for your feet, they carry you through life".