Freitag, 31. März 2023

Stampcorner April-Release Sneak #3

 
Hallo Ihr Lieben!
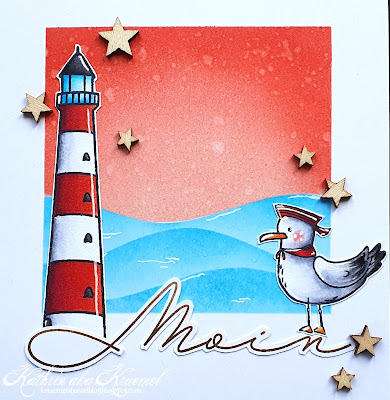
Heute habe ich noch ein Sneak auf das April Release von Stampcorner für Euch. Es gibt auch ein neues maritimes Set, und das ist super für nicht-ganz-so-süße Karten. Meine Karte ist sogar ziemlich clean and simple geworden.

Hello everyone!
Today I am sharing another sneak of Stampcorner's april release with you. They are also releasing a new maritime set, that is great for not-so-cute cards. My card even turned out quite CAS.
 
Ich habe ein Stück weißen Cardstock genommen und so abgedeckt, dass mittig ein Quadrat bleibt. In das habe ich dann mit einer der Slimline Hills Stencil von MFT mit Distress Ink Salty Ocean Wellen gewischt, für den Himmel habe ich Tattered Rose und Abandoned Coral verwendet. Dann habe ich einige ganz feine Tropfen Wasser daraufgespritzt.
Später habe ich den Cardstock schwarz gemattet und auf einen weißen Kartenrohling geklebt.
 
I cut a piece of white cardstock the right size and then covered it with masking tape, leaving a square in the center free. Then I inked some waves into the square using one of the Slimline Hills stencil by MFT and Distress Ink Salty Ocean, for the sky I used Tattered Rose and Abandoned Coral. Then I flicked some fine drops of water onto the ink.
 Later I matted the cardstock black and attached it to a white note card.
 

 Den Leuchtturm und eine der Möwen aus dem Set habe ich mit schwarzer Tinte abgestempelt und mit Copics coloriert. 
Auch der Moin-Schriftzug ist in dem Set enthalten. Den habe ich, in Anlehnung an Sand, im Ombre-Look mit hell- und dunkelbrauner Tinte auf weißen Cardstock gestempelt und anschließend ausgeschnitten. 
Den Leuchtturm habe ich hinter die Schleife des M gesetzt, so als stände er auf einem Sandhügel. Die Möwe habe ich dann auf das n gestellt. 
Zum Schluss habe ich als Deko noch ein paar kleine Holzsterne auf der Karte verteilt.

I stamped the lighthouse and one of the seagulls from the stamp set with black ink and colored them with Copics.
Also the Moin - a north-german way to say hello - is from the new set. I stamped it in an ombre look with light and dark brown ink, to add a hint of a sand look, and cut it out with my scissors.
I placed the lighthouse behind the loop of the M like it is a sandy hill the lighthouse is standing on. The seagull I placed on the n.
To finish the card I added a few small wooden stars to the card.

Donnerstag, 30. März 2023

Heute mal non-cute

 
Hallo Ihr Lieben!
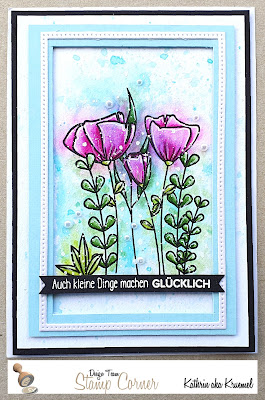
Heute zeige ich auf dem Stampcorner Blog diese Karte mit den tollen Blumen aus dem März-Release. Und die haben sich natürlich angeboten, um auch mal non-cute zu arbeiten.

Hello everyone!
Today over on the Stampcorner Blog I am sharing this card with the beautiful flowers from the march release. And those are perfect to make a non-cute card for a change.
 
Ich habe hier ein Stück Watercolor Cardstock verwendet und mittig mit Distress Ink Mermaid Lagoon und Ink Smooshing einen leicht fleckigen Hintergrund aufgetragen. Dann habe ich mit dünnem 3D Tape einen per Hand geschnittenen Rahmen aus hellblauem Cardstock aufgeklebt. Da mir der später zu fad war, habe ich noch einen dünnen Rahmen, gestanzt aus weißem Cardstock, aufgeklebt.  

Here I used a piece of watercolor cardstock and put a slightly blotchy background to its center doing some ink smooshing with Distress Ink Mermaid Lagoon. Then I attached a frame, cut from light blue cardstock, with thin foam tape to it.  Since the blue frame looked a bit plain, I later glued another thinner frame, cut from white cardstock, on top of it.


Die Blumen aus dem Set Blumenwiese habe ich dann mit wasserfester Tinte auf den getrockneten, hellblau eingefärbten Bereich in der Mitte des Watercolor Cardstocks gestempelt. Dann habe ich sie mit Watercolors in grün und leuchtendem Pink - das bei mir ja so gut wie nie zum Einsatz kommt, aber hier gefiel es mir einfach - coloriert. An einigen Stellen, vor allem an den Blütenblättern, kann man den blauen Hintergrund noch durchsehen, aber das finde ich schön. 
Und ich habe tatsächlich die Motive erst sauber an den Stempellinien coloriert. Später habe ich dann ganz sanft und fleckig die jeweils selbe Farbe auch ein wenig auf den blauen Hintergrund aufgetragen und vermalt. Ich finde, das gibt einen tollen "künstlerischen" Look. Dann habe ich feine Spritzer weißen Copic Opaque Whites über den Cardstock gespritzt.
Der Text ist aus dem Stempelset Glückskäfer und mit weißem Embossingpulver auf schwarzen Cardstock embosst. Ich bin da ein kleiner Monk - ich mag es nicht, wenn in ein und demselben Text gerade und kursive Schriften gemischt sind. Verschiedene Schriftarten gerne, aber bitte alle "in die selbe Richtung". Deswegen habe ich hier das Wort Glücklich durch eines aus dem Stempelset Kleine Worte 2 ersetzt. So passte der Text auch besser auf meine Karte.

I stamped the flowers with waterproof ink onto the dried blue area in the center of the watercolor cardstock. Then I colored them with watercolors in green and bright pink - a color I rarely use but really liked here. You can still see the texture of the blue background in some areas, especially on the flower petals, but I really like that.
I actually colored the image inside the stamped lines first. Then I applied very little of the same colors around the image and blended those into the background. I think, this adds a nice "artistic" touch to the card. Then I lightly flicked some Copic Opaque White onto the cardstock.
The text means "find beauty in the little things". I white heat embossed it onto a strip of black cardstock. Well, the last word glücklich is originally placed under the rest of the text and is written in a different font. I am a little Monk here - I don't like having straight and cursive texts mixed in one sentiment. I love mixed fonts, but please all of them "in the right direction". So I replaced this word with one from a different stamp set. This is also smaller and so the text fits better onto my card.


Den Text habe ich dann wieder mit 3D Tape direkt unter die Blumen quer über den Rahmen geklebt. So wirkt er fast ein wenig wie der Boden, auf dem die Blumen stehen. Außerdem habe ich einige weiße Perlen rund um die Motive verteilt.
Dann habe ich alles schwarz gemattet und auf einen weißen Kartenrohling geklebt.

I used foam tape again to adhere the text strip across the card, directly under the stamped flowers to ground them. Then I glued a few white pearls around the image.
I matted everything black und attached it to a white note card.

Mittwoch, 29. März 2023

Create a Smile March Moodboard Challenge Reminder

 
Hallo Ihr Lieben!
Noch knapp eine Woche läuft die aktuelle Moodboard Challenge von Create a Smile. Und ich habe heute, quasi als Reminder, eine weitere Karte für Euch, die super zum Moodboard und dessen pastelligen Farben passt. 

Hello everyone!
The current moodboard challenge by Create a Smile is running for nearly another week. And - as some kind of reminder - I'm sharing another card with you today, that fits the moodboard and its pastel colors perfectly.

Die Idee zu dieser Karte kam mir spätabends auf der Couch. Und ich konnte einfach nicht anders, als auszuprobieren, ob das machbar ist.
Na, habt Ihr ihn erkannt? Es ist der Weihnachtsmann aus dem Stempelset Expresslieferung. Okay, es ist sein Motorrad, das er dem Osterhasen für eine besonders eilige Lieferung geliehen hat....
Für den Hintergrund habe ich mit Distress Oxide Hickory Smoke und dem Whisk Stencil die Straße auf weißen Cardstock gewischt. Dann habe ich rundherum Gras, Büsche und Bäume - die mit der Wald und Wiese Stencil - mit Distress Oxide Cracked Pistacchio und Rustic Wilderness aufgewischt. Für den Himmel habe ich Tumbled Glass, für die Baumstämme Gathered Twigs verwendet.
Mit Polychromos habe ich dann einige Grashalme an den Straßenrand gemalt, die Blüten in den Bäumen und Büschen sowie die Blumen am Wegesrand sind mit Glaze Pens in Rosa und Gelb sowie einem weißen Gelstift gemacht. Mit dem habe ich auch die Mittellinie auf die Straße gemalt.

I had the idea for this card late one evening when I was sitting on the sofa. And I just had to test if it would be possible to realize it.
Did you recognize him? It's Santa from the stamp set Express Delivery. Well, it's just his bike, that he gave the easter bunny for an extra urgend delivery...
For the background I inked the street with Distress Oxide Hickory Smoke and the Whisk stencil onto a piece of white cardstock. Then I added grass, bushes and trees - the latter two with the Wald und Wiese stencil - with Distress Oxide Cracked Pistacchio and Rustic Wilderness. For the sky I used Tumbled Glass, for the tree trunks Gathered Twigs.
With Polychromos I added some grass details along the road, the blossoms in the bushes and trees and the flowers along the road are made with pink and yellow Glaze Pens as well as a white gel pen. I also used this to add the middle line to the road.


Und hier ist der Osterhase in Großaufnahme! 
Den Beiwagen habe ich ganz normal an das Motorrad gestempelt. Santa's Kopf habe ich weggeschnitten und stattdessen den Kopf des Bären, der eigentlich im Beiwagen mitfahren kann, angeklebt. Dahinter habe ich dann noch die Hasenohren eines der Küken aus dem Set Schöne Ostern geklebt und die Hände des Weihnachtsmanns durch die Pfoten des Hasen aus dem Set Osterkorb ersetzt. Außerdem habe ich jede Menge Ostereier aus dem Set Schöne Ostern abgestempelt und später den Beiwagen damit gefüllt.
Coloriert habe ich mit Copics und zarte Pastelltöne verwendet. Aus Santa's Bart habe ich beim Colorieren ein grünes Halstuch mit weißen Punkten, das im Fahrtwind weht, gemacht. Nach dem Colorieren habe ich alle Teile ausgeschnitten und aufeinander geklebt. Dann habe ich das Motorrad mit 3D Tape auf der Straße aufgeklebt und darunter mit dem Schattenstempel aus dem Set Schöne Ostern und dunkelgrauer Tinte noch Schatten gestempelt.
Den Text "Expresslieferung" habe ich in eine der Speechbubbles, gestanzt aus weißem Cardstock und mit einer schwarzen Sprechblase leicht versetzt hinterlegt, gestempelt. Auch die ist mit 3D Tape auf die Karte geklebt.
Zum Schluss habe ich noch ein "vom Osterhasen" mit den Clear Letters zusammengesetzt, schwarz gemattet und an den unteren Rand der Szene geklebt.

And here's the easter bunny!
I stamped the waggon as usual onto the bike. I cut off Santa's head and used the head of the bear, that can fit into the waggon, instead. Behind it I put the bunny ears one of the chicks from the Joyful Easter is wearing and replaced Santa's hands with bunny hands from the Osterkorb stamp set. I also stamped lots of easter eggs from the Joyful Easter stamp set and filled the waggon with them later.
I did the coloring with Copics using soft pastel colors. When I did the coloring I turned Santa's beard into a green neckcloth with white dots, that is fluttering in the wind. After I had colored everything, I cut out all the elements and put everything together.  Then I used foam tape to adhere the bike onto the street and stamped the shadow from the Joyful Easter stamp set with dark grey ink under the bike and waggon. 
The text "express delivery" is stamped onto one of the Speechbubbles, die cut from white cardstock and matted with another one cut from black cardstock. I adhered those with foam tape again.
To finish the card I put together a "from the easter bunny" using the Clear Letters stamps, matted the cardstock strip black and attached it to the very bottom of my scene.

Dienstag, 28. März 2023

Stampcorner April-Release Sneak #2


Hallo Ihr Lieben! 
Ich gebe Euch heute einen weiteren Sneak auf eines der Stempelsets aus dem bevorstehenden April-Release von Stampcorner. Und es ist ganz unverkennbar aus der Feder von Oma Plott. 
 
Hello everyone!
Today I am giving you a sneak of another of the new stamp sets from the upcoming april release by Stampcorner today.
 
Ich finde den Bauarbeiter-Biber klasse!
Hier habe ich für den Hintergrund ein Stück weißen Cardstocks erst leicht mit Distress Ink Frayed Burlap gewischt, dann habe ich das Gathered Twigs Stempelkissen leicht darüber gewischt und anschließend noch das Ground Espresso Pulver - nur die Kante - an einigen Stellen auf das Papier gedrückt. Das ergibt ein tolles Holzmuster.
Anschließend habe ich mit der Brett-Stanze aus dem Signpost Stanzenset von CraftEmotions viele Holzbretter aus dem Cardstock gestanzt und sie leicht überlappend - und ordentlich schräg und versetzt, teilweise mit 3D Tape - auf die Vorderseite eines weißen Kartenrohlings geklebt.
Oben habe ich dann ein Bild aufgehängt. Ich habe eines der Häuser aus dem Happy Village Stempelset von LawnFawn abgestempelt und mit Copics coloriert. Dann habe ich mit einer der Wave Stanzen von Stampcorner aus schwarzem Cardstock den Rahmen gestanzt. Durch Partial Die-Cutting habe ich aus dem Rechteck ein Quadrat gemacht und anschließend mit der Schere den inneren Teil knapp neben der gestitchten Linie herausgeschnitten.
Das colorierte Hausmotiv habe ich dann hinter den Rahmen geklebt und mit einer der Wonky Frames Stanzen von WhimsyStamps den Aufhänger gestanzt. Das Bild habe ich dann - Haus kopfüber - mit 3D Tape an der Holzwand aufgehängt. Und ich bin mir nicht sicher, ob die "Profis" das Bild verkehrt herum aufgehängt haben, oder ob sie das ganze Haus auf dem Kopf gebaut haben...
 
I love this builder beaver!
Here I inked a piece of white cardstock lightly with Distress Ink Frayed Burlap, then lightly swiped the Gathered Twigs ink pad over it and then pressed just the edge of the Ground Espresso ink pad lightly onto the cardstock in a few spots. That creates a great wood pattern.
Then I used the wood plank die from the Signpost die set by CraftEmotions to die cut lots of planks from my woodgrain background and attached those - kind of crooked and slanted and partly with foam tape - onto the front of a white card base.
Then I hung a picture onto this wooden wall. I used one of the Wave dies by Stampcorner and cut it from black cardstock. By doing partial diecutting I was able to make a square from the originally rectangle die and then used my scissors to cut out the inner area close to the stitched lines.
 I glued the colored house image behind the frame and cut the hanger using a die from the Wonky Frames set by WimsyStamps. Then I adhered the picture with foam tape again, hanging the house upside down. And I am not sure, if those "pros" hung up the picture upside down or if they built the whole house that way....


Und hier ist der geniale Biber. Er schaut so toll verdrossen. Naja, kein Wunder, wenn die "Profis" eben doch keine sind....
Ich habe ihn mit Copics coloriert und dann mit der Schere ausgeschnitten.
Den Text - der nur die erste Linie des Textes ist, der mit dem Motiv kommt - habe ich weiß auf schwarzen Cardstock embosst. Dann habe ich ihn mit einer Sprechblasenstanze ausgestanzt und die Spitze an der Sprechblase abgeschnitten und durch zwei Punkte ersetzt, so dass sie zur Gedankenblase wird. Dann habe ich alles wieder mit 3D Tape auf den Hintergrund geklebt.

And here's the great beaver. He looks so wonderfully fed up  - no wonder, if those "pros" really aren't any...
I colored him with Copics and cut him out with my scissors.
The text - "to work with pros just once" - is just the first line of a longer text that comes in the set with the image. I white heat embossed it onto black cardstock, then cut it out with a speech bubble die. I cut off the little arrow from the speech bubble and replaced it with two little dots to turn it into a thought bubble. Then I attached everything to the card with foam tape again.


Hier kann man sehen, wie die Bretter in unterschiedlichen Höhen angebracht sind, was die Wand noch "schlechter gebaut" aussehen lässt. 
Zum Schluss habe ich mit einem schwarzen Fineliner Nägel an den Enden der Bretter aufgemalt und einige gelbe Perlen als Deko aufgeklebt.

Here you can see the different heights of those planks, what give the wall an even imperfecter look.
To finish the card, I used a black fineliner to draw some nails at the ends of the planks and then added a few yellow pearls as decorations.

Montag, 27. März 2023

Quietsche-Enten!

 
Hallo Ihr Lieben!
Heute habe ich eine Karte voller Quietsche-Enten zu zeigen - und die haben eine richtig gute Zeit zusammen.

Hello everyone!
Today I have a card with rubber ducks to share with you - and those are having a quacking good time together.

Die Karte ist nach einem Sketch in einer kleinen Bastelgruppe entstanden. Eigentlich war der für ein Speed Stamping - aber das war recht spontan angesetzt und ich hatte keine Zeit. Den Sketch wollte ich aber dann doch noch umsetzen - und ehrlich gesagt, diese Karte hätte ich in einer Stunde so nicht geschafft!
Aus einem Stück weißen Cardstocks, das ich etwas kleiner als die Front einer Slimline-Karte zugeschnitten habe, habe ich mit einer der Stitched Squares von Gummiapan drei Quadrate in einer Reihe ausgestanzt und dabei die Abstände zum Rand und den Quadraten untereinander gleich gehalten.
Mit Masking Tape habe ich den oberen Teil des Cardstocks abgedeckt und nach unten hin auslaufend Distress Oxide Tumbled Glass aufgewischt. Den oberen Teil habe ich dann mit Mermaid Lagoon gewischt und hier etwas Wasser aufgespritzt.
Rund um die Ausschnitte habe ich dann noch weiße Rahmen, gemacht mit den Stitched Square Frames Stanzen von Create a Smile, geklebt.

The card is made following a sketch from a small private group of stampers. It was made for a speed stamping - but it was on short notice and I didn't have time that day. But I really wanted to use the sketch - and honestly, I would not have been able to make this card in just an hour!
From a piece of white cardstock, that I had cut slightly smaller than the front of a slimline sized card base, I die cut three squares using one of the Stitched Squares dies by Gummiapan. I kept the squares in a row and also made sure, they are evenly spaced across the cardstock. Then I covered the upper area of the cardstock with masking tape and inked the lower part with Distress Oxide Tumbled Glass, letting the ink fade out towards the bottom edge. The upper part of the cardstock I inked with Mermaid Lagoon and flicked some drops of water onto just this area.
With one of the Stitched Square Frames dies by Create a Smile I also die cut three frames  from white cardstock and glued those around the square cut outs.


Die Gummienten sind aus dem Stempelset Ducky von Create a Smile. Ich habe sie abgestempelt und mit Copics coloriert. Und da ich wusste, dass ich eine der Enten kopfüber abtauchen lassen wollte, die Gummienten aber keine Füße haben, habe ich die Hände eines der Frösche aus dem Stempelset Springen abgestempelt, ausgeschnitten und als Füße unten an eine der Enten geklebt. Außerdem habe ich mit Stempeln aus dem selben Set einige Rohrkolben und Seerosenblätter samt Seerosen sowie drei Wassertropfen gestempelt. Auch diese Motive habe ich mit Copics coloriert. 
Mit dem Papierschneider habe ich drei weiße Quadrate, etwas größer als die Ausschnitte im Kartenaufleger, zugeschnitten. Den oberen Teil der Quadrate habe ich wieder mit Distress Oxide Mermaid Lagoon gewischt, den unteren Teil mit Copics in Wasseroptik coloriert. Außerdem habe ich noch drei schmale Streifen ebenso coloriert und die obere Kante mit einer Wellenstanze ausgestanzt.
Ich habe die Motive - teils mit dünnerem 3D Tape - auf die kleinen Quadrate geklebt.

The rubber ducks are from the Ducky stamp set by Create a Smile. I stamped them and colored them with Copics. And since I already knew that I wanted one of the ducks upside down on the card, the ducks don't have feet though, I stamped the hands from one of the frogs from the Jump Up stamp set, cut them out and attached them as feet to the bottom of one of the ducks. I also used stamps from the same set to stamp some cattails, water lillies and water drops. Again I used Copics to color those images. 
I used my paper cutter to cut three squares from white cardstock, making them a bit larger than the windows I cut into the long cardstock strip. Then I inked up the upper areas with Distress Oxide Mermaid Lagoon again and used Copics to color the bottoms in a water look. I also cut three additional strips, colored them the same and cut the top edge with a wave border die. 
Then I attached the images onto the small squares, using thin foam tape for some of them.


Der Text ist wieder mit einer Kombi aus Stempeln und Stanzen gemacht.
Für den gestempelten Text habe ich einen Stempel aus dem Set Lucky Duck von Gerda Steiner und direkt mit schwarzer Tinte auf den Cardstock gestempelt. Dabei habe ich das quacking, das eigentlich auch gestempelt wird, abgedeckt, den Text auf zweimal gestempelt und zwischendurch etwas im Misti verschoben, so dass dazwischen Platz für die gestanzten Buchstaben war.
Die Buchstaben sind mit dem Lemon Alpha Set von Create a Smile gemacht - die Schatten aus schwarzem Cardstock, die Buchstaben aus gelbem Cardstock. Die habe ich mit Copics etwas schattiert und dann auf die schwarzen Schatten und anschließend zwischen die gestempelten Textteile auf den Cardstock geklebt.

The text is again a combi of stamps and dies.
For the stamped text I used a stamp from the Lucky Duck set by GerdaSteiner and stamped it with black ink directly onto the cardstock. I left out the quacking, that is included in the stamped text, stamped the beginning of the text first, the end next, moving my cardstock in the Misti in between, to have enough room for the die cut letters.
To die cut the letters I used the Lemon Alpha die set by Create a Smile - I cut the shadows from black and the letters from yellow cardstock. I used Copics to shade the yellow letters, then adhered them to the shadow layers first and then onto the cardstock between the stamped texts.


Auf ein etwas größeres Stück schwarzen Cardstocks habe ich zuerst die drei kleinen Quadrate mit den Motiven an die passenden Stellen geklebt, dann den Cardstockstreifen mit dickem 3D Tape darüber. Zwischen die Fenster habe ich die übrigen Seerosenblätter und Rohrkolben geklebt. Dann habe ich alles auf einem weißen Slimline-Kartenrohling angebracht. 

Onto a slightly larger piece of black cardstock I first adhered the smaller squares with the images, making sure to have them in the right spot, then I put the large cardstock strip on top with thick foam tape. Between the windows I attached the left over water lillies and cattails, then put everything onto a white slimline card base.

Sonntag, 26. März 2023

Stampcorner April-Release Sneak #1


 Hallo Ihr Lieben!
Das April-Release von Stampcorner steht quasi bereits in den Startlöchern - Zeit, Euch also das erste Sneak zu zeigen! 

Hello everyone!
Stampcorner's april release is just around the corner - time to give you a first sneak!

Hier habe ich für den Hintergrund die Quilted Backdrop Stanze von LawnFawn aus weißem Cardstock gestanzt und dann mit Distress Oxide Peeled Paint, Bundled Sage, Speckled Egg und Salvaged Patina gewischt.
Anschließend habe ich den Hintergrund schwarz gemattet und auf einen weißen Kartenrohling geklebt.

Here I die cut the Quilted Backdrop die by LawnFawn from white cardstock and then inked it with Distress Oxide Peeled Paint, Bundled Sage, Speckled Egg and Salvaged Patina.
I matted the background black and attached it to a white note card.


Die süße Ente mit den Blumen sowie die Texte sind aus einem der neuen A7-Sets - zusammen mit einem weiteren Text.
Ich habe die Ente mit Copics coloriert und ausgeschnitten. 
Beim Text habe ich ein wenig getrickst - eine kleine steht normalerweise zwischen dem f und k bzw. den beiden k des Wortes Aufmerksamkeit. Ich habe einmal nur das Wort Aufmerksamkeit eingefärbt und abgestempelt, dann habe ich den Text komplett gestempelt und die beiden kleinen Worte ausgeschnitten. Entlange der Linien des Wortes Aufmerksamkeit habe ich dann dieses Wort ausgeschnitten - so verdeckt es nicht so viel meiner Karte, als wenn ich es auf ein Banner oder einen breiten Cardstockstreifen gestempelt hätte.
Für den Hintergrund habe ich ein welliges Rechteck aus hellblauem Designpapier mit weißen Punkten gestanzt und per Hand die eine schwarze Mattung geschnitten. Aus dem selben Designpapier, nur in grün, habe ich noch ein Oval geschnitten, das ich als Boden für die Ente verwendet habe. Außerdem habe ich aus weißem Cardstock noch etwas Gras ausgestanzt, mit Copics coloriert und hinter die Füße der Ente geklebt.
Außerdem habe ich die Wolken aus den Stanzensets Platform Pop-Up Cloud Wrap-Around (groß) und Platform Pop-Up Cloud Inserts (klein) von LawnFawn aus weißem Cardstock gestanzt und dann alle Teile meiner Deko zusammengesetzt.
Das blaue gewellte Rechteck samt Mattung ist mit dünnem 3D Tape auf den Hintergrund geklebt. Das habe ich auch verwendet, um die Ente mit dem grünen Oval aufzukleben. Für den Text habe ich dann dickeres 3D Tape verwendet. Eine der Wolken ist direkt auf den Hintergrund, eine zwischen Hintergrund und Mattung und die anderen beiden mit dünnem 3D Tape aufgeklebt.

The cute duck with the flowers and the texts are from a new A7 set - together with a second text.
I colored the duck with Copics and cut it out.
For the text I did some partial stamping to make it fit my card design. The two smaller words are positioned between the f and k and the two ks of the large word. So I only inked up the large word and stamped it, then stamped the whole text again and cut out the two smaller words. I used my scissors to cut out the large word - this way it isn't covering as much space on my card as if I'd stamped it onto a bannner or larger piece of cardstock. 
For the background behind the duck I die cut a scalloped rectangle from light blue patterned paper with white dots and cut a black mat by hand. From the same patterned paper - just of a green sheet - I die cut an oval, that I wanted to use as a ground for my duck to stand on. I also die cut some grass from white cardstock, colored it with Copics and glued it behind the duck's feet.
I also die cut the clouds from the die sets Platform Pop-Up Cloud Wrap-Around (big) and Platform Pop-Up Cloud Inserts (small) by LawnFawn from white cardstock and then put all the pieces of my card decoration together.
I attached the blue scalloped rectangle including the mat with thin foam tape onto the background. I used the same tape to adhere the duck and the green oval. For the text I used some thicker foam tape. One of the clouds is attached directly to the scalloped rectangle, one is tucked between the blue rectangle and the mat and for the other I used the thinner foam tape again.

Samstag, 25. März 2023

Stempeleinmaleins - Ausgabe vom 25. März 2023

 
Hallo Ihr Lieben!
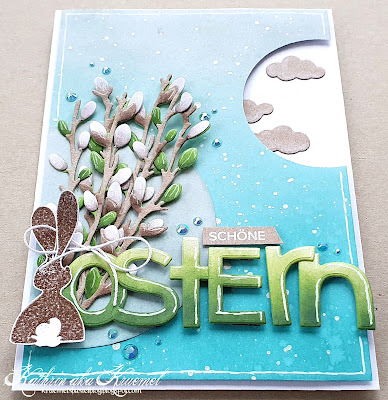
Heute gibt es einen neuen Sketch beim Stempeleinmaleins und ich habe danach diese Osterkarte gemacht.

Hello everyone!
Today there is a new sketch over at Stempeleinmaleins and I made this eater card following it.

Für den Hintergrund habe ich ein Stück weißen Cardstocks von oben nach unten mit Distress Oxide Speckled Egg, Salvaged Patina und Peacock Feathers gewischt. Dann habe ich etwas Wasser und weiße Metallic Watercolor daraufgespritzt.
Eigentlich hatte ich einen anderen Hintergrund für die Karte geplant und auch schon fertig. Hier hatte ich den Roses all Over Background von MFT vor dem Wischen auf den Cardstock embosst und dafür die Spritzer weggelassen. Aber am Ende war das viel zu unruhig und ich habe diesen einfacheren Hintergrund gemacht.
Oben rechts habe ich einen Halbkreis aus dem Hintergrund gestanzt. Außerem habe ich einen weiteren, etwas größeren Kreis aus weißem Cardstock gestanzt und wieder mit Speckled Egg eingefärbt. Den habe ich unten links an die Kante des Cardstocks geklebt, er bildet den Hintergrund für meine Motive.

For the background I've inked up a piece of white cardstock from bottom to top with Distress Oxide Speckled Egg, Salvaged Patina and Peacock Feathers. Then I flicked some water and white metallic watercolor onto it.
I originally had planned a different background and also had it ready. I had white heat embossed the Roses all Over Background by MFT prior to inking the cardstock and left out the water and metallic watercolor. But once I had my elements put onto that background, the whole card was way too busy so I decided to go with a simpler background instead.
I cut half of a circle from the top right edge of the background and also die cut a slightly larger circle from white cardstock and inked it with Speckled Egg. I attached that larger circle along the bottom left edge of the cardstock, it makes the background for my elements.


Ich wollte unbedingt die Botanicuts Pussy Willow von TheGreetery verwenden - Weiden und Palmkätzchen sind für mich neben Schneeglöckchen die ultimativen Frühlingsboten. Ich habe die verschiedenen Elemente aus grünem, craft farbenem und weißem Cardstock gestanzt und mit Copics ein wenig schattiert. Die Palmkätzchen habe ich im unteren Bereich hellgrau eingefärbt und dann mit einem weißen Gelstift feine Linien aufgemalt, damit sie schön haarig wirken. Dann habe ich alle Zweige zu einem Osterstrauß zusammen- und auf den hellen Halbkreis geklebt. 
Eigentlich wollte ich noch ein paar Ostereier in den Strauß hängen, das sah aber irgendwie komisch aus - meine Ostereier waren wohl zu klein, ich wollte aber auch nicht die ganzen Zweige verdecken - und ich habe darauf verzichtet. 

I really wanted to use those Botanicuts Pussy Willow dies by TheGreetery. Pussy willows are - besides snowdrops - the ultimate heralds of spring to me. I die cut the different pieces from green, kraft and white cardstock and shaded them a bit with Copics. The pussy willows I colored a light grey and then added fine strokes with a white gel pen to make them look hairy. Then I arranged all the branches to some kind of bouquet and attached them to the half circle.
I had planned to hang some easter eggs into the branches, but that looked strange - guess the easter egg images I used were too small but I didn't want to cover too much of the branches - and so I skipped that idea. 


Die Buchstaben für das Wort Ostern lagen, aus weißem Cardstock gestanzt, noch von einer anderen Karte als Rest auf meinem Schreibtisch. Sie sind mit dem Spell Anything Alphabet Stanzenset von MFT gemacht. Ich habe sie von unten mit Distress Oxide Mowed Lawn und, nur ganz unten am Rand, ein wenig Rustic Wilderness eingefärbt und sie leicht überlappend unten quer über die Karte geklebt. Da die aufeinander geklebten Zweige recht hoch waren, habe ich alle Buchstaben bis auf das O, das ja auf die Zweige geklebt ist, mit 3D Tape hinterlegt.
Ergänzt habe ich den Text mit einem weiß auf craft farbenen Cardstock embossten "schöne" aus dem Stempelset Kleine Worte 2 von Stampcorner. 
Und dann wollte ich noch einen kleinen Osterhasen mit auf die Karte bringen, der aber vom Stil her nicht zu niedlich sein sollte. Dieser kleine Kerl ist von Magnolia. Ich habe ihn mit Distress Embossing Glaze Walnut Stain auf weißen Cardstock embosst, ausgeschnitten und links vor dem Wort Ostern auf die Karte geklebt.

The letters for the die cut word Easter, die cut from white cardstock, were left overs from another card I made recently. They are made using the Spell Anything Alphabet dies by MFT. I used Distress Oxide Mowed Lawn to ink them, darker at the bottom and light at the top, then added a hint of Rustic Wilderness to the very bottom and attached them to the card, overlapping the individual letters slightly. Since the stacked branches were pretty thick, I put foam tape behind all the letters besides the O, which is adhered to the top of the branches. 
I finished the text with a small "happy", white heat embossed onto a strip of kraft colored cardstock.
And then I also wanted to bring in a little easter bunny, but wanted one, that fits the style of the card. I found this little guy by Magnolia in my stash and heat embossed it with Distress Embossing Glaze Walnut Stain onto white cardstock. Then I cut him out and attached them to the left side of the card, right before the word easter.


Den kompletten Cardstock habe ich dann mit 3D Tape hinterlegt und auf einen weißen Kartenrohling geklebt. 
Damit der Halbkreis oben rechts nicht störend ist - er sah ein wenig aus, als habe ihn jemand aus Vereshen aus dem Cardstock gestanzt -, habe ich noch drei kleine Wolken aus craftfarbenem Cardstock gestanzt und, teilweise unter den dekorierten Cardstock geschoben, auf den Kartenrohling geklebt.
Ganz zum Schluss habe ich dann noch einige türksifarben-irisierende Glitzersteine auf der Karte verteilt.

I put foam tape behind the whole cardstock panel and adhered it to a white card base.
The half circle at the top right looked odd, like someone accidently cut it from the card, so I die cut three little clouds from kraft cardstock and glued it to the card base, partially tuck them behind the decorated cardstock.
To finish the card I added a few aqua iridescent gems to it.

Freitag, 24. März 2023

Loads of Birthday Wishes

 
Hallo Ihr Lieben!
In einer kleinen privaten Facebook-Bastelgruppe gibt es alle zwei Wochen eine kleine Challenge - diesmal mit einem Sketch. Und weil mir aufgefallen ist, dass ich zwar einige Geburtstagskarten auf Lager habe, darunter aber keine für Jungs - oder jung gebliebene Männer - ist, habe ich den Sketch für eine solche Karte verwendet. 

Hello everyone!
In a small private Facebook group we have a little challenge each fortnight - this time with a sketch. And since I realized that I have quite a few birthday cards at hand right now, but none of them fits a young man - or an older one that's young at heart - I used the sketch to make such a card.

Hier habe ich die übriggebliebenen Streifen eines gleichen Hintergrunds verwendet - ich hatte die Simple Stripes Diagonal Stanze von LawnFawn aus gelbem und schwarzem Cardstock gestanzt und dann die Streifen abwechselnd aneinander gesetzt. Somit erhalte ich zwei Hintergründe. Dieser lag noch auf meinem Tisch. Ich habe für diese Karte nur etwas weiße Acrylfarbe darüber gespritzt.

Here I used the left over strips from another background I'd made - I had die cut the Simple Stripes Diagonal die by LawnFawn from yellow and black cardstock and thenput the strips together interchanging in color. This way I ended up with two backgrounds. This one was still on my table. For this card I flicked some white acrylic paint onto it.


Ich muss wohl nicht verstehen, warum, aber irgendwie haben doch alle Männer ein Faible für Baumschinen - je größer, desto besser. Deswegen habe ich Motive aus dem Stempelset Construction Trucks von Pretty Pink Posh verwendet. Alle Motive sind aus diesem Set. Ich habe sie abgestempelt, mit Copics coloriert und ausgeschnitten.
Für den Szene drumherum habe ich ein Stück weißen Cardstock oben mit Distress Oxide Mermaid Lagoon gewischt, den erdigen Boden habe ich mit Gathered Twigs und Ground Espresso gemacht. Dabei habe ich optisch eine zweite Lage mit eingewischt. Auf die Erde habe ich dann einige Wassertropfen und ebenfalls weiße Acrylfarbe aufgespritzt. 
Ich habe alle Motive auf den Hintergrund geklebt und an den Auspuff des Baggers drei winzige Wolken, gestanzt aus weißem Cardstock, aufgeklebt. Außerdem habe ich mit grauer Tinte zweimal das Wort Vroom aus dem Across the Miles Stempelset von PrettyPinkPosh in den Himmel gestempelt. Das war so nicht geplant, ich hatte aber, ohne es zu merken, Wasser an einem meiner Finger und habe damit beim Aufkleben der Motive den Himmel "versaut". Ich hatte zwar versucht, den Fleck zu überwischen, das Ergebnis war aber nicht optimal. Der aufgestempelte Text hier lenkt vom Fleck ab (und Ihr könnt ihn jetzt auf jeden Fall sehen). 
Für den Text auf der Karte habe ich ein Sending, ebenfalls aus dem Stempelset Across the Miles, schwarz auf weißen Cardstock gestempelt, ausgeschnitten und mit 3D Tape auf den dekorierten Cardstock geklebt. Den habe ich dann noch weiß gemattet. 
Für den Rest des Textes habe ich mit einer der Simple Wavy Banners von LawnFawn ein Banner aus weißem Cardstock gestanzt und dann einen Text aus dem Stempelset Big Pickup Cab von HoneybeeStamps aufgestempelt. Den Stempel habe ich an die Rundungen des Banners angepasst ins Misti geklebt.

I don't guess I have to understand, why, but it seems like all men are crazy for cronstruction vehicles - the bigger, the better. So I used images from the Construction Trucks stamp set by PrettyPinkPosh for this card. All images on the card are from this set. I stamped them, colored them with Copics and then cut them out with my scissors. 
For the backdrop I inked the top of a piece of white cardstock with Distress Oxide Mermaid Lagoon, for the soil I used Gathered Twigs and Ground Espresso, adding two different levels of soily ground. Onto the soil I flicked some water and white acrylic paint.
I attached the images onto the scene and added three tiny puffy clouds, cut from white cardstock, above the excavator's exhaust. I also stamped the word vroom from the Scross the Miles stamp set by PrettyPinkPosh twice onto the sky. I hadn't planned that, but when I attached the images I had a bit of water on my finger - which I didn't realize - and so I messed up the sky. I had tried to cover the spot with Distress Oxide again, but wasn't happy with the result. The stamped words here distract from that kind of strange spot (which of course you all can locate and see now).
For the text I stamped a little Sending, also from the Across the Miles stamp set, with black ink onto white cardstock, cut it out and adhered it with foam tape to the decorated cardstock. Then I matted that white.
For the rest of the text I die cut one of the Simple Wavy Banners by LawnFawn from white cardstock and then stamped a text from the Big Pickup Cab stamp set by HoneyeeStamps onto it. When placing the stamp in my Misti, I bend it a bit to make it fit the shape of the banner.


Zum Schluss habe ich das Banner und den Cardstock mit den Motiven mit 3D Tape auf den gestreiften Hintergrund geklebt und alles auf einem weißen Kartenrohling befestigt.

To finish this card I adhered the banner and the cardstock with the images to the striped background using foam tape, then attached everything to a white note card.

Donnerstag, 23. März 2023

Osterkarte mit Küken

 
Hallo Ihr Lieben!
Es ist nicht mehr lang bis Ostern. Und so ist es nur natürlich, dass derzeit einige Osterkarten von meinem Tisch hüpfen. Eine davon zeige ich heute auf dem Stampcorner Blog.

Hello everyone!
It's not much time left until Easter. So of course I have been creating a few easter cards lately. One of them I am sharing over at the Stampcorner Blog today.

Nun, der Osterhase ist natürlich das Ostersymbol schlechthin. Aber mir war mal nach etwas anderem. Und so kam ich darauf, dass das süße Küken-Mädchen aus dem Meerverliebt 2 Stempelset von Stampcorner sich doch auch toll auf einer Osterkarte machen würde. Und wenn schon "anders", dann gleich richtig. Und so habe ich hier eine eher nicht so klassische Oster-Farbkombi benutzt.
Für den Hintergrund habe ich aus einem Stück weißem Cardstock einen Bogen ausgestanzt. Das geht prima mit einer der Stitched Tall Rainbow Stanzen von MFT - die Linie unten habe ich einfach mit der Schere geschnitten.
Anschließend habe ich Distress Oxide Broken China auf etwas Folie aufgetragen, mit Wasser besprüht und die Farbe dann rund um den Ausschnitt auf den Cardstock aufgetragen. Ich habe das zweimal gemacht und die Farbschichten zwischendurch getrocknet, so legen sie sich schön aufeinander und es entsteht der tolle Effekt.

Well, of course the easter bunny is one of the most used easter symbols. But I felt like doing something different. So I had the idea that the little chick girl from the Meerverliebt 2 stamp set by Stampcorner would look cute on an easter card as well. And while I was doing something different, I thought, I might do it soroughly. And that's why I used some not so common easter color combos on my card.
For the background I cut an arched window from a piece of white cardstock. That works great with one of the Stitched Tall Rainbow dies by MFT - I simply cut the bottom line with my scissors.
Then I smeared some Distress Oxide Broken China onto some acetate, sprayed it with water and dabbed the acetate onto the cardstock, trying to put the color down only in the area around the cut out window, I did this twice, drying the color inbeteween to get the layerd effect.


Als Deko für meine Karte habe ich ein Stück graublauen Cardstock mit blauer und weißer Metallic Watercolor bespritzt.
Dann habe ich aus hell- und dunkelpink farbenem Cardstock Ostereier in verschiedenen Größen ausgestanzt und sie mit ein wenig Distress Ink Hickory Smoke bespritzt. So bekommen sie ein wenig Struktur - ein Muster wollte ich hier nicht aufmalen.
Das süße Küken ist mit Copics coloriert, die Highlights sind mit einem weißen Gelstift gemacht.
Ich habe die Ostereier kreuz und quer aufeinander und dann mit dünnem 3D Tape auf den graublauen Cardstock geklebt. Darauf kam dann das ausgeschnittene Küken, wieder mit 3D Tape befestigt.
Am Himmel habe ich noch ein paar fluffig-weiße Wölkchen angebracht. Dann habe ich den blauen Cardstock mit dickem 3D Tape hinter den weißen Cardstock und in das Fenster geklebt.

To decorate my card I cut a piece of grey-ish blue cardstock and spritzed some blue and white metallic watercolor onto it.
Then I die cut easter eggs in different sizes from light and dark pink cardstock and spritzed some Distress Ink Hickory Smoke over them to give them some structure - I didn't want to add any pattern like dots or stripes to them.
The cute chick is colored with Copics, for the highlights I used a white gel pen.
I glued the easter eggs on top of each other, making them lean into different directions, then attached them with thin foam tape to the blue cardstock. On top I adhered the chick, using foam tape again.
To the sky I glued a few fluffy white clouds. Then I used thick foam tape to glue the blue cardstock behind the white cardstock with the cut out, using the cut out window as a frame for my images.


Mit einer Grasstanze von MFT habe ich den oberen Rand eines Stücks craftfarbenen Cardstocks ausgestanzt und dann das Wort fröhliche darauf embosst. Ich habe weißes Embossingpulver sowie einen Stempel aus dem Set Ostereier von Stampcorner benutzt. Wieder mit dünnem 3D Tape habe ich das Gras dann auf die Karte geklebt und dabei den unteren Rand des Fensters überdeckt.
Für das Wort Ostern habe ich die Handletter Alphabet Stanzensets Lowercase und Uppercase von CraftEmotions benutzt und die Buchstaben einmal aus dem hell- und einmal aus dem dunkelpinken Cardstock gestanzt. Dann habe ich die helleren Buchstaben zusammengeklebt, mit den dunkleren hinterlegt und das Wort am unteren Rand er Karte aufgeklebt.

Using a grass border die by MFT I cut the top edge of a piece of kraft colored cardstock into a grass shape and then heat embossed the word "happy" onto it. I used white embossing powder and a stamp from the Ostereier set by Stampcorner here. Again with thin foam tape I attached the grass to the card, covering the bottom edge of the cut out window with it.
The die cut word means "easter". I used the Handletter Alphabet die sets Lowercase and Uppercase by CraftEmotions to die cut the letters once from the light and once from the dark pink cardstock. I glued together the light letters, then put the darker ones behind them and adhered the word to the bottom edge of my cardstock.


Zum Schluss habe ich rund um den Text einige hellrosa farbene Glitzersteine verteilt, alles mit craft farbenem Cardstock gemattet und auf einen weißen Kartenrohling geklebt.

To finish the card, I put some light pink gems around the text, matted the decorated panel with some kraft ccolored cardstock and adhered everything to a white note card.

Mittwoch, 22. März 2023

März-Moodboard Challenge bei Create a Smile

 
 Hallo Ihr Lieben!
Heute startet wieder eine neue Create a Smile Challenge. Und hier ist das Moodboard, das Thema der Challenge ist:
 
Hello everyone!
Today we are starting a new Create a Smile Challenge. And this is the moodboard, that is the theme of this challenge:
 

 Da es ja nun doch endlich mit großen Schritten auf den Frühling und Ostern zugeht, fand ich die Pastell-Farben klasse. Und das Bild unten links mit den Steckdosen hatte es mir sofort angetan. Und so ist diese Karte entstanden:

Since we are finally getting close to spring and easter, I really love the soft pastell colors of this moodboard. And the picture on the bottom left really caught my eye. It inspired me to make this card:


Für meine Karte habe ich je einen Streifen aus zart pinkem, hellgelbem und hellblauem Cardstock zugeschnitten. Damit der nicht ganz so eintönig ist, habe ich sie von unten her mit Distress Oxide Kitsch Flamingo, Fossilized Amber bzw. Mermaid Lagoon ein wenig gewischt. Ich gebe zu, dass ich sehr versucht war, auch noch einige Farbspritzer aufzutragen, aber ich bin froh, dass ich mich dagegen entschieden habe.
Die Streifen habe ich dann auf einen weißen Kartenrohling geklebt und um den soften Look zu erhalten, habe ich hier sogar auf meine übliche schwarze Mattung verzichtet. Dafür ist der weiße Rand ein klein wenig breiter ausgefallen.

For my card I cut a strip each from pastell pink, light yellow and light blue cardstock. To make those a tad bit more interesting, I inked them from the bottom with Distress Oxide Kitsch Flamingo, Fossilized Amber and Mermaid Lagoon. I have to admit that I was really tempted to flick some color on top, but I am glad I didn't. 
I adhered those strips onto a white note card. And to keep the soft look, I even didn't use my usual black mat here. Instead the white edge around the colored panels is a bit wider.


Um die Idee mit den Steckdosen wieder aufzugreifen, habe ich mit der zweitgrößten der Nested Eggs Stanzen je ein Osterei aus hellblauem und pinkem Cardstock gestanzt und habe etwas mit Wasser verdünnte Distress Ink Hickory Smoke darauf gespritzt.
In der Mitte wollte ich kein gelbe Ei mit gelbem Küken auf gelbem Grund - deswegen habe ich hier statt eines gestanzten Eis den Korb aus dem Stempelset Osterkorb verwendet und ihn mit einem pinken und einem hellblauen Ei gefüllt. 
Die süßen Küken sind aus dem Stempelset Schöne Ostern. Alle Motive habe ich mit Copics coloriert, mit dünnem 3D Tape auf die Eier bzw. den Korb geklebt und anschließend wieder mit dünnem 3D Tape auf den Cardstockstreifen befestigt. 
Unter die Motive habe ich Schatten, gestanzt aus schwarzem Cardstock, ebenso direkt auf den Cardstock geklebt wie auch die weißen Wölkchen am Himmel, die mit einer der Stanzen aus dem Set Weather gemacht sind.

To stick with the picture that inspired me to make this card, I used the second largest die from the Nested Eggs set to die cut one egg each from pink and light blue cardstock, then flicked some Distress Ink Hickory Smoke, mixed with water, onto them.
I didn't want to have a yellow egg with a yellow chick on a yellow background as the middle panel - so I used the basket from the Osterkorb stamp set instead and filled it with a pink and a blue easter egg.
The cute chicks are from the set Joyful Easter. I colored all images with Copics and attached the chicks with thin foam tape to the eggs and basket. Then I used thin foam tape again to to adhere the images to the cardstock strips.
I put some shadows, die cut from black cardstock, under the images and glued those directly to the cardstock, as I did with the white clouds in the sky, that I die cut using one of the dies from the Weather die set.


Auch die Texte sind aus dem Set Schöne Ostern. Ich habe sie mit weißem Embossingpulver auf schwarzen Cardstock embosst, mit Stanzen aus dem Useful Banners Stanzenset ausgestanzt und dann wieder mit dünnem 3D Tape unten quer über die Karte geklebt. Das schmale Banner habe ich dabei auseinander geschnitten, so dass beide Enden gleich weit unter dem oberen Banner hervorschauen. So kann man sich nun aussuchen, ob man "fröhliche" oder "bunte" Ostern möchte.

Also the texts are from the - german version - of the Joyful Easter stamp set. I white heat embossed them onto black cardstock and used two of the Useful Banners dies to cut them out. Than I adhered them with thin foam tape across the card. I cut the smaller banner apart so they evenly stick out from under the larger one. I used the words "happy" and "colorful" and easter on the larger banner - so the recipient can pick, what he likes better.

Montag, 20. März 2023

März-Challenge bei Stampcorner

 
Hallo Ihr Lieben!
Heute startet die neue Challenge bei Stampcorner mit dem Thema "Frühling" und ich habe mal eine Osterkarte im Slimline-Format gemacht. Das war eigentlich gar nicht so geplant, aber als ich alle Elemente für die Karte vor mich gelegt hatte, war klar, dass das so nur auf eine Slimline Karte passt.

Hello everyone!
Today the new Stampcorner Challenge started with spring as our theme and I made a slimline easter card. I hadn't planned to do one, but once I had all the elements for my card laid out in front of me, I realized, that they will only fit a slimline card.

Also habe ich für den Hintergrund erstmal ein Stück Watercolor-Cardstocks mit deiner der Slimline Deckle Edge Stanzen von Stampcorner gestanzt. Dann habe ich ein wenig Ink Smooshing betrieben. Das mache ich momentan wirklich gerne - wenn auch im Vergleich zu vielen von Euch immer noch sehr kontrolliert, getreu dem Motto "da weiß man, was man hat". Hier habe ich Distress Ink Speckled Egg und Peacock Feathers verwendet.

For the background I first die one of the Slimline Deckle Edge dies by Stampcorner from watercolor cardstock, then I did some ink smooshing on it. I really enjoy doing this more and more - even if I still do it the more controlled way compared to most of you. But well, I just like to know what I get. Here I used Distress Ink Speckled Egg and Peacock Feathers.


Mit Stanzenaus dem Spell Anything Alphabet-Set von MFT habe ich die Buchstaben für das Wort Ostern aus dem Hintergrund ausgestanzt. 
Mit 3D Tape habe ich den Ausschnit mit gelbem Designpapier mit kleinen weißen Pünktchen hinterlegt und außerdem unterhalb der Buchstaben eine Reihe Gras aufgeklebt. Die ist mit einer der Grassy Hills Stanzen von MFT - einfach nebeneinander gestanzt damit es für die Länge der Slimline Karte reicht - gemacht. Eigentlich hatte ich Grün gar nicht ins Farbkonzept eingerechnet. Da aber das Grün an der Karotte natürlich auch so werden sollte, wollte ich die Farbe nochmal aufgreifen. 
Um den Text zu vervollständigen habe ich ein "möhrchenhafte" mit schwarzer Tinte auf hellblauen Cardstock gestanzt und mit 3D Tape über dem O und S aufgeklebt.

Using the Spell Anything alphabet die set by MFT I die cut the letters for the word easter from the background. 
With foam tape I put some yellow patterned paper with small white dots behind that cut out and also added a row of grass under the letters. I used one of the Grassy Hills dies by MFT - simply die cut a second time directly after the first one to get a strip long enough for a slimline card. Originally I hand't planned to add any green to this card, but there's the green on top of the carrot and I wanted to pick up the color again.
I stamped a little word to complete my text - sorry, I can't translate that, it's a play with the german word carrot, that sounds just like fairytale  - with black ink onto a strip of blue cardstock and adhered that above of the o and s with foam tape.


Das süße Henri-Nilpferd kommt hier als Osterhase daher. Ich habe ihn mit Copics coloriert, ausgeschnitten und wieder mit 3D Tape auf die Karte geklebt.
Und weil sie einfach zu Ostern gehören, habe ich noch einige Ostereier hinzugefügt. Die habe ich aus weißem Cardstock gestanzt und mit Copics coloriert. Eines befindet sich hinter dem Henri-Hasen, zwei weitere am Ende des Worts Ostern.

The cute Henri the Hippo has dressed up as easter bunny today. I colored him with Copics, cut him out and attached him to the card with foam tape.
And since easter can't be without them I also added a few easter eggs. I die cut those from white cardstock and colored them with Copics. I tucked one behind Henri and two more to the end of the word easter.


Zum Schluss habe ich dann alles mit 3D Tape auf eine blaue Mattung und anschließend auf eine weiße Slimline Karte geklebt. 
Und weil mir irgendwie oben rechts noch etwas auf der Karte fehlte, ich aber keine Glitzersteine oder ähnliches verwenden wollte, flattern hier noch zwei kleine Schmetterlinge. Die sind von LawnFawn und mit Copics coloriert. 

I attached the deorated cardstock with foam tape onto a blue mat and then onto a white slimline card base.
And since I felt like there was something missing in the top right of the card, but didn't want to add any gems or sequins, there are two little butterflies fluttering around there. Those are by LawnFawn and colored with Copics.