Mittwoch, 30. November 2022

Create a Smile Moodboard Challenge November II

 
Hallo Ihr Lieben!
Heute startet eine neue Moodboard Challenge bei Create a Smile - und da der November 5 Mittwoche hat, ist es sogar die zweite diesen Monat. Und es wird festlich!

Hello everyone!
Today is the start of a new moodboard challenge by Create a Smile. Since there are 5 wednesdays this november, it's the second one of the month. And it's getting festive!


Ich mag mich wiederholen, aber ich mag die Farbkombi rot-grün nicht. Deswegen bin ich wirklich froh, dass hier vor allem rot und weiß das Moodboard bestimmen. Und die Farbkombi liebe ich, vor allem in Kombination mit Silber. So sieht auch unser Christbaum jedes Jahr aus.

I may repeat myself, but I don't like the color combo of red and green. So I am really happy that red and white are the main colors of this moodboard. That's a combo I love for christmas, escpecially combined with silver. That's also how our christmas tree is decorated each year.


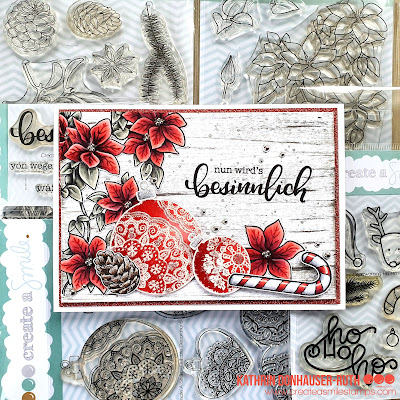
Für den Hintergrund habe ich die Direct To Paper Technik angewandt, bei der ein Stempelkissen ganz vorsichtig direkt über das Papier gezogen wird. Ich habe ein graues Stempelkissen verwendet und so eine Art Holzmuster aufs Papier gewischt. 

For the background I did the direct to paper technique, where you lightly drag an ink pad over your paper. I used a grey ink pad and created some kind of wood pattern background.


Das Holzmuster war dann der Hintergrund für mein Weihnachts-Stilleben. 
Für die Weihnachtsstern-Blüten habe ich ein wenig getrickst und das Clematis Stempelset verwendet. Ich habe die Blüten mit Copics rot coloriert und anschließend mit Polychromos das Muster auf die Blüten gemalt. Schon sehen sie aus wie Weihnachtssterne. Für die Blütenmitten habe ich silbernen Glitterkleber aufgetragen und dann kleine silberne Perlen hineingedrückt. Und weil ich grün und rot ja nicht mag, habe ich für die Blätter ein sehr dezentes Grün-Grau verwendet.
Die Zuckerstange aus dem Set Heartwarming Ho-Ho-Holidays und der Tannenzapfen aus dem Set Festive Foliage sind ebenfalls mit Copics coloriert. Auf den Tannenzapfen wollte ich eigentlich die Snow-Paste von Ranger auftragen. Die hat aber offenbar irgendein Bestandteil, das die Copics wieder anlöst und das Braun wurde orange-rot. Zum Glück habe ich es sofort bemerkt und die Paste gleich wieder abgenommen. Stattdessen habe ich ebenfalls silbernen Glitterkleber aufgetragen. 
Die tollen Christbaumkugeln sind aus dem Set Delicate Decorations. Ich habe sie weiß embosst und dann mit Distress Ink Candied Apple und Aged Mahogany gewischt. Den Aufhänger habe ich dabei abgedeckt und später mit Copics coloriert. Na, und da Christbaumkugeln schön glänzen müssen, habe ich meine fertig ausgeschnittenen Kugeln dann mit klarem Ultra Thick Enamel Embossingpulver überzogen. Ich hatte allerdings nicht daran gedacht, dass bei zu langem Erhitzen auch das weiße Pulver darunter wieder anschmilzt, so dass mein Muster auf den Kugeln an einigen Stellen ein wenig verlaufen ist. Aber ich finde, das gibt den Kugeln einen tollen Vintage-Look. Anschließend habe ich auch hier an einigen Stellen und den Aufhängern silbernen Glitterkleber aufgetragen.
Den Text aus dem Set Besinnlich habe ich dann mit schwarzer Tinte direkt auf den Hintergrund gestempelt. 

The wood pattern was the backdrop for my christmas decorations.
For the poinsettia flowers I did some cheating and used the Clematis stamp set. I colored the flowers red with my Copics, then used Polychromos to add the details to the leaves. And the clematis changed into poinsettias. For the flower centers I put down some silver glitter glue and put tiny silver beads into it. And since I don't like the color combo of red and green, I went with a very subtle grey-ish green to color the leaves.
The candy cane from the set Heartwarming Ho-Ho-Holidays and the pinecone from the Festive Foliage set are also colored with Copics. I wanted to put some snow paste by Ranger onto the pinecone, but it seems like contains something that reacts with the Copics and the brown turned into an orange-red. Luckily I realized it immediately so I scraped off the little paste I had already put down and added some of the silver glitter glue to the pinecone instead. 
The beautiful christmas baubles are from the Delicate Decorations stamp set. I 've white heat embossed them and then used Distress Ink Candied Apple and Aged Mahogany to color them. When I did that, I covered the hanger and colored that with my Copics later. Well, and since a real bauble has to be shiny I brought out my clear UTEE and covered them with it. I didn't think of the fact, that also the white embossing powder would melt again when I heated the UTEE for too long. So my white lines are a bit runny in a few areas. But I don't mind it, I think it adds a nice vintage touch to the baubles. Then I added some of the silver glitter glue also to a few areas of the baubles and the hangers.
The text is stamped directly onto the background using black ink.


Als Deko habe ich noch einige silberne Perlen auf der Karte verteilt. Dann habe ich den dekorierten Cardstock mit rot-silbenem Glittercardstock gemattet und alles auf einen weißen Kartenrohling geklebt.

I glued down a few more silver pearls to my card. Then I matted the decorated cardstock with some silver-red glitter cardstock and glued it onto a white note card.

Dienstag, 29. November 2022

Stampcorner Dezember Release Sneak Peek #2


 Hallo Ihr Lieben!
Eine Karte mit der süßen Ernestine habe ich Euch bereits letzte Woche gezeigt. Aber wird im Dezember noch ein weiteres neues Stempelset von Stampcorner geben. Und das möchte ich Euch natürlich auch zeigen, okay, zumindest einen Teil davon.

Hello everyone!
I already shared a card with the cute Ernestine with you last week. But there will be another new stamp set by Stampcorner in december. And of course I want to show that to you as well, okay, at least a part of it.

Ich muss gestehen, dass ich derzeit so im "Weihnachtstunnel" feststecke, dass es mir im ersten Moment echt schwer fiel, eine Karte zu einem Ganzjahres-Thema zu machen. Und so ist diese Party-Einladung, für die ich mich letztendlich entschlossen habe, ein klein wenig cleaner ausgefallen, als ich eigentlich geplant hatte. Ich finde sie trotzdem toll. 
Für den Hintergrund habe ich ein Stück weißen Cardstocks zugeschnitten und mit Tape rundum einen 1/2 Inch breiten Streifen abgeklebt. Die Mitte des Cardstocks habe ich dann von oben her mit Distress Oxide Speckled Egg, Evergreen Bough, Rustic Wilderness und Black Soot gewischt. Dann habe ich das Tape abgezogen und einen Konfetti-Embossingfolder verwendet, um das Konfettimuster auf den kompletten Cardstock zu embossen. Da die Konfetti im gewischten Bereich irgendwie nicht so schön zu sehen waren, wie ich es mir gewünscht habe, habe ich ein weißes Stempelkissen ganz leicht auf die erhabenen Stellen gedrückt. Die Oxide Tinte war zu diesem Zeitpunkt noch nicht komplett getrocknet, so dass die Konfetti nicht weiß sind, sondern durch die Tinte nur aufgehellt wurden. Zum Schluss habe ich noch goldene Metallic Watercolor darüber gespritzt.

I have to admit, that I am so deep into christmas that I really was a challenge at first, to make a card for a more all year long theme. And so this party invitiation, that I finally decided to make, a lot cleaner than I had planned. But I still like it.
For the background I cut a piece of white cardstock a bit smaller than a german card base and covered a 1/2 Inch strip on all four sides with masking tape. Then I inked the center of the cardstock - from bottom to top - with Distress Oxide Speckled Egg, Evergreen Bough, Rustic Wilderness and Black Soot. I removed the tape and used a confetti embossing folder to dry emboss the confetti onto the whole piece of cardstock. In the inked area the confetti weren't as prominent as I wanted them to be, so I used a white ink pad and lightly pressed it onto the raised areas. The Oxide ink wasn't completly dry at that moment, so the confetti didn't turn white but got lightened up a bit. To finish the background I flicked some gold metallic watercolor onto it.


Die Motive, die alle aus dem neuen Stempelset sind, habe ich mit Copics coloriert und per Hand ausgeschnitten. 
Den Text habe ich weiß auf schwarzen Cardstock embosst. Der große obere Text, der einfach super zum Motiv passt, ist ebenfalls aus diesem Stempelset. Für den unteren habe ich Stempel aus den Sets Kleine Worte 1 und Kleine Worte 2 kombiniert. 
Zum Aufkleben der Deko habe ich dann 3D Tape benutzt, so kann sich der uneben Untergrund nicht abzeichnen.
Als Deko habe ich dann noch fünf goldene Pailetten aufgeklebt.

The images, that are all from this new stamp set, are colored with Copics and cut out by hand.
The text here is white heat embossed onto black cardstock. I really can't translate that and explain, why it works so greatly with the wind-up image. It's something like "wind up - invitation to our party". 
To attach the elements to the card I used foam tape, this way the raised pattern of the embossing can't show on the images.
To decorate the card I glued down five gold sequins.


Um die Karte fertig zu stellen, habe ich den Hintergrund schwarz gemattet und auf einen weißen Kartenrohling geklebt. 

To finish this card I matted the background black and attached it to a white note card.

Montag, 28. November 2022

Frohes Fest

 
Hallo Ihr Lieben!
Heute habe ich die nächste Weihnachtskarte für Euch. Und irgendwie habe ich das Gefühl, dieses Jahr fallen alle meine Karten recht blumig aus.

Hello everyone!
Today I am sharing another christmas card with you. And I really have the feeling, my christmas cards this year are all pretty floral.

Im Hintergrund habe ich ein Stück braunen Cardstock zugeschnitten und mit der Dotted Tile Debossing Cover Stanze von Altenew ein Muster hineingestanzt. Okay, nach dem Dekorieren sieht man jetzt davon nicht mehr allzu viel. Anschließend habe ich weiße Acrylfarbe darüber gespritzt. 

For the background I've cut a piece of craft colored cardstock and cut a cover into it using the Dotted Tile Debossinng Cover die by Altenew. Okay, you don't see much of it after I put all the decorations on top. Then I spritzed some white acrylic paint over the cardstock.


Für die Deko habe ich Pinienzweige mit Stanzen aus dem Beautiful Boughs Set von SU aus dunkel-türisfarbenem Cardstock gestanzt und dann die Zweige mit Distress Oxide Black Soot gewischt.
Die Zweige mit den Beeren sind aus dem Stanzenset Slimline Scalop Christmas Bauble von CraftEmotions und aus helltürkisfarbenem Cardstock gestanzt.
Und Hauptstar sind natürlich die großen Blüten, gemacht mit dem Lovely Layers Mum Stanzenset von HoneyBeeStamps. Dafür habe ich alle Lagen der Blüten aus weißem Cardstock gestanzt und dann mit Distress Ink Lumberjack Plaid, Aged Mahogany und Black Soot gewischt. Die Blätter habe ich aus türkisfarbenem Cardstock gestanzt und mit Distress Oxide Broken China und Uncharted Mariner gewischt. 
Ich habe alle Teile aufeinander geklebt und auch auf die Deko weiße Acrylfarbe gespritzt. Und damit das ganze winterlich-weihnachtlich wird, habe ich alles mit Distress Rock Candy Glitter überzogen und außerdem ein paar kleine Schneeflocken, gestanzt aus weißem Cardstock, zwischen die Deko geschoben. 

For my decorations I die cut some pine branches from dark turquoise cardstock using dies from the Beautiful Boughs by SU and then darkened the ends of the branches with Distress Oxide Black Soot. The branches with the berries are made from light aqua cardstock with dies from the Slimline Scalop Christmas Bauble set by CraftEmotions. 
And the star of the card are of course the big flowers, made with the Lovely Layers Mum von HoneyBeeStamps. I've die cut all layers from white cardstock and then inked them up with Distress Ink Lumberjack Plaid, Aged Mahogany and Black Soot. The leaves I've cut from turquoise cardstock and inked them with Distress Oxide Broken China and Uncharted Mariner. 
I put the flowers together and put the branches underneath, then spritzed more white acrylic paint on top. And to add a wintery christmassy touch to everything, I covered everything with some Distress Rock Candy Glitter and also tucked a few snowflakes, die cut from white cardstock, between the die cuts.


Wohin dann mit dem Text? Die Karte ist doch schon so voll. Deswegen habe ich einfach ein Stück Transparentpapier zu einem Bannner geschnitten und dort ein "Frohes Fest" hineingeprägt. Das Banner habe ich dann unten quer über die Karte geklebt.

Well, where should I put my text? The card is already so full. So I simply cut a banner from vellum and cut a "merry christmas" into it. Then I glued the banner across the card.


Und hier könnt Ihr die ganze Karte nochmal in ihrer ganzen Blumen- und Glitzerpracht sehen. Zum Schluss habe ich unten und links die überstehenden Dekoteile abgeschnitten und alles auf einen weißen Kartenrohling geklebt.

And here you  can see the whole card again in all its flowery glitterness. To finish the card I cut off the overhanging decorations from the bottom and right edge, then attached the cardstock to a white note card.

Samstag, 26. November 2022

Stempeleinmaleins - Ausgabe vom 26. Novemer 2022


 Hallo Ihr Lieben!
Heute gibt es beim Stempeleinmaleins einen neuen Sketch für Euch. Da der eher einfach ist, habe auch ich mal wieder eine Clean and Simple Karte danach gemacht. Und ich muss sagen, dass fällt mir immer leichter!

Hello everyone!
Today we have a new sketch at Stempeleinmaleins. It's a more simple one, so I made a clean and simple card again. And I have to admit - it's getting easier for me to make those, the more often I do them!

Hier habe ich für den Hintergrund ein Stück weißen Cardstock mit einem Wellpappe-Embossingfolder geprägt. Da das Papier doch sehr in der Höhe geschrumpft ist, ist meine Karte einen Ticken kleiner als gewöhnlich. Damit der Hintergrund nicht nur geprägt ist, habe ich einige Sprenkel mit goldener Metallic Watercolor aufgespritzt.

Here I used a corrugated paper embossing folder to dry emboss a piece of white cardstock. During the embossing it shrinked quite a bit in height, so my card is a tad bit shorter than a regular card. To add a little more interest to the background I flicked some gold metallic watercolor onto it.


Als Hauptmotiv habe ich diesen tollen Mistelzweig von Create a Smile verwendet. Ich habe ihn mit Copics coloriert und ausgeschnitten und die Beeren zusätzlich mit Glossy Accents überzogen. Die Schleife ist aus dem Mini Treat Bag Stanzenset von SU. Ich habe sie insgesamt 8 Mal gestanzt - 7 Mal aus weißem Cardstock und für die oberste Lage einmal aus mattgoldenem Metallic-Cardstock. Ich habe die Schleifen aufeinandergeklebt und dabei mittig, also zwischen die 4. und 5. Lage, den Mistelzweig eingebaut. So ist die Schleife höher als der Zweig, trotzdem konnte ich den noch mit 3D Tape auf dem Hintergrund befestigen. 
Ich wollte unbedingt diesen Text auf der Karte verwenden - ich denke, das wird die Weihnachtskarte für meinen Mann. Ich habe nur einen einzigen Stempel mit diesem Text. Er ist aus einem recht alten Mini-Set von StudioG und recht klein. Außerdem musste ich ihn auseinanderschneiden, um jedes Wort einzeln abstempeln zu können. Ich habe die Worte mit goldenem Embossingpulver auf schwarzen Cardstock embosst und dann ausgeschnitten. Dann habe ich sie rund um den Mistelzweig angeordnet.

As my main image I went with this beautiful mistletoe image by Create a Smile. I colored it with Copics and cut it out and also added a layer of Glossy Accents to the berries. The bow is made using a die from the Mini Treat Bag die set by SU. I've die cut it 8 times - 7 times from white cardstock and for the top layer once from matte golden metallic cardstock. I stacked all the bows and glued the cut out mistletoe between the 4th and 5th layer. This way the bow is a bit higher than the mistletoe, but I was still able to attach this with foam tape to my background.
I really wanted to use that text on my card - guess it will be the one for my husband. I have just one stamp with this text. It's from a pretty old mini stamp set by StudioG and quite small in size. I also had to cut it apart to be able to stamp each word individually. I gold heat embossed the words onto black cardstock, cut them out and then arranged them around the mistletoe image.


Zum Schluss habe ich kleine Pailetten-Sterne in zwei verschiedenen Größen rund um Motiv und Text verteilt, den Cardstock mit goldenem Glittercardstock gemattet und alles auf einen weißen - in der Höhe etwas gekürzten - Kartenrohling geklebt.

To finish this card I glued a few gold star shaped confetti in two different sizes around the image and text, matted the cardstock with some gold glitter cardstock and attached everything onto a white cardbase - that I cut off a strip to make it fit the height of my dry embossed cardstock.

Freitag, 25. November 2022

Stampcorner Dezember Release Sneak Peek #1

 
Hallo Ihr Lieben!
 Im Dezember wird es wieder neue Stempel und ein Stanzenset von Stampcorner geben. Eine Vorschau auf eines der Sets gebe ich Euch heute mit dieser Neujahrs-Karte. 

Hello everyone!
There will be new stamps and dies by Stampcorner again in december. I am giving you a sneak at one of the new stamp sets with this New Year's card.
 
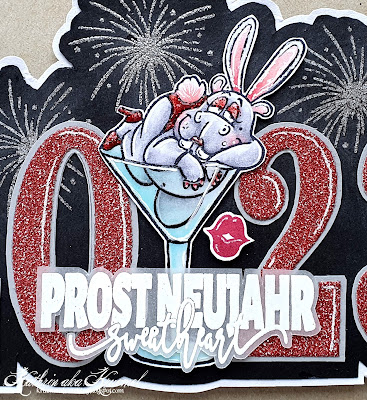
Das Set ist unverkennbar wieder aus der Feder von Oma Plott. Und Nilpferd Ernst hat offenbar seine große Liebe gefunden: Ernestine! 
Für meine Karte habe ich mit Stanzen von SU die Zahl 2023 aus silber-rotem Glittercardstock gestanzt und per Hand eine Schattenlage aus hellgrauem Cardstock gestanzt. Dann habe ich die Zahlen auf ein Stück schwarzen Cardstock gelegt und in der Mitte Platz für Ernestine gelassen. So konnte ich sehen, wo ich die explodierenden Raketen abstempeln wollte. Der Raketenstempel und auch alle weiteren Motive auf der Karte kommen alle im selben Set wie Ernestine. Damit die Raketen schön glitzern, habe ich sie mit silberfarbenem Glitter-Embossingpulver auf den schwarzen Cardstock embosst. 
 
This set is again designed by Oma Plott. And hippo Ernst seems to have found the love of his life: Ernestine!
For my card I used dies by SU to die cut the numbers 2023 from silver-red glitter cardstock and cut a shadow layer from light grey cardstock by hand. Then I laid the numbers onto a piece of black cardstock and left some room between them for Ernestine. This way I was able to tell, where I wanted to stamp the fireworks. The fireworks and all the other images on this card all come in the set with Ernestine. To make the fireworks glitter nicely I used silver glitter embossing powder to heat emboss them onto the black cardstock.
 

 Und hier könnt Ihr Ernestine genauer sehen. Sie räkelt sich ziemlich lasziv im Hasenkostüm in einem Martini-Glas. 
Ich habe alle Motive - auch die Sektflasche links und die Sektgläser rechts - mit Copics coloriert. Ernestines Schuhe und das Höschen habe ich rot beglittert, das Glas, die Sekflasche und die kleinen Sektgläser sind zudem mit Glossy Accents überzogen. Nachdem das getrocknet war, habe ich alle Motive per Hand ausgeschnitten und mit 3D Tape auf die Zahlen, die ich inzwischen auf den Cardstock aufgeklebt habe, geklebt.
Auch der Text ist aus dem selben Stempelset - es gibt noch mehr davon, aber den hier fand ich von der Größe her super passend. Ich habe ihn mit weißem Embossingpulver auf Vellum embosst, ausgeschnitten und ebenfalls mit 3D Tape über den Stiel des Glases geklebt. Und weil er so gut passte, habe ich auch noch den Kussmund mit roter Farbe abgestempelt und in eine Lücke über dem Text geklebt.

Here you get a closer look at Ernestine. She's lolling quite lascivious in a martini glass.
I colored all images - also the bottle of champagne on the left and the champagne glasses on the right - with Copics. I covered Ernestine's shoes and her panty with red glitter, the bottle, the small glasses and also the martini glass are also covered with Glossy Accents. After that had dried, I cut out all images by hand and attached them onto the numbers, that I had adhered to the black cardstock inbetween, using foam tape.
Also the text is from the same stamp set - there are more like this, but I liked the size of this one the best. I white heat embossed it onto vellum, cut it out and glued it across the glass' handle with foam tape. And since it really fits great on this card, I also stamped the smooch with red ink and glued it onto a spot, that was irritating me because there was that much black visible, above the text.


Da nun alle Elemente auf der Karte aufgeklebt waren, habe ich mit der Schere die doch recht ungewöhnliche Form zugeschnitten, alles auf weißen Cardstock geklebt und ein weiteres Mal per Hand drumrum geschnitten. Und damit man in die Karte auch etwas schreiben kann, habe ich von hinten eine weiße, oben gefaltete Karte geklebt, die etwa die Größe einer Mini-Slimline-Karte hat. Von vorne sieht man sie gar nicht, und es war die einfachste Lösung.

Since all elements on my card were now attached to the cardstock, I used my scissors and cut the quite unusual shape of my card. Then I glued it onto white cardstock and cut around it once again. Well, of course I wanted to be able to write something onto this card. So I cut a top folding note card the size of a mini slimline card and adhered it  to the back of my shaped card. You don't see it from the front, and it was the easiest way to do it.

Donnerstag, 24. November 2022

Ho Ho Ho - oder so....

 
Hallo Ihr Lieben!
Die Adventszeit steht vor der Tür - und so zeige ich heute auf dem Stampcorner Blog eine Karte, die schon mal einen Blick auf den Abend vor Weihnachten wirft. Okay, ich hoffe sehr, dass das nicht wirklich eintreffen wird. Aber man kennt es ja, manchmal ist es in der Vorweihnachtszeit so stressig, dass dieses Szenario, zumindest im Kopf, nicht allzu unwahrscheinlich erscheint.

Hello everyone!
Christmas season is right around the corner - and so I'm sharing a card today over at the Stampcorner Blog, that gives a preview on the night before christmas. Okay, I really hope that this won't come true. But we all know those days, sometimes christmas season is so busy and stressful, that this scene doesn't seem that unlikely - at least not in our heads.

Die Karte ist natürlich mit einem Augenzwinkern zu sehen. Aber den Elch aus dem neusten Set von Oma Plott musste ich einfach mit ein wenig Humor in Szene setzen!

Well, of course this card is meant to be seen with a lot of humor. But that deer from the newest set by Oma Plott was just perfect for a card like that.


Hier habe ich für den Hintergrund den Holz-Stencil aus dem letzten Relase verwendet. Erst habe ich den oberen Bereich eines Stücks weißen Cardstocks mit Distress Oxide Gathered Twigs eingefärbt, den Stencil aufgelegt und dann mit Ground Espresso die Holzmaserung aufgewischt. Anschließend habe ich von den Rändern her noch etwas Black Soot aufgetragen, um den Raum ein wenig abzudunkeln.
Auf den unteren Teil des Cardstocks habe ich mit hellgrauer Tinte den Holzboden aus dem On Solid Ground Stempelset von MFT aufgestempelt und dann mit Copics in hellen Brauntönen ein wenig coloriert. Da der Stempel zu schmal war, um den kompletten unteren Bereich des Cardstocks abzudecken, habe ich hier einfach mit den beiden helleren Brauntönen einige weitere Striche aufgemalt und diese Richtung Mitte auslaufen lassen. 
Und in dieser Holzhütte - denn danach sieht der Raum für mich aus - liegt der Elch. Total besoffen vor einer umgeworfenen Tasse Glühwein und hoffnungslos in die Lichterkette gewickelt, die er eigentlich an den Baum bringen sollte. Ich bin mir ja nicht ganz sicher, ob der am nächsten Abend voll geschmückt leuchten wird....
Alle Motive auf der Karte sind mit Copics coloriert, ausgeschnitten und direkt auf den Hintergrund geklebt. Für den Weihnachtsbaum, die Lichterkette, die weiteren Tassen und die Weihnachtsplätzchen habe ich Stempel aus verschiedenen Sets von LawnFawn benutzt.

Here I used the woodgrain stencil from the latest release to create the background. I've inked up the upper half of a piece of white cardstock with Distress Oxide Gathered Twigs, put the stencil on top and then used Ground Espresso to add the woodgrain pattern. In the end I added a bit of Black Soot at the edge of my paper to darken the room a bit.
Onto the lower half of the cardstock I stamped the wooden floor image from the On Solid Ground stamp set by MFT using grey ink, then colored it light brown with Copics. Since the stamp wasn't large enough to cover the whole cardstock, I simply added strokes with the two lighter tones in the area where there wasn't a stamped image, fading it out towards the center.
And in this lodge - because that's what the room looks to me - the deer is lying on the floor. Completly drunk from mulled wine, with a knocked over cup in front of him and hopelessly tangled into the string of lights that he was meant to put on the tree. I really am not sure if this tree will be all decorated the next evening...
All images on the card are colored with Copics, cut out and then attached directly onto the background. For the christmas tree, the string of lights, the additonal cups and the cookies I used stamps from different sets by LawnFawn.


Ganz unten auf der Karte habe ich meinen Text aufgestempelt. Dabei habe ich das Ho Ho Ho erst mit roter Tinte gestempelt und dann mit rotem Embossigpulver überzogen. Die Highlights habe ich mit einem weißen Gelstift nur an diesen  Buchstaben hinzugemalt. Dann habe ich den Rest des Textes mit schwarzer Tinte daneben gestempelt. 

Onto the bottom of my cardstock I added the text. It means "bring me another cup of mulled wine", bring in german can also be said using "hol" so there is a Ho Ho Ho at the start of the text, the last word changing into "bring". I stamped the Ho Ho Ho with red ink first, then covered it with red embossingpulver and used a white gel pen to add the white highlights only to those letters. Then I stamped the rest of the text with black ink.

Mittwoch, 23. November 2022

Holiday joy to you and yours


Hallo Ihr Lieben!
Heute geht es weiter mit den Weihnachtskarten. Auf dieser hier habe ich ein Pfingstrosenmotiv verwendet - aber das merkt man gar nicht. Es lohnt sich also, auch mal durch die nicht-weihnachtlichen Stempel zu schauen, ob sich da nicht was passendes findet....
 
Hello everyone!
I am continuing to share christmas cards. On this one I used a peony image - but you can hardly recognize it as that. So it's always worth going through your non-christmas stamps, maybe there's something among those, that works on a christmas card as well.
 
Hier habe ich für den Hintergrund ein Stück dunkel-türkisfarbenen Cardstock zugeschnitten und weiße Acrylfarbe aufgespritzt. Dann habe ich den Christmas Background von MFT mit Distress Ink Uncharted Mariner darüber gestempelt. Der Text ist ziemlich subtil, und trotzdem wirkt der Hintergrund dadurch so viel interessanter.
Da ich hier auf die Mattung meines Cardstocks verzichtet habe - sonst hätte ich so viel des Motivs wegschneiden müssen - habe ich stattdessen mit einer der Stitched Rectangle Frames von Create a Smile einen Rahmen aus silberfarbenem Spiegelcardstock gestanzt und auf den Hintergrund geklebt.
 
For my background I cut a piece of dark turquoise cardstock a bit smaller than my card base and spritzed some white acrylic paint onto it. Then I stamped the Christmas Background by MFT on top, using Distress Ink Uncharted Mariner. The text is quite tone on tone with the cardstock, but still it adds a lot of interest to the background. 
Since I didn't mat my cardstock for this card - I would have had to cut off quite  a bit of the image otherwise - I die cut a frame from silver mirror cardstock using one of the Stitched Rectangle Frames by Create a Smile and glued that onto the background.


Die tolle Pfingstrose ist aus dem Gracious Peonies Stempelset von Altenew. Ich habe das Motiv mit hellgrüner Tinte auf weißen Cardstock gestempelt und es  dann mit Copics coloriert - die Blüten in ganz zartem Grün, die Blätter in dunklerem Grün. Anschließend habe ich das Motiv noch einmal mit der selben Tinte aufgestempelt - durch die Feuchtigkeit der Copics waren die Linien, die ich mit Dye Ink gestempelt hatte, doch recht verblasst. Indem ich das Motiv noch einmal aufgestempelt habe, waren die Details wieder sichtbar. Nur an den dunklen Stellen der Blätter kam die hellgrüne Tinte natürlich nicht durch. Deswegen habe ich dort die Blattadern mit einem dunkelgrünen Polychromo nachgemalt.
Anschließend habe ich das Motiv mit der passenden Outline-Stanze ausgestanzt. Und dann fing das Drama in meinem Kopf an. Ich sah auf einmal statt der tollen Blüten nur noch Kopfsalat. Das hat natürlich nichts mit dem tollen Motiv, sondern mit meiner Farbwahl zu tun. Aber da war die Idee nun mal in meinem Kopf... Also habe ich erstmal weiße Acrylfarbe über das Motiv gespritzt, dann habe ich auf die hellsten Bereiche der Blütenblätter Kleber aufgetragen und Distress Rock Candy Glitter aufgestreut. Anschließend habe ich das Motiv zerschnitten, komplett hätte es nie auf meine Karte gepasst. So habe ich einen Teil links direkt auf die Karte geklebt, den größeren Teil dann rechts mit 3D Tape leicht überlappend darüber. Egal, der Kopfsalat ist immer noch in meinem Kopf... ;)
 
Those beautiful peonies are from the Gracious Peonies stamp set by Altenew. I stamped the image with light green ink onto some white cardstock, then used my Copics to color the petals a very light green, the leaves a quite dark green. Then I stamped the image again, using the same ink. I had used a Dye Ink, and the moisture of the Copics had let the ink fade a bit. By stamping it on top again, the details are more visible. And since the details weren't visible under the dark green of the leaves, I used a dark green Polychromo to re-draw those.
Then I used the matching outline die to cut the image out. And then the drama started. Instead of seeing some beautiful peonies, all I saw were heads of lettuce. Of course this has nothing to do with the beautiful image itself, but everything with the colors I've chosen. But well, the idea was stuck in my head... So I spritzed some white acrylic paint over the image as well, then applied some clear drying glue to the lightest areas of the petals and covered them with Distress Rock Candy glitter. I cut the image apart - it was way too big for my card. I attached the smaller part onto the left edge of my background, glueing it directly onto the cardstock. To adhere the bigger part to the right edge, overlapping it a bit with the other part, I used foam tape. But well, there's still lettuce in my head... ;)


Für den Text habe ich wieder eine Mischung aus gestanzten Buchstaben und gestempelten Worten verwendet. Das Wort Joy ist mit dem Tall Skinny Alphabet Stanzenset von Scrapbook.com gemacht. Erst als meine Karte fertig war und ich die Stanzen wieder aufgeräumt habe, ist mir aufgefallen, dass ich das Y von den Kleinbuchstaben verwendet habe. Da aber alle Buchstaben gleich hoch sind, fällt das gar nicht auf. 
Ich habe alle Buchstaben aus silberfarbenem Spiegelcardstock gestanzt und mit 4 Lagen aus schwarzem Cardstock hinterlegt. Dann fiel mir auf, dass das J tiefer sitzt, da ich das Motiv rechts ja mit 3D Tape aufgeklebt habe. Also habe ich noch ein paar weitere schwarze Js gestanzt, so dass sich dort insgesamt 8 Lagen schwarzen Cardstocks hinter dem silbernen Buchstaben befinden. 
Für den Rest des Textes habe ich Stempel aus dem Set Filled with Joy von MFT verwendet und sie mit der selben grünen Tinte gestempelt, die ich auch für das Motiv verwendet habe. Die Streifen mit den aufgestempelten Texten habe ich dann wieder mit 3D Tape aufgeklebt.

For the text I used a mix of die cut letters and stamped words again. The word JOY is cut with the Tall Skinny Alphabet die set by Scrapbook.com. After I had finished my card and was putting my dies away, I realized, that I had used the lowercase Y with the uppercase J and O. But since all letters have the same size, I didn't care.
I cut the letters from silver mirror cardstock and glued 4 layers cut from black cardstock behind each letter. Then I realized, that the J will be lower because I had attached the image on the right with foam tape. So I've cut a few more black Js and now there are 8 black layers behind the silver letter.
For the rest of the text I used stamps from the Filled with Joy stamp set by MFT and stamped the words with the same green ink I had used for the image. Then I adhered the strips with the stamped on texts with foam tape.


Durch den Glitter auf den Blütenblättern - und in Kombi mit dem silberfarbenen Spiegelcardstock - hat die Karte einen tollen und perfekt zu Weihnachten passenden Schimmer. 
Eigentlich hatte ich es nicht geplant, habe abe dann doch einige wenige, kleine silberne Perlen auf der Karte verteilt. Dann habe ich alles auf einen weißen Kartenrohling geklebt.

With the glitter on the petals and in combination with the silver mirror cardstock this card has a wonderful and christmassy shimmer.
I really hadn't planned to, but then I decided to add a few tiny silver pearls to my card and attached it to a white note card.

Montag, 21. November 2022

Krokodile zum Geburtstag


 Hallo Ihr Lieben!
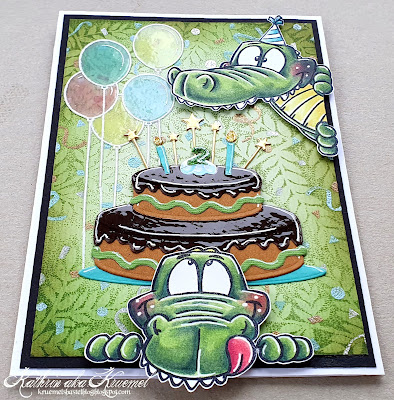
Mein Enkel ist vor kurzem 2 Jahre alt geworden. Und ja, ich finde, auch Zweijährige "verdienen" eine Geburtstagskarte. Und weil Krokodile immer noch hoch im Kurs stehen, durften die die Karte zieren.

Hello everyone!
My little grandson turned 2 a few days ago. And yes, I think, also 2 year olds "deserve" a birthday card. Since he still loves crocodiles I picked those for his card.

Für den Hintergrund habe ich den Fern Background von WhimsyStamps mit grüner Tinte auf hellgrünen Cardstock gestempelt. Ich finde, der schafft ein tolles und trotzdem dezentes Dschungelfeeling. 
Dann kam das Confetti Turnabout Stempelset von Concord and 9th zum Einsatz. Ich habe die einzelnen Lagen mit goldenem, silbernem, hellblauem und helltürkisfarbenem Embossingpulver über den Hintergrund embosst. Nun fallen im Dschungel Konfetti und Luftschlangen vom Himmel.
Anschließend habe ich die Ränder des Hintergrunds noch mit Distress Ink Mowed Lawn und ein wenig Forest Moss gewischt.

For the background I stamped the Fern Background by WhimsyStamps with green ink onto some light green cardstock. I think it adds a great but still subtle jungle feeling.
Then I used the Confetti Turnabout stamp set by Concord and 9th and heat embossed the different "layers" with gold, silver, light blue and light turquoise embossing powders onto the background. Now there are confetti and streamers falling down from the sky.
Then I inked up the edges of the cardstock with Distress Ink Mowed Lawn and a bit of Forest Moss.
 

 Das tolle Stempelset Instagator von WhimsyStamps habe ich extra für diese Geburtstagskarte gekauft. Ich finde die Krokodile einfach klasse!
Im oberen Bereich der Karte darf eines der Krokodile neugierig um die Kartenecke schauen. Passend zum Geburtstag habe ich ihm einen Partyhut aus dem Stempelset Year Nine von LawnFawn aufgesetzt. Ich befürchte ja, er hat es auf die Luftballons abgesehen... Die sind aus dem Stempelset Balloon Bouquet von MFT. Ich habe sie mit weißem Embossingpulver auf Vellum embosst. Von hinten habe ich das Vellum dann mit Copics in türkis, blau, gelb und hellrot eingefärbt, die Luftballons ausgeschnitten und dann von oben über das Vellum noch eine Lage klares Embossingpulver gegeben. So glänzen die Ballons schön - und durch sie hindurch, abgeändert durch die Farbe auf dem Vellum, kann man immer noch den Hintergrund sehen. So, wie es sich für Ballons eben gehört.

I bought the great Instagator stamp set by WhimsyStamps just because of this card. I just love the crocodiles in this set!
In the upper area of my card one of them is looking curiously around the edge of the card. To make him match the birthday theme I dressed him up with a party hat from the Year Nine stamp set by LawnFawn. I am really afraid, he's after the balloons.... Those are from the Balloon Bouquet stamp set by MFT. I white heat embossed them onto vellum and colored the balloons from the back with turquoise, blue, yellow and light red Copics. Then I cut them out and added a layer of clear embossing powder to the balloons. Now they have a nice shine - and through them you can still see the background, changed in color due to the color on the back of the vellum. Just as real balloons.


Auf einer Geburtstagskarte darf natürlich eine Torte nicht fehlen! Und da ist doch schon wieder ein Krokodil, das sich schon die Lippen leckt....
Die Torte habe ich mit einem Stanzenset von MarianneDesign gemacht, den Teller darunter habe ich mit einer Ovalstanze von MFT gemacht. Dekoriert habe ich die Torte mit zwei kleinen Kerzen, im Sahnetuff steckt eine glitzernde 2. Und dahinter befinden sich noch fünf goldene Sternenstecker. 
Das Krokodil ist, wie alle Motive auf der Karte, mit Copics coloriert. 

Of course there has to be a birthday cake on a birthday card! And there's another crocodile, looking at the cake and licking its lips...
I used a die set by MarianneDesign for the cake, the plate it is put onto, is made with an oval die by MFT. I decorated the cake with two candles, there's a glittery 2 tucked into the cream puff and behind the cake there are also five golden star picks.
The crocodile is colored with Copics - as are all images on this card.


Den Schokoladenüberzug der Torte habe ich dick mit Glossy Accents überzogen, so dass er lecker glänzt. 
Torte und Ballons sind direkt auf den Hintergrund geklebt, zum Aufkleben der Krokodile habe ich 3D Tape genommen.
Ich habe alles schwarz gemattet und dann auf einen weißen Kartenrohling geklebt.

I covered the chocolate icing of the cake thick with Glossy Accents, so it has a yummy shine.
I glued the cake and balloons directly to the background, to attach the crocodiles I used foam tape.
Then I matted the background black and adhered it to a white card base.


Im Instagator Stempelset sind drei Krokodilmotive enthalten. Da ich mir erst nicht sicher war, welche und wie viele ich verwenden würde, habe ich alle drei coloriert. Na, und da das letzte nicht mehr auf die Kartenvorderseite passte, durfte es ins Innere der Karte schlüpfen.

There are three crocodile images in the Instagator set. Since I wasn't sure, which ones and how many I would use, I colored all three of them. And since the last one didn't fit onto the card front anymore, it jumped inside the card.


Dieses Krokodil schaut ganz frech vom oberen Rand der Karte herab.
Im Hintergrund habe ich zwei Partygirlanden gespannt, sie sind mit einer Stanze aus dem Pinwheel Party Set von TheGreetery gemacht.
Und ein Text musste ja auch noch auf die Karte. Dafür habe ich mit der Happy Birthday Stanze von MFT nur das Wort Birthday einmal aus schwarzem und einmal aus weißem Cardstock gestanzt. Das weiße habe ich dann mit Copics in einem blau-grün-gelb Farbverlauf coloriert und mit dem schwarzen Cardstock hinterlegt. Dann habe ich das Wort in die Karte geklebt und darüber bzw. darunter den Rest des Textes mit einem Stempel aus dem Bitty Birthday Wishes Set von MFT aufgestempelt.
Zum Schluss habe ich noch einige goldene Sternchen in die Karte geklebt.

This crocodile is looking down from the top edge of the card.
In the background I hung up two party garlands, made using a die from the Pinwheel Party set by TheGreetery.
And then my card needed a text. I've die cut the word birthday using the Happy Birthday die by MFT from white and black cardstock. I colored the white die cut with Copics in a blue-green-yellow ombre look, then glued the black word behind it as a shadow. I adhered the word to the inside of the card, then stamped the rest of the text above and under it, using a stamp from the Bitty Birthday Wishes set by MFT.
As a last finishing touch I put some golden star confetti inside the card.

Samstag, 19. November 2022

Joy to the World

 
Hallo Ihr Lieben!
Heute zeige ich Euch eine weitere Weihnachtskarte, und auch die ist wieder elegant und erwachsenentauglich ausgefallen. Und auch die Farben sind eher nicht klassisch weihnachtlich. Aber mir gefällt die Karte wahnsinnig gut.

Hello everyone!
Today I am sharing another christmas card with you, and again it is a more elegant and adulty design. Also the colors are not classical christmas. But I really love how this one turned out.

Für den Hintergrund habe ich kraftfarbenen Cardstock und den Embossingfolder Perfect Poinsettias von Altenew verwendet. Der prägt ein tolles, vollflächiges Weihnachtsstern-Muster. Bevor ich den Folder mit dem Cardstock durch die Big Shot genudelt habe, habe ich die Seite, die die Linien einprägt, mit Distress Ink Frayed Burlap bestrichen, so kommt das Muster noch besser heraus. Da ich von vornherein wusste, dass meine Karte recht busy wird, fand ich die Idee gut. Außerdem habe ich nach dem Prägen ein weißes Stempelkissen vorsichtig über den Cardstock gezogen und so die obersten Lagen des Cardstocks aufgehellt. Anschließend habe ich noch weiße Acrylfarbe aufgespritzt.

For the background I used some craft colored cardstock and the Perfect Poinsettias embossing folder by Altenew. This creates a beautiful poinsettia pattern all over the page. Before I ran the folder with the cardstock through my Big Shot I inked up the side of the folder with the raised lines with some Distress Ink Frayed Burlap, this makes the pattern even more noticable. Since I already knew that my card would be pretty busy I thought this a good idea. After the dry embossing I also dragged a white ink pad lightly over the cardstock and lightened up the raised areas a bit. Then I spritzed some white acrylic paint onto the cardstock.


Im oberen Bereich meiner Karte fliegt dieser wunderschöne Vogel Feathered Friends 16 von PapertreyInk. Ich habe ihn aus Watercolor Cardstock gestanzt und dann bewusst fleckig mit Distress Ink Speckled Egg, Iced Spruce und Stormy Sky eingefärbt. Um das Auge habe ich ein wenig Frayed Burlap aufgetragen, die Füße, der Schnabel und das Auge sind mit einem schwarzen Copic angemalt. Im Stanzenset sind noch einige weitere Stanzen für Details enthalten, die habe ich aber gar nicht verwendet, da mir der Vogel so schon super gefallen hat. Den vorderen Flügel habe ich mit einem kleinen Stück 3D Tape am Körper befestigt, so dass er weiter oben liegt als der hintere. 
Auch den Vogel - genauso wie später den Zweig und die Ilex-Blätter - habe ich mit weißer Acrylfarbe bespritzt, hier aber etwas kleinere Spritzer aufgetragen.

In the upper area of my card this beautiful bird Feathered Friends 16 by PapertreyInk is flying by. I cut it from watercolor cardstock and then colored him in with Distress Ink Speckled Egg, Iced Spruce and Stormy Sky, keeping the colors kind of blotchy on purpose. Around the eye I added a hint of Frayed Burlap, the feet, beak and eye are colored with a black Copic marker. There are more dies in this set that cut a few more details, but I didn't use those since I really liked the bird that way. I used some thin foam tape to attach the wing, that's more in the front, to add some dimension here.
Onto the bird - and later also the branch and the holly leaves - I flicked some white acrylic paint again, keeping the speckles a bit smaller here than I did on the background.


Im unteren Bereich der Karte habe ich meinen Text aufgebracht.
Das Joy ist mit einer Stanze aus dem Set Joy and Noel von CC Designs gemacht. Es besteht aus vier Lagen schwarzen Cardstocks mit einer Lage aus schwarzem Glittercardstock obenauf. Außerdem habe ich per Hand einen Schatten aus Vellum geschnitten. Die Highlights sind mit einem silbernen Metallic-Gelstift gemacht.
Die kleinen Texte darunter sind aus dem Bitty Holiday Wishes stamp set von MFT und silbern auf schwarzen Cardstock embosst. Ich habe zwei Texte kombiniert, da mir nur die eine Zeile nicht gefallen hat.
Am Rand der Karte habe ich Ilex-Blätter und einen Zweig mit Beeren aus dem Stempelset Poinsettia and Berries von Altenew aufgeklebt. Den Zweig habe ich schwarz gestempelt und mit den selben Distress Farben, die ich für den Vogel verwendet habe, coloriert. Für den Ast selbst habe ich wieder einen schwarzen Copic verwendet. Dann habe ich ihn per Hand ausgeschnitten.
Die Ilex-Blätter sind mit den Distress Inks gestempelt. Ich habe jedes Motiv mehrmals gestempelt und die Stempel zwischendurch ein wenig mit Wasser bespritzt. So passen die Motive besser zum Look des Vogels. Auch die Ilex habe ich per Hand ausgeschnitten.
Dann habe ich alle Beeren mit Distress Rock Candy Glitter überzogen, so dass sie einen eisigen Look bekommen. 

To the lower half of the card I attached my texts.
The joy is cut using a die from the Joy and Noel die set by CC Designs. I stacked four layers cut from black cardstock with one layer of black glitter cardstock on top. I also cut a shadow from vellum by hand. The highlights are made with a silver metallic pen.
The smaller texts underneath are from the Bitty Holiday Wishes stamp set by MFT and silver heat embossed onto black cardstock. I combined two stamps here, because I didn't like just that one line under the die cut word.
Around the edge I attached some holly leaves and a berry branch from the Poinsettia and Berries stamp set by Altenew. I stamped the branch with black ink and colored it with the same Distress Inks, that I had also used for the bird. The wood is again colored with a black Copic marker. Then I cut the branch out by hand.
The holly leaves are stamped with the Distress Inks. I stamped each image several times, misting the stamp with water in between. This way the images go better with the look of the bird. Also those leaves are cut out by hand.
Then I covered all berries with some Distress Rock Candy Glitter, to give them an icy touch.


Zum Aufkleben der verschiedenen Elemente habe ich teilweise 3D Tape verwendet. 
Um das Silber des Embossingpulvers auch im oberen Teil der Karte aufzugreifen, habe ich ein paar wenige mattsilberne Pailetten rund um den Vogel aufgeklebt. Dann habe ich alles auf einen weißen Kartenrohling geklebt.
Und hier könnt Ihr den Schimmer des Rock Candy auf den Beeren und auch des schwarzen Glitter Cardstocks, der wirklich nur schwarz ist, besser sehen.

To partly used foam tape to attach the elements to my card-
To pick up the silver from the embossing powder again in the upper half of the card, I glued down just a few matte silver sequins around the bird. Then I adhered the cardstock onto a white note card.
And here you can see the shimmer of the Rock Candy on the berries and also the black glitter cardstock, that's really just black with no other color added, better.
 

Donnerstag, 17. November 2022

Let it Snow

 
Hallo Ihr Lieben!
So mitten im November sollte man sich dann auch schon Mal in Gedanken auf den Schnee vorbereiten. Das geht am besten, indem ich das Thema basteltechnisch umsetze. Und so zeige ich heute auf dem Stampcorner Blog diese winterliche Karte.
 
Hello everyone!
In the middle of noveber it's time to mentally prepare for snow. And I can do that best by making snowy cards. So I am sharing this wintery card over at the Stampcorner blog today. 
 
 Diese Karte ist inspiriert von einer Karte, die GinaK in einem Video vor einiger Zeit gemacht hat. Ich habe andere Farben und Embossingfolder verwendet, sie hat einen Shaker eingebaut, ich habe dafür ein Motiv auf meine Karte gesetzt. Aber so von der Grundidee her....
Ich habe hier ein Stück weißen Cardstock mit Distress Oxide Shaded Lilac, Stormy Sky, Faded Jeans und Chipped Sapphire eingefärbt. Dann habe ich mit einer Ovalstanze mittig ein Oval ausgestanzt, das ich dann später umgedreht - also die dunklere Farbe nach oben - wieder eingesetzt habe.
Und weil das irgendwie noch ein wenig langweilig aussah, habe ich den Sweater Embossingfolder von Sizzix verwendet und dieses tolle Strickmuster in den Cardstock geprägt. Ich finde, das passt super zur großen Strickmütze meines Motives.

This card is highly inspired by a card, that GinaK did in a video a little ago . I used different colors and embossing folder, she made a shaker card, I put an image onto my card instead. But watching her video inspired me to make this card.
I inked up a piece of white cardstock with Distress Oxide Shaded Lilac, Stormy Sky, Faded Jeans and Chipped Sapphire. Then I used an oval die to die cut an oval from the center of my cardstock, that I put back into place later upside down, so the dark color top.
And since that still looked a bit plain, I used the Sweater embossingfolder by Sizzix to dry emboss this beautiful knit pattern into my cardstock. I think, it goes great with the big knitted hat, that the image on my card is wearing.


Auf das ausgestanzte Oval habe ich mit dem Copic Opaque White dann einige Spritzer als Schnee aufgetragen, dann habe ich es mittig auf ein Stück weißen Cardstock geklebt.
Darüber habe ich zwei Reihen Tannen, gestanzt mit der Tree Line Stanze von Sizzix aus weißem Cardstock, gesetzt, die obere Lage habe ich mit 3D Tape aufgeklebt. Außerdem habe ich stellenweise Stickles aufgetragen, damit die verschneiten Tannen ein wenig glitzern.
Ich habe dickeres 3D Tape benutzt und den embossten Cardstock ebenfalls auf den weißen Cardstock geklebt. So liegt der Winterwald ein wenig tiefer. Mit der selben Ovalstanze und einer etwas größeren habe ich anschließend einen Rahmen aus weißem Cardstock gestanzt und ihn auf den embossten Cardstock geklebt.

Onto the cut out oval I spritzed some snow using Copic Opaque White, then I glued it onto the center of a piece of white cardstock.
Then I adhered two rows of snowy trees, die cut with the Tree Line die by Sizzix from white cardstock, using foam tape to attach the second layer. I also added clear Stickles to a few areas so the snowy trees glitter nicely.
Then I used some thicker foam tape to attach the embossed cardstock onto the white cardstock. Now the snowy forest is a bit in the back. With the same oval die and a slightly larger one I've cut a frame from white cardstock and glued it around the oval window.


Als Motiv habe ich mich für dieses süße Bärenmädchenaus dem Set Schnubbis entschieden. Da ich das Farbschema der Karte so toll fand, wollte ich es unbedingt beibehalten und habe das Motiv daher mit Copics ganz zart in Lila- und Grautönen sowie einem etwas kräftigeren Blau coloriert. Die Highlights sind mit einem weißen Gelstift gemacht. 
Der Text ist aus dem selben Stempelset. Ich habe ihn mit weißem Embossingpulver auf einen Streifen schwarzen Cardstocks embosst und mit einem weißen Gelstift einen feinen Rahmen aufgemalt, da der schwarze Cardstock sich sonst zu schlecht vom hier doch recht dunklen Untergrund abgehoben hat. Dann habe ich Motiv und Banner wieder mit 3D Tape auf die Karte geklebt.

As the image I went with this little bear girl from the Schnubbis stamp set. Since I really liked the colors of the card I wanted to stick to it. So I used my Copics to color the image in soft purples and greys and some brighter blue. For the highlights I used a white gel pen.
The text is from the same stamp set. I white heat embossed it onto a strip cut from black cardstock and used the white gel pen again to draw a frame around it, since there wasn't much contrast between the black cardstock strip and the background. I glued banner and image down using foam tape again.


Den Kartenrohling habe ich aus dunkelblauem Shimmer Cardstock geschnitten und darauf meinen Aufleger aufgeklebt. 
Als Deko kamen ein paar matt-silberne Pailetten von Simple and Basic zum Einsatz - ausnahmsweise mal nur ganz wenige -, außerdem habe ich auch auf den Flügeln an den Schuhen und das Herz an der Mütze des Motivs ebenfalls noch eine dünne Lage klarer Stickles aufgetragen.

I've cut my card base from some dark blue shimmer cardstock and adhered my card to it.
To add a tiny bit of embellishment I only used a few matte silver sequins by Simple and Basic and added some clear Stickles to the wings on the shoes and the heart on the hat of the image.