Freitag, 30. September 2022

Noch ein Oktober-Sneak

 
Hallo Ihr Lieben!
Heute habe ich einen weiteren Sneak auf die Oktober-Neuheiten von Stampcorner. Achtung, es wird winterlich! 

Hello everyone!
Today I have another sneak at one of the stamp sets from the october release by Stampcorner. It's getting wintery!

Hier habe ich mal wieder eine Kartenidee von Jennifer McGuire umgesetzt. Ich kann mich erinnern, dass sie die vor Jahren schon mal gezeigt hatte und ich sie damals schon nachgewerkelt habe. Jetzt hat sie die Technik in einem weiteren Video nochmal gezeigt und zack - musste ich gleich wieder machen. Es ist doch schön, wenn man immer mal wieder einen Reminder bekommt, sonst verliert man so schnell tolle Ideen und Techniken aus den Augen. Und weil ich mal wieder etwas mehr gemacht habe, habe ich die Karte nicht ein- sondern zweilagig gewerkelt. Und dabei auch endlich das Folieren auf Acetate probiert - stand auch schon länger auf meiner To-Do-List. 
Zum Verschicken lässt sich die Karte ganz flach machen - okay, mit den doppelten Lagen nicht mehr ganz so flach, aber sie passt immer noch ohne Zusatzporto in einen normalen Umschlag.

Here I used another card technique by Jennifer McGuire. I remember that she posted this technique quite a long time ago and I made a card like that back then. Now she shared the technique in another video - and I just had to make one again. It's nice to get reminders every now and then, or all those amazing ideas and techniques will get forgotten. And since I did some "more" again I did not add one but two layers to my card - and while I was at it also finally tried foiling on acetate. Another thing I wanted to try since quite some time.
To mail the card it folds completly flat - okay, with my doubled up layers not so flat anymore, but it can still be mailed in a regular envelope without requiring any additional postage.


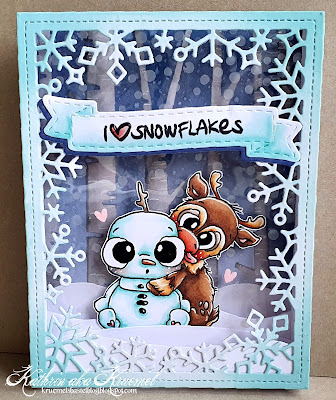
Nimmt man die Karte aus dem Umschlag, poppt sie ein wenig auf. Das ist echt schwer zu fotografieren, vor allen, wenn eine Lage aus Folie besteht. Aber die Szene bekommt so eine tolle Tiefe!
Ich habe hier für den Hintergrund die Birch Tree Stencils von LawnFawn benutzt um ein Stück weißen Cardstocks mit Distress Oxide Stormy Sky und Faded Jeans für den Himmel sowie Hickory Smoke und Black Soot für die Bäume zu wischen. Dann habe ich ganz feine Wassertröpfen daraufgespritzt.
Unten an meiner Karte habe ich mehrere Lagen Schnee augeklebt. Die habe ich mit zwei Stanzen aus dem Snow Globe Stanzenset von MFT aus weißem Cardstock gestanzt. 
Die mittlere Lage besteht, wie gesagt, aus foliertem Acetate. Man kann die Spiegelungen darauf auf dem Foto gut erkennen. Darauf habe ich mit einer cremefarbenen, perlmuttenen, halb-transparenten Folie und der Slimline Confetti Background Hotfoil Plate von Spellbinders Schneeflocken auffoliert. Klappt echt super - man sollte nur nicht die Folie während des Aufheizens vergessen - hüstel. Dadurch waren meine Ränder ein wenig gewellt/angeschmolzen, die konnte ich aber gut wegschneiden. 
Die oberste Lage besteht aus zwei aufeinander geklebten Schneeflockenrahmen, gemacht mit der Snow Flurries Backdrop Stanze von LawnFawn. Ich habe zwei Stück aufeinander geklebt, um sie stabiler zu machen. Ich habe sie aus weißem Cardstock gestanzt und von außen her mit Distress Oxide Salvaged Patina ganz leicht eingefärbt.

When you take the card out of the envelope it pops pu a bit. It's really hard to take a picture of, especially when one of the layers is made from acetate. But the scene gets such a nice depth!
Here I used the Birch Tree Stencils by LawnFawn to ink up a piece of white cardstock, using Distress Oxide Stormy Sky and Faded Jeans for the sky and Hickory Smoke and Black Soot for the trees. Then I added some really small droplets of water, it was more of a mist.
To the bottom of my layers I added some snow drifts. I've cut those form white cardstock with two dies from the Snow Globe die set by MFT. 
As mentioned, the middle layer is made from foiled acetate. You can see the light reflecting on it in the picture. I foiled some snowflakes onto it, using a cream pearlescent, half transparent foil and the Slimline Confetti Background hotfoil plate by Spellbinders. It really works great - you just shouldn't let the foil sit for quite a long time in the heated hotfoil system because you forgot about it like I did. I ended up with some slightly curled up/molten edges but was able to cut those off.
The top layer of my card is made from two layers of the snowflake frame, made with the Snow Flurries Backdrop die by LawnFawn. I glued two together to make the frame sturdier. I've cut it from white cardstock and lightly inked up the edges with Distress Oxide Salvaged Patina.


So, und hier könnt Ihr endlich das süße Motiv aus der Feder von StuffDeluxe genauer sehen. Ich finde diese riesigen Augen einfach zu knuffig! 
Ich habe die beiden Süßen mit Copics coloriert und per Hand ausgeschnitten. Dann habe ich sie hinter eine der Schneebänke direkt auf die mittlere Lage aus Folie geklebt. So sind sie schön in der Mitte der Szene. 
Für den Text habe ich einen weiteren Stempel aus diesem Stempelset benutzt und ihn auf eines der Banner Stitch gestempelt. Das habe ich dann ebenfalls ein wenig mit Copics schattiert und mit einem weiteren Banner, gestanzt aus blauem Cardstock, hinterlegt. Dann habe ich es auf den Schneeflockenrahmen geklebt.
Als Deko habe ich zwei kleine rosafarbene Herzen ebenfalls auf die Folienlage aufgeklebt. Außerdem sind das Herz im Text und die Nase des Rentiers dick mit Glossy Accents überzogen.

And here you finally get a closer look at the image, drawn by StuffDeluxe. I just love those giant eyes! I've colored those two cuties with Copics and fuzzy cut them. Then I glued them behind one of the snowflakes, directly onto the middle layer made from acetate. This way they are sitting right in the scene.
For the text I used another stamp from this new stamp set and stamped it onto one of the Banner Stitch die cuts. I shaded that lightly with my Copics and put another banner, cut from blue cardstock, behind it. Then I glued the text onto the snowflake frame.
I only added two small pink hearts onto the acetate layer and put a thick layer of Glossy Accents onto the heart in the text and the reindeer's nose.


Und weil man es auf den anderen Bildern wirklich nicht so gut sehen kann, habe ich hier noch ein weiteres Bild für Euch, auf dem ich versucht habe, die Tiefe der aufgepoppten Karte einzufangen. Ich denke, man kann es hier erahnen. Aber probiert es selbst, die Karte ist recht schnell gemacht und hat so einen tollen Effekt!

And since you can barely see the depth of this card on the other photos, I took another one, this time from an angle, trying to catch it. I think you can see it better, but I really suggest you trying this type of card on your own. It's quite quickly made and has such a great effect!

Donnerstag, 29. September 2022

Halloween rückt näher

 
Hallo Ihr Lieben!
Wie schon im Titel geschrieben - Halloween rückt näher! Okay, wenn man meine Posts anschaut, dann könnte man meinen, es wäre längst rum. Aber ich liebe es einfach, Halloweenkarten zu machen. Dort verwende ich Farbkombinationen, zu denen ich das ganze Jahr nicht greife, aber hier passen sie einfach perfekt. Und außerdem darf man hier - wenn in meinem Fall auch trotzdem noch definitiv cute - seine dunkle Seite ein wenig ausleben. Und so zeige ich heute auf dem Stampcorner Blog eine weitere Halloweenkarte.

Hello everyone!
I already wrote it in the post title - Halloween is coming closer! Okay, if you follow my posts you might think that Halloween has long passed. But I just love making Halloween cards. I use color combos I don't use the rest of the year, but they are perfect for this holiday. And also I can free my dark side, but I definately stay on the cute side of crafting. So today I'm sharing another Halloween card over at the Stampcorner Blog

Ich hatte mir ja mal selbst die Challenge auferlegt, jeden Monat zumindest für eine Karte ältere Stempel zu verwenden. Die geraten angesichts der vielen neuen tollen Motive, die es jeden Monat gibt, ja gerne ins Hintertreffen. Die letzten Monate habe ich das ein wenig schleifen lassen. Aber heute ist es soweit: ich habe das Stempelset Süßes oder Saures von Oma Plott verwendet. Und tatsächlich auch nur das, kombiniert mit einigen wenigen Stanzen und einem Stencil. Ja, es geht manchmal auch ohne zig verschiedene Produkte, auch wenn das bei mir eher selten passiert.
Für den Hintergrund habe ich zuerst durch einen Sternenstencil mit Distress Oxide Spiced Marmalade ein paar Sterne mittig auf ein Stück weißen Cardstocks gewischt. Dann habe ich glitzerndes Embossingpulver darübergestreut. Da ich mit Oxides darüber wischen wollte und bei einmal Embossen oft doch noch kleine Stellen frei bleiben, habe ich eine zweite Schicht - diesmal klaren Embossingpulvers - darüber embosst. Das klare Pulver hat eine glattere Oberfläche, von der sich die Tinte später einfacher wieder abwischen lässt. Außerdem lässt es sich schöner wieder-erhitzen - etwas das ich mache, wenn ich mit Oxides über geschmolzenes Pulver gegangen bin. Durch die Oxides wirkt das Embossingpulver immer etwas matt, durch erneutes kurzes Erhitzen mit dem Embossingfön glänzt es wieder schön.
Anschließend habe ich die Through the Clouds Stencil von MFT aufgelegt und mit Distress Oxides Broken China, Uncharted Mariner und Black Soot die Wolkenringe aufgewischt und auch den Bereich um die Sterne eingefärbt. Auf Metallic Watercolor habe ich diesmal verzichtet, ich habe nur ein paar Tropfen Wasser über den fertig gewischten Hintergrund gespritzt.

Some time ago I gave myself the challenge to make at least one card each month with older stamps. I always tend to forget about these with all the cute new images being released by all the stamp companies. Well, I forgot about that challenge during the last months. But today I finally remembered and I used an older Halloween stamp set by Stampcorner. And actually this is the only stamp set I used on this card, combined with a few die cuts and a stencil. And yes, sometimes I manage to make a card without bringing out tons of different products, even if that happends very seldomly.
For the background I used a star stencil and Distress Oxide Spiced Marmalade to ink the stars into the center of a piece of white cardstock. Then I covered it with some glittery embossing powder. Since I wanted to go over the stars with Distress Oxides and most times you just don't get a smooth surface with just one layer of embossing powder, I added a second layer, this time just regular clear embossing powder. The clear powder has a smoother surface and the ink can be wiped off more easily later. Also, it is easier to re-heat - something I make after I went over melted powder with my Oxides. They often leave some kind of matte finish, but after re-heating it for just a few seconds with your heat gun the shine comes back.
Next I used the Through the Clouds stencil by MFT and Distress Oxides Broken China, Uncharted Mariner and Black Soot to ink the whole cardstock with the rings of clouds, also inking up the area around the stars. I didn't add any metallic watercolor for a change, only put a few droplets of water onto the inked background for a little texture.


Am Himmel habe ich ein paar Fledermäuse aus dem Süßes oder Saures Stempelset verteilt. Die habe ich mit Versafine Clair Nocturne auf weißen Cardstock gestempelt und anschließend mit klarem Embossingpulver überzogen. So glänzen so toll, ohne dass ich schwarzes Embossingpulver verwenden muss. Das und ich sind irgendwie keine Freunde.... Anschließen habe ich sie ausgeschnitten und mit 3D Tape auf den Hintergrund geklebt.
Für den Text habe ich das kleinste der Banner aus dem Banner-Stanzenset aus dem August Mid Month Release aus weißem Cardstock gestanzt und darauf dann mit Distress Oxide Spiced Marmalade den Boo!-Text abgestempelt. Auch den habe ich dann mit einer Lage glitzerndem Embossinpulver und einer Lage klarem Embossingpulver überzogen, genauso wie bei den Sternen. Das Banner habe ich mit Distress Oxide Broken China und Black Soot eingefärbt und mit einem weiteren Banner, gestanzt aus schwarzem Cardstock, hinterlegt. Dann habe ich mit einem weißen Gelstift einige Highlights aufgemalt und es ebenfalls mit 3D Tape auf die Karte geklebt.

I set a few bats free on my sky. I stamped those with Versafine Clair Nocturne onto white cardstock, then covered them with a layer of clear embossing powder. This gives them a nice shine without me having to use black embossing powder. We just don't go along together pretty well.... Then I cut the bats out and attached them onto the background with foam tape.
For the text I've die cut the smallest banner from the banner die set from Stampcorner's august mid month release. I've cut it from white cardstock, then used Distress Oxide Spiced Marmalade to stamp the boo! onto it. I covered this again with one layer of glittery embossing powder and a layer of clear embossing powder on top, just as I did with the stars. I inked up the banner with Distress Oxide Broken China and Black Soot, matted it with a second banner, cut from black cardstock, added a few highlights with a white gel pen and then glued it onto the card with foam tape.


Hauptfokus auf  meiner Karte sind natürlich die süße Katze und der Kürbis. Ich habe sie mit Copics coloriert und die Highlights mit einem weißen Gelstift gemacht. Ich wollte, dass die Katze farblich zum Hintergrund passt. Deswegen habe ich sie mit einer Kombination aus BG- und T-Tönen coloriert. Der Hut und die Augen der Katze sowie die leuchtenden Teile des Kürbis sind jeweils mit Glossy Accents überzogen. Beide Motive sind mit 3D Tape aufgeklebt.
Trotzdem brauchten die Motive irgendeinen Hintergrund, nur die Wolken sahen komisch aus. Also habe ich eine Koralle aus schwarzem Cardstock gestanzt und links an den Kartenrand geklebt. Davor kam ein Strandzaun. Mit seiner windschiefen Optik passt der super zu Halloween. Ich habe in einmal aus hell- und einmal aus dunkelgrauem Cardstock gestanzt und jeweils mit weißer Stempelfarbe und Distress Oxide Uncharted Mariner und Black Soot betupft. Und dann konnte ich mich nicht entscheiden, welcher der beiden mir farblich besser auf der Karte gefiel. Also habe ich sie einfach leicht versetzt aufeinander geklebt - den dunkleren hinter dem helleren - und sie beide benutzt. So gefällt mir der Zaun gleich noch besser.
Die Korallenteile, die über den Kartenrand überstanden, habe ich mit einer Schere weggeschnitten und gedreht vor den Zaun gelegt. Man will ja nichts verschwenden! Damit er sich gut abhebt, habe ich ihn mit Distress Oxide Spiced Marmalade und ebenfalls weißer Stempelfarbe betupft und weil das irgendwie noch nicht genug war, ihn außerdem mit dem glitzernden Embossingpulver überzogen. 

Main focus on my card are the cute cat and the pumpkin. I colored them with Copics and added highlights with a white gel pen. I wanted, that the cat kind of melts into the background so I colored her in with a combination of BG and T tones. The hat and the eyes of the cat and also the lightning areas of the pumpkin are covered with Glossy Accents. I glued both images down with foam tape.
Still my images needed  some kind of scene, just the clouds looked a bit strange. So I've die cut a coral image from black cardstock and glued it onto the left edge of the card. Then I put a beach fence in front of it. With it weathered look it works great on Halloween cards. I've die cut it once from lighter and once from darker grey cardstock, then dabbed some white ink and Distress Oxide Uncharted Mariner and Black Soot onto both pieces. And then I just couldn't decide if liked the lighter or darker one better. So I simply glued them on top of each other just a bit off, the light one on top of the dark one and I even like the fence better now.
I've cut off the part of the coral die that hang over the edge of the card with my scissors, turned it and glued it in front of the fence - don't waste anything, right?! To add some contrast, I dabbed Distress Oxide Spiced Marmalade and white ink onto it. And since it still wasn't visible good enough I covered it with the glittery embossing powder.


Und dann fehlte mir noch etwas an den Ecken. Zuerst wollte ich ein Spinnennetz aufembossen, aber das wäre ja irgendwie im Nirgendwo gehangen. Und dann fiel mir mein geliebtes Cheesecloth ein. Vor etwa drei Jahren gab es keine Karte von mir ohne - jetzt kommt es kaum noch zum Einsatz. Hier aber passte es einfach perfekt. Ich habe jeweils ein Stück davon etwas ausgefranst - einfach zwischen den Händen zusammenrollen und wieder auseinander streichen - und über die linke obere und rechte untere Ecke gespannt. Hinten habe ich es einfach mit Tesa fixiert. 
Dann habe ich meine Szene noch mit schwarzem Cardstock gemattet und auf einen weißen Kartenrohling geklebt.

And then I felt like the corners were too plain. I first thought about white heat embossing some spider webs theres, but they would have hang kind of in the nowhere. And then my beloved cheesecloth came to my mind. About three years ago I didn't make a card without it, now I use it very rarely. But here it was just perfect. I gave two pieces a kind of distressed look by simply rolling them between my hands and pulling it apar again, then put it over the corners, fixing it on the back of the cardstock with a piece of tape.
I matted my scene black and glued it onto a white note card.

Mittwoch, 28. September 2022

Noch eine Hochzeitskarte

 
Hallo Ihr Lieben!
Ist es Euch schon mal passiert, dass Ihr gebeten wurdet, zwei Karten für ein und die selbe Hochzeit zu machen? Mir ging es das erste Mal so. Eine Kindergartenfreundin meiner Zwillinge bittet mich öfter um eine Karte, so auch für diese Hochzeit, denn die Braut ist eine ihrer Kolleginnen. Nun ist aber der Bräutigam ein Kollege meines Mannes, der sich dann entschieden hatte, doch ein paar seiner engeren Kollegen einzuladen. Naja, und dann brauchte auch mein Mann eine Karte. 

Hello everyone!
Has it ever happened to you, that you are asked to make two cards for the same wedding? Well, it happened to me for the first time. A kindergarden friend of my twins asks me for a card every now and then, and also for this wedding because the bride is one of her co-workers. Well, the groom is one of my husband's colleagues and he later decided that he wanted to invite some of his closest co-workers. And so my husband needed a card as well.

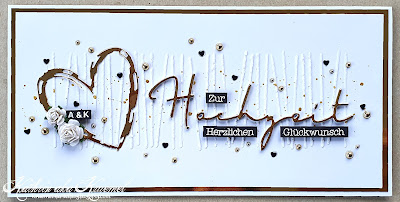
Mir war so gar nicht nach coloriertem Brautpaar oder ähnlichem. Da ich beide persönlich kenne, weiß ich, dass das einfach nicht zu den beiden passt. Ich wollte aber auch nicht, dass die beiden Karten ähnlich sind. Da war guter Rat teuer! Für die eine Karte hatte ich ja bereits eine Torte mit Brautpaar und Blumen verwendet. Zum Glück wollte mein Mann etwas schlichteres - und das ist das Ergebnis.
Ich habe jetzt schon mehrere Karten mit einem gestreiften Hintergrund gesehen - nach einigem Suchen konnte ich herausfinden, dass der gestencilt ist. Ich wollte aber nicht für eventuell nur eine Karte eine Stencil bestellen. Also habe ich sie mir mit einer schmalen Strichstanze und Mylar-Folie einfach selbst hergestellt und sie dann mit weißer Paste auf ein Stück weißen Cardstock im Slimline Format aufgestencilt. 
Nach dem Trocknen habe ich noch goldene Metallic Watercolor aufgespritzt.

I so didn't feel like using a colored bride or groom or anything cute. I know the couple personally and this just doesn't it them. But I also didn't want both cards to look alike - so I really had to put my thinking cap on. I already had used flowers and a cake with a bridal couple as the cake topper on the other card. Luckily my husband wanted the card to be clean and simple - and this is what I came up with.
I have seen several cards with a soubtle striped background - after some g..gling I found out that a stencil was used on those. But I didn't want to order a stencil that I might only use on one card. So I used a thin strip die and some Mylar to make it myself. Then I used white paste to stencil the pattern onto a slimline sized piece of cardstock.
After the paste had dried I spritzed some golden metallic watercolor onto the cardstock.


Für den Text habe ich das Wort Hochzeit mit einer Stanze von Charlie und Paulchen mehrere Male aus weißem Cardstock und einmal aus goldenem Spiegelcardstock gestanzt und alle Teile aufeinander geklebt. Das Wort habe ich dann rechts auf den gestencilten Hintergrund aufgeklebt.
Für den Rest des Textes habe ich Stempel von Kulricke benutzt. Sie sind weiß auf schwarzen Cardstock embosst, ausgeschnitten und mit 3D Tape ober- und unterhalb des gestanzten Wortes aufgeklebt.

For the text I've die cut the word wedding several times from white cardstock and once from golden mirror cardstock and stacked all the die cuts. Then I attached the word to my card, placing it on the right side of the stenciled stripes,
For the rest of the text I've white heat embossed words onto black cardstock, cut them out and attached them above and under the die cut word with foam tape. Now the text on my card reads "congrats to your wedding". 


 Links neben den Text habe ich ein Herz aufgeklebt. Es ist mit der - schon älteren - Sketch Heart Stanze von SimonSaysStamp aus goldenem Spiegelcardstock gestanzt.
Und dann musste ich einfach doch zwei kleine weiße Röschen mit aufkleben. Hinter denen verstecken sich noch die Anfangsbuchstaben der Namen des Brautpaares, wieder weiß auf schwarzen Cardstock embosst. 

To the left of the text I added a heart. It's die cut with the - older - Sketch Heart die by SimonSaysStamp from golden mirror cardstock.
And then I just had to add two little roses to the card. Behind them I've tucked a small strip of black cardstock, onto which I had white heat embossed the Initials of the bride and groom.


Als Dekoh abe ich dann kleine schwarzen Herzen und goldene Perlen quer über der Karte verteilt, alles mit dem goldenen Spiegelcardstock gemattet und auf einen weißen Slimline Kartenrohling geklebt.

As embellishments I went with small black hearts and golden pearls all over my card, then matted the cardstock with the golden mirror cardstock and attached everything to a white slimline card base.

Dienstag, 27. September 2022

Es wird geheiratet!

 
Hallo Ihr Lieben!
Eine Hochzeit stand an, und ich durfte eine Karte dafür machen. Und das ist sie.

Hello everyone!
There was a wedding and I was asked to make a card for the happy couple. And this is what I came up with.

Mir war so gar nicht nach Brautpaar, da habe ich nur Motive von Magnolia oder Lili of the Valley und noch ein Set mit heiratenden Bären. Das fand ich irgendwie total unpassend. Und so kam mir die Idee für diese Karte - mit großer Hochzeitstorte und eher elegant.
Für den Hintergrund habe ich die Quatrefoil Stanzen von HoneyBeeStamps verwendet. Es gibt zwei davon - eine, die nur das Muster in den Cardstock pierct, eine weitere, die dann die Ausstanzungen in den Cardstock stanzt, die dann mit dem gepiercten Muster zusammenpasst. Ich habe für die untere Lage hellblauen Cardstock verwendet, die obere Lage ist aus zart-grünem Cardstock gemacht. 
Nach dem Zusammenkleben der beiden Lagen, habe ich den Hintergrund auf einen weißen Kartenrohling geklebt.

I just didn't feel like making a card with a bridal couple, I only have images by Magnolia or Lili of the Valley and one set with wedding bears. I just felt like those didn't fit. And so I had the idea of making a card with a large wedding cake and in a more elegant style. 
For the background I used the Quatrefoil dies by HoneyBeeStamps. There are two dies - one that only pierces the pattern in to the cardstock and a top layer that has a cut out pattern that ligns up with the pierced one. I used some light blue cardstock for the bottom layer and a soft green for the top one. After I had glued the layers together I attached the background to a white note card.


Das Tortenmotiv ist von SU - eigentlich aus einem Geburtstagsset, ich finde aber, sie macht sich super als Hochzeitstorte. Ich habe sie mit Copics coloriert und ausgeschnitten. Um eine richtige Hochzeitstorte daraus zu machen, habe ich oben noch ein Brautpaar aufgesetzt. Das habe ich mit Stanzen aus  einem Set von Avec/Action gemacht. 
Das große Ja ist einige Male aus schwarzem Cardstock gestanzt, für die oberste Lage habe ich silbernen Perlmutt-Cardstock verwendet. Aus dem selben Cardstock habe ich noch ein kleines Herz gestanzt, das ich über dem Brautpaar aufgeklebt habe.
Der "ihr traut euch" Text ist aus dem Stempelset Ein ziemlicher Knaller von Create a Smile - die untere Zeile habe ich beim Stempeln abgedeckt. Ich habe den Text schwarz auf weißen Cardstock gestempelt und den Streifen dann mit den selben Copic-Blautönen eingefärbt, die ich auch für die Blüten auf der Torte verwendet habe. Den Streifen habe ich dann noch schwarz gemattet.
Die Namen des Brautpaares, die mit auf die Karte sollten, habe ich mit dem Dymo und silberfarbenem Band gemacht, schwarze gemattet und auf die Karte geklebt.
Da der Hintergrund doch recht unruhig war, habe ich zwischen Torte und Hintergrund noch eine Lage Vellum gesetzt. Die habe ich mit den Labels Forty-One Stanzen von Spellbinders gemacht. Die habe ich schon ewig - und ewig nicht mehr benutzt. Aber hier passte die Form einfach super zum Muster im Hintergrund.

The cake image is by SU - it's from a birthday stamp set, but I think, it's perfect as a wedding cake as well. I colored the cake with Copics and cut it out. To turn it into a real wedding cake, I put a bridal couple on top. I've die cut this with die from a set by Avec/Action.
I've die cut the big word ja - yes - several times from black cardstock and for the top layer I used some silver perlescent cardstock. From the same silver cardstock I've also die cut a heart, that I glued above the heads of the couple on top of the cake.
The smaller text means "you do" and is from a stamp set by Create a Smile. I've stamped it with black ink onto white cardstock, then used the same blue tones of Copics, that I used to color the flowers on the cake, to color the strip in. I also matted the strip black.
I was asked to include the name of the couple. So I brought out my Dymo and some silver Dymo tape to write them, then matted the tape black as well.
Since the background was pretty busy, I decided to put a layer of vellum under the cake. I used one of the dies from the Labels Forty-One die set by Spellbinders. I have those since ages - and haven't used them for years. But here the shape went so wonderfully with the pattern on the background.


Wie fast immer habe ich zum Zusammensetzen der Karte 3D Tape benutzt. Zum Schluss habe ich als Deko noch einige hellblaue Glitzersteine auf der Karte verteilt.

As I do on nearly all my cards, I used foam tape to glue the different elements down. As a finishing touch I added a few light blue rhinestones.

Montag, 26. September 2022

Stampcorner Oktober Sneak Peak

 
Hallo Ihr Lieben!
Es ist wieder Sneak Zeit, denn am 1. Oktober gibt es das neue Release von Stampcorner. Und auch wenn man es nicht auf den ersten Blick erkennen kann -  hier bekommt Ihr eine Vorschau auf gleich zwei Oktober-Neuheiten!
 
Hello everyone!
It's sneak time again, because the new Stampcorner release will be available october 1st. And even if it might not be as obvious - here you get a sneak at not one but two new products.
 
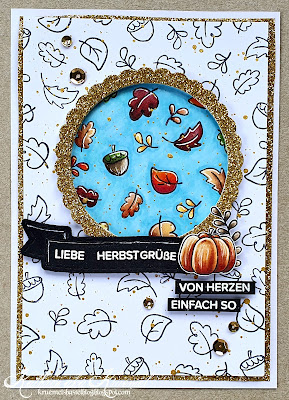
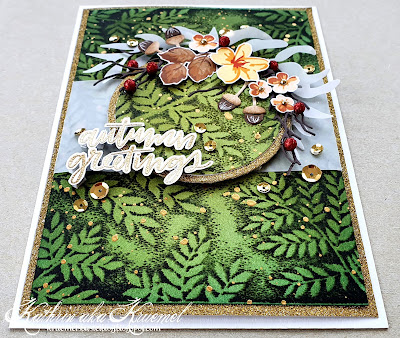
Das Stempelset Herbst Tiere hat es mir ja total angetan, auch hier kam es zum Einsatz. Ich habe die einzelnen Blätter verwendet, um mein eigenes Designpapier herzustellen. Dafür habe ich die Blätter in schwarz abgestempelt und damit den kompletten Kartenaufleger gefüllt. 
 
I just love the Herbst Tiere stamp set, and used it again on this card. This time I used all the small leaves to create my own patterned paper. I stamped them with black ink and filled a whole card top, cut from white cardstock, with it.
 

 Die erste Neuheit, die auf der Karte zum Einsatz kam, ist ein Set mit gewellten Kreisen. Hier kann man es wegen des Glittercardstocks, aus dem ich den Kreis gestanzt habe, nicht sehen, aber die Stanzen schneiden zusätzlich eine tolle stitched line in den Cardstock. Mit der Stanze werden komplette Kreise gestanzt - um den in einen Ring zu verwandeln, habe ich aus der Mitte meines aus goldenem Glittercardstock gestanzten Kreises einen Kreis mit einem Durchmesser von 2,5" ausgetanzt.
Den so entstandenen Ring habe ich auf meinen Hintergrund gelegt und anschließend nur die Blätter innerhalb des Rings mit Copics coloriert. Außerdem habe ich den Hintergrund hier hellblau eingefärbt. So rückt dieser Teil der Karte in den Focus. 
Anschließend habe ich goldene Metallic Watercolor über den kompletten Hintergrund gespritzt und den Ring mit 3D Tape aufgeklebt.
Die weitere Neuheit ist ein zweites Set Kleine Worte - und die Stempel in diesem Set lassen sich perfekt mit dem aus dem ersten kombinieren. Hier habe ich die Worte Liebe und Herbst aus dem neuen Set verwendet, die anderen sind aus dem bereits vor einigen Monaten erschienenem Set. Ich habe sie alle weiß auf schwarzen Cardstock embosst. Den Text Liebe Herbstgrüße habe ich mit einer der Banner Stitch Stanzen ausgestanzt. Beim Abstempeln des Textes  habe ich die Worte ein wenig gebogen, so dass sie sich der Form des Banners anpassen. 
Das Banner habe ich ebenfalls mit 3D Tape leicht überlappend auf den Rahmen geklebt und daneben noch den Kürbis und den Zweig, ebenfalls aus dem Set Herbst Tiere, aufgeklebt. Da das andere Ende des Banners unter dem Kürbis gestört hat, habe ich es einfach weggeschnitten. Stattdessen habe ich darunter die beiden anderen Texte, wieder mit 3D Tape aufgeklebt.

The first new product I used here is a set of scalloped circle dies. It's not visible due to the glitter cardstock I've cut it from here, but those dies also cut a beautiful stitched line into the cardstock. The die cuts complete scalloped circles. To turn it into a frame I've die cut a 2,5" large circle from the center of the scalloped circle, that I had cut from golden glitter cardstock.
I layed the ring created that way onto my background and then only colored the leaves inside this ring with my Copics. I also colored the area around the leaves with a light blue marker. This way this part of the card turns into the main focus.
Then I splattered some golden metallic watercolor all over my background and glued the ring down with foam tape.
The other new product used here is another set "small words" - and the stamps from this one can be combined perfectly with the ones from the first set, that was released a few months ago. The text on my card means "happy fall greetings - from the heart, just because". I combined both sets here and white heat embossed the words black onto white cardstock. Then I used one of the Banner Stitch dies to cut out the largest text. When stamping this I bend the stamps slightly to make them fit the a bit curvy edge of the banner die cut.
I used foam tape again to glue the banner onto my card, making it overlap my frame slightly. Then I put a pumpkin and a twig, again from the Herbst Tiere set, down on the right side of the banner. Since the other end of the banner looked a bit strange under the pumpkin I simply cut it off. Instead I placed my other two parts of the sentiments there.


Ich habe meinen kompletten Hintergrund erst mit goldenem Glittercardstock gemattet und dann auf einen weißen Kartenrohling geklebt.
Und als Deko kamen ein paar wenige goldene Pailetten zum Einsatz.

I've matted my complete background with golden glitter cardstock, then attached it onto a white note card.
To finish the card off I added a few golden sequins.

Sonntag, 25. September 2022

LawnFawnatics Challenge #133 - Awesome Autumn


Hallo Ihr Lieben!
Awesome Autumn ist das Thema der LawnFawnatics Challenge #133. Da fiel mir doch sofort was zu ein - Herbstkarten mache ich total gerne. Und ich habe versucht, die tollen Seiten des Herbst auf meine Karte zu bringen.

Hello everyone!
Awesome Autumn is the theme for the LawnFawnatics Challenge #133. I immediately had an idea - I love to make autumn cards. And I've tried to include all the things, that make autumn special, onto my card.

Es kamen wieder einige Stanzen- und Stempelsets zum Einsatz.
Für den Hintergrund habe ich die Sunburst Backdrop Stanze aus weißem Cardstock gestanzt. Die Sonne habe ich dann mit Distress Oxide Scattered Straw, den Himmel mit Tumbled Glass und Mermaid Lagoon gewischt. Dann habe ich kleine Wassertropfen und - ebenfalls ganz fein - goldene Metallic Watercolor darüber gespritzt.
Meine grünen Hügel bestehen aus einer Lage mit Bäumen, gemacht mit der Simple Stitched Tree Border Stanze, und davor drei weiteren Grashügeln. Dafür habe ich die Stitched Wavy Backdrop Portrait Stanze aus weißem Cardstock gestanzt und die unteren drei Ebenen verwendet. Zwei habe ich zuammenhängend gelassen, für die vorderste Lage habe ich die dritte Hügelebene nochmal in die Stanze gelegt und unten so gestanzt, dass sie die von mir gewollte Höhe hatte. So habe ich dort auch den geraden und gestitchten Rand erhalten. 
Alle Teile hier habe ich ebenfalls aus weißem Cardstock gestanzt. Die Hügel habe ich mit Distress Oxide Twisted Citron, Mowed Lawn und Rustic Wilderness gewischt und ebenfalls mit Wasser und goldener Metallic Watercolor bespritzt. Die Baumstämme habe ich mit einem braunen Copic eingefärbt, die Laubkronen der Bäume sind mit Distress Oxide Forest Moss, Ripe Persimmon und Mustard Seed eingefärbt. Dann habe ich alle Teile für meinen Hintergrund zusammengeklebt - und hey, das alles ganz ohne 3D Tape! Kein einziges Stück auf der Karte!
Über den Hintergrund habe ich dann meinen "Text" gesetzt. Den habe ich mit der Giant Outlined Oh What Fun Stanze gemacht und den Rahmen sowie die Sterne weggeschnitten. Die Sterne passten nicht zum Thema Herbst, und ohne Rahmen war mehr Platz für Deko. Ich habe den Text einmal aus weißem Cardstock und einmal aus kupferfarbenem Glittercardstock gestanzt und dann die Buchstaben aus dem Glittercardstock auf das weiße Stanzteil geklebt.

Again I used quite a few die and stamp sets on this card.
For the background I've die cut the Sunburst Backdrop from white cardstock. I've inked up the sun with Distress Oxide Scattered Straw, for the sky I used Tumbled Glass and Mermaid Lagoon. Then I put a fine mist of water on top and also added some fine drops of golden metallic watercolor.
The hillls on my card are made from one layer cut with the Simple Stitched Tree Border die, and three more hills in front of that. I've die cut the Stitched Wavy Backdroop Portrait again from white cardstock and used the bottom three layers on my card. The bottom two I left connected and cut off the third one. Then I put that back into the die to cut it the height I wanted it and also ended up with a straight edge with those beautiful stitches. 
All those pieces were again die cut from white cardstock. I inked up the hills with Distress Oxide Twisted Citron, Mowed Lawn and Rustic Wilderness and again misted it with water and added speckles of golden metallic watercolor. I used a brown Copic to ink up the trees, the leaves/top of the trees are colored with Distress Oxide Mustard Seed, Forest Moss and Ripe Persimmon. Then I glued all the pieces for my background together - and wow, I didn't use a single piece of foam tape on this card!
On top of the background I've added my "text". I used the Giant Outlined Oh What Fun die and cut off the stars and the frame. The stars just didn't work on a fall card, and without the frame there was more room for my scene. I've die cut the text once from white cardstock and once from copper colored glitter cardstock. Then I glued just the letters cut from the glitter cardstock on top of the white die cut.


Im oberen Bereich der Karte habe ich eines der Eichhörnchen aus dem Set Let's Go Nuts auf das T von What gesetzt. In der Hand hält es ein Stück Twine, an dessen anderem Ende sich ein gelber Drache aus dem Set Yay, Kites befindet.
Außerdem habe ich auf der kompletten Karte einige Herbstblätter aus den Stempelsets Happy Harvest und Jump for Joy verteilt. Die Eichenblätter waren vollflächige Stempel, die ich zweifarbig abgestempelt habe. Damit sie optisch zum Rest der Blätter passen, habe ich mit einem schwarzen Fineliner Outlines dazugemalt. Alle anderen Blätter und Motive sind übrigens mit Copics coloriert.

In the top area of my card I put one of the squirrels from the Let's Go Nuts stamp set onto the T from the word what. It's holding a piece of twine, on its other end I glued down a yellow kite from the Yay, Kites set.
I also added a few fall leaves from the stamp sets Happy Harvest and Jump for Joy all over my card. The oak leaves were solid images that I stamped in two different colors. To make them match the look of the other leaves I used a black fineliner to add an outline. All the other leaves and images are colored with Copics.


Und im unteren Bereich der Karte war dann noch Platz für mehr Motive. Dort finden sich die Vogelscheuche und die Sonnenblumenaus dem Set Happy Harvest, die Kürbisse aus dem Simply Celebrate Fall Set sowie drei Äpfel aus dem Set Apple-Solutely Awesome. 

On the bottom of my card was room for more images. There's the scarecrow and the sunflowers from the set Happy Harvest, pumpkins from the Simply Celebrate Fall set and three apples from the Apple-Solutely Awesome set. 


Und ich kann es einfach nicht lassen - ich möchte einfach zu gerne den Glitzer und Schimmer auf meinen Karten zeigen. Deswegen gibt es wieder ein weiteres, schräg aufgenommenes Bild. ;)

And I just can't help myself - I really want to show the shimmer and shine on my cards. So here you get another picture, taken with the light coming from an angle.


Samstag, 24. September 2022

Stempeleinmaleins - Ausgabe vom 24. September 2022

 
Hallo Ihr Lieben!
Heute gibt es beim Stempeleinmaleins einen neuen Sketch für Euch. Und ich habe ihn für eine weitere herbstliche Karte genutzt.

Hello everyone!
Today we have a new sketch for you over at Stempeleinmaleins. And I used it to make another fall-ish card.
 
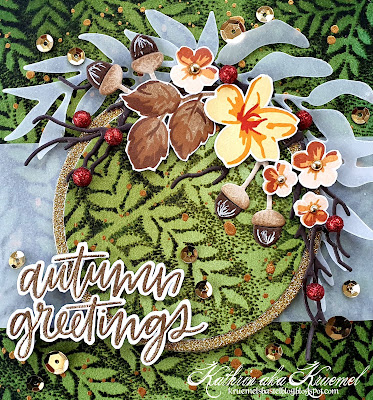
 Vor kurzem bin ich über den Fern Background von WhimsyStamps gestolpert. Der ist wohl schon ein klein wenig älter, war bisher aber total an mir vorbeigegangen. Dabei ist er der absolute Hammer! Also musste ich ihn kaufen und habe ihn auf dieser Karte verwendet. Das tolle ist, dass nur die Schatten um die Zweige herum gestempelt werden - die Zweige und die Zwischenräume erscheinen in den Farben des Cardstocks. 
Ich habe hier ein Stück weißen Cardstock mit Distress Ink Bundled Sage und Evergreen Bough gewischt. Dann habe ich den Hintergrund it Peeled Paint und Rustic Wilderness - nur an den Ränder aufgetragen - gewischt. Nun, das war mir alles zu bläulich und sommerlich. Deswegen habe ich mit einem Pinsel noch eine dünne Lage Peeled Paint über den kompletten und bereits bestempelten Cardstock gewischt und das Motiv noch einmal halb bis zur Mitte mit Forest Moss sowie ganz außen am Rand mit schwarzer Tinte abgestempelt. So gefiel mir die Farkombi für eine Herbstkarte viel besser. Anschließend habe ich noch goldene Metallic Watercolor darüber gespritzt.

A little ago I stumbled across the Fern Background by WhimsyStamps. Seems like it's a bit of an older image but I really hadn't seen it before. And I totally love it! So I had to buy it and used it on this card. The great thin is, that only the dotted shadows around the ferns are stamped - the ferns and the areas in between show the actual color of the cardstock.
Here I inked up a piece of white cardstock with Distress Ink Bundled Sage and Evergreen Bough and stamped the image with Peeled Paint and Rustic Wilderness, put down only on the edges of the stamp, on top .Well, the result looked way too blue-ish and summer-ish. So I used a brush to apply a thin layer of Peeled Paint all over the cardstock and the already stamped image. Then I inked up about half of the image all around with Forest Moss and then some black ink just on the edges. This color combo looked so much better for a fall card. Then I spritzed some golden metallic watercolor over the background.
 

 Aus der Mitte des Hintergrunds habe ich dann einen Kreis ausgestanzt und mit einem etwas größeren Kreis, gestanzt aus goldenem Glittercardstock, hinterlegt. Dann habe ich ihn mit 3D Tape wieder an seinen Platz gesetzt und darunter quer über die Karte einen Streifen Vellum mit eingebaut. 
Die Blumen und Blätter sind mit dem Vintage Flowers Stempelset von Altenew gemacht. Ich habe sie in verschiedenen Orange-/Rottönen sowie Braun, für die Blätter, gestempelt und anschließend ausgeschnitten. Da die Blüten recht klein sind, habe ich mir den Stempel für die Blütenmitten gespart und dort kleine goldene Perlen aufgeklebt.
Das ganze habe ich dann mit Zweigen, gestanzt mit dem Branching Out Stanzenset von Memorybox aus dunkelbraunem Cardstock, und zwei Eicheln aus dem Fall Leaves Backdrop Stanzenset von LawnFawn halbkreisförmig arrangiert und auf den Kreis geklebt. Dazwischen habe ich ein paar rot-glitzernde Beeren gesetzt. Und hinter dem Kreis habe ich noch zwei Zweige, gemacht mit Stanzen aus einem Set von Avec/Action, aus Vellum gesetzt. So ist oben am Kreis etwas mehr Kontrast.
Den Text aus dem Autumn Blessings Stempelset von MFT habe ich golden auf weißen Cardstock embosst und per Hand ausgeschnitten. Dann habe ich ihn auf den Kreis, links überhängend, aufgeklebt

I've die cut a circle from the center of my background and matted it with a circle cut from golden glitter cardstock. Then I glued it back into place using foam tape, putting a strip of vellum under the circle and across my card. 
The flowers and leaves are stamped with the Vintage Flowers stamp set by Altenew. I used different shades of oranges/reds and browns for the leaves. Then I cut them out by hand. Since the blossoms are pretty small, I skipped the flower center image and glued down some golden pearls instead.
Then I arranged the flowers with twigs, cut with the Branching Out die set by Memorybox from dark brown cardstock, and two acorns from the Fall Leaves Backdrop set by LawnFawn and glued them to the edge of the circle. I put a few red glittery pearls between the images as red berries. And behind the top of the circle I've added two branches cut from vellum to add some contrast there.
The text from the Autumn Blessings stamp set by MFT is golden heat embossed onto white cardstock and fuzzy cut. Then I glued it onto the circle, letting it overhang the circle on the left side.


Um die verschiedenen Lagen aufeinander zu setzen, habe ich teilweise wieder 3D Tape benutzt.
Zum Schluss habe ich einige goldene Pailetten auf der Karte verteilt, alles mit goldenem Glittercardstock gemattet und auf einen weißen Kartenrohling geklebt.

To put the different layers down I used foam tape in a few areas.
In the end I added a few golden sequins to my card, matted it with golden glitter cardstock and then attached it to a white note card.

Freitag, 23. September 2022

Altenew Pair-a-Flower Watercolor Edition Contest

 
Hallo Ihr Lieben!
Bei Altenew läuft noch bis Sonntag der Pair-A-Flower Watercolor Edition Contest. Ich hatte bereits Ende August davon gelesen, aber dann sind wir in Urlaub gefahren - und danach habe ich es einfach vergessen. Jetzt habe ich einen Reminder gesehen und mir den Contest und die Aufgabe genauer angesehen. Es soll ein Blumenmotiv mit Watercolors coloriert werden und dann zusammen mit der Blume, die einen inspiriert hat, fotografiert werden. Es müssen keine echten Blumen sein - künstlich, ein Stoffmuster oder das Muster auf Geschirr, alles geht. 
Nun, in der Kurzbeschreibung stand, man soll ein Altenew-Motiv mit Altenew-Watercolors colorieren. Wie gut, dass ich das Kleingedruckte gelesen habe, denn die Watercolors von Altenew habe ich nicht, dafür andere Marken. Aber in der genaueren Beschreibung heißt es dann "Altenew watercolors and/or Altenew stamp/die/stencil". Das "or" war für mich dann der ausschlaggebende Punkt, mich hinzusetzen, und quasi auf den letzten Drücker noch eine Karte zu machen.
Und wie Ihr seht, bin ich in den Garten und habe eine Rose und eine Herbstannemone - zwei der wenigen Blumen, die dort momentan noch blühen UND für die ich einen passenden Stempel habe - abgeschnitten. 

Hello everyone!
Altenew's Pair-A-Flower Watercolor Edition Contest is running 'til sunday. I already read about it end of august, but then we went on vacation - and afterwards I had simply forgotten about it. Now I've seen a reminder and went to check their post to find out details about the contest and what they are asking for. You have to make a flower project with watercolors and then take a picture of the project beside the flower that inspired you. And you don't even have to use real flowers - aritificial, some fabric, the pattern on a plate - anything is possible.
Well, in their short description they said to use an Altenew image and Altenew watercolors. Luckily I read the more detailed description, because I don't own the waterolor pans by Altenew, but those from other brands. And in their detailed descriptions they said "Altenew watercolors and/or Altenew stamp/die/stenil". The "or" was the reason, that I sat down to make a card, quite last minute.
As you can see I went into our yard and cut off a rose and a japanese anemone - two of the few flowers that are still blooming AND that I have a matching stamp for.


Nun, da ich zwei fast weiße Blüten hatte, habe ich dann doch ein wenig geschummelt bei den Farben. Meine Rosen sind um einiges dunkler im Rosaton als das Original aus meinem Garten. Und die Herbstannemone hat bei mir eine blau-graue Färbung erhalten. 
Ich habe die Motive mit der Fade-Out Tinte von Ink on 3 auf Watercolor Cardstock gestempelt und dabei maskiert, um die Blüten und Blätter übereinander zu stempeln. Verwendet habe ich Blumen aus den Sets Lush Garden und Airbrushed Flowers. Anschließend habe ich sie mit meinen ZIG Markern und einem ganz feinen Pinsel coloriert. 
Normalerweise verwende ich ja meist meine Copics zum Colorieren. Wenn ich dann mit Watercolors arbeite, tu ich mich immer schwer, die nicht perfekt verblendeten Linien auf den Motiven zu akzeptieren. Hier war ich fast soweit - und dann waren die Blüten und Blätter doch fast perfekt verblendet. Und das hat mich dann doch auch wieder so gestört, dass ich bewusst nochmal viel Wasser aufgetragen habe, so dass die Farbe wieder etwas mehr verläuft. Na, Hauptsache, ich weiß, was ich will, oder?
Rund um die Blumen habe ich stark verdünnte grau-grüne Farbe aufgetragen und ins Weiß des Cardstocks auslaufen lassen. Dann habe ich meine Masken wieder aufgelegt und die selbe Farbe über den Hintergrund gespritzt. Nach dem Trocknen habe ich dann noch über den kompletten Cardstock stark mit Wasser verdünnte Copic Opaque White gespritzt.
Irgendwie fehlte mir auf meiner Karte was. Also habe ich meine Hotfoil Maschine angeschmissen und einen Rahmen mit halbtransparenter, rosafarbener Folie auffoliert. Damit der nicht auch auf dem Motiv zu sehen ist, habe ich meine Masken wieder aufgeklebt.
Unten links in den Rahmen habe ich dann noch mit grau-grüner Stempelfarbe einen Text aus dem Stempelset Bountiful Bouquet aufgestempelt. 

Well, since I had two nearly white flowers, I cheated a bit when I colored my flowers in. My roses are a way darker pink than the one from my garden. And the japanese anemone I colored in a grey-ish blue color. 
I stamped the images with the fade-out ink by Ink On 3 onto watercolor cardstock and did some masking to stamp my flower arrangement. Then I colored them with my ZIG markers and a very fine brush. 
Most of the time I use Copics to color. When I work with watercolors for a change, I always have a hard time to accept the not so smoothly blended colors and kind of harsh lines between the layers. Here I was kind of liking the look - and then all of a sudden I hard nearly perfectly blended colors. Well, I was kind of bummed - and added some pools of water onto the petals and leaves to make those lines re-apear at least a bit. Oh well, I seem hard to be satisfied.
Around the flowers I laid down some grey-ish green color, mixed with quite a lot of water. Then I put my masks back on and spritzed the same color only onto the background. After that had dried I also spritzed some Copic Opaque White, mixed with a lot of water, over the whole piece of cardstock.
I felt like something's missing on my card. So I brought out my hotfoil machine and foiled a frame onto the cardstock, using a semi transparent light pink foil. To make sure the frame doesn't get foiled over the images, I put down my masks again.
Into the bottom left corner inside the frame I stamped a text from the Bountiful Bouquet stamp set, using some grey-ish green ink.


Zum Schluss habe ich einige klar-irisierende Glitzersteine auf der Karte verteilt, die jeweils die Farbe des Untergrundes aufgreifen. Dadurch sind sie nicht so auffällig, geben der Karte aber trotzdem ein kleines bisschen Glamour. 
Ich habe den Watercolor Cardstock mit grün-grauem Cardstock gemattet, habe 3D Tape dahinter geklebt und dann alles auf einen weißen Kartenrohling montiert.

In the end I added a few clear-iridescent rhinestones to my card, that pick up the colors underneath. This way they aren't that prominent, but still add a touch of glamour to the card.
I matted the watercolor cardstock with some grey-green cardstock, put a layer of foam tape on the back and glued it onto a white note card.
 

Donnerstag, 22. September 2022

Herbst - aber mal keine Karte

 
Hallo Ihr Lieben!
Heute zeige ich auf dem Stampcorner Blog ein weiteres herbstliches Werk. Diesmal habe ich aber statt einer Karte einen großen Shaker Tag gemacht.

Hello everyone!
Today I am sharing another fall project over at the Stampcorner Blog. But this time I made a large shaker tag instead of a card.

Ich habe hier den Tag an sich bewusst weiß gehalten, damit meine Motive und das Shaker Fenster gut zur Geltung kommen. Und auch die gewählten Farben sind hier eher gedeckt als herbstlich bunt. 

I kept the tag white so my images and the shaker window stay in focus. And I also went with some more muted colors instead of the typical fall colors.


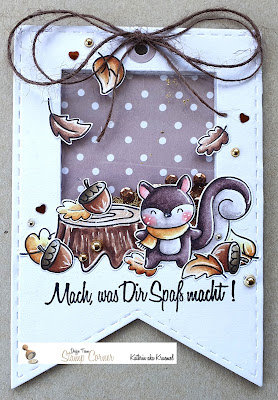
Für meinen Tag habe ich die Fishtail Banner Stitch Stanzen von Stampcorner verwendet und sie durch Partial Die Cutting wieder so gekürzt, dass ich rundum den tollen gestitchten Rand habe. Mit Tape habe ich in die Mitte der Karte eine quadratische Stanze an die Fishtail Stanze geklebt und so mehrere weitere Banner ausgestanzt - da die für die nötige Höhe des Shakers sorgen, war der gestitchte Rand hier nicht wichtig und ich habe sie einfach mit dem Paper Trimmer auf die richtige Länge geschnitten. Aber durch das aneinander kleben der Stanzen konnte ich sichergehen, dass sich das Fenster immer an der selben Stelle befindet. 
Diese Lagen habe ich alle aufeinander geklebt und als Rückseite ein Banner ohne Fenster aus einem der Bögen aus dem neuen Paper Pad gestanzt. 
Hier könnt Ihr sehen, dass ich meinen Shaker mit goldbraunen Mini-Pailetten sowie goldenen Kügelchen gefüllt habe.
Oben habe ich mit der Crop-a-Dile ein Lock durch alle Lagen des Tags gestanzt, einen kleinen Ring, wieder aus dem Designpapier gestanzt, drumherum geklebt und dann dort eine Schleife aus braunem Twine angebunden. 

For my tag I used one of the Fishtail Banner Stitch dies by Stampcorner and did some partial die cutting to make the tag shorter, but still keep the nicely stitched edge all around my tag. I temporarily attached a square die to the banner die with some tape and die cut several additional banners - since those will be hidden under the top tag I didn't need to care about the stitched edges here and simply cut them to the right size with my paper trimmer. But by taping the dies together I made sure, that the shaker window is in the exact same place on all of my banners.
I glued all those layers on top of each other and die cut a banner without the window from a sheet of the new paper pad as the back layer of my tag.
Here you can see that I used some small golden brown sequins and tiny golden beads to fill my shaker window.
I used my Crop-a-Dile to punch a hole through all the layers of my tag, glued a small ring around it, again made from the patterned paper, and then tied a bow from brown twine through the hole.


Und hier seht Ihr endlich die süßen Motive. Das Eichhörnchen und den Baumstumpf hatte ich bisher noch nicht verwendet. Ich habe sie wieder mit Eicheln und Blättern aus demselben Stempelset kombiniert. 
Coloriert habe ich mit Copics, die Highlights sind mit einem weißen Gelstift gemacht. Ich habe wieder die E70-Töne für das Eichhörnchen benutzt, weil die einfach perfekt zum Ton des Designpapiers passen. Die restlichen Motive sind in weiteren Braun-Kombinationen sowie gedeckten Gelbtönen coloriert. 
Direkt auf den Tag habe ich mit schwarzer Tinte einen Text aus dem Stempelset Auszeit aufgestempelt. Dann habe ich zwischen Text und Fenster die Motive aufgeklebt, und dabei teilweise 3D Tape benutzt. Als Deko kamen dann noch einige gold-braune Herzen und goldene Perlen auf denTag. 

And here you finally get a closer look at the cute images. The squirrel and the tree stump are images I hadn't used yet. Again I combined them with the acorn and leaves from the same stamp set.
I used Copics to color the images in and a white gel pen for the highlights. Again I went with the E70 tones for the squirrel because these go perfectly with the color of the patterned paper. The other images are colored in other combinations of browns and muted yellows.
I stamped a "do what makes you happy" directly onto the tag, using black ink. Then I added the images between the text and the shaker window, using foam tape for several parts of the scene. 
To decorate my tag I used some small golden-brown hearts and golden pearls.

Mittwoch, 21. September 2022

Create a Smile September Sketch Challenge

 
Hallo Ihr Lieben!
Heute startet die neue Challenge bei Create a Smile - diesmal wieder mit einem Sketch. Und diese herbstliche Karte ist bei mir danach entstanden. So sieht der Sketch aus:

Hello everyone!
Today starts the new challenge over at Create a Smile - this time again with a new sketch. And this is the card I made after it. This is the sketch: 


Ich liebe die klaren Sketche von Create a Smile - super auch für Clean and Simple Karten, man kann aber natürlich immer etwas hinzufügen. 

I love the clean sketches by Create a Smile - they are great for clean and simple cards, but there's always room to add elements to it.


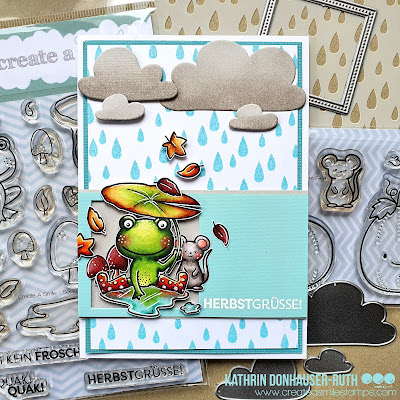
Ich habe hier ein Stück weißen Cardstock genommen und mit Distress Glaze Salvaged Patina und dem Raindrops Stencil Regentropfen darauf embosst. Das Glaze ist halb-transparent, und so glänzen die Regentropfen nicht nur toll, sie sind auch wie echte Regentropfen halb durchsichtig. Auf weißem Cardstock bringt dieser Effekt natürlich nichts, aber dadurch werden die Regentropfen schön 
intensiv. 
Oben am Himmel habe ich einige Regenwolken aufgeklebt. Die habe ich mit den Wolkenstanzen aus dem Weather Stanzenset aus grauem Cardstock gestanzt und von unten her ein wenig mit Distress Ink Hickory Smoke gewischt. 

Here I used a piece of white cardstock and added the raindrops using Distress Glaze Salvaged Patina and the Raindrops stencil. The glaze is semi-transparent, so the raindrops do not only shine wonderfully, they are also half see-through, just like real raindrops. I know, this effect isn't visible on my white cardstock, but the white background makes the raindrops wonderfully intense.
I glued a few rain clouds to the sky. I cut those from grey cardstock using the cloud dies from the Weather die set, then inked the bottom with some Distress Ink Hickory Smoke.


Quer über den Regentropfen-Hintergrund habe ich dann erst einen Streifen hellgrauen Cardstocks geklebt, darauf dann türkisblauen Cardstock, aus dem ich links mit einer der Stitched Square Frames Stanzen ein Quadrat ausgestanzt habe. 
In bzw. über - ich habe wieder 3D Tape benutzt - das Fenster habe ich dann meine Motive geklebt. Der Frosch, die Pfützen, die Blätter und die Pilze sind alle aus dem Stempelset Sei kein Frosch. Das gibt es schon länger, und beim letzten Release habe ich es mir endlich mitbestellt. Die kleine Maus ist aus dem neuen Set Frisch vom Feld. 
Alle Motive sind mit Copics coloriert, die Pfütze habe ich außerdem mit Glossy Accents überzogen. Neben dem ausgestanzten Fenster war dann noch Platz für einen Text. Der ist ebenfalls aus dem Set Sei kein Frosch und weiß auf den türkisblauen Cardstock embosst.

Across the raindrop cardstock I glued a strip of light grey cardstock, then put a strip of turquoise cardstock on top. From the left of this turquoise cardstock strip I have die cut a square using one of the Stitched Square Frames dies. 
Into/over - I used foam tape again - the cut out window I attached the images. The frog, the puddles, the leaves and the mushrooms are all from the Unfrogettable stamp set. It's an older set, that I finally ordered with the items from the last release. The little mouse is from the new Frisch vom Feld stamp set. 
All images are colored in with Copics, I covered the puddles with Glossy Accents.
And next to the window there was room for a greeting. I've white heat embossed an "autumn greetings" directly onto the turquoise cardstock.


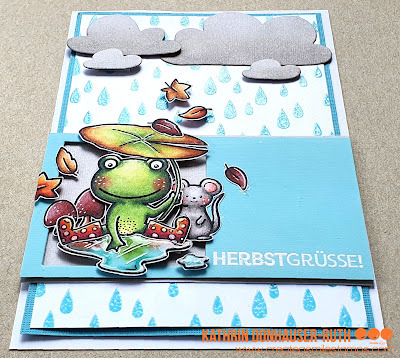
Hier seht Ihr, wie ich einzelne Elemente der Deko und auch den türkisfarbenen Cardstockstreifen mit 3D Tape aufgeklebt habe.
Zum Schluss habe ich alles türkisfarben gemattet und auf einen weißen Kartenrohling geklebt. Die Cardstockstreifen hinter den Motiven habe ich dabei bis an den Rand des Kartenrohlings gehen lassen und auch die Wolken stehen über die türkisfarbene Mattung hinaus.

Here you can see how I used foam tape to attach differend elements of my decorations and also the turquoise cardstock strip.
In the end I matted the white cardstock turquoise and glued everything onto a white card base. I cut the cardstock strips behind the images the same width as my card base and also the clouds go over the turquoise matting.