Donnerstag, 29. Juni 2017

Eine Gummibärchenverpackung


Hallo Ihr Lieben!
Heute zeige ich auf dem Kulricke Blog eine weitere Gummibärchen-Verpackung. Natürlich wieder mit dem passenden Gummibärchen-Stempelset gemacht.

Hello everyone!
Over at the Kulricke Blog I am sharing another gumbear gift today. Of course again made using the Gummibärchen stamps.

Die Verpackung an sich besteht aus einem Streifen grünen Cardstock, den ich passend gefalzt habe. Darauf habe ich dann überall das Wort Gummibärchen aufgestempelt (das ist die erste Zeile eines der Stempel, die zweite folgt dann neben den Gummibärchen). Außerdem habe ich die Ränder etwas gewischt und ein paar rote Enamel Accent aufgebracht.

The gift is made from a strip of green cardstock that was scored matching the size of the gumbears inside. Then I've stamped the word "gumbear" all over the strip and also inked up the edges a bit. Then I've added a few red Enamel Accents.


Die Gummibärchen sind mit Copics coloriert und - damit sie schön glänzen - mit Glossy Accents überzogen. Die orangefarbenen mag ich eigentlich nicht so sehr (sie sind aber immer noch besser als die gelben!), aber hier passte es so schön ins Farbkonzept... ;)
Die Kreise hatte ich noch vom Regenbogen meiner Einhornkarte übrig und habe hier etwas Restverwertung betrieben. Sie sind mit den Nesting Stitched Circles gemacht. Darunter habe ich noch ein weißes Doily gepackt.

The gumbears are colored in with Copics and to add a nice shine to them I've covered them with Glossy Accents. I don't really like the orange ones that much (allthough they still taste better than the yellow ones!) but it fit good in my color scheme... ;)
I had those circles left over from when I made the rainbow for my unicorn card a little ago and so I used up some of them here. They were made using the Nesting Stitched Circles dies and I've added a white doily underneath.


Auch auf der Rückseite habe ich das Wort Gummibärchen aufgestempelt, darauf achtend, dass es bei geschlossener Box auch richtig herum lesbar ist.
Außerdem habe ich noch einen weiteren Text aus dem Gummibärchen-Set hier aufgeklebt und zum Matten bw. für das Band die Farben von den Kreisen auf der Vorderseite aufgegriffen.
Außerdem habe ich einen Verschluss für die Box/den Umschlag gefertigt. Dazu habe ich eine Stanze von Memorybox benutzt.

Also on the backside I've added the word gumbear making sure it can be read when the box is closed. I also added another text here meaning "a day without gumbears is possible but senseless". For the matting and the ribbon again I used the colors from the front.
I also added a closure for my envelope here that was made using a die by Memorybox. 


Und so sieht die Verpackung geöffnet aus. Innen habe ich sie einfach blank gelassen...

And this is the opened gift. I just kept the inside plain.


Mittwoch, 28. Juni 2017

Eine Piratenkarte


Hallo Ihr Lieben!
Heute zeige ich wieder ein Werk auf dem Stamping-Fairies Blog. Und wieder habe ich Stempel und Stanzen von MFT verarbeitet. Zuerst dachte ich ja, aus dem Juni-Release brauche ich jetzt nicht unbedingt etwas. Aber dann kam mir die Idee zu dieser Karte...

Hello everyone!
Today I am sharing another card over at the Stamping-Fairies Blog. And again I've used stamps and dies by MFT. First I thought I didn't need any of the june release but then I had the idea for this card...

Für die Holzoptik im Hintergrund habe ich das Holzmuster mit klarem Embossingpulver auf Aquarell-Cardstock embosst und darüber dann Distress Ink Frayed Burlap aufgetragen. So entsteht ein wenig der Eindruck, die kleine Piratin steht im Inneren eines Schiffs und schaut aus dem Bullauge.
Ich habe hier auch noch ein paar kleine Tupfer schwarzes Enamel Accents aufgebracht, einfach damit sich noch ein wenig etwas tut auf der großen freien Fläche.

For the wooden optic in the background I've stamped the wood print onto watercolor paper and then heat embossed it with clear embossing powder. Then I've added Distress Ink Frayed Burlap on top. Now it looks like the little pirate is standing inside a ship, looking out the window.
I also added a few small dots with black Enamel Accents here, just to have a little something on that big plain area.


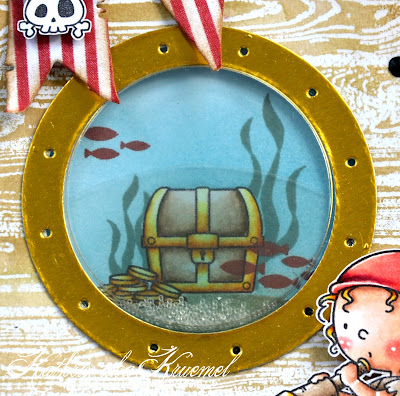
Für das Fenster habe ich das Ocean View Porthole aus goldenem Spiegelkarton ausgestanzt. In die Ausstanzung kam eines der Circle Shaker Pouches, das ich mit ein paar klaren Mini-Kugeln gefüllt habe. Wenn man die Karte langsam schüttelt, schaut es aus wie kleine Blubberblasen.
Hinter den Shakerteil - ich habe ihn von hinten mit klarer Folie verschlossen - habe ich dann diese Szene gesetzt. Dafür habe ich die Schatztruhe und die Goldmünzen aus dem Party like a Pirate Stempelset abgestempelt und mit Copics coloriert. Dann habe ich mit Distress Ink Broken China erst nur den Bereich drumherum gewischt - Schatztruhe und Goldmünzen habe ich mit Maskiertape abgedeckt - und anschließend auch ganz wenig Farbe über der Schatztruhe und dem Gold verteilt, so dass es aussieht, als wären sie im Wasser. Dann habe ich ein paar Wasserpflanzen und Fische aus dem Mermazing Stempelset drumherum/drüber gestempelt. Dafür habe ich Distress Oxide Fired Brick und Iced Spruce benutzt.

For the window I've die cut the Ocean View Porthole from golden mirror cardstock. Into the cut out area I've put one of the Circle Shaker Pouches that is filled with some tiny clear beads. If you shake the card slightly it looks like little bubbles coming up.
Behind this shaker part - the back of the pouch is sealed with transparency - I've put this under water scene. I've stamped and colored in the treasure chest and the coins from the Party like a Pirate stamp set before adding Distress Ink Broken China only around the images (I covered them with masking tape for this step). Then I applied just a little bit of ink on top of the chest and coins to make them look like they are under water. Then I've added some underwater plants and fish from the Mermazing stamp set using Distress Oxide Fired Brick and Iced Spruce.


Die kleine Piratin ist mit Copics coloriert. Ich finde, sie sieht so erschrocken aus als hätte sie gerade einen Schatz gefunden... ;)

The little pirate is colored in with Copics. I think she looks a little surprised - like if she'd just discovered a treasure... ;)


Oben an der Karte habe ich dann noch ein kleines Banner aus gestreiftem Papier angebracht - und natürlich darf zumindest ein Totenkopf hier nicht fehlen!

To the top of the card I've added a small banner cut from red and white striped designer's paper - and of course I had to add at least one skull here.

Und vielleicht habe Ihr diese Kreislinie im Bullauge gesehen. Nun, wenn man denkt, besser als ein Schatz kann es nicht mehr werden... schwimmt eine kleine Schildkröte am Fenster vorbei! Ich habe das für Euch mal gefilmt:

And maybe you've discovered that circle line inside the porthole. Well, as soon as you think it can't get any better than discovering a treasure.... there's a little turtoise swimmin by your window. I took a little movie of it for you:


Die Schildkröte ist an den Rand eines Kreises aus Folie geklebt. Den habe ich mit einem Brad an der Karte befestigt. Er musste so groß ausfallen, damit die Schildkröte auch einen schön großen Bogen schwimmt.
Am unteren Ende des Kreises habe ich noch zwei Stempel aus dem Stempelset Interactive Labels aufgestempelt. Das Set finde ich klasse, genau das, was man für alle möglichen interaktiven Karten braucht!

The tortoise is glued to the edge of a circle cut from transparency. I've attached this to my card with a brad that had to be that big so the turtle swerves by nicely.
To the lower end of the circle I've stamped two stamps from the Interactive Label stamp set. I think this is a must have for any of those interactive cards.


Samstag, 24. Juni 2017

Stempeleinmaleins - Ausgabe vom 24. Juni 2017


Hallo Ihr Lieben!
Heute startet die neue Challenge beim Stempeleinmaleins, wie immer mit einem Sketch.

Hello everyone!
Today we are starting our new challenge over at Stempeleinmaleins - again with a sketch for you to follow.

Ganz ehrlich, der Sketch hat mich Nerven gekostet! Da ging ja gar nichts mit meinen geliebten Lagen... Aber ein Sketch soll ja auch mal eine Herausforderung sein. Und außerdem war er perfekt für meine neuen Stempel von Lili of the Valley. 100 % zufrieden bin ich trotzdem nicht...
Ich habe drei Streife in unterschiedlichen Blautönen auf weißen Cardstock geklebt und daraus die Fenster ausgestanzt. Dahinter kamen dann die süßen Bären. Das alles habe ich dann noch rosa gemattet. 
Der Text ist aus dem Hochzeitsset von Creative-Depot. 
Ein paar Herzen auf Stielen sowie Gras und Blumen und zwei rosafarbene Ecken runden das ganze dann - mehr oder weniger - ab.

Honestly, this sketch was hard for me! No chance to include all those layers that I love so much... But well, a sketch should be a challenge every oce in a while. And at least it was perfect for my new stamps by Lili of the Valley. I still am not 100 % satisfied with how the card turned out...
I've put three strips of cardstock of different blues onto some white cardstock and then cut out the windows. Behind those I've put the colored in stamps and then matted everything using some light pink cardstock.
A few hearts on stems, grass and flowers and also two pink die cut corners finished this off - more or less.


Freitag, 23. Juni 2017

Eine Vellum Overlay Card


Hallo Ihr Lieben!
Letzten  Samstag haben wir Euch beim Stempeleinmaleins die Vellum Overlay Card gezeigt. Und heute zeige ich auf dem Blog von Stamping-Fairies diese Karte, die ebenso entstanden ist. 

Hello everyone!
Last saturday we've been sharing the Vellum Overlay Card over at the Stempeleinmaleins Blog. And today I am sharing this card over at the Stamping-Fairies Blog using the same technique.

Das Motiv zeige ich Euch später noch genauer. Drumherum habe ich ein paar Punkte mit den Enamel Accents Electric Lime aufgetragen. Der Text ist aus dem Stempelset Roses von Hampton Art und die beiden kleinen Herzen aus dem Stanzenset Band Aid von MFT.
Um die Linien des Motivs auf das Vellum zu embossen, habe ich weißes Embossing Pulver von Ranger benutzt.

I'll share the image soon. Around the image I've added some dots using Enamel Accents Electric Lime. The saying is from the Roses stamp set by Hampton Art and those two little hearts are made using the Band Aid die by MFT.
I heat embossed the lines of the stamp onto the vellum using white Embossing Powder by Ranger.


Hier sieht man, wie die Farbe des Motivs durch das Vellum scheint und gleichzeitig in der Intensität gedämmt wird.

Here you see the image shining through the Vellum and also getting toned done in intensity.


Und so sieht das Motiv aus, wenn das Vellum zur Seite geklappt wird. Ihr seht, das Vellum nimmt wirklich viel von der Intensität des Motives weg!
Der Stempel ist von Craft Emotions und heißt Botanical Roses Bud. Auch hier habe ich wieder ohne sichtbare Stempellinien und mit Copics coloriert. Gerade bei floralen Motiven finde ich das einfach super. 

And this is the image once the Vellum is opened. As you can see, the Vellum really takes a lot of the intensity of the image!
This is the Botanical Roses Bud stamp by Craft Emotions. Again I did some no-line coloring with my Copics here. Especially with those floral images I really love this technique.


Donnerstag, 22. Juni 2017

Eine Zwillings-Karte


Hallo Ihr Lieben!
Meine zweite Karte für den Vildastamps Blog diesen Monats ist eine Zwillings-Karte geworden. Der süße Stempel Flisan & Oliver hat sich da so toll angeboten. Eigentlich sind es ja zwei einzelne Stempel, aber wie auf dem Artkelbild im Shop abgestempelt, sind sie perfekt für eine Karte für ein Zwillingspärchen.

Hello everyone!
My second card for the Vildastamps Blog this month is a twins' card. The cute stamp Flisan & Oliver was perfect for that. Originally these are two single stamps but stamped like shown on the product picture in the shop they are perfect for mixed twins.

Da das Motiv so doch recht groß ist, habe ich im Hintergrund nur zwei Designpapiere sowie einen ausgestanzten Babybody von JM Creations gesetzt. Alles schön abwechselnd in rosa und hellblau, dazu kam ein wenig Gelb als neutrale Farbe.

Since the image stamped like this is kind of large I only used two different designer's papers and a die cut baby onesie in the background, changing from pink to blue and back in colors and adding a hint of yellow as a neutral color.


Und hier seht Ihr das Motiv, mal wieder "no lines". Neben Flisan und Oliver habe ich auch den kleineren der Schnuller aus dem Pacifiers Stempelset zweimal abgestempelt, coloriert und neben das Motiv gesetzt.
Die Buchstaben sind ausgestanzt und zwei kleine Herzen bilden den I-Punkt.

And this is a close-up of the image, again "no lines". Besides Flisan and Oliver I also stamped the smaller one of the Pacifiers twice, colored them in and put those next to the image.
The letter are diecut and two hearts are using for the i-dot.


Mittwoch, 21. Juni 2017

Eine Feen-Karte


Hallo Ihr Lieben!
Heute darf ich wieder auf dem Blog von Vildastamps posten. Und meine erste Karte dort heute ist diese Feen-Karte.

Hello everyone!
Today it's my turn again to post over at the Vildastamps Blog. And my first card there today is this fairy card.

Passend zu der von mir gestempelten Szene, die doch irgendwie direkt aus einem Märchen stammen könnte, habe ich Papiere mit Sternenmuster verwendet. Dazu habe ich oben ein paar Feenflügel unter das Motiv geschoben. Unten rechts habe ich ein paar ausgestanzte Tannenbäume aufgeklebt, die den Wald auf dem Motiv irgendwie fortführen.

Matching the stamped scene, that kind of seems to come directly from a fairytale, I used papers with a star pattern. I also added two diecut fairy wings to the top left of the image and used some die cut trees on the bottom right that kind of continue the woods from the scene.


Und hier ist die Szene. Sie ist mit verschiedenen Stempeln aus den Sets Grass Kit, Fantasy 1, Fantasy 2 und Fantasy 3 zusammengesetzt. Die Flügel der Fee unten im Gras habe ich mit etwas Glitzer überzogen.
Ich wollte, dass der Wald und die Burg im Hintergrund so scheinen, als würden sie im Nebel liegen. Darum habe ich erst den Hintergrund mit Distress Inks Weathered Wood und Iced Spruce gewischt und darauf die Burg und die Bäume gestempelt. Im Anschluss habe ich dann weiße Stempelfarbe über die Szene gewischt - unten mehr als oben, da der Nebel ja von unten her aufsteigt. Zum Schluss kamen dann der Mond, der Baum links, das Gras und die Fee. Ein paar weiße Punkte bilden die Sterne am Himmel und darum herum habe ich noch etwas gelbe Stempelfarbe aufgewischt.

And here is the scene. It's made using different stamps from the Grass Kit, Fantasy 1, Fantasy 2 and Fantasy 3 stamp sets. I also added some Glitter to the wings of the fairy that's sitting in the grass.
I wanted the trees and the castle in the background look like they are surrounded by fog. So first I created the background using Distress Ink Weathered Wood and Iced Spruce and then stamped the trees and castle onto that background. Then I used some white ink and applied it onto the scene, adding more color to the bottom since the fog is coming from the ground. At the end I added the moon, the tree on the left, the grass and the little fairy.
A few white dots were added as stars and I also added a little bit of yellow ink around those to make them glow.


Montag, 19. Juni 2017

Eine Einhorn-Schachtel


Hallo Ihr Lieben!
Ich hoffe, mit all den Einhörnern, die ich Euch in letzter Zeit gezeigt habe, langweile ich Euch nicht langsam. Aber diese Box, die ich heute auf dem Blog von Kulricke zeige, möchte ich euch hier natürlich nicht vorenthalten. Und demnächst gibt es auch mal wieder was anderes!

Hello everyone!
I hope I am not going on your nerves with all the unicorn stuff I've been posting lately. But this box, that I am sharing over at the Kulricke Blog today, is something I wanted to share with you here as well. And I'll do something else for my next posts!

 Hier habe ich in den Deckel einer Box eine Shaker-Box eingearbeitet. Deren Hintergrund ist mit Sonnenstrahlen - Ton in Ton mit dem Cardstock - gewischt. Darauf kamen dann ein paar Wolken und das süße Einhorn, das natürlich mit einer ordentlichen Portion Glitter versehen ist. In die Shakerbox habe ich nur ein paar lila- und goldfarbene Pailetten gegeben.

Here I turned the lid of a box into a shaker box. The background is covered with sunrays, tone in tone with the cardstock. Then I've added some clouds and the cute unicorn that, of course, needed some glitter. Into the shaker I've only put a few purple and gold sequins.

Vorne auf der Box habe ich einen der Text aus dem neuen Einhorn Text Stempelset verwendet. Darunter sitzt einer der Pop Up Sterne, unter dem sich der Magnet versteckt, der die Box geschlossen hält.

To the front of the box I've added a saying meaning "life is full of magic". Underneath there is one of the Pop Up Stars that is hiding the magnet that keeps the box closed.


Und auch innen ist die Box dekoriert. Neben dem neuen Einhorn Text, der sowohl zum Einhorn als auch der Schokolde passt, habe ich hier die kleinen Pop Up Sterne verwendet. Der Text ist auf weißen Cardstock gestempelt, mit einem der Nesting Frames Small ausgestanzt und anschließend habe ich die Ränder farblich passend zur Box gewischt. Und auch die Schokolade passt pefekt ins Farbkonzept.

And also the inside of the box is decorated. Beside a new saying that means "chocolat makes life sweeter, a unicorn adds the glitter" I also used the small pop up stars here. The saying is stamped on white cardstock, then cut out using one of the Nesting Frames Small dies and then I used some pink ink to ink up the edges. And also the chocolats go perfect with my color scheme.


Samstag, 17. Juni 2017

Stempeleinmaleins - Ausgabe vom 17. Juni 2017


Hallo Ihr Lieben!
Bei der heutigen Ausgabe des Stempeleinmaleins zeigen wir Euch eine Vellum Overlay Card. Bei dieser Karte liegt das Motiv unter einer Schicht Transparentpapier, wo es bei geschlossener Karte nur abgeschwächt zu sehen ist, und es erst bei geöffneter Karte in voller Farbpracht "erstrahlt".

Hello everyone!
With today's issue of Stempeleinmaleins we are sharing a Vellum Overlay Card with you. With this card the image is dimmed by a layer of vellum and can only be seen in full color once the card is opened.

Ich habe hier einen Layering Stamp mit Hortensienmotiv verwendet. Mit solchen Stempeln lässt sich der Effekt besonders einfach umsetzen. Zum Embossen habe ich weißes Embossingpulver verwendet. Der tolle Text, in blau embosst, ist aus dem Stempelset Nur für Dich von Creative-Depot. Ansonsten habe ich nur etwas grün-weißes Twine und ein paar Glitzersteinchen angebracht. Bei dieser Kartenart ist, meiner Meinung nach, weniger mehr, damit der tolle Effekt der Karte nicht zerstört wird.

I used a layering stamp with a hydrangea image here. It's the easiest to make the cards with this type of stamps. To emboss the outlines I used white embossing powder.
The saying means "thinking of you" and it's embosst using a blue embossing powder. I also added some white and green twine and a few rhinestones. Less is more with this type of cards to not destroy the beautiful effect.


Und das ist das kleine Innenkärtchen der Karte, ohne die Vellum-Schicht darüber. Seht Ihr, wie intensiv die Farben sind? Glaubt man gar nicht, dass das Vellum so viel davon schluckt...
Weil ich es nicht mag, wenn man auf der Rückseite der Karte das Klebeband durch das Vellum sieht, habe ich hier noch ein Stück grünen Cardstock, das etwas größer als das Innenkärtchen ist, von hinten gegen die Karte geklebt. So ist der Kleber verdeckt und gleichzeitig habe ich eine grüne Mattung um das Motiv.

And this is the smaller card inside, without the vellum covering it. Can you see how vibrant those colors are? I didn't think the vellum would soften it that much...
And since I don't like being able to see the glue on the back of the card - which always is a problem with vellum - I've cut some green cardstock slightly larger than the inside card and glued it to the back of the card. Now the glue is covered and I also have a green matting around the inner card.


Donnerstag, 15. Juni 2017

Juni-Challenge bei Altair-Art


Hallo Ihr Lieben!
Heute startet die neue Challenge bei Altair-Art - diesmal mit dem Thema Chipboard. Ich selbst verwende es eher selten und musste erstmal in den Tiefen einiger Schränke wühlen, aber dann wurde ich doch fündig!

Hello everyone!
Today the new challenge over at Altair-Art goes live - and we've picked the theme "chipboard" for you. Honestly, I don't use it very often and had to dig through some drawers in my craftroom before I was able to find some, but I did!

Wie Ihr schon erahnen mögt, war ich basteltermin-technisch etwas voraus, denn das ist die Karte, die meine Mom dieses Jahr zum Muttertag von mir bekommen hat... Die süßen Mäuse von Lili of the Valley wollten einfach verarbeitet werden!

Well, I was a bit ahead craftwise because this is the card I made my mom for this year's mother's day... Those cute mice by Lili of the Valley were just screaming for ink!

Ich habe eine Shakercard gemacht und dafür grün und blau gemusterte Papiere von Altair-Art verwendet. Das grün ist schön dezent und so beißt sich nichts.

I made a shaker card and used green and blue designer's papers by Atair-Art. The green is very subtle and so the colors go great together.


Hier könnt Ihr das Motiv genauer sehen, mit all den Schüttelteilen in eine Ecke, damit auch nichts verdeckt wird. Ich habe das Motiv mit der No-Lines Technik gestempelt bzw. coloriert. War etwas aufwändiger, aber die Arbeit wert. Auf dem Pilzhut habe ich Wink of Stella Clear aufgetragen, die kleinen Herzen sind mit Stickles überzogen.

Here you get a closer look of the image, all those shaker pieces put into a corner so nothing is covered by sequins or pearls. I did the no-line coloring here. It wasn't that easy or fast done but definately worth the effort. I covered the mushroom with clear Wink of Stella and the hearts got a layer of Stickles.


Und hier könnt Ihr noch die Deko - und endlich auch das Chipboard sehen. Ich hatte nur graues Chipboard - in Herzform - das ich dann mit weißem Gesso bemalt habe. Auf die Ränder habe ich etwas Smokey Grey Distress Ink aufgetupft, so wirkt es plastischer. Übrigens befindet sich auf dem Rahmen über dem Shakerteil oben rechts noch ein weiteres Herz aus Chipboard. ;)
Dann kamen noch ein Schnörkel, Spitze und Blumen als Deko dazu und natürlich ein passender Text.

An here you can see the decorations - and finally some chipboard also. I only found some grey heart-shaped chipboard in my stuff so I've covered those with white Gesso and added Distress Ink Smokey Grey to the edges. Oh, and if you didn't notice, there's another just smaller heart like this on the top right corner of the frame I've put on top of the shaker. ;)
At the end I've added a flourish, some lace and flowers and of course a matching saying meaning "happy mother's day".


Mittwoch, 14. Juni 2017

Ein Pinguin im Urlaub


Hallo Ihr Lieben!
Ich war zwar gerade erst eine Woche in Italien, aber ich könnte schon wieder Urlaub am Meer machen! Mit dieser Karte, die ich heute auf dem Blog von Stamping-Fairies zeige, hole ich den Urlaub zumindest ein wenig hier nach Hause.

Hello everyone!
I've just been in Italy for a week but I am ready for another vacation at the sea already! Well, with this card, that I'm sharing over at the Stamping-Fairies Blog today, I bring home a little bit of vacation.

Ich habe hier eine weiße Basiskarte verwendet und dazu passend türkis- und grau gemustertes Designpapier zugeschnitten. Ungefähr aus der Mitte habe ich dann das Square Peek-a-Boo Window von MFT ausgestanzt. Mit den tollen Nähten außenrum hat es einen tollen Rahmen, was doch schöner ist als ein schnödes Loch, oder?
Die Stranszene mit auslaufenden Wellen und Sand sowie die Palme habe ich mit der Beach Scene Builder Stanze gemacht. Für den Sand am Fuß der Palme habe ich einfach eine der Wolken zweckentfremdet.

I used a white card base and cut some grey and turquoise designer's paper a tad bit smallen than the card itself. Then I've diecut the Square Peek-a-Boo Window by MFT from its middle. With the stitches around this window has a nice frame and looks so much more interesting than just a plain one, right?
The beach scene with the rolling on waves and the sand as well as the palm tree were made using the Beach Scene Builder die. For the sand at the bottom of the palm tree I simply used one of the clouds from this set.


Und hier ist der Pinguin, der es sich gerade so richtig gut gehen läßt. Der ist, ebenso wie der Wasserball und der Text, aus dem Penguins in Paradise Stempelset. Ich habe wieder die No Lines Technik verwendet und mit Copics coloriert. Den Cocktail habe ich mit Maskieren vor den Pinguin mit aufs Strandtuch gestempelt.
In das ausgestanzte Fenster kam dann eines der Square Shaker Pouches und dahinter die Szene mit dem Pinguin. Vor dem Aufkleben habe ich dann das Shaker-Teil mit etwas echtem Sand gefüllt. So wirkt der Strand noch etwas realistischer.

And here is the little penguin that is having a great time at the beach. The penguin as well as the ball and the saying are from the Penguins in Paradise stamp set. I did some No Lines Coloring again using Copics. And I did some masking to stamp the drink on the beach towel and in front of the penguin.
I've placed one of the Square Shaker Pouches into the cut out window and placed the scene with the penguin behind it. Before glueing everything together I've put some real sand into the shaker. Now the beach looks even more realistic.


Sonntag, 11. Juni 2017

Ein Schweinchen-Tag


Hallo Ihr Lieben!
Auf dem Blog von Stamping-Fairies wird es heute versaut... Natürlich nur in Form der süßen Schweinchen von MFT!!!

Hello everyone!
Over at the Stamping-Fairies Blog I am sharing this pig-ish tag today.

Als Basis habe ich einen der 5" Craft Tags von Ranger verwendet. Die haben eine so toll glatte Oberfläche und Tinte lässt sich darauf prima verwischen.

As a base I used one of the 5" Craft Tags by Ranger. They have a wonderful smooth surface and ink can be blended perfectly.


Auf den Tag habe ich mit der Radiating Rays Schablone von MFT den Hintergrund aufgetragen. Ich nehme ja meine Schablonen viel zu selten, aber diese hier ist zum absoluten Liebling avanciert. Habt Ihr evtl. schon bemerkt, oder?
Die süßen Schweinchen sind aus dem Hog Heaven Stempelset. Eines hat sich mit einer Blume am Ohr, das andere mit einer Schleife feingemacht.
Da die Stempelsets von MFT alle so wunderbar untereinander kombinierbar sind, habe ich hier neben dem eben erwähnten Set Hog Heaven auch noch die Stempelsets Adorable Elephants (Luftballons und Schmetterlinge) sowie Sweet Forest Friends (Text und "Gras", das eigentlich ein Baum ist) verwendet.

I used the Radiating Rays stencil by MFT to create the background on the tag. I really don't use my stencils often enough but this one turned out to be an allrounder and also my absolute favourite. Saying this just in case you didn't notice it already...
Those cute piggies are from the Hog Heaven stamp set. One put a flower behind its ear, the other one is wearing a bow.
Since all the stamps sets by MFT can be wonderfully combined with each other I did not only use the said Hog Heaven set here but also the Adorable Elephants set (balloons and butterflies) and Sweet Forest Friends (saying and "grass" that's originally a tree).


Und ich habe hier auch die Tag Press von Tim Holtz benutzt. Der größte der Rahmen hat die perfekte Größe für dieses kleine Schweinchen. Und ich hoffe wirklich, dass es noch größere Rahmen geben wird! Super fand ich dann aber, dass dieser Rahmen mit 3,18 cm Durchmesser genau auf den Kreis in der Mitte der Schablonenstrahlen passt!

And I also used the Tag Press by Tim Holtz here. The biggest frame is perfect in size for this cutie. And I really hope there will be bigger ones soon. But I totally loved that this frame with its 3,18 cm in diameter was the perfect size to fit onto the circle in the middle of the stenciled rays!


Samstag, 10. Juni 2017

Stempeleinmaleins - Ausgabe vom 10. Juni 2017


Hallo Ihr Lieben!
Beim Stempeleinmaleins zeigen wir Euch heute die Ink Spray Smash Technik. Damit könnt Ihr Eure Hintergründe selbst gestalten.

Hello everyone!
Over at Stempeleinmaleins we are sharing the Ink Spray Smash Technique. You can use this to make your own background papers.

Ich habe Distress Inks verwendet - und mit farblich mal wieder nicht zu weit aus dem Fenster gelehnt. Es ist Faded Jeans, Weathered Wood und ein bisschen Dusty Concord.
Außerdem  habe ich hier auch gleich nochmal die Die Cut Inlay Technik verwendet, die wir Euch vor einiger Zeit mal gezeigt haben. So ist die Karte schön eben. 
Ich habe ein paar Zweige, Blüten, Spitze, Enamel Accents sowie ein ausgestanztes Wort auf meine Karte gesetzt - nicht zu viel, damit die Papiere wirken.

I used Distress Inks here - and didn't go too wild with my colors again. I used Faded Jeans, Weathered Wood and a hint of Dusty Concord.
I also did the Die Cut Inlay Technique here again, that we've shared with you some time ago. It keeps the surface even.
I've added a few branches, flowers, lace, Enamel Accents and a die cut word to my card - not too much to keep the papers in focus.


Und auf diesem Bild könnt Ihr 3 selbstgemachte Papiere sehen - alle mit nur einmal Farbe auftupfen. Es ist faszinierend, wie sehr die Papiere sich trotzdem unterscheiden! Und auch wenn ich ja ein kleiner Kontrollfreak bin und solche Techniken mir eher weniger liegen, es hat verdammt viel Spaß gemacht!

And on this picture you can see 3 selfmade papers - all by using the same colors and with only  dropping ink on my paper once. It's amazing how they still are different from each other! And even if I usually am a control freak and most times have a hard time with those techniques, this one was a lot of fun to make!


Donnerstag, 8. Juni 2017

Ein Reagenzglashalter


Hallo Ihr Lieben!
Heute zeige ich auf dem Kulricke-Blog diesen Reagenzglashalter mit Einhorn. Den Halter hatte ich 2011 mit meinen Mädels, damals anders gefüllt, als Halloweenparty-Einladung gemacht. Und als nun in einer Plotter-Gruppe nach so einer Verpackung gesucht wurde, fiel mir meine Datei wieder ein. Also habe ich sie mal wieder aus der virtuellen Schublade geholt.
Gefüllt ist das Glas mit Mini-Marshmallows - und das Einhorn ist der perfekte Überbringer für die luftig-leichten und süßen Dinger.

Hello everyone!
Today I am sharing this gift with a unicorn over at the Kulricke Blog. I made those with my girls back in 2011 - filled differently - as the invitations for their Halloween party. When someone asked for a cutting file for this kind of box I got reminded of them and thought it's time to bring those out again.
The jar is filled with mini Marshmallows - and the unicorn is perfect to bring over those fluffy and sweet candies.

Meine Verpackung ist mit zwei verschiedenen Papieren aus dem Winter-Designpapierset von Kulricke bezogen. Die Herzen, die alle genau in der Mitte des langen Rückteils in einer Reihe übereinaner stehen, sieht man erst, wenn das Reagenzglas herausgeholt ist.

My box is covered with two different designer's papers from Kulricke's winter paper pad. The hearts, that are perfectly centered on the long back part, can only be seen when the jar is taken out.


Am Glas habe ich einen den Text aus dem Gummibärchen-Set angebracht. Den hatte ich auf das kleinste der Nesting Tags gestempelt und blau hinterlegt.

I've tied a text meaning "eat me" to the jar. The text was stamped onto the smallest of the Nesting Tags and then I've matted the tag using blue cardstock.


Und hier ist das süße Einhorn. Diesmal habe ich es nicht gar so farbenfroh coloriert, ein bisschen Regenbogen musste aber sein. Und so ist das Horn bunt geworden und brauchte natürlich auch ein wenig Glitter.
Ich weiß, Einhörner können fliegen, aber auf die Dauer ist das dann doch ziemlich anstrengend. Darum ruht sich mein Einhorn auf ein paar Wolken ein wenig aus.
Zum Schluss habe ich noch ein paar kleine Pailetten verteilt.

And this is the cute unicorn. I didn't color it in too colorful this time, but it still needed a bit of a rainbow touch. So the horn is  a little more colorful and of course it needed some glitter as well.
I know, unicorns are able to fly, but it is really exhausting if you do it for  a long span of time. So my unicorn is taking a rest on a few clouds.
At the end I've added a few silver mini sequins.


Mittwoch, 7. Juni 2017

Eine Hochzeitskarte


Hallo Ihr Lieben!
Nach wie vor sind wir ja in der Hochzeits-Saison. Darum zeige ich heute auf dem Blog von AltairArt diese Glückwunschkarte zur Hochzeit.

Hello everyone!
We're still in the middle of wedding season. So I made this card that I am sharing over at the AltairArt Blog.

Die Einladung zur Hochzeit war in grau und rosa gehalten, darum habe ich diese  Farben auch auf der Karte verwendet. Und ich habe wieder eine Z-Gate-Fold Tag Card gemacht, die wir Euch ja vor kurzem beim Stempeleinmaleins gezeigt haben. 
Alle Papiere sind aus dem Blue Rose Paperpad, in dem es mehrere rosafarbene Papiere in unterschiedichen Farbtönen gibt. Für die Vorderseite habe ich ein etwas dunkleres Rosa gewählt.

The wedding invitation was made using greys and pinks, so I picked those colors for my card as well. And again I made a Z-Gate-Fold Tag Card, that we shared with you over at Stempeleinemaleins only little ago.
All the papers I used on this card are from the Blue Rose paperpad that holds different pink designer's papers. For the front I went with a darker shade of pink.


Auf der Banderole, mit der die Karte geschlossen gehalten wird, habe ich dieses süße Brautpaar von Lili of the Valley verwendet. Darunter habe ich einen verschnörkelten Rahmen, rundherum ein paar Herzen und Blumen verteilt.

On the banderole, that keeps the card closed, I used this cute couple by Lili of the Valley. I've put a die cut frame underneath and added some hearts and flowers.


Hier seht Ihr die geöffnete Karte - die beiden äußeren Panele, die auf der Vorderseite zu sehen sind, sind hier nur teilweise mit auf dem Bild.

Here you can see the opened card - the both outer panels that build the front when the card is closed, can only be seen partially on this picture.


Hier ist der Hauptteil der Karte. Dafür habe ich dieses tolle Papier mit dem Rosendruck benutzt, das ebenfalls etwas dunkler im Ton ist.
Unten habe ich diese Einstecktasche mit dem filigranen Herzmuster angebracht. Dort kann etwas Geld eingesteckt werden. Oben kam ein Text auf diesen Teil der Karte.
Und der Tab, der oben zu erkennen ist, ist an der undekorierten Karte angebracht, die sich im aufgedoppelten Teil dieser Karte befindet. Darauf kann dann noch ein persönlicher Text angebracht werden.

This is the main part of the card. I picked this great paper with the rose print that's also a bit darker in tone.
To the bottom I've added this die-cut pocket with the filigrane pattern where you can put some money into. To the top of this part I've added a saying.
And the tab, that can be seen on top of this picture, is attached to an undecorated squre card that is put into a pocket that is created by doubling this part of  the card up.


Und hier ist noch das kleinere Panel auf der Innenseite. Ich habe beide identisch - nur spiegelverkehrt - dekoriert. Hier habe ich ein Papier in hellerem Pink verwendet. Darauf kam das florale Stanzteil, etwas Spitze darüber und darauf jeweils zwei Rosen.

And here is the smaller panel on the inside. Both of these are made identically, just mirrored. I went with a designer's paper in a lighter pink here. Then I added this floral die-cut, some lace and two roses on top of that.