Hallo Ihr Lieben!
Habt Ihr die neue TaDa-Diorama Stanze von LawnFawn gesehen? Ich war mir ja nicht sicher, ob ich die Stanze brauche, vor allem, weil wir 2019 beim Stempeleinmaleins bereits eine Anleitung für diese Kartenart hatten, damals unter dem Namen Ziehkulissenkarte. Die war ohne Zwischenlagen und in einer anderen Größe, aber das Prinzip ist/war das selbe. Die Anpassungen können ja nicht so schwer sein, dachte ich mir - und habe mich ohne die Stanze ans Werk gemacht. Hat geklappt, aber mein Gott war das ein Gefummel und so einiger Cardstock ist in der Tonne gelandet. Und weil ich das Video von Jennifer McGuire gesehen habe, bei dem sie dieses Stanzenset verwendet und einen Giftcard Holder daraus macht - die Idee finde ich klasse und werde sie mir für Weihnachten merken! - habe ich die Stanze dann doch noch geordert. Dies hier ist allerdings meine Karte, die ich ohne die Stanze gemacht habe.
Hello everyone!
Have you seen LawnFawn's new TaDa-Diorama die? I really wasn't sure if I needed this die, especially since we from Stempeleinmaleins had a tutorial for this kind of card back in 2019, named Ziehkulissenkarte. It was without the layers inbetween and also different in size, but I really wasn't sure making these changes couldn't be that complicated. So I sat down and got started - it worked, but oh my god, it was kind of heart with lots of trial and error. I also saw Jennifer McGuire's video where she takes the die and makes a giftcard holder with it - something I really want to make for christmas! - I went ahead and ordered the die. But this is the card I made without it.
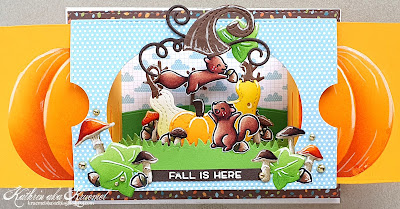
Hier habe ich den Mechanismus - bzw. die Diorama-Karte, denn die kann man natürlich auch so verwenden - auf ein Stück Designpapier aus dem Into the Woods Paper Pad und anschließend auf einen weißen Kartenrohling geklebt. So hat man innen noch schön Platz für persönliche Worte und muss sie nicht auf die Rückseite des interaktiven Elements schreiben.
Here I attached the mechanism - or the diorama card because it can also be used as is - onto a piece of patterned paper from the Into the Woods paper pad and then adhered everything to a white note card. This way there's room for some personal words and you don't have to write those onto the back of the interactive element.
Für das Grundpanel meines Diramas habe ich aus einem blauen Designpapier mit weißen Punkten aus dem selben Paper Pad eine der Stitched Rectangles von Stampcorner gestanzt und seitlich zwei Eingrifflöcher ausgestanzt. Mit der selben Stanze habe ich auch die Rückseite sowie die beiden Seitenteile gestanzt, von den Seitenteilen habe ich jeweils den Cardstock außerhalb der gestitchten Linien weggeschnitten.
Bei meinem Fenster war ich ja total frei - also habe ich aus dem gepunkteten Designpapier einen großen Kürbis gestanzt. Dafür habe ich die Pumpkin House Stanze von LawnFawn benutzt. Mit der sind auch die Blätter und der Stiel des Kürbis gemacht. Die Schnörkel sind aus dem selben Set sowie dem Stitched Pumpkin Frame Set.
Da mir nur eine große orangefarbene Fläche hinter dem Ausschnitt nicht gefallen hat, habe ich mir mit dem Pumpkin House auch noch eine Stencil gemacht. Dafür habe ich den Kürbis aus Mylarfolie gestanzt und den mittleren Teil entlang der gestitchten Linien ausgeschnitten. Nach dem Falten der inneren Teile, habe ich sie auf Stoß zusammen und passend hinter den Aufleger gelegt um sicher zu gehen, dasss ich den Kürbis auch an der richtigen Stelle aufwische. Dann habe ich erst den kompletten Kürbis mit Distress Ink Spiced Marmalade gewischt, dann den mittleren Teil der Stanze aufgelegt und die äußeren Teile des Kürbis noch mit Rustiy Hinge etwas dunkler gestaltet. Zum Schluss habe ich noch Details mit einem weißen Gelstift aufgemalt.
Die Blätter habe ich ein wenig mit Mowed Lawn gewischt und unten auf die Karte geklebt. Dazu kamen einige Eicheln sowie gestanzte Pilze, die ich mit Copics coloriert habe.
Unter dem Ausschnitt habe ich noch den Text angebracht. Er ist aus dem Set Jump for Joy und weiß auf braunen Cardstock embosst. Dann habe ich ihn unter die beiden inneren Pilze geschoben.
Als Deko kamen hier noch ein paar goldene Perlen zum Einsatz.
For the base of my diorama I die cut one of the Stitched Rectangles by Stampcorner from blue patterned paper with white dots from the same paper pad and cut two half circles out of the shorter sides. Using the same die I also created the back and the two side pieces of my diorama. From the side pieces I cut off the top and bottom along the stitched lines.
I was totally free in choosing my window - so I die cut a pumpkin from the patterned paper. I used the Pumpkin House die by LawnFawn for that and also to cut the leaves and stem of the pumpkin. The swirly pieces are from the same set and from the Stitched Pumpkin Frame set.
Since just a plain orange area behind the window wasn't that beautiful I used the Pumpkin House die to create a stencil. I cut the pumpkin from Mylar and then cut off the inner piece along the stitched lines. After I had scored and folded my side pieces I put them behind the dotted paper and put my stencil on top to make sure, I ink the pumpkin in the right spot. Then I first inked the whole pumpkin with Distress Ink Spiced Marmalade, put in the middle piece of my stencil and inked only the outer parts with Rusty Hinge. Then I added some lines with a white gel pen.
I inked the leaves with a bit of Mowed Lawn and attached them to the bottom of my card. Then I added a few acorns and mushrooms, that I colored with Copics.
At the bottom of my pumpkin window I added a text. It's from the Jump for Joy set and white heat embossed onto brown cardstock. Then I tucked it under the two inner mushrooms.
As decoration I added a few gold pearls.
Greift man den orangen Cardstock durch die Eingrifflöcher und zieht daran, dann poppt die Vorderseite auf und es bildet sich ein Diorama mit toller Tiefe - und viel Platz für eine Szene.
When you grab the orange cardtock through the cut out half circles and pull them, the front of the diorama pops up and creates a great diorama with great depth - and lots of space for a scene.
Bei mir tummeln sich zwei Eichhörnchen zwischen Kürbissen, Eicheln und Pilzen.
Für den Hintergrund habe ich ein weiteres Papier aus dem Into the Woods Paper Pad verwendet. Darauf befindet sich ein grüner Hügel mit Herbstbäumen. Die sieht man später auf einem anderen Bild nochmal besser.
In my scene two squirrels are playing inbetween some pumpkins, acorns and mushrooms.
For the background I used another sheet from the Into the Woods paper pad. There's a green hill with two fall trees glued onto it. You'll be able to see those better on another picture a bit later in this post.
Das Innenleben der Karte zu fotografieren ist gar nicht so einfach!
Die Kürbisse sind mit den Stanzensets Stitched Pumpkins und Stitched Gours aus cremefarbenem, gelbem und orangefarbenem Cardstock gestanzt. Dann habe ich sie mit Distress Ink Bundled Sage, Spiced Marmalade und Mustard Seed gewischt.
Die Eichhörnchen und Eicheln sind aus dem Set Let's Go Nuts und mit Copics coloriert.
Da ich zu faul zum Aufstehen war und auf der Magnetplatte, auf der sich die Kürbisse befanden, auch die Various Mushroom Pilzstanzen von CraftEmotions sowie die Pilze aus dem All Seasons Tree Set von WhimsyStamps waren, habe ich einfach die verwendet und Pilze aus weißem Cardstock gestanzt. Dann habe ich sie mit Copics coloriert.
Die Einleger habe ich mit Grasstanzen gemacht und nach dem Einschieben in die Schlitze außen jeweils einen Cardstockstreifen als Stopper angeklebt. Die Schlitze habe ich mit einer Stanze aus dem Let's Toast Stanzenset gemacht und später noch etwas verlängert. So kann man die Motive auf den Streifen weiter nach außen setzen, da sie dann beim Zusammenklappen der Karte ein wenig mit durch die Schlitze rutschen. Die Motive habe ich an die Grasstreifen geklebt und das springende Eichhörnchen im Hintergrund mit Hilfe eines Folienstreifens befestigt.
Photographing the inside of this card really isn't easy!
For the pumpkins I used the Stitched Pumpkins and the Stitched Gourds die set and cut them from cream, yellow and orange cardstock. Then I inked them with Distress Ink Bundled Sage, Spiced Marmalade and Mustard Seed.
The squirrels and acorns are from the Let's Go Nuts set and colored with Copics.
Since I was too lazy to get up and there were the mushroom dies from the Various Mushrooms die set by CraftEmotions and the mushrooms from the All Seasons Tree set by WhimsyStamps on the same magnet sheet as my pumpkins, I used those to cut the mushrooms from white paper and colored them with Copics.
The elements across the inside are made using grass border dies and after putting them through the slits in the sides I glued some strips of paper to their ends as stoppers. To cut the slits I used a die from the Let's Toast die set and later cut them a bit longer. This way I was able to put the images on my grass layers a bit further out because when I fold the card together, the images can partly slide through those slits as well. I attached the images to the grass and used a piece of acetate to attach the jumping squirrel.
Und hier ist noch ein Bild aus einem anderen Winkel. Hier kann man die Bäume zumindest ein wenig erkennen. Ich habe sie ohne die Laub-Lage verwendet, so passen sie besser zum Herbst, finde ich. Gemacht sind sie aus braunem Cardstock mit der Simple Stitched Tree Border. Damit habe ich auch den grünen Hügel gestanzt - diesmal aus grünem Cardstock, dann habe ich die Bäume mit einer Schere weggeschnitten.
So, und jetzt warte ich mal auf die Post und bin gespannt, ob die Karte mit dem Stanzenset schneller geht!
And here's a picture taken from a different angle. Hier you can see the trees at least a bit. I used them withouth the leaf layer, I think they go better with the fall theme without. I used the Simple Stitched Tree Border to die cut them from brown cardstock. I also made the hill with this die by cutting it from green cardstock, then simply snipping the trees off with my scissors.
Now I'm waiting for the postie and am really curious to find out, if this type of card is made faster using the die set!


.jpg)


.jpg)


