Donnerstag, 31. Oktober 2019

Stempeleinmaleins - 10. Geburtstag


 Hallo Ihr Lieben!
Heute vor genau 10 Jahren ging das Stempeleinmaleins mit seiner ersten Anleitung online. Ich kann nicht glauben, dass das so lange her ist - und gleichzeitig ist es unfassbar, dass ich wirklich seit Tag 1 dabei bin und die Zeit doch so verflogen ist. Diesen Geburtstag feiern wir mit einer Extra-Anleitung für Euch: eine Karte mit magischem Innenleben.

Hello everyone!
It's 10 years today that Stempeleinmaleins started with its first tutorial. I can't believe that it was that long ago - and also that I have been a member since day 1 and how time has flown. We are celebrating our birthday with an additional tutorial for you: a card with a magical inside.

Das hier ist erstmal die Front meiner Karte. Passenderweise eine Geburtstagskarte, allerdings nicht extra für das SEME gemacht. Dessen 70. Geburtstag werde ich wohl nicht erleben - denn dann wäre ich 114. Meine Schwiegermutter ist vor kurzem 70 Jahre alt geworden - und so habe ich diese Karte für sie gemacht.
Zum Motiv sage ich gleich mehr.
Die Teile mit dem Motiv habe ich auf weißen Cardstock geklebt, auf das ich vorher mit Distress Ink Tumbled Glass und der Radiating Rays Stencil von MFT hellblaue Strahlen aufgewischt habe. Das ganze habe ich dann schwarz gemattet und auf eine weiße Grundkarte geklebt.

This is the front of my card. Matching this special day I've made a birthday card, but it's not for Stempeleinmaleins. I guess I won't live until its 70th birhtday because I'd be 114 then. My mother in-law turned 70 a little ago and so I made this card for her.
I'll tell you more about the image soon.
The part with the images was glued onto a piece of white cardstock to which I've added some light blue rays by using the Radiating Rays stencil by MFT and Distress Ink Tumbled Glass. Then I've matted it black and glued it onto a white card base.


Vorne habe ich den Birthday Bash Stempel von Mama Elephant verwendet, zumindest einen Teil davon. Ich habe ihn auf weißen Cardstock gestempelt und dann mit dem Elegant Label von MFT ausgestanzt und coloriert. Ich bin ja nicht so für quietsche-knalle-bunt zu haben. Also habe ich alle Geschenke weiß mit türkisfarbener Schleife gestaltet und dann die kleinen Tierchen in Grau- und Gelbtönen. 
Das Motiv habe ich dann entlang der oberen Stempellinie ausgeschnitten und mit 3D Tape auf ein weiteres Label geklebt, das ich mit Distress Ink Tumbled Glass leicht gewischt und auf das ich Konfetti von LawnFawn aufgestempelt habe. 
Hinter das Motiv habe ich eine aus goldenem Glitzercardstock und mit dem Impact Numbers Stanzenset von MFT ausgestanzte 70 geklebt.
Das Label habe ich dann eine Nummer größer aus goldenem Glitzercardstock ausgestanzt und hinter das Label mit dem Motiv geklebt.

 To the front I've added this Birthday Bash image by Mama Elephant, at least a part of it. I've stamped it onto white cardstock and then cut out  a portion of it with one of the Elegant Labels by MFT. I am no "going wild with a bunch of colors" type so for the coloring I've done white presents with turquoise bows and then added some greys and yellows for the critters.
Then I've cut out the image along the top stamped line and glued it onto another label cut from white cardstock. Onto that second label I've stamped some confetti by LawnFawn and inked up the rest of it with Distress Ink Tumbled Glass. The image was glued down with dimensionals.
Behind the image I've put a die cut 70, cut from golden glitter cardstock using the Impact Numbers die set by MFT.
Then I've die cut the next bigger label from golden glitter cardstock and glued it behind the smaller label.


Und das ist die Überraschung auf der Innenseite: eine 3D Torte! Und natürlich geht hier nicht nur eine Torte, es können alle möglichen (halb)runden Dinge abgebildet werden. Ich habe mich nur für die Torte entschieden, weil es einfach zu meiner Karte passt.

And this is the surprise on the inside: a 3D cake! And of course you can not only add cakes there but any (half) round things. I just went with the cake because it fit my card.


Die Torte zieht sich automatisch in ihre halbrunde Form, wenn man die Karte öffnet.
Ich habe meine aus weißem Cardstock gestaltet und mit Copics coloriert. Oben habe ich ein paar kleine Sahnetuffs angebracht und natürlich darf auch eine Geburtstagskerze nicht fehlen! Sogar einen "Teller" aus goldenem Spiegelkarton habe ich unten aufgeklebt.
Und weil noch ein Text fehlte, habe ich ein "Alles Gute" aus goldenem Glitzercardstock ausgestanzt und auf der Torte befestigt. Da sich die Torte wölbt, steht der Text toll ab.

The cake gets pulled automatically into its half round shape when you open the card.
I have made my cake from white cardstock and colored it with Copics. To the top I've added some small cream puffs and of course a birthday cake also needs a candle! I've even added a plate cut from golden mirror cardstock to the bottom of my cake.
And since there was a saying missing I've die cut a "congrats" from golden glitter cardstock and glued it onto the cake. Since the cake gets shaped the text seems to float on top/in front of the cake.


Dienstag, 29. Oktober 2019

Interaktiv und weihnachtlich


Hallo Ihr Lieben!
Der letzte Release von MFT stand ja absolut im Zeichen von Weihnachten. Und weil ich den Stempeln und Stanzen auch nicht widerstehen konnte, zeige ich heute auf dem Stamping-Fairies Blog diese weihnachtliche Karte.

Hello everyone!
MFT's last release was all about christmas. And since I couldn't resist those amazing stamps and dies I am sharing this christmas card over at the Stamping-Fairies Blog today.

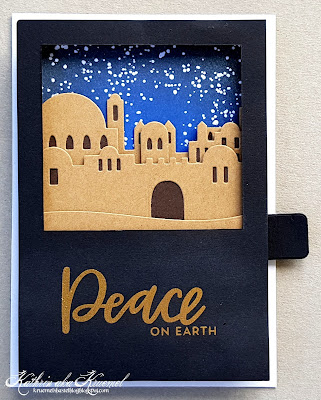
Auf dieser Karte findet sich mal kein coloriertes Motiv. Das einzig gestempelte ist der Sternenhintergrund sowie der Text. 
Für den Sternenhintergrund habe ich den Brush Splatter Background klar auf weißen Cardstock embosst und dann den Cardstock mit Distress Oxide Blueprint Sketch und Black Soot eingefärbt. 
Der Text ist mit goldenem Embossingpulver auf den schwarzen Carstock embosst. Für den Text habe ich das Peace des Peace on Earth Stempels mit einem der Text aus dem Bitty Holiday Wishes Stempelset kombiniert.

On this card I didn't use a colored image. The only things stamped are the starry background and the saying.
For the background I've clear heat embossed the Brush Splatter Background onto white cardstock and then used Distress Oxide Blueprint Sketch and Black Soot to color the white cardstock.
The saying is golden heat embossed onto black cardstock. The saying is a mix of the Peace from the Peace on Earth stamp set and one of the sayings from the Bitty Holiday Wishes stamp set.

Bevor ich Euch mehr über die Szene erzähle, zeige ich Euch erstmal, warum der Posttitel Interaktiv und Weihnachtlich lautet:

Before I tell you more about the scene I show you why I named this post interactive and christmas-sy:


Ich stehe ja total auf interaktive Karten. Und wenn es Stanzen gibt, die das Leben erleichtern, dann schreie ich natürlich hier. So auch bei dem neuen Launch Party Stanzenset, das hier zum Einsatz kam. Dadurch steigt der Stern von Bethlehem über der Stadt auf.

I love interactive cards. And if there are dies making our crafting life easier then of course I have to buy them. That's what also happened with the Launch Party die set that I've used here. It makes the star of Bethlehem rise above the city.


Und hier könnt Ihr die Szene samt Stern nochmal genauer sehen.
Die Stadt habe ich aus den verschiedenen "Bordüren" des Little Town of Bethlehem Stanzensets gemacht, aus dem auch der Stern ist. Die einzelnen Stadtteile sind jeweils aus craftfarbenem Cardstock gestanzt, die Ausstanzungen für Fenster und Türen habe ich dunkelbraun hinterlegt. Anschließend habe ich alle Teile mit 3D Tape aufeinander gesetzt und auf den Hintergrund geklebt.
Darüber habe ich eine Lage schwarzen Cardstock geklebt, aus der ich ein Fenster geschnitten habe, durch das die Stadt zu sehen ist.

And here you get a better look at the scene including the star.
The town is cut using the different "borders" from the Town of Bethlehem die set that also includes the star. The individual parts were cut from kraft colored cardstock, behind the cut outs for the windows and doors I've put some dark brown cardstock. Then I've glued the different pieces on top of each other with dimensionals and glued them onto the star background.
On top of that I've put a layer of black cardstock from which I've cut a window as a frame for the scene.


Montag, 28. Oktober 2019

Monstermäßige Geburtstagsgrüße


 Hallo Ihr Lieben!
Heute zeige ich Euch eine weitere Kart mit den tollen Stempeln von JM Creation, bei denen ich ja bis Ende Dezember Gastdesigner sein darf.
Nach den bayrischen Boxen vom letzten Post, habe ich heute eine Geburtstagskarte zu zeigen. Und die ist im wahrsten Sinne des Wortes monstermäßig!

Hello everyone!
Today I am sharing another card with some of the great stamps by JM Creation that I am joining as  a guest designer until january.
After the bavarian boxes from my last post I have made a birhtday card to share today. And this really is monstrous!

Und hier habe ich wirklich mal eine One Layer Card gemacht. Der weiße Cardstock, auf dem sich die Motive befinden, ist schwarz gemattet und dann auf einen weißen Kartenrohling geklebt.

And here I've truly made a One Layer Card. The white cardstock with the images is matted with black cardstock and then glued onto a white note card.


Im unteren Bereich des weißen Cardstocks habe ich diesen tollen Geburtstags-Text aufgestempelt. Ich finde den genial - eben weil er ein wenig "unordentlich" wirkt und trotzdem so viele veschiedene Grüße enthalten sind. 
Darunter habe ich etwas türkisfarbenes Twine um die Karte gewickelt und zur Schleife gebunden.

In the lower part of the white cardstock I've added this text stamp. I love that it looks kind of "messy" but also holds a lot of different birthday greetings in just one stamp.
Underneath I've wrapped some turquoise twine around the card and tied it to a bow.


Und hier ist das Hauptelement der Karte mit dem super genialen Monster! Der passt für so viele Gelegenheiten mit seinem bedröppelten Gesichtsausdruck. Hier aber überbringt er die Geburtstagsgrüße, mitsamt selbstgepflückter Blume.
Ich habe ihn mit Copics coloriert und ausgeschnitten. Dann habe ich mit Distress Oxide Squeezed Lemonade und Carved Pumpkin einen Kreis auf den weißen Cardstock gewischt. Dafür habe ich einfach einen Kreis aus einem Stück weißen Kopierpapier gestanzt und als Schablone verwendet. Unten habe ich einen schmalen Streifen ebenfalls abgedeckt, um einen Boden für das Monster zu erhalten. 
Nach dem Aufkleben des Monsters auf den Hintergrund - gilt das dann überhaupt noch als One Layer Card? - habe ich mit Copics noch etwas Gras hinzugefügt. Und damit das Monster nicht so einsam ist, kommt von oben noch ein Vogel geflogen. Der ist eigentlich der beste Freund des Nikolaus und kommt mit dem in einem Stempelset.
Zum Schluss habe ich noch ein paar türkisfarbene Enamel Accents auf der Karte verteilt.

And this is the main element of my card with the super cute monster. Here he's not only bringing some birthday greetings but also a flower he picked with his own hands.
I've colored him in with Copics and cut him out. Then I've used Distress Oxide Squeezed Lemonade and Carved Pumpkin to add the colorful circle to my card. I've simply die cut a circle from some copy paper and used it as a stencil. I've also covered a small strip at the bottom of the circle to create a ground for the monster to stand on.
After glueing the monster onto the circle - does that still count as a One Layer Card now? - I've used my Copics to add some grass. And to avoid him feeling lonely I've also given the monster a bird as a friend. Originally this comes in a set with Santa, but you really can't tell that if he's used individually.
At the end I've also added some turqoise Enamel Accents to the card.


Sonntag, 27. Oktober 2019

Und nochmal November-Neuheiten


Hallo Ihr Lieben!
Heute zeige ich Euch eine andere der Neuheiten aus dem November-Release von SF Stamps. Es sind sogar zwei Karten geworden, denn beim On the Edge Stamping bekommt man fast in einem Aufwasch zwei Karten fertig. Nur das Dekorieren muss noch extra übernommen werden - naja, und das Motiv natürlich zweimal coloriert werden.

Hello everyone!
I have another post showing another new set of the november release by SF Stamps. Actually there are two cards because when doing On the Edge Stamping you nearly end up with two cards at once. Only the decorating needs to be done - and well, you have to color both images.


In dem Stempelset, das ich heute vewendet habe, sind verschiedene Weihnachtsterne (also die Pflanzen/Blüten) enthalten. Ich habe die hier als Bordüre am Rand der Karte verwendet.

In the stamp set I've used today there are different poinsettias included. I've stamped those on the edge to create a border of flowers.


Da die Blumen wirken sollen, ist der Rest der Karte eher einfach. 
Ich habe entlang der ausgeschnittenen oberen Bordüre goldene Stickles verteilt.
Der tolle Weihnachtstext ist zweifarbig embosst - Weihnachtszeit in rot, der Rest in Gold.

Since I wanted the flower to be the focus I've kept the rest of the card simple.
Along the cut out border I've added some golden Stickles.
The saying means christmas time - heat embossed in red - and happy, merry, quiet, magical etc and some stars around it, heat embossed in gold.


Hier sieht man den Effekt der Karte besser. Die Bordüre wird identisch auf die Außen- und die Innenseite der Karte gestempelt und coloriert. Dann wird die Bordüre auf dem Außenteil der Karte mit etwas Abstand ausgeschnitten. Bei dieser Karte befindet sie sich auf der Innenseite der Karte, ist aber trotzdem bei geschlossener Karte sichtbar.

Here you get a better look at the effect of this type of card. The border gets stamps on both the outside and the inside of the card and then colored in. Then the border on the outside gets cut out, leaving a bit of a edge. On this card the border is on the inside of the card but can still be seen when the card is closed.


Die ausgeschnittene Bordüre kann dann gleich zum dekorieren einer weiteren Karte verwendet werden. 
Hier habe ich auf die Grundkarte ein Rechteck aus rotem Cardstock geklebt, darauf kam ein kleineres, gestanzt aus goldenem Spiegelkarton. An die rechte Seite des Spiegelkartons habe ich die ausgeschnittene Bordüre geklebt.

The cut out border can be used to decorate a second card.
Here I've glued some red cardstock onto a white note card, then glued a smaller rectangle, cut from golden mirror cardstock, on top. To the right side of the golden rectangle I've glued the cut out border.


Und hier seht Ihr gleich noch eine weitere der Neuheiten - die Zahlenstanzen. Ich habe damit ein 24. aus rotem Cardstock gestanzt und aufgeklebt. Darunter kam noch ein kleines Banner mit dem Text Frohes Fest golden aufembosst.

And here I've also used another one of the new products - the numbers dies. I've die cut a 24. - that's when christmas is celebrated here in Germany - from red cardstock and glued it down to my card. Underneath I've added a banner with a golden heat embossed merry christmas on it.


Samstag, 26. Oktober 2019

Stempeleinmaleins - Ausgabe vom 26. Oktober 2019


Hallo Ihr Lieben!
Es ist wieder Zeit für eine neue Sketch-Inspiration beim Stempeleinmaleins! Und weil Halloween vor der Tür steht und hier noch so einige Halloweenstempel auf ihren Einsatz gewartet haben, habe ich wieder eine Halloweenkarte für Euch. 

Hello everyone!
It's time for a new sketch inspiration over at Stempeleinmaleins. And since Halloween is close and there are a few Halloween stamps sitting on my desk waiting for ink I've made another Halloweencard following the sketch.

Ich hatte mir die Feeling Frightful sowie die Feeling Frightful Fillers Stempelsets von Clearly Besotted bestellt. Und die wollte ich unbedingt verwenden. Beim dieswöchigen Sketch eine Herausforderung, aber was muss, das muss! Also habe ich lilafarbenen Wellkarton für den Hintergrund verwendet und mit einem Sandingblock das Braun unter der lila Farbe ein wenig freigelegt. Quer darüber kam die Townscape Stanze von Sizzix, gestanzt aus grauem Cardstock und mit Distress Oxide Hickory Smoke ein wenig eingefärbt. Die Fenster habe ich mit grünem Glitzercardstock hinterlegt.

I got myself the Feeling Frightful and the Feeling Frightful Fillers stamp sets by Clearly Besotted. And I really wanted to use those. It was a bit of a challenge to make them go with this week's sketch but well, sometimes you have to make it work! So I've taken some purple corrugated paper for the background and used a sanding block to bring out the brown core in a few areas. Across it I've glued the Townscape die by Sizzix, cut from grey cardstock and using Distress Oxide Hickory Smoke to darken a few areas. Behind the windows I've glued some green glitter cardstock.


In die Mitte des Hintergrundes kam ein Zackenkreis, gestanzt aus schwarzem Cardstock und an den Ecken mit weißem Gesso eingefärbt. Darauf kam ein Kreis, auf den ich mit Distress Oxide Pumice Stone und Hickory Smoke sowie der Brick Wall Schablone von MFT eine Mauer aufgewischt habe. Zwischen Kreis und Zackenkreis kam eine Lage Cheesecloth. Das nutze ich inzwischen gar nicht mehr so häufig, aber zu Halloween passt es perfekt!
Auf dem Kreis habe ich ein Regalbrett einer Hexe dargestellt. Darauf stehen einige Einmachgläser mit Würmern, Augäpfeln, Gehirn und Raupen. Ein Frosch und zwei dicke Spinnen sowie ein paar Spinnweben dürfen natürlich auch nicht fehlen. 
Alle Motive habe ich mit Copics coloriert.
Der Text ist Teil eines Stempels von SU. Ich habe ihn mit lila Tinte auf zwei Banner gestempelt, die Banner schwarz hinterlegt und oben links sowie unten rechts des Kreises aufgeklebt. Hier sind ja zwei Kreise im Sketch eingezeichnet. Und weil mir da die Banner ein bisschen wenig vorkamen, habe ich noch jeweils einen ausgestanzten Geist darunter geklebt.

In the middle of the corrugated paper I've glued a spiky circle, cut from black cardstock. I've added some white Gesso to the spikes of the circle. On top of it I've glued a circle. I've used Distress Oxide Pumice Stone and Hickory Smoke and the Brick Wall stencil by MFT to add a wall pattern to the circle. Between the two circles I've put some cheesecloth. I don't use that very often anymore, but it goes perfectly for Halloween.
On the circle I've shown a wall board from a witch's kitchen. There are several glasses filled with worms, eyeballs, brains and caterpillars. Of course there also has to be a frog, some fat hairy spiders and some cobwebs.
I've colored all images with my Copics.
The saying is part of a stamp by SU. I've stamped it onto two banners using purple ink, matted the banners with black cardstock and glued them to the top left and bottom right of the circle. There are two circles drawn in the sketch here. Since I thought the banners weren't enough here I've also tucked two die cut ghosts under the banners.


Freitag, 25. Oktober 2019

Ein Kalender mit weiterem Sneak


Hallo Ihr Lieben!
Heute habe ich ein weiteres Sneak für Euch. Viele von Euch haben ja, genau wie ich, nach passenden Zahlenstanzen zum Alphabetstanzenset von SF Stamps gefragt. Silke hat uns erhört, und so gibt es im November-Release ein Set mit Zahlen und Sonderzeichen. Und ich habe das vverwendet, um diesen Dauerkalender zu werkeln.

Hello everyone!
Today I am sharing another sneak with you. Many, me included, asked for number dies matching the alphabet die set by SF Stamps. Silke granted our wish and so there comes a set of numbers and punctuation characters with the november release. I've used them to create this calendar.


Die Anleitung für den Kalender haben wir vor einigen Jahren mal beim Stempeleinmaleins gezeigt, und der kam mir wieder in den Sinn. Die Zahlen sind so auf den beiden Würfeln angeordnet, dass man alle Tage des Monats damit darstellen kann.
Ich habe die Zahlen aus taupefarbenem Cardstock gestanzt, auf einen weißen Kreis geklebt und auf die hell-türkisfarbenen Würfel geklebt.

We've shared a tutorial for this calendar some years ago over at Stempeleinmaleins and it came back to my mind. The numbers are glued to the two cubes so you can write each date with them.
I've die cut the numbers from taupe colored cardstock, glued them onto a white circle and then onto the cubes, made from light turquoise cardstock.


Die Wochentage und Monatsnamen, ebenfalls von SF Stamps, sind jeweils mit weißem Embossingpulver auf Kärtchen embosst, die austauschbar sind. Auf der Rückseite des Kalenders befindet sich ein Fach, um die übrigen Kärtchen aufzubewahren.
Auf den braunen Cardsstock im Hintergrund habe ich den Herzhintergrund ebenfalls weiß aufembosst. 
Da der Kalender ja das ganze Jahr über genutzt werden soll, wollte ich mit der Deko einigermaßen neutral bleiben. Und ich finde, Blüten gehen immer. Also habe ich eine der Mohnblumen in türkis coloriert und auf den Halter aufgeklebt. Und weil es so ganz ohne Text nicht geht, kam auch noch dieser tolle Spruch aus dem Stempelset Deine Träume zum Einsatz.

The names of the day and month are also white heat embossed onto little cards that are interchangable. There's a box attached to the back of the calendar that holds the other cards.
And I also used white embossing powder to heat emboss the hearts background onto the brown cardstock in the background.
Since a calendar is standing on your desk all year long I didn't want to go too special with decorations. And I think you can never go wrong with flowers. So I've used one of the poppies, colored it in turquoise and glued it onto the stand.
I also felt like I needed a saying. This one means "your dreams don't expire, believe in them". I think that goes great with a calendar.


Donnerstag, 24. Oktober 2019

Morgenmuffel?


Hallo Ihr Lieben!
Ich weiß ja nicht, wie das bei Euch so ist. Ich stehe gerne früh auf - auch am Wochenende um 6.30 Uhr ist bei mir keine Seltenheit. Aber wirklich ansprechbar bin ich erst nach dem ersten Kaffee. Ich bin nicht unfreundlich ohne, aber ein wenig grummelig auf jeden Fall. Man könnte also sagen, der Dino auf meiner Karte, die ich heute auf dem Stampcorner-Blog zeige, trifft mich ganz gut. ;)

Hello everyone!
I don't know how it is in your life. I don't mind getting up early - getting up at 6.30 on weekends just because I'm awake is happening quite often. But better don't talk to me before I had my first coffee. I won't be unfriendly, but I might not bet the best person to talk with either. So you could say that dino on the card that I'm sharing over at the Stampcorner-Blog today, fits me quite well. ;)


Ich habe den Dino abgestempelt, mit Copics coloriert und ausgeschnitten.
Die Fliesen im Hintergrund habe ich per Hand gemalt, den Bereich darüber mit Distress Oxide Squeezed Lemonade ein wenig sonnig eingefärbt.

I've stamped the dinosaur, colored it with my Copics and cut it out.
The tiles in the background are made by hand, the "wall" above it is inked with Distress Oxide Squeezed Lemonade to add a sunny touch.


Und natürlich durfte ein passender Text nicht fehlen! 
Die Zeilen oben und unten sind mit dem PC geschrieben und schwarz hinterlegt. Für das Wort Kaffee habe ich die einzelnen Buchstaben mit dem Alphabet and Numbers Stanzenset von XCut aus schwarzem Cardstock gestanzt und aufgeklebt. Außerdem habe ich noch ein paar Highlights mit einem weißen Gelmarker gesetzt.
Zum Schluss kamen noch ein paar schwarze Enamel Accents auf die Karte.

And of course this image needed a matching saying. It means "I won't say a word without my coffee" - something that is leaned onto the "I won't say a word without my lawyer" saying. The top and bottom line are printed with my homeprinter. For the word coffee I've die cut the individual letters from black cardstock using the Alphabet and Numbers die set by XCut. I've also added some white lines with a gelly marker here.
At the end I've added some black Enamel Accents to my card.


Mittwoch, 23. Oktober 2019

Es ist wieder Sneak-Time


Hallo Ihr Lieben!
Nicht mehr lange, und die November-Neuheiten von SF Stamps sind erhältlich. Ich sage nur so viel: es wird winterlich/weihnachtlich! Und damit Ihr Euch schon mal einen kleinen Eindruck machen könnt, habe ich heute eine Karte mit einem der neuen Sets zu zeigen.

Hello everyone!
Not long anymore and the november release by SF Stamps will be in store. I just say: we're talking winter/christmas here! And to not just talk about it I have made a card using one of the new stamps.

Sind die Schneeflocken nicht klasse? Ich habe sie mit weißem Embossingpulver auf Acetate embosst und dieses dann hinter ein Stück weißen Cardstock geklebt, in das ich ein rechteckiges Fenster gestanzt habe. Innen in den Rahmen, als Kontrastpunkt und für einen frostigeren Look, habe ich noch einen schmalen Rahmen aus silbernem Spiegelkarton geklebt.
Hinter dem Fenster befindet sich ein Shaker Element, gefüllt mit silbernen Mini-Streuseln, holografischen Sechseckenund durchsichtig-holografischen Pailetten. 
Den Cardstock im Hintergrund habe ich mit Distress Oxide Tumbled Glass, Peacock Feathers und Broken China gewischt und zudem etwas mit Wasser besprenkelt.
 
Aren't those snowflakes amazing? I've white heat embossed them onto a piece of acetate and then glued this behind some white cardstock from which I've die cut a rectangle window. Inside the frame I've added another thin frame cut from silver mirror cardstock to add some more of a frosty look.
Behind the frame there's a shaker element, filled with tiny silver foil pieces, holographic hexagons and clear-holographic sequins.
The cardstock in the background is colored with Distress Oxide Tumbled Glass, Peacock Feathers and Broken China. I've also sprinkled some water onto it.

Auch der Text ist in dem neuen Set enthalten. Ich habe ihn mit silbernem Embossingpulver auf weißen Cardstock embosst, bannerförmig zugeschnitten und wieder mit silbernem Spiegelkarton hinterlegt. Zum Schluss kamen noch ein paar glitzer-silberne Nuvo Drops auf die Karte.

Also the saying is from the new set. It means "snow is falling" and is the first line of a german christmas song (and no, I'm not talking about the one by Shakin' Steven's here!). I've silver heat embossed the text onto white cardstock, cut it into a banner shape and then used silver mirror cardstock again to mat the bannner. In the end I've also added some silver glitter drops to the card.


Dienstag, 22. Oktober 2019

Auch so geht Herbst


Hallo Ihr Lieben!
Heute zeige ich auf dem Blog von Stamping-Fairies diese herbstliche Karte. Ich finde das Stempelset Falling for You von AveryElle so goldig, das musste ich haben. Und bevor der Herbst nun vorbei ist, wollte es natürlich eingeweiht werden.

Hello everyone!
Over at the Stamping-Fairies Blog I'm sharing this fall-ish card today. I just love the Falling For You stamp set by AveryElle and just had to get it. And before fall is over it needed to see some ink.

Für den Hintergrund habe ich den Marble Background von MFT in blau abgestempelt und dann mit Distress Ink Tumbled Glass den Rest des Cardstocks eingefärbt, da mir der Kontrast doch ein wenig zu heftig war. 

For the background I've stamped the Marble Background by MFT using blue ink and then colored in the rest of the white cardstock with Distress Ink Tumbled Glass, since the contrast was a bit too hard.


Diese Szene habe ich mit den süßen Stempelset gestaltet. Der Fuchs wird wohl einige Zeit beschäftigt sein, wenn er alle Blätter am Baum auffangen will. Aber er scheint wirklich Spaß zu haben.
Die Motive sind mit Copics coloriert.

I've created this scene using the cute stamp set. The little fox will be busy for quite a while if he plans to catch all the leaves on the tree. But he seems to enjoy his game.
The images are colored in with Copics.


Unten auf der Karte habe ich das Wort Fall, gestanzt mit dem Impact Alphabet Stanzenset by MFT, aufgeklebt. Ich habe die Buchstaben jeweils zweimal ausgestanzt und leicht versetzt aufeinander geklebt.
Den Rest des Textes - auch aus dem Falling for You Stempelset - habe ich auf weißen Cardstock gestempelt und unter bzw. auf das letzte L geklebt.
Und die süße Schnecke mit dem Blatt auf ihrem Haus musste auch unbedingt noch auf die Karte. Die ist einfach zu goldig.

To the bottom of the card I've glued a die cut word FALL, cut using the Impact Alphabet die set by MFT. I've die cut each letter twice and glued them on top of each other, slightly off to create a shadow.
The rest of the saying, also from the Falling for You stamp set, is stamped onto white cardstock and glued under/on top of the last L. 
And that cute snail with the leave on her house just had to go on the card as well. She's such a cutie!


Montag, 21. Oktober 2019

2 x 60


Hallo Ihr Lieben!
Keine Angst, heute gibt es hier keine Mathematik-Stunde. Ich wurde gebeten, eine Karte für ein Ehepaar zu machen, das zusammen seinen jeweils 60. Geburtstag feiert. So hier geschehen.

Hello everyone!
Don't worry, we don't do maths lessons here today. I was asked to make a birthday card for a couple that was celebrating their 60th birthday - each of both was turning 60 - together. So that's what I came up with.

Die Karte durfte weder zu weiblich, noch zu männlich ausfallen. Also habe ich auf die gute alte Geburtstagstorte zurückgegriffen. Die hier ist per Hand geschnitten - und weil mich das so genervt hat, habe ich mir noch während des Bastelns eine Geburtstagstorten-Stanze in einer etwas größeren Größe bestellt. Fürs nächste Mal bin ich also aufgestellt!
Im Hintegrund habe ich mit Distress Oxide Scattered Straw ganz leicht Strahlen, ausgehend von der aufgeklebten 60, aufgewischt. Als Deko kamen ein paar Luftschlangen aus goldenem Spiegelcardstock dazu.

I wanted the card to fit the taste of both, male and female. So I went with the good old birthday cake. This one was cut by hand - and since it drove me crazy I went right ahead and ordered myself a birthday cake die in a pretty good size (while I was still working on this one). So I am all set up for the next birthday card!
In the background I've used Distress Oxide Scattered Straw to add some rays, the glued on 60 being the middle of them. For decorations I've also added a few streamers cut from golden mirror cardstock.


Die Torte ist aus hellgelbem Cardstock mit Schokoüberzug aus dunkelbraunem Cardstock. An die unteren Ränder der Torten habe ich jeweils Sahnetupfen mit einem Plusterpen gemacht.   
Oben auf der Torte brennen einige Kerzen, außerdem ist die Torte mit zwei Blumen dekoriert. 
Als Teller habe ich ein schmales Oval aus goldenem Spiegelcardstock gestanzt. Spiegelkarton ist ja immer nicht so einfach zu fotografieren. Hier sind die Bilder aber generell nicht so doll, denn es war nicht mehr komplett hell draußen, aber die Karte musste weitergegeben werden.
Oben über der Karte ist ein Schild mit dem Namen des männlichen Geburtstagskindes.

The cake is cut from light yellow cardstock with a chocolat frosting cut from dark brown cardstock. To the lower edges of the cakes I've added some cream puffs made with a white puffy pen.
On top of the cake a few candles are burning and there are also two flowers decorating the cake.
For the plate I've die cut a thin oval from golden mirror cardstock. Mirror cardstock is always hard to take a picture of. But the pics of this card are generally not very good because it was getting dark outside but had to hand out the card.
Over the card there's a sign with the name of the male birthday "boy".


Unter dem Kuchen habe ich braunen Cardstock aufgeklebt und darauf ein herzlichen Glückwunsch aufgebracht. Das Glückwunsch ist aus goldenem Spiegelcardstock gestanzt. Das herzlichen ist mit dem PC geschrieben. Dafür habe ich die gleiche Schriftart wie auch für den Namen über der Torte verwendet.

Under the cake I've added some brown cardstock and put a birthday greeting made from a die cut cut from golden mirror cardstock and a banner on which I've printed the word with my home printer.

Und ja, natürlich darf auch das weibliche Geburtstagskind nicht unerwähnt bleiben!

And yes, of course the birthday "girl" is also mentioned!


Hinter der Torte versteckt sich ein Slider Mechanismus, durch den der Name auf der Torte wechselt bzw. gewechselt werden kann.

Behind the cake there's a slider mechanism which makes is possible to change the name on top of the cake.


Der Vollständigkeit halber hier noch ein Bild der Karte mit dem weiblichen Namen. 
Innen befand sich noch ein Täschchen für Geld, das ich mit einem "kleiner Wunscherfüller" Text dekoriert hatte. Aber davon habe ich doch glatt vergessen, ein Foto zu machen.

And to complete this post I also have a pic of the card with the girl's name on top.
Inside the card there was also a little pocket for some money that was decorated as well. But I totally forgot to take a picture of that.


Samstag, 19. Oktober 2019

Stempeleinmaleins - Ausgabe vom 19. Oktober 2019


Hallo Ihr Lieben!
Heute wird es herbstlich beim Stempeleinmaleins. Wenn man momentan durch den Wald läuft, kann man neben bunten Blättern auch Kastanien, Eicheln und Bucheckern sammeln. Wir haben uns inspirieren lassen und zeigen Euch heute, wie Ihr eine Geschenkbox in Form einer Eichel werkeln könnt.

Hello everyone!
We're getting fall-ish today over at Stempeleinmaleins. When you take a walk through the woods right now you can collect a bunch of beautiful things like colorful leaves, chestnuts and acorns. We got inspired by that and are sharing with you how to make a gift box in an acorn shape.

Der untere Teil meiner Box ist aus hell-kraftfarbenem Cardstock gewerkelt. Die einzelnen Teile habe ich mit dem Forest Branches Embossingfolder von Cuttlebug geprägt und dann die Teile leicht mit Distress Ink Walnut Stain gewischt. So sieht die Eichel etwas realistischer aus.
Außerdem  habe ich hier ein kleines Banner aufgeklebt, auf das ich einen Herbstgrüße-Text von Scrapbook Forever aufgestempelt und die Ränder des Banners ein wenig mit Distress Ink Spiced Marmelade gewischt habe.

The box part of my acorn is cut from light kraft colored cardstock. I've used the Forest Branches embossing folder by Cuttlebug to add some pattern to the individual pieces and then colored the raised areas lightly with Distress Ink Walnut Stain. That makes the look of the acorn a bit more realistic.
I've also added a banner with a stamped on fall greeting here. I've stamped the saying with some reddish-brown ink and used Distress Ink Spiced Marmelade to ink up the edges of the banner a bit.

 
Den Deckel habe ich aus olivgrünem Cardstock gearbeitet. Auch hier habe ich die Kanten ein wenig mit Distress Ink Peeled Paint gewischt.
 Als Deko habe ich am "Stiel" eine Schleife aus gelbem Satin und etwas naturfarbenes Twine angebracht. Außerdem habe ich hier ein Ahornblatt von Sizzix sowie einen Schnörkel von Magnolia aufgeklebt.

The lid is  made from  olive green cardstock. Also here I've used Distress Ink - Peeled Paint here - to ink up the edges.
For decorations I've added a bow from yellow satin ribbon and a piece of natural colored twine. I've also glued down an acorn leave by Sizzix and a flourish by Magnolia here.


Mittwoch, 16. Oktober 2019

Halloween naht


 Hallo Ihr Lieben!
Es ist wieder Produktwoche bei Stamping-Fairies. Dieses mal gibt es die Designpapiere von Dini Design im Angebot - und natürlich reduziert. Und davon habe ich dann auch welche auf dieser Halloween-Karte verbastelt, die ich heute auf dem Stamping-Fairies Blog zeige.

Hello everyone!
Over at Stamping-Fairies another product spotlight week has started. This month it's about the Dini Design designer's papers. And so I've used some on this Halloween card that I'm sharing at the Stamping-Fairies Blog today.

Jetzt muss ich dazu sagen, dass meine Designpapiere eher tropisch angehaucht waren. Geht bei mir definitiv nur im Sommer! Aber wie man sieht, kann man sie auch prima auf Halloween-Karten verwenden.
Das Papier im Hintergrund ist eines der Designpapiere. Es ist toll lilafarben und hat hell-lila Flecken. Um meinen Hintergrund etwas interessanter zu gestalten, habe ich mit Distress Oxide Wilted Violet und Black Soot von außen her ein wenig gewischt. Die Flecken kann man trotzdem noch sehen, nur sind sie außen auch dunkler. In der Mitte sieht man noch die Originalfarbe.

I have to add that my papers were all a bit tropical. I only can use those during summer. But as you can see those work great for Halloween cards as well.
The paper in the background is one of the designer's papers. It's a great purple with speckles in a lighter purple. To make my background even more interesting I've used Distress Oxide Wilted Violet and Black Soot from the outer edges in. You still can see the speckles, just toned down a bit as well. The original color can be seen in the center of my card.


Auch für die Häuser habe ich Designpapier verwendet. Und man kann gar nicht mehr richtig sehen, dass es mit Briefen, Fotoapparaten und Briefmarken bedruckt ist, oder? Trotzdem macht gerade das den interessanten Touch aus. Ich habe die Häuse aus dem Ghost Town Stanzenset von Sizzix daraus ausgestanzt und dann ein wenig mit Distress Ink Hickory Smoke und Black Soot gewischt. Gerade die weiß aufgedruckten Motive habe ich mit der grauen Tinte ein wenig abgedeckt, allerdings so, dass man sie immer noch sieht. Dann habe ich mit Hickory Smoke noch ein Crackling Muster auf Teile der Häuser aufgestempelt. Dafür habe ich den Stempel aus dem Cracks and Specks Stempelset genommen und nicht vollflächig eingefärbt.
Die Bäume, auch aus dem Ghost Town Set, sind aus schwarzem Cardstock gestanzt, die "Böden" sind mit den Stitched Snow Drift Stanzen und der Zaun mit der Animal Farm Fence Stanze gemacht. Dann habe ich alles mit 3D Tape aufeinander geklebt und zwischen die Häuser noch ein paar kleine Gespenster aus dem Tiny Halloween Stempelset von LawnFawn gesetzt.
Im Mittelpunkt der Karte steht die süße Eule aus dem Spooktacular Friends Stempelset von MFT, coloriert mit Copics.

Also for the houses I've used designer's paper. And you can't even see that it had a letter, camera and stamps print, right? But that's exactly what adds the interesting touch. I've die cut the houses using the Ghost Town dies by Sizzix from the designer's paper and then added some Distress Ink Hickory Smoke and Black Soot. I've made sure to cover the white print with the grey ink. You can still see it if you look close, but really toned down. Then I've stamped a crackling pattern onto parts of the houses using Hickory Smoke as well. I've inked up the stamp only partially to not have the pattern all over the houses.
The trees, also from the Ghost Town stamp set, are cut from black cardstock, the hills are made using the Stitched Snow Drifts dies, the fence is the Animal Farm Fence, both by MFT. 
Then I've glued everything together using dimensionals and added a few small ghosts from the Tiny Halloween stamp set by LawnFawn.
In the center of my card there's this cute owl from the Spooktacular Friends stamp set by MFT, colored with Copics.


Natürlich durfte ein Text auf der Karte nicht fehlen. Hier habe ich die neuen Captions Alphabet Stanzen von MFT verwendet und einen Teil der Buchstaben aus dem selben lilafarbenen Designpapier, das ich auch für den Hintergrund benutzt habe, ausgestanzt. Der andere Teil ist aus einem grünen Designpapier, mit tropischen Blättern, gestanzt. Aber ich gebe zu, da habe ich bewusst um die Motive herum gestanzt. Mit weißem Muster wären die kleinen Buchstaben einfach zu schlecht lesbar gewesen.

Of course my card needed a text. Here I've used the new Captions Alphabet dies by MFT and cut a part of the letters from the same purple designer's paper I've also used for the background. The other part is cut from a sheet of green designer's paper with some white tropical leaves printed on. But I have to admit - I've intentionally only cut the letters from the plain green areas. With the white print on them the small letters would have been too hard to read.


Dienstag, 15. Oktober 2019

Oktober-Challenge bei Stampcorner


 Hallo Ihr Lieben!
Bei Stampcorner startet heute die Oktober-Challenge. Wir haben uns für das Thema Gold entschieden. Das passt sowohl zum "goldenen Oktober", Ihr könnt aber damit auch schon an Weihnachten denken. Oder aber Ihr macht es wie ich und macht eine allgemeinere Karte.

Hello everyone!
Today we are starting our october challenge at Stampcorner. We've picked "gold" as this month's theme. That goes perfectly with "golden october", you could also think of christmas with this theme or you do it as I did and make a general card including gold.

Das Bild oben zeigt die Karte nicht so genau, aber hier kann man prima das von mir in Form von goldenem Spiegelkarton, goldenem Embossingpulver und goldenen Folienkonfetti eingesetzte Thema erkennen. Spiegelkarton ist ja frontal nicht immer einfach zu fotografieren, da sich alles darin spiegelt, also auch die dunkle Kamera.

The picture above doesn't show much of the card but here you can see the golden mirror cardstock, the golden embossing powder and the golden foil confetti that I've used. Those are hard to take a picture of because everything gets reflected in them, also the black camera.


Hier habe ich eine Frontalansicht der Karte. Sie besteht aus mehreren Lagen, die ich jeweils mit 3D Tape aufeinander gesetzt habe. 
Ganz im Hintergrund befindet sich blauer Cardstock. Die nächste Lage bildet das goldene Folienkonfetti, das ich einlaminiert habe und so als komplette Lage aufkleben konnte. Dann folgen Wolken und Boden und zuletzt der goldene Rahmen sowie der Spruch.
Für die Szene habe ich die Falling from the Clouds Frame Stanze von MFT verwendet, der Boden ist per Hand geschnitten und über den unteren Ausschnitt geklebt. Dann kam der Rahmen darauf.
Der Text-Stempel "Menschen wie Du" ist eigentlich dreizeilig. Ich habe ihn aus Platzgründen zweizeilig abgestempelt. Er ist, passend zum Thema, golden auf schwarzen Cardstock embosst.

Here is a frontal picture of my card. It's made from several layers, all attached using dimensionals.
In the background there is some blue cardstock. The next layer is made of the golden foil confetti, that I've laminated which gave me the chance to add those as one complete layer. Then there are the clouds and the bottom, a golden frame and the saying.
For the scene I've used the Falling From the Clouds Frame die by MFT, the ground is hand cut and glued across the frame. Then I've added tha golden frame.
The saying means "people like you make this word a little better". Matching our theme I've golden heat embossed it onto some black cardstock.


Und hier  ist endlich eine Nahaufnahme des Motives.
Ich habe hier einen der Stempel aus dem Stempelset Freunde verwendet. Eigentlich sind Hase und Elefant etwas näher beieinander und der Hase macht Seifenblasen. Da ich die Motive einzeln ausgeschnitten habe, war es kein Problem, die Seifenblasen zu entfernen. Stattdessen bläst der Elefant nun Sterne aus seinem Rüssel. Dafür habe ich den Glitzer Sterne 1 Stempel mit goldenem Glitzerembossingpulver auf Folie embosst und ausgeschnitten. Links und rechts habe ich etwas der Folie stehen lassen, damit konnte ich sie hinter dem Elefanten bzw. dem Rahmen festkleben.

And finally here's a close up of the image.
I've used another elephant and bunny stamp here. Originally those two are standing a bit closer together and the bunny is making soap bubbles. Since I've cut out the image individually it was no problem to remove the bubbles. Instead the elephant is now blowing some glittering stars. Therefor I've heat embossed the stars stamp onto acetate using golden glitter embossing powder. Then I've cut them out and left a bit of foil to the left and right of the stars so I was able to glue those behind the elephant and the frame.