Samstag, 29. Mai 2021

Stempeleinmaleins - Ausgabe vom 29. Mai 2021

 
Hallo Ihr Lieben!
Es ist wieder Sketch-Zeit beim Stempeleinmaleins. Ich habe nach dem heutigen Sketch dieses Geburtstagskärtchen gewerkelt.

Hello everyone!
It's time for another sketch over at Stempeleinmaleins. I made this birthday card following today's sketch. 

Ich habe mit blauer Tinte einen Pinselstrich-Stempel von Marianne Design auf den oberen Bereich eines Stücks weißen Cardstocks gestempelt und dann kleine Spritzer goldener Schimmer-Wasserfarbe darüber verteilt. Dann habe ich den Cardstock schwarz gemattet und auf einen weißen Kartenrohling geklebt.

I stamped the rush strokes by Marianne Design with blue ink onto a piece of white cardstock, then added some speckles of golden shimmer watercolor. Then I matted the background with black cardstock and glued both layers onto a white note card.


Für den Wolkenhintergrund habe ich eine Idee von Christine von Create a Smile ausprobiert. Auf hellblauen Cardstock habe ich mit weißem Embossingpulver die Wolken von MFT aufgebracht. Dann habe ich mit einem etwas dunkler blauen Marker Schatten neben/unter die Wolken gemalt. Der Effekt ist grandios und super schnell gemacht. Ich habe zusätzlich noch weiße Highlights mit einem Gelpen auf die den Schatten gegenbüerliegenden Wolkenseiten aufgebracht, was den Effekt noch verstärkt, finde ich. 
Aus dem Hintergrund habe ich einen großen Kreis ausgestanzt und ihn ebenfalls schwarz gemattet. Die Kreise sind direkt auf die Karte geklebt.
An den Wolken vorbei fliegen die beiden süßen Hasen in ihrem Doppeldecker - partytauglich geschmückt, schließlich ist das eine Geburtstagskarte. Das Motiv ist aus dem High-Flying Adventure Stempelset von MFT, mit Copics coloriert und ausgeschnitten. Dann habe ich es mit 3D Tape vor die Wolken geklebt.

For the cloud background I tried an idea Christine from Create a Smile shared a little while ago. Onto some light blue cardstock I've white heat embossed the clouds by MFT. Then I added some shading under/next to the clouds with a slightly darker blue marker. I just love this effect and how easy it is to make. In addition I also added some white highlights onto the clouds on the opposite sides of the shadows. I think this makes the effect even better.
From this background I've die cut a large circle and matted it black as well. Then I glued them both directly onto the card.
And these two cute bunnies in their double decker are flying by the clouds - the plane is decorated ready for a party. This is a birthday card after all. The image is from the High-Flying Adventure stamp set by MFT, colored with Copics and cut ot. Then I glued the image onto the background with dimensionals.


Hier habe ich das Motiv nochmal ein wenig schräg gegen das Licht fotografiert. Hier kann man nämlich erkennen, dass ich die silberfarben colorierten Teile des Motivs noch mit silbernem Schimmer überzogen habe. 

Here I took another picture of the image, where the light comes from an angle. Now you can see that I covered the silver colored areas of the plane with a silver glitter pen. 


Den Streifen, der beim Sketch quer über die Karte geht, habe ich für meinen Text benutzt. Dafür habe ich einen Text aus dem Magical Dragons Stempelset von MFT weiß auf schwarzen Cardstock embosst, auseinander geschnitten und das gestempelte birthday durch ein gestanztes ersetzt. Auch dieses Wort ist mit einer Stanze von MFT gemacht und Teil der Happy Birthday to You Stanze. 
Ich habe wieder Highlights mit einem weißen Gelpen auf die Buchstaben aufgemalt und auch das birthday mit der silbernen Schimmerfarbe überzogen.

There's a strip across the card in the sketch and I used that for my sentiment. I white heat embossed one of the texts from the Magical Dragons stamp set by MFT onto a strip of black cardsdtock, cut it apart and replaced the stamped birthday with a die cut one. Also the die I used for the die cut word is by MFT - it's part of the Happy Birthday to You die.
Again I added some white highlights to the letters and covered them with the same silver shimmer pen.

Donnerstag, 27. Mai 2021

Sprich nicht mit mir!

 
Hallo Ihr Lieben!
Seid Ihr auch so Morgenmuffel bis Ihr Euren ersten Kaffee getrunken habt? Ich kenne das nur zu gut! Und eine Karte passend zu diesem Thema zeige ich heute auf dem Stampcorner Blog.

Hello everyone!
Are you like me, all grumpy in the mornings until you had your first cup of coffee? I am totally with you! And today I am sharing this card over at the Stampcorner Blog, that is dedicated to all of us grumpy morning cats.
 
 Für diese Karte habe ich die genialen Katzen aus dem Mai-Release mit dem Kaffeeset 3 kombiniert. Die lustigen Gesichter der Miezen passte einfach perfekt zu diesem Spruch. Nur die Katze unten rechts in der Ecke scheint das alles gar nicht zu verstehen... Das Frage- und Ausrufezeichen hatte ich noch von einer anderen Karte auf dem Tisch - es ist der "Müll" aus einer der Sprechblasen aus dem Slim Comic Strip Stanzenset von MamaElephant.
Für den Hintergrund habe ich einen Bogen aus dem ebenfalls neuen Designpapier Set von Stampcorner benutzt. Rot als Warnfarbe schien mir hier perfekt.
Ich habe das Designpapier schwarz gemattet und auf einen weißen Kartenrohling geklebt.

For this card I used these great cats from Stampcorner's may release and combined it with a coffee stamp set.
The funny, tired and grumpy faces of tall those cats just go perfectly with this text, that means "don't talk to me until I had my first cup of coffee". Only the cat at the bottom right of my card doesn't seem to understand all of the others... The question and exclamation mark were left from another card. Actually these are the cut out pieces from one of the speach bubbles from the Slim Comic Strip die set by MamaElephant - the pieces you usually throw away.
For the background I used a sheet from the also new patterned paper by Stampcorner. Red as a warning color seemed perfect here.
I matted the designer's paper with black cardstock and glued it onto a white note card.


Ich habe den Text zweifarbig in rot und schwarz auf weißen Cardstock gestempelt, rund ausgestanzt und mit rotem Cardstock gemattet. Darunter befindet sich ein größerer Kreis aus schwarzem Cardstock, an dem ich all die Katzen angeklebt habe. Dazwischen befinden sich ein paar Kaffeebohnen und kleine rote Pailetten.

I stamped the text in red an black onto white cardstock, cut it out with a circle die and matted it with red cardstock. Underneath there's a bigger black circle onto which I've glued all the cat faces. I also added a few stamped coffee beans and small red sequins to my background.

Und auf dieser Karte habe ich wieder ein interaktives  Element untergebracht. Es wäre ja zu gemein, wenn nicht alle Katzen mal oben auf dem Kreis sitzen dürften:

And on this card I've added an interactive element again. It'd be too unfair if not each of the cats may sit at the top of the circle at least once:


So, jetzt sollte aber jeder zufrieden sein! ;)

Well, now everyone should be happy! ;)

Mittwoch, 26. Mai 2021

Achtung, es wird bunt!

 
Hallo Ihr Lieben!
Wie schön angekündigt - heute wird es bunt. Wie viele hatten auch wir im Frühling eine dieser Pflanzschalen mit Primeln, Narzissen und anderen Frühlingsblühern auf dem Terrassentisch. Da blühte eine cremefarbene Primel neben dunkelpinken Bellis und ich dachte mir, die Farbkombi wäre doch mal was für eine Karte. So hier geschehen. Und ich gestehe - ich bin mir immer noch nicht sicher, ob mir das ganze nicht doch viel zu knallig ist.... Aber entscheidet selbst.

Hello everyone!
Caution, it's getting colorful today. Like many we had a pot filled with spring flowers on our back porch table. And there was a cream colored primrose blooming next to some dark pink bellis - and I though that would make a nice color combo for a card. So that's why I used these colors on this card - and I'm still not sure if it's way too bright for my taste. But decide for yourself. 

Hier habe ich dunkelpinken Cardstock für den Hintergrund benutzt. 
Mit weißem Embossingpulver habe ich ein paar zarte Blümchen eher mittig auf den Cardstock aufembosst. 

Here I used some dark pink cardstock for the background.
With white embossing powder I added a few small flowers towards the center of the cardstock.


In die Mitte der Karte habe ich einen Text aufgeklebt.
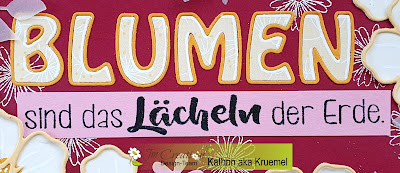
Der Stempel ist der neue "Blumen sind das..." Stempel von JM-Creation. Ich habe ihn mit schwarzer Tinte auf rosafarbenen Cardstock gestempelt. Dabei habe ich ihn so gestempelt, dass er nur einzeilig ist - und den Autor des Textes habe ich ebenfalls unterschlagen *hüstel*. Außerdem habe ich das Wort Blumen durch ein Blumen aus gestanzten Buchstaben ersetzt. Dafür habe ich wieder das tolle Alphabet mit dem Rahmen benutzt. Die Buchstaben sind aus hellgelbem Designpapier mit weißen Blümchen gestanzt, für die Rahmen habe ich ein kräftigeres Gelb-Orange benutzt.

In the center of the card I added a saying.
It means "flowers are nature's smile". I replaced the word flowers in the stamp with a die cut one, using the great alphabet die set with the frames again. I've die cut the letters from light yellow patterned paper with white flowers printed on it and a darker orange-ish yellow for the frames.


Für den Blumenrahmen habe ich ann die Blüte Filigran Stanze benutzt. Das Set besteht aus einer gefüllten Blumen und einer bestehend aus Outlines. Ich habe cremefarbenen Cardstok für die gefüllten Blumen, hellgelben für die Outlines benutzt und in die Mitte jeder Blume zwischen die beiden Lagen jweils noch einen kleinen Kreis des orange-gelben Cardstocks gesetzt.
Auf dem Bild ist es schlecht zu erkennen, aber auf die gefüllten Blumen habe ich noch ein paar Streifen mit einem weißen Gelstift gemalt.
Dann habe ich die Blumen aus dem Stanzenset Tags Groß aus rosafarbenem Cardstock gestanzt und hinter die großen gelben Blumen geklebt. Und zum Schluss habe ich noch den Zwei aus dem Stanzenset Zweig mit Blüten, gestanzt aus Vellum, zwischen die Blüten gesetzt. 

For the flowery frame I used the new floweer die set. It cuts a solid flower and one made from just some lines. I used cream colored cardstock for the solid flowers, light yellow for the outlines and put a circle die cut from the orange-ish yellow cardstock inbetween the layers.
It's hard to see on the picture but I've also drawn a few lines onto the petals using a white gel pen. 
Then I put some small flowers, cut from pink cardstock, behind the large flowers and also a few branches, die cut from Vellum, inbetween them. 

Dienstag, 25. Mai 2021

You brigthened my Day!

 
Hallo Ihr Lieben!
Heute wird es leuchtend - denn auf dem Stamping-Fairies Blog zeige ich diese Karte mit Glühwürmchen. Und mit so einem süßen Leuchtkäfer kann man jemandem auch den Tag erhellen!

Hello everyone!
It's getting bright today - because over at the Stamping-Fairies Blog I am sharing this card with a firefly today. And with such a cute lightning bug you can also brighten someone's day!

Hier habe ich mit gelber Tinte den Best Friends Background von MFT auf weißen Cardstock gestempelt. So ist der Stempel schön dezent, macht aber den weißen Cardstock doch interessanter anzusehen. 
Den Cardstock habe ich schwarz gemattet und auf einen weißen Kartenrohling geklebt.
Der Text ist aus dem Rainbow Greetings Stempelset und mit weißem Embossingpulver auf blauen Cardstock embosst. Das you im Text habe ich vor dem Abstempeln abgedeckt und durch ein gestanztes ersetzt. Dafür habe ich nur das you der Thank You Stanze benutzt. Auch hierfür habe ich blauen Cardstock verwendet. Unter den blauen Streifen mit dem aufembossten Text habe ich noch einen Streifen des blau-weiß gestreiften Designpapiers aus dem Stripe Splash Paperpad aufgeklebt.

Here I stamped the Best Friends Background by MFT onto a piece of white cardstock using yellow ink. This way the stamp isn't too present but still makes the plain white much more interesting.
I matted the cardstock black and glued it onto a white note card.
The saying is from the Rainbow Greetings stamp set and white heat embossed onto blue cardstock. I covered the you before stamping the text and replaced it with a die cut you, made using the Thank You die and blue cardstock again. Under the strip with the stamped on text I also glued another strip cut from a blue and white striped sheet from the Stripe Splash paper pad.


Und hier ist meine nächtliche Szene mit Motiv. 
Das Hauptelement, nämlich die beiden Figuren und das Gras davor, sind aus dem Stempelset Firefly Friends. Ich habe die Figuren gestempelt, mit der passenden Stanze ausgestanzt und mit Copics coloriert. Das Gras habe ich direkt auf ein größeres Stück Cardstock gestempelt und rundherum meine Szene gestaltet.
Der Mond im Hintergrund ist aus dem Hugs make everything Better Stempelset, die Büsche aus dem Adorable Adventures Set. Die habe ich direkt an der Stempellinie ausgeschnitten, so dass ich sie ohne störenden Rand in die Szene integrieren konnte. 
Himmel und Gras sind mit Copics gestaltet, dann habe ich alles mit einer runden Stanze ausgestanzt und die Büsche aufgeklebt. Dahinter habe ich einige der Birch Trees gesetzt, die ich mit Copics schattiert habe. Die und auch die Büsche habe ich dabei so aufgeklebt, dass sie über den Rand des Kreises überstehen. In die Mitte kamen dann der Junge und das Mädel mit dem Glühwürmchen.
Zum Schluss habe ich noch einige gelbe Glitzersteine auf der Karte verteilt.

And here's my night scene with the image.
The main image, which of course is the boy and girl and the grass in front of them, are from the Firefly Friends stamp set. I stamped the kids and cut them out with the matching die. Then I colored them with my Copics. The grass ist stamped directly onto a bigger piece of white cardstock, then I created the scene around it.
The moon is from the Hugs make everything Better stamp set, the bushes from the Adorable Adventures Set. I cut these out directly at the stamped line so I was able to glue them into my scene without a white edge around them.
Sky and ground are colored with Copics, then I cut my scene out with a big circle die and glued the bushes on top. Behind them I placed a few Birch Trees, that I also shaded with Copics. The bushes and the trees I've let overlap the edge of the circle so they fill the background of the card a bit. In the middle of the scene I glued the boy and girl with the firefly.
In the end I added a few yellow rhinestones to my card.

Montag, 24. Mai 2021

Eine Karte zum 30. Geburtstag

 
Hallo Ihr Lieben!
Die beste Freundin meiner Tochter hat ihren 30. Geburtstag gefeiert, und ich wurde gebeten, eine Karte zu machen. Gerne doch! Und zum 30. darf es gerne auch ein wenig verrückt werden...

Hello everyone!
My oldest' best friend celebrated her 30th birthday and my daughter asked me, to make a card. Of course! And for a 30th birthday I think I can get a bit extraordinary...

Hier habe ich mal aus den Vollen meiner WhimsyStamps Kiste gegriffen. Fast alles auf der Karte ist von Whimsy. 
Basis bildete die Slimline Film Strip Stanze. Die habe ich aus schwarzem Cardstock gestanzt und dann mit 3d Tape auf eine ein klein wenig größere Slimline Karte geklebt.

Here I used a lot of the stuff in my WhimsyStamps box. Nearly everything used here is by Whimsy. 
I started with the Slimline Film Strip die and die cut it from black cardstock. Then I glued it onto a white slimeline card using dimensionals.


In den 3 Feldern des Filmstreifens habe ich dann einen kleinen Film gestartet. 
Im obersten befindet sich im Hintergrund ein Stück weißer Cardstock, den ich erst mit Distress Oxide Speckled Egg vollfächig gewischt habe, dann habe ich mit Broken China die Strahlen aufgewischt. Dafür habe ich eine der Strahlen-Schablonen von MFT benutzt. 
Die Stempel sind alle aus dem Stempelset Bam You're Old von Whimsy. Die Bombe ist direkt auf den Hintergrund geklebt, das Bam anschließend mit dünnerem 3D Tape obenauf. 
Den Text habe ich in eine der Comic Speech Bubbles gestempelt und den "Zacken" an der unteren Kante weggeschnitten. Die Sprechblase habe ich dann mit einer weiteren, gestanzt aus dunkeltürkisfarbenem Cardstock, hinterlegt und mit 3 Tape oben auf den Filmstreifen geklebt. 
Als Deko kamen noch drei kleine Sterne aus gelbem Cardstock, hinterlegt mit einem weiteren gestanzt aus schwarzem Cardstock, um die Bombe herum.

In the 3 windows of the film strip I created a little "film". 
Behind the top window I glued a piece of white cardstock that I firste inked up completly with Distress Oxide Speckled Egg. Then I added the rays using Broken China and one of the ray stencils by MFT. 
All the images are from the Bam You're Old stamp set by Whimsy. I glued the bomb directly onto the background, then glued the BAM on top of it using thin dimensionals. 
I stamped the saying onto one of the Comic Speech Bubbles and cut off the "arrow" at the bottom edge. Then I matted it with another speech bubble, cut from turquoise cardstock, and glued it onto the film strip, again with dimensionals. 
As decoration I glued three tiny stars, cut from yellow cardstock and matted with another star cut from black cardstock, around the top of the bomb.
 

 Im zweiten Fenster habe ich den weißen Cardstock für den Hintergrund mit Distress Oxide Mustard Seed gewischt und dann mit der Half-Tone Stencil und Carved Pumpkin orangene Punkte aufgewischt. 
Über den Hintergrund habe ich dann die Skyline aus dem Bam You're Old Stempelset aufgeklebt, wieder mit 3D Tape kam dann eines der Gossip Girls darauf. Das habe ich mit Copics coloriert. 
Der Text kam wieder auf eine der Speech Bubbles - hier eine doppelte. Für den Text in der oberen habe ich Stempel aus den Sets Bam You're Old und dem Alphabet Mini kombiniert.
Die Sprechblase ist wieder türkis gemattet und mit 3D Tape auf den Filmstreifen geklebt.

In the second window I inked up the white cardstock for the background with Distress Oxide Mustard Seed and then added the dots with the Half-Tone stencil and Carved Pumpkin. 
Across the background I glued the skyline from the Bam You're Old stamp set, then added one of the Gossip Girls, again glueing her down with dimensionals. I colored the girl with Copics.
The text is again stamped onto one of the speech bubbles, here I used the double one. For the text in the upper one I combined stamps from the sets Bam You're Old and Alphabet Mini.
The speech bubble is again matted a dark turquoise and glued onto the film strip with dimensionals.


Und hier noch das letzte Fenster.
Der Hintergrund ist wieder mit Speckled Egg vollflächig gewischt, dann habe ich den Radiating Half-Tone Background mit Broken China daraufgestempelt. 
Auch hier habe ich wieder die Skyline im auf den Hintergrund geklebt, darauf kam mit 3D Tape ein weiteres der Gossip Girls. Auch das ist mit Copics coloriert. Oh, und das Tattoo des Mädels war ein Unfall. Ich hatte offenbar ein wenig Farbe am Finger und habe sie angefasst. Da der Fleck aber so perfekt an einer klassischen Tattoo-Stelle war, habe ich das Motiv trotz Fleck verwendet.
Und hier kam eine weitere der Sprechblasen zum Einsatz, diesmal habe ich aber den "Zacken" nicht weggeschnitten, die Sprechblase ist von Haus aus so.  Sie ist wieder gemattet und mit 3D Tape auf den Rahmen geklebt.

And here's the bottom window.
Again I inked up some white cardstock with Speckled Egg, then I stamped the Radiating Half-Tone Background on top of it using Broken China.
Also here I used the skyline in the background, then I glued down another one of the Gossip Girls with dimensionals. Also this girl is colored with Copics. Oh, and the tattoo was a mistake. Seems like I had a bit of color on one of my fingers when I touched the girl. But since the area where I left a spot is such a classical tattoo-spot I used the image just like this.
I also used another one of the speech bubbles here, but this time I didn't have to cut off the "arrow" since the die comes like this. Again it's matted turquoise and glued onto the frame with dimensionals.

Samstag, 22. Mai 2021

Stempeleinmaleins - Ausgabe vom 22. Mai 2021

 
Hallo Ihr Lieben!
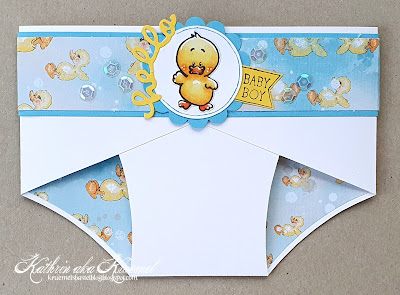
Beim Stempeleinmaleins zeigen wir Euch heute eine etwas andere Babykarte - sie hat die Form einer Windel! 

Hello everyone"
Over at Stempeleinmaleins we are sharing an idea for a baby card - it looks like a diaper!


So sieht die Karte mit eingeschobenem Einleger aus. Da ist die Windelform noch nicht ganz so toll zu erkennen.

This is the card with the card put into the diaper - I think it doesn't look exactly like a diaper yet.


Aber wenn man die Karte innen herauszieht, dann ist der Windellook bestens zu erkennen.
Ich habe die innere Karte aus hellblauem Cardstock gemacht und mit Designpapier mit Entendruck beklebt. Darauf kam dann ein Text aus einem alten Stempelset von MFT. Den Spruch finde ich einfach klasse.
Oben an der inneren Karte habe ich ein Tab aus hellblauem Cardstock angebracht, an dem ich ein weißes Eyelet befestigt habe. Durch das Eyelet habe ich gelbes Band gezogen und noch eine gelbe Schleife mit angebracht.

But when you pull the inner card out the diaper looks becomes clear.
I've made the inner card from light blue cardstock and covered it with designer's paper with a duck print. On top I've glued a piece of white paper onto that I've stamped a text from an old stamp set by MFT. I just love this text!
To the top edge of the inner card I've glued a tab cut from light blue cardstock. I put an eyelet through it and put a piece of yellow ribbon through the eyelet. I also added a yellow bow here.


Meine Windel habe ich natürlich aus weißem Cardstock gemacht. Innen ist sie wieder mit dem Enten-Papier beklebt.
Bei den Windeln meiner Mädels damals - und offenbar auch jetzt auch noch, denn auch die Windeln meines Enkels sind so - war oben immer ein Streifen mit aufgedruckten Tieren. Ich kann mich noch erinnern, dass sie später hin und wieder mal auf ein bestimmtes Tier bestanden haben, das es an diesem Tag unbedindt sein musste. Also gehören bedruckte Streifen für mich an eine Windel - und darum habe ich hier einen Streifen des Enten-Designpapiers, hellbau gemattet, um den oberen Rand der Windel gewickelt. 
Passend dazu habe ich dann eine der süßen Enten aus dem Stempelset Lucky Duck von Gerda Steiner als Deko verwendet. Die Ente ist mit Copics coloriert und auf einen weißen Kreis geklebt, den ich mit einem gewellten Kreis aus hellblauem Cardstock gemattet habe. Zwischen die Kreise habe ich rechts ein kleines Banner mit den Worten Baby Boy geschoben. Auf die linke Seite habe ich ein aus gelbem Cardstock gestanztes Hello geklebt, das ich so gut es ging an die Rundung des Kreises gebogen passend aufgeklebt habe. 
Um die Blubberblasen auf dem Designpapier irgendwie zu wiederholen, habe ich dann noch ein paar klare Pailetten auf den Designpapierstreifen aufgeklebt.

Of course I made my diaper from white cardstock. The inside is covered with the patterned paper with the ducks print.
I remember back then when my girls were little - and it still seems to be like this because my grandchild's diapers are the same - there was a border with animal prints on the diapers. I also remember that when they were old enough to talk there were days where they requested a special animal. So a border with animals is what belongs to a diaper for me. So I cut another strip from the ducky paper, matted it with light blue cardstock, and glued it around the top of my diaper.
Matching the designer's paper I used one of the cute ducks from the Lucky Duck stamp set by Gerda Steiner to decorate my card. I colored it with Copics, cut it out and glued it onto a white circle that I matted with a scalloped circle cut from blue cardstock. Between the circles, on the right side, I put a little banner cut from yellow cardstock onto that I stamped a Baby Boy.
On the other side I glued down a hello, die cut from yellow cardstock. When glueing it down I tried to bend it to match the circle - as good as possible.
Since there seem to be bubbles on the designer's paper I added a few clear sequins to the paper strip to add some more bubbles.

Freitag, 21. Mai 2021

Noch eine Karte mit Bär

 
Hallo Ihr Lieben!
Bereits letzte Woche habe ich auf dem Stampcorner Blog eine Karte mit Bär gezeigt. Damals war es der Honigbär - auf der Karte, die ich heute teile, hat es sich der Waschbär gemütlich gemacht. Wobei, so ganz glücklich sieht er nicht aus....

Hello everyone!
I already shared a card with a bear over at the Stampcorner Blog last week. Back then it was the bear in the honey jar - on the card that I'm sharing today I used this cute rascal. But, somehow he doesn't look completly happy...

Hier habe ich den Cosmic Half Tone Oval Stempel von WhimsyStamps für den Hintergrund benutzt und ihn mit grauer Tinte auf weißen Cardstock gestempelt. Von der Ecke rechts unten aus habe ich dann noch ein wenig Distress Oxide Hickory Smoke aufgewischt, einfach um dort einen Eindruck von Schatten zu kreieren. 
Den Hintergrund habe ich schwarz gemattet und auf einen weißen Kartenrohling geklebt.

Here I used the Cosmic Half Tone Oval stamp by WhimsyStamps for the background and stamped it with grey ink onto white cardstock. From the bottom right corner I also put a soft layer of Distress Oxide Hickory Smoke over the background, letting it fade out towards the middle, just to create some kind of shadow there.
I matted the background with black cardstock and glued it onto a white note card.


Meine Deko auf der Karte besteht aus vielen verschiedenen Lagen. 
Zuerst habe ich von rechts auf die Karte einen Streifen schwarzer Wellpappe aufgeklebt, die ich links einfach abgerissen habe. Da sie innen braun ist, gibt das eine schöne Kante. Darauf kam dann ein Streifen eines schwarz und weiß gestreiften Designpapiers. 
Oben auf dem schwarzen Wellpappe-Streifen sitzt der süße Waschbär mit seinem Kaffeebecher. Ich denke, dass er von dem Kaffee noch nicht allzuviel getrunken hat, und deswegen noch ein wenig bedröppelt dreinschaut. Coloriert habe ich den Kleinen mit Copics.
Für den Rahmen rund um den Waschbären, habe ich einen Kreis-Rahmen aus kraftfarbenem Cardstock sowie einen Rechteck-Rahmen aus goldenem Spiegelcardstock, die beide seit Monaten von einem früheren Projekt auf meinem Tisch lagen, ineinander geschoben und auf die Karte geklebt.
Für die Texte habe ich drei verschiedene Stempel benutzt: den Ooohhhmmm-Stempel, das "positive Energie" aus dem Stempelset Axolotl, beide von Stampcorner, sowie den fast vollen Ladebalken aus dem Stempelset Virtual Friends von LawnFawn. Alle sind mit weißem Embossingpulver auf schwarzen Cardstock embosst und mit 3D Tape auf die Karte geklebt.
Mit dem Mini Alphabet and Numbers Stanzenset von CC Designs habe ich dann die Buchstaben für das Wort Kaffee aus schwarzem Cardstock gestanzt und an die Rundung des Kreisrahmens angepasst auf die Karte aufgeklebt. Die Highlights sind mit einem weißen Gelpen gemacht.
Von der Honigbären-Karte von letzter Woche hatte ich noch drei Alcohol-Ink-Honigwaben übrigig. Ich war mir nicht sicher, ob Waschbären auch Honig mögen. Aber es sind ja Bären, also habe ich für mich beschlossen, dass sie den bestimmt ebenso mögen. Inzwischen habe ich das gegoogelt, und ja klar, die mögen den! Durch das goldene Mixative, das ich auf den Alcohol Ink Hintergrund aufgetragen hatte, passen die Honigwaben außerdem farblich super zum goldenen Rahmen. 
Ganz zum Schluss hab ich noch ein paar kleine mattgoldene Pailetten auf der Karte verteilt.

The decoratios on my card is made from a lot of layers.
First I glued a strip of black corrugated cardstock across my background, tearing the left edge of the strip off. Since the cardstock has a brown core tearing it creates a great edge. On top of that I glued a strip of black and white striped patterned paper.
On the top edge of this corrugated cardstock I placed the rascal with his cup of coffee. I guess he didn't take many sips yet and that's why he looks a bit grumpy or sleepy. Coloring on this cutie was done with Copics.
For the frame around the rascal I put a circle frame, cut from craft colored cardstock, into a rectangle frame, cut from golden mirror cardstock. Both were lying on my table for month, left overs from another project. Then I glued this new frame around the rascal.
All the words on this card are white heat embossed onto black cardstock and glued down with dimensionals. I don't think I have to translate the Ooohhhmmm, "postive Energie" means "positive energy", both are stamps by Stampcorner. The last one is from the Virtual Friends stamp set by LawnFawn. 
I used the Mini Alphabet and Numbers die set by CC Designs to cut the letters of the german word for coffee and glued them onto the card, making them fit the round of the circle. The highlights on the letters are made with a white gel pen.
I had three alcohol ink honeycombs left over from last weeks honey bear card. I wasn't sure if rascals like honey but then decided they simply have to because after all they are bears. Afterwards I've googled it and yes, I was right! Due to the golden Mixative, that I had put on top of the alcohol ink, these honeycombs go perfectly with the frame cut from golden mirror cardstock.
In the end I only added a few small golden sequins onto my card.

Donnerstag, 20. Mai 2021

Mai-Challenge bei Stampcorner

 
Hallo Ihr Lieben!
Heute startet die Mai-Challenge bei Stampcorner. Und weil es im Mai-Release jede Menge wirklich tolle Stencils gab, haben wir das auch gleich zum Thema der Challenge gemacht. Es lautet also "Stencils". 

Hello everyone!
Today Stampcorner's may challenge is starting. And since they had quite a few really great stencils in their may release we decided to pick those for this month's theme. So it's stencils.

Ich habe hier nach einem Video von Jennifer McGuire gearbeitet und meine Stencil nicht nur gewischt. Diese Stencil mit der Mauer und den genialen Schnörkeln hatte es mir sofort angetan. Den Mauerteil habe ich mit Distress Oxide Pumice Stone ganz zart gewischt, währenddessen habe ich den Teil mit den Schnörkeln abgedeckt. Dann habe ich mit dem doppelseitigen Nuvo-Pinsel noch Distress Ink Hickory Smoke ganz leicht darüber aufgetragen. Ich muss zugeben, über die Pinsel war ich ein wenig enttäuscht. Ich hatte sie mir schön weich vorgestellt - dabei sind die Borsten wirklich hart. Aber wenn man damit die Farbe nicht dick aufträgt, sieht man die Striche der einzelnen Pinselhaare, was hier auch einen tollen Effekt finde. Sie sind also doch nicht so verkehrt, ich hatte mir eben nur was anderes drunter vorgestellt. 
Anschließend habe ich den Mauerteil abgedeckt und durch die Schnörkel erst Distress Ink Broken China aufgetragen. Dann habe ich mit dem selben Stempelkissen die Punkte durch den Stencil aufgestempelt. Das braucht ein wenig Kraft - okay, ich gebe zu, ich hatte mein Stempeltool auf dem Boden liegen und bin mit den Fußballen daraufgetreten, hüstel - aber es geht. Anschließend habe ich mein Papier minimal verrutscht und noch weiße Punkte leicht versetzt aufgestempelt. Dafür habe ich das Unicorn Stempelkissen von LawnFawn benutzt - mein absolutes Lieblings-Weiß, weil es wirklich schön deckend ist. Der Punktestempel ist der Tiny Dots Background von MFT.
Den Hintergrund habe ich schwarz gemattet und auf einen weißen Kartenrohling geklebt.

Here I worked following a video tutorial by Jennifer McGuire and did not only use my stencil to brush some color onto the cardstock. This stencil with the brick wall and the beautiful flourishes was love at first sight. I added Distress Oxide Pumice Stone through the brick wall part, covering the flourish side of the stencil while working on the bricks. Then I used the doublesided brushes by Nuvo to add some Distress Ink Hickory Smoke. I have to admit that I was quite disappointed when I got those brushes. I had imagined those being soft and with fine hair - instead they are pretty hard and with thick hair. But when you only use a bit of color and brush it on lightly you can see the individual strokes what creates a great effect. So they aren't bad, just not what I had imagined.
Then I covered the brick area and added Distress Ink Broken China through the flourishes. Then I used the same ink pad to stamp the dots, keeping the stencil in place. That takes quite some muscles - okay, I admit that I had my stamping tool on the floor and was literally standing on it - but it works. Next I moved my paper with the stencil just a tiny bit and added more dots, this time stamping them with white ink. I used the Unicorn ink pad by LawnFawn here, my absolute favorite white ink pad because it really is visible very good. The dots stamp is the Tiny Dots background by MFT.
I matted the background with black cardstock and glued it onto a white note card.


Hier habe ich noch einmal einen Ausschnitt der Karte fotografiert, auf dem Ihr die gestencilten (gibt es das Wort?) Bereiche gut sehen könnt. Wenn Ihr genau schaut, dann erkennt Ihr auch die groben Pinselstriche auf dem Mauerteil.

Here I took a close-up of an area of my card where you can see the stenciled areas. When you look closely you can even see the brush strokes on the bricks.


Dekoriert wollte meine Karte natürlich auch noch werden.
Der Briefkasten und die süße Schnecke - ebenso wie der gestempelte Teil des Textes und die Herzen - sind aus dem Snail Mail Stempelset von Sunny Studio. Ich habe alle Motive mit Copics coloriert und ausgeschnitten. Das Haus der Schnecke ist auch noch mit ein wenig Schimmer, gemacht mit dem Glitterpen von LawnFawn, überzogen. 
Das Smile ist aus dem Stanzenset Selfie Frames von LawFawn. Ich habe es 4 mal aus schwarzem Cardstock gestanzt und aufeinander geklebt. Außerdem ist es ebenfalls mit Schimmer überzogen. 
Den Text und das ausgestanzte Smile habe ich dann auf der Karte arrangiert. Trotzdem fehlte mir noch etwas. Also habe ich einen Pfeil aus schwarzem Cardstock gestanzt und unter das Smile geklebt. Daneben habe ich dann noch das Wort Thanks, gestanzt mit dem Mini Alphabet and Numbers Set von CCDesigns, geschrieben. 
Zum Schluss habe ich noch mit einem Striche-Stempel, der ebenfalls aus dem Snail Mail Stempelset ist, eine Spur hinter die Schnecke sowie - durch mehrfaches Stempeln - eine Linie hochkant links auf die Karte aufgestempelt. 

Of course my card needed a bit of decoration.
The mail box and cute snail - as well as the stamped part of the text and the hearts - are from the Snail Mail stamp set by Sunny Studio. I colored all images with Copics and cut them out. The house of the snail is also covered with glitter, added with the glitterpen by LawnFawn.
The die cut word smile is from the Selfie Frames die set by LawnFawn. I've die cut it four times from black cardstock and stacked them on top of each other. I also covered this with glitter as well. 
Nest I glued the saying and the die cut smile onto the card. But there was something missing. So I've die cut an arrow from black cardstock and wrote the word thanks next to it. For the thanks I used the Mini Alphabet and Numbers die set by CCDesgns.
In the end I used a stitches stamp, that also comes in the Snail Mail stamp set, to add some stitches behind the snail and - stamping it repeatedly - a long line from the top to the bottom of the left side of the card. 

Mittwoch, 19. Mai 2021

Nochmal ein Geldgeschenk

 
Hallo Ihr Lieben!
Heute möchte ich Euch eine weitere Idee für ein Geldgeschenk zeigen - diesmal wieder in niedlich und für alle Alterklassen geeignet.

Hello everyone!
Today I want to share with you another idea to wrap up some money - this time it's a cute design again and so perfect for all ages.


Als Basis meiner Box habe ich die Mini-Dose rund von JM-Creation verwendet. Ich habe die Teile aus weißem Cardstock gestanzt und dann mit dem Mauerstempel in grau bestempelt. Den kann man prima zusammensetzen, so dass sich eine zwar nicht regelmäßig gemauerte, aber immerhin komplette Mauer ergibt. Damit der Kontrast nicht zu krass ist, habe ich nach dem Stempeln noch Distress Oxide Pumice Stone und Hickory Smoke ganz leicht auf den weißen Cardstock gewischt.
Um den unteren Rand der Box habe ich das große Grasbüschel mit grüner Tinte aufgestempelt und es ebenfalls einfach leicht überlappend aneinander gesetzt.
Auf die Box habe ich dann noch den "ein paar Kröten nur für dich" Text aufgeklebt. Der ist auf weißen Cardstock gestempelt und mit 3D Tape aufgeklebt. Er geht etwas mehr als halb um die Box herum.

As the base I used the round box die by JM Creation. I've die cut the pieces from white cardstock and then used a brick wall stamp to add the pattern. I stamped it with grey ink  - and then lightly added Distress Oxide Pumice Stone and Hickory Smoke so the contrast between the white and grey isn't too hard.
To the bottom edge of the cardstock I stamped some grass with green ink.
Around  the bottom of the box I added a text that means "some money for you" - but here isn't used the word money but "toads" which is a german word for money. And please, don't ask me why! But that also explains the image and overall design of my box to all you non-germans. I stamped the text onto a strip of white cardstock and wrapped it around the bottom of the box - it goes a little more than half around the box.


Aus dem Deckel habe ich einen kleineren Kreis ausgstanzt und von innen einen Kreis aus schwarzem Cardstock dagegen geklebt. Und so wird aus meiner runden Box ein Brunnen. Und auf dem trohnt natürlich der Froschkönig! Die Steinlinien oben auf dem Deckel habe ich frei Hand mit einem grauen Fineliner gemalt und den Ring dann ebenfalls mit Distress Oxide gewischt.
Der Froschkönig ist mit Copics coloriert, ausgeschnitten und auf den Deckel der Box geklebt. Damit er schön aufrecht steht, habe ich hinten einen Streifen Cardstock gegen den Frosch geklebt, den ich unten gefaltet und auf dem Deckel der Box angeklebt habe. So fällt der arme Kerl nicht um.

I've die cut a smaller circle from the lid and put a circle cut from black cardstock behind it. And so my round box turns into a well. And of course the Frog King is sitting on top of it! I used a grey fineliner to freehand draw the stone lines onto the ring on top of the lid, then inked up that with Distress Oxides as well. 
The Frog King is colored with Copics, cut out and glued onto the lid. I used a strip of cardstock that I glued to the back of the frog, folded it at the bottom and glued the other end onto the lid. That way the frog can't fall on his face or back.


Und so sieht der Brunnen mit abgenommenem Deckel aus. In die Box kommen natürlich die angekündigten Kröten, aber was in diesem Fall auf keinen Fall fehlen darf ist die goldene Kugel, die der Frosckönig dann herauftauchen kann. Die werde ich auf jeden Fall mit hineinfüllen, aber aufs Foto darf sie aus bekannten Gründen nicht.

And this is the well with the lid taken off. I will put some money inside the box. But what really needs to get in it as well is the golden ball that the frog king can bring up from the bottom of the well. I will definately put one into it but had to remove it for the picture. The reason why I did explain to you in a post beginning of the month - it's the same chocolat company. 

Dienstag, 18. Mai 2021

I'm hoppy for you

 
Hallo Ihr Lieben!
Heute zeige ich auf dem Stamping-Fairies Blog wieder eine Karte unter der Kategorie "alter Stempel". Wobei ich hier klarstellen möchte, dass das nicht unbedingt bedeutet, dass die Stempel uralt sind. Zumindest mir geht es so, dass ich immer so auf das Neue fixiert bin, dass manchmal schon Stempel, die erst ein Jahr als sind, für mich alt sind. Die Produkte auf dieser Karte sind aber schon wirklich älter als ein Jahr. 
 
Hello everyone! Over at the Stamping-Fairies Blog I am sharing another card using old stamps today. But I want to clarify that old doesn't necesseraily mean that these stamps came out years ago. I'm mostly so concentrated on the new stuff that sometimes stamps that are only a year old seem old to me. But the products I used on this card are older than just a year.
 
Als das Wetter so schön war, stand ich an unserem Gartenteich und habe den Kröten darin zugesehen. Und das hat mich zu dieser Karte inspiriert. Wobei die Frösche auf meiner Karte sich zu benehmen wissen... ;)
Für den Hintergrund habe ich Blending Solution und Aquamarine Alcohol Ink auf ein Stück Yupo aufgetragen und dann mit dem AirBlower verteilt.  So entsteht der Wasseroberflächenlook auf der Karte. 
Das Yupo habe ich dann auf einen weißen Kartenrohling geklebt.

A little ago, when the weather was really warm and nice, I was outside in our garden, standing at our pond, watching the toads. And that inspired me to this card. But the frogs on my card really know how to behave themselves... ;)
For the background I put Blending Solution and Aquamarine Alcohol Ink onto a piece of Yupo and moved it around with the AirBlower. That's an easy way to create a water surface look.
Then I glued the Yupo onto a white note card.


Für den Aufleger habe ich ein Stück weißen Cardstocks benutzt und mit der Stitched Triple Peek-a-Boo Window and Edge Stanze zuerst den Rand gestanzt. Den habe ich nicht gerade, sondern schräg aufgelegt und so ist die Wasseroberfläche hauptsächlich unten rechts in der Ecke sichtbar. Anschließend habe ich noch den gestitchten Kreis dreimal aus dem Cardstock ausgestanzt. 
Die süßen Frösche aus dem Toad-ally Awesome Stempelset habe ich mit Copics coloriert. Dann hab ich sie ausgeschnitten und hinter zwei der Kreise gesetzt. Nun ja, die Unterkörper musste ich ihnen dafür leider amputieren. Aber das tut ihrer Optik keinen Abbruch. Dafür habe ich einige Herzchen über den beiden aufgeklebt.
In den dritten Kreis habe ich die Binsen aus dem Splendid Swans Stempelset gesetzt. 
Für den Text habe ich einen der Texte aus dem Toad-Ally Awesome Stempelset mit weißem Embossingpulver auf einen Streifen schwarzen Cardstocks embosst und auseinander geschnitten. Das Hoppy aus dem Text habe ich komplett herausgeschnitten und durch eines mit dem Captions Alphabet gestanzten ersetzt. Das habe ich dann auch so ein wenig hüpfend neben das mittlere Fenster geklebt und darüber bzw. darunter den Rest des Textes aufgeklebt.
Der komplette weiße Cardstock ist übrigens mit 3D Tape aufgeklebt, ebenso der Textstreifen mit dem "for you". Das Y war zu schmal, um es mit 3D Tape aufzukleben, deswegen habe ich es 7mal aus schwarzem Cardstock gestanzt und aufeinander geklebt, so dass es die selbe Höhe wie die anderen Buchstaben hat.
Zum Schluss habe ich noch ein paar klare Pailetten auf die Karte geklebt, die ein wenig wie Wassertropfen aussehen.

For the card topper I took a piece of cardstock and first die cut its edge with the Stitched Triple Peek-a-Boo Window and Edge die. I didn't use this straight down but put it on the cardstock a bit turned. Now the water surface is mainly visibly on the bottom right area of the card. Then I die cut the stitched circle three times from the white cardstock.
The cute frogs are from the Toad-Ally Awesome stamp set and colored with Copics. Then I cut them out and glued them behind two of the circle cut outs. I had to cut off their bottoms but I guess they are still super cute. And I glued a few hearts above their heads. 
In the third circle I glued the pipe flasks from the Splendid Swans stamp set.
For the text I used another stamp from the Toad-Ally Awesome stamp set and white heat embossed it onto a strip of black cardstock. I cut that apart and replaced the hoppy with a die cut one. I used the Captions Alphabet die set to cut the letters and glued them down like they are hopping a bit themselves. Above and under the letters I put the rest of the text.
The whole white carstock ist glued onto the background with dimensionals, also the little strip with the "for you" embossed on. The Y from hoppy was too small to put dimensionals behind it so I've die cut it seven times, stacked those on top of each other until the Y was on the same level as the rest of the letters. 
In the end I added a few clear sequins onto the card that look a bit like droplets of water.


Und hier habe ich noch ein Bild ein wenig schräg gegendas Licht aufgenommen, auf dem man zum einen die Pailetten besser sehen kann. Zum anderen sieht man hier auch, dass ich die Herzen und die Augen der Frösche mit Glossy Accents überzogen habe.

And here I took another pic where I held the card a bit more into the light so you can see the clear sequins better. But here you can also see, that I covered the hearts and the frogs' eyes with Glossy Accents.

Samstag, 15. Mai 2021

Stempeleinmaleins - Ausgabe vom 15. Mai 2021

 Hallo Ihr Lieben!
Heute haben wir beim Stempeleinmaleins eine Double Slider Card für Euch. Nun ist das inzwischen ja eine Bezeichung für verschiedene Kartenarten mit doppeltem Slidermechanismus, aber wie soll man sie auch sonst immer alle nennen? Das ist auf jeden Fall die Version einer Double Slider Card, die wir Euch heute zeigen.

Hello everyone!
Over at Stempeleinmaleins we are sharing a Double Slider Card with you. Well, there are many different types of Double Slider Cards out there, but it would be impossible to come up with a new name each time for all those cards with a double slider mechanism. So, this is the version of a Double Slider Card we are sharing with you today.

Ich habe meine Karte aus braunem Cardstock gewerkelt. Da nur der Cardstock zu nackig für meinen Geschmack gewesen wäre, habe ich hier den Love Background von Magnolia ein paar Mal mit brauner Tinte am Rand entlang abgestempelt.

I made my card from brown cardstock. Since only the brown cardstock was too plain for my taste I used the Love Background stamp by Magnolia and stamped it several times close to edges of my card using brown ink.


Als Motiv habe ich mal wieder dieses süße Mädel von Sugar Nellie ausgepackt - eines meiner All Time Favorites. Ich habe sie mit Copics in blau und braun coloriert, ausgeschnitten und auf die Karte geklebt. Darunter befindet sich ein Stück Designpapier mit Holzmaserung, das ich weiß gemattet habe. Außerdem geht noch ein Streifen weißer Cardstock quer über dieses Holzpapier, auf das ich wieder ein wenig Designpapier aufgeklebt habe. Außerdem habe ich hier vor dem Aufkleben ein Stück Twine darumgewickelt und zur Schleife gebunden.
In die obere linke Ecke des Holzpapieres habe ich ein Banner mit Text aufgeklebt. Das war hier eigentlich gar nicht geplant, befand sich aber im Stempelset, aus dem auch der Text auf meiner Karte ist. Und alsdas Set auf meine mTisch lag, hat mir irgendwie die Idee, es an dieser Stelle aufzukleben, dann spontan gefallen. Gestempelt habe ich es mit hellblauer Tinte.
Rund um den Cardstock mit der Holzmaserung und das Motiv habe ich kleine Blumen in braun und blau aufgeklebt. Die nutze ich ja nur noch selten, habe aber noch jede Menge. Und hier passten sie endlich mal wieder. Außerdem habe ich hier ein paar Halbperlen mit aufgeklebt.
Äh, habe ich was von Text gesagt? Ja, es gibt einen, aber der ist erstmal versteckt und zeigt sich erst, wenn man an der Schnur oben an der Karte zieht:

As the image I brought out this cutie by Sugar Nellie - one of my all time favorite images. I colored her with Copics, cut her out and glued her onto the card.
Under the image there's a piece of designer's paper with a wooden pattern. It's matted with white cardstock. 
There's also a strip of white cardstock glued across the wooden paper. I glued another piece of cardstock on top of it and, before glueing it down, wrapped some twine around it and tied it to a bow on the front.
To the top left corner of the wood pattern paper I glued a banner with a "you're great" text. I hadn't planned that but it's a stamp that's in the same stamp set like the text I used on my card. And when I had that set lying on my table I spontaneously decided that this would be a good stamp to be used here. I stamped it with light blue ink. 
Around the cardstock with the wooden paper on top and the image I glued some brown and blue flowers. I rarely used those anymore but still have plenty left. Here they fit perfectly. I also glued some small pearls between them.
Did I say something about a text being used on this card? Well, there is one, but it's hidden and only shows when you pull the tab on the top edge:


Zieht man oben an der Schnur, fahren zwei weitere Cardstockstücke aus der Karte heraus. 
Das hintere, größere Panel habe ich mit Designpapier beklebt. Außerdem ist hier ein hellblaues Eyelet angebracht, durch das ich wieder etwas Twine gezogen habe. Dann habe ich daran eine kleine hellblaue Schleife aus dünnem Organzaband angebracht. 
Auf dem weißen Cardstock darunter ist der Text aufgestempelt. Er ist von SU - und eigentlich ist da noch ein "ganz" zwischen der ersten Zeile und "liebe". Dann wäre der Text aber zu hoch gewesen, also habe ich das einfach weggelassen und darunter noch ein kleines Herz in hellblau aufgestempelt. 
Außerdem habe ich mit einem hellblauen Marker einen Rahmen aufgemalt.
Zum Schluss habe ich dann auch noch auf den braunen Cardstock einen Rahmen mit einem weißen Gelpenaufgemalt.

When you pull the tab two more pieces of cardstock get pulled out of the card.
The bigger one in the back is only covered with designer's paper. I also put a light blue eyelet through the top, put some twine through it and then tied a bow from light blue organdy ribbon to it.
Onto the white cardstock that builds the middle layer I added my text. The stamp is by SU and means "I'm sending lovely greetings". There's originally a "very" between the first line of this text and the second word on my cardstock. But this stamp was too tall and so I skipped this one word. Instead I stamped a small heart under the text, using light blue ink. I also drew a thin frame around the text with a light blue marker.
In the end I also used a white gel pen to draw a frame onto the brown cardstock that builds the card front.

Donnerstag, 13. Mai 2021

Honigsüße Grüße


Hallo Ihr Lieben!
Heute zeige ich auf dem Stampcorner-Blog eine Karte, die im wahrsten Sinne des Wortes "süß" ist. Und das ist nicht nur auf den süßen Bären bezogen.
 
Hello everyone!
Today I am sharing this card over at the Stampcorner Blog - and it's literally a sweet card. And I'm not only talking about the cute bear in a honey jar.
 
Hier habe ich für den Hintergrund ein Stück Yupo mit Blending Solution beträufelt, dann Alcohol Ink Sandal und Butterscotch darauf gegeben und alles mit dem Air Blower über das komplette Yupo verteilt. Dann habe ich noch ein paar Tropfen goldenes Mixative darauf gegeben, wieder mit Blending Solution verdünnt und "verblasen". Fertig war ein toller Alkohol-Hintergrund, der farblich perfekt zu Honig passt.
Diesen Hintergrund habe ich dann auf einen weißen Kartenrohling geklebt.
Für die Honigwaben, habe ich die Save the Bees Stanze von ModaScrap aus weißem Cardstock gestanzt und mit 3D Tape auf den Hintergrund aufeklebt. Da ich noch ein Stückchen des eingefärbten Yupo übrig hatte, habe ich noch ein paar Waben daraus ausgestanzt und die so entstandenen Sechsecke, ebenfalls mit 3D Tape, auf den weißen Cardstock geklebt.
 
For the background I added a few drops of Blending Solution onto a piece of Yupo, then added Alcohol Ink Sandal and Butterscotch and moved the color around with the Air Blower until the whole piece of Yupo was covered. Then I added a few drops of the golden Mixative, added a bit of Blending Solution again and then blew the color around. Now I had a great alcohol ink background that goes perfectly with honey colorwise. 
Then I glued the background onto a white note card.
For the honeycomb I die cut the Save the Bees die by ModaScrap from a piece of white cardstock and glued it onto the Yupo with dimensionals. Since I had a small piece of the colored Yupo left I've die cut a portion of the die from it again and then glued the little hexagons onto the white cardstock, using dimensionals again.


Hauptakteur der Karte ist natürlich der süße Honigbär von Stampcorner. Ich habe ihn mit Copics coloriert und dann ausgeschnitten.
Für den Text habe ich verschiedene Stempel bzw. Stempelsets kombiniert. Das Chill Mal ist aus dem Koala-Stempelset, Es wird ein...Tag ist aus dem Set Regenbogen und das süßer ist aus dem Set Gnome. Alle Texte sind mit weißem Embossingpulver auf dunkelbraunen Cardstock embosst. Dann habe ich sie ebenfalls mit 3D Tape auf die Karte geklebt.
Nun fehlte noch das Wort Honig. Dafür habe ich das Mini Alphabet and Numbers Stanzenset von CC Designs verwendet und die Buchstaben aus goldenem Spiegelcardstock gestanzt. Damit er sich besser vom gold-gelben Alcohol Ink Hintergrund abhebt, habe ich die Buchstaben erst auf braunen Cardstock geklebt, per Hand mit etwas Abstand ausgeschnitten und dann auf die Karte geklebt.
Ganz zum Schluss habe ich noch ein paar kleine braune Pailetten auf der Karte verteilt.

Main element on this card is this cute honey bear by Stampcorner. I colored him with Copics and cut him out.
For the text I combined a few different stamps from different stamp sets. The text means "let's chill - it's going to be a day as sweet as honey". I white heat embossed the stamps onto dark brown cardstock and then glued them onto the card with dimensionals.
The word honey is written with die cut words. I used the Mini Alphabet and Numbers die set by CC Designs to die cut the letter from golden mirror cardstock. Since there wasn't enough contrast between the golden cardstock and the golden-yellow alcohol ink background I glued the letters onto brown cardstock first, then cut them out by hand and attached them to the card.
In the end I added a few small brown sequins to my card.


Und weil man den Spiegelcardstock auf den Bildern oben so schlecht sieht, habe ich hier noch ein weiteres Bild für Euch - hier ist er aber wirklich in vollem Schein zu sehen!

And since it's hard to really see the mirror cardstock on the pics above I took another one from a different angle - and here you really can see its shine!