Mittwoch, 31. Januar 2024

Sending Love, Hugs and Kisses

 
Hallo Ihr Lieben!
Heute habe ich eine kleine Karte mit Bildergeschichte - passend für Valentinstag, aber auch tauglich um jemandem zwischendurch zu sagen, dass man ihn mag.

Hello everyone!
Today I have a card with a little comic on it - great for Valentine's but also to say someone, that you love him, anytime of the year.

Ich habe den Foursquare Backdrop von LawnFawn aus schwarzem Cardstock gestanzt und als Rahmen für meine einzelnen Bilder genutzt. Die Rahmen habe ich mir auf ein Stück weißen Cardstock übertragen und dann jeweils mit Distress Oxide Salty Ocean und Tumbled Glass gewischt. Außerdem habe ich hell-rosafarbene Metallic Watercolor aufgespritzt.

I die cut the Foursquare Backdrop by LawnFawn from black cardstock and used it as a frame for my individual pictures. I marked the rectangles on a piece of white cardstock and inked them with Distress Oxide Salty Ocean and Tumbled Glass. I also flicked some light pink metallic watercolor onto the cardstock. 


Die einzelnen Bilder habe ich bewusst einfach gehalten und auf Details wie Böden etc verzichtet, so dass die Karte insgesamt noch stimmig wirkt. 
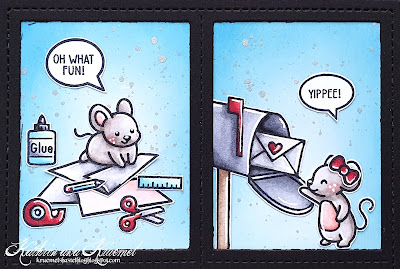
Im ersten Bild könnt Ihr Herrn Mäusemann sehen. Der hat sich ins Bastelzimmer zurückgezogen und werkelt da fleißig an einer Karte. Die Maus samt Papier ist aus dem Stempelset Just Plane Awesome, die Bastelartikel aus dem Set Just Add Glitter. Darüber befindet sich eine kleine Sprechblase mit einem aufgestempelten Oh What Fun aus dem Stamptember Set von 2022.
Im nächsten Bild holt Frau Mäuserich die  Karte aus dem Briefkasten und man kann sehen, wie sehr sie sich freut, denn schon am Umschlag hat sie erkannt, dass das keine Rechnung ist. Die Mäusefrau ist aus dem Merry Mice Set, ich habe ihr eine kleine Schleife ans Ohr geklebt. Beim Briefkasten musste ich fremdgehen - es gibt von LawnFawn wohl nur die Stanze in einem der Build-a-House Add-On Sets, der ist aber von vorne, und das hätte hier nicht gepasst. Also habe ich diesen Briefkasten von SunnyStudio verwendet. Auch über der Mäusefrau befindet sich eine kleine Sprechblase, in der man lesen kann, wie sehr sie sich über die Post freut.
Alle Motive auf der Karte sind übrigens mit Copics coloriert.

I kept the individual pictures and didn't add any elements like grounds etc. This way the overall design still creates a unit.
In the first pictures you can see Mr. Mouse. He went to his craftroom and is working on a special card. The mouse including the paper is from the Just Plane Awesome set, the craft accessoires from the Just Add Glitter set. I placed a little speech bubble with a "oh what fun" from the 2022 Stamptember set stamped into it.
In the next picture Mrs. Housemouse is taking the card out of her mailbox and you can see, how happy she is about this mail because she can already tell from the envelope, that this is no bill. This mouse is from the Merry Mice set and I put a little bow under her ear. For the mailbox I had to use a different brand - there's only a mailbox die in one of the Build-a-House Add-On Sets, but that shows the mailbox from the front and that just didn't work for my scene. So instead I used this mailbox image by SunnyStudio. Above the mouse there's another speech bubble, in which you can see, how excited she is about today's mail.
I used Copics to color all the images.


Auf dem unteren linken Bild könnt Ihr sehen, wass passiert ist, als die Mäusefrau den Umschlag geöffnet hat. Neben einem hellrosa Brief befanden sich viele Herzen, Xs und Os darin, die nun alle fröhlich aus dem Umschlag schweben. 
Das Kuvert ist aus dem Love Letters Stempelset. Die Herzen, Xs und Os habe ich mit einer der XOXO Backdrop Stanzen aus rosafarbenem, rotem und schwarzem Cardstock gestanzt.
Und im letzten Bild befindet sich dann der Text meiner Karte. Das Sending und das And sind aus den Stempelsets Offset Sayings Birthday und Offset Sayings Christmas. Ich habe sie jeweils mit schwarzer Tinte direkt auf den Cardstock hinter dem Fenster gestempelt. Die Worte Love, Hugs und Kisses sind aus kleinen gestanzten Buchstaben von MFT gemacht. Dabei habe ich die Buchstaben jeweils aus der Cardstockfarbe gestanzt, in der ich auch das entsprechende Element, also Herz, X und O, gestanzt habe.

The lower left picture shows what happened, once Mrs. Housemouse opened the envelope. There was not only a light pink letter in it but also lots of hearts, Xs and Os that started floating out of the envelope.
The envelope is from the Love Letters stamp set. The hearts, Xs and Os I die cut from red, pink and black cardstock using one of the XOXO Backdrop dies.
And in the last picture I placed my text. The words sending and and are from the stamp sets Offset Sayings Birthday and Offset Sayings Christmas. I stamped those with black ink directly onto the cardstock behind the window/frame. The words love, hugs and kisses I put together from die cut letters, using a die set by MFT. I used the matching colors I had used to die cut the elements (hearts, Xs and Os) from for my letters.


Zum Schluss habe ich meine Geschichte nur noch auf einen weißen Kartenrohling geklebt.

As a last step I simply attached my comic to a white card base.

Montag, 29. Januar 2024

Stampcorner Februar-Release Sneak #2

 
Hallo Ihr Lieben!
Mit dem heutigen Werk gebe ich Euch ein Sneak auf das zweite Stempelset, das es im Februar bei Stampcorner geben wird. Es ist voller toller Sprüche und diesem kleinen Glas, das man super mit allem möglichem füllen kann.

Hello everyone!
With today's creation I am sharing a sneak of the other stamp set, that will be part of the february release by Stampcorner. It's filled with great sayings and tis little jar, that can easily be filled with whatever fits the theme of your card.
 

Ich habe diesmal einen Tag gewerkelt - der Freund meiner Mutter liebt Marmelade, aber nur selbstgemachte. Die schmeckt einfach so viel besser. Diesen Tag werde ich ihm das nächste Mal an ein frisches Glas binden.... ;)
Der Tag besteht aus einem, mit einer der Tag Stanzen von Stampcorner aus weißem Cardstock gestanzten Tag. Eigentlich sind es zwei, die ich aufeinander geklebt und dazwischen einen Shaker eingebaut habe.
Oben an der Öse habe ich einen Verstärker aus rotem Cardstock angeklebt. Per Hand habe ich dann einen größeren Tag aus rotem Designpapier mit weißen Herzen gestanzt, ebenfalls ein Loch hineingestanzt und die weißen Tags darauf geklebt. Durch die Löcher habe ich etwas rosa-weißes Twine gezogen und dann eine große Schleife aus weißem Organzaband über der Öse angebracht.

This time I made a tag - my mom's partner loves jam, but only the homemade one. It tastes just so much better. I plan to tie this tag to the next jar he'll get... ;)
I die cut one of the Tag dies by Stampcorner from white cardstock - two of them, that I stacked, creating a shaker between the two layers.
I attached a reinforcer, cut from red cardstock, to the hole. Then I used my scissors to cut a larger tag from red patterned paper with white hearts, punched a hole into it and then glued the white tags on top. I put some pink and white twine through the holes and then put a big white bow, made from white organdy, over the hole reinforcer. 


Und hier seht Ihr das Glas, das ich in einen Shaker verwandelt habe. Dafür habe ich das Glas mit hellblauer Tinte abgestempelt. Den Deckel habe ich separat nochmal mit schwarzer Tinte gestempelt und mit Copics ein wenig coloriert. Aus dem Glas habe ich das Innenleben herausgeschnitten und es dann auch entlang der Stempellinien ausgeschnitten. Und auch aus dem Tag habe ich grob die Form des Glases geschnitten.
Vor dem Aufkleben des ausgeschnittenen Glases habe ich ein schmale Oval aus grauem Cardstock ans untere Ende des Fensters im Tag geklebt und darauf dann das Glas geklebt. 
Das Fenster ist von hinten natürlich mit einem Stück Folie hinterlegt, den Shaker habe ich mit kleinen Herzen in rot und rosa gefüllt. 
Auch den separat gestempelten Deckel habe ich ausgeschnitten und auf das Glas geklebt. Am Übergang habe ich ein Stück rosa-weißes Twine aufgeklebt und einen kleinen Tag daran befestigt. Der besteht aus einem schmalen Streifen roten Cardstocks, auf den ich ein "für dich" - Teil eines der Texte aus dem Ernst-Stempelset, weiß aufembosst habe. Ans obere Ende des Streifens habe ich ein kleines Sechseck aus grauem Cardstock mittig gefaltet angeklebt und den Tag auf das Glas geklebt. Obenauf kam dann noch eine kleines Schleife aus dem rosa-weißen Twine. 
Und  dann fehlte noch ein kleiner Text. Der ist ebenfalls aus dem neuen Set Sprüche 2 - ich habe nur die Anordnung ein wenig verändert und die Herzen nicht mit abgestempelt. Eigentlich passt der Text nämlich genau in das Glas. Ich habe ihn in drei Teile geschnitten und links neben bzw. ein wenig überlappend auf das Glas geklebt.

And here you get a look at the jar, that I turned into a shaker. I stamped the glass with light blue ink and the lid separately with black ink, then color it a bit with Copics. I cut out the inner part of the jar, then cut it out along the stamped lines. I also cut the shape of the jar from the white tag.
Before attaching the cut out jar I die cut a thin oval from grey cardstock and adhered it at the bottom of the window, then put the jar on top.
Of course there's some acetate behind the window in the tag, and I used pink and red heart confetti to fill the shaker.
I also cut out the separately stamped lid and adhered it to the jar. Along the bottom of the lid I glued down a piece of white and pink twine and attached it a little tag to it. I white heat embossed a "for you" onto a strip of red cardstock, attached a hexagon, cut from grey cardstock and folded in the middle, to one end of the cardstock strip and glued it onto the twine. Then I put a little bow, also made from the pink and white twine, on top.
And then I needed a little text - this one means "the secret ingredient is always love". I white heat embossed the text onto red cardstock, cut it into three pieces and then attached them to the left of, partly overlapping the jar.


Zum Aufkleben der Texte habe ich dünnes 3D Tape verwendet - so bildet er eine weitere Ebene des Tags. Als Deko habe ich dann noch drei der Herzen, die ich auch zum Füllen des Shakers verwendet habe, über dem Glas aufgeklebt.

To attach the text I used thin foam tape, this way it creates another layer on my tag. And as decoration I glued three of the little hearts, that I had also used to fill the shaker, above the jar.

Samstag, 27. Januar 2024

Ein kleiner Gruß

 
Hallo Ihr Lieben!
Ich weiß ja nicht, wie es Euch geht, aber bei mir setzt so langsam die Sehnsucht nach dem Frühling ein. Zum Glück können wir Bastler ganz wie gewünscht in den Jahreszeiten hin- und herspringen und so zeige ich heute auf dem Kulricke Blog diese doch sehr frühlingshafte Shaker Card. Damit enden dann auch meine 3 Monate als Gastdesigner.

Hello everyone!
I don't know about you, but I'm beginning to long for spring. Luckily we crafter can jump between seasons easily and so I'm sharing this pretty springish shaker card over on the Kulricke Blog today. And with this card I am also ending my 3 months term as a guest designer. 

Da mir das Grau in Grau draußen inzwischen doch recht auf die Nerven geht, wollte ich meine Karte möglichst hell halten. Deswegen habe ich den Kranz aufgestempelt und den Cardstock drumherum weiß gelassen. Ich habe nur einige hellrosa Metallic Watercolor und weiße Farbspritzer darauf aufgespritzt. Die weißen Spritzer habe ich dabei nach dem Colorieren gemacht, da sie auch auf dem Motiv sein sollten. 

I am really getting sick of all the grey weather and wanted my card to be very bright and light. So I stamped the wreath and left the cardstock around it white. I only flicked some light pink metallic watercolor and white acrylic paint onto it. The white spatters I added after I did the coloring because I wanted those to be on top of the image as well. 


 Ich kombiniere ja gerne viele verschiedene Stempel- und Stanzensets, hier habe ich bewusst nur ein einziges Set verwendet. So kann der tolle Kranz aus dem Blumen Kreis Set gut wirken. Ich habe ihn mit No-Line Ink abgestempelt und dann mit Copics coloriert. Die feinen Striche in den Blumen und Blättern sowie den Ring des Motives habe ich dann mit Polychromos hinzugefügt bzw. nachgezeichnet. Die Beeren habe ich außerdem mit Glossy Accents überzogen. 

I love to combine lots of differents stamps and dies, but here I decided to just go with one single stamp set. This way the beautiful wreath from the Blumen Kreis set is the only star of the show. I stamped it with no-line ink, then colored it with Copics. The fine lines in the flowers and leaves and the circle of the image I then re-did with Polychromos. I also covered the berries with Glossy Accents.

 
Den Bereich innerhalb des Kreises habe ich mit der Schere herausgeschnitten und dahinter dann einen Shaker gesetzt. Der komplette weiße Cardstock ist mit helltürkisfarbenem Cardstock hinterlegt, auf den ich im Bereich des Kreises ebenfalls weiße Acrylfarbe aufgespritzt habe.
Gefüllt habe ich den Shaker mit winzigen, halbtransparenten Kügelchen in helltürkis und hellrosa sowie irisierenden Herzen in zwei verschiedenen Größen.
Den Text, ebenfalls aus dem Blumen Kreis Stempelset, habe ich weiß auf hellgrünen Cardstock embosst. Dabei habe ich die eigentliche Anordnung des Textes etwas geändert und das "ein kleiner" nebeneinander gestempelt, das Gruß habe ich extra gestempelt. So konnte ich es mit etwas Abstand zu den Stempellinien ausschneidenn. 

I used my scissors to cut out the area inside the circle and created a shaker behind it. I matted the complete white cardstock with some light aqua cardstock, onto the area that will be seen through the shaker I flicked some white acrylic paint again.
I filled the shaker with tiny, semi transparent pearls in light aqua and light pink and some iridescent hearts in two diffferent sizes.
The text means "a little hello". I white heat embossed it onto light green cardstock and cut out the large word close to the embossed lines.


Zum Schluss habe ich alles auf einen weißen Kartenrohling geklebt und als Deko einige wenige klare Pailetten aufgeklebt.

To finish the card I adhered it to a white card base and added just a few clear sequins.

Freitag, 26. Januar 2024

Kochen mit Christine

 
Hallo Ihr Lieben!
Keine Angst ob des Blog-Titels - ich bin nicht unter die Food-Blogger gegangen und bleibe dem Basteln treu. Aber "gekocht" habe ich trotzdem.... Bei Create a Smile gibt es dieses Jahr etwas neues: jeden Monat gibt es ein neues "Rezept" für eine Karte, das einer Bestellung beigelegt wird. Es ist eine bebilderte Schritt-für-Schritt-Anleitung von Christine. Und als ich vor kurzem nicht so recht wusste, was ich basteln wollte, habe ich das Rezept "nachgekocht". 

Hello everyone!
This post is titled "cooking with Christine" - but don't worry, I haven't changed into a food blogger and keep on papercrafting. But I still did some "cooking".... At Create a Smile they came up with something new beginning of the year. Each month there is a new "recipe" for a card, that will be sent with an order. It's a step by step tutorial with pictures, made by Christine. And last week, when I was unsure what I wanted to make, I followed the recipe.

Nun wollte ich die Karte natürlich nicht einfach kopieren - könnte ich auch gar nicht, denn das verwendete Stempelset habe ich nicht. Außerdem war es so kalt, dass ich mir die Tropen ins Haus geholt habe...
Die Karte an sich habe ich aus hellgrünem Cardstock gemacht und ein Oval aus der Front gestanzt. Darauf kam dann ein Stück weißen Cardstocks, aus dem ich ebenfalls ein Oval an der selben Stelle gestanzt habe. Durch den Aufleger konnte ich nämlich die Ränder der Folie, die über - bzw. im Rezept hinter - dem Fenster angeklebt ist, verstecken. Das finde ich einfach schöner. Den weißen Cardstock habe ich mit der Monstera-Stencil mit Blättern gefüllt. Allerdings habe ich die nicht gewischt, sondern nur die Außenlinien mit einem Fineliner nachgemalt. Zuerst habe ich das einmal mit einem hellgrünen Marker gemacht, dann habe ich die Stencil gedreht, erneut aufgelegt und weitere Blätter mit einem dunkelgrünen Marker aufgemalt, und zwar so, dass sie optisch hinter den hellgrünen Blättern liegen. Dann habe ich noch goldene Metallic-Watercolor aufgespritzt.

Of course I didn't want to just copy her card - and even if, I couldn't because I don't have the stamp set Chrstine used. It was so cold outside, that I've decided to bring the tropics into my home....
I made my card base from light green cardstock and cut an oval from the front. Then I put a piece of white cardstock on top, from which I had die cut another oval in the exact same spot. The white piece of cardstock gave me the chance to hide the edges and glue of the acetate, that's put over - or in the recipe behind - the window. I just liked that better. I used the Monstera stencil to fill the white cardstock with leaves. But I didn't ink them on, instead I used pens to trace the outlines. First I added leaves with a light green marker, then turned the stencil and added leaves with a dark green marker, making it look like those dark leaves are behind the light ones. I also flicked some gold metallic watercolor onto the cardstock.


Der süße Kakadu aus dem Stempelset Taa-Da balanciert auf einem Stück schwarzen Twines. Den Kakadu habe ich mit Copics coloriert und ausgeschnitten. 
Der Text aus dem selben Stempelset ist mit schwarzer Tinte auf weißen Cardstock gestempelt, mit einer Sprechblasenstanze ausgestanzt und schwarz hinterlegt.

This cute cockatoo from the Taa-Da stamp set is balancing on a piece of black twine. I colored the bird with Copics and cut him out.
The text is from the same stamp set. I stamped it with black ink onto white cardstdock, cut it out with a speechblubble die and put some black cardstock behind it.


Die Motive habe ich dann auf der Folie, die, wie schon erwähnt, das Fenster abdeckt, aufgeklebt.
Als Deko habe ich noch ein paar sonnengelbe Enamel Dots aufgeklebt.
 
 I adhered the images to the acetate, that - as I already mentioned - is covering the oval window.
I added some Enamel Dots in a sunny yellow as decoration.
 

 So sieht die geöffnete Karte aus - den Text im Inneren der Karte sieht man bei geschlossener Karte durch das Fenster hindurch und es bildet so den Hintergrund für das Motiv. Den habe ich mit Stempeln aus den Sets Konfetti und Taa-Da (hier habe ich zwei Textstempel zerschnitten um sie partiell verwenden zu können) mit grüner Tinte gestempelt. Dann habe ich auch hier goldene Metallic Watercolor aufgespritzt.
Und hier habe ich noch eine weitere Änderung vorgenommen: Da es mir nicht gefallen hat, dass man den Kleber hinter dem Kakadu sowie das von der Farbe getränke Papier von hinten im Fenster gesehen hat, habe ich den Kakadu einfach nochmal ausgeschnitten und von hinten gegen das Fenster geklebt.

This is the opened card - the text on the inside can be seen through the window when the card is closed and makes the backdrop for the image. I used stamps from the sets Konfetti and Taa-Da (I cut two texts from this set apart to be able to use them partially) and stamped them with green ink. Then I flicked some gold metallic watercolor also on the inside.
And here's another change I did: I didn't like that you could see the glue behind the image and the paper saturated by my markers through the window. So I simply cut another cockatoo and glued it exactly behind the colored bird on the inside of the card.


So, und jetzt muss ich Euch gestehen, dass mir die Karte oben echt schwer gefallen ist! Vielleicht weil sie eigentlich ja doch eher einfach und das ja nicht unbedingt mein bevorzugter Stil ist. Deswegen ist auch eine weitere Karte,die ich bereits angefangen hatte, bis jetzt nicht fertig geworden. Mal sehen, ob das noch was wird.... Aber ich war herausgefordert - so schwer kann das ja nicht sein! Also habe ich beschlossen, noch eine Mini-Karte nach dem Rezept zu kochen, und hier ging alles ganz schnell. Mein Problem ist offenbar der viele freie Raum auf einer normalgroßen Karte. ;)
Und das  hier ist mein Mini-Kärtchen. Es hat die Maße von 6,5 x 12 cm. Die Grundkarte habe ich diesmal aus rosafarbenem, den Aufleger aus grauem Cardstock gemacht. Und für das Fenster habe ich einen Kreis gewählt. 

And now I have to admit that I really had a hard time putting this first card together! Maybe because it's some kind of simple design and that's not my preferred crafting style. That's also, why another card idea after this recipe, that I had already started, still isn't finished. We'll see if it ever will... But now I felt challenged - it can't be that hard! So I've decided to make another card in a mini size, and  this was really put together quickly and easily. Seems like my problem was all that empty space on the regular sized card. ;)
And this is my mini card, it measures 6,5 x 12 cm. The base card I made from light pink, the topper from grey cardstock. And for my window I've chosen a circle here.


Als Motiv kam diesmal der kleine Bär aus dem Set Tierisch Vielseitig zum Einsatz - auch er ist mit Copics coloriert. Darüber befindet sich eine Glühbirne aus dem Set Licht An, und die passt dann perfekt zum Text in der Sprechblase. Der ist aus dem Set Kleine Sprüche. Unter dem Bären habe ich ein Oval, gemacht aus schwarzem Cardstock mit einer der Shadows and Flowers Stanzen, als Boden aufgeklebt. Die Glühbirne ist außerdem mit Glossy Accents überzogen.
Und darunter kam dann ein großer Text, der den Raum unter den Motiv fast komplett ausfüllt. Ich habe ihn mit schwarzer Tinte direkt auf den grauen Cardstock gestempelt und mit einem weißen Gelstift Linien rechts und oberhalb der einzelnen Buchstaben aufgemalt. So wirkt er nicht gar so langweilig. Mit dem weißen Gelstift habe ich dann auch noch einen Rahmen um das Fenster sowie entlang der Außenkanten des grauen Cardstocks gemalt.

As my image I picked this little bear from the Tierisch Vielseitig stamp set - again I used Copics to color him in. I put a little light bulb from the Licht An set above his head and stamped an "I have an idea" into a small speech bubble. Under the bear I placed an oval, die cut from black cardstock with one of the Shadows and Flowers dies, as a ground. The light bulb I also covered with a layer of Glossy Accents.
Underneath there war room for a large text, that fills that space nearly entirely. I stamped it with black ink onto the grey cardstock and used a white gel pen to draw a line on the right and top of each letter. This way it doesn't look so plain. Then I drew a frame around the circle window and also along the outer edges of the grey cardstock with the white gel pen.


Und hier ist die Mini-Karte in geöffnetem Zustand. Hinter den Bären auf der Vorderseite habe ich wieder einen aus weißem Cardstock geschnittenen aufgeklebt, um den Kleber zu verdecken. 

And here's the opened mini card. Again I glued a bear cut from white cardstock onto the inside left of the card to hide the adhesive, that's visible through the window. 


Und auch auf der rechten Innenseite befindet sich ein Bär. Der hält ein Herz in der Hand und ist identisch zu dem auf der Kartenfront coloriert. Auch der Boden aus schwarzem Cardstock findet sich hier wieder. Beide Teile und auch die Sprechblase, die ich mit einem weiteren Text aus dem Set Kleine Sprüche bestempelt habe, sind deckungsgleich mit den Motiven auf der Vorderseite aufgeklebt, so dass sie erst zu sehen sind, wenn die Karte geöffnet wird. 
Für den Hintergrund, der ja auch durch das Fenster sichtbar ist, habe ich hier mit rosa Tinte kleine Herzen aufgewischt, auch den Bereich hinter dem Bären etwas eingefärbt und außerdem weiße Acrylfarbe aufgespritzt.
Und unter  dem Bären setzt sich der Text von der Kartenfront fort - natürlich will ich mit meiner Karte niemanden beleidigen! Lieb haben klingt natürlich viel besser. Beide Texte sind aus dem Set Du kannst mich Mal. 

And also on the inner right side there's a bear. He's holding a heart and is colored just like the one on the outside of the card. Also the ground cut from black cardstock can be found here again. Both pieces and the speech bubble are adhered matching exactly there positions on the outside of the card so you can only see them when the card is opened.
For the background, that can also be seen through the window, I inked some small hearts with pink ink onto the cardstock and also darkened the area behind the bear a bit. I also flicked some white acrylic paint onto this area of the inside. 
And under the bear you can find the rest of the text on the front. The one on the front means "kiss my ass" but in german we say "you can .... me". Since I for sure don't want to send out any cards to offend someone, I stamped a "love" on the inside. So the full text means "you can love me". And I am not sure if this makes sense the way I described it. But love me sounds so much better and nicer than "kiss my....". 

Donnerstag, 25. Januar 2024

Du bist bombastisch!


 Hallo Ihr Lieben!
Die Ideen zu meinen Karten kommen mir manchmal an den ungewöhnlichsten Orten - die zu dieser Karte, die ich heute auf dem Stampcorner Blog zeige, hatte ich tatsächlich in der Dusche. Auf einmal war sie in meinem Kopf. Wahrscheinlich weil ich gerade meine Karte von Anfang des Monats gemacht hatte und dafür die Stempel aus der Advents-Aktion, die ich noch nicht verwendet hatte, durchgesehen hatte...

Hello everyone!
Sometimes I get the idea for my cards in the weirdest places - the idea for this card, that I'm sharing on the Stampcorner Blog today, I had in the shower. It was just there in my head. Most likely because I had just finished this month's first card and for that I had gone through the december special stamps that I hadn't used yet....

Der Hintergrund ist mit dem Speed Lines Stempel gemacht. Den habe ich mit goldenem Embossingpulver auf blauen Cardstock embosst und dann den Cardstock von außen her mit Distress Ink Chipped Sapphire und Black Soot abgedunkelt. 

The background is made with the Speed Lines stamp. I gold heat embossed it onto dark blue cardstock and then darkened the edges with Distress Ink Chipped Sapphire and Black Soot. 


Ich hoffe sehr, GroWi, die diesen Stempel designed hat, verzeiht mir, dass ich ihn fast zur Unkenntlichkeit abgewandelt habe - Ihr braucht Euch also nicht wundern, dass Ihr den Stempel nicht sofort erkannt habt. Es ist die runde Flasche mit dem Papierboot darin aus dem Set Ahoi. Und irgendwie kam mir die Idee, dass der doch auch eine coole Bombe abgeben würde....
Ich habe den Stempel mit Versamark abgestempelt und dann den kompletten inneren Bereich ebenfalls mit der Tinte eingefärbt. Dann habe ich alles mit schwarzem Embossingpulver überzogen. Das habe ich dann zweimal wiederholt, damit die "Bombe" auch schön gleichmäßig und glänzend wirkt. Dann habe ich sie ausgeschnitten und dabei alle Elemente um die Flasche herum sowie den Korken mit weggeschnitten. Die Highlights habe ich mit einem weißen Gelstift gemacht.
An der Rückseite habe ich ein Stück dickeres weißes Twine als Zündschnur angeklebt. An das obere Ende der Zündschnur musste natürlich etwas Glitzerndes, denn die Bombe wure bereits gezündet. Also habe ich das Feuerwerk aus dem Ernestine Stempelset mit goldenem Glitzer-Embossingpulver auf weißen Cardstock embosst, mit der Schere ausgeschnitten und hinter das obere Ende der Zündschnur geklebt. Obenauf habe ich dann noch einen kleinen Stern, gestanzt aus goldenem Spiegel-Cardstock, aufgeklebt. 
Für den Rest des Textes hier unten auf der Karte habe ich den "du bist fantitastisch" Text aus dem Stempelset Sweetie benutzt. Ich habe ihn mit weißem Embossingpulver auf schwarzen Cardstock embosst und zugeschnitten - die Worte du und bist jeweils als einzelnen Teil, vom Wort fantitastisch habe ich nur das astisch ausgeschnitten. Dann habe ich alle Teile mit gelbem Cardstock hinterlegt.

I really hope, GroWi, who designed this stamp, won't be mad with me for changing the image that much that it can't be recognized anymore - so you don't have to wonder that you've never seen this image before. It's the round bottle with a paper boat in it. And I just had the idea that it might make a great bomb....
I stamped the image with Versamark and then filled the complete inner area with the ink as well. Then I covered it with black embossing powder. I repeated this step twice to make sure my "bomb" is evenly covered with embossing powder and shiny. I cut it out and cut off all the elements around the bottle and also the cork at the top. The highlights I added with a white gel pen.
I attached a piece of thicker twine to the back of the bottle/bomb as the fuse. Of course there had to be something sparkly at the top of the fuse because the bomb has already been fired. So I used the fireworks stamp from the Ernestine stamp set and heat embossed it with gold glitter embossing powder onto white cardstock. I cut it out with my scissors and glued it behind the top end of the fuse. On top I adhered a little star that I have die cut from gold mirror cardstock.
For the rest of the text at the bottom of the card I used a stamp from the Sweetie stamp set. I white heat embossed the text onto black cardstock and cut each word into an individual rectangle, then put yellow cardstock behind each cardstock strip.


Ich fand, ein BÄM wäre perfekt als Teil des Textes. Also habe ich die BÄM Stanze von Stampcorner einmal aus weißem und einmal aus schwarzem Cardstock gestanzt. Auf das weiße Stanzteil habe ich dann mit schwarzer Tinte kleine Punkte aufgestempelt und außerdem mit einem Y26 Copic an der linken Seite jedes Buchstabenteils eine Linie gezogen. Diese Elemente geben dem Wort einen tollen Comic-Look. Dann habe ich die schwarze Lage etwas versetzt dahinter geklebt.

I thought, a bam would be perfect as part of my text. So I die cut the BÄM die by Stampcorner once from white and once from black cardstock. I used black ink to stamp some tiny dots onto the white word and also drew lines to the left side of each part of each letter with a Y26 Copic marker. Those elements add a great comic look to the word. Then I glued the black die cut behind the white one, setting it a bit off.


Zum Schluss habe ich alles zusammengesetzt. Das Wort BÄM ist direkt auf den Hintergrund geklebt, für die Bombe samt Glitter am oberen Ende der Zündschnur habe ich dünnes 3D Tape benutzt. Den Text habe ich dann mit dickem 3D Tape aufgeklebt und zwar so, dass sich die Bombe zwischen den letzten beiden Worten/Wortteilen befindet. So lautet der text nun "du bist bombastisch". Und seht Ihr, wie toll die Bombe glänzt?
Als Deko habe ich noch ein paar goldene Stern-Pailetten aufgeklebt, den Cardstock schwarz gemattet und alles auf einen weißen Kartenrohling geklebt.

The last step was to put everything together. I glued the word BÄM directly onto the background, for the bomb and the top of the fuse including the glitter I used thin foam tape. The text I adhered with thick foam tape, placing the bomb between the words so now the text means "you're the bomb". And do you see the great shine of the bomb?
I added a few gold star confetti as embellishments, matted the cardstock black and attached it to a white note card.

Mittwoch, 24. Januar 2024

Noch eine Karte mit Schweinchen

 
Hallo Ihr Lieben!
Heute zeige ich Euch eine weitere Karte mit einem Schweinchen-Motiv. Eigentlich war der Plan, dieses hier auf der Karte von vorgestern in den Polaroid-Rahmen zu stecken. Da passte es aber nicht wirklich hinein, das Schweinchen war aber bereits gestanzt. Und wegwerfen wollte ich das kleine Kerlchen dann auch nicht. Also habe ich schnell noch eine ganz einfache Karte damit gewerkelt.

Hello evereyone!
Today I am sharing with you another card with a pigglet on it. Originally I wanted to put this one in the polaroid frame on the card I shared with you two days ago. But it didn't fit in there well. Since I had already die cut it and didn't want to throw this little guy away I've decided to make a quick and simple card with it.

Der Hintergrund hier ist aus einem Stück weißen Cardstocks gemacht, den ich mit Distress Oxide Cracked Pistacchio, Lucky Clover, Pine Needles und ein wenig Black Soot gemacht habe. Anschließend habe ich etwas Wasser sowie goldene Metallic Watercolor aufgespritzt. 
Und weil ich wusste, dass hier nicht viele Elemente auf die Karte wandern würden, habe ich mit einem Kreise-Stencil und weißer Stempelfarbe noch einen Bokeh-Look in den oberen beiden Dritteln des Cardstocks aufgewischt.

The background is made from a piece of white cardstock that I inked with Distress Oxide Cracked Pistacchio, Lucky Clover, Pine Needles and a bit of Black Soot. I  then spattered some water and also some gold metallic watercolor onto it.
And since I knew that there won't be many elements on this card I've decided to add a Bokeh look to the two upper thirds of the background using a circles stencil and white ink.


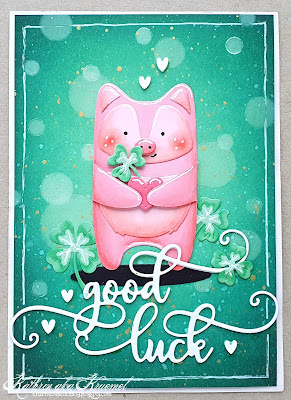
Das kleine Schweinchen ist aus einem der Weihnachts-Stanzensets 2023 von Action. Eigentlich ist es gedacht, um einen Waschbären oder Fuchs oder auch Bären zu stanzen. Aber ich finde, mit zwei Nasenlöchern und kleinen, per Hand aufgemalten Augen macht sie sich auch gut als Schweinchen. Die Teile habe ich aus zwei verschiedenen Pink-Tönen gestanzt und mit Copics schattiert. Das Kleeblat ist mit dem Clovers Stanzenset von Nellie Snellen gemacht.
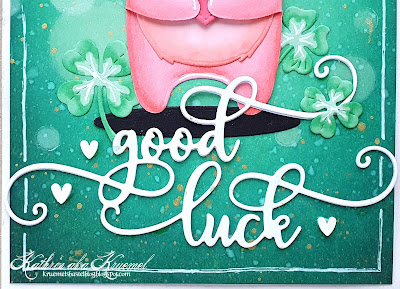
Das Schweinchen steht auf einem schwarzen Oval, gestanzt mit einer der Oval Shadows Stanze von MFT. Drumerhum befinden sich drei weitere Kleeblätter - gemacht wieder mit der Stanze von NellieSnellen sowie dem Lucky Clovers Set von LawnFawn. 

The little piggy is from one of 2023's christmas die sets by Action. Usually the die is made to cut either a fox or bear or rascal. But I think, with two nostrils and small eyes drewn on the set also creates a cute piglet. I cut the pieces from two different tones of pink and shaded them with Copics. The clover is made with a die from the Clovers set by Nellie Snellen.
The piglet is standing on a black oval, die cut with one of the Oval Shadows dies by MFT. Around the piggy I placed three more clovers, made again with the die by Nellie Snellen and the Lucky Clovers set by LawnFawn.


Und auf dieser Karte habe ich dann auch endlich die Good Luck Stanze von Gummiapan eingeweiht, die ich mir letzten September auf dem Stempelmekka gekauft habe. Die war so reduziert, dass ich einfach nicht widerstehen konnte. Ich habe sie zweimal aus weißem Cardstock gestanzt und die Teile aufeinander geklebt.

And on this card I also used the Good Luck die by Gummiapan, that I bought last september during Stempelmekka, for the first time. It was reduced so much in price, I just had to buy it. I die cut the text twice from white cardstock and stacked the pieces.


Ich habe alle Teile auf den Hintergrund geklebt, die Nase des Schweinchens, die Arme und das Herz und Kleeblatt, die es hält, sind für ein klein wenig Dimension mit dünnem 3D Tape aufgeklebt. 
Als Deko habe ich eingige kleine weiße Herzen aufgeklebt, außerdem habe ich mit einem weißen Gelstift einen Rahmen rundum auf den Hintergrund gemalt. 
Zum Schluss habe ich alles auf einen weißen Kartenrohling geklebt.

I glued all elements onto the background, the nose and arms of the piggy and also the heart and clover, it is holding, I attached with some thin foam tape for a bit of dimension.
As decoration I added a few white clay hearts and also used a white gel pen to draw a frame onto the background.
Then I just adhered the cardstock to a white note card.

Dienstag, 23. Januar 2024

Stampcorner Februar-Release Sneak #1

 
Hallo Ihr Lieben!
Der Januar ist schon fast wieder rum, also wird es Zeit, Euch ein erstes Sneak auf das Februar-Release von Stampcorner zu geben. Und wie  Ihr sicher schon erkannt habt, wird auch wieder ein Set mit dem tollen Ernst von Oma Plott dabei sein. Einen davon habe ich auf dieser Karte verwendet.

Hello everyone!
January has nearly passed already, so it's time to give you a sneak of the february release by Stampcorner. And as you might have seen already, there's also a new set with the great Ernst by Oma Plott. One of them I used on this card.

Die Karte hat einen ziemlichen Comic-Touch erhalten. Eigentlich war das gar nicht so geplant, aber es kam eins zum anderen, und mir gefällt sie so.
Für den Hintergrund habe ich ein Stück roten Cardstocks von außen mit Distress Ink Black Soot, Lumberjack Plaid und Barn Door gewischt. Dann habe ich mit Versafine Clair Nocturne den Cosmic Half Tone Oval Stempel von WhimsyStamps aufgestempelt. Der unterstützt den nach innen heller werdenen Look des gewischten Cardstocks nochmal. 

This card ended up pretty comic like - I hadn't planned that. But I kept adding different elements and I really like the result.
For the background I inked a piece of red cardstock from the outside in with Distress Ink Black Soot, Lumberjack Plaid and Barn Door. Then I stamped the Cosmic Half Tone Oval background by WhimsyStamps with Versafine Clair Nocturne onto the cardstock. The design kind of intensifies the look of the inked cardstock.


Ich finde den wütenden Ernst ja klasse - er scheint mal so richtig sauer zu sein! Ich habe ihn mit Copics coloriert und anschließend ausgeschnitten. Damit er nicht in der Luft schwebt, habe ich ein schwarzes Oval mit einer der Oval Shadows Stanzen von MFT gestanzt und ihn daraufgesetzt.
Der ganze Comic-Look begann eigentlich mit der Wolke, aus der die Blitze kommen. Ich habe eine aus schwarzem und eine aus grauem Cardstock gestanzte Wolke leicht versetzt aufeinander geklebt und daraus zwei Blitze die jeweils aus einem Blitz aus hellgelbem und einem aus dunkelgelbem Cardstock bestehen, daran geklebt. 
Nur die Wolke sah aber irgendwie fad aus. Also habe ich aus gelbem Cardstock die Form hinter Ernst gestanzt. Ich weiß gar nicht, wie ich die nennen soll - nach innen gewölbte Wolke? Aber die hat mich ebenfalls an einen Comic erinnert. Und dann habe ich beschlossen, hinter diese Form noch Strahlen zu setzen. Die habe ich mit Distress Oxide Wild Honey und weißer Stempelfarbe sowie einem Strahlenstencil von MFT auf den fertigen Hintergrund gewischt. 

I just love this angry Ernst - he seems to be really pissed! I colored him with Copics and cut him out. To make sure he's not floating on the card I die cut a black oval with one of the Oval Shadow dies by MFT and placed him on it. 
The whole comic look started with the cloud and flashes. I glued two clouds, one cut from black and one from grey cardstock, on top of each other a bit off set and then attached two flashes, that are each made from a light yellow and a dark yellow die cut, to them. 
Just the cloud looked boring. So I die cut the shape behind Ernst from yellow cardstock. I have no idea how to name that - inward cloud? But it definately reminded me of a comic. And then I decided, to put some rays behind this wonky shape. I inked those with Distress Oxide Wild Honey, white pigment ink and a rays stencil by MFT onto the finished background.


Die Texte auf der Karte sind ebenfalls aus dem neuen Stempelset. Eigentlich ist es ein Text, den habe ich aber zerschnitten, um ihn auf der Karte verteilen zu können. Außerdem konnte ich so den Schlechte-Laune-Text etwas gebogen in mein Misti kleben. Beide Texte sind mit weißem Embossingpulver aufembosst.

The text on this card means "Being in a bad mood? Never!". It's another stamp from the new set, I just cut it apart to be able to place the text parts seperately onto my card. That also gave me the possibility to stick the longer text bent into my Misti. Both texts I white heat embossed onto the background.


Hinter Ernst und das Oval sowie die Wolken habe ich etwas dünnes 3D Tape gesetzt und die Motive so auf den Hintergrund geklebt. Außerdem habe ich als Deko noch einige dunkelgelbe Sterne auf der Karte verteilt und mit einem weißen Gelstift einen dünnen Rahmen aufgemalt.
Zum Schluss habe ich alles schwarz gemattet und auf einen weißen Kartenrohling geklebt. 

Behind Ernst and the oval and also behind the clouds I used some thin foam tape to adhere the images to the background. I also added a few dark yellow stars to the card and drew a thin frame with a white gel pen.
Then I matted the cardstock black and adhered it to a white card base.

Montag, 22. Januar 2024

Geburtstagskarte mit Schweinchen

 
Hallo Ihr Lieben!
Diese Karte startete mit einer komplett anderen Idee, aber irgendwie kam dann alles anders. Und so ist eine Geburtstagskarte mit Schweinchen entstanden.

Hello everyone!
This card started with something completly different in mind, but then somehow everything changed. And so I ended up with a birthday card with piglets.

Der Hintergrund ist ein Stück weißer Cardstock, den ich mit Distress Oxide Tattered Rose, Saltwater Taffy, Abandoned Coral und Lumberjack Plaid gewischt habe. Dann habe ich mit weißer Stempelfarbe den Happy Birthday Background von MFT aufgestempelt. Außerdem habe ich etwas schwarze Metallic Watercolor aufgespritzt - stärker in der unteren rechten Ecke und in die oberen linke auslaufend.

The background is made from a piece of white cardstock, that I inked with Distress Oxide Tattered Rose, Saltwater Taffy, Abandoned Coral and Lumberjack Plaid. I used white ink to stamp the Happy Birthday Background by MFT onto the cardstock and also spattered some black metallic watercolor onto it - a lot in the bottom right corner and letting it fade towards the top left one.


Die süßen Schweinchen sind aus dem Peek-a-Boo Pets Stempelset von AveryElle. Ich habe die Körper ein klein wenig verlängert, so dass sie das Polaroid schön ausfüllen. Der Luftballon und das Herz sind aus dem Set Monsters, die Blume und der Luftballon wieder aus dem Set Peek-a-Boo Pets. Alle Motive sind mit Copics coloriert. Die Hände und die Dinge, die sie halten, habe ich mit dünnem 3D Tape aufgeklebt. 
Mit einer Polaroid-Stanze von MFT habe ich den Polaroidrahmen aus weißem Cardstock ausgestanzt. Dabei habe ich per Partial Diecutting die Buchstaben für das Wort BDAY in den Rahmen hineingestanzt. Dafür habe ich erst die Buchstaben so aus einem Stück weißen Cardstocks gestanzt, dass die untere Kante nicht mitgestanzt wird. Anschließend habe ich drei Durchgänge Partial Die Cutting in verschiedenen Richtungen gebraucht, um den Polaroidrahmen möglichst komplett zu stanzen - nur die untere Kante des inneren Fensters habe ich dann noch mit dem Cutter geschnitten. 
Die Schweinchen sind mit dünnem 3D Tape auf ein Stück schwarzen Cardstocks geklebt, dann habe ich den Rahmen mit dickem 3D Tape drumherum gesetzt. Den Luftballon habe ich oben auf den Rahmen geklebt. Dort befindet sich auch eine Sprechblase. 
Für den Rest des Textes habe ich Stempel aus dem Occasional Labels Set von MamaElephant verwendet. Sie sind wieder mit dünnem 3D Tape auf den Rahmen geklebt, außerdem habe ich zwei kleine rote Herzen als Deko aufgeklebt.

The cute piggies are from the Peek-a-Boo stamp set by AveryElle. I made the bodies a bit longer so the fill the Polaroid frame nicely. The balloon and the heart are from the Monsters stamp set, the flower and balloon again from the Peek-a-Boo Pets set. I colored all images with Copics. The hands and things, the critters are holding, I attached with thin foam tape.
Using a polaroid frame die by MFT I cut the frame from white cardstock. I did some partial die cutting to the the word BDAY into the frame. I first cut the letters from a piece of white cardstock, not cutting their bottom edge. Then I needed three runs of partial diecutting, each time using the frame in a different orientation, to cut as much as possible of the Polaroid frame - I only had to use my craft knife to cut the bottom edge of the inner window.
The piggies I adhered with thin foam tape to a piece of black cardstock, then I put the frame with thick foam tape around it. The ballon I adhered on top of the frame and there's a speech bubble there as   well.
For the rest of the text I used stamps from the Occasional Labels set by MamaElephant. Again I adhered them with thin foam tape, I also added two red hearts as decoration.


Ich habe den Rahmen mit den Motiven auf den Hintergrund geklebt und einige schwarze Perlen drumherum verteilt. Dann habe ich den Cardstock schwarz gemattet und alles auf einem weißen Kartenrohling befestigt.
 
I glued the frame with the images onto the background and put a few black pearls around it. Then I matted the cardstock black and attached everything to a white card base.

Samstag, 20. Januar 2024

Zum Geburtstag alles Gute

 
Hallo Ihr Lieben!
Der Januar ist immer ein wenig "Saure-Gurken-Zeit" wenn es um die Themen, zu denen ich basteln könnte, geht. Weihnachten und Silvester sind vorbei, der Winter dürfte sich meinetwegen auch verabschieden - also genau die richtige Zeit, um den Vorrat an Geburtstagskarten aufzufüllen. Eine solche zeige ich heute auf dem Kulricke Blog.

Hello everyone!
January is always a bit of a dead season when it comes to themes that I want to craft for. Christmas and New Year's have passed, in my opinion winter could go away also - so it's the perfect time to stock up my stash of birthday cards. One of them I am sharing over on the Kulricke Blog today.

Gegen den Winterblues habe ich zu richtig sonnigen Farben gegriffen. 
Erst habe ich die Worte Herzlichen Glückwunsch und Happy Birthday aus dem Set Beste Wünsche Reverse mit Distress Ink Wild Honey in Reihen auf ein Stück gelben Cardstock gestempelt, bis er komplett damit gefüllt war. Dann habe ich mit einem Blending Brush vom Rand her ebenfalls Wild Honey auf den Cardstock gewischt. Es ist zwar derselbe Farbton, den ich auch zum Stempeln der Worte benutzt habe, durch das Aufbringen mit dem Blending Brush ist die Farbe aber ein kleines bisschen weniger intensiv, so dass die Worte immer noch lesbar sind. Anschließend habe ich noch weißes Gesso - das ich kürzlich beim Umräumen eines Schrankes in meinem Bastelzimmer wiedergefunden habe - auf den Carstock gespritzt.

Against the winterblues I went with really sunny colors here.
First I stamped the texts "congrats" and "happy birthday" from the Beste Wünsche Reverse stamp set with Distress Ink Wild Honey in rows onto a piece of yellow cardstock until it was completly filled with them. Then I used a blending brush and Wild Honey again to darken the edges of the cardstock. I used the same color that I used to stamp the words, but since the blending was applied with a brush the color is a bit lighter there and the words are still legible. Then I flicked some white Gesso - that I just re-discovered when re-arranging one of the closets in my craft room - onto the cardstock.


Für die Deko meiner Karte habe ich zu schwarz, weiß und aqua gegriffen. 
Erst habe ich den Kreis Stern Insert aus einem Stück schwarzen Cardstocks gestanzt und rundherum zu einem Quadrat geschnitten. In der selben Größe habe ich ein Quadrat aus weißem Cardstock geschnitten und die beiden Teile mit dünnem 3D Tape leicht gedreht aufeinander geklebt.
Die Kerzen sind aus dem Stempelset Party. Ich habe sie mit schwarzer Tinte auf weißen Cardstock gestempelt und dann die beiden Flächen einfach mit Distress Ink eingefärbt - die Flamme wieder mit Wild Honey, die Kerze an sich mit Salvaged Patina. Auf die Flamme habe ich mit einem gelben Glitter-Gelstift ein wenig Glitter aufgetragen, auf die Kerze habe ich mit einem weißen Gelstift Streifen aufgemalt. Damit habe ich auch einen Rahmen auf das schwarze Quadrat aufgemalt. 
Ich habe die Kerzen ausgeschnitten und wiederum mit 3D Tape auf die Quadrate geklebt.
Für den Text habe ich die Fähnchen Zum Geburtstag und Alles Gute aus schwarzem Cardstock gestanzt und jeweils mit einem Streifen gelben Cardstocks hinterlegt. Dann habe ich sei auf die Kerzen geklebt und eine doppelte Schleife aus Twine links aufgeklebt. Die Enden rechts habe ich mit 3D Tape hinterlegt. 
Und um den Aquafarbton nochmal aufzugreifen, habe ich einige Enamel Dots in derselben Farbe aufgeklebt.

I went with black, white and aqua for my decorations.
First I die cut the Kreis Stern Insert from black carstock and cut the cardstock into a square. I cut another square in the same size from white cardstock and glued both pieces with foam tape together, just not straight but a bit at an angle. 
The candles are from the Party stamp set. I stamped them with black ink onto white cardstock and then used Distress Inks again to color them. I went with Wild Honey again for the flames and Salvaged Patina for the candles. Then I used a yellow glitter gel pen to add some glitter to the flames, with a white gel pen I drew some stripes onto the candles. I also used that white gel pen to add a frame to the black square. 
I cut the candles out and adhered them to the squares, using foam tape again.
For the text I die cut the banners "Zum Geburtstag" and "Alles Gute" from black carstock and glued a strip of yellow cardstock behind them. Then I glued them onto the candles and added a double bow, made from white twine, to the left edges. Behind the right ends I put some more foam tape.
To pick up the aqua tone again I added some Enamel Dots in that color to the card.


Zum Schluss habe ich meinen dekorierten Cardstock nur noch schwarz gemattet und alles auf einen weißen Kartenrohling geklebt.

To finish this card I only matted my decorated cardstock black and adhered it to a white note card.

Freitag, 19. Januar 2024

LawnFawnatics Challenge #165

 
Hallo Ihr Lieben!
Lots of Hearts - das ist das Thema der LawnFawnatics Challenge #165. Und das Thema lädt natürlich geradezu dazu ein, eine Valentinstagskarte zu machen. Und so ist diese Karte entstanden - natürlich mit vielen Herzen!

Hello everyone!
Lots of Hearts - that's the theme of the LawnFawnatics Challenge #165. Of course this theme is perfect to make a Valentine's card - and I did, of course adding lots of hearts.

Ich habe mich für rot, weiß, pink und türkis als Farbschema entschieden. Ich finde, die Farben harmonierensuper zusammen und wenn man mal schaut, gibt es viele Valentinstagsartikel in dieser Farbkombi. 
 
 I went with red, white, pink and aqua as my color scheme. I love how these colors go together and if you take a look, a lot of valentine's related products are using these colors, too.
 
 
Da ich recht satte Farben im Hintergrund wollte, habe ich hier mit den Distress Inks - und nicht den Oxides, die sich ja schöner verblenden lassen - gearbeitet. Der Himmel ist mit Picked Raspberry, Kitsch Flamingo und Spun Sugar gewischt. Dann habe ich einige Wassertropfen, weiße Acrylfarbe und ewas Liquid Stardust bespritzt.
Am Himmel fliegen einige kleine Wolken und dazwischen ganz viele Herzen. Die Wolken sind mit Stanzen aus den Sets Platform Pop-Up Cloud Inserts und Platform Pop-Up Cloud Wrap Around gemacht. Für die Herzen habe ich eine Stanze aus dem Heart Shaker Tag Set, das eigentlich die Füllung für den Shaker stanzt, aus Cardstock in drei verschiedenen Rottönen gestanzt. 
Im unteren Teil der Karte befinden sich zwei Lagen weißen Cardstocks, deren obere Kante ich mit der Heart Garden Border Stanze gestanzt habe. Nun wachsen dort herzförmige Blumen. Den weißen Cardstock habe ich von unten her mit Distress Ink Uncharted Mariner und Salvaged Patina gewischt. Auf die herzförmigen Blüten habe ich dann Herzen, gestanzt wieder aus den drei Cardstockfarben, die ich bereits für die Herzen am Himmel verwendet habe, aufgeklebt. 

I wanted some bright colors in the background, so I used Distress Ink - not Oxides, that are easier to blend - here. The sky is inked with Picked Raspberry, Kitsch Flamingo and Spun Sugar. Then I flicked some droplets of water, white acrylic paint and some of Liquid Stardust onto it.
In the sky there are some clouds floating around and between them lots of hearts. I die cut the clouds using dies from the Platform Pop-Up Cloud Inserts nnd Platform Pop-Up Cloud Wrap Around die sets. For the hearts I used a die from the Heart Shaker Tag set, that's meant to cut the shaker pieces, to cut the hearts from three different tones of red cardstock.
The bottom of the card I made from two layers of white cardstock, that I had die cut the Heart Garden Border die from. Now there are heart shaped flowers blooming on my card. I inked the white cardstock with Distress Ink Salvaged Patina and Uncharted Mariner, then glued hearts, again cut from the three tones of red I had used for the hearts in the sky, onto the heartshaped flower heads.


Auf den türkisfarbenen Bereich der Karte habe ich meinen Text geklebt. Dafür habe ich die Giant XOXO Stanze zweimal aus weißem  und zweimal aus dunkelpinkem - ja, auch wenn man es kaum sieht, hier habe ich tatsächlich einen dunklen Pinkton verwendet - Cardstock gestanzt. Ich habe jeweils zwei der Stanzteile zusammen- und sie dann leicht versetzt aufeinander geklebt. Da ich hier ja, wie ich es normalerweise tue, keinen weißen Gelstift für die Highlights benutzen konnte, habe ich die Highlights auf den Buchstaben mit Stickles gemacht.
Quer über das gestanzte Wort habe ich einen gestempelten Text geklebt. Dafür habe ich ein be mine und ein happy valentine's day aus dem Set How You Bean? Conversation Hearts Add-On mit weißem Embossingpulver auf roten Cardstock embosst und ausgeschnitten. 
Und oben auf dem gestanzten Text war dann Platz für meine Motive - so ganz ohne geht es doch nicht! Und ich habe wieder mal zu den Mäusen gegriffen. Die mag ich einfach so sehr und sie passen irgendwie überall. 
Der Mäusejunge hat eine Valentinstagskarte gebastelt und zwei besonders schöne Blumen aus dem Garten gepflückt und bringt sie nun seiner Angebeteten...
Der Mäusemann ist aus dem Set Merry Mice, die Karte aus dem Porcu-Pine for You Add-On Set und die Mäusedame aus dem Set Christmas Before 'n Afters. Alle Motive sind mit Copics coloriert. Und von den Bordüren im Hintergrund hatte ich Reststücke übrig - also habe ich zwei Blumen von dort abgeschnitten und sie dem Mäusemann in die Hand gegeben. Damit sich die Blüten hier ein wenig von denen im Hintergrund abheben, habe ich sie mit Stickles beglittert. 

Onto the aqua area of my card I added my text. I die cut the Giant XOXO die cut twice from white and twice from dark pink - yes, it's hard to see in the picture but here I actually used some very dark pink - cardstock. I put the two die cuts of the same color on top of each other and then glued the white ones onto the pink ones, offsetting them a bit. And since I wasn't able to use a white gel pen for the highlights on the letters - like I usually do - I used some Stickles for them.
Across the die cut word I put a stamped text. I white heat embossed a be mine and a happy Valentine's day from the  How You Bean? Conversation Hearts Add-On set onto red cardstock and cut them out.
And on top of my text there was room for some images - I just can't do without. And again I went with the mice. I just love them so much and they seem to fit on every card.
The mouse boy made a Valentines's card all by himself and picked two of the nicest flowers from his garden. Now he's standing there, ready to hand them over to his beloved one....
The mouse boy is from the Merry Mice set, the card from the Porcu-Pine for You Add-On set and the mouse girl is from the Christmas Before 'n Afters set. I colored all images with Copics. And from the heart garden borders I had some pieces left - so I cut two flowers off of these and let the mouse boy hold them. To make sure they don't blend in with the ones in the background I used Stickles to add some glitter to them. 


Hier könnt Ihr all den Schimmer und Glitter auf der Karte besser sehen. Ich finde, das passt einfach wunderbar zu Valentinstag.
Ich habe alle Teile aufeinander geklebt, hinter den embossten Texten und den Mäusen befindet sich etwas 3D Tape. Zum Schluss habe ich alles auf einen weißen Kartenrohling geklebt.

Here you get a better look at all the shimmer and glitter on this card. I think, it adds the perfect touch to a Valentine's card.
I glued all pieces together, behind the embossed texts and the images I put some foam tape. Then I adhered the decorated cardstock to a white note card.