Posts mit dem Label Belles´n´Whistles werden angezeigt. Alle Posts anzeigen

Samstag, 20. Juni 2026

It's summer, make a splash!

 
Hallo Ihr Lieben!
Merkt Ihr es - der Sommer ist da! Und mit ihm die Badesaison. Und auch wenn ich persönlich Schwimmbäder oder Seen nicht mag - bei mir muss es das Meer sein - habe ich mich zu dieser Karte inspirieren lassen.
 
Hello everyone!
Do you feel it - summer is here! And with it comes pool season. Well, I personally neither like pools or lakes - it has to be the ocean for me. But I got inspired to make this card.
 
Ich habe vor kurzem meine Stempel in ein anderes Katalogisierungsprogramm verschoben und weil so einiges nicht mehr aktuell ist/war, gehe ich die diversen Notizen durch und schaue, was ich davon tatsächlich noch habe. Nun, dabei entdeckt man den ein oder anderen alten Schatz, den man eigentlich schon vergessen hat. So ging es mir mit meinen Stempeln diverser Firmen mit den Designs von Elisabeth Bell. Ich liebe ihre Motive einfach und nutze sie viel zu selten. Hier kam dann Tube Wear von Belles'n'Whistles zum Einsatz.
Der Hintergrund besteht aus einem Stück Watercolor Cardstock, den ich per Ink Smooshing mit Distress Inks eingefärbt habe. Für den Himmel habe ich Salty Ocean, für den schmalen Streifen am Boden Peacock Feathers verwendet. Der Unterschied ist nicht groß, aber doch sichtbar. 
Anschließend habe ich goldene Metallic Watercolor aufgespritzt.
 
I moved my stamp organization to a different program recently and because not everything is up to date I am working through the notes, checking what I actually have left. When doing this you might discover  some treasures that you actually forgot you had. To me that happened with the stamp by different brands using the designs by Elisabeth Bell. I love her images and use them way too little. Here I brought out Tube Wear by Belles'n'Whistles.  
The background is made from a piece  of watercolor that I colored by doing ink smooshing with Distress Inks. I used Salty Ocean for the sky and Peacock Feathers for  the thin strip at the bottom of the cardstock. There isn't much of  a difference but it's noticable. 
 Then I splattered some gold  metallic watercolor onto the cardstock. 
 

Hier seht Ihr die Kleine mit ihrem Schwimmring genauer. Ich habe sie mit Copics coloriert - ja, meist ist es einfach noch bequemer als die Ohuhus - und mit der Schere ausgeschnitten. Ich habe sie schon schön sonnengebräunt, mit vom Wasser ausgebleichten Haaren coloriert und außerdem mit einem braunen Fineliner einige Sommersprossen auf die Backen gemalt. 
Der Pool, in dem sie steht, ist von Gummiapan. Ich habe ihn aus gelbem Cardstock gestanzt und mit Copics schattiert. Dann habe ich etwas mit Salty Ocean eingefärbten Watercolor Cardstock hineingeklebt. 
Das große Wort Splash und die Wassertropfen sind ebenfalls aus Watercolor Cardstock und bewusst fleckig mit Salty Ocean eingefärbt. Aueßrdem habe ich alles mit einem Schatten aus dunkelblauem Cardstock hinterlegt.  
Das gestanzte Wort ergänzt den weiß embossten Text, den ich links des Motivs aufgeklebt habe. Er ist mit Stempeln von LawnFawn zusammengesetzt. 
 
Here you can see the little cutie with her tube a bit better. I colored her with Copics - yes, it's still the easier way than using my Ohuhus - and cut her out with my scissors. I colored her with bronzed skin, hair bleached by water and sun and also used  a brown fineliner to add some freckles to her cheeks. 
The pool she is standing on is by Gummiapan. I cut it from yellow cardstock and shaded it with Copics. Then I glued a piece  of watercolor cardstock that I colored with Salty Ocean, into it.
The large word splash and the water droplets are also from watercolor cardstock and colored splotchy on purpose using Salty Ocean. I also put a shadow cut from dark blue cardstock behind all the letters and droplets. 
The die cut word completes the white heat embossed text, that I glued to the left of the girl's head. I put that together using stamps by LawnFawn.
 

 Oben am Himmel habe ich eine Sonne mit zwei kleinen weißen Wolken aufgeklebt. Die Sonne habe ich mit Distress Ink Squeezed Lemonade und Mustard Seed eingefärbt, die Wolken habe ich einfach weiß gelassen. 
Und um das Rot, mit dem ich den Badeanzug des Mädchens coloriert habe, nochmal aufzugreifen, habe ich drei rote Herzen als Deko auf der Karte verteilt.
 
To the sky I glued a sun and two small white clouds. I colored the sun with Distress Ink Squeezed Lemonade and Mustard Seed, the clouds I left a plaing white.
To pick up the red again that I had used to color the girl's bathing suit, I glued three red clay hearts to the card.
 

 Die kleine Wolke und die gestempelten Texte habe ich mit dünnem, die ausgestanzten Buchstaben mit dickem 3D Tape aufgeklebt. Außerdem habe ich die Sonne, einige Bereiche des Schwimmrings, das Wasser und die gestanzten Buchstaben und Tropfen mit Stickles beglittert.
Zum Schluss habe ich alles auf einen weißen Kartenrohling geklebt.
 
I adhered the small cloud and the  stamped  texts with thin, the die cut letters with thick foam tape. Then I put  Stickles onto the sun, some areas of the tube, the water and the die cut letters and droplets.
Then I glued the card panel to a white note card.
 

Freitag, 22. November 2024

Eine Karte zum Abschied

 
Hallo Ihr Lieben!
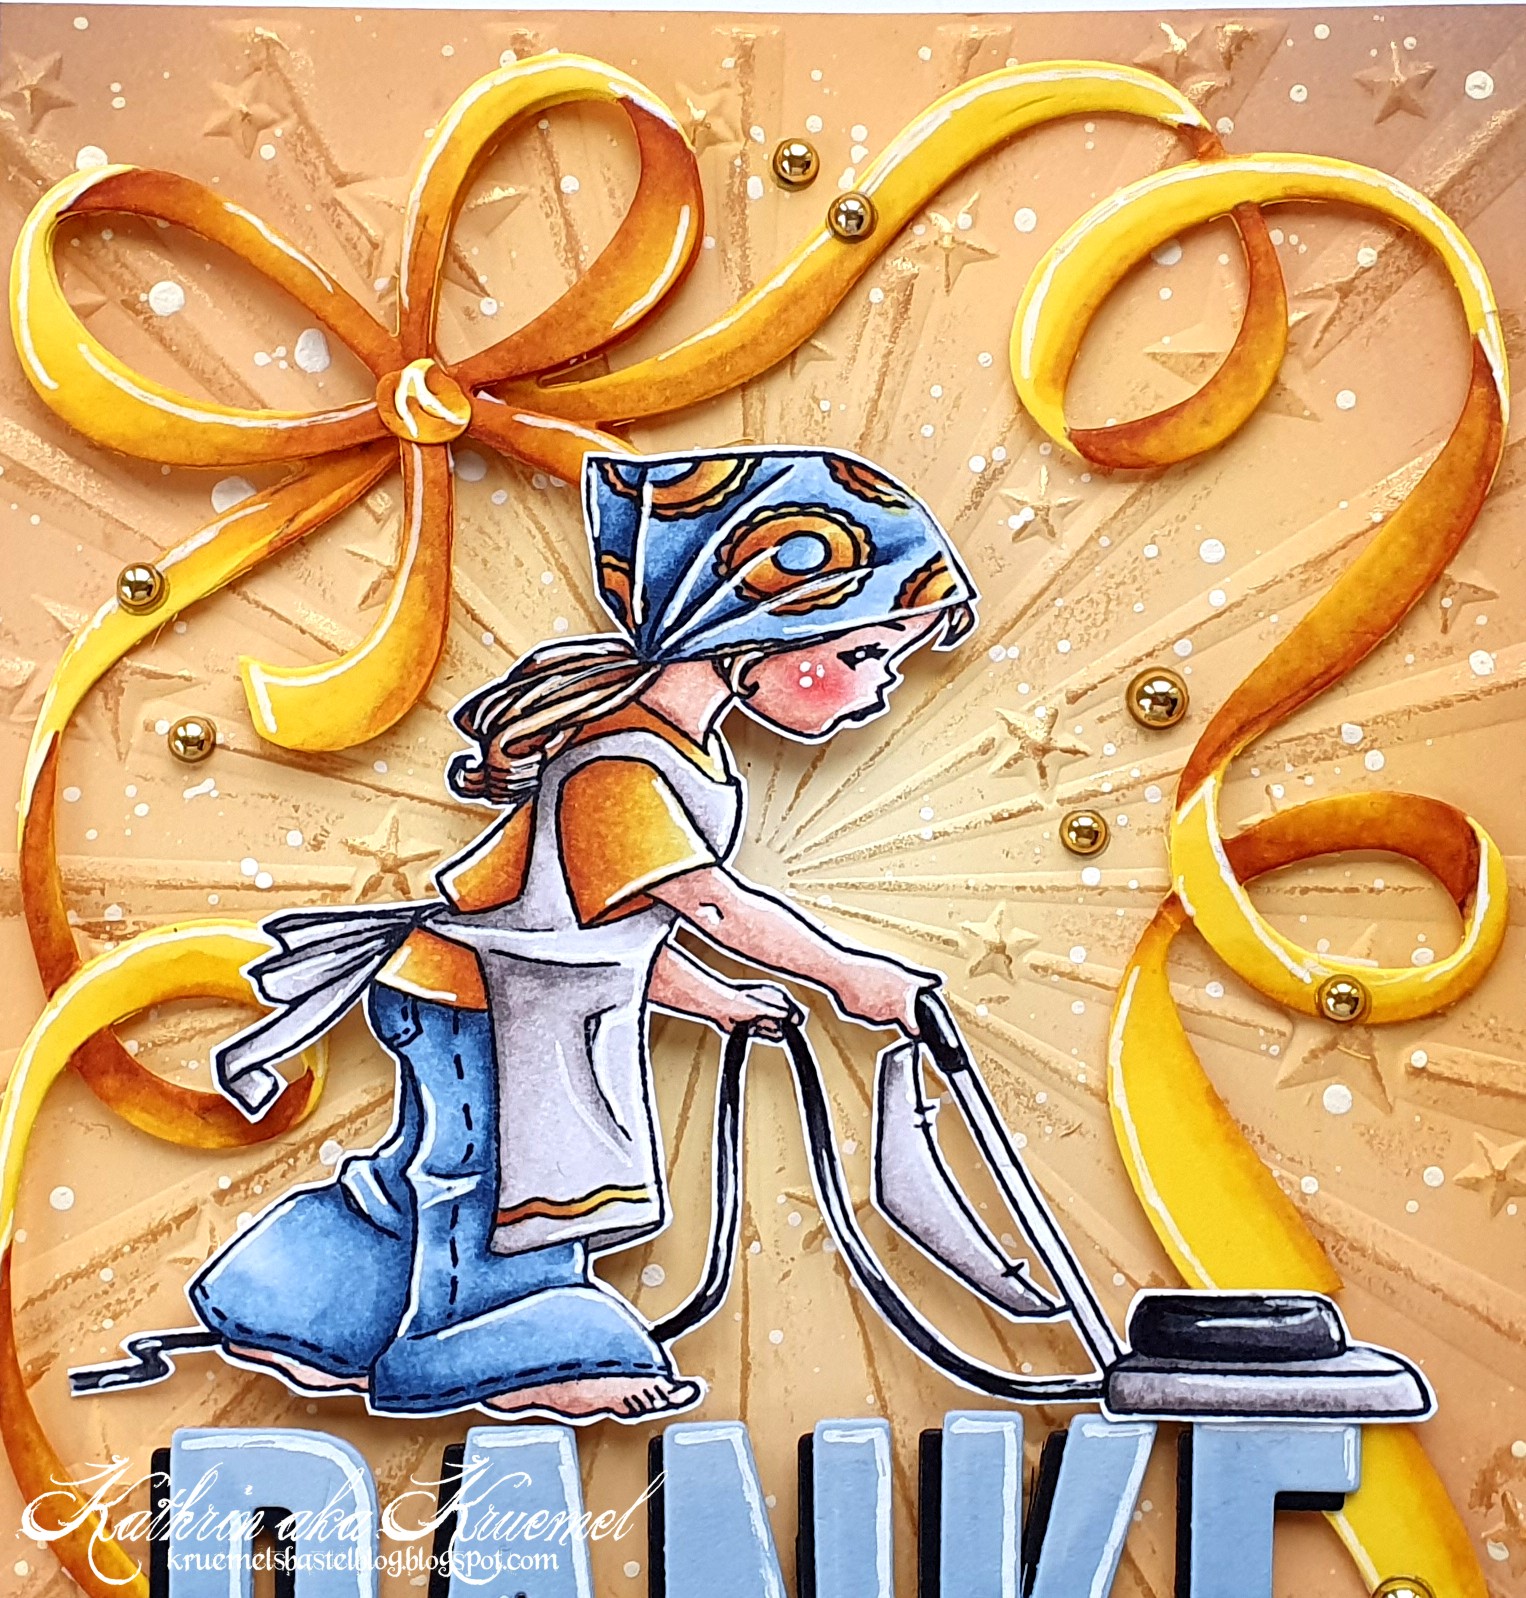
Wenn die Putzfrau in Rente geht, dann ist das doch der perfekte Zeitpunkt, um das süße Mädel mit dem Staubsauger mal wieder zum Einsatz kommen zu lassen. 

Hello everyone!
When your cleaning lady at work goes into retirement then that's the perfect moment to use this little girl with the vacuum cleaner again.
 
Für den Hintergrund habe ich ein Stück cremefarbenen Cardstocks erst mit Distress Oxide Scattered Straw, Wild Honey und Gathered Twigs gewischt. Dann habe ich mit dem All Star Burst Embossingfolder von SimonSaysStamp die Strahlen und Sterne hineingeprägt. Auf die Sterne und höchsten Stellen der Strahlen habe ich dann goldenes Gilding Wax aufgetragen. Da ich verschiedene Goldtöne habe, habe ich drei verschiedene benutzt - jeweils in der Helligkeit zur Farbe im Hintergrund passend. Anschließend habe ich noch weiße Acrylfarbe aufgespritzt.
Als Rahmen habe ich den Ribbon Frame von TheGreetery auf die Karte geklebt. Den habe ich horizontal geteilt, damit er auf die deutsche A2 Karte passt. Die "Lücken" habe ich dann hinter dem Text und Motiv versteckt.
Gestanzt habe ich den Rahmen aus gelbem Cardstock und mit Copics Schatten hinzugefügt.

For the background I inked a piece of cream colored cardstock with Distress Oxide Scattered Straw, Wild Honey and Gathered Twigs. Then I used the All Star Burst embossing folder by SimonSaysStamp to emboss the rays and stars into the cardstock. Onto the stars and the hightest point of the rays I dabbed some gold Gilding Wax. Since I have different tones of gold Gilding Wax I used three different ones here, making them match the intensitiy of the color in the background. Then I also added splatters of white acrylic paint.
I used the Ribbon Frame die by TheGreetery to put a frame onto my card. I cut it apart crosswise to make it fit the german standard A2 card size. The "gaps" I've hidden behind the text and image.
I die cut the frame from yellow cardstock and added shadows with my Copics.


Das Motiv ist Belle Vacuuming von Belles 'n' Whistles - und ich bin froh, es nicht aussortiert zu haben. Ich habe es mit Copics coloriert und per Hand ausgeschnitten.

The image is Belle Vacuuming by Belles 'n' Whistles - and I am really happy that I kept it. I colored her with Copics and fuzzy cut her out.


Für den Text habe ich mit dem Wedding Alphabet Stanzenset von XCut die Buchstaben für das Wort Danke einmal aus hellblauem und einmal aus schwarzem Cardstock gestanzt. Die hellblauen Buchstaben habe ich mit Copics schattiert, dann habe ich die schwarzen Buchstaben etwas versetzt als Schattenlage dahinter geklebt.
Der Rest des Textes ist mit Stempeln aus den Reverse-Sets von Kulricke gemacht und einfach schwarz auf hellblauen Cardstock gestempelt.

For the text I used the Wedding Alphabet die set by XCut to cut the letters for the word "danke" - thanks - from light blue and black cardstock. I shaded the blue ones lightly with Copics, then glued the black ones a bit offset behind them as a shadow layer.
The rest of the text means "for everything and all the best for your future" and is simply stamped black onto light blue cardstock.


Den Rahmen habe ich mit dünnem, das Motiv und den Text mit dickem 3D Tape auf den Hintergrund geklebt. Als Deko habe ich einige goldene Perlen auf der Karte verteilt und dann alles auf einem weißen Kartenrohling befestigt.

I adhered the frame with thin, the image and text with thick foam tape. Then I added a few gold pearls as decoration and put my card panel onto a white note card.

Montag, 1. Mai 2023

Tochter-Geburtstagskarte #2

 
Hallo Ihr Lieben!
Nachdem ich Euch gestern die Geburtstagskarte für eine meiner Zwillinge gezeigt  habe, folgt heute die Karte für die "andere Hälfte".

Hello everyone!
After sharing the birthday card for one of my twins with you yesterday, I am sharing the one for the "other half" today.

Ihr seht schon - gemeinsames Element ist die große 22 und die folierten Texte.
Natascha ist "die Kreative" und studiert Design. Also sollte auch die Karte etwas mit Kreativität zu tun haben - auch wenn da heute ganz viel am PC stattfindet.
Für den Hintergrund habe ich einen Marmoreffekt gold auf weißen Cardstock foliert.

As you can see - the big 22 and the foiled texts are the element, both cards have in common.
Natascha is a creative person and studies design. So I wanted my card to have something to do with creativity - even if most of it is done on a computer nowadays.
For the background I foiled a marble pattern with gold foil onto a piece of white cardstock.


Die beiden Zahlen sind wieder mit den Outline Numbers Stanzen von MFT gemacht - je dreimal aus weißem Cardstock und für die oberste Lage einmal aus schwarzem Glitter-Cardstock. Ich habe sie aufeinander geklebt und vor dem Aufkleben auf der Karte einige orangefarbene und pinke Farbkleckse auf dem Hintergrund verteilt. Die sind mit Stanzen aus dem Art Supplies Stanzenset von LawnFawn aus weißem Cardstock gestanzt und mit Copics coloriert. Im Hintergrund habe ich zwei große und einen kleineren Klecks aufgeklebt.

The numbers are again made with the Outline Numbers die set by MFT - I die cut each three times from white cardstock and for the top layer once from black glitter cardstock. Then I stacked them and before attaching them to the card I added some orange and pink splashes of color to the background. I cut those from white cadstock using dies from the Art Supplies die set by LawnFawn and colored them with my Copics. Behind the numbers I attached two large and one smaller color splash.


Als Motiv habe ich den Sass and Class Stempel von Belles'n Whistles mal wieder ausgepackt und mit Copics coloriert. Die Idee, die Hose schwarz zu colorieren, habe ich ein wenig bereut, aber ins Design der Karte (und zu meiner Tochter) passt es. Nach dem Colorieren habe ich das Motiv ausgeschnitten und hinter den ausgestreckten Fuß noch einen Becher mit Stiften Scheren aus dem Virtual Friends Add-On Stempelset von LawnFawn geklebt. Dann habe ich das Motiv und einige weitere kleine Texte mit 3D Tape auf den Hintergrund geklebt.
Als Texte habe ich wieder die selben Texte aus einem Hotfoil-Set von Kartenkunst verwendet. Sie sind gold auf schwarzen Cardstock foliert und dann ebenfalls mit 3D Tape aufgeklebt. Und dass ich genau die selben Texte für diese Karte gewählt habe, die auch schon auf Pias Karte zu finden sind, liegt einfach daran, dass die von der Anordnung her am besten auf die Karte passten.

For the image I brought out the Sass and Class image by Belles'n Whistles after quite some time and colored it with Copics. I kind of regreted to have chosen black as the color for the trousers, but the color fits the colors on my card (and my daughter!). I cut the colored image out and added a cup with pens and scissors from the Virtual Friends Add-On stamp set by LawnFawn behind the foot. Then I adhered the image and a few more small color spashes to the card using foam tape. 
I went with the same texts by Kartenkunst here. I hotfoild them gold onto black cardstock and adhered them using foam tape again. And that I went with the exact same texts, that I also used on Pia's card, is simply because those fit the card best in length.


Abschließend habe ich noch einige schwarze Glitzersteine auf der Karte verteilt. 
Und dann stand ich auch hier vor der Frage - schwarze Mattung oder nicht? Ich habe mich auch hier dagegen entschieden, einfach, weil mir die Karte so besser gefällt. 

As a last step I added a few black rhinestones to the card.
And then I was again debating with myself, if I wanted a black mat or not - and again I decided against it because I liked the card withouth it better.

Samstag, 22. Februar 2020

Stempeleinmaleins - Ausgabe vom 22. Februar 2020


 Hallo Ihr Lieben!
Die heutige Anleitung auf dem Stempeleinmaleins ist diese Flap Fold Card. 

Hello everyone!
Today's tutorial over at Stempeleinmaleins is this Flap Fold Card.

Bei Stöbern nach einer Deko-Idee für meine Karte bin ich über die Pizza-Stanze von Magnolia gestolpert - und so steht diese Karte ganz im Zeichen der Pizza.

While going throuh my stash looking for an idea of how to decorate my card I came across this pizza die by Magnolia - and so this card is all about pizza.


Die Klappe auf der Vorderseite lässt sich nach oben klappen - sie wird vom "wishing you a yummy day" Text von  Mama Elephant auf der Vorderseite geschlossen gehalten. Die Pizza am oberen Rand der Karte ist auch im geöffneten Zustand zu sehen.
Ich habe aus meiner Karte eine Einladung zum Pizza-Essen gemacht. Dafür habe ich unter der Klappe ein aus schwarzem Cardstock gestanztes "Einladung", gemacht mit einer Stanze von Kulricke, versteckt. 
Um die Klappe habe ich rot-weiß kariertes Band gewickelt, das zu meinem ebenfalls rot-weiß karierten Designpapier auf der zweiten Lage der Karte, passt. 
Als Deko reichten ein paar schwarze Enamel Accents.

The flap on the front opens up - it get's hold closed from the "wishing you a yummy day" saying by Mama Elephant. The pizza on the top edge can also be seen when the card is opened.
I've turned this card into an invitation for a pizza night. So I've die cut a "invitation" from black cardstock and have hidden it underneath  the flap. 
Around the flap I've wrapped some red and white checked ribbon, that matches the designer's paper I've used for the second layer of my card.
For decorations a few black Enamel Accents were enough.


Hier könnt Ihr die Deko besser sehen. 
Die Teile der Pizza sind aus verschieden farbigen Cardstocks gestanzt und mit Distress Ink teilweise ein wenig "gebräunt". 
Auf dem Einladung und den Herzen daneben habe ich mit einem weißen Gelmarker Highlights gesetzt.

Here you get a better look at the decorations.
The different parts of the pizza are die cut from different colors of cardstock and I've inked up the edges of some of the parts with Distress Ink to "brown" them a bit.
I've used a white gelly marker to add some highlights to the die cut word and the hearts next to it.


Und so sieht die Karte komplett geöffnet aus.

And here's the card completly opened.


Auf die kleinere Fläche unter der Kreis-Ausstanzung habe ich einen Einladungstext von Magnolia aufgestempelt.

Onto the smaller area underneath the die cut circle I've stamped an invitation text by Magnolia.


Und weil mir die Karte innen doch zu weiß war und ich unbedingt noch ein Motiv aufbringen wollte, habe ich hier noch das süße Pizza-Mädel von Belles'n'Whistles aufgestempelt. Ich liebe sie, benutze sie aber so selten. Hier passte sie perfekt zum Thema. Sie ist mit Copics coloriert, ausgeschnitten und auf die Karte geklebt. Darunter habe ich noch ein schwarz gemattetes Banner mit einem weiteren Text von Mama Elephant - beide übrigens aus dem Baked with Love Stempelset - geschoben.

And since the inside of the card looked too white and I really wanted to include an image I've used the cute pizza baker by Belles'n'Whistles here. I love this image but barely use it. Here she went perfect with the theme. She was colored with Copics, cut out and glued onto the card. Under her leg I've tucked a black matted banner onto which I've stamped another saying by Mama Elephant - both sayings from the Baked with Love stamp set.


Samstag, 16. Dezember 2017

Stempeleinmaleins - Ausgabe vom 16. Dezember 2017


Hallo Ihr Lieben!
Beim Stempeleinmaleins zeigen wir Euch heute eine "Aufdrehkarte". Wie Ihr oben sehen könnt, ist sie geschlossen etwas wirr...

Hello eveyone!
Over at Stempeleinmaleins we are sharing a "turn open card" toay. As you can see on the picture it looks kind of weird when it's closed...


Aber wenn man sie öffnet, dann ist sie wirklich toll. Und mit einem Aufhänger versehen auch eine schöne Deko.

But if you turn it open she's really great. And if you add a tab to the top it'd also make a beautiful decoration for your home.


Auf dem untersten Kreis habe ich mal wieder eines der Sarah Kay Motive von Stampavie verwendet. Ich liebe die ja seit meiner Kindheit. Der Christbaum ist von Belles'n'Whistles, die Tapete mit Copics und einem spitzen Bleistift per Hand gemalt.
Hinter diesen Kreis habe ich das Doily von Magnolia gesetzt.

On the biggest circle I've used one of those Sarah Kay images by Stampavie - for the first time since a long time. I love her images since I was a kid. The christmas tree is by Belles'n'Whistles, the wallpaper is made using Copics and a pencil.
Behind this circle I've put the large doily by Magnolia.


Für den mittleren Kreis habe ich den Merry Christmas Circle Frame von MFT aus goldenem Spiegelkarton gestanzt. In die Mitte kam ein Stern sowie ein paar Glitzersteine.

For the middle circle I used the Merry Christmas Circle Frame by MFT, cut from golden mirror cardstock. In the middle I've put a star and a few rhinestones.


Auf dem kleinsten Kreis durfte die Deko dann auch etwas höher werden. Hier habe ich auf einen Kreis aus Wellpappe etwas Cheesecloth, goldene Flüge und eine Schleife gesetzt.

On the smallest circle the decorations can be a bit bulkier. So I put some cheesecloth, golden wings and a bow on a circle from brown corrugated paper.


Mittwoch, 15. November 2017

November-Challenge bei AltairArt


Hallo Ihr Lieben!
Heute starte die neue Challenge bei AltairArt, diesmal mit dem Thema "metal embellishment or pendant". 

Hello everyone!
Today we are starting our new challenge over at AltairArt and our new theme is "metal embellishment or pendant".

Ich habe eine weitere Weihnachtskarte zu zeigen - gemacht nur mit Papieren aus der neuen Festive Bells Kollektion. Es sind typisch weihnachtliche Farben - und trotzdem muss die Karte nicht unbedingt klassisch rot-grün werden. Die Farbkombi geht bei mir nämlich gar nicht. Stattdessen habe ich mich für viel Rot mit Beige, braun und weiß entschieden.

I made another christmas card - made using papers from the new Festive Bells collection only. Those papers are made using all the classical christmas colors - and still the card doesn't have to be the typical red and green. That's a color combination I hate to work with! Instead I went with a lot of red combined with beige, brown and white.

Das Papier mit dem Orangendruck finde ich super. Ich hatte sofot den Duft von mit Nelken gespickten Orangen in der Nase. Hier habe ich es als mittlere Lage verwendet, darunter dunkelrot mit leichter Holzoptik und dann noch eines mit weißen Punkten. Etwas braune Wellpappe passte prima dazu und war die perfekte Unterlage für meinen goldenen Glöckchen-Charm.
Die Zahlen - genauso wie der HoHoHo-Text - sind übrigens auch auf eines der Papiere gedruckt. Mein erster Gedanke war "Adventskalender", aber hier habe ich es einfach als Hintergrund verwendet und mein Motiv daneben gesetzt.

The paper with the oranges print is great. I immediately had the smell of oranges and cloves in my nose. Here I used it as the middle layer with a dark red with a slightly wooden print underneath and a dark red one with white dots on top. Some brown corrugated paper also fitted in great and was the perfect base for my golden bells charm.
The numbers - as well as the saying - are also printed on one of the papers. My first thought was "advent calendar" but here I just used it as a background and put my image next to it.


Und hier noch mein Motiv. Eigentlich wollte ich einen Weihnachtsmann verwenden, aber glaubt es oder nicht, bis auf ein paar eher im Comic-Stil gezeichneten oder zwei Stempel mit Kindern o. ä. drumrum habe ich doch tatsächlich alle meine Weihnachtsmänner verkauft! Naja, wie das so ist - sie liegen ewig im Schrank und wenn man sich getrennt hat, dann wären wie genau richtig. Stattdessen habe ich also diesen süßen Jungen von BnW verwendet. Ich wollte ihn passend zu meiner Vintage angehauchten Karte machen und habe ihn daher eher hell und mit wenig Farben coloriert.
Als Deko  habe ich dann noch einen Sternenhintergrund und 3D Sterne aufgeklebt. Ist es peinlich zuzugeben, dass ich erstmal googeln musste, wie man die Dinger zusammensetzt? Ich dachte, die kleinen Klebelaschen sind dazu da, die Strahlen der Sterne zu verbinden - und das ging natürlich nicht. Zum Glück gab es da ein Video - und es fiel mir wie Schuppen von den Augen. Aber wenn man den Denkfehler erstmal drin hat... ;)

And here's the image I used. I had a Santa in mind but, believe me or not, except for a few ones drawn more in a comic style and two stamps with Santa in a scene I really sold all my Santa stamps! Well, that's how it goes - they are unused for ages but once you sell them they'd be the perfect image for your card. So I went with this cute boy by BnW instead. Matching my a little vintage looking card I only colored him in with light and only little colors.
For decorations I went with a star background and two three dimensional stars. It's kind of embarrasing but I have to admit that I had to google how to put those together. I thought those little notches were meant to glue the tips of the star together - and of course that didn't work. Lucky me there was a video on how to put them together - and of course once I saw it it was just logical. But well, if you're on the wrong track it's hard to see the obvious... ;)


Dienstag, 15. August 2017

August-Challenge bei AltairArt


Hallo Ihr Lieben!
Na, genießt Ihr die Ferien und den Sommer? Passend dazu haben wir uns für die neue Challenge bei AltairArt für das Thema "Summer Fun" entschieden. Und das war das perfekte Thema, um diesen süßen Stempel von Belles'n'Whistles mal wieder rauszuholen.

Hello everyone!
So, are you enjoying your summer break and summer itself? To go with this we picked "summer fun" as our theme for the new challene over at AltairArt. And that was the perfect one to dig out this cute stamp by Belles'n'Whistles again.

Ich habe hier Papiere in verschiedenen Blau- und Grüntönen verwendet und mit weißer Mattung aufeinander geschichtet. Eine gestichelte Wolke sowie etwas ausgestanztes Schilf fanden auch Platz. Generell aber ist die Karte eher einfach. Ich denke, das liegt am vielen Weiß auf der linken Hälfte des Motivs. Ich habe versucht, es mit den drei Vögeln etwas zu überstempeln, aber so ganz hat das nicht geklappt.

I used papers in different tones of blues and greens and put them on top of each other adding some white matting. A stitched cloud and a die cut grass also found their places on this card. But in generell it is more simple. I guess that's because of all that white on the left side of the image. I tried to cover at least a part of it with those birds but it didn't really work out.


Das Motiv ist mit Copics coloriert. Irgendwie scheint sich der junge Mann noch nicht sicher zu sein, ob das mit dem Baden eine tolle Idee ist... ;)

The image has been colored in with Copics. And somehow this young man seems a little unsure about his idea of taking a swim... ;)


Dienstag, 7. Februar 2017

Eine Einladung


Hallo Ihr Lieben!
Heute darf ich wieder einen Inspirations-Post auf dem Blog von AltairArt zeigen. Und diesmal habe ich diese Einladung gewerkelt.

Hello eveyone!
Today it's my turn to post an inspiration over at the AltairArt Blog. And this time I made this invitation card.

Grundlage für meine Karte ist das tolle Papier Holy Mountains #03 - das verwitterte Holz ist einfach toll. 
Darauf habe ich dann meine Kartendeko aufgebaut. Das große, schräg angebrachte Rechteck aus dem Bogen Sunrise #02 hat ein blau-weißes Muster und ist wunderbar unaufdringlich, also perfekt für Hintergründe. 

Base for my card is a the paper sheet Holy Mountains #03 - the shabby wood print is just amazing.
On this I've put the other layers of my card. The bigger square from the paper sheet Sunrise #02 has a beautiful and soft blue and white print and that makes it perfect to be put in the background because it won't draw all the attention to it.


Das Motiv von Belles'n'Whistles ist auf einem Kreis eines der Papiere aus dem Dreams Come True Papierblock, unter dem ein Doily sitzt, aufgeklebt.
Und die Schürze, die einfach perfekt zum Thema Kochen passt, ist aus einem Bogen aus dem Papierblock Signs of Love gestanzt. Das blau-weiße Karomuster hat mich sofort an diese Tischdecken aus Wachstuch erinnert, die meine Oma immer draußen im Garten auf dem Tisch hatte. Das gleiche Papier habe ich auch noch als Streifen quer über die Karte gelegt.

The image by Belles'n'Whistles is put onto a circle cut from one of the paperes from the Dreams Come True paper pad and I've put a doily underneath.
The apron, that just goes great with the kitchen theme, is cut from one of the sheets that come in the Signs of Love paper pad. The blue and white check print immediatey reminded me of one of these table cloth from wax cloth that my grandma had on her garden table. I also used this paper for the strip across my card.


Als Deko habe ich, neben Blumen und Cheesecloth, noch dieses Besteck auf die Karte geklebt und darauf einen Text angebracht.

For decorations besides flowers and cheesecloth I also added this silver ware and put the text on top of it.


Mittwoch, 1. Februar 2017

Challenge bei Stamping-Fairies


Hallo Ihr Lieben!
Heute startet die Februar-Challenge auf dem Stamping-Fairies Blog, wie immer mit einem Sketch für Euch. Und weil Februar ist, habe ich eine Karte zum Thema Liebe gemacht.

Hello everyone!
The february challenge over at the Stamping-Fairies Blog is starting today, as usually with a sketch for you to follow. And since it's february I made a love themed card.

Ich habe hier wieder zwei der tollen Papiere von AltairArt verwendet - das Papier im Hintergrund aus der Ever and Always Collection und das Papier links aus dem Papierpack Dreams Come True. Alle Papiere sind mit weißem Gesso bestrichen und weiß gemattet.

Here I used two more papers by AltairArt - the paper in the background from the Ever and Always Collection and the paper on the left from the Dreams Come True paper pack. All papers got covered with white Gesso and a white matting.


Dieses süße Motiv von Belles'n'Whistles ist eines meiner Favorites. Und sie passt super zu der neuen Mailbox von MFT. Die ist aus verschiedenen Papiere gestanzt und zusammengesetzt. Das kleine Herz auf dem Brief ist mit den Fluttering Hearts gestanzt. Damit kann man auf einmal ganz viele Herzen in drei unterschiedlichen Größen stanzen - also auch super für Schüttelkarten. ;)
Für das Wort "love" habe ich wieder das Well Connected Alphabet von MFT verwendet und es mit Distress Ink Walnut Stain gestempelt. Dank des Stamp Perfect Tools von Hampton Art kann man es super zusammensetzen - und wenn man doch mal etwas verrutscht, verzeiht das dieses Alphabet bestens. Der Rest des Textes ist aus verschiedenen Stempeln zusammengesetzt. Dank des Tools auch ganz einfach.

This cute image by Belles'n'Whistles is one of my all time favorites. And it goes great with the new Mailbox die set by MFT. It has been cut using different papers and then put together. The small heart on the letter was made using the Fluttering Hearts die. With this you can die cut a bunch of tiny hearts in 3 different sizes with just one run through the Big Shot - so it's also great for Shaker Cards.
The word love has once again been made using the Well Connected Alphabet by MFT and stamped using Distress Ink Walnut Stain. Thanks to the Stamp Perfect Tool by Hampton Art it is easy to put a word together - and if you happen to stamp the letters not lined up perfectly this font still looks nice. The rest of the saying has been made using different stamps - thanks to the stamping tool easyily done again.


Montag, 5. Dezember 2016

Blog-Adventskalendertürchen # 5


Hallo Ihr Lieben!
Auch ich darf beim Blog-Adventskalender mitmachen. Und ich habe mir überlegt, für Euch ein Tutorial für eine Shadowbox-Geschenkbox zu machen.
Hello everyone!
I am taking part in a blog advent calendar, where each day a different blog hosts the day's window. I decided to show you how to make  a shadowbox giftbox.


Es gibt auch eine Cameo-Datei dafür - wenn Du sie (für den privaten Gebrauch) haben möchtest, dann kannst Du sie Dir über diesen Link über Dropbox herunterladen: https://www.dropbox.com/s/k1pim153t9r43xb/Shadowbox%20Box%20Adventskalender.studio3?dl=0

I also made a cutting file for the Silhouette Cameo - if you want to have it (only for private use) you can download it via Dropbox by clicking on this link: https://www.dropbox.com/s/k1pim153t9r43xb/Shadowbox%20Box%20Adventskalender.studio3?dl=0


Die Box ist von außen eine geschlossene Box, in deren Deckel sich eine 3D-Szene befindet.

The box looks like a regular box. In the lid there is a 3D scene included.


Innen ist dann Platz für z. B. zwei kleine Ritter Sp..t Schokoladen.

Inside there's room for example for two small chocolats.


Und auch eine Geschenkkarte passt (zusätzlich) noch mit hinein.

And also a gift card fits in (additionally if you want to).


Also, fangen wir mit dem Tutorial an:
So, let's get started with how to make this:

Ihr braucht:
- 1 x Cardstock 21,8 x 15,3 cm
- 1 x Cardstock 9,5 x 12,5 cm
- evtl. etwas Folie zum Abdecken der Szene
- Designpapier
- Stempel
- 3D Klebeband
- Kleber, Schere, Falzbein etc.

You'll need:
- 1 x cardstock 21,8 x 15,3 cm
- 1 x cardstock 9,5 x 12,5 cm
- optionally some transparency
- some designer's paper
- stamps
-3D tape
- glue, scissors, bone folder etc.


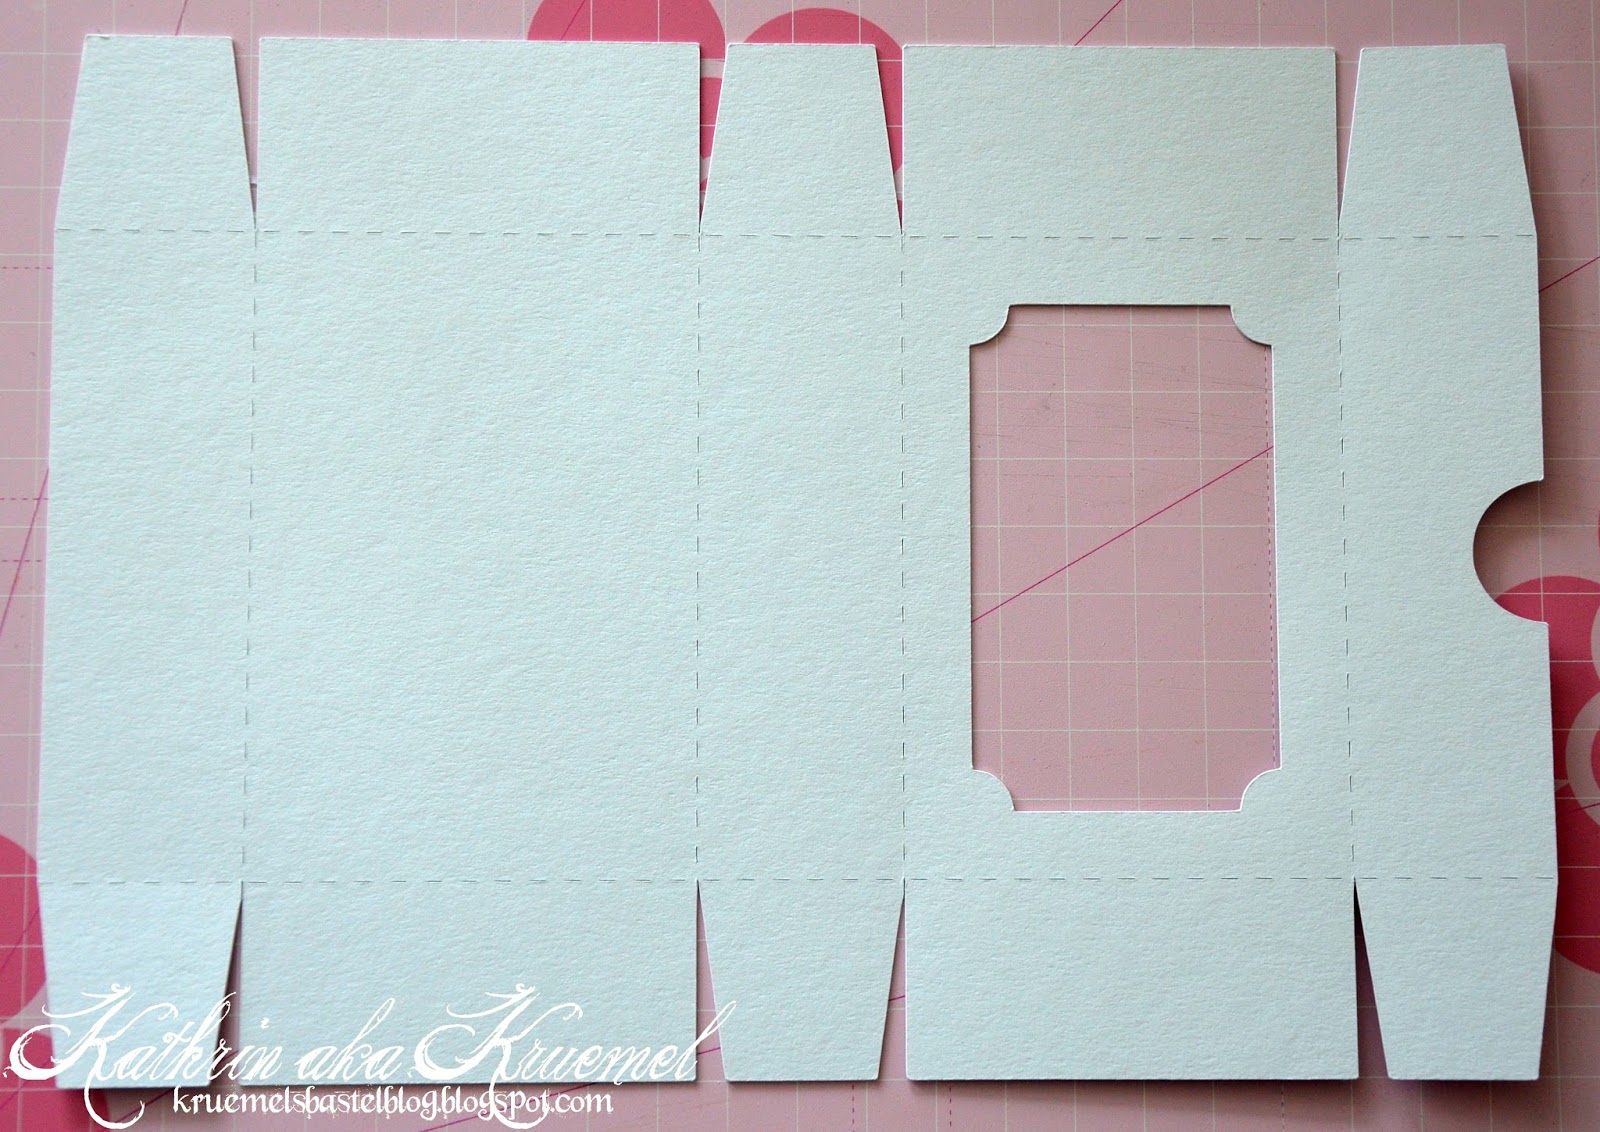
Nehmt als erstes das größere Stück Carstock. Falzt die lange Seite bei 2,9 cm, 9,4 cm, 12,4 cm und 18,9 cm, die kurze bei 2,9 cm und 12,4 cm. Schneidet dann alles wie auf dem Bild erkennbar zu.
Schneidet dann in einen der Deckel ein Fenster. Ich habe hier ein Ticket verwendet, Ihr könnt aber auch andere Formen wie Oval, Kreis oder Rechteck verwenden. Die Box, in der sich die Szene befindet, hat ein Innenmaß von 8,5 cm x 5,5 cm. Größer sollte Euer Ausschnitt an der breitesten/höchsten Stelle nicht sein, sonst sieht man den (Klebe)Rand. 
Außerdem habe ich hier mit einem Kreisstanzer noch eine halbrunde Öffnung in ein Seitenteil gestanzt, so dass die Box später einfacher zu öffnen geht.

First take the larger piece of cardstock. Score the longer side at 2,9 cm, 9,4 cm, 12,4 cm and 18,9 cm, the shorter side at 2,9 cm and 12,4 cm. Then cut the cardstock like shown on the picture.
Then cut a window in one of the large sections. I used a ticket die here but you can use whatever you feel like, an oval, circle, square... The inner box that holds the scene is 8,5 x 5,5 cm. Your window shouldn't be larger than that or you'll see the (glueing) edge through the window.
I also used a circle punch to cut out half a circle so opening the box will  be easier later.


Als nächstes machen wir die innere Box für die Szene, für die wir den kleineren Cardstock brauchen. Er wird an der langen Seite bei 0,5 cm, 2 cm, 10,5 cm und 12 cm und an der kürzeren Seite bei 0,5 cm, 2 cm, 7,5 cm und 9 cm gefalzt. 
(Bei der Cameo-Datei sind zwei verschiedene Innenboxteile enthalten - einmal mit 1,5 cm Höhe und einmal mit 1 cm Höhe.)
Dann wird wieder alles wie auf dem Foto ersichtlich zugeschnitten.

Next we make the inner box that will hold the scene and use the smaller piece of cardstock here. The long side gets scored at 0,5 cm, 2 cm, 10,5 cm and 12 cm, the short side at 0,5 cm, 2 cm, 7,5 cm and 9 cm. 
(If you are using my Cameo file there are two different inner boxes included there, one with 1,5 cm heigth and one with 1 cm.)
Then cut everything as shown on the picture again.


Klebt dann die äußere Box wie eine Pizzaschachtel zusammen, der Deckel mit dem ausgeschnittenen Fenster ist an einer Seite offen, die untere Box geschlossen.

Then glue the outer box like a pizza box, the lid with the cut out window being open on one side, the other half being closed.


Auch die innere Box wird zusammengeklebt. Der 0,5 cm breite Kleberand wird nach außen gefaltet. Ich habe meine Box außen verklebt, so dass die Klebelaschen nicht in der Box zu sehen sind.

Also the inner box gets glued together now. The strips of 0,5 cm get folded outside, this is for glueing it into the box later. 
I put the small parts for glueing on the outside of the box so it can't be seen through the window later.


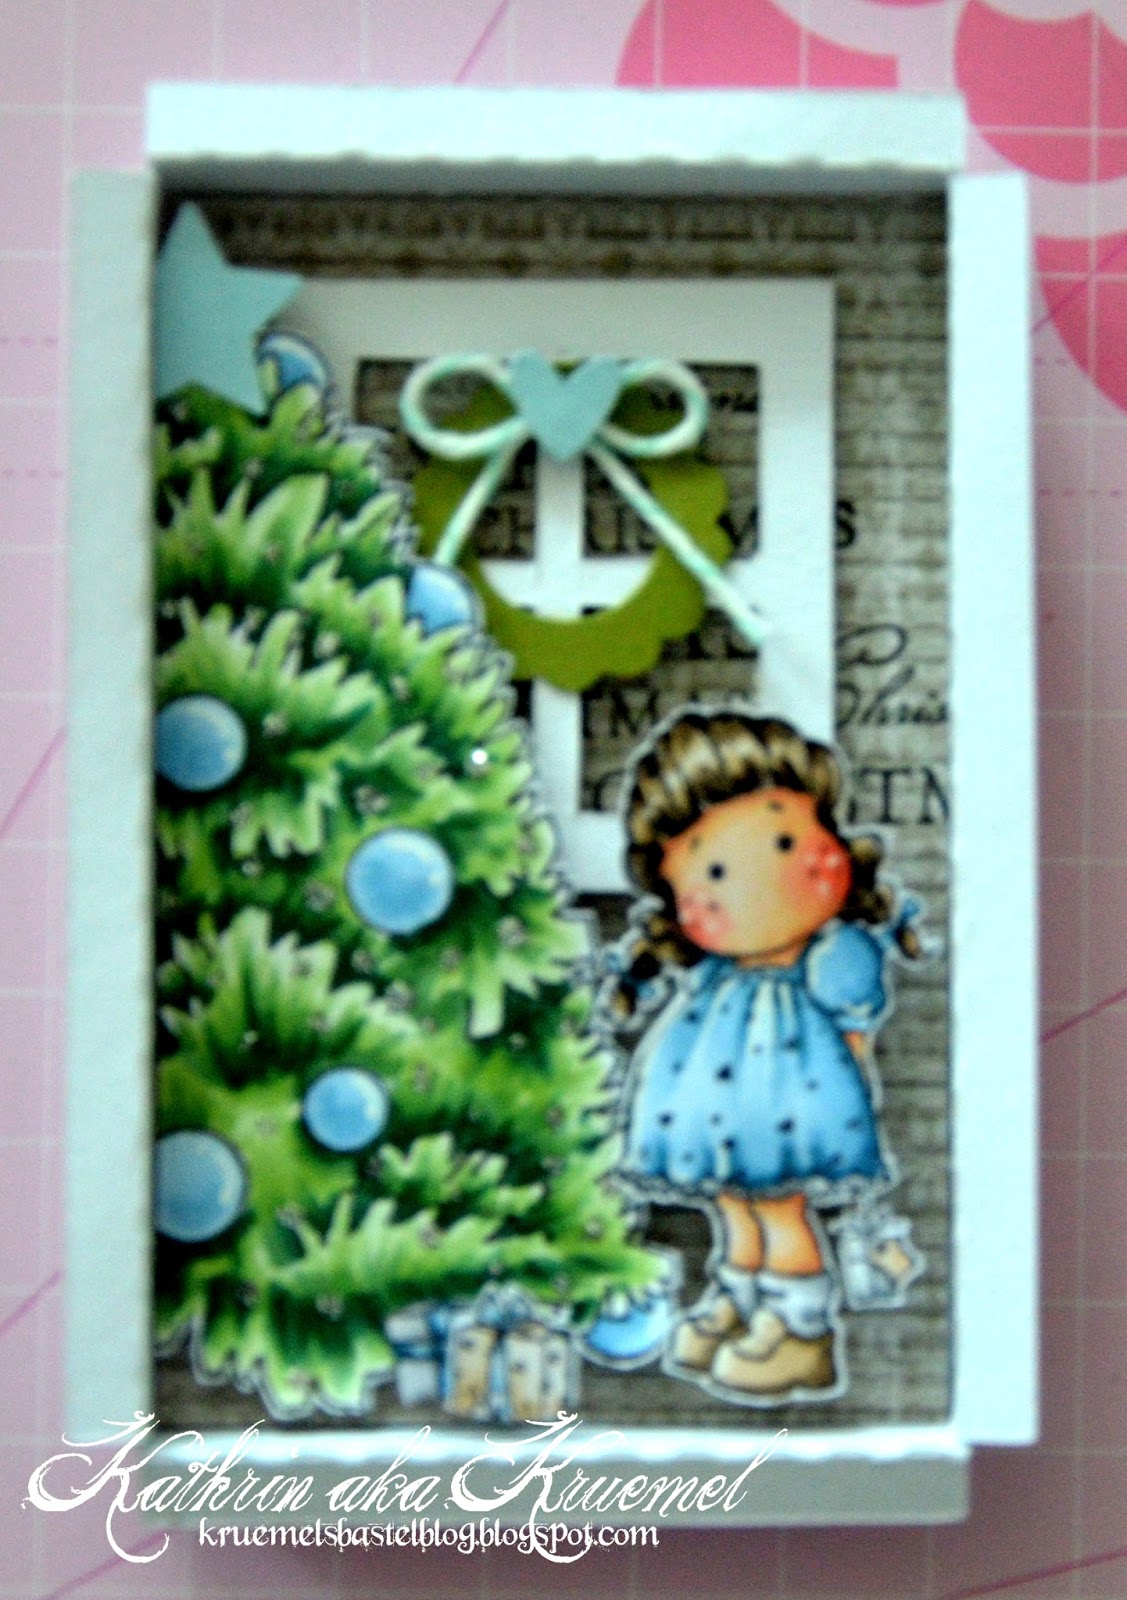
Sucht Euch dann die Teile zusammen, die Ihr für die Szene verwenden möchtet. Ich habe hier einen Mini-Stempel von Magnolia, einen Weihnachtsbaum von Belles'n'Whistles verwendet sowie ein mit der Hand geschnittenes Fenster, einen Fensterkranz (gemacht aus Stanzen), eine Schleife und etwas Hintergrundpapier, das ich mit einem Text bestempelt habe.

Then decide which parts you want to use for your scene. I went with a mini stamp by Magnolia, a christmas tree by Belles'n'Whistles, a hand cut window, a wreath made from punches, a bow and some designer's paper that I stamped some text on.


Klebt alles mit 3D Klebeband zu einer Szene zusammen. Mein Designpapier hat genau die Größe der inneren Box, also 8,5 x 5,5 cm. So kann ich genau sehen, wie ich die Teile arrangieren muss, dass sie in die Box passen (vom Baum z. B. habe ich einfach etwas abgeschnitten).
Sorry für das unscharfe Bild, ich hatte es zu spät gemerkt... :(

Use 3D tape to create a scene. My designer's paper has exactly the size of the inner box (8,5 x 5,5 cm). That makes it easy to see how to arrange the parts on the paper to make them fit into the box (I just cut off a part of the tree).
Sorry for the blurry pic here, I didn't realize it i time... :(

Wenn Ihr wollt, könnt Ihr nun noch etwas Folie über Euer Fenster legen, um sie etwas zu schützen. Das ist aber Euch selbst überlassen. Ich habe sie 9,4 x 6,4 cm groß zugeschnitten und mit Klebeband auf den Kleberand meiner Box aufgeklebt.

If you want to you can use transparency now to protect your scene, but that's up to you. I cut it 9,4 x 6,4 cm and used tacky tape to glue it to the outer brim of my box.


Bringt dann doppelseitiges Klebeband auf den Kleberahmen Eurer inneren Box auf und klebt sie von innen hinter das ausgeschnittene Fenster der großen Box.

Then put some doublesided tape on the brim of your inner box and glue it inside to the lid of your bigger box.

Und dann kann es ans Dekorieren gehen!
And now it's time for some decorations!


Ich habe die Box mit Designpapier überzogen und den Frohe Weihnachten Stitched Text von Kulricke außen auf die Box geklebt. Oben habe ich noch eine Schneeflocke sowie zwei Glöckchen mit befestigt.

I covered the box with designer's paper and added a "merry christmas" saying by Kulricke. I also added a snowflake and two bells to the top.

Ich hoffe, Euch hat mein kleines Tutorial gefallen und Ihr seid auch in den nächsten Tagen auf den anderen Adventskalender-Blogs dabei! Morgen geht es weiter bei Birgit! Gestern gab es das schöne Türchen von Daniela. Und falls Ihr den Adventskalender bisher verpasst habt, könnt Ihr bei Birgit auch auf Türchen #1 treffen und einmal durchhopsen.

I hope you liked my tutorial and also pop by the next day at the other blogs of the advent calender. Tomorrow's window will open at Birgit's blog! Yesterday Daniela opened another wonderful shutter. And if you missed the first days Birgit's Blog is also where you can find window #1 to start all along.