Posts mit dem Label thank you werden angezeigt. Alle Posts anzeigen

Sonntag, 23. August 2026

Craft Roulette Episode #333

 
Hallo Ihr  Lieben!
Am Freitag  war wieder Craft Roulette Zeit, diesmal Episode 333 - eine Schnapszahl! Und die Parameter haben es leicht gemacht, wenn gleich mich die Farbvorgabe erst ein wenig ratlos gemacht  hat. Aber sie  ist wieder sehr frei auslegbar. 
Die Parameter diese Woche sind:
Project: 4" x 6" Card
 Colors: Buffet
Element: Holiday
Random: Bark
 
Hello everyone!
Friday it was time for new issue of Craft Roulette, episode 333 - we in Germany call that a "Schnapszahl". Translated by word it means liquor number, but it's just a number with all digits identical. The word originated from many years back, when they were playing  all kind of games in bars. When the points were added up and someone ended up with a number with all identical digits he had to pay for a round  of liquor. It may also come from the fact, that people that drank too  much liquor saw things doubled or tripled... ;) The parameters this week were easy, again. However, the color parameter left me stumped for a few moments. But again it's one that can be interpreted very freely.
The parameter this week are:
project: 4" x 6" card
colors: buffet
element: holiday
random: bark
 
Beim Thema Holiday habe ich mich dazu entschlossen, eine Erntedank-Karte zu machen. Nicht, dass ich dieses Fest in irgenndeiner Art feiere oder gar Karten dazu verschicke. Aber so konnte ich eine Herbstkarte machen und die Countryside Reihe von Concord and 9th einweihen. 
Das Format 4" x 6" kam mir sehr gelegen, entspricht es doch fast unserem A6 Format. Es ist nur ein klein wenig höher. 
Wie gesagt, habe ich die Countryside Reihe von Concord and 9th verwendet und den Hintergrund mit dem Stencilset auf weißen Cardstock gewischt. Der Stapel der verwendeten Distress Inks ware riesig. Die Grasflächen habe ich mit Mustard Seed, Fossilized Amber und Crushed Olive gemacht, die Scheune mit Scorched Timber und Fired Brick. Für den Weg habe ich Frayed Burlap verwendet und für den Himmel Dried Marigold, Ripe Persimmon und Abandoned Coral. 
Und weil man es auf dem Bild oben im Ganzen sieht: um die Voragbe Bark - Rinde - einzuarbeiten, habe ich auf der rechten Seite der Karte eine große Birke, gemacht mit einer Stanze von MFT, gepflanzt. Für das Rindenmuster habe ich erste eine Seite des Baums mit Pumice Stone gewischt und dann mit Alcohol Markern die Querrillen aufgemalt. Und weil die Stanze rechts und links des Baumstamms immer wieder kleine Stück herausstanzt, habe ich den Baumstamm noch mit grauem Cardstock hinterlegt. 
 
When I thought  about the holiday theme I've decided to make a Erntedank card. Erntedank is kind of the german Thanksgiving, and I am sure the american one somehow originates in it. It's not a real holiday and  even not really celebrated other than in church or school - so I am surely not sending out Erntedank cards to anyone. It's also sometime in september, I don't even know the exact date, rather than end of november like the american Thanksgiving. It was a fest the farmers celebrated once all the produce was harvested to celebrate the end of this year's work and also to thank god for a good crop. But the Erntedank theme gave me the chance to use the Countryside series by Concord and 9th and make a fall card. 
The card size of 4" x 6" wasn't a real challenge for me since it's pretty close to a standard german A6 card. It's just a tad bit taller. 
As  mentioned already did I use the Countryside series by Concord and 9th  here and used the stencil set to create the background. The stack of Distress Inks I used on this card was massive. I used Mustard Seed, Fossilized Amber and Crushed Olive for the fields, the barn is made with Scorched Timber and Fired Brick. For the path I used Frayed Burlap and for the sky Dried  Marigold, Ripe Persimmon and Abandoned Coral.
And because you can see it completly on the pic above: to bring in the bark theme I planted a large birch tree, made  with a die by MFT, on the right side of my card. For the bark pattern I first inked one side of the tree with Pumice Stone, then added the pattern details with alcohol markers. And because the die cuts out little pieces on the left and right side of the tree I used some gray cardstock to back the tree with.
 

 Für die  restlichen Elemente  auf der Karte habe  ich sowohl das Countryside Stempel- als auch das Stanzenset bennutzt. 
Aus dem Stempelset sind der Hahn auf dem Schneunedach und der Zaun - aufgestempelt mit Versafine Clair Nocture - sowie die Grasbüschel - gestempelt mit Distress Ink Forest Moss und Crushed Olive -, die Steine auf dem Weg - gestempelt mit Scorched Timber - und die Blattdetails auf dem Laub des großen Astes, der von links in die Szene ragt. Die habe ich mit einem Mix verschiedener Farben gestempelt. Außerdem gibt es einen Stempel für das Holzmuster auf der Scheune. Das habe ich mit Versafine Crimson Red aufgestempelt. Die Vögel am Himmel, die wieder schwarz gestempelt sind, sind aus dem Stempelset Postage Collage Forest Sunset von WaffleFlower.
Der Ast samt Laub, die Kürbisse, die Strohgarben, die Scheunentür  und -fenster und der große Zaun sind aus dem Stanzenset. Ich habe die Teile aus farbigem Cardstock gestanzt und mit Distress Inks schattiert. Neben den schon erwähnten Farben kam noch Aged Mahogany zum Einsatz.
 
For the other elements on the card I used the Countryside die set and the Countryside stamp set.
From the stamp set are the vane on the barn roof and the fence - both stamped with Versafine Clair Nocturne - and the small grass details, that I stamped with Forest Moss and Crushed Olive. Also from this set are the stones on the path (Scorched Timber) and the lef details on the leaves of the large branch, that is coming in on the  left side. Those I stamped with a mix of colors I had already used. There's also a stamp for the pattern on the barn. I stamped that on with Versafine Crimson Red. The birds in the sky are from Postage Collage Forest Sunset by WaffleFlower and stamped black again.
The branch with the leaves, the pumpkins, the sheaves, the door and windows on the barn and  the large fence. I die  cut the pieces from colored cardstock  and shaded  them with Distress Ink, using colors I had already used on the card, only bringing in some Aged Mahogany, too. 
 

 Ich habe die winzigen Kürbisse rund um die Scheune verteilt und auf der linken Seite des Wegs den gestanzten Zaun samt Garben und kleinen Kürbissen  aufgeklebt.
Unten rechts, an den Fuß des Birkenstamms, habe ich drei größere Kürbisse gesetzt. Hier musste  nicht  nur ein Element in den Vordergrund, die Kürbisse verdecken auch die Tatsache, dass der Birkenstamm ein wenig zu kurz für die 6" hohe Karte war. ;) Die Kürbisse sind mit Stanzen diverser Hersteller gemacht, ich habe einfach genommen, was von der Größe her passte. Die Kürbisse im Countryside Set waren hier einfach zu klein.
Und entlang des unteren Rands der Karte habe ich dann noch meinen Text geklebt. Er ist aus dem Set Itty Bitty  Thanks von MFT und weiß auf schwarzen Cardstock  embosst. Als Deko habe ich drei kleine weiße Herzen um den Text verteilt. 
Und um Episode  333 zu ehren, habe  ich drei Elemente auf der Karte, die  in Gruppen von drei auftreten: die kleinen Kürbisse  vor dem Zaun, die großen am Fuß der Birke und die weißen Herzen. ;) 
 
I scattered the tiny pumpkins  around the barn and to the left of the path I added the fence, sheaves and small pumpkins.
At the bottom right, in front of the birch tree, I added three larger pumpkins. Not only needed the card a larger element here, the pumpkins also hide the bottom of the birch tree, that was just a bit too short for this 6" tall card. ;) The pumpkins are made with different dies from my stash, I simply grabbed what fit in size. The ones from the countryside set were just too small here.
And along  the bottom edge  of the card I added my text. It's from Itty Bitty Thanks by MFT and white heat embossed onto black cardstock. I added three white clay hearts as decoration. 
And to honor episode 333 I have 3 elements, that are added in clusters of three: the small pumpkins at the fence, the large ones at the bottom of the birch tree and the white hearts. ;) 
 

 Ich habe den großen Ast mit den Blättern und den Text mit dünnem, die Birke mit den großen Kürbissen mit dickem 3D Tape auf die Karte geklebt. Dann habe ich alles auf einem weißen Kartenrohling angebracht.
 
I adhered the large branch with the leaves and the text with thin, the birch tree and the large pumpkins with thick foam tape. Then I glued the card panel onto a white card base.
 
Und hier noch der Parameter-Check: 
4" x 6" Karte: der Kartenrohling hat diese Größe, den Aufleger habe ich ein wenig kleiner gemacht
Buffett-Colors: zu Erntedank gab es immer die aufgebauten Tische voller reifer Früchte wie Kürbissen, Mais, Äpfeln  und dazwischen bunte Blätter. Das war meine Farbidee hinter dieser Karte.
Feiertag: wie schon ausführlich erklärt, war Erntedank das Fest meiner Wahl
Bark - also Rinde, hätte aber genauso gut auch mit Bellen übersetzt werden können: die große Birke vorne rechts hat ein aufgemaltes Birkenrinden-Muster.
 
And here's the parameter check:
4" x 6" card: the card base has this size, the card panel I made a bit smaller
buffet colors: for Erntedank there were always those large tables full of ripe vegetables like pumpkins, corn, apples and inbetween colored leaves. This was the color idea I used on my card.
holiday: as already explained above I went with Erntedank
Bark: the large birch tree on the right side has a birch tree bark pattern drawn onto it.
 

Dienstag, 11. August 2026

Ein Blumentopf als Dankeschön


 Hallo Ihr Lieben!
Als Dankeschön verschenkt man ja gerne mal Blumen - deswegen habe ich auf die heutige Dankeskrte einen Blumentopf gesetzt. Und der ist ganz frisch bepflanzt.
 
Hello everyone!
People like to give flowers to say thanks - so I put a flower pot on today's thank you card.  And this was just planted.
 
Die Karte ist rustikaler geworden als ich eigentlich geplant hatte. 
Im Hintergrund wollte ich den Look eines Rankgitters haben, das passt so toll zum Garten. Also habe ich den Diamond Plate Background von TheTon aus weißem Cardstock getanzt und so verbreitert, dass er den gesamten Cardstock abgeckt. Dahinter habe ich türkisfarbenen Cardstock gesetzt. Den habe ich direkt mit zwei Tönen türkisener Tinte gewischt und dabei das Kissen direkt über den Cardstock gezogen. Auf die Idee kam ich, weil ich die selbe Technik schon unten auf dem Holz angewendet hatte und so passt alles zusammen.
Für das Holz im unteren Teil habe ich den Woodgrain Texture Background von WaffleFlower aus hellbraunem Cardstock gestanzt, ein Stück davon ausgeschnitten und es dann mit den dazugehörigen Stencils zart in zwei Brauntönen gewischt. Die Kissen der selben Töne habe ich dann  wieder leicht über das Papier gezogen. Alle Stempelkissen sind von MFT, ich habe Hybrid und Dye Kissen gemischt. 
 
This card turned out more rustic than I had planned.
In the background I wanted to have the look of a lattice because it goes great with the gardening theme. So I die cut the Diamond Plate Background by TheTon from white cardstock and made it wider with partial diecutting so it covers the whole width of the card. Then I put some turquoise cardstock behind it. I used two different shades of turquoise ink to ink the cardstock, dragging the ink pad lightly and directly across the paper. I had the idea because I already had done the same technique to add structure to the wooden base and now everything goes together. 
For the wood on the bottom I die cut the Woodgrain Texture Background by WaffleFlower from light brown cardstock and cut out a piece of it. Then I inked that with two shades of brown ink and the matching stencil set. Using the same colors and dragging the ink pads  over the paper I added more ink. All  ink pads I used here are by MFT, I mixed Dye inks and Hybrid inks. 
 

Der Blumentopf ist aus dem Happy Herbs Stanzenset von WaffleFlower. Ich habe ihn aus hellgrauem Cardstock gestanzt und die Teile mit grauen Stempelkissen eingefärbt. Dann habe ich den oberen Teil des größten Blumentopfs aus dem Set Pots and Plants sowie den passenden Aufleger aus dem selben Cardstock gestanzt und als Untersetzer verwendet. So wirkt der Topf gleich viel mehr als wäre  er als Geschenk gedacht - schließlich will man beim Übergeben nicht schon mit nasser Erde eingeschmiert werden. Den Geschenk-Eindruck verstärkt außerdem eine Schleife, die  ich um den Topf gewickelt  habe. Das Band habe ich mit der Blumentopf-Stanze gemacht  und die untere Kante mit der Schere geschnitten, die Schleife ist aus dem Set Postage Collage Gifts. Ich habe die Teile aus rosafarbenem Cardstock gestanzt und mit Ohuhu Markern schattiert. 
Rund um den Blumentopf liegt noch Erde vom Einpflanzen. Die Häufchen sind mit der Sandhügel-Stanze aus dem Set Build-a-House Beach AddOn von LawnFawn gemacht. Rundherum habe ich dann mit dunkelbrauner Tinte den Sand aus dem Set Inquisitve Seagulls gestempelt.
Und vor dem Topf liegen noch die Gartengeräte, mit denen die Blumen gepflanzt wurden. Die sind  aus dem Set Postage Collage  Gardening AddOns. Ich habe den Metallteilen aus matt-silbernem Metallic-Cardstock rosafarbene Griffe angeklebt und auf die  dann kleine Punkte mit einem weißen Gelstift aufgemalt. Für die Erdreste an den Geräten habe ich die noch einmal aus dunkelbraunem Cardstock gestanzt, mit der Schere Stückchen davon ausgeschnitten und sie dann auf die kompletten Geräte geklebt. 
 
The flower pot is from Happy Herbs by WaffleFlower. I die cut it from light grey cardstock and then added some texture to it with gery ink pads. Then I die cut the top part of the largest flower pot from Pots and Plants and also the additional brim from the same cardstock and used that to create a plate. Now it looks more like it is meant to be a gift - you don't want to get dirty when handing it out. The bow I put on the pot makes it look even more like a present. I used the flower pot die to create the ribbon, cutting the bottom with my scissors. The bow is from Postage Collage Gifts. I cut the pieces from pink carstock and shaded them with Ohuhu markers. 
Around the flower pot there's still some dirt from planting the flowers. I made the piles using the sand pile die from Buld-a-House Beach AddOn by LawnFawn. Around them I then stamped the sand from Inquisitive Seagulls using dark brown ink. 
And in front of the flower pot there are still the gardening tools that were used to plant the flowers. Those are from Postage Collage Gardening AddOns. I cut the metall pieces from matte silver metallic cardstock and added some pink handles to them. I used a white gel pen to draw white dots to the handles. For the dirt on the tips of the tools I die cut the tools again from dark brown cardstock, cut off pieces  with my scissors and glued those onto the complete tools. 
 

 Beflanzt habe ich den Blumentopf mit dunkelroten Blumen, zwischen denen kleine pinkfarbene Blüten sitzen. Die sind alle aus dem Set Floral Anchor Außerdem habe ich einige Zweige aus dem Set Postage Collage Mini Seals dazwischengesteckt.
Meinen Text habe ich auf zwei Blumenstecker gestempelt. Die sind aus dem Set Plant Marker, die Texte darauf aus Plant Marker Words. Ich habe  sie weiß auf schwarzen Cardstock embosst und auf die größeren Schildchen geklebt. Vom dritten Pflanzenstecker - die Stanze macht gleich drei auf einmal - habe ich den Schildteil abgeschnitten und stattdessen ein Herz aus pinkfarbenem Cardstock aufgeklebt. Das Herz habe ich mit Stickles beglittert und auch ein wenig davon auf die großen Blumen aufgetragen.
 
I planted some dark red flowers into the flower pot and put some small pink flowers between them. I used the Floral Anchor set here and added some more leaves from Postage Collage Mini Seals. 
The text on this card I stamped onto some plant markers, made with the Plant Marker die set and the Plant Marker Words stamp set. I white heat embossed the texts onto the smaller pieces, cut from black cardstock, then glued them onto the larger markers. From the third plant marker - the die cuts three at once - I cut off the top part and glued a pink heart onto it. I added Stickles to the heart and also put a bit of it onto the large flowers.
 

 Den Blumentopf  habe  ich mit dünnem, die Gartengeräte mit dickem 3D Tape auf den Hintergrund geklebt. Als Deko habe ich dann einige hellrosa-irisierende Steinchen auf der Karte verteilt und alles auf einen weißen Kartenrohling geklebt. 
 
I backed the flower pot with thin, the gardening tools with thick foam tape and adhered them to the background. Then I added a few light pink iridescent rhinestones as decoration and glued the card panel to a white note card. 
 

Donnerstag, 14. Mai 2026

LawnFawnatics Challenge #220

 
Hallo Ihr Lieben!
Heute zeige ich Euch meine Karte zur LawnFawnatics Challenge #220. Das Thema lautet "inspired by" und wie es das Thema schon erahnen lässt, soll man sich von der Karte eines anderen Bastlers inspirieren lassen.
Vor einiger Zeit hat Jennifer McGuire ein Video zu Spinner-Karten gemacht und auf einer der Karten den kleinen Maulwurf von LawnFawn samt Schubkarre im Kreis fahren lassen. Ich habe Euch das Video verlinkt, denn ich kann kein Bild ihrer Karte finden. Als ich das Video angeschaut habe, musste ich sofort an die Rasenmäher-Maus und hier ist nun - endlich - meine Umsetzung der Idee.
 
Hello everyone!
Today I am sharing with you my card for LawnFawnatics Challenge #220. The theme is "inspired by" and, as the theme indicates, you are asked to get inspiration from another cardmaker's card.  
A while ago Jennifer McGuire made a video about spinner cards and on one of her cards she let the little mole by LawnFawn run in circles with his wheelbarrow. I linked the video because I can't  find a picture of her card. When I watched the video I immediately had the little mower mice in mind and - finally - here's my card.
 
Und um Euch nicht so lange auf die Folter zu spannen hier gleich mal das animierte GIF der Maus beim Rasenmähen. Ich finde das übrigens ganz passend, dass sie immer im Kreis läuft, denn genau so fühlt sich Gartenarbeit manchmal an. Ist man endlich am einen Ende des Gartens angekommen, kann man wieder von vorne beginnen....
 
To not let you wait so long I am sharing with you the animated GIF right now so you can watch the mouse mow the lawn. I actually think her running around and around is a good fit because sometimes garden work just feels like running in circles. When you've finally made it to the end of the garden you can start all over at the other end....
 

Ich weiß, das Bild ist etwas wackelig - ich hatte mein Stativ nicht zur Hand. Aber es sollte doch noch okay sein so. 
 
 I know, it's a bit wonky, I didn't have my camera stand at hand. But I think it's still okay.


Der Hintergrund besteht hier aus einem Stück hellblauen Cardstocks, den ich mit Distress Oxide Speckled Egg und Broken China gewischt habe. Dann habe ich etwas Wasser aufgespritzt.
Die Mitte des Cardstocks habe ich ungewischt gelassen, denn dort wollte ich meine Blumenwiese aufstempeln und sie dann colorieren. 
 
The background is made from a piece of light blue cardstock, that I inked with Distress Oxide Speckled Egg and Broken China. Then I splattered some water onto it. 
I kept the center of the cardstock ink free because that's where I wanted to stamp my meadow and then color the flowers.
 

 Das Gras aus dem Set Critters on the Savannah habe ich mit grüner Tinte im Kreis aufgestempelt. Dann habe ich die Blumen, die ich aus diversen LawnFawn Sets zusammengesucht habe, darüber gestempelt - die Stiele mit grüner, die Blüten mit schwarzer Tinte. 
Da der Hintergrund-Cardstock ja blau war, habe ich zum Colorieren der Blüten Polychromos verwendet, die die Farbe des Cardstocks überdecken. Außerdem habe ich noch einige mehr Grashalme mit einem dunkelgrünen Polychromo zwischen die gestempelten Grashalme gemalt. 
Die süße Maus mit Rasenmäher ist aus dem Set Mower Mouse. Auf dem Rasenmäher sitzt die kleine Maus aus Garden Mouse - Achtung, natürlich nicht nachmachen! Kinder gehören nicht auf den Rasenmäher, aber auf einer Karte darf das mal. Außerdem habe ich noch einen kleinen Schmetterling und zwei kleine Wolken abgestempelt. Ich habe die Motive mit Ohuhu Markern coloriert und dann per Hand ausgeschnitten.
Die Motive habe ich dann auf einen Folienkreis, etwas größer als der gelbe Kreis in der Mitte des Motivs, geklebt. Den Schmetterling habe ich an einem schmalen Streifen Folie befestigt. Wie der  Mechanismus funktioniert, könnt Ihr in Jennifer's Video sehen.  
In die Mitte meines Graskreises - und um den Mechnismus zu überdecken - habe ich einen etwas größeren Kreis aus grünem und darauf einen Kreis aus gelbem Cardstock geklebt. Auf den gelben Kreis habe ich einen der Texte aus Magic Messages aufgestempelt. Den Text habe ich mit schwarzer, die Strahlen mit orangefarbener Tinte gestempelt. Dann habe ich die Strahlen mit Stickles beglittert. 
 
 I stamped the grass from Critters on the Savannah with green ink in a circle. Then I added the flowers behind it - the stems with green, the blossoms with black ink. I used flowers from all kinds of different sets here.
Since the background cardstock is a light blue I used Polychromos, that cover the cardstock color, to color the flowers. I also added some more grass between the stamped grass using a dark green Polychromo. 
The cute mouse with the lawn mower is from Mower Mouse. I sat a small mouse from Garden Mouse onto the mower - caution, don't try that with your own kids! Of course kids must not sit on top of a running lawn mower, but on a card everything is possible. I also  stamped two small clouds and a butterfly. Then I colored the images with Ohuhu markers and cut them out with my scissors.
I glued the images to the edge of a circle cut from acetate, that's a bit larger than the yellow circle in the center. For the butterfly I used a thin strip of acetate. You can check Jennifer's video to see how the mechanism behind this card is done.
Into the center of my grass circle - and to cover up the mechanism - I cut a circle from green cardstock and glued a slightly smaller one, cut from yellow cardstock, on top. Onto the yellow circle  I stamped one of the texts from Magic Messages. I stamped the words with black, the sun rays with orange ink and covered the rays with Stickles.
 

 Im unteren Bereich der Karte habe ich dann meinen Text aufgeklebt. Das Thank you ist aus dem Set Pick of the Patch AddOn. Ich habe es weiß auf grünen Cardstock embosst und dann ausgeschnitten. Für den Spruch darunter, den ich in ein Wortspiel abändern wollte, habe ich ein "you're just awesome" verwendet und das "awe" mit Hilfe des Stempels Mom, beides aus Just Plane Awesome, in "mow" abgewandelt. So ist es quasi eine Mischung aus awesome und mow....
 
In the lower area of the card I added the text. The thank you is from Pick of the Patch AddOn. I white heat embossed it with green cardstock and cut it out. The text underneath I wanted to change into a little pun. So I used a "you're just awesome" and used the word Mom, both from Just Plane Awesome, to turn the awe into mow. I really hope it sounds like a mix of awesome and mow....


Die Texte habe ich direkt auf den Hintergrund geklebt, damit die Maus nicht daran hängen bleiben kann. Als Deko habe ich drei kleine rosafarbene Herzen auf der Karte verteilt und zudem einen Rahmen mit einem weißen Gelstift aufgemalt.
Zum Schluss habe ich alles auf einen weißen Kartenrohling geklebt.
 
I glued the texts directly onto the background to make sure that the mouse can't get caught here. I added three small pink clay hearts as decoration and drew a frame with a white gel pen.
Then I glued the card panel to a white note card.
 

Donnerstag, 30. April 2026

To a JEANuine Friend

 
 Hallo Ihr Lieben! 
Vor kurzem ist das Jean Jacket Bundle von HeroArts bei mir eingezogen und das ist meine erste Karte damit.  
 
Hello everyone!
A little ago I got the Jean Jacket Bundle by HeroArts  and this is my first card using it.
 
Ich hatte erst die Jacke gestaltet und dann überlegt, was als Hintergrund dazu passen würden. Letztendlich habe ich mit blauer Tinte, den selben Farben, die auch bei der Jacke zum Einsatz kamen, und einem Stencil Strahlen auf hellblauen Cardstock gewischt. Darauf habe ich dann weiße Acrylfarbe gespritzt.
 
I had created the jacket first and then thought, what I wanted to do as the background. Finally I used some blue ink, the same tones I also used on the jacket, and a rays stencil to add some rays  to a piece of light blue cardstock. Then I splattered white acrylic paint onto it. 
 

Das Bundle besteht aus einer Stanze und dazu passenden Stencils, beides auch separat zu nutzen. Ich habe es kombiniert und die Jacke aus grau-blauem Cardstock gestanzt. Ich bin sowieso nicht unbedingt der Jeans-Mensch, aber wenn, dann muss sie dunkelblau oder schwarz sein. Hellblaue Jeans mochte ich noch nie. 
Ich habe die Details für die Front der Jacke zusätzlich aus dem selben Cardstock gestanzt, die Knöpfe sind aus matt-silbernem Metallic-Cardstock. Dann habe ich die Stencil benutzt, um die Falten aufzuwischen. Dabei habe ich die zusätzlich gestanzten Teile ebenfalls gewischt. Ich hatte außerdem noch den Denim Background von MFT. Den habe ich erst mit dunkelblauer Tinte und anschließend mit weißer Pigment-Tinte auf alle Teile gestempelt - bewusst nicht perfekt, so dass es realistischer wirkt. Aber ich finde, der Stempel gibt der Jacke den Look, als würde sie tatsächlich aus Stoff bestehen.
Mit einem hellgrauen Gelstift habe ich dann die  Nähte aufgemalt, außerdem hat die Jacke an der Seite ein rotes Label bekommen. Ihr wisst sicher, welche Marke ich da im Kopf hatte. Auch im Inneren des Kragens habe ich ein Label angebracht. Das ist aus dem Stempelset Occasional Labels von MamaElephant. Ich habe den Stempel beim Einkleben ins Misti etwas gebogen, so dass er sich an die Rundung des Kragens anpasst. Dann habe ich ihn mit hellblauer Tinte abgestempelt.
Es gibt zu dem Jackenset zwei Zusatzsets - eines mit Fliege und Hosenträgern und eines mit Patches als Deko für die Jacke. Die habe ich beide nicht bestellt - ich denke, den Look kann man auch ohne die Stanzen gestalten. Also habe ich meine Stanzen nach kleinen Motiven durchforstet  und mich dann für eine kleine Blume von Create a Smile, einen Smilie von Spellbinders und eine Kirsche von LawnFawn entschieden. Ich habe die Teile aus farbigem Cardstock gestanzt und auf schwarzen Cardstock geklebt. Den habe ich dann mit der Schere so ausgeschnitten, dass ein schmaler schwarzer Rand stehen bleibt. 

The bundle contains a die and a matching stencil, both can be used without each other. I combined them here and die cut the jacket from grey-ish blue cardstock. I am not really a jeans girl but if I feel like wearing one it has to be dark blue or black. I never liked the ligth blue ones.
I also die cut the detail pieces for the front of the jacket from the same cardstock, the buttons I cut from matte silver metallic cardstock. Then I used the stencils to add the shadows to  the jacket. I also did that on the parts I had cut additionally. I also have the Denim Background by MFT. I first stamped it with dark blue ink onto all the pieces, then with white pigment ink on top. I didn't care for a perfect impression tomake the look more realistic. And I think, the jacket really looks like it's made from fabric. 
With a light grey gel pen I added the stitches and also glued a small red label next to the pocket. I think we  all  know which brand I had in mind. I also added a label to the inside of the collar. That's made using a stamp from Occasional Labels by MFT. When sticking  it to my Misti I bent it slightly to make the shape match the one on the collar. I stamped it with light blue ink.
There are two additional sets you can order for the jean jacket - one with a bow tie and suspenders and another one with little patches. I didn't any of these because I think I can get the same look without the dies. So I went through my dies and looked for small images I could use. I went with a small flower from Create a Smile, a Smilie by Spellbinders and a cherry by LawnFawn. I cut all the pieces from colored cardstock, glued them onto black cardstock and cut that out with my scissors, leaving a small edge of the black visible all around.  
 Irgendwie wollte ich dann natürlich das Jeans-Thema mit meinem Text aufgreifen. Neben JEANius ist mir nur JEANuine eingefallen, aber das passt ja ganz gut zu einer Freundschaftskarte. Ich habe die Buchstaben aus blauem und weißem Cardstock gestanzt und die blauen auf die selbe Weise mit dem Denim Background bestempelt, wie ich es auch bei der Jacke getan habe. Dann habe ich die weißen Buchstaben etwas versetzt dahinter geklebt.
Der Rest des Textes ist mit Stempel aus den Henry's Build a Sentiment Sets von LawnFawn und dunkelblauer Tinte gemacht. Alles habe ich oben links auf den Hintergrund geklebt.
 
I somehow wanted to include the jeans theme in my sentiment. Besides JEANius I only came up with JEANuine, but I think, that goes great with a friendship card.  I die cut the letters from blue and white cardstock and stamped the Denim Background onto the blue ones just like I did on the jacket. Then I glued the white letters behind the blue ones just a bit offset. 
The rest of the text is made using stamps from the Henry's Build a Sentiment sets by LawnFawn and stamped with dark blue ink. Then I glued the text to the top right of my background. 
 
 
Beim Zusammenkleben der Karte habe ich alle zusätzlichen Elemente mit dünnem 3D Tape aufgeklebt, die Knöpfe sind jeweils mit zwei weiteren Lagen blauen Cardstocks hinterlegt.
 Aber das war noch nicht das Ende der Karte...
 
When putting the card together I backed all the additional elements with thin foam tape, behind the buttons there are two layers cut from blue cardstock.
But there's more behind this card... 
 
 
 Ich wollte nämlich unbedingt auch die Rückseite der Jacke benutzen. Also habe ich sie nicht einfach aus blauem Cardstock gestanzt sondern aus einer Art Karte. Die Falz der Karte habe ich dabei ganz knapp innerhalb der seitlichen Kante der Jacke angelegt. So ist eine kleine, seitlich aufklappbare Jacke entstanden. Wenn man sie öffnet, sieht man das hier.
Ich habe die Rückseite der Jacke genauso "behandelt" wie die Vorderseite. Als zusätzliches Element habe ich hier nur einen Kragen für die rechte Seite gestanzt. Auf der linken Seite habe ich darauf verzichtet, damit die Stelle nicht zu dick wird.  
 
 I really wanted to use the back of the jacket, too. So instead of cutting it from just cardstock, I cut it from a smaller sidefold card. I placed the fold of this small card just next to the side edge of the die to create this jacket shaped card. When you open it, this is what you see.
I created the back of the jacket just like I did the front. As an additional element I only added a collar to the jacket on the right side. I skipped it on the left because I was afraid, that the jacket would become too bulky here. 
 
 
Auf der linken Rückseite habe ich dann ein ausgestanztes thanks aufgeklebt. Ich habe es mit einer Stanze von MFT aus weißem und  rotem Cardstock gestanzt und auf die Jacke geklebt. Der Text war hier notwendig, da dieser Jackenteil ja nirgends aufgeklebt wird, an den Stellen der Nähte aber Linien in die Jacke gestanzt werden. Das "thanks" hält die zusammen und die Jacke fällt nicht auseinander. 
 
On the left back I glued on a die cut thanks. I cut that with a die by MFT from white and red cardstock and glued it on. I needed that text here because this part of the jacket isn't adhered to anything. The die cuts slits into the jacket where the seams are, the "thanks" holds the jacket together and keeps it from coming apart.  


 Auf der rechten Jackenrückseite geht der Text dann weiter. "Thank you for always having my back" fand ich passend zur Rückenansicht der Jacke. Da ich auch hier keinen passenden Stempel habe, habe ich den Text mit Stempeln und Stempelteilen aus verschiedenen Stempelsets von LawnFawn zusammengesetzt. Dann habe ich als  Deko noch drei Herz-Patches gestaltet und auf der Jacke verteilt - zwei auf der rechten und eines auf der linken Seite. Die Herzen-Patches sind als Stanzen so im Jean Jacket Set enthalten. 
 
The text continues on the right jacket back. "Thank you for always having my back" seemed a good text to go with the back of the jacket. I didn't have  a text that says that. So I used  different stamps and parts of stamps from differenet stamp sets by LawnFawn to put it together. Then I also created three heart shaped patched and glued them onto the jacket backs - one on the left and two on the right side. The dies for those heart patches come in the Jean Jacket die set.  
 

Sonntag, 1. März 2026

Eine affige Karte - oder so


Hallo Ihr Lieben!
Von Create a Smile gibt es ja zu jeder Bestellung einen Mini-Stempel als Goodie. Bis auf die erste Serie habe ich die alle komplett - und ja, auch hier schlägt das Full-Set-Syndrom zu - und das auch dank der Tauschwilligen in der FB-Gruppe. Nun gibt es eine neue Serie und ich habe hier einen Affen aus einer älteren Kollektion gegen einen Affen aus der ganz neuen getauscht. Ich finde es immer schön, wenn die Karte, mit der der Tauschstempel kommt, dann auch irgendwie zum Tausch passt. Und so habe ich diese Affenkarte gewerkelt. Der Affe unten ist übrigens der, den ich in Mini ertauscht habe....
 Der zweite Affe, den ich doppelt hatte, hat leider nicht so ganz ins Kartenkonzept gepasst.  
 
Hello everyone!
With every Create a Smile order you get a mini stamp as a gift. I have all the series except the first one complete - and yes, Full-Set-Syndrom also kicks in here - also because of the exchange post in the FB group. A new series just started and I exchanged a monkey from an older series with the one from the new series. I always like  when the card I send the mini stamp in goes with the exchanged image(s). So I made this monkey card, the monkey on the bottom is the one I got as a mini.
The second monkey, that I had a second one of, didn't fit the card concept.
 
Da der ertauschte Affe mit dem Bananen-Telefon  telefoniert, kam mir die Idee, die Karte optisch in zwei Teile zu teilen und in jedes einen telefonierenden Affen zu setzen. 
Ich habe hier aus schwarzem Cardstock den Peppermint Stripes Backdrop von LawnFawn ausgestanzt und bis auf einen Streifen etwa in der Mitte alle anderen Streifen weggeschnitten. Damit er in die richtige Richtung geht, habe ich das Stanzteil dann auch noch aufs Gesicht gelegt. 
Den oberen/rechten Teil habe ich mit blauem, den unteren/linken Teil mit grünem Cardstock hinterlegt. Die Cardstockstücke habe ich jeweils mit Distress Ink (Rustic Wilderness und Salty Ocean) ein wenig gewischt und dann auf beide Teile weiße Acrylfarbe aufgespritzt. 
Über alles habe ich dann erst den Tropical Leaves Backdrop und darauf dann einen der Stitched Rectangle Frames, beides ebenfalls von LawnFawn, geklebt. Den Blätterrahmen habe ich aus hellgrünem Cardstock gestanzt und die Blätter mit Copics in unterschiedlichen Grünkombis coloriert. Den Rahmen obenauf habe ich wieder aus schwarzem Cardstock gestanzt.
 
The monkey I got in exchange is one making a call with his banana phone. So I got the idea, to seperate the card into two areas and put one monkey with a banana phone onto each.
I die cut the Peppermint Stripes Backdrop by LawnFawn from black cardstock and cut off all the stripes except one, that's placed about in the center. To have the stripe go the right direction I also turned the die cut on its face.
 I backed the upper/right half with blue, the lower/left one with green cardstock. I inked both pieces lightly with Distress Ink (Rustic Wilderness and Salty Ocean) and then spalttered white acrylic paint onto both pieces.
I first put the Tropical Leaves Backdrop on top of the background and then, on top of that, a Stitched Rectangle Frame, both again from LawnFawn. I die cut the leaf frame from light green cardstock and colored the leaves in different combinations of greens with Copics.  The frame on top I die cut again from black cardstock.
 

 Der Affe auf der rechten Seite hängt mit seinem Schwanz von einer Liane herab. Eigentlich hält er keine Banane in der Hand, die ist einzeln im Set enthalten. Ich habe den zweiten Arm des Affen abgeschnitten und nur das vordere Ende als Hand an die Banane geklebt.
Die Sprechblase ist aus dem All the Speech Bubbles Stempelset von LawnFawn, das "hallo?!" darin aus dem Am Telefon Set von Create a Smile. Ich habe die Sprechblase gelb coloriert und mit schwarzem Cardstock hinterlegt. 
 
The monkey on the right side is dangling from a vine, that he's clinging to with his tail. Originally he doesn't hold a banana, this is an individual image from the set. I cut off the second arm of this monkey and glued just the end to the banana to create a hand.
The speech bubble is from All the Speech Bubbles by LawnFawn, the "hello?!" I stamped into it is from Am Telefon by Create a Smile. I colored the speech bubble yellow and put a black shadow behind it.
 

 Der Affe im linken Teil der Karte ist tatsächlich so im Set enthalten. Auch hier habe ich eine Sprechblase mit dem selben Text angebracht und habe nur die Spitze, die unten an den Sprechblasen angebracht ist, durch eine in die andere Richtung zeigende ersetzt. 
Alle Motive habe ich mit Copics coloriert. 
Zwischen den beiden Bananen-Telefonen habe ich dann noch ein klassisches Telefonkabel gespannt. Da ich hier keine passende Stanze hatte, habe ich einfach viermal die Luftschlange aus dem Balloon Shaker Window and Frame Set von MFT  aus schwarzem Glossy-Cardstock gestanzt und an den Enden aneinander geklebt. Eines der Teile habe ich dabei umgedreht. Wer erinnert sich auch noch daran, wie sich das Telefonkabel immer verheddert hat...?
Auf der rechten Seite habe ich unten dann auch noch ein "vielen lieben Dank" als Text aufgeklebt. Das ist aus dem Set Bunte Texte von Create a Smile und weiß auf schwarzen Cardstock embosst.
 
The monkey in the left half of the card is actually drawn like this. Again I  added a speech bubble with the same text, I just changed the "tip" at the bottom of the speech bubble with one that points in the other direction.
I colored all images with Copics.
Between those two banana phones I added a phone cord. I didn't have a die for that so I simply cut the streamers from Balloon Shaker Window and Frame by MFT four times from black glossy cardstock and glued the pieces together. I turned one of the pieces. Who else remembers the way the phone cord always got twisted....?
On the right bottom of the card I also added a "thank you so much" text, that I white heat embossed onto black cardstock.
 

 Zwischen den einzelnen Lagen der Karte befindet sich jeweils 3D Tape. 
Als Deko habe ich einige kleine Herzen aufgeklebt - weiße im blauen, blaue im grünen Bereich der Karte und neben dem Text. 
Zum Schluss habe ich alles auf einen weißen Kartenrohling geklebt.
 
I put foam tape between the different layers of the card.
As decoration I added some small clay hearts - white ones in the blue, blue ones in the green area of the card and on the text.
Then I glued the card panel to a white note card.
 

Mittwoch, 17. Dezember 2025

Thanks so much


Hallo Ihr Lieben!
Heute gibt es mal eine kurze Unterbrechung der Weihnachtskarten - so ein wenig Abwechslung hin und wieder brauche ich dann doch. Und weil auf meinem Tisch noch so einige unbenutzte Artikel auf ihren Einsatz warten, ich die reinen Winter-Artikel für nach Weihnachten aufheben möchte (da weiß ich ja immer nicht so recht, was ich basteln soll), habe ich heute eine Dankeskarte für Euch.  
 
Hello everyone!
Today I am taking a little break from christmas crafting - I just need that every now and then. There is still a pile of unused stuff on my desk, waiting to get used. I want to keep the obviously winter themed stuff for after christmas - I am always a bit at a loss of finding themes that time - so I have a thank you card to share with you today.
 
Ihr habt es bestimmt schon erraten, hier kam wieder das Capsule Basics Stanzensest von TheGreetery zum Einsatz. Passend dazu gibt es nämlich eine Rosemal Reflections Serie, die an Bauernmalerei erinnert. Tatsächlich hat meine Mutter die alten, handgemachten Schränke, die früher im Kinderzimmer meines Vaters standen, für mein Kinderzimmer mit Bauernmalerei bemalt. Leider wollte ich die Schränke für meine erste Tochter "anders" gestalten und habe Ihr Kunstwerk mit einem zugegebenermaßen recht fragwürden Mond übermalt.... Aber beim Basteln der Karte musste ich viel an sie denken. 
Das große gewellte Oval habe ich aus dem altrosafarbenen Cardstock von Faltkarten gestanzt. Da ich die Ränder irgendwie betonen, sie aber nicht mit Tinte wischen wollte, habe ich mein weißes Ultra Thick Enamel Accents Embossingpulver hervorgeholt. Das habe ich schon ewig nicht mehr benutzt. Ich habe etwas davon nur entlang der Ränder aufgetragen. Beim Schmelzen ergibt es einen relativ dicken Überzug, der fast wie Emaille aussieht. 
Aus weißem Cardstock habe ich dann ein Oval - ebenfalls im Capsule Basics Set enthalten -  ausgestanzt und mittig daraus ein kleines Oval herausgestanzt. Auf den so entstandenen Ring  habe ich dann das Muster mit dem Rosemal Reflections Stempelset aufgestempelt. Die Zweige habe ich silbern embosst, die Blumen dann mit rosafarbener, roter und dunkelroter Tinte aufgestempelt. 
 
You for sure already noticed, I used the Capsule Basics die set by TheGreetery again. There's a matching Rosemal  Reflections series, inspired by rosemaling. Here in Germany we call that "Bauernmalerei", which translates as "farmer's way of painting". Actually, when I was little my mom did some rosemaling on the old, handmade dresser my dad had in his room when he was little and then put it up in my room. Sadly I wanted to make it look "different" when my first daughter was born and I covered her beautiful work with a - I have to admit it - more than questionable looking moon... But I had to think of my mom a lot when I made this card.
I die cut the large scalloped oval from a dusky pink cardstock. I wanted to somehow make the edges stand out but didn't want to do inkblending. So I brought out my white Ultra Thick Enamel Accents embossing powder, that I hadn't used in ages. I applied some just along the edges of the oval. When melted, this powder creates a kind of thick layer that looks just like enamel.
 From white cardstock I cut an oval - also included in the Capsule Basics set - and cut a smaller one from the center. Onto that ring/frame I then stamped the images from Rosemal Reflections. I silver heat embossed the leaves/branches and stamped the flowers with pink, red and dark red ink.
 

 Wieder aus dem altrosa Cardstock habe ich ein weiteres Oval in der gleichen Größe des weißen ausgestanzt. Das habe ich dann mit dem Rosemal Reflections Embossingfolder geprägt. Der macht auch einen wundervollen Blumenrand, den ich aber mit dem weißen Oval verdeckt habe, weil ich doch auch das Stempelset unbedingt benutzen wollte. So sieht man durch das ovale Fenster im weißen Cardstock nur einen teil des geprägten Motives. 
Mit einem rosafarbenen Stempekissen habe ich ganz vorsichtig Tinte nur auf die erhabenen Stellen des Embossings aufgetragen. 
Und dann kam das nächste Produkt aus der Serie zum Einsatz: das Rosemal Reflections Details Stanzenset. Damit kann man die Bauernmalerei auch stanzen. Ich habe die Teile aus weißem, rosafarbenen sowie hell- und dunkelroten Cardstock gestanzt. Und um den Elementen noch mehr den Look von Bauernmalerei zu geben, habe ich Polychromos und Prismacolors benutzt, um den typisch "streifigen" Look auf die Stanzteile zu malen. Auch den gestempelten Blumen habe ich ein paar wenige Striche verpasst.
Die farbigen Stanzteile habe ich dann so auf die weiße Basis geklebt, dass die hinter den Blüten ein klein wenig sichtbar bleibt. 
Mit dem Embossingfolder habe ich dann nur das Banner ein weiteres Mal in dunkelroten Cardstock geprägt und auch den ein wenig "coloriert". Dann habe ich einen der Texte aus dem Rosemal Reflections Sentiments Stempelset silbern aufembosst, das Banner ausgeschnitten und aufgeklebt.
 Und weil keine Karte ohne Embellishments auskommt, habe ich eine Schleife aus silbernem Twine an eine der großen Blüten geklebt und direkt daneben ein weißes Herz aufgeklebt. Auf einigen der restlichen Blüten und auf dem Banner habe ich kleine silberne Perlen angebracht, die embossten Punkte im Hintergrund habe ich mit einem weißen Gelstift weiß eingefärbt.
 
I die cut another oval the same size as the white one from that dusky pink cardstock again. Then I used the Rosemal Reflections embossing folder to dry emboss the pattern into it. I also creates a beautiful border, that I covered with the white oval because I really wanted to use the stamp set, too. So you can only see part of the dry embossing through the window in the white oval.
I used a pink ink pad to carefully color just the raised areas of the embossed details.
And then I brought in the next product from the series: the Rosemal Reflections Details die set. With this set you can also die cut some rosemaling. I cut the pieces from white, pink, light and dark red cardstock. To give those elements an even more realistic rosemaling look I added some details with Polychromos and Prismacolor pens. I also added a few to the stamped flowers.
I glued the colored pieces onto the white base, making it peek out just a bit at the top.
I dry embossed just the banner again from dark red cardstock and "colored" it a bit, too. Then I silver heat embossed one of the texts from Rosemal Reflections Sentiments onto it, cut the banner out and glued it on. 
No card is finished without embellishments. I glued a bow, tied from silver twine, onto one of the large flowers  and put a small white clay heart next to it. Then I added some small silver pearls to a few of the other flowers and also the bannner, the dry embossed dots in the background I re-did with a white gel pen.
 

 Den ovalen weißen Ring habe ich mit dünnem, das Banner und die Blumen mit dickem 3D Tape auf das rosafarbene Oval geklebt. Hinter dem befindet sich dann eine weiße ovale Karte, die nach oben geöffnet wird. So ist dann auch Platz für einen persönlichen Text. Außerdem konnte ich damit auf der Innenseite die debosste Seite des rosafarbenen Ovals verdecken.
 
I adherd  the white oval ring with thin, the banner and the flowers with thick foam tape onto the pink oval. Behind it I put a white topfolding oval card to make space for a personal message. It also covered the debossed side of the pink oval for a clean inside.
 

 Für die ovale Karte habe ich einfach das große Oval aus einem gefalteten Cardstock-Streifen gestanzt und dabei den Rand der Stanze ein wenig über den Falz hinaus geschoben. Die eine Seite habe ich auf dem gewellten, die andere hinter dem embossten Cardstock befestigt.
Ich hatte vom Ausstanzen der Rosemal Reflections Details Stanze noch einige kleine Blüten übrig. Die habe ich dann zusammengesetzt und innen auf die Karte geklebt. Auch hier habe ich ein paar silberne Perlen als Deko angebracht, außerdem  habe ich einen Rahmen mit einem silbernen Gelstift aufgemalt.
 
For the oval card base I simply cut the large oval from a folded strip of cardstock, moving the top edge of the die a bit over the scored cardstock edge. I glued one side  onto the scalloped, the other behind the  dry embossed cardstock.
From cutting the Rosemal Reflections Details die I had some fmall flowers left. I put them together and adhered them to the inside of the card. I used some small silver pearls as decoration again and also drew a frame with a silver gel pen.
 

Donnerstag, 27. Februar 2025

Von Herzen schönen Dank

 
Hallo Ihr Lieben!
Am heutigen Donnerstag zeige ich Euch eine Dankeskarte, dich ich mit Produkten von Stampcorner gemacht habe.

Hello everyone!
On this thursday I am sharing with you a thank you card I made using products by Stampcorner.

Ich habe schon länger keine Karte in der Eclipse Technik mehr gemacht, also wurde es mal wieder Zeit...
Auf ein Stück weißen Cardstocks habe ich mit schwarzer Tinte Herzen aufgestempelt. Das Herz, das ich hier verwendet habe, ist aus dem Set Fauli.
Aus dem bestempelten Hintergrund habe ich dann mit dem Alphabet-Stanzenset das Wort Dank herausgestanzt. Auf den Rest des Hintergrunds habe ich dann blau-graue Metallic Watercolor gespritzt.

I haven't made an eclipse card since quite some time, so it was about time...
With black ink I stamped a little heart all over a piece of white cardstock.
I used the alphabet die set to cut the letters for the word "Dank" - thanks - from this cardstock, then splattered some grey-ish blue metallic watercolor onto the rest of the background.


Zuerst habe ich nur die  Herzen auf den ausgestanzten Buchstaben rot coloriert, aber es waren dann irgendwie doch zu wenig davon auf den Buchstaben sichtbar. Also habe ich auch die Buchstaben selbst coloriert und mich für ein Blaugrau entschieden.
Ich habe noch je 3 jedes Buchstaben aus schwarzem Cardstock gestanzt, alle Buchstaben aufeinander geklebt - die bunten natürlich als oberste Lage - und sie dann in den Ausschnitt im Hintergrund eingesetzt. 
Mit einem weißen Gelstift habe ich Highlights aufgemalt und außerdem einen roten Gelstift benutzt, um eine Art roten Schatten an jeden Buchstaben zu malen.
Der kleine Text über dem gestanzten Wort ist mit Stempeln aus den Sets Kleine Worte und Kleine Worte 2 gemacht und weiß auf schwarzen Cardstock embosst.

First I had colored only the hearts on the die cut letters red, but there weren't enough of them on the letters so I decided, to color the letters a grey-ish blue.
I die cut three more of each letter from black cardstock, stacked them - of course the colored one on top - and then pieced them back into their spot in the background.
I used a white gel pen to add some highlights to the letters, then used a red gel pen to draw some kind of red shadow next to each letter.
The small text above the die cut word is white heat embossed onto black cardstock and together the text means "many thanks from the heart".


Natürlich durfte auch ein Motiv auf der Karte nicht fehlen. Ich habe mich für den kleinen Bären mit der Blume aus dem Set Sommer Sonne entschieden. Er ist mit Copics coloriert, dann habe ich ihn per Hand ausgeschnitten. Auf die Brust habe ich ihm ein kleines rotes Herz geklebt.
Unten hinter die Füße habe ich einen dünnen Schatten, gemacht aus schwarzem Cardstock mit den Oval Shadows von MFT, angeklebt.

Of course my card needed an image. I went with this little bear with the flower. He's colored in with Copics, then I cut him out with my scissors. Onto his chest I glued a little red heart.
Behind the bear's feet I put a shadow, die cut from black cardstock using one of the Oval Shadows by MFT.


Ich habe alle Herzen auf der Karte mit Glossy Accents überzogen.
Der Cardstock-Streifen mit dem aufembossten Text ist mit dünnem 3D Tape hinterlegt, so hat es die selbe Höhe wie die gestanzten und hinterlegten Buchstaben. Hinter dem Bären befindet sich dickes 3D Tape. 
Mit einem roten Gelstift habe ich dann einen Rahmen auf den weißen Cardstock gemalt und ihn auf ein Stück schwarzen Cardstocks geklebt, den ich mit der größten der A2 Zick Zack Stitch Stanzen gemacht habe, aufgeklebt.
Zum Schluss habe ich alles auf einem weißen Kartenrohling befestigt.

I covered all the hearts on this card with Glossy Accents.
I backed the cardstock strip with the heat embossed text with thin foam tape, so it has the same height as the stacked letters. Behind the bear I put some thick foam tape.
I used the red gel pen again to draw a frame onto the white cardstock. Then I glued that onto a piece of black cardstock, that I had die cut with the largest of the A2 Zick Zack Stitch dies.
As the last step I glued the card panel to a white note card.

Freitag, 22. November 2024

Eine Karte zum Abschied

 
Hallo Ihr Lieben!
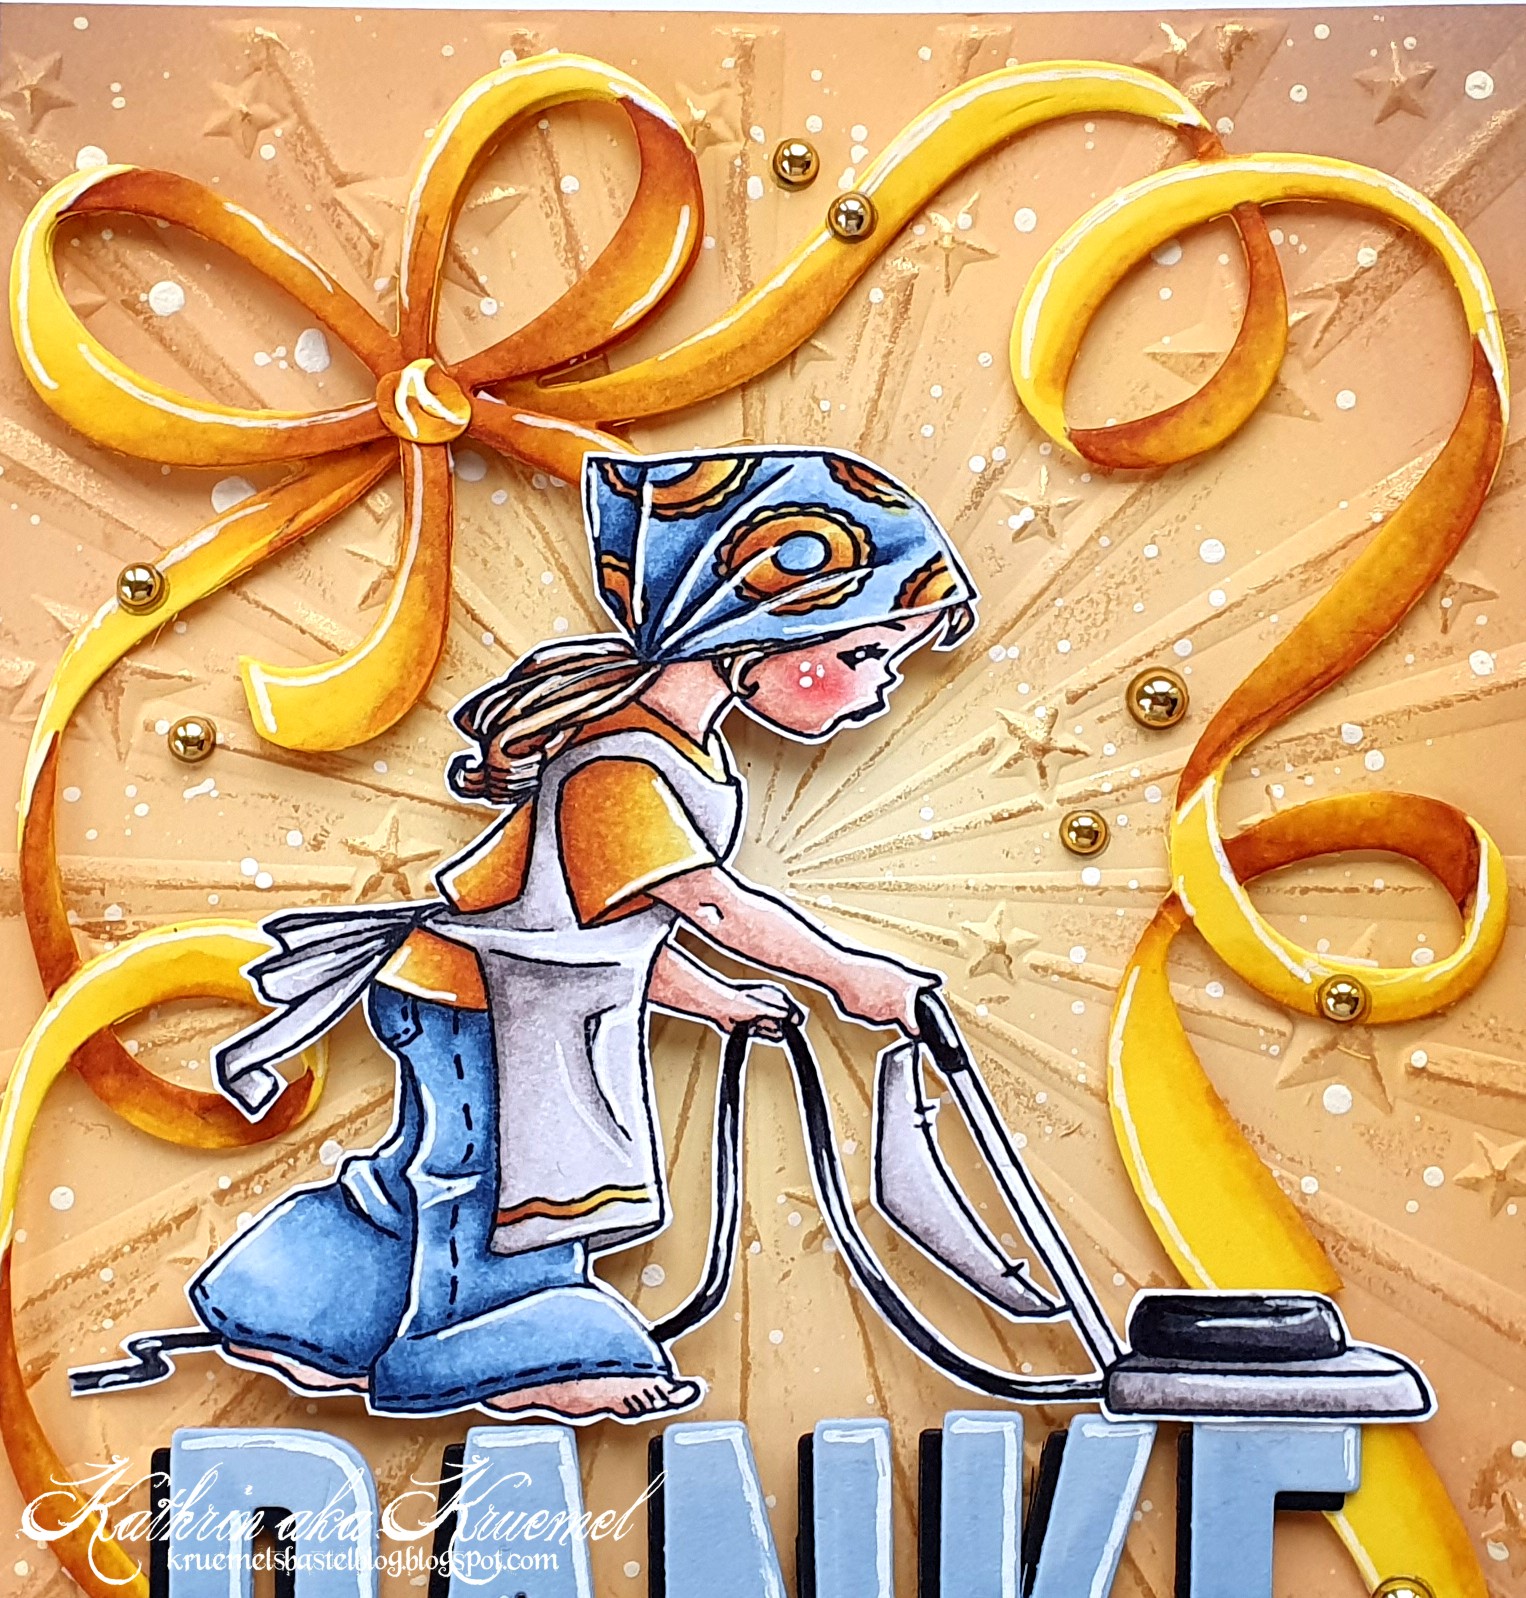
Wenn die Putzfrau in Rente geht, dann ist das doch der perfekte Zeitpunkt, um das süße Mädel mit dem Staubsauger mal wieder zum Einsatz kommen zu lassen. 

Hello everyone!
When your cleaning lady at work goes into retirement then that's the perfect moment to use this little girl with the vacuum cleaner again.
 
Für den Hintergrund habe ich ein Stück cremefarbenen Cardstocks erst mit Distress Oxide Scattered Straw, Wild Honey und Gathered Twigs gewischt. Dann habe ich mit dem All Star Burst Embossingfolder von SimonSaysStamp die Strahlen und Sterne hineingeprägt. Auf die Sterne und höchsten Stellen der Strahlen habe ich dann goldenes Gilding Wax aufgetragen. Da ich verschiedene Goldtöne habe, habe ich drei verschiedene benutzt - jeweils in der Helligkeit zur Farbe im Hintergrund passend. Anschließend habe ich noch weiße Acrylfarbe aufgespritzt.
Als Rahmen habe ich den Ribbon Frame von TheGreetery auf die Karte geklebt. Den habe ich horizontal geteilt, damit er auf die deutsche A2 Karte passt. Die "Lücken" habe ich dann hinter dem Text und Motiv versteckt.
Gestanzt habe ich den Rahmen aus gelbem Cardstock und mit Copics Schatten hinzugefügt.

For the background I inked a piece of cream colored cardstock with Distress Oxide Scattered Straw, Wild Honey and Gathered Twigs. Then I used the All Star Burst embossing folder by SimonSaysStamp to emboss the rays and stars into the cardstock. Onto the stars and the hightest point of the rays I dabbed some gold Gilding Wax. Since I have different tones of gold Gilding Wax I used three different ones here, making them match the intensitiy of the color in the background. Then I also added splatters of white acrylic paint.
I used the Ribbon Frame die by TheGreetery to put a frame onto my card. I cut it apart crosswise to make it fit the german standard A2 card size. The "gaps" I've hidden behind the text and image.
I die cut the frame from yellow cardstock and added shadows with my Copics.


Das Motiv ist Belle Vacuuming von Belles 'n' Whistles - und ich bin froh, es nicht aussortiert zu haben. Ich habe es mit Copics coloriert und per Hand ausgeschnitten.

The image is Belle Vacuuming by Belles 'n' Whistles - and I am really happy that I kept it. I colored her with Copics and fuzzy cut her out.


Für den Text habe ich mit dem Wedding Alphabet Stanzenset von XCut die Buchstaben für das Wort Danke einmal aus hellblauem und einmal aus schwarzem Cardstock gestanzt. Die hellblauen Buchstaben habe ich mit Copics schattiert, dann habe ich die schwarzen Buchstaben etwas versetzt als Schattenlage dahinter geklebt.
Der Rest des Textes ist mit Stempeln aus den Reverse-Sets von Kulricke gemacht und einfach schwarz auf hellblauen Cardstock gestempelt.

For the text I used the Wedding Alphabet die set by XCut to cut the letters for the word "danke" - thanks - from light blue and black cardstock. I shaded the blue ones lightly with Copics, then glued the black ones a bit offset behind them as a shadow layer.
The rest of the text means "for everything and all the best for your future" and is simply stamped black onto light blue cardstock.


Den Rahmen habe ich mit dünnem, das Motiv und den Text mit dickem 3D Tape auf den Hintergrund geklebt. Als Deko habe ich einige goldene Perlen auf der Karte verteilt und dann alles auf einem weißen Kartenrohling befestigt.

I adhered the frame with thin, the image and text with thick foam tape. Then I added a few gold pearls as decoration and put my card panel onto a white note card.