Mittwoch, 28. Februar 2018

Eine Box mit Hase


Hallo Ihr Lieben!
Heute zeige ich auf dem Kulricke-Blog diese Osterbox mit Hase.

Hello everyone!
Over at the Kulricke Blog I am sharing this easter box with bunny today.


Für die Box habe ich die Take-Away-Box verwendet und die oberen Teile abgeschnitten. Dann habe ich sie mit Designpapier beklebt und einen Einsatz gebastelt. Der ist 4,5 cm hoch und hat 6 "Erdlöcher" für die Schokoladenmöhren.

For the box I used the Take-Away-Box die and cut off the top parts. Then I've covered it with designer's paper and created an insert. It's 4,5 cm high and has 6 die cut wholes to "plant" the chocolat carrots in.


Der süße Hase - hier konnte ich mal die größte Größe verwenden - hat sich aus dem Beet schon mal eine Möhre geklaut und mümmelt nun genüsslich daran herum. Die Möhre habe ich einfach per Hand dazugemalt - die Pfotenstellung ist ja perfekt dafür geeignet.
Den Text aus dem Stempelset Osterei habe ich mit brauner Tinte auf kraftfarbenen Cardstock gestempelt, bannerförmig zugeschnitten und die Schrift für mehr Kontrast innen noch mit weißem Gelmarker gefüllt.
Hinter den Bannern ist noch ein ausgestanztes Herz.

The cute bunny - here I was able to use the biggest size - already sneaked a carrott from the field and is now enjoying his treat. I simply handdrew the carrott - the way his hands are drawn is just perfect for that.
I stamped the saying - happy easter in german - onto craft colored cardstock using brown ink and then cut it into a banner shape. To add some contrast I used a white gelly marker to fill the font.
Behind the banners I've added a die cut heart.


Und natürlich muss so ein Beet auch beschriftet werden - damit man auch weiß, was man dort ausgesät hat. Ich habe das mittlere der Nesting Labels 5 verwendet und den oberen Teil oval/rund zugeschnitten. Darauf kam dann der Text "lecker Schokolade", den ich aus Stempeln der Schokolade 2 und Schokolade 3 Stempelsets zusammengesetzt habe. Der Pfeil ist aus dem Plan Stanzenset. Ich habe einfach nur die Spitze verwendet.

And of course a field  needs a sign so you know what you've planted there in spring. I used the middle sized Nesting Labels 5 and cut the top part into a round/oval shape. Then I added a "yummy chocolat" saying and added an arrow from the Plan die set.


Dienstag, 27. Februar 2018

Noch eine Babykarte


Hallo Ihr Lieben!
Bereits vor einiger Zeit habe ich Euch ja schon eine Babykarte mit dem Baby-Set von Scrapbook Forever gezeigt. Ich finde es immer gut, ein paar Babykarten auf Lager zu haben. Aber oft passiert es mir dann, dass ich eine Mädchenkarte brauche und nur Jungskarten da sind - oder umgekehrt. Darum habe ich heute mal eine Karte gemacht, die für beide Geschlechter passend sind, nämlich richtig bunt.

Hello everyone!
A little time ago I've already shared a baby card using the baby stamp set by Scrapbook Forever. I love to have a few baby cards at hand. But most times when I need a girls' card all I have are boys' - or vice versa. So today I made a card that fits both genders - using really bright colors.

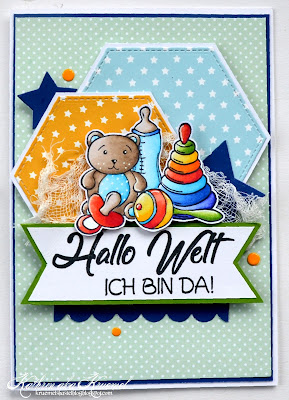
Im Hintergrund habe ich zwei Sechsecke aus Designpapier sowie zwei Sterne aus dunkelblauem Cardtsock sowie eine blaue Bordüre aufgeklebt. Teilweise sind die verschiedenen Lagen mit 3D Tape aufeinander gesetzt.

In the background I used two die cut hexagons cut from designer's paper and two stars and a border cut from dark blue cardstock. A few of the layers were adhered using dimensional tape.

Und dass auf einer Babykarte nicht zwingend ein Baby zu sehen sein muss, sieht man hier. Ich habe alle Baby-Accessoires aus dem Stempelset auf-, neben- bzw. hintereinander maskiert und coloriert. Dann habe ich diese Szene - kann man das hier dann so nennen? - ausgeschnitten und oben auf ein Banner gesetzt, auf das ich den Text aus dem Baby-Set gestempelt habe. Das Cheesecloth hinter den Spielsachen sorgt für etwas mehr Kontrast.

And that you don't have to use a baby on a baby card can be seen here. I stamped all the accessoires from the stamp set next to and behind each other. Then I've cut this scene - can you call it a scene here? - out and glued it onto a banner on which I've stamped the saying "hello word - here I am". The cheesecloth behind the toys is used to created a more neutral background behind the toys.


Sonntag, 25. Februar 2018

Eine Karte zum 40. Geburtstag


 Hallo Ihr Lieben!
Vor kurzem war ich auf einen 40. Geburtstag eingeladen - und so ein Tag gehört natürlich gefeiert. Zum Feiern gehört in so einem Fall Champagner - und so habe ich meine Karte gleich in Form einer Champagnerflasche gemacht. Nachdem der Geburtstag nun vorüber ist, kann ich die Karte auf dem Noor!Design UK Blog zeigen.

Hello everyone!
Little time ago I've been invited to a 40th birthay - and days like this have to be celebrated. And it wouldn't be a real celebreation without champagne. So I've decided to make my card in the shape of a champagne bottle. Since the birthday is over now I can share my card over at the Noor!Design UK Blog.

Die Flasche habe ich mit meiner Cameo geschnitten und mit Designpapieren von Mintay und Lemoncraft dekoriert.

I've cut the bottle using my Cameo and coverd it with papers by Mintay and Lemoncraft.


Man glaubt ja gar nicht, was man selbst auf einer nur 10 cm breiten Flasche als Deko alles unterbringt. Ich habe die Zahl 40 auf ein Ticket aufgeklebt und mit einem Pin an der Karte befestigt. Darunter habe ich ein ausgestanztes Cheers aufgeklebt, unter dem sich ein Schnörkel befindet.

You won't believe how many embellishments you can put on a card that is only 10 cm wide. I've glued the die cut number 40 onto a ticket and used a pin to attach it my card. Under it I've put a die cut cheers and a flourish.


Die Wein trinkende Tilda war perfekt für meine Flaschen-Karte. Sie ist mit Copics coloriert. Und ich weiß, man soll Alkohol nicht mit Strohhalmen trinken - aber als Deko passten sie hier einfach zu gut, darum habe ich zwei Stück davon mit aufgeklebt. Darunter ist ein weiterer Schnörkel und ein ausgestanzter Zweig. Rundherum habe ich ein paar Rosen und eine wunderschöne Stoffblüte, die ich aus einem Stück Spitze ausgeschnitten habe, aufgeklebt.

Wine tasting Tilda was perfect again for my bottle card. She's been colored in with Copics. And I know, you shouldn't drink alcohol using paper straws - but for decorations they were just perfect so I've added two of them. Under the straws there is another flourish and a die cut branch. I also glued some roses on the card an a beautiful white flower that was cut from a piece of lace.


Am Flaschenhals - sozusagen als Etikett - habe ich einen runden Text angebracht, den ich mit Cardstock hinterlegt habe. In die Mitte kam ein kleines ausgestanztes Herz, darunter etwas Baker's Twine und eine Halbperle.

At the top of the bottle - as the label - I've stamped some round birthday greetings and used some plain cardstock to mat it. In the middle I've put a small heart. I also added some Baker's Twine and a half pearl here.


Samstag, 24. Februar 2018

Stempeleinmaleins - Ausgabe vom 24. Februar 2018


 Hallo Ihr Lieben!
Heute startet die neue Challenge beim Stempeleinmaleins. Ich habe den Sketch wie oben zu sehen umgesetzt - und dabei die Kreise, die auf dem Sketch eingezeichnet sind, durch Motive ersetzt.

Hello everyone!
We are starting our new challenge over at Stempeleinmaleins today. I used the sketch to make this card - and replaced the circles, that are drawn in the sketch - with images.

Den Hintergrund habe ich mit der Cloud Stencil von MFT gewischt, der grüne Streifen unten ist einfach ein Stück Cardstock. Für den Rahmen habe ich ebenfalls eine Stanze von MFT verwendet und beim Stanzen nach unten verlängert. Und quer über die Karte habe ich eine Häuserzeile - oder Stadt-Silhouette - geklebt, die passte so schön dazu, wie ich die Karte im Kopf hatte.

For the background I used the Cloud Stencil by MFT, the green strip at the bottom is simply a strip cut from green cardstock. For the frame I also used a die by MFT and while cutting it making it longer. Across the card I've placed these houses or town silhouette since I fit perfectly with what I had in mind.


Der süße Elefant im Heißluftballon macht sich gerade auf eine große Reise. "I'll miss you" hätte mir als Text auch gefallen, aber in der Zukunfts-Form hatte ich keinen passenden Stempel. Also habe ich mir mit einem anderen Text beholfen. Hinter dem Ballon sind zwei Wolken angebracht.

This cute elephant in his balloon is starting off for a lon trip. "I'll miss you" would have been the saying I had in mind, but didn't have any with the future used. So I went with another text. Behind the balloon I've placed two clouds.


Und da im Ballon ein kleines Elefant sitzt, habe ich auch vor die Stadt einen Elefanten gestellt. Außerdem schaut der so schön passend in den Himmel...

And since there is a small elephant in the balloon I also used an elephant to stand in front of the town. He also looks up in the sky which was perfect for my card as well.


Freitag, 23. Februar 2018

My kind of weird


Hallo Ihr Lieben!
Heute habe auf dem Stamping-Fairies Blog nochmal eine Karte mit den süßen Monstern von MFT zu zeigen. Die sind aber auch knuffig!

Hello everyone!
Today I have another card made using the cute monsters by MFT that I am sharing over at the Stamping-Fairies Blog today. Those are so cute!

Auf Aquarellpapier habe ich zuerst den Mini Hearts Background gestempelt und weiß embosst. Dann habe ich einen Teil mit Distress Ink Candied Apple eingefärbt. Darauf kam dann die Deko.

I stamped the Mini Hearts Background onto watercolor paper and heat embossed it with white embossing powder. Then I inked up a part of the background using Distress Ink Candied Apple and then added the decorations.


Aus dem Hintergrund habe ich ein rundes Fenster ausgestanzt und in sowie auf den Ausschnitt die Stanzen des Peek-a-Boo Circle Windows gesetzt, die ich aus weißem bzw. schwarzem Cardstock ausgestanzt habe. Hinter das Fenster habe ich hellgrau-weiß gestreiftes Designpapier gesetzt. Und dann kam das Monster aus dem Monster Sized Stempelset zum Einsatz. Es ist mit Copics rosa coloriert - und auch die Sterne sind aus diesem Set und mit Stickles überzogen.
Dem Monster habe ich kleine Wackelaugen aufgesetzt.
Für den Text habe ich zwei Stempel aus dem Yeti-Stempelset Beast Friends kombiniert und ebenfalls weiß embosst. Ich finde, so passt der Text perfekt zum Monster.
Alle Teile der Karte sind mit 3D Tape zusammengesetzt, das sorgt für noch mehr Tiefe.
Ganz zum Schluss kamen ein paar schwarze Punkte, gemacht mit den Enamel Dots Black Tie, auf die Karte.

I've die cut a circle from the background and then put the Peek-a-Boo Circle Window dies, cut from white and black cardstock, onto/on top of the cut out circle. I've put some grey and white striped designer's paper behind the cut out. And then the monster from the Monster Sized stamp set came in. It's colored in with Copics, using pinks. The stars are from the same stamp set and covered with Stickles.
I've added some goggling eyes to the monster.
For the saying I've combined two different stamps from the Beast Friends stamp set and also heat embossed it in white. I think, now the saying goes perfectly with the monster.
All parts of the card were attached using dimensional tape to add more depth.
In the end I've added a few black dots using Enamel Dots Black Tie.


Donnerstag, 22. Februar 2018

Eine Schüttelkarte


Hallo Ihr Lieben!
Heute habe ich eine Geburtstagskarte für ein etwas jüngeres Geburtstagskind zu zeigen - und da darf werkle dann auch ich mal kindlich.

Hello everyone!
Today I have a birthday card for a younger child to share - and for those occasions even I can go not only cute but childish.

In der Mitte ist ein Shaker-Element eingebaut, darum habe ich als erstes den Ausschnitt in den passend zugeschnittenen weißen Cardstock gestanzt. Dann habe ich den Wolkenhintergrund und das grün unten mit Distress Ink aufgewischt.
Dann habe ich den Shaker aufgebaut und mit Sternen, Pailletten und kleinen Perlen gefüllt.

In the middle of this card there is  a shaker element, so first I've die cut a circle from a piece of white cardstock, cut to fit my card base. Then I used Distress Inks to create the cloud background and the green ground.
Then I created the shaker and filled it with stars, sequins and small beads.


Der süße Panda, der hier die Luftballons zur Party mitbring, ist - ebenso wie der Text auf der Karte - von SF Stamps. Ist der nicht goldig? Hinter die Luftballons habe ich schwarzes Garn geklebt und dieses dann hinter der Hand des Pandas vorbei nach unten gezogen, so dass es so aussieht, als würde der Panda die Ballons halten.

This cute Panda that is bringing some balloons to the party is by Scrapbook Forever. Isn't he a real cutie? I've glued some black twine behind the balloons and let the Panda hold the strings. The saying says "make a wish".


Mittwoch, 21. Februar 2018

Eine Kaffee-Box - und Ostergrüße


Hallo Ihr Lieben!
Heute zeige ich Euch meine Werke für den Blog von Vildastamps diesen Monat. Vielleicht habt Ihr es schon gelesen - Vildastamps wird seit Anfang Januar von Engström betrieben. Bisher läuft der Vildashop noch wie gewohnt, daher hoffe ich auch, dass meine Links funktionieren...

Hello everyone!
Today I am sharing my projects for the Vildastamps Blog this month. Maybe you've already heard about it - Vildastamps has been taken over by Engström in january. The Vildastamps shop is still running so I hope my links work...


Mein erstes Werk ist eine Kaffeebox. Die Box selbst habe ich mit der Cameo geschnitten. Vorne habe ich die Box mit dem Kaffeebecher aus dem Coffee Kit dekoriert. Die Banderole habe ich extra einmal auf Wellpapper gestempelt, ausgeschnitten und auf den Becher geklebt. Darüber kam ein Fähnchen mit dem Wort Espresso, das ebenfalls im Coffee Kit enthalten ist. 
Das kleine Herz ist aus dem Stempelset German Lyrics Oktoberfest - es hängt eigentlich oben am Wort Oktoberfest, aber ich habe es separat abgestempelt und nach dem Colorieren auf die Banderole aufgeklebt. 
Unter dem Kaffeebecher befindet sich etwas Spitze, Cheesecloth, braunes Band und zwei Papierstrohhalme.

My first project is a coffee box. The box itself has been cut using my Cameo. The front is decorated with the coffee cup from the Coffee Kit stamp set. I stamped the sleeve seperately onto corrugated paper, cut it out and then glued it onto the cup. On top of that I've put a banner with the word espresso stamped on, which also comes in the coffee kit. 
The little heart is from the German Lyrics Oktoberfest stamp set - it originally is connected to the word Oktoberfest but I stamped it seperately, colored it in and glued it under the banner.
Under the mug there is some lace, cheesecloth, brown ribbon and two paper straws.


Die restlichen Seitenteile sind alle ähnilch gestaltet. Ich habe auf kraftfarbenen Cardstock erst mit brauner Tinte verschiedene Flecken aus den Stempelsets Scrap and Mixed Media Kit 2 und dem Splats Kit aufgestempelt. Dann habe ich weitere Worte - Cappuccino und Caffe Latte - aus dem Coffee Kit in schwarz aufgestempelt. 

The other sides are decorated nearly identically. First I used different stamps from the Scrap and Mixed Media Kit 2 and the Splats Kit and stamped those onto craft colored cardstock using brown ink. Then I added other words from the Coffee Kit - Cappuccino and Caffe Latte - with black ink.


In die Box habe ich dann Papierstreifen gefüllt, damit man den eigentlichen Inhalt nicht sofort sehen kann.

Then I filled the box with paper strip so you can't see the real content.

Mein zweites Werk ist eine ganz einfache, österlich dekorierte Box. Darum bekommt sie auch keinen eigenen Post: 

My second project is a real simple and easter-ish decorated box. So I've added it to this post instead of making an extra one tomorrow:


Die Box ist aus blauem Cardstock geschnitten und mit Designpapier beklebt. Ich habe quer ein Stück Spitze drübergelegt und ausgstanzte Ostergrüße aufgeklebt. Als optische Verbindung von Motiv und Box habe ich ausgestanzte Wolken auf beides geklebt.

The box is cut from blue cardstock and covered with designer's paper. Across the box I've placed some blue lace and I added a die cut word "easter greetings". To bring image and box together I've die cut some clouds and glued them onto the box so they cover part of both.


Das süße Motiv ist aus dem Easter Kit.

The cute image is form the Easter Kit.


Montag, 19. Februar 2018

Ein Osterkörbchen


Hallo Ihr Lieben!
Wir bastler sind unserer Zeit ja immer ein wenig voraus - und so habe ich mir schon mal Gedanken an Ostern gemacht. Auf dem Kulricke-Blog zeige ich heute ein kleines Osterkörbchen. 

Hello everyone!
We crafter are always a bit ahead of time - and so I've been thinking about easter goodies already. Over at the Kulricke Blog I am sharing a little easter basket today.

Vielleicht habt Ihr es erkannt - für mein Körbchen habe ich die Erdbeerbox-Stanze zweckentfremdet. Ich habe nur das Unterteil aus braunem Cardstock ausgestanzt und zusammengeklebt. Um den oberen Rand herum habe ich dunkelbraunen Cardstock aufgeklebt.

Maybe you've noticed it - for my basket I simply used the Erdbeerbox die. I've only cut the bottom part from brown cardstock and glued it together. Then I used some dark brown cardstock to create a brim all around.


Als Deko habe ich vorne einen der süßen Hasen Medium verwendet. Dahinter befindet sich das Gras aus dem Schattenbox-Stanzenset und eines der Eier. 

To decorate my box I went with one of the cute mediumsized bunnies. Behind it there's the grass from the shadowbox die set and one of the eggs.


Oben am Henkel - für den ich einfach einen Streifen dunkelbraunen Cardstock innen an der Box festgeklebt habe - habe ich dann einen von Flati's Tags angebracht. Auf den habe ich vorher einen "Ostergruß" gestempelt, für den ich zwei verschiedene Stempel aus dem Stempelset Osterei kombiniert habe.

To the handle - for which I've simply glued a strip from dark brown cardstock to the inner sides of the box - I've added one of Flati's Tags. Before I tied it to the handle I stamped an ester greeting on it.


Sonntag, 18. Februar 2018

Noch eine Babykarte


 Hallo Ihr Lieben!
Vor einiger Zeit habe ich ja auf dem Noor!Design UK Blog eine Babykarte mit dem kleinen Edwin gezeigt. Heute nun habe ich das "weibliche Pendant" dazu. Schließlich wollte Tilda auch verbastelt werden.

Hello everyone!
Some time ago I've shared a baby card using Adorable Edwin over at the Noor!Design UK Blog. Today I am sharing the female version of this card - Tilda wanted to be inked up as well.

Das Layout dieser Karte ist quasi identisch - ich habe nur die Farben, Papiere und Embellishments anders gewählt. Aber genau darauf war ich aus - gleicher Look, und doch total anders.
Die Papiere hier sind von Mintay und Pion Design. Ich habe viel Pink verwendet, dazu weiß und ein kleines bisschen rot.

The layout of this card is nearly identical - I just changed the colors, papers and embellishments. But that's exactly what I was after - same look though different at the same time.
The papers I used here are by Mintay and Pion Design. I went with lots of pink, some white and a hint of red.


Hier ist Adorable Tilda. Die Füße finde ich einfach zu knuffig! Sie ist wieder mit Copics coloriert.

This is Adorable Tilda. I just love her chubby feet! She's been colored in with Copics again.


So ziemlich die komplette Deko habe ich auf der linken Seite untergebrach. Der Body ist aus einem älteren DooHickey Club Kit. Darumherum habe ich ein paar Blumen sowie einen Perlenstrang verteilt. Unter den Perlen befindet sich eine ausgestanzte Kleepflanze, die wunderbar filigran ist.

Almost all the decorations I've put on the left side of my card. The onesie is from one of the older DooHickey Club Kits. Around it I've placed some flowers and a pearl spray. Underneath the spray there is a die cut clover which is wonderfully detailed and delicate.


Ein klein wenig Deko habe ich auch rechts untergebracht. Auf das ausgestanzte Herz habe ich wieder ein paar Blumen sowie einen Schnörkel aufgeklebt.

A bit of decoration also found its way to the right side. On top of a die cut heart I've put some flowers again and a die cut flourish.


Samstag, 17. Februar 2018

Stempeleinmaleins - Ausgabe vom 17. Februar 2018


Hallo Ihr Lieben!
Beim Stempeleinmaleins zeigen wir Euch heute eine einfache Stempeltechnik mit Bleistiften - naja, oder eher mit den Radiergummis, die hinten dranstecken.

Hello everyone!
Over at Stempeleinmaleins we are sharing an easy technique today using pencils - or better said, the erasers that are put one the backs sometimes.

Sind wir doch mal ehrlich - die Radiergummis hinten an den Bleistiften taugen in den wenigsten Fällen zum Radieren. Aber wir Stempler wären ja nicht wir, wenn uns da keine andere Verwendung für einfallen würde. Stempeln natürlich!
Ich habe damit den Hintergrund auf meiner Karte gemacht. Ich habe Distress Ink verwendet und den Radiergummi immer mehrmals abgedrückt - immer ein wenig versetzt. So werden die PUnkte von links nach rechts/unten nach oben heller.
Und weil mit die Punkte an Konfetti erinnert haben, habe ich meinen Hintergrund benutzt, um eine Geburtstagskarte zu machen.

Honestly - those erasers on the back of pencils are hardly good enough to use them. But us creative people of course come up with a different use for them - stamping, of course! 
I used it to create the background on my card. I used Distress Ink and "stemped" the eraser several times before inking it up again, always starting at the left/bottom and then going to the right/upwards. This left me of the effect with the color getting lighter.
And since those dots reminded me of confetti I used my finished background to make a birthday card.


Als Deko habe ich erst einen Kreis aus silberfarbenem Glitzercardstock ausgestanzt und darauf mit 3D Tape einen kleineren Kreis, aus dem ich ein Herz ausgestanzt habe, aufgeklebt. Zwischen die beiden Lagen habe ich dann ein Banner mit Text geschoben. 
Links habe ich ein Kleeblatt mit Schleife untergebracht und über die Karte noch ein paar grüne Punkte aus Enamel Accents verteilt. Oh, und etwas Cheesecloth darf bei mir auch nichte fehlen. 

For decorations I've die cut a circle from silver glitter cardstock and then used dimensional tape to glue a smaller circle from which I've die cut a heart on top. Between those layers I added a banner with a saying.
On the left I've put a die cut flover with a bow and added some green dots made from Enamel Accents. Oh, and of course I had to add some cheesecloth.


Freitag, 16. Februar 2018

Hallo Welt!


Hallo Ihr Lieben!
Heute habe ich mal eine Babykarte zu zeigen. Für Jungs, was mir ja eigentlich immer ein wenig schwerer fällt. Aber im Baby Stempelset von Scrapbook Forever war irgendwie alles drin, was ich brauchte. 

Hello everyone!
Today I have a baby card to share. It's for a boy, which is a little hard for me whenever I have to do it. But in this baby stamp set by Scrapbook Forever I found all I needed.

Die Kartenbasis - die hier dreilagig gestaltet ist - ist aus blauem Cardstock. Darauf kam ein Rechteck aus weißem Cardstock, das ich mit kleinen blauen Schnullern bestempelt habe. Das süße Baby ist gar nicht auf dieser Kartenlage aufgebracht. Ich habe das Motiv dort abgestempelt und mit etwas Abstand rund um das Motiv herum ausgeschnitten. Das Motiv selbst klebt mit 3D Tape eine Lage weiter unten. Neben das Baby habe ich dann den Text gestempelt und noch drei braune Sterne hinzugefügt. Und weil mir alles immer noch zu fad war, habe ich auch noch einen dünnen Rahmen aus craftfarbenem Cardstoc ausgeschnitten und mit zwei Unterbrechungen aufgeklebt.

The card base - which is made of 3 layers here - is cut from blue cardstock. Then I've put a rectangle from white cardstock that I stamped little pacifiers on using blue ink on top of it. The cute baby isn't glued to this layer of the card. I've stamped it onto the white cardstock and cut around it with some distance. The image itself is glued to the layer underneath this one, using dimensional tape. Next to the baby I've stamped the saying "hello world" and added three brown stars here. And since it still looked too plain to me I also cut a thin frame from craft colored cardstock and glued it onto the white one, leaving two gaps where it would have gone over/too close to the saying or image.


Wenn man die erste Lage der Karte aufklappt, sitzt da das Baby, das auch durch den Ausschnitt in der obersten Lage zu sehen ist. Daneben habe ich dann den Text mit "ich bin da" weitergeführt. Der Text ist auf ein Banner gestempelt und dahinter habe ich die Babyflasche und einen Teddy, alle aus dem selben Baby Set, gesetzt. Mit blauer Tinte, die nur einen Touch dunkler ist als der blaue Cardstock, habe ich noch ein paar Sterne hinzugefügt. 
Auch diese Lage kann man nach unten klappen, dort ist dann genug Raum für einen persönlichen Gruß oder z. B. auch Angaben wie Geburtsdatum, Größe, Gewicht etc.

When you open up the top layer the baby, that can be seen through the cut out from the top layer, is sitting on the card. I stamped a "I'm here" saying onto a banner and glued it next to the baby. Underneath I've added a baby bottle and a teddy bear, both also from the baby stamp set. I used blue ink only slightly darker than the cardstock to add more stars here.
Also this layer can be opened and on that last layer there is enough room for some personal words or also dates like birth date, length, weight etc.


Donnerstag, 15. Februar 2018

Ein Kaffee-Geschenk


Hallo Ihr Lieben!
Letzte Woche habe ich auf dem Kulricke-Blog ja ein Werk für Männer gezeigt, heute dann gibt es wieder was, das eher für Mädels geeignet ist. Wobei, eigentlich ist es auch universal einsetzbar.

Hello everyone!
Last week I shared a manly creation over at the Kulricke Blog. Today I made something with women in mind, but when I look at it it'd also suitable for a man.

Es ist eine Box zum Thema Kaffee - ich habe es als Einladung für einen Kaffeeklatsch verwendet. Natürlich habe ich die Pommesbox-Stanze benutzt, um die Schachtel zu stanzen. Sie ist aus kraftfarbenem Cardstock. Auf die Vorder- und hintere Innenseite habe ich "Designpapier" geklebt. Da ich kein passendes hatte, habe ich einfach weißen Cardstock mit Kaffeebohnen bestempelt.

I made a box with a coffee theme - and I used it as an invitation for a coffee date. 
Of course I used the fries box die to cut the box. It's cut from craft colored cardstock. The front and inner back are covered with "designer's paper". I didn't have any matching the theme so I simply used a coffee bean stamp and stamped it onto white cardstock.


Und so habe ich meine Box dekoriert. Ich habe dazu den Take Away Cup ausgestanzt. Die Banderole ist aus Wellpappe, der Deckel aus dunkelbraunem Cardstock - natürlich auch mit den Stanzen gemacht. Um die Banderole habe ich noch etwa Leinenschnur gewickelt, zur Schleife gebunden und ein kleines Herz daneben gesetzt.
Der leckere Muffin - Kaffee und Kuchen gehören ja zusammen - ist aus dem Stempelset
Geburtstag #3 und mit der passenden Stanze aus dem Cupcake Set ausgestanzt. Mit Copics habe ich ihn ein wenig coloriert - ich wollte meine Box in braun und creme halten, darum habe ich mich auch beim Colorieren zurückgehalten.
Der Text auf der linken Seite ist aus dem Stempelset Coffee To Go. Die Texte in dem Set passen alle auch perfekt auf den Kaffeebecher, ich wollte hier aber den Becher nicht bestempeln und habe den Text deshalb daneben gesetzt.
Hinter das alles habe ich  noch etwas Cheesecloth und ein kleines Doily gesetzt.

And this is how I decorated my box. I've die cut the Take Away Cup. The sleeve is cut from corrugated paper, the lid from dark brown cardstock, of course using the dies from the set again. I've wrapped some linnen twine around the sleeve, tied it to a tiny bow and put a little heart next to it. 
The yummy cupcake - coffee and cake just have to go together - is from the Geburtstag #3 stamp set and has been die cut using the matching die from the Cupcake Set. I've colored it in with Copics a bit - since I wanted to keep my box in browns and cream I only did a little coloring here.
The saying on the left says "I love coffee, but it tastes better with you". The texts in the set this one comes in all fit the cup but I wanted to keep it plain here and put the text next to it.
Behind all this I've aded some cheesecloth and a small doily.


Mittwoch, 14. Februar 2018

Creative Olympics - event #2


Hallo Ihr Lieben!
Bereits heute morgen habe ich Euch ja schon eine Karte mit dem süßen Schwänen von MFT gezeigt. Und da sie noch auf meinem Schreibtisch lagen, habe ich sie auch für die zweite Disziplin bei den Creative Olympics von MFT verwendet. Das Thema lautet diesmal "Freestyle". Es ist alles erlaubt, einzige Vorgabe: die Karte muss ein Winterthema haben.

Hello everyone!
I already shared a card this morninig using the cute swans by MFT. And since they were still on my desk I also used them for the second Creative Olympics event over at MFT. The theme this time is "freestyle". It's kind of an anything goes theme with just one exception: the card has to have a winter theme.

Ich habe hier bewusst nur ganz helle, eisige Farben verwendet. Im Hintergrund habe ich den Tiny Hearts Background mit Sno Cone Tine auf weißen Cardstock gestempelt und helltürkis hinterlegt. Darauf kam etwas Cheesecloth und darauf das Motiv.

I decided to go with very light, icy colors here. In the background I stamped the Tiny Hearts Background onto white cardstock using the Sno Cone ink pad by MFT, matting this piece of cardstock with light turquoise cardstock. Then I put some cheesecloth onto that layer and added a scene.


Und hier ist mein Motiv. Es war etwas schwer zu erklären, denn um einen nebelartigen Effekt zu bekommen, habe ich über das Motiv eine Schicht Vellum gelegt, auf die ich dann mit einem Gelmarker die Schneeflocken aufgemalt habe.
Die Szene besteht aus den beiden Schwänen und den Binsen, die auf einem See schwimmen. Dafür habe ich auch die Spiegelung gestempelt. Dahinter habe ich mit der Drifts and Hills Schablone eine verschneite Landschaft gestaltet. Kann man es erkennen?
Der Text, der sowohl zum vorgegeben Winterthema als auch dem heutigen Valentinstag passt, ist aus dem Stempelset Ski-Sons Greetings.

And this is the scene I created. It was a bit hard to take a picture of because to get a kind of foggy effect I've put a layer of Vellum on top of my scene and added the snowflakes here using a white gelly marker. 
The scene is made from those two swans and the plant in the background. The swans are "swimming" on a frozen lake. So I also stamped their reflections onto the ice. In the background I used the Drifts and Hills stencil to create a snowy landscape. Can you see it?
The saying, that goes not only with the given winter theme but also with today's Valentine's Day, is from the Ski-Sons Greetings stamp set.