Hallo Ihr Lieben!
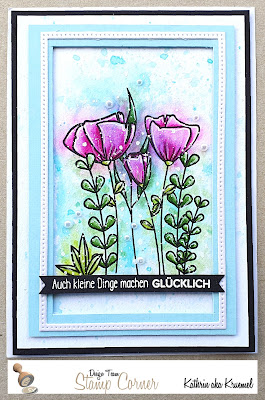
Heute zeige ich auf dem Stampcorner Blog diese Karte mit den tollen Blumen aus dem März-Release. Und die haben sich natürlich angeboten, um auch mal non-cute zu arbeiten.
Hello everyone!
Today over on the Stampcorner Blog I am sharing this card with the beautiful flowers from the march release. And those are perfect to make a non-cute card for a change.
Ich habe hier ein Stück Watercolor Cardstock verwendet und mittig mit Distress Ink Mermaid Lagoon und Ink Smooshing einen leicht fleckigen Hintergrund aufgetragen. Dann habe ich mit dünnem 3D Tape einen per Hand geschnittenen Rahmen aus hellblauem Cardstock aufgeklebt. Da mir der später zu fad war, habe ich noch einen dünnen Rahmen, gestanzt aus weißem Cardstock, aufgeklebt.
Here I used a piece of watercolor cardstock and put a slightly blotchy background to its center doing some ink smooshing with Distress Ink Mermaid Lagoon. Then I attached a frame, cut from light blue cardstock, with thin foam tape to it. Since the blue frame looked a bit plain, I later glued another thinner frame, cut from white cardstock, on top of it.
Die Blumen aus dem Set Blumenwiese habe ich dann mit wasserfester Tinte auf den getrockneten, hellblau eingefärbten Bereich in der Mitte des Watercolor Cardstocks gestempelt. Dann habe ich sie mit Watercolors in grün und leuchtendem Pink - das bei mir ja so gut wie nie zum Einsatz kommt, aber hier gefiel es mir einfach - coloriert. An einigen Stellen, vor allem an den Blütenblättern, kann man den blauen Hintergrund noch durchsehen, aber das finde ich schön.
Und ich habe tatsächlich die Motive erst sauber an den Stempellinien coloriert. Später habe ich dann ganz sanft und fleckig die jeweils selbe Farbe auch ein wenig auf den blauen Hintergrund aufgetragen und vermalt. Ich finde, das gibt einen tollen "künstlerischen" Look. Dann habe ich feine Spritzer weißen Copic Opaque Whites über den Cardstock gespritzt.
Der Text ist aus dem Stempelset Glückskäfer und mit weißem Embossingpulver auf schwarzen Cardstock embosst. Ich bin da ein kleiner Monk - ich mag es nicht, wenn in ein und demselben Text gerade und kursive Schriften gemischt sind. Verschiedene Schriftarten gerne, aber bitte alle "in die selbe Richtung". Deswegen habe ich hier das Wort Glücklich durch eines aus dem Stempelset Kleine Worte 2 ersetzt. So passte der Text auch besser auf meine Karte.
I stamped the flowers with waterproof ink onto the dried blue area in the center of the watercolor cardstock. Then I colored them with watercolors in green and bright pink - a color I rarely use but really liked here. You can still see the texture of the blue background in some areas, especially on the flower petals, but I really like that.
I actually colored the image inside the stamped lines first. Then I applied very little of the same colors around the image and blended those into the background. I think, this adds a nice "artistic" touch to the card. Then I lightly flicked some Copic Opaque White onto the cardstock.
The text means "find beauty in the little things". I white heat embossed it onto a strip of black cardstock. Well, the last word glücklich is originally placed under the rest of the text and is written in a different font. I am a little Monk here - I don't like having straight and cursive texts mixed in one sentiment. I love mixed fonts, but please all of them "in the right direction". So I replaced this word with one from a different stamp set. This is also smaller and so the text fits better onto my card.
Den Text habe ich dann wieder mit 3D Tape direkt unter die Blumen quer über den Rahmen geklebt. So wirkt er fast ein wenig wie der Boden, auf dem die Blumen stehen. Außerdem habe ich einige weiße Perlen rund um die Motive verteilt.
Dann habe ich alles schwarz gemattet und auf einen weißen Kartenrohling geklebt.
I used foam tape again to adhere the text strip across the card, directly under the stamped flowers to ground them. Then I glued a few white pearls around the image.
I matted everything black und attached it to a white note card.


.jpg)