Posts mit dem Label Simon Says Stamp werden angezeigt. Alle Posts anzeigen

Montag, 8. September 2025

SimonSaysStamp IG challenge

 
Hallo Ihr Lieben!
Auch diesen Monat gibt es eine Instagram Challenge von SimonSaysStamp. Und weil Stamptember ist, lautet das Thema ganz einfach "Stempel". Na, da sind die Möglichkeiten ja endlos - und im Prinzip könnte ich fast jede meiner Karten diesen Monat einreichen. Aber ich empfinde das irgendwie immer als Cheaten und habe somit extra eine Karte nur für die Challenge gemacht. 
 
Hello everyone!
Also this month there is an Instagram challenge by SimonSaysStamp. And since it's Stamptember they simply picked "stamps" as the theme. Well, that leaves endless possibilities - and I could simply enter with nearly any card I made  this month. But to me that alsways feels like cheating and so I made an extra card, just for the challenge.
 
Ihr habt es bestimmt schon bemerkt, hier kam wieder der große Kürbis-Hintergrund von SimonSaysStamp zum Einsatz. Ich glaube, der kam letztes Jahr heraus und ich war sofort verliebt. Er war dann aber ausverkauft und mit den doch längeren Versandzeiten aus den USA war mir, als er dann wieder auf Lager war, einfach nicht mehr nach herbstlichem Basteln. Dieses Jahr habe ich ihn mir dann rechtzeitig bestellt und jetzt will er natürlich benutzt werden!
Ich habe hier den Hintergrund gold auf ein Stück Watercolor Cardstock  embosst und dann alles ganz grob mit Distress Ink Wild Honey, Crackling Campfire und ein wenig Fired Brick gewischt. Und dann habe ich alles dick mit Wasser besprüht. Ich bin ja nicht der Typ für so "unkontrollierbare" Techniken, aber ich war doch versucht und mit dem Ergebnis nach dem Trocknen war ich an sich recht zufrieden. 
 
You may have already noticed - I used the large pumpkin background by SimonSaysStamp again. I think, it was released last fall and I fell in love immediately. But it was sold out and - with shipping from the States taking quite some time - I didn't feel like fall crafting anymore once it was back in stock. This year I ordered it in time and now it wants to get used!
I gold heat embossed the image onto a piece of watercolor cardstock and put some Distress Ink Wild Honey, Cracking Campfire and a bit of Fired Brick onto each pumpkin, not really taking care about blending. Then I sprayed a lot of water on top. I am usually not one for those "uncontrollable" techniques but I was tempted to try it again and, once everything had dried, was quite happy with the result.  
 

 Ich wollte meinem Hintergrund dann doch noch etwas mehr Tiefe geben, außerdem waren auch die Kürbis-Stiele orange. Also habe ich sie mit Polychromos braun eingefärbt und verschiedene Orange- und Gelbtöne sowie weiß benutzt, um Details auf die Kürbisse aufzumalen. 
Dann habe ich goldene Metallic-Watercolor aufgespritzt.
 
I  wanted to give my  background more depth, and the pumpkin stems were orange, too. So I used my Polychromos to color them brown and used different shades of orange and yellow and also some white to add details to the pumpkins.
Then I splattered some gold metallic watercolor onto the background.
 

 Ziemlich weit unten, etwa mittig, befindet sich im Kürbisfeld, das übrigens eigentlich 15 x 15 cm groß und mit Rahmen ist, ein dicker Kürbis. Dem habe ich dann noch einen Hexenhut aufgesetzt. 
Der Hexenhut ist mit dem Stanzenset Sassy Witch Hat von SimonSaysStamp gemacht. Ich habe ihn aus braunem Cardstock, die umgeschlagene Krempe und das Band aus gelb-braunem Cardstock und die Schleife aus goldenem Glitter-Cardstock gestanzt. Die Teile sind alle mit Copics schattiert. 
Und weil der Hexenhut viel zu gepflegt aussah, habe ich noch drei kleine Spinnen angebracht. Die sind aus dem Set Boo von WaffleFlower und ich weiß, dass sie vom Design her ein Stilbruch sind. Aber ich fand sie einfach super süß und sie geben der Karte etwas verspieltes. Den Spinnenfaden, an dem die Spinne hängt, habe ich mit einem goldenen Gelstift nachgemalt. 
Der Text auf der Karte ist wieder aus dem Set Pumpkin to talk About. Ich habe den Stempel zerschnitten um das What's über statt vor das Cooking setzen zu können und den Text dann weiß auf Vellum embosst. Dann habe ich ihn mit einem der Essential Modern Ovals von Spellbinders  ausgestanzt und unter dem Hut auf die Karte geklebt. Das Ende des Vellums habe ich umgeknickt und hinten auf der Karte festgeklebt. 
 
 Quite at the bottom and centered in this pumpkin patch, that's a 6" x 6" stamp with a frame, there's this quite round pumpkin. I put a witch's hat onto that. 
The hat is made with the Sassy Witch Hat die set by SimonSaysStamp. I die cut it from brown, the folded up side and the ribbon from yellow cardstock  and the bow from gold glitter cardstock and shaded the pieces with Copics. 
And since the hat looked way too smooth for a witch's hat I decided to add three small spiders. They are from the Boo stamp set by WaffleFlower and I know, that they don't really fit to the style of the rest of the card. But I really liked them with their large eyes and they add a goofy touch to the card. I used a gold gel pen to trace the thread the spider is dangling from. 
The text on the card is again from Pumpkin to talk About. I cut the stamp apart to be able to stamp the what's above the cooking and white heat embossed the text on vellum. I cut it out with one of the Essential Modern Ovals by Spellbinders and adhered it under the hat onto the cardstock. I folded over the left edge of the vellum and glued it to the back of the card.
 

 Den Hut habe ich mit dünnem 3D Tape auf den Hintergrund geklebt. Und auch hinter dem oberen Rand der Krempe befindet sich ein kleines Stück davon - den unteren Rand habe ich mit Flüssigkleber direkt am Hut angeklebt. So wirkt sie schön plastisch.
 Ich habe dann beschlossen, dass noch irgendein optischer Abschluss auf der Karte fehlte. Also habe ich aus weißem Cardstock einen der Stitched Rectangles von Create a Smile gestanzt und aufgeklebt. Der hält auch das Vellum noch etwas besser an Ort und Stelle. Außerdem habe ich ein paar weiß-irisierende Perlen rund um den Hut verteilt aufgeklebt.
Zum Schluss habe ich alles auf einen weißen Kartenrohling geklebt.
 
I used thin foam tape to adhere the hat to the background. And I also put a small piece of it behind the top of the folded over part of the hat - the bottom I glued with liquid glue directly to the hat. This makes it look very dimensional. 
I decided that I was missing some kind of frame here. So I die cut one of the Stitched Rectangles by Create a Smile from white cardstock and glued it down. This frame also holds the vellum in place better. And I added some white-iridescent pearls around the heat.
As the last step I glued the card panel onto a white note card.
 

Mittwoch, 20. August 2025

Technique Throwback Thursday Challenge August 2025

 
Hallo Ihr Lieben!
Ich habe dieses Jahr schon die ein oder andere Halloween-Karte gemacht und bin irgendwie schon richtig drin in dem Thema. Deswegen ist auch meine Karte für die Technique Throwback Thursday Challegen im August eine Halloween-Karte geworden.
Thema ist diesmal eine Technik, bei der ein mit Alkohol besprühter Stencil auf einen zuvor gewischten Hintergrund gelegt und zum Prägen durch die Big Shot gedreht wird. Durch die Feuchtigkeit wird das Muster des Stencils im Cardstock heller und gleichzeitig natürlich eingeprägt. Soweit die Theorie...
 
Hello everyone!
I have already made quite a few Halloween cards this year and so it is no wonder that also my card for the august Technique Throwback Thursday challenge is a Halloween card.
Theme is a technique, where you place a stencil, nested with alcohol, on a previously inked background and ran it through your Big Shot to emboss the stencil pattern into the cardstock. The moisture of the alcohol makes the ink lighten up. Well, at least in theorie....
 
Ich habe hier ein Stück weißen Cardstock mit Distress Ink Dusty Concord, Wilted Violet, Villainous Potion und Black Soot gewischt und dann die Technik mit dem Stencil probiert. Ich habe den Spinnennetz-Stencil von LawnFawn bestimmt 6 mal mit Alcohol besprüht und dann durch die Big Shot gedreht, aber so richtig hell wollte mein Muster nicht werden. Vielleicht war es der falsche Cardstock - wobei ich den immer zum Ink Blending benutze und Wassertropfen normalerweise schön hell werden -, vielleicht lag es auch daran, dass es super heiß war und der Alkohol eventuell zu schnell getrocknet ist. Ich habe mich im Endeffekt dazu entschlossen, das Muster ganz leicht mit einem weißen Polychromo nachzumalen, habe also quasi ein wenig gecheatet. Aber so sieht man das Spinnennetz zumindest. 
Und dann habe ich angefangen, viele Elemente auf die Karte zu packen. Zuerst habe ich durch den Stencil hindurch den Ghoulish Greetings Background von MFT mit schwarzer Tinte auf den Cardstock gestempelt, anschließend habe ich weiße Acrylfarbe aufgespritzt. Außerdem habe ich mit schwarzer Stencil Butter und dem Layered Bats Stencil von SimonSaysStamp Fledermäuse quer auf den Hintergrund aufgetragen.
 
I inked a piece of white cardstock with Distress Ink Dusty Concord, Wilted Violet, Villainous Potion and Black Soot and then tried out the technique with the stencil. I misted the spiderweb stencil by LawnFawn at least 6 times with alcohol and ran it through the Big Shot, but the pattern on my card didn't want to become really light. Maybe it was the wrong cardstock for this technique - it's the same cardstock I always use for ink blending and water drops usually light it up pretty well though - or maybe it's because it was a really hot day and the alcohol might have evaporated too quickly. In the end I decided to use  a white Polychromo and lightly trace the pattern, so yes, I cheated a bit. Bit this way the  spider web is at least visible better. 
And then I started to pack more and more things on this card. First I stamped the Ghoulish Greetings Background by MFT with black ink, stamping through the stencil. Then I added splatters of white acrylic paint. I also used black stencil butter and the Layered Bats stencil by SimonSaysStamp to add some bats  across the background.
 

 Aus lila-farbenem Vellum habe ich den Drippy Frame von WhimsyStamps gestanzt und die Ränder leicht mit Black Soot gewischt. Den Rahmen habe ich mittig auf meinen Hintergrund gelegt und dahinter einen Mond und Nebelschwaden geklebt. 
Der Mond ist mit der Over the Moon Stanze von MFT aus hell-lila Cardstock gestanzt und mit Dusty Concord ein wenig schattiert. Ich habe ihn so aufgeklebt, dass er oben über den Hintergrund hinausragt und den Überstand abgeschnitten.
Die Nebelschwaden sind mit einem Clouds-Stanzenset von MFT aus Vellum gemacht.  
 
From purple vellum I die cut the Drippy Frame by WhimsyStamps and inked the edges with a bit of Black Soot. I placed the frame centered onto the background and put a moon and some fog behind it. The moon I cut with the Over the Moon die by MFT from light purple cardstock and shaded it with a bit of Dusty Concord. I adhered it to the background, letting it go over the top edge of the cardstock, then cut off the overhang.
The fog is made from vellum using a cloud die set by MFT.
 

 Mittig in den Rahmen habe ich ein Boo geklebt. Das habe ich mit der Boo Script Stanze von PrettyPinkPosh einmal aus schwarzem Cardstock und einmal aus silbernem Glitter-Cardstock gestanzt und leicht versetzt aufgeklebt.
Den Text ergänzt dann ein "2 you", das ich unten auf den Rahmen geklebt habe. Auch diese Buchstaben sind aus schwarzem Cardstock und silbernem Glitter-Cardstock gemacht. Die Zahl 2 ist aus dem Set Wedding Alphabet von X-Cut, das you Teil der Happy Birthday To You Stanze von MFT.
 Und dann habe ich noch ein paar größere Fledermäuse ausgestanzt und auf die Karte geklebt. Ich habe hier das Bat Trio Stanzenset von SimonSaysStamp benutzt. Die Fledermäuse sind jeweils einmal aus silbernem Glitter-Cardstock und einmal aus schwarzem Mirror-Cardstock gestanzt. Die schwarzen Fledermäuse habe ich jeweils in drei Teile geschnitten und dann den Körper auf, die Flügel hinter die silberne Fledermaus geklebt. Die Augen sind mit einem silbernen Glitter-Gelstift gemacht.
 
Centerd into the frame I glued a boo. I made that with the Boo Script die by PrettyPinkPosh, cutting it once from black cardstock and once from silver glitter cardtock, then layering them a bit offset.
The text is completed by a "2 you", that I adhered to the bottom of the frame. Again I cut the letters from black cardstock and silver glitter cardstock. The number 2 is from Wedding Alphabet by X-Cut, the you part of the Happy Birthday to You die by MFT.
And then I also added some larger bats. I die cut those with the Bat Trio die by SimonSaysStamp and cut them once from silver glitter cardstock, once from black mirror cardstock. I cut the black bats into three pieces, then glued the bodies on top, the wings behind the silver bats. The eyes I drew with a silver glitter gel pen.
 

 Auf dieser Karte habe ich nur hinter die Fleermäuse etwas dünnes 3D Tape gesetzt, der Rest ist direkt auf den Hintergrund geklebt.
Als Deko habe ich noch ein paar silberne Glitter-Pailetten auf der Karte verteilt und dann alles auf einen weißen Kartenrohling geklebt.
 
On this card I only used a bit of thin foam tape behind the bats, the rest I glued directly onto the background.
I added a few silver glitter sequins as decoration and attached the card panel to a white note card.
 

Mittwoch, 13. August 2025

La dolce vita

 
Hallo Ihr Lieben!
Vor kurzem habe Euch ja schon eine Karte mit der Cafetiera-Stanze von HeroArts gezeigt, heute folgt eine weitere. Und mit der holen wir uns Italien ins Haus. Denn auch wenn Cafetieras inzwischen überall auf der Welt genutzt werden, ich muss bei ihrem Anblick einfach immer an Italien denken.
 
Hello everyone!
A little ago I've shared a card with you, on which I used the Stovetop Espresso die by HeroArts, today I have another one. And with this one, we're bringing Italy into our home. Of course those Cafetieras get used all over the world, but whenever I see one I think of Italy. 
 
Auf dieser Karte habe ich Produkte diverser Firmen kombiniert. 
Der Hintergrund besteht aus helltürkis farbenem Cardstock, in den ich mit der Woodgrain Texture Stanze von WaffleFlower eine Holzmaserung geprägt habe. Dann habe ich die passenden Stencils aufgelegt und die Texture mit Distress Ink Weathered Wood, Hickory Smoke und Scorched Timber aufgewischt. Ich wollte, dass es so aussieht, als hätte jemand eine Wand aus altem Treibholz gebaut. Das Meer ist ja nicht weit. 
Und passend zum Kaffee-Thema habe ich dann noch den Coffee Drinks Stencil von SimonSaysStamp aufgelegt und mit Scorched Timber die Kaffee-Worte aufgetragen. Gerade so, als hätte jemand seine Treibholzwand in der Küche mit einem Stencil dekoriert. 
 
I combined several brands on this card.
The background is made from light aqua cardstock. I cut the Woodgrain Texture by WaffleFlower into it, then used the matching stencils and Distress Ink Weathered Wood, Hickory Smoke and Scorched Timber to add the details to the stitched pattern. I wanted it to look like someone covered the wall with old drift wood. The ocean isn't that far away...
And going with the coffee theme of the card I used the Coffee Drinks stencils by SimonSaysStamp and Scorched Timber to add the words. Just like someone decorated their drift wood kitchen wall with the words.
 

Aus der Mitte des Hintergrunds habe ich ein Rechteck geschnitten und dahinter eine Landschaft in der Toskana gesetzt. Die ist einfach mit Distress Ink Tumbled Glass, Salty Ocean und Rustic Wilderness auf weißen Cardstock gewischt. Dann habe ich Copic genommen und ganz rudimentär ein paar Zypressen mit einem Weg dazwischen aufgemalt.  
Dann habe ich den Window Frame von LawnFawn dreimal aus weißem Cardstock gestanzt und von zwei der Fenster nur Teile benutzt. Die habe ich alle mit Copics schattiert und dann aufeinander- und um die Landschaft geklebt. Nun kann man aus dem Küchenfenster die Landschaft und das Meer sehen.
 
From the center of the background I cut a rectangle and put a scene behind it, going for the look of Tuscany. I simply inked a piece of white cardstock with Distress Ink Tumbled Glass, Salty Ocean and Rustic Wilderness. Then I brought out my Copics and added some cypresses with a path inbetween, just drawing them on in a very simple way.
Then I cut the Window Frame by LawnFawn three times from white cardstock, from two of them I just used parts. I shaded them all with Copics, then glued them on top of each other and put the landscape scene behind it. Now you can see the landscape of Tuscany and the ocean throug the kitchen window. 
 

 Die Cafetiera, deren Deckel sich diesmal nicht öffnen lässt, habe ich aus silbernem Schimmer-Cardstock gestanzt, Griff und Knopf am Deckel sind aus schwarzem Cardstock. Ich habe die silbernen Teile mit Hickory Smoke gewischt und später noch ein paar dunkle Schatten mit Copics hinzugefügt.
Auch die Tasse, ebenfalls aus dem Stovetop Espresso Stanzenset von HeroArts, habe ich wieder dreimal gestanzt, so zugeschnitten, dass sich die Teile layern lassen, und alles mit Copics schattiert. Außerdem habe ich mit einer Stanze von MarianneDesign einen kleinen Kekes aus weißem Cardstock gestanzt, mit Copics coloriert und auf den Unterteller gelegt. 
Weil Tasse und Cafetiera nicht in der Luft vor der Wand schweben können habe ich aus dem grauen Woodgrain Cardstock von LawnFawn einen Streifen abgeschnitten, die Struktur mit Hickory Smoke und etwas weißer Stempeltinte hervorgehoben, und ihn entlang des unteren Rands der Karte auf den Hintergrund geklebt. 
Rund um die Cafetiera habe ich einige Kaffeebohnen verteilt.  
Der Text ist aus dem La Dolce Vita Banners Stanzenset von Spellbinders.  Ich habe ihn aus hellblauem Cardstock gestanzt und ein wenig mit Tumbled Glass gewischt, um das Blau des Himmels nochmal aufzugreifen. Dann habe ich unterhalb des Fensters quer über die Karte geklebt.
 
I die cut the cafetiera - the lid doesn't open this time - from silver shimmer cardstock, the handle and knob are cut from black cardstock. I shaded the silver pieces with Hickory Smoke and later added some darker shadows with Copics. 
Again I die cut the cup, that's also from Stovetop Espresso by HeroArts, three time, cut it to be able to layer it and shaded the pieces with Copics.  I also used a die by MarianneDesign to cut a little cookie, colored it with Copics and put it onto the saucer.
And since the cup and cafetiera can't float in front of the window I cut a strip from the grey woodgrain cardstock by LawnFawn, brought out the texture a bit more with Distress Ink Hickory Smoke and some white pigment ink and glued the strip along the bottom edge onto the background.
I added some coffee beans around the cafetiera.
The text is from the La Dolce Vita Banners by Spellbinders.  I cut it from light blue cardstock and shaded it with Tumbled Glass, bringing in the blue of the sky in the window again. Then I adhered the text banner across the card, right under the window.
 

 Die Cafetiera habe ich mit dünnem, Tasse und Text mit dickem 3D Tape hinterlegt. Dann habe ich noch ein paar weiße Herzen als Deko auf der Karte verteilt und alles auf einen weißen Kartenrohling geklebt.
 
I backed the cafetiera with thin, the cup and text banner with thick foam tape. Then I added some white clay hearts as decoration and adhered the card panel to a white note card.
 

Samstag, 26. Juli 2025

Simon Says Stamp Challenge Juli 2025 die Zweite


 Hallo Ihr Lieben!
Gestern habe ich es ja bereits angekündt - heute habe ich eine weitere Karte, die ich für die Simon Says Stamp IG Challenge diesen Monat gemacht habe, für Euch. Und ja, vom Prinzip ist sie der gestrigen ähnlich. Aber ich konnte mich einfach nicht für ein Motiv entscheiden, denn ich mochte beide Ideen.
 
Hello everyone!
I already announced it yesterday - I have another card, made for the Simon Says Stamp IG challenge of this month, to share with you. And yes, the overall idea is pretty similar to the one on the card I shared yesterday.  But I just wasn't able to decide, which image to use, I liked both ideas.
 
Auch hier kam wieder gepunktetes Designpapier zum Einsatz - klar, lag ja noch auf dem Tisch. Als Abwechslung habe ich hier aber noch einige Papiere mit Sternenmuster mitbenutzt. 
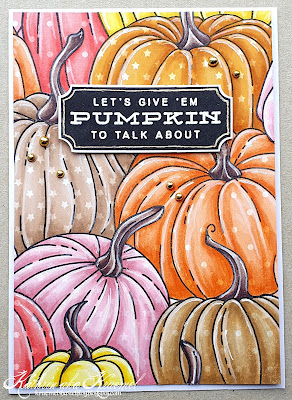
Als Motiv kam hier der große Kürbishintergrund aus Pumpkin to Talk About von SimonSaysStamps zum Einsatz. Kürbisse gehen bei mir immer, wohl im Bastelzimmer als auch in der Küche. Und ich fand die Idee, vieler Kürbisse in vielleicht nicht ganz so üblichen Farben, auf einer Karte zu haben, sehr verlockend. 
 Ich habe den Hintergrund auf Designpapier in verschiedenen Farben gestempelt und dann die Kürbisse mit Copics schattiert. Die Stiele der Kürbisse habe ich auf normalen weißen Cardstock gestempelt und coloriert.  Für die Highlights kam hier dann mal ein weißer Polychromo zum Einsatz, der ist etwas sanfter, und nur an einigen wenigen Stellen habe ich zusätzlich noch Linien mit einem weißen Gelstift aufgemalt. 
Anschließend habe ich die einzelnen Kürbisse mit der Schere wieder englang der Stempellinien ausgeschnitten und den Hintergrund aus den verschieden farbigen Kürbissen wieder zusammengesetzt. 
 
Again I used dotted patterned papers here - sure, I still had it left on my table. For a little change I also used some papers with a star pattern for a few of the pumpkins.
I used the large pumpkin background from Pumpkin to Talk About by SimonSaysStamp here. I am never tired of pumpkins, no matter if it's in my craft room or my kitchen. And I really liked the idea of having a bunch of pumpkins in not so usual colors on one card.
 I stamped the background image onto different colors of patterned paper and shaded them with Copics. The stems I stamped onto plain white cardstock and colored them with Copics. For the highlights I used a white Polychromo here, it just gives a softer look, and added some lines with a white gel pen just in a few spots.
Then I cut out each pumpkin with my scissors, cutting right along the stamped lines, and put the image back together, using the different colored pumpkins.
 

 Der Text auf meiner Karte ist aus dem selben Stempelset, wie auch das Motiv. Ich fand den hier äußerst passend, denn so bunte Kürbisse sorgen garantiert für Gesprächsstoff. Aber natürlich ist der Text hier ein Wortspiel mit "something" statt "pumpkin". 
Ich habe den Text mit weißem Embossingpulver auf schwarzen Cardstock embosst und dann einen kleinen Kreisstanzer verwendet, um die Ecke wegzustanzen. So entsteht eine Art Ticket-Look . Den schwarzen Cardstock habe ich dann weiß gemattet und einen Rahmen mit einem goldenen Gelstift aufgemalt.
 
The text on my card is from the same stamp set as the image. I just love this pun - and such colorful pumpkins for sure give people something to talk about.
I white heat embossed the text onto black cardstock and used a small circle punch to cut off the edges and create some kind of ticket/label. I matted that white and drew a frame with a gold gel pen.
 

 Den Text habe ich mit 3D Tape oben auf den Kürbishintergrund geklebt und einige goldene Perlen als Deko drumherum verteilt. 
Dann habe ich alles auf einen weißen Kartenrohling geklebt.
 
I adhered the text with foam tape onto the pumpkin background and added some gold pearls around it as decoration.
Then I glued the card panel to a white note card.
 

Freitag, 25. Juli 2025

Simon Says Stamps IG Challenge im Juli 2025

 
Hallo Ihr Lieben!
Diesen Monat bin ich mit meinen Challenge-Beiträgen irgendwie recht spät dran. Aber auch für die Simon Says Stamps IG Challenge habe ich einen Beitrag geschafft - eigentlich sogar zwei, denn ich konnte mich mal wieder nicht für ein Motiv/eine Idee entschieden. Diese zweite Karte zeige ich Euch dann morgen.
 
Hello everyone!
This month I am pretty late with my entries for the challenge I join regularly. But I made a card for the Simon Says Stamp IG challenge, also. Well, actually I made two because once again I couldn't decide, which image/idea I wanted to make. This second card I am going to share with you tomorrow.
 
Das Thema im Juli ist "patterned paper". Vor einigen Jahren gab es bei mir keine Karte, auf der nicht mehrere verschiedene Designpapiere zum Einsatz kamen. Inzwischen nutze ich es tatsächlich nur noch selten. Genug davon habe ich natürlich immer noch in meinen Schränken. Auf dieser Karte kamen verschiedene gepunktete Designpapiere zum Einsatz.
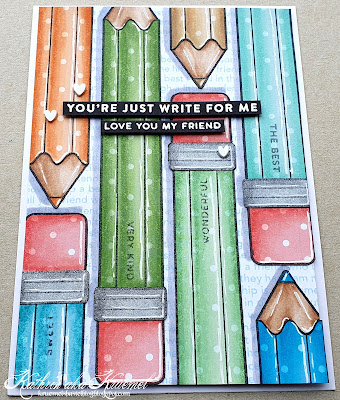
Für den Hintergrund habe ich hier den großen Hintergrundstempel aus dem Set Just Write von Simon Says Stamp auf weißen Cardstock gestempelt und nur die Holzteile der Stifte mit Copics coloriert. Die habe ich dann abgedeckt und mit hellblauer Tinte den Best Friend Background von MFT auf den kompletten Cardstock gestempelt. 
 
The theme in july is "patterned paper". A few years ago I did't make a single card using not at least a few different patterned papers on it. Now I rarely use it anymore. But of course I still have more than enough in my stash. On this card I used different dotted designs.
For the background I stamped the large background image from Just Write by SimonSaysStamp onto white cardstock and colored just the wooden tips of the pencils with Copics. I masked those off and then stamped the Best Friend Background by MFT with light blue ink onto the whole background piece.
 

 Anschließend habe ich den Stifte-Hintergrund auf verschiedene Farben der gepunkteten Designpapiere gestempelt, so dass ich zum Schluss lauter Stifte in verschiedenen Farben hatte. Die Radiergummi-Enden habe ich dabei auf rosafarbenes Designpapier, die metallenen Ringe auf silbernen Schimmer-Cardstock gestempelt. 
Mit farblich passenden Copics habe ich jeden Stift - bzw. jedes Stift-Element - schattiert und dann alle Teile direkt entlang der Stempellinien ausgeschnitten. Die Stifte habe ich dann in den Hintergrund eingesetzt. 
Da, wo bei echten Stiften der Hersteller eingestanzt ist, habe ich kleine Texte aus dem Delicate Garden Stempelset von Altenew aufgestempelt - alles kleine Komplimente für einen guten Freund. Zum Aufstempeln habe ich dabei graue Tinte benutzt. Das Designpapier, das ich für die Stifte benutzt habe, wurde beim Schattieren mit Copics irgendwie etwas fleckig, so als würde sich die Farbe ein wenig ablösen. Das hat auch die Stempelabdrücke der kleinen Worte, die wirklich sehr klein und fein sind, beeinträchtigt. Aber in Stifte eingeprägte Texte sind ja auch nicht immer super klar, so dass mir das nichts ausmacht. 
 
Then I stamped the pencil background onto different  shades of dotted patterned papers to end up with a lot of pencils in different colors. I stamped the image onto pink patterned paper for the eraser ends and silver shimmer cardstock for the metallic rings/ends.
Using matching Copics I shaded each pencil/pencil element and then cut all the pieces out with my scissors, cutting right along the stamped lines. Then I paper pieced them into the background.
Onto the ends, where there is the brand etched into a real pencil, I stamped little texts from Delicate Garden by Altenew. Each text a little compliment for a good friend. I used dark grey ink to stamp the words. When I shaded the patterned papers with Copics, the papers became a bit splotchy, just like the ink got partly removed by the alcohol inks. That also affected the way those little words, that really are tiny and very delicate, stamped. But since the etching in real pencils isn't always completly crisp, too, I don't really mind it.
 

 Im oberen Bereich habe ich dann zwei Texte quer über die Karte geklebt. Die sind aus den Sets Just Write von SimonSaysStamp und Delicate Garden von Altenew und jeweils mit weißem Embossingpulver auf schwarzen Cardstock embosst.
 
On the top half of my card  I adhered two texts. They are again from Just Write by SimonSaysStamp and Delicate Garden by Altenew and white heat embossed onto black cardstock.
 

Mit einem grauen Copic-Marker habe ich Schlagschatten entlang der Stifte auf den Hintergrund gemalt.
Dann habe ich die Texte mit dünnem 3D Tape aufgeklebt und drei weiße Herzen als Deko auf der Karte verteilt.
Zum Schluss habe ich den dekorierten Cardstock auf einen weißen Kartenrohling geklebt. 
 
 I used a grey Copics marker to draw some drop shadows next to the pencils onto the backgroud.
I adhered the text strips with thin foam tape and added three white clay hearts as decoration. Then I glued the card panel to a white note card.
 

Samstag, 12. Juli 2025

Bloom with Happiness


Hallo Ihr Lieben!
Eigentlich verbindet man mit Sonnenblumen ja eher den Herbst, aber auf dem Weg zu/von der Arbeit fahre ich momentan an einigen leuchtenden Sonnenblumenfeldern vorbei. Und die waren dann auch die Inspiration für meine heutige Karte.
 
Hello everyone!
Usually we have fall in mind when we think of sunflowers. But on my way to/from work I am passing a few bright sunflower fields right now. And those were the inspireation for today's card.
 
Das Sunflower Garden Stempelset von SimonSaysStamp hatte es mir schon länger angetan, der Stempel ist einfach wundervoll. Und zudem riesig - auf meine normal große Karte hat er bei bestem Willen nicht komplett gepasst. Aber so kann man mit dem selben Motiv, je nach Wahl des Ausschnitts, immer unterschiedliche Karten designen (oder mit einem gestempelten Motiv gleich zwei Karten füllen). 
Ich habe hier einen Ausschnitt des Motivs auf ein Stück weißen Cardstocks gestempelt - und da ich in No-Line Technik colorieren wollte dafür das Jellyfish Stempelkissen von LawnFawn benutzt.
 
I have been eyeing with the Sunflower Garden stamp set by SimonSaysStamp for quite some time, it's such an amazing image. And also gigantic - it will never fit completly onto a regular sized card. But this way you can create differently looking cards with the same image, depending on what portion of the image you use (or even fill two cards with just one stamped image).
I picked a part of the image and stamped it onto white cardstock, using the Jellyfish ink pad by LawnFawn because I wanted to do some no-line coloring.
 

 Auf eine der Blumen habe ich noch eine kleine dicke Biene aus dem Bee You Stempelset von ColoradoCraft gestempelt - ebenfalls mit dem Jellyfish Stempelkissen. 
Zum Colorieren habe ich dann Copics verwendet und ganz zum Schluss einige feinere Details/Linien mit Polychromos hinzugefügt. Auch den Hintergrund habe ich mit hellblauen Copics eingefärbt - weiß war mir irgendwie zu langweilig. 
Nach dem Colorieren habe ich über den Cardstock ganz fein und eher sparsam weiße Acrylfarbe aufgespritzt.  
 
I stamped a little chunky bee from Bee You by ColoradoCraft onto one of the sunflowers - again using the Jellyfish ink pad.
To color the image I used my Copics and brought in some Polychromos at the very end to add some fine details/lines. I also filled the background with a light blue Copic - white just looked too plain and boring to me.
After I had finished the coloring I added - not too much - fine splatter of white acrylic paint.
 

 Für den Text habe ich ein "bloom" samt Shadow Layer aus dem Great Greetings Spring Stanzenset von HoneyBeeStamps verwendet. Die Schattenlage ist aus Vellum gestanzt, das Wort Bloom habe ich sechsmal aus weißem Cardstock gestanzt. Je 3 davon befinden sich hinter und auf dem Vellum.
Ergänzt wird der Text durch ein winziges "with happiness", das ich mit schwarzer Tinte direkt auf das Motiv gestempelt habe. Ich gebe zu, es ist etwas schwer sichtbar, auch weil es so klein ist. Es ist ein Teile eines Textes aus dem Sunflower Garden Stempelset. Aber ich wollte so wenig wie möglich des Motivs verdecken.
 
For the text I die cut the word "bloom" and its shadow layer from Great Greetings Spring by HoneyBeeStamps. The shadow layer I cut from vellum, the word bloom I cut six times from white cardstock. Three each are stacked under and on top of  the vellum. I completed the text with a tiny "with happiness", that I stamped with black ink directly onto the image. I have to admit, that it's really hard to see, also because it is so small. It's part of a larger/longer text from the Sunflower Garden Set. I really wanted to cover as little of the image as possible.
 

Auf die oberen Enden des Wortes Bloom sowie die Flügel der Biene habe ich Stickles aufgetragen, die Flügel und das Auge der Biene habe ich außerdem mit Glossy Accents überzogen.
Als Deko habe ich drei kleine weiße Herzn auf der Karte verteilt und dann alles auf einen weißen Kartenrohling geklebt.
 
I applied Stickles to the top edge of the word bloom and the bee's wings, her wings and eye I also covered with Glossy Accents. 
I glued three white clay hearts onto the image and then adhered the card panel to a white note card. 
 

Sonntag, 22. Juni 2025

Hello Sunshine

 
Hallo Ihr Lieben!
Heute habe ich zur Abwechslung mal keine Karte mit niedlichen Motiven, sondern eine Blumenkarte, die den Sommer ins Haus holt. Sie ist für die Simon Says Stamp Instagram Challenge und das Thema diesen Monat dort lautet "add some texture". Gibt es eine einfachere und gleichzeitig effektvollere Art, Struktur auf eine Karte zu bringen, als einen Embossingfolder? Und der sorgt hier auch gleich für das Motiv.
 
Hello everyone!
Today I don't have a critter card to share, for a change I made a flower card, that brings summer into your home. I made it for the Simon Says Stamp Instagram challenge and their theme for june is "add some texture". Is there a simpler and yet more effective way to add texture than an embossing folder? And at the same time it creates the image for my card.
 
Ich habe Euch ja schon erzählt, dass mein Bastelzimmer vor kurzem umgezogen ist und ich dabei auch das ein oder andere wieder entdeckt habe, von dem ich gar nicht mehr wusste, dass ich es habe. So auch die zwei Distress Pencils (schwarz und weiß) sowie einige Distress Crayons. Ich konnte mich erinnern, dass ich die hauptsächlich wegen der weißen Stifte gekauft hatte, weil ich sie auf dunklem/farbigem Cardstock probieren wollte. Da ja dann Wasser zum Einsatz kommt, habe ich für meinen Hintergrund ganz dicken, taupefarbenen Cardstock benutzt. Der hat das Wasser wirklich prima vertragen. 
 
I already told you that I moved my craft room to two other rooms in our house and that I re-discovered a few items, that I had totally forgotten about. Two Distress Pencils (black and white) and a few Distress Crayons were some of them. I remembered, that I had bought them, to try them on dark/colored cardstock. Since I had to use water with them I used a very thick taupe colored cardstock for this card and it worked great with the water.
 

 Ich habe den Cardstock mit Wasser besprüht und dann mit dem Fresh Daisies Embossingfolder von Simon Says Stamp geprägt. Die Details dieses Embossingfolders sind phantastisch. 
Die Blüten der Gänseblümchen habe ich mit dem weißen Distress Pencil coloriert und dann ein wenig Distress Ink Shaded Lilac - und später auch noch etwas Distress Oxide Shaded Lilac - mit aufgetragen. Die restlichen Elemente des Embossingfolders habe ich mit Distress Oxide Twisted Citron, Mowed Lawn, Wild Honey, ein wenig Crackling Campfire und Shaded Lilac eingefärbt. Außerdem habe ich den Bereich rund um die Motive mit Salvaged Patina coloriert. Zum Auftragender Farben habe ich einen feinen Pinsel verwendet.
Da durch das Auftragen von Wasser einige der geprägten Details verloren gehen, habe ich den Cardstock noch einmal mit dem Embossingfolder geprägt und anschließend weiße Acrylfarbe aufgespritzt. 
 
I misted the cardstock with water and dry embossed it with the Fresh  Daisies embossing folder by Simon Says Stamp. The details of thsi folder are amazing!
I colored the petals of the daisies with the white Distress Pencil and added a bit of Distress Ink Shaded Lilac - later also a bit of Distress Oxide Shaded Lilad - to them. The other elements of the embossed image I colored with Distress Oxide Twisted Citron, Mowed Lawn, Wild Honey, a hint of Crackling Campfire and Shaded Lilac. I also put Salvaged Patina around the image. To apply the colors I used a fine brush.
Since applying water resulted in loosing some of the details in the images I put the cardstock back into the folder and embossed it again. Then I added some fine splatters of white acrylic paint.
 

 Für den Text habe ich mich für Stanzteile entschieden. Die Stanzen sind beide von MFT. Das Wort sunshine habe ich aufgedoppelt und von unten ein wenig mit Distress Oxide Wild Honey gewischt. Dann habe ich mit einem Nuvo Aqua Shimmer Pen etwas Glitter aufgetragen, der sich aber nicht fotografieren lassen will.
Die Texte habe ich dann auf den Hintergrund geklebt und drei kleine weiße Herzen als Deko drumherum aufgeklebt.
 
For the text I went with die cuts. The dies I used for both  words are by MFT. I doubled up the word sunshine and inked the bottom with a bit of Ditress Oxide Wild Honey. Then I applied some glitter with a Nuvo Aqua Shimmer Pen, but that just doesn't want to show itself on camera.
I glued the texts onto the background and added three little white hearts around it.
 

 Hier sieht man die Tiefe der geprägten Elemente nochmal besser.
Als letzten Schritt habe ich alles auf einen weißen Kartenrohling geklebt.
 
Here you can see the depth of the embossed details better.
As the last step I glued the card panel to a white note card.
 

Samstag, 14. Juni 2025

Finde den Fehler

 
Hallo Ihr Lieben!
Letzten Monat war so viel los, dass ich es einfach nicht geschafft habe, eine Karte für die Challenge der Share Handmade Kindness Gruppe zu machen. Aber diesen Monat bin ich dann wieder dabei - und hier ist meine Karte dafür.
 
Hello everyone!
Last month was so busy that I simply didn't have time to make a card for the challenge in Jennifer McGuire's Share Handmade Kindness group. But this month I am in again - and here's the card I made.
 
Das Video, das diesen Monat Thema ist, stellt Texte einfach aber effektvoll in Szene.
Ich habe hier die Monstera Layering Stencils von SimonSaysStamp benutzt und mit Distress Inks Twisted Citron, Mowed Lawn und Rustic Wilderness auf cremefarbenen Cardstock gestencilt. 
Die äußeren Ränder des Cardstocks habe ich mit etwas Old Paper gewischt und dann weiße Acrylfarbe über alles gespritzt. Außerdem habe ich mit einem hellgrauen Copic einen Schatten an das Blatt gemalt. 
 
The video, that's this month's theme, is showing ways to put a sentiment in the focus the easy but impactful way. 
I used the Monstera Layerings stencils by SimonSaysStamp and stenciled them with Distress Ink Twisted Citron, Mowed Lawn and Rustic Wilderness onto a piece of cream colored cardstock. 
I inked the outer edges of the cardstock with a bit of Old Paper and then splattered white acrylic paint onto the panel. I also used a light grey Copic marker to draw a shadow around the leave.
 

 Aus dem fertig gewischten Cardstock habe ich dann eine Streifen herausgschnitten und mit goldfarbenen Metallic Cardstock hinterlegt. Dann habe ich ihn mit 3D Tape wieder aufgeklebt - dieser Streifen bildet den Hintergrund für den gestanzten Text.
Das "hugs" ist mit der Circled Greetings Hugs Stanze von Altenew gemacht - den Kreis drumherum habe ich einfach weggeschnitten - und besteht aus zwei Lagen weißen Cardstocks und darauf einer leicht versetzten Lage aus dem goldenen Metallic Cardstock. 
Den Rest des Textes habe ich mit Stempeln aus dem Set Monster Mash von LawnFawn zusammengesetzt. Ich fand das Wortspiel "sending monstera hugs" statt "monster hugs" ganz lustig und habe einfach an das Wort "monster" ein A angestempelt. Diesen Textteil habe ich mit schwarzem Cardstock direkt auf den Hintergrund gestempelt. 
 
I cut a strip out of the stenciled cardstock and matted it with a strip of gold shimmer cardstock. Then I glued it back in place with foam tape - this strip is going to be the backdrop of the text.
The word "hugs" is made using the Circled Greetings Hugs die by Altenew - I simply cut off the circle around it - and is made from two layers of white cardstock and on top, slightly offset, a layer from gold shimmer cardstock. 
The rest of the text I put together using stamps from Monster Mash by LawnFawn. I liked the pun of "sending monstera hugs" instead of "monster hugs" and so I simply added an A to the word "monster.
 

 Als Deko habe ich dann einige goldene Pailetten sowie zwei goldene Herzen aufgeklebt und den kompletten Cardstock wieder gold gemattet. Dann habe ich alles auf einem weißen Kartenrohling befestigt.
Und wer hat jetzt den Fehler in der Karte gefunden? Ich löse auf: Ich hatte das Monstera-Blatt zuerst mit Old Paper in der Mitte gewischt und im Pinsel war wohl noch etwas Olivgrün. Die Farben haben mir nicht so recht gefallen. Also habe ich den Cardstock umgedreht und auf der Rückseite ein weiteres Blatt gewischt. Nach dem Zerschneiden des Cardstocks habe ich dann offenbar den unteren Streifen so aufgeklebt, dass das zuerst gewischte Blatt auf der Rückseite zu sehen ist. Das ist mir tatsächlich erstmal gar nicht aufgefallen, ich fand nur, dass die Streifen unten nicht so toll zusammenpassen, habe das aber auf den schmalen goldenen Streifen geschoben. Erst ganz zum Schluss habe ich mich dann gewundert, wo denn mein grauer Schatten im unteren Bereich geblieben ist - und da fiel es mir auf. Da war es dann aber zu spät, denn es war schon alles zusammengeklebt. Aber deswegen ist das Blatt unten auch nicht komplett, ich hatte die Stencils beim ersten Wischen etwas anders auf den Cardstock gelegt. Aber jetzt mal ehrlich - wem war es wirklich aufgefallen?
 
I added some gold sequins and two gold hearts as decoration and matted the whole card panel with the gold shimmer cardstock. Then I adhered it to a white card base.
And now I have to ask, if anyone spotted the mistake on this card? I had inked the monstera leave with some Old Paper in the center first and also had some kind of olive ink left in the blending brush. I didn't like those colors so I turned the cardstock around and did another leave on the back. After cutting the image into strips I must have glued down the bottom strip with the "wrong" leave facing up. I really didn't realize it, just thought that the bottom strip doesn't fit nicely. But I thought it just looks like that because of the gold cardstock strip inbetween. Only at the very end I wondered, where my grey shadows had gone on the bottom of the card - and that's where I realized my mistake. But by that time I had already glued everything together. That's also why the leave is cut off at the bottom - I had placed the stencils a bit differently onto the back of the cardstock.
And now, be honest - did anyone realize it?
 

Mittwoch, 22. Januar 2025

SSS Instagram Challenge

 
Hallo Ihr Lieben!
Vor kurzem habe ich entdeckt, dass es von Simon Says Stamp eine monatliche Challenge auf IG gibt. Das Thema diesen Monat ist "white on white". Und weil ich gerade eine Geburtstagskarte brauchte, habe ich das Thema doch gleich umgesetzt.

Hello everyone!
I just found out, that Simon Says Stamp has a monthly challenge on IG. The theme this month is "white on white". And since I needed  a birthday card, I made a card for the challenge.

Das Thema passte hier perfekt - es gibt da diese Freundin, bei der einfach alles weiß sein muss. Ich selbst liebe weiß ebenso, vor allem bei der Einrichtung, aber ein wenig pimpen mit anderen/dunklen Tönen möchte ich es dann doch.... Das gleiche gilt für meine Karten. Rein weiß ist ja dann doch nicht ganz so einfach, man kann eben nicht einfach mit einer anderen Farbe Kontrast auf die Karte bringen. Aber ich bin mit dem Ergebnis zufrieden - und wie man hier sieht, ist weiß nicht gleich weiß. Die "weißen" Cardstocks, die ich habe, hatten alle einen leicht unterschiedlichen Ton. 
Für den Hintergrund habe ich den Winter Foral Mix Background von SimonSaysStamp mit weißem Embossingpulver auf weißen Cardstock embosst. Die großen Beeren habe ich mit Glossy Accents überzogen, außerdem habe ich ein wenig weiße Metallic-Watercolor aufgespritzt.


Hauptelement der Karte ist der Text. 
Mit dem Impact Alphabet von MFT habe ich ein großes H und ein B ausgestanzt, beide bestehen jeweils aus zwei Lagen. Die habe ich dann leicht überlappend aufeinander geklebt. Die restlichen Buchstaben für das Wort happy - ebenfalls wieder zwei Lagen - habe ich aus kleinen Buchstaben gestanzt, der Rest des Wortes Birthday ist mit der Happy Birthday Stanze von MFT gemacht. Das besteht aus vier Lagen. Als i-Punkt habe ich ein kleines weißes Herz verwendet.
Hier sieht man recht gut, wie unterschiedlich die "weißen" Cardstocks verschiedener Marken sind.
Aus Vellum  habe ich einen gezackten Kreis gestanzt und darauf den Text arrangiert. 
Als Deko habe ich noch einige Schneeglöckchen-Blüten aus dem Lovely Layers Mini Holiday Florals von HoneyBeeStamps ausgestanzt - die passen jetzt zum Winterende ganz gut. Und ja, ich weiß, dass ich mir das mit dem Winterende etwas schönrede, der bleibt uns schon noch ein wenig erhalten...  Ich habe beide Cardstocktöne und für die Blumenmitten weißen Glitter-Cardstock benutzt. So heben sich die verschiedenen Lagen etwas voneinander ab. 
Außerdem habe ich mit einem Stanzenset von Charlie und Paulchen noch die Zahlenstecker 5 und 7 ausgestanzt - die Zahlen an sich habe ich nochmal aus dem Glitter-Cardstock gestanzt.

Main element on my card is the text.
I used the Impact Alphabet by MFT to die cut a large H and B, both are made from two layers. I glued those together a bit overlapping. The other letters for the word happy I die cut with a small alphabet (again two layers), the rest of the word birthday is made with the Happy Birthday die by MFT. This one I made from four layers. As the tittle of the i I used a small clay heart.
Here you can see pretty good how different those "white" cardstocks from different brands are. 
From vellum I die cut a spiro circle and arranged my text on it.
As decoration I die cut some snowdrops from the Lovely Layers Mini Holiday Florals by HoneyBeeStamps, skipping the stems. I think, those are great now that winter comes to an end. And I know, I am glossing this over, winter will be here for quite some time.... I used both white cardstock tones here and white glitter cardstock for the flower centers. This way the different layers are noticable a bit better.
I also used a die set by Charlie und Paulchen to die cut number picks with a 5 and a  7 - just the numbers I cut again from white glitter cardstock.


Hinter zwei der Schneeglöckchen habe ich dünnes bzw. dickes 3D Tape gesetzt.
Mit einem klaren Glitter-Gelstift habe ich Higlights auf die Buchstaben sowie einen Rahmen auf den Hintergrund gemalt. Als Deko kamen noch einige weitere weiße Herzen zum Einsatz.
Zum Schluss habe ich alles mit 3D Tape auf einen weißen Kartenrohling geklebt.

I backed two of the snowdrops with thin/thick foam tape.
Using a clear glitter gel pen I drew highlights onto the letters and a frame onto the background. As decoration I added a few more of the white clay hearts.
Then I adhered the card panel to a white note card using foam tape.