Samstag, 16. April 2022

Stempeleinmaleins - Ausgabe vom 16. April 2022

 
Hallo Ihr Lieben!
Beim Stempeleinmaleins zeigen wir Euch heute mal wieder eine besondere Kartenform: die Tribünenkarte. Und wieder mal steckt das Besondere der Karte im Inneren. Ich fange aber mal mit der Vorderseite meiner Karte an.

Hello everyone!
Over at Stempeleinmaleins we are sharing another specialty card today: a grandstand card. And once again what's special about this card is on the inside. But I'm starting with the front of my card here.

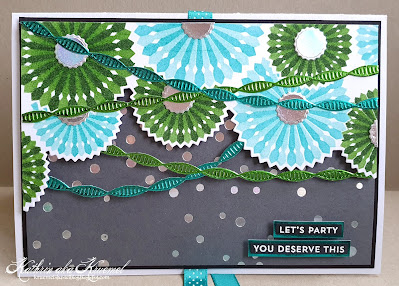
Ich habe hier einen weißen Kartenrohling als Basis verwendet, darauf kam ein Stück dekorierter grauer Cardstock, den ich schwarz gemattet habe. 
Unten auf dem grauen Cardstock habe ich zwei kleine Texte angebracht. Die sind aus dem Stempelset Itty Bitty Celebrations von MFT und mit weißem Embossingpulver auf schwarzen Cardstock embosst. Dann habe ich die Textstreifen mit türkisfarbenem Spiegelcardstock gemattet und mit 3D Tape auf den grauen Cardstock geklebt. Auf den habe ich vorher mit der Slimline Confetti Background Hotfoil Plate von Spellbinders und silber-holografischer Folie die Konfetti auffoliert. 

Here I used a white note card and glued a piece of grey cardstock, that I decorated and matted black, onto it.
to the bottom of the grey cardstock I added two small texts. Those are form the Itty Bitty Celebrations stamp set by MFT and white heat embossed onto black cardstock. Then I matted the strips with turquoise mirror cardstock and glued them onto the cardstock with dimensionals. Before glueing the texts down I added the confetti, using the Slimline Confetti Background Hotfoil plate by Spellbinders and some silver-holographic foil.


Für die Deko habe ich hier die Pinwheel Party Stencils und Stanzen sowie die Twisted Crepe Stanzen von TheGreetery verwendet - Sachen, die schon so lange auf meiner Wunschliste standen und die nun endlich bei mir eingezogen sind. 
Ich habe einen Teil der Pinwheels mit Distress Ink Mowed Lawn und Rustic Wilderness gewischt, die anderen mit Salvaged Patina und Peacock Feathers. Mein Pinsel war wohl nicht gut genug ausgewischt, so dass das Mowed Lawn viel dunkler rauskam, als ich geplant hatte. Aber mir gefallen die grünen Pinwheels trotzdem. Anschließend habe ich mit der passenden Stanze alle Pinwheels - gibts für diese Deko-Dinger ein deutsches Wort? - auf einmal ausgestanzt.
Die Girlanden habe ich mit den Twisted Crepe Stanzen aus türkisfarbenem und grünem Spiegelcardstock gestanzt und teilweise auf, teilweise unter die Pinwheels geklebt.
Vom Auffolieren der Konfetti auf den grauen Carstock hatte ich noch ein kleines Reststück Folie. Das habe ich mit der Solid Hotfoil Plate von PinkFresh auf weißen Cardstock foliert und anschließend daraus die Mitten der Pinwheels gestanzt und aufgeklebt. Im Set ist nur eine Größe enthalten, aber ich finde, die geht für alle gleichermaßen.
Zum Schluss habe ich diesen dekorierten Cardstock mit 3D Tape auf den grauen Cardstock mit den Konfetti geklebt.

To decorate my card I used the Pinwheel Party stencils and dies and also the Twisted Crepe dies by TheGreetery. Those were on my list since so long and now I finally got them.
I inked some of the pinwheels with Distress Ink Mowed Lawn and Rustic Wilderness, for the others I used Salvaged Patina and Peacock Feathers. Seems that my blending brush wasn't completly clean so the Mowed Lawn turned out darker than I had planned, but I still like the green pinwheels. Then I used the matching die to cut out all the pinwheels at once.
The garlands are die cut with the Twisted Crepe dies from turquoise and green mirror cardstock, then glued them partly on top of the pinwheels, partly under them.
I had a small piece of foil left from foiling the confetti onto the grey cardstock. I used this and the Solid Hotfoil Plate by PinkFresh to foil a piece of white cardstock, then I've die cut the centers of the pinwheels from it. There's only one size of center included in the set, but I think it fits all sizes of pinwheels. 
In the end I glued the decorated cardstock onto the grey cardstock with the foiled on confetti using foam tape.


Um die Karte geschlossen zu halten, habe ich ein Stück türkisfarbenes Band mit weißen Punkten um den Katenrohling gelegt und dann den dekorierten Cardstock darüber geklebt. So wird das Band fixiert. Zum Schließen der Karte habe ich an der vorderen Kante aus dem Band eine Schleife gebunden.

To hold the card closed I wrapped a piece of turquoise ribbon with white dots around my note card, then glued the decorated cardstock on top. It fixes the ribbon on the card. To close the card I've tied the ribbon to a bow at the edge where you open the card.


Und bevor wir endlich zum Inneren der Karte kommen, habe ich hier noch ein Bild, das ich ein wenig gegen das Licht aufgenommen habe, um die Folierung besser einzufangen. Habe ich schon erwähnt, dass ich meine Hotfoil Maschine liebe?

And before we finally get to the inside of the card, I have one last picture of the outside that I took a bit against the light to show the foiling better. Did I mention that I love my hotfoil machine?


Und hier ist nun endlich die Tribüne, von der die Karte ihren Namen hat. 
Im Inneren der Karte befinden sich zwei Treppen, die aussehen wie die Sitzreihen in einem Stadion. Auf dem kleineren befindet sich der Text meiner Karte.
Diesen Teil habe ich mit hellgrünem Papier aus dem Dandy Day Paper Pad von LawnFawn beklebt. Auf zwei der Stufen, die die aufrecht stehen, habe ich den Text aufgebracht. Dafür habe ich die Buchstaben für die Worte Birthday To You mit dem Hip Hip Yay Alphabet Stempelset von MFT auf weißen Cardstock gestempelt, mit Copics coloriert, ausgeschnitten und aufgeklebt. Das happy, das den Text ergänzt, habe ich direkt über das Wort Birthday auf das Designpapier gestempelt.
Alle Lagen habe ich dann zusätzlich mit Partygirlanden aus dem Set Pawty Time von MFT dekoriert. Die habe ich direkt auf das Designpapier gestempelt und  mit Copics coloriert. So passt das Innere zur Kartenfront.
Auf die beiden anderen Stufen habe ich zusätzlich noch ein paar kleine Partytexte aus dem Stempelset Itty Bitty Celebrations von MFT gestempelt.
Die äußere Treppe, die ich ebenfalls aus schwarzem Cardstock gearbeitet habe, habe ich mit Designpapier aus dem Watercolor Wishes Rainbow Paper Pad von LawnFawn beklebt. Das hat einen Konfettidruck in Grün-, Blau- und Türkistönen.

And finally here's the grandstand, which the name of this card comes from.
On the inside there are two kind of stairs, that look kind of the row of seats in a stadion. On the smaller one there's the text of my card.
I glued pieces of light green patterned paper from the Dandy Day paper pad by LawnFawn onto these stairs. Onto two of those, the ones that are standing upright, I added my text. For it I stamped the letters of the words Birthday To You onto white cardstock, using the Hip Hip Yay Alhpabet stamp set by MFT, then colored them with Copics, cut them out and glued them down. I stamped the happy above the word birthday, directly onto the patterned paper.
Then I stamped some party garlands from the Pawty Time stamp set by MFT directly onto the patterned paper, then colored them with Copics. Now the inside goes with the front theme of the card.
Onto the other two stair steps I also stamped a  few small birthday texts from the Itty Bitty Celebrations stamp set by MFT.
The larger outer stair, that I've also cut from black paper, is deocrated with pieces of one sheet from the Watercolor Wishes Rainbow paper pad by LawnFawn. It has a confetti print in greens, blues and turquoises.
 

Donnerstag, 14. April 2022

It's Partytime!

 
Hallo Ihr Lieben!
Nach langer Zeit sind die Clubs endlich wieder offen! Ich bin ja nicht der Typ, der jedes Wochenende auf die Piste geht. Aber vor kurzem, als die Clubs noch nicht wieder öffnen durften, haben wir in einer Bar ein paar Cocktails auf den Geburtstag meiner Großen getrunken. Dort wurde der Raum, in angenehmer Lautstärke, mit Techno beschallt. Genau das meine - und es hat mich so in den Füßen gejuckt, loszutanzen. Dieses Erlebnis in Kombination mit dem neuen Stempelset von Oma Plott und Stampcorner hat mich zu dieser Karte inspiriert, die ich heute auf dem Stampcorner Blog zeige.

Hello everyone!
Finally, after a long time, the clubs have opened again! Well, I'm not one of those that goes out every night during the weekends. But a little ago, the clubs were still closed, we went to a bar for a few cocktails to celebrate the birthday of my oldest. They played techno there, exactly my type of music. And I was so temped, to just start dancing. This evening and the new stamp set by Stampcorner and Oma Plott inspired me to make this card, that I'm sharing over at the Stampcorner Blog today.
 
 Ich liebe dieses Nilpferd! Eigentlich ist das Motiv eher auf Gaming und durchzockte Nächte ausgelegt. Aber ich habe das Mikrophon beim Stempeln einfach wegmaskiert, so dass mein Nilpferd nur noch Kopfhöhrer aufhat und eher wie ein DJ aussieht. So passt er auch zu meiner Karte.
Für den Hintergrund habe ich den Comic Burst Background von WhimsyStamps aus schwarzem Cardstock gestanzt und goldene Metallic Watercolor darübergespritzt. Und dann war es Zeit, mal etwas der vielen wirr gemusterten Designpapiere, die seit Ewigkeiten bei mir im Schrank liegen weil sie nirgends passten, hervorzuholen. Hier waren sie perfekt! 
Ich habe ein Stück orangefarbenen Cardstock etwas größer als die Comic Burst, die ich von der Breite her auf 9,5 cm und somit deutsches Maß zugeschnitten habe, ausgeschnitten und hinter den Ausschnitt dieses orange, weiß und schwarz gezackte Designpapier geklebt. Durch die kleinen Löcher im Design sieht man den orangefarbenen Cardstock. Den Comic Burst Background habe ich dann mit 3D Tape auf den orangefarbenen Cardstock geklebt.

I love this hippo! Originally it is more designed with gaming and play nights without sleep in mind. But I masked off the microphon when I stamped the image so my hippo is only wearing headphones and looks more like a DJ. And like this he's perfect for my card.
For the background I've die cut the Comic Burst Background by WhimsyStamps from black cardstock, then spritzed some golden metallic watercolors onto it. And then it was time to bring out those wildly patterned papers that were lying in my drawers since ages because they never fit anywhere. Here they do!
I've cut a piece of orange colored cardstock a bit larger than the Comic Burst Background - which, by the way, I trimmed down in width to make it fit a german standard size card -, then put this black, white and orange ziggy-zaggy patterned paper behind the cut out. Through the smaller ones you can see the orange cardstock. I used foam tape to glue the Comic Burst Background onto the orange cardstock.


Mit einem weißen Gelpen habe ich die Ränder der Ausstanzungen im schwarzen Hintergrund noch ein wenig hervorgehoben.
Auch die beiden Boom!-Worte sind aus gemustertem Cardstock gestanzt und anschließend weiß hinterlegt. Diese Schatten habe ich per Hand zugeschnitten. Weil sich das schwarz-weiße Designpapier nicht so richtig vom weißen Cardstock dahinter abgehoben hat, habe ich die Ränder der Worte noch mit Distress Oxide Spiced Marmalade gewischt. Dann habe ich sie mit 3D Tape auf den schwarzen Cardstock geklebt.

I used a white gel pen to highlight the cut outs in the black cardstock a bit.
Also the two Boom! words are die cut from patterned paper and then matted white. I've cut this shadow layer by hand. And since the black and white patterned paper and the white cardstock behind it didn't provide enough contrast I used Ditress Oxide Spiced Marmalade and inked the edges of the words. Then I glued them down with dimensionals.


Und hier ist endlich der geniale Hippo! Der sieht so richtig fertig aus und ich bin mir nicht sicher, ob er die Musik gerade wirklich genießt.... Ich habe ihn mit Copics coloriert und per Hand ausgeschnitten. Dann habe ich ihn mit dünnem 3D Tape in den Ausschnitt geklebt.
Kennt Ihr die Balken, die auf Mischpulten zu Höhen, Tiefen und Bässen ausschlagen? Diese Balken eines Spectrum Analyzers wollte ich unter dem Motiv darstellen. Und bevor ich mich jetzt mit fremden Federn schmücke - ich habe meinen Mann gefragt, der bis vor kurzem jahrelang in einer Band gespielt hat und sich mit Musiktechnik auskennt. Sein Kommentar zu meiner Karte war "bisschen wenig Bässe und Tiefen in Deinen Frequenzen". Aber so genau nehmen wir es nicht! Ich habe einfach aus schwarz-weiß gestreiftem Designpapier einige Streifen geschnitten, die mit etwas Abstand zueinander auf weißen Cardstock geklebt und diesen dann mit etwas Abstand zu den Streifen ausgeschnitten. Das ganze habe ich dann wiederum mit 3D Tape auf den schwarzen Hintergrund geklebt.
Und darauf war dann Platz für einen Text. Der ist aus dem Stempelset Eule und mit weißem Embossingpulver auf schwarzen Cardstock embosst. Ja, auch dieser Streifen ist mit 3D Tape aufgeklebt.
Zum Schluss habe ich als Deko noch ein paar orangefarbene Pailetten auf der Karte verteilt.

And here's the genius hippo image! He looks kind of dreaded and I'm not completly convinced that he's really enjoying the music.... I colored him in with Copics, then cut him out by hand and glued him into the cut out area using thin foam tape.
Do you know those bars that move on mixers, showing the bass and high and low tones? I wanted to show these bars of a Spectrum Analyzer here under the image. And before you think I have any clue about what I'm talking here - I asked my husband who played in a band for many years until just recently and so he knows everything about music technique. His comment to this card was "there's pretty little bass and lows in your frequencies". But I don't care because I don't think anyone else will realize! I simply cut a few strips from black and white striped patterned paper and glued those onto a piece of white cardstock, leaving a bit of room between them. Then I cut around the strips, leaving a bit of the white cardstock visible, and glued the piece onto the black background, again using dimensionals. 
And on top of it there was room for a text. I white heat embossed it onto a strip of black cardstock and glued it onto the spectrum bars - yes, I used dimensionals again.
In the end I added a few orange sequins as decoration.

Sonntag, 10. April 2022

Eine Karte als Mutmacher

 
Hallo Ihr Lieben!
In einer FB-Stempelgruppe gab es einen Kartenaufruf - eine Karte für eine erneut an Krebs erkrankte Mit-Stempelerin als Mutmacher. Na, die schicke ich doch gerne auf den Weg! Da die Karte inzwischen angekommen sein sollte, zeige ich sie Euch hier heute.

Hello everyone!
In a stamping group they were asking to send a card to another stamper who again got diagnosed with cancer. Of course I wanted to send one, too. And since the card should have been recieved by now, I am sharing it with you today.

Ich habe hier auf ein Stück dunkelblauem Cardstock mit Polychromos coloriert und so eine fast Ton-in-Ton Karte gemacht.
Den blauen Cardstock habe ich später gold gemattet und auf einen ebenfalls dunkelblauen Kartenrohling geklebt.

I colored with Polychromos here on a piece of dark blue cardstock and create a nearly monochrome card.
Later I've matted the cardstock with gold mirror cardstock and glued it onto an also dark blue note card.


Das tolle Motiv ist der Framed Anemones von HoneybeeStamps. Ich habe ihn mit dem No-Line Stempelkissen von InkOn3 aufgestempelt und dann mit Polychromos coloriert. Für die Blätter und Stängel habe ich Grün verwendet - die auch noch in blau zu colorieren, hätte das Motiv zu sehr verändert. 
Die Blumenmitten habe ich später mit einem weißen Gelpen aufgemalt. Dadurch sind sie evtl. ein wenig anders als beim eigentlichen Motiv, aber die Stempellinien waren hier einfach nicht mehr gut genug erkennbar. Ich habe aber mein Bestes gegeben, um sie so gut wie möglich wieder original einzufügen.
Anschließend habe ich das Motiv abgedeckt und über den Hintergrund grau-blaue Metallic Watercolor gespritzt und dann auch ein paar wenige Spritzer auf dem Motiv verteilt.
Den weißen Gelstift - zusammen mit einem goldenen - habe ich auch benutzt, um ein paar Glitzer-Highlights an den Rändern des Motives zu verteilen.
Der Rahmen, der eigentlich um das Motiv gezeichnet ist, war mit dem No-Line Kissen natürlich auch nicht wirklich sichtbar. Also habe ich ihn mit dem goldenen Gelstift nachgemalt und konnte ihn dabei auch ein wenig höher machen, so dass er auch auf das deutsche Format passt.
Der Text ist aus dem Chrysanthemum Stempelset von PinkFresh - ich habe zwei Stempel kombiniert, um das never größer abstempeln zu können. Der Text ist mit weißem Embossingpulver direkt quer über das Motiv embosst.

The great image is made with the Framed Anemones stamp by HoneybeeStamps. I stamped it onto the blue cardstock with the No-Line ink pad by InkOn3 and then used Polychromos to color it in. For the leaves I went with green - it felt like too much doing them in blue also.
Later I added the flower centers with a white gel pen. They might be slightly different than on the stamped image, the lines just weren't visible anymore. But I did my best to re-draw as close to the original as possible.
Then I covered the image and spritzed some grey-ish blue metallic watercolor over the background, then also sprinkled just a few onto the image.
I used the white gel pen - and a golden one - to add some glittery stars to a few areas on the edge of the image.
The frame, that the stamp also stamps, wasn't visible much stamped with the No-Line ink. So I used the golden gel pen to re-draw it which also gave me the chance to make it a bit longer so it fits the german card size.
The text is from the Chrysanthemum stamp set by PinkFresh - I combined two stamps to get the never written in script and larger. I white heat embossed it directly on top of the image.


Ganz zum Schluss habe ich noch ein paar wunderbar glänzende und leich holografisch schimmernde Perlen auf der Karte verteilt. Deren Schein, und den des Spiegelcardstocks im Hintergrund, habe ich versucht, hier für Euch einzufangen.

In the end I added a few wonderful shiny and slightly holographic shimmery pearls to the card. Their shine, and the one of the golden mirror cardstock, is what I tried to catch on the picture above.

Donnerstag, 7. April 2022

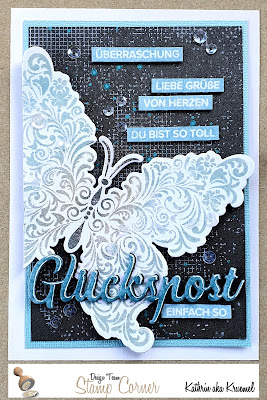
Glückspost - einfach so

 
Hallo Ihr Lieben!
Kennt Ihr diese "was-lange-währt-wird-endlich-gut"-Karten? Diese Karte, die ich heute auf dem Stampcorner Blog zeige, gehört definitiv in diese Kategorie. Aber nachdem sie endlich fertig war, gefiel sie mir richtig gut.

Hello everyone!
Do you know those "sometimes-it-takes-a-bit-longer-to-get-there" kind of cards? This one, that I'm sharing over at the Stampcorner Blog today, definately falls into this category. But once I got it finished I really liked how it turned out.

Auf dieser Karte seht Ihr zwei weitere neue Stempelsets von Stampcorner aus dem April-Release: den Hintergrund und die kleinen Texte. Und an den Stempeln lag es definitiv nicht, dass ich mich hier so schwer getan habe!
Mit Bastelmaterialien ist es ja oft wie mit der Mode - man muss die Sachen nur lange genug aufheben, dann kommen sie wieder in Mode. Ich weiß jetzt nicht, ob Perfect Pearls derzeit "in" sind. Aber die hebe ich seit Jahren auf, ich habe schon öfter überlegt, mich von ihnen zu trennen und es dann doch nicht getan. Und hier war mir dann danach, sie mal wieder zu verwenden. Und da fingen die Probleme an. 
Ich habe den tollen Elegant Butterfly von WhimsyStamps mit dem Perfect Pearl Medium Kissen auf weißen Cardstock gestempelt und dann die Perfect Pearls in Pewter, einem irisierenden Grün, einem hellen Türkis und einem hellen Blau aufgetragen. Zum Fixieren habe ich sie mit ein wenig Wasser besprüht und nach dem Trocknen das Motiv deckungsgleich nochmal mit klarem Embossingpulver auf das Perfect Pearl Motiv embosst. Denn eigentlich wollte ich den Cardstock drumherum mit Distress Ink wischen, so dass der Schein der Perfect Pearls perfekt zur Geltung kommt. Also habe ich den weißen Cardstock mit Distress Ink Pumice Stone, Antique Linen, Speckled Egg und Iced Spruce eingefärbt - und es hat mir überhaupt nicht gefallen. Deswegen seht Ihr das hier auch nicht, der Schmetterling wanderte später in den Rundordner unterm Tisch. Durch das Embossingpulver war einfach zu viel des Schimmers verdeckt und das Motiv hat sich nicht mehr vom gewischten Rundherum abgehoben. Zuvor wollte ich das ganze aber noch irgendwie retten. Also habe ich das Motiv noch auf Vellum gestempelt und Perfect Pearls aufgetragen. Nach dem Fixieren mit Wasser, hat sich das Vellum aber so gewellt, dass selbst glattbügeln im Laminator nicht mehr wirklich geholfen hat. Also habe ich nochmal von vorne mit weißem Cardstock angefangen und einfach nur das Motiv mit Perfect Pearls aufgetragen, ohne Farbe drumherum. Und so habe ich es dann gelassen.
Da ich nun einen hellen Schmetterling hatte, habe ich mich für einen Hintergrund aus schwarzem Schimmer-Cardstock entschieden. Den tollen Hintergrundstempel habe ich mit weißer Stempelfarbe darauf gestempelt und anschließend ein paar türkisfarbene Metallic Watercolor darüber verteilt. 
Darauf habe ich dann mit 3D Tape den Schmetterling geklebt. Der ist so groß, dass er nicht komplett auf die Karte gepasst hat. Ich habe ihn rechts und unten ein wenig überstehen lassen, den überstehenden Teil links habe ich bündig mit der Mattung weggeschnitten.

On this card you get a look at the other two new stamp sets from Stampcorner's april release: the background and the tiny texts. And it was definately not due to those stamp sets that I had some trouble with this card!
With some things in our stash it is like fashion - you just have to keep them long enough and they will be trendy again. I have no idea if Perfect Pearls are "in" at the moment, but I have kept mine for such a long time, had thought about selling them quite often but never did it. And now I felt like finally using them again. That's where the problems started.
I used the Perfect Pearls Medium pad to stamp the beautiful Elegant Butterfly image by WhimsyStamps onto white cardstock and then put down the Perfect Pearls in Pewter, an iridescent green, a light turquoise and a light blue. To fix them I lightly misted the image with water and after it had dried, I clear heat embossed the image on top of the one with the Perfect Pearls. Because I had planned to ink up the cardstock with Distress Ink, to really bring out the shine of the Perfect Pearls. So I inked up the white cardstock with Distress Ink Pumice Stone, Antique Linen, Speckled Egg and Iced Spruce - and I really didn't like it. That's also why you don't see this image being used here, I threw it away later. The embossing powder had taken away quite a bit of the shine of the Perfect Pearls and the image wasn't clearly visible on the inked up cardstock.  But before throwing it away I had plans to save it. So I did the same Perfect Pearl process on Vellum again, not adding the embossing powder and the ink. But after fixing the Perfect Pearls with water the vellum got so wavy that even running it through my laminator didn't help. So I once again started all over with white cardstock and just added the image and Perfect Pearls, no color, no embossing powder. And that's how I used it.
Since I had ended up with a light butterfly, I decided to go with a background cut from black shimmer cardstock. I used white ink to stamp the great background pattern onto the black cardstock and then spritzed some turquoise metallic watercolor over it.
On top of that I glued the butterfly image, using foam tape. This image is so big, it just didn't fit onto the card completly. I let it overhang a bit on the right and bottom and cut off the overhang on the left side at the edge of the matting.


Hier könnt Ihr den gestempelten Hintergrund und die Farbspritzer besser erkennen. Das Linienmuster ist an mehreren, auch größeren Stellen, unterbrochen, was dem Motiv einen leicht grungigen Touch verleiht. 
Bei den kleinen Texten konnte ich mich einfach nicht für einen entscheiden - im Set sind so viele verschiedene! Und genug Platz für mehrere war auf meiner Karte ja auch noch. Ich habe sie mit klarem Embossingpulver - das lag ja eh auf dem Tisch - auf weißen Cardstock embosst und den anschließend mit Distress Ink Speckled Egg eingefärbt. 
Die einzelnen Texte habe ich dann ausgeschnitten und mit 3D Tape auf den Hintergrund geklebt.

Here you get a better look at the stamped background and the spritzed on color. The line pattern of this image is broken/missing in several areas of this stamp design, what adds a nice grungy look to it.
I just couldn't decide on just one of those tiny texts - there are so many different ones included in this set. And I had pretty of room left on my card, so I went with "surprise", "greetings", "from the heart" and "you are awesome". I clear heat embossed them onto white cardstock - the clear powder was still sitting on my desk from my attempt of putting embossing powder on top of the butterfly image - and then inked up the cardstock around the embossed texts with Distress Ink Speckled Egg.
I then cut the cardstock into strips and glued those down onto the background, again using foam tape.


Unten auf der Karte war Platz für ein großes gestanztes Wort und einen weiteren kleinen Text.
Das Glückspost habe ich mehrfach aus schwarzem Cardstock gestanzt und diese Teile aufeinander geklebt. Für die oberste Lage habe ich weißen Cardstock mit Speckled Egg eingefärbt, das Wort ausgestanzt und es anschließend mit klarem Embossingpulver überzogen. Die weißen Highlights habe ich mit einem Gelstift auf das geschmolzene Embossingpulver aufgemalt.
Das gestanztes und gestackte Worte habe ich dann auf den Flügel des Schmetterlings geklebt und darunter noch einen weiteren Streifen mit einem "Einfach so" Text aufgeklebt.

At the bottom of the card I had room for a large die cut word and another small text.
The big word means "happy mail", I've die cut it a few times from black cardstock and stacked those. For the top layer I inked up a piece of white cardstock with Speckled Egg, die cut the word from it and then covered it with clear embossing powder. Then I added the highlights with a white gel pen on top of the melted embossing powder. 
Then I glued the die cut and stacked word onto the wing of the butterfly and added another small strip with a stamped on "just because" under it.


Und weil der Schimmer der Perfect Pearls schwer einzufangen war, habe ich das hier nochmal schräg gegen das Licht versucht. So sieht man ihn besser, aber immer noch nicht so wunderbar wie in Wirklichkeit. 
Den schwarzen Schimmer-Cardstock habe ich dann mit türkisfarbenem, ebenfalls schimmerndem Cardstock gemattet und alles auf einen weißen Kartenrohling geklebt. 
Außerdem habe ich noch ein paar klare Pailetten von Simple and Basic auf der Karte verteilt.

And since the shimmer of the Perfect Pearls was once again hard to show on camera I took another picture against the light in an angle. It's visible better here, but still not as bright as in reality.
I matted the black shimmer cardstock with some turuqoise, also shimmery cardstock and glued everything onto a white card base.
I also added some clear sequins by Simple and Basic onto the card.

Mittwoch, 6. April 2022

Create a Smile Sketch Challenge

 
Hallo Ihr Lieben!
Was, schon wieder zwei Wochen rum? Das bedeutet, dass heute eine neue Create a Smile Challenge startet! Und nach dem Moodboard letztes Mal, gibt es heute wieder einen Sketch für Euch.

Hello everyone!
How comes another two weeks have passed already?! That means, a new Create a Smile Challenge goes life today! And after the moodboard we provided for you last time, we are having a new sketch for you for this challenge.


Ich liebe die Sketche von Create a Smile - sie sind so klar, lassen jede Menge Platz für eigene Ideen und man kann sie immer sowohl für Clean and Simple als auch aufwändigere Karten benutzen. Diesmal hat mich der Sketch zu dieser Karte inspiriert:

I love the sketches by Create a Smile - they are so clean, leave lots of room for ideas and you can always use them for clean and simple or more complicated cards. This time the sketch inspired me to make this card:


Okay, ich glaube, hier hat mich nicht nur der Sketch inspiriert, sondern auch mein kleiner Enkel. Er wurde im November 1 Jahr alt und ist gerade in der Phase, dingebezogene Geräusche zu machen. Nun,  fast jedes vierbeinige Tier, das er sieht, "brüll". Und bei uns im Garten sieht man eine Menge Tiere. Die Karte ist nach einem seiner Besuche entstanden, und ich hatte das Brüllen wohl noch in den Ohren....
Für den Hintergrund habe ich grau-türkisen Cardstock etwas kleiner als einen Kartenrohling zugeschnitten. Dann habe ich die Fern Stencil mit Distress Ink Iced Spruce auf den Cardstock aufgewischt. 
Nachdem die Farbe getrocknet war, habe ich erst einen BG78 Marker von Copic verwendet, um auf einer Seite der einzelnen Farnblätter eine Schattenlinie hinzuzufügen. Auf den Farnblättern habe ich auf der den Schatten gegenüber liegenden Seiten mit einem weißen Gelstift Highlights aufgemalt. So wirken die gewischten Blätter viel plastischer. Anschließend habe ich noch mintfarbene Metallic Watercolor von Coliro über den Hintergrund gespritzt.

Okay, I guess it was not only the sketch that inspired me here, but also my little grandson. He turned 1 back in november and is currrently in the phase where he makes noises related to things. Well, most every four legged animal roars. And there are many animals to discover in our garden. I made this card after he had visited and I guess I still had the roaring in my head...
For the background I've cut down a piece of greyish turquoise cardstock slightly smaller than my card base. Then I used the Fern stencil by CreateASmile and Distress Ink Iced Spruce to ink the ferns onto the cardstock.
After the color had dried I first used a BG78 Copic marker to add a shadow to one side of the ferns. Onto the leaves I added a highlight with a white gel pen on the sides opposite to the shadows. This way the stenciled background gets more dimension. Next I also spritzed some mint colored metallic watercolor by Coliro over the background.


Auf den Hintergrund kam dann ein dekoriertes Stück Cardstock mit dem Motiv.
Ich habe hier weißen Cardstock verwendet und mit Distress Oxide Mustard Seed, Ripe Persimmon, Brushed Corduroy und Ground Espresso gewischt. So erinnert er mich an den Abendhimmel in der Savanne und passt damit prima zum Löwenmotiv.
Oben an den Himmel habe ich die Sonne gesetzt. Dafür habe ich die Sonne aus dem Weather Stanzenset aus hellgelbem Cardstock gestanzt und anschließend mit Copics schattiert.
Der stattliche Löwe ist aus dem Stempelset Königlich - genauso wie der Vogel, der Stein und das Gras. Die großen Blätter sind mit einem Stempel aus dem Set Floral Decorations. Alle Motive sind mit Copics coloriert, anschließend ausgeschnitten und auf den gewischten Cardstock gelegt. So konnte ich im Hintergrund mit brauner Tinte weitere Blätter mit einem anderen Stempel aus dem Floral Decorations Stempel aufstempeln. Dann habe ich die Motive aufgeklebt und in den Vordergrund noch ein paar Grasbüschel mit schwarzer Tinte oben aufgestempelt.
Der Text ist eigentlich ein zweizeiliger Stempel. Ich habe die beiden Zeilen nebeneinander mit schwarzer Tinte auf einen Streifen weißen Cardstocks gestempelt und den dann mit dünnem 3D Tape unter das Motiv geklebt.
Zum Schluss habe ich auch den dekorierten Cardstock mit 3D Tape auf den Hintergrund geklebt.

Onto the background I glued down a decorated piece of cardstock with the images.
Here I cut a piece of white cardstock and then inked it up with Distress Oxide Mustard Seed, Ripe Persimmon, Brushed Corduroy and Ground Espresso. The colors remind me of an evening sky in the Savanna and so it is perfectly going with the lion image.
Onto the sky I glued down a sun, made with a die from the Weather die set. I've cut it from light yellow cardstock and then shaded it with Copics.
The handsome lion is from the Fur Real stamp set - as are the bird, the stone and the grass. 
The large leave is made with a stamp from the Floral Decorations set. I colored all images with Copics, then cut them out and put them onto the inked background, not glueing them down yet. Now I was able to stamp another leave from the Floral Decorations set with brown ink behind the images. Then I glued the images down and stamped some grass on top of them with black ink.
The text is originally divided into two lines. I stamped both next to each other to end up with one long strip, then cut it down and glued it under the image with foam tape.
In the end I used more foam tape to glue the decorated cardstock with the images onto the background.

Samstag, 2. April 2022

Stempeleinmaleins - Ausgabe vom 02. April 2022

 
Hallo Ihr Lieben!
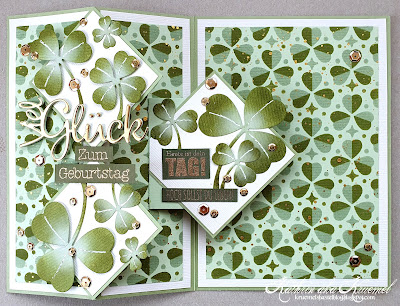
Heute zeigen wir Euch beim Stempeleinmaleins wieder eine besondere Kartenform: die Diamonad Z-Fold Card. Und meine Karte bringt mit unzähligen Kleeblättern ganz viel Glück zum Geburtstag.

Hello everyone!
Over at Stempeleinmaleins we are sharing another special fold card today: the Diamond Z-Fold Card. My birthday card is full of luck with all those clovers.


Die Basis meiner Karte habe ich aus grünem Cardstock geschnitten. Die einzelnen Elemente habe ich dann erst mit cremefarbenem Cardstock gemattet, darauf kam hellgrüner Cardstock. Den habe ich mit Distress Ink Bundled Sage und Peeled Paint sowie der Clover Background Stencil von LawnFawn aufgewischt. Anschließend habe ich goldene Metallic Watercolor darüber gespritzt. 
Die beiden Rauten sind wieder aus dem dunkler grünen Cardstock geschnitten und mit kleineren cremefarbenen Rauten beklebt. Auf denen habe ich dann jede Menge drei- und vierblättrige Kleeblätter aufgebracht. Die habe ich mit den Lucky Clovers Stanzen von LawnFawn aus hellgrünem Cardstock gestanzt. Anschließend habe ich sie von außen her mit Distress Ink Bundled Sage und Peeled Paint gewischt und in die Mitte außerdem etwas weiße Stempelfarbe aufgetupft. Die gestitchten Linien auf den Blättern habe ich mit einem weißen Gelpen nachgefahren.  Einige der Kleeblätter sind direkt auf den Cardstock geklebt, andere mit 3D Tape.

I've cut the base of my card from green cardstock, then put a smaller layer cut from cream colored cardstock onto the different elements. On top of that I've glued some light green cardstock that I had added the clover pattern to using Distress Ink Bundled Sage and Peeled Paint and the Clover Background Stencil by LawnFawn. I also spritzed some gold metallic watercolor over the clover background. 
The two diamond shaped pieces of cardstock are again cut from the darker green cardstock with some smaller diamonds cut from cream colored cardstock on top. Onto those I've glued a few three and four leaved clovers. I've die cut those from light green cardstock using the Lucky Clovers dies by LawnFawn. Then I inked them from the outside inwards with Distress Ink Bundled Sage and Peeled Paint and also put some white ink into the center of each clover. I've re-drawn the stitched lines on the clovers with a white gel pen. Some of the clovers are glued directly onto the diamonds, for some I used foam tape.


Mittig über die beiden Rauten habe ich meinen Text aufgebracht.
Das Viel Glück ist mit einer Stanze gemacht, von der ich dachte, sie wäre von  Charlie und Paulchen. Ich kann sie aber in meinem Evernote nicht finden und so bin ich mir nicht wirklich sicher, sie ist auch schon ein paar Jahre alt. Ich habe sie einige Male aus grünem Cardstock gestanzt, aufeinander geklebt und obenauf ein Stanzteil, gestanzt aus mattgoldenem Metallic Cardstock, gesetzt. Diesen Text habe ich dann nur auf der oberen Raute angeklebt, deswegen auch die vielen Lagen darunter. So ist der gestanzte Text stabil genug.
Für den Rest des Textes habe ich dann ein Zum Geburtstag von Kulricke mit goldenem Embossingpulver auf dunkelgrünen Cardstock embosst, ausgeschnitten und unter dem gestanzten Text aufgeklebt.

I added my text onto the are where the diamonds meet.
The die cut words means "good luck". I've used a die to cut the text several times from green cardstock, stacked those and then added a layer cut from matte golden metallic cardstock on top. Then I glued the text down onto the upper diamond only. That's also why I've stacked a few die cuts, that makes the die cuts sturdy enough.
For the rest of the text I golden heat embossed a "for your birthday" onto dark green cardstock, cut it out and glued it under the die cut text. 
The text on the card is used as a "happy birthday" greeting here in Germany.


Öffnet man die Karte, erscheint eine dritter Raute, die beim Öffnen der Karte außerdem angehoben wird und so als Zwischenlage zwischenden Rauten oben auf der Karte und der Rückseite der Karte wie in der Luft zu schweben scheint.

When you open the card, a third diamond appears. It also gets lifted and seems to be floating between the diamonds on top of the card and its background.


Klappt man die Karte komplett auf, liegt auch die dritte Raute wieder flach auf der Karte.

When you open the card comopletly, also this third diamond lays flat down again.


Auch diese dritte Raute ist aus hellgrünem Cardstock geschnitten und mit cremefarbenem Cardstock beklebt. 
Als Deko habe ich drei weitere Kleeblätter aufgeklebt. Neben und unter den Kleeblättern habe ich zwei weitere Texte aufgebracht. Dafür habe ich Texte von SU wieder golden auf dunkelgrünen Cardstock embosst, ausgeschnitten und aufgeklebt. Man kann sie auf den Bildern etwas schlecht lesen, die Texte lauten "heute ist dein Tag" und "hoch sollst du leben". 
Ganz zum Schluss habe ich noch golene Pailetten auf der Karte verteilt.

Also this third diamond is cut from light green cardstock with a smaller diamond cut from cream colored cardstock on top.
To decorate this diamond I glued down three more clovers. Under and next to those I added two more texts that I again golden heat embossed onto dark green cardstock. They are a bit hard to read on the pictures, they mean "it's your day" and "you shall live greatly". 
In the end I added a few golden sequins to my card.

Donnerstag, 31. März 2022

Der Frühling ist da!

 
Hallo Ihr Lieben!
Jetzt können wir es wirklich sagen - der Frühling ist da! Aber das scheint noch nicht jedem klar zu sein, wie man auf dieser Karte, die ich heute auf dem Stampcorner Blog zeige, sehen kann.

Hello everyone!
Now we can really say "spring is here!". Just seems like not everyone got notice of that, as you can see on this card that I'm sharing over at the Stampcorner Blog today.

Ich habe hier ein Stück weißen Cardstock verwendet, nach dem Dekorieren blau gemattet und auf einen weißen Kartenrohling geklebt. Eigentlich war der zu dekorierende Cardstock etwas größer. Aber irgendwie hatte ich mich beim Wischen verschätzt und so war der blaue Hintergrund nicht mittig. Deswegen habe ich den Cardstock einfach noch etwas kleiner geschnitten.
Ich habe hier den unteren Teil des weißen Cardstocks maskiert, dann erst ein wenig Distress Ink Bundled Sage als Hintergrund für das Gras, darüber dann als Himmel Tumbled Glass und Salty Ocean aufgewischt. Und weil ich die kleinen Blütensamen, die im Frühling in der Luft schweben, so schön finde,  habe ich helle Metallic Watercolor in feinen Punkten auf den Himmel aufgespritzt. 
Nach dem Trocknen habe ich mit Copics das höhere Gras im Hintergrund aufgemalt.

Here I used  a piece of cardstock, that I've matted blue after I had decorated it and then glued it onto a white note card. I had cut the white cardstock a bit larger but after I had ink blended the background onto the card I realized that it wasn't centered. So I simply cut the piece a bit smaller.
Here I masked off the bottom area of the white cardstock, then inked the upper area with a bit Distress Oxide Bundled Sage as the base layer for the grass, above it I used Tumbled Glass and Salty Ocean for the sky. I love all those tiny white flower seed that float through the air during spring. So I used some light metallic watercolor and spritzed it in small dots over the sky.
After the paint had dried I used Copics to draw the tall grass onto the background.


Hier ist der kleine Igel aus dem Stempelset Stay Crazy, wie man unschwer erkennen kann von Oma Plott gezeichnet. Der ist noch ganz verschlafen und hat noch gar nicht mitbekommen, dass der Frühling bereits begonnen hat. Wie gut, dass der kleine Schmetterling ihn aufweckt!
Ich habe den Igel und auch die Schmetterlinge mit Copics coloriert. Die Schmetterlinge sind aus dem Butterfly Kisses Flip-Flop Stempelset von LawnFawn. Vor der Nase des Igels ist eigentlich ein angebissener Apfel. Den hatte ich ebenfalls coloriert, aber dann beschlossen, dass der inzwischen bestimmt verrottet ist und ihn nicht mit auf die Karte geklebt. Für die Highlights habe ich wie immer einen weißen Gelstift benutzt.
Ich habe die Motive ausgeschnitten und auf den Hintergrund geklebt, dann habe ich vor den Igel noch eine weitere Lage etwas niedrigeres Gras gemalt und hierfür dunklere Grüntöne benutzt.
Der Text ist aus dem Stempelset Echt Jetzt. Ich habe ihn mit weißem Embossingpulver auf Vellum embosst und dann mit einer Sprechblasenstanze ausgestanzt. Die Sprechblase sowie die beiden Kreise, die sie in eine Gedankenblase verwandeln, habe ich dann auf den Hintergrund aufgeklebt.

Here's the little hedgehog from the Stay Crazy stamp set by Stampcorner. He's not really awake yet and hasn't realized, that spring has begun. He's really lucky that the butterfly is waking him up!
I colored the hedgehog and the butterflies with Copics. The butterflies are from the Butterfly Kisses Flip-Flop stamp set by LawnFawn. Originally there's a half way eaten apple next to the hedgehog's nose, that I had colored also. But then I decided, it most likely would have gone rotten by now and so I didn't add it to the card. For the highlights I used a white gel pen.
I cut the images out and glued them onto the card, then added another row of grass in front of the images, making it shorter and darker than the one in the background.
The text means "for real?!". I white heat embossed it onto vellum, than cut it out with a speech bubble die. Then I glued down the text and the two little dots, that turn the speech into a think bubble, onto the background.


Nun fehlte noch ein richtiger Text auf der Karte. 
Ich habe mit den Henry's ABC Stanzen die Buchstaben für das Wort Frühling aus einem Bogen aus dem Flower Market Paper Pad, beides von LawnFawn, ausgestanzt. Außerdem habe ich sie noch aus pinkfarbenem Cardstock gestanzt, die ich als Schatten hinter die Buchstaben aus Designpapier geklebt habe.
Die Buchstaben habe ich mit dünnem 3D Tape unter die Wiese mit dem Igel geklebt. Dann habe ich verschiedene Stempelteile von Stempeln aus dem Set Danke verwendet, um den Rest des Textes vor und hinter das Wort Frühling direkt auf die Karte zu stempeln.
Ganz zum Schluss habe ich noch rote Metallic Watercolor in feinen Punkten auf und über das Gras aufgetragen, um viele Blumen im Gras zu verteilen.

Now my card needed a real text.
I used the Henry's ABC die set to cut the letters for the german word spring from a sheet from the Flower Market paper pad, both by LawnFawn. I also die cut them from pink cardstock, that I glued as a shadow layer behind the letters cut from patterned paper. 
I used thin foam tape to glue the letters under the grass layer with the hedgehog. Then I used different stamps to stamp the rest of the text directly onto the background to create a "spring is here" text.
In the end I used a fine brush to put lots of small red dots from red metallic watercolor onto and above the grass to add a lot of small flowers to the grass.

Dienstag, 29. März 2022

Küsschen?

 
Hallo Ihr Lieben!
Noch zwei Tage, dann gibt es das April-Release von Stampcorner. Ich gebe Euch heute noch eine weitere Vorschau auf einen der süßen Frösche. Und ein Text aus einem weiteren Stempelset hat sich auch mit aufs Projekt geschlichen...

Hello everyone!
Two more days, then the new Stampcorner release will be available. Today I have another sneak at one of the new frog images. And a text from another new set also sneaked on my project...

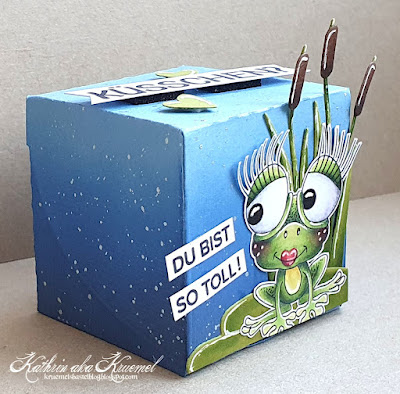
Ich habe hier eine Box mit der Box 1 Stanze von Stampcorner gewerkelt. Die habe ich aus hellblauem Cardstock gestanzt, ich finde, das erinnert an Wasser und so passt es perfekt zum Motiv.

I used the box 1 die by Stampcorner to create this little box. I've die cut it from light blue cardstock, since it looks like water it goes perfectly with the image.


Alle Seiten bis auf  Boden und Deckel habe ich mit Distress Oxide Prize Ribbon und Chipped Sapphire gewischt, jeweils unten dunkler und nach oben hell in die Farbe des Cardstocks auslaufend. Auch die tollen abgerundeten Seiten habe ich so gewischt, allerdings unten nicht ganz so dunkel, dass sie farblich zum Seitenteil darunter passen.
Anschließend habe ich silberfarbene Metallic Watercolor auf alle Seiten gespritzt.

Besides the lid and bottom of the box I've inked up all sides with Distress Oxide Prize Ribbon and Chipped Sapphire, starting dark at the bottom and let the color fade out into the color of the cardstock. I did the same with the rounded sides, just not making them as dark to make their color match the sides underneath. 
Then I spritzed some silver metallic watercolor onto all sides.


Und hier ist die geniale Froschdame. Ich war mir ja nicht sicher, ob ich die extrem langen Wimpern ausschneiden könnte, aber das war gar kein Problem. Und ich finde, die stehen ihr klasse. Passend zu dem etwas tussi-haften Look der Wimpern - und dem Text auf dem Deckel der Box - habe ich ihr beim Colorieren  noch einen roten Kussmund hinzugefügt. Dafür habe ich einfach ein etwas aberundetes Herz auf die Mitte des Mundes gemalt und das rot coloriert. 
Auch hier habe ich zum Colorieren wieder Copics sowie einen weißen Gelstift für die Highlights verwendet. 
Hinter der Froschdame wachsen wieder eine paar Rohrkolben, gemacht mit der Cattails Border Stanze von LawnFawn, und sie sitzt wieder auf einem Seerosenblatt. Da ich nur eine Seerosenblatt-Stanze besitze, kam wieder die von PapertreyInk zum Einsatz. 
Ich habe alle Teile aufeiander und anschließend auf die Vorderseite der Box geklebt. Dabei habe ich nicht gut aufgepasst, und als ich dann die überstehenden Teile des Seerosenblattes weggeschnitten habe, habe ich der armen Dame auch den vorderen Teil der Zehen mit weggeschnitten. Oops, sorry. Aber das tut ihrer Schönheit natürlich keinen Abbruck!
Liebt Ihr kleine Texte auch so wie ich? Die passen auf jede Karte oder Box. Und so ein Set mit vielen verschiedenen Texten wird es ebenfalls im April-Release geben? Einen davon habe ich hier neben dem Motiv mit auf die Box geklebt.

And here's the beautiful frog lady. I wasn't sure if I'd be able to cut her out with her extremly long lashes, but it actually worked great. And they suit her just wonderfully. Matching the kind of chickie look of her lashes - and to go with the text on top of the box - I added some puckered lips when I did the coloring. I simply drew a rounded heart over her mouth and colored it red. 
Again I used Copics to color the image and a white gel pen for the highlights. 
Behind the frog lady there are some cattails growing, again I used the Cattails Border die by LawnFawn for those, and the frog is sitting on a water lilly leaf. Since I only have that one water lilly leaf die I used the one by PapertreyInk again.
I glued all pieces on top of each other and then onto the front of the box. I didn't check the height good enough, so when I cut off the overhanging parts of the water lilly leaf, I also cut off the tip of the toes of the poor frog. Oops, sorry. But I think she still looks nice.
I love small text stamps - they fit onto every card or box. And so I am really happy that there will be a stamp with full of those in the april release. I used one text next to the frog here, it means "you are so great". 


Oben auf der Box habe ich dann noch einen Text aus dem Frosch-Stempelset verwendet. Der passt doch perfekt zum Motiv, und außerdem verrät er auch gleich, was sich in der Box befindet. ;) 
Eigentlich befindet sich hinter dem Wort kein Fragezeichen. Also habe ich das hinter einem der Texte aus dem Stempelset Echt Jetzt hinter das Wort gestempelt.
Der Text ist mit 3D  Tape auf die Box geklebt und außerdem habe ich zwei grüne Herzen mit aufgeklebt.

On top of the box I glued down a text from the frog stamp set. It means "want a kiss?" and goes great with the image. 
I glued the text down with foam tape and added a little heart above and under the text.

Samstag, 26. März 2022

Stempeleinmaleins - Ausgabe vom 26. März 2022

 
Hallo Ihr Lieben!
Beim Stempeleinmaleins gibt es wieder einen neuen Sketch für Euch - hier seht Ihr, wie ich ihn umgesetzt habe. Für meine Idee habe ich ihn hochkant gedreht.

Hello everyone!
We have a new sketch over at Stempeleinmaleins - and this what the card I made following this sketch looks like. For my idea I had to turn it to a portrait format.

Für den Hintergrund habe ich die All the Stars Cover-Up Stanze von MFT zweimal ausgestantz - einmal aus silberfarbenem, einmal aus hellgoldfarbenem schimmernden Cardstock. Dann habe ich beide diagonal geteilt und die silbernen Sterne in den goldenen Hintergrund, die goldenen in den silbernen Hintergrund eingesetzt. Auf diese Weise konnte ich die diagonale Teilung im Sketch einbauen und trotzdem einen fortlaufenden Hintergrund erhalten.
Dekoriert habe ich meinen Sternenhintergrund dann mit Dekorosetten und Girlanden. Die Rosetten habe ich mit einer der Pinwheel Party Stanzen von TheGreetery aus weißem Papier gestanzt. Dann habe ich mit Hilfe der passenden Stencil Embossing Ink auf die Rosetten aufgetragen und diesen Teil anschließend golden embosst. Danach habe ich die übrigen Streifen der Rosette mit Distress Ink Black Soot gewischt. 
Die Partygirlanden habe ich mit den Twisted Crepe Stanzen, ebenfalls von TheGreetery, aus dunkler goldfarbenem Schimmercardstock gestanzt.
Ich habe die Deko auf den Hintergrund geklebt und dann einen schwarzen Rahmen drumherum gesetzt. Dafür habe ich 4 dieser Rahmen gestanzt, aufeinander- und dann auf den Hintergrund geklebt.

For the background I've die cut the All the Stars Cover-Up die by MFT twice - once from silver and once from light golden pearl cardstock. Then I cut both apart diagonally and glued the silver stars into the golden background, and the golden stars into the silver background. This way I was able to include the diagonal seam drawn in the sketch but still keep one complete background.
I decorated this star background with pinwheels and garlands. I've die cut the pinwheels with one of the Pinwheel Party dies by TheGreetery from white paper. Then I used the matching stencil to cover it with embossing ink and then golden heat embossed this part of the pinwheel. After heat embossing it I inked up the left over strips in the pinwheel with Distress Ink Black Soot. 
To die cut the garlands I used the Twisted Crepe dies, also by TheGreetery, and die cut those from a darker golden pearl cardstock.
I glued all pieces onto the background and then added a black frame. I've die cut 4 of those, stacked them and glued them down.


Der Text ist definitiv das Hauptelement auf meiner Karte. Dafür habe ich einen der Texte aus dem Jumbo Sentiments Stempelset von TheTon auf Vellum embosst und anschließend mit einer der passenden Stanzen ausgestanzt. Ich habe nur extra-feines schwarzes Embossingpulver hier und damit nie Erfolg auf Vellum. Darum habe ich den Text mit Versafine Clair Nocturne auf das Vellum gestempelt und anschließend klar embosst. Dadurch ist es zwar nicht tiefschwarz, aber für meinen Geschmack immer noch schwarz genug. 
Den ausgestanzten Text habe ich dann mit 3D Tape auf den Hintergrund geklebt. 
Um aus einer Glückwunschkarte eine Geburtstagskarte zu machen, habe ich noch einen der Texte aus dem Stempelset Itty Bitty Celebrations by MFT mit goldenem Embossingpulver auf einen schmalen Streifen schwarzen Cardstocks embosst und diesen dann ebenfalls mit 3D Tape über den großen Text geklebt.

The text is definately the star of this card. I heat embossed one of the words from the Jumbo Sentiments stamp set by TheTon onto Vellum and then cut it out with the matching die. I only have extra fine black embossing powder at home and never get a good result on Vellum with this. So I used Versafine Clair Nocturne to stamp the text onto the Vellum and then covered it with clear embossing powder. It doesn't turn out plain black that way, but for my taste it's still dark enough.
I used dimensionals to glue the text onto the background.
To turn this card into a birthday card I golden heat embossed one of the sentiments from the Itty Bitty Celebrations stamp set by MFT onto a thin strip of black cardstock and glued this on top of the word congrats, again using dimensionals. 


Als Deko habe ich noch einige goldene Perlen auf der Karte verteilt - so strahlt und schimmert sie einfach wunderbar!

As embellishments I glued a few golden pearls onto the card - now it has a great shimmer and shine!

Freitag, 25. März 2022

Sei kein Frosch!

 
Hallo Ihr Lieben!
Heute gebe ich Euch einen kleinen Blick auf ein Motiv, dass es im April-Release von Stampcorner geben wird. Ich finde diesen Frosch einfach klasse - und er bringt jede Menge Frosch-Freunde mit!

Hello everyone!
Today I am sharing this card with you, that gives you a sneak at one of the images from Stampcorner's april release. I just love this little frog - and he brings a lot of friends with him in a stamp set!

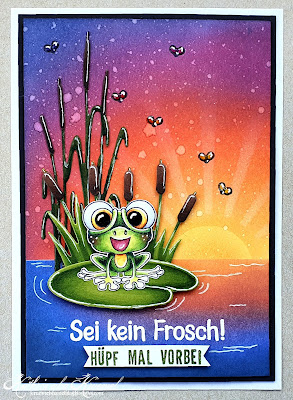
Für meine Karte habe ich einen Sonnenuntergang am See gestaltet. Dafür habe ich den unteren Teil eines Stücks weißen Cardstocks maskiert und mit der Maske überlappend einen Kreis aus Masking Tape für die Sonne aufgeklebt. Anschließend habe ich den Himmel mit Distress Oxide Wild Honey, Spiced Marmalade, Crackling Campfire, Seedless Preserves und Chipped Sapphire gewischt, die Maske für die Sonne entfernt und nur diesen Teil nochmal mit Wild Honey gewischt. Dann habe ich einige Wassertropfen darauf verteilt. Nachdem die getrocknet waren, habe ich beschlossen, dass noch ein paar Sonnenstrahlen toll aussehen würden. Also habe ich eine Strahlenstencil von MFT über die Sonne gelegt und mit einem kleinen Blending Brush weiße Stempelfarbe aufgewischt, und zwar so, dass sie nach einigen Zentimetern in den Hintergrund übergeht.
Für das Wasser habe ich den oberen Teil des Cardstocks maskiert und dann Distress Oxide Spiced Marmalade, Crackling Campfire, Wilted Violet, Blueprint Sketch und Chipped Sapphire aufgewischt. Die Wasserlinien habe ich später mit einem weißen Gelpen dazugemalt.
Den gewischten Cardstock habe ich schwarz gemattet und auf einen weißen Kartenrohling geklebt.

For my card I created a sundown at a lake. I masked off the bottom part of a piece of white cardstock and added a circle cut from masking tape, taping it down so only the very top will be visible in the sky. Then I inked up the sky with Distress Oxide Wild Honey, Spiced Marmalade, Crackling Campfire, Seedless Preserves and Chipped Sapphire. I removed the circle mask and inked up just the sun with Wild Honey again. Then I spritzed some droplets of water onto the background. After the water had dried, I thought, some sunbeams would look nice. So I put a ray stencil by MFT over my sun and filled the rays with white ink using a small blending brush, making sure to let the color fade into the background after a few centimeters. 
For the water I masked off the top area of my cardstock and then used Distress Oxide Spiced Marmalade, Crackling Campfire, Wilted Violet, Blueprint Sketch and Chipped Sapphire. Later I added the ripples to the water with a white gel pen.
I matted the inked up cardstock black and glued it onto a white card base.


Hier könnt Ihr den tollen Frosch mit seinen großen Glupschaugen besser sehen. Ich habe ihn mit Copics coloriert und anschließend ausgeschnitten. Die Highlights sind mit einem weißen Gelpen gemacht. Außerdem habe ich einige dunkelgrüne Punkte auf den Oberschenkeln und über der Nase des Frosches mit einem Fineliner aufgetupft.
Da er ja nicht so auf dem Wasser sitzen kann, habe ich ihn auf ein Seerosenblatt von PapertreyInk gesetzt. Dahinter wachsen einige Rohrkolben - die kleineren sind mit der Cattails Border von LawnFawn, die höheren dahinter mit einer Stanze von CraftEmotions gestanzt. Ich habe alle Teile aus grünem bzw. braunem Cardstock gestanzt und anschließend mit Copics schattiert. 
Die höheren Rohrkolben sind direkt auf den Hintergrund geklebt, die niedrigeren sowie der Frosch auf dem Seerosenblatt jeweils mit 3D Tape.
Und weil die rechte Seite der Karte ein wenig fad aussah, habe ich dort noch einige Fliegen aus dem Toadally Awesome Stempelset von LawnFawn aufgestempelt. Auf die Flügel habe ich außerdem etwas Glossy Accents aufgetragen. 

Here you get a better look at the great frog with his amazingly big eyes. I colored him in with Copics and then cut him out. I used a white gel pen to add some highlights and also used a dark green fineliner to add some tiny dots to the legs and above the nose of the frog.
Since the frog isn't able to just sit on the water, I gave him a water lilly leave by PapertreyInk to sit on. Behind him I planted a few cattails  - the smaller ones are made with the Caittails Border die by LawnFawn, the taller ones I used a die by CraftEmotions for. I've die cut all pieces from green and brown cardstock, then shaded them with Copics.
The taller cattails are glued directly onto the background, the smaller ones and the frog on the leaf are attached with foam tape.
And since the right side of the card looked a bit empty I stamped a few flies onto it. The fly image is from the Toadally Awesome stamp set by LawnFawn, I covered the wings with Glossy Accents.


Unten auf dem Wasser habe ich dann noch den Text meiner Karte untergebracht.
Der Text "sei kein Frosch" stammt ebenfalls aus dem neuen Frösche-Stempelset. Ich habe ihn mit weißem Embossingpulver auf das Wasser embosst.
Für den Text darunter habe ich kleine Buchstabenstempel verwendet und damit sowie mit Versafine Clair Shady Lane den Text zusammengesetzt. Anschließend habe ich ihn mit dünnem 3D Tape unter den embossten Text geklebt.

I added my text to the water area of my card.
The top one, that comes in the new frog stamp set, means "don't be a frog" - a german way to say "don't be such a baby". I white heat embossed it directly onto the background.
For the text under that - this one means "hop on over" - I used small letter stamps to put the text together and stamp it with Versafine Clair Shady Lane onto white cardstock. Then I cut it out and glued it onto the card with thin foam tape.