

Hallo Ihr Lieben!
Nein, ich möchte mit Euch natürlich keine Cocktailrezepte austauschen - wobei ich zu einem leckeren Cocktail hin und wieder natürlich nicht nein sage!
Nein, in der Stamping-Fairies Produktwoche möchten wir Euch diesen Monat die Alcohol Inks vorstellen.
Hello everyone!
Let's talk about alcohol! And no, I don't want to swap cocktail recipes with you - allthough I can't say no to a yummy drink every now and then.
In this month's product spotlight we are talking about alcohol inks.
Bei dieser Karte habe ich nur eine einzige Farbe verwendet: Mermaid.
Basis ist Yupo Paper - und auch das kann man embossen. Das Ergebnis ist vielleicht nicht ganz so detailreich wie bei Cardstock, aber da ich einen 3D Embossingfolder (Mosaic Gems von Sizzix) verwendet habe, habe ich trotzdem ein tolles Relief. Hier habe ich die Rückseite verwendet, denn es sieht klasse aus, wenn sich die Tinte in den Vertiefungen sammelt.
Wie gesagt, ich habe erstmal nur flächig mit Alcohol Ink und der Blending Solution gearbeitet. Dann habe ich ein wenig goldenes Mixativ aufgetragen und auch das schön verteilt.
Ein wenig des Mixatives habe ich mit Blending Solution gemischt und die Farbe dann gezielt mit einem kleinen Pinsel in einige der Vertiefungen gefüllt.
Ganz zum Schluss habe ich dann noch etwas Patina Alcohol Ink auf ein Alcohol Ink Applicator Felt gegeben und hauptsächlich außen am Rand aufgetragen.
For this card I've only used one color: Mermaid.
For the base I went with Yupo Paper - and also that can be dry embossed. The result may not be as detailed compared to cardstock but since I've used a 3D Embossing Folder (Mosaic Gems by Sizzix) I still got a great result. Here I've used the back side with the debossed areas because it just looks great when the colors sets into those debossed areas.
As mentioned, I've only covered the whole paper with Alcohol Ink and Blending Solution. Then I've added some golden Mixative and also spread this by adding more Blending Solution.
In the end I've put some Patina Alcohol Ink onto an Alcohol Ink Applicator Felt and added it mainly to the edges.

Auf diesem Foto habe ich versucht, das Embossing etwas besser zu zeigen.
On this picture I've tried to get a better look at the dry embossing.

Als Deko habe ich erst den Mandala Background von MFT aus weißem Cardstock gestanzt und aufgeklebt. Darüber kamen zwei Fähnchen aus schwarzem Cardstock, auf die ich einen der Texte aus dem Anyting but Basic Friendship Stempelset golden aufembosst habe. Ich habe in die obere Zeile eine Lücke gestempelt - und das Wort Friend hier durch ein aus goldenem Spiegelkarton gestanztes Wort ersetzt. Das ist viermal mit weißem Cardstock hinterlegt, um es etwas anzuheben.
Zum Schluss habe ich noch ein paar schwarze Enamel Accents auf der Karte aufgeklebt.
For decorations I've die cut the Mandala Background by MFT from white cardstock and glued it onto the alcohol ink background. Then I've added two black banners onto which I've golden heat embossed one of the sayings from the Anything but Basic Friendship stamp set. While stamping I've moved the strip a bit to get some free space in the first line. I've also not stamped the word friend there and replaced this with one die cut from golden mirror cardstock. To add some depth I've stacked four "friend" die cuts cut from white cardstock and then put the golden one on top.
In the end I've added a few black Enamel Accents to the card.
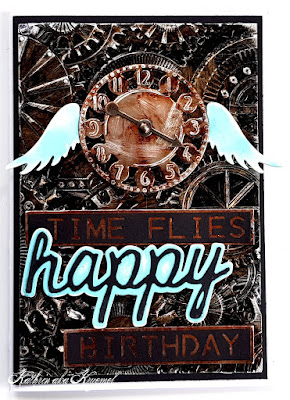
Hier habe ich eine weitere Alkohol-Karte. Und ja, ich habe tatsächlich freiwillig eine Männerkarte gemacht! Ich finde, die Alcohol Inks sind perfekt dafür.
Here I have another card. And yes, I really made a men's card - without any pressure! I think, alcohol inks are perfect for that type of card.

Auch hier habe ich wieder mit einem 3D Embossingfolder gearbeitet, diesmal dem Mechanics Folder. Der hat tolle Zahnräder, die wirklich super plastisch wirken. Aber diesmal habe ich nicht mit Yupo Paper gearbeitet. Ich wollte unbedingt die Alcohol Inks auf Metallic-Paper probieren. Es gibt extra eines von Ranger, das hatte ich aber nicht. Alufolie hat für mich nicht wirklich funktioniert. Also habe ich mir Plumber Tape besorgt. Das ist eine Art Alufolie mit klebender Rückseite, das es auf der Rolle gibt. Damit habe ich normalen weißen Cardstock beklebt und anschließend dry embosst.
Mit einem Alcohol Ink Felt Applicator habe ich dann zuerst Alkoholtinte der Farbe Pitch Black aufgetragen, darüber dann Sepia aufgetragen und ein klein wenig Blending Solution mit dazugenommen. Dadurch läuft die Tinte wunderbar in die Vertiefungen des embossten Hintergrundes.
Nach dem Trocknen habe ich noch die Ränder und ein paar der erhabenen Stellen vorsichtig mit einem Sanding Block bearbeitet. Die Tinte lässt sich ganz leicht abschmirgeln und das silber der Metallfolie kommt darunter zum Vorschein.
Also here I've used an 3D Embossing Folder again, this time the one called "Mechanics". This gives a great impression of gears that really look like they'd be stacked onto each other. But this time I didn't work with Yupo Paper. I really wanted to try the alcohol inks on metallic paper. There are special metallic sheets by Ranger but I didn't have those at hand. Tin foil didn't work too well for me so I got myself some plumber tape. It's a roll of some kind of tin foil with a selfadhesive back. I've simply covered some regular white cardstock with it.
I've used an Alcohol Ink Felt Applicator to first add some Pitch Black ink, then added some Sepia on top of it. I've also added a tiny bit of Blending Solution which makes the ink run into the debossed areas of the background.
After drying I've used a sanding block to take off some of the ink around the edges and from a few of the raised areas. The ink goes off pretty easy and the silver of the foil can be seen in those areas.

Als Deko habe ich dieses Ziffernblatt gewählt. Dafür habe ich es aus einem weiteren Stück mit Metallfolie beklebtem Cardtsock ausgestanzt und die Zahlen und Punkte außen herum geprägt (die Stanze ist so gestaltet). Dann habe ich Rust Alcohol Tinte wieder mit einem Stück Filz aufgetupft und auch hier die Fläche mit einem Sanding Block bearbeitet.
Statt der Zeiger habe ich hier einen drehbaren Pfeil benutzt.
Und um eine Verbindung zum Text darunter herzustellen, habe ich hinter das Ziffernblatt zwei Flügel aus hell-türkisfarbenem Cardstock geklebt. Auch die Flügel sind mit einem Sanding Block auf alt getrimmt.
For decorations I went with this clock face. I've simply cut it from another piece of cardstock that I've covered with the Plumber Tape and embossed the numbers and dots (the die is designed that way). Then I've covered it with Rust Alcohohl Ink, dabbing it on with another piece of felt, and again used the sanding block.
Instead of hands I went with this arrow that spins around.
And to make a connection to the saying underneath I've die cut some wings from light blue cardstock, sanded those as well and glued them behind the clock face.

Für die beiden Banner mit den Texten "time flies" und "birthday" habe ich mein Word Punch Board von We'R'Memory Keepers und schwarzen Cardstock verwendet. Die Cardstockstreifen habe ich mit mehr des Metallbandes auf weißem Cardstock hinterlegt und es vorher wieder mit Rust Alcohol Ink eingefärbt.
Das Happy ist eine der Stanzen aus dem Shadow Script #2 Stanzenset von Tim Holtz. Ich finde es toll, dass es einen passenden Untereger für den Text gibt. Das Wort an sich ist aus einfachem schwarzen Cardtsock gestanzt, der Unterleger wieder aus türkisfarbenem Cardstock, an dem ich wieder den Sanding Block angesetzt habe.
For the two banner's with the texts "time flies" and "birthday" I've used my Words Punch Board by We'R'Memory Keepers and black cardstock. I've matted the black strips with some more of the Plumber Tape glued onto white cardstock that I've colored with some Rust Alcohol Ink again.
The happy is one of the dies from the Shadow Script #2 die set by Tim Holtz. I just love that there's a matching matting. The word itself was cut from plain black cardstock, the shadow again from light turquoise cardstock that again was sanded.
Und dann habe ich eine dritte und letzte Karte für Euch:
And then I have a third and last card for you today:

Ja, auch diese Karte ist hauptsächlich mit Alcohol Inks gemacht, auch der Hintergrund. Ich erkläre Euch gleich mehr dazu.
Yes, also this card was made using mainly alcohol inks, even for the background. I'll tell you how in a second.
Den Hintergrund habe ich auf weißen Cardstock gestaltet, den ich dann helltürkis gemattet und auf eine weiße Kartenbasis geklebt habe.
Ich wollte keinen großen Text, irgendwie fehlte aber doch eine Botschaft auf der Karte. Also habe ich wieder das Word Punch Board genommen, damit das Wort Bloom aus türkisfarbenem Cardstock gestanzt und es mit einem Stück Yupo Paper, das ich mit Sandal Alcohol Ink eingefärbt habe, hinterlegt.
I've created the background on white cardstock, matted it light turquoise and then glued it onto a white card base.
I didn't want a big saying here but felt like a message is missing. So I've used the Word Punch Board again, punched the word bloom from turquoise cardstock and matted it with a piece of Yupo paper that I've covered with Sandal alcohol ink.

Nun zum Hintergrund. Ich habe hier mit der Gelli Plate gearbeitet. Ich gestehe, ich hatte mir bereits vor Jahren eine gekauft und sie, nachdem sie zwei Jahre unbenutzt in der Schublade lag, wieder verkauft. Als ich dann auf der Stempelmesse Süd gelernt habe, dass die auch mit Alcohol Inks zu verwenden ist - ja, Ihr ahnt es sicher, habe ich mir eine neue gekauft. Diesmal kam sie aber auch zum Einsatz!
Für den Hintergrund verteilt Ihr mit einem Brayer Alcohol Ink auf der Gelliplate. Ich habe dann eine Schnörkelschablone daraufgelegt und zusätzlich mit Noppenfolie noch ein paar Abdrücke in den freien Bereichen gemacht. Zieht die Schablone ab und Ihr könnt das Ergebnis schon erahnen. Um die Alcohol Inks wieder anzulösen, tragt Ihr mit einem anderen Brayer normale Acrylfarbe auf. Nicht zu dick, nur so, dass die Gelli Plate komplett bedeckt ist. Ich habe weiße Acrylfarbe benutzt, es geht auch farbige. Dann sieht man natürlich die Farbe, die Ihr verwendet habt neben/zwischen der Alkoholtinte, also den Bereichen "zwischen den Schnörkeln".
Now on to the background. I've used my Gelli Plate here. I have to admit, years ago I've bought one and sold it after not having used it once after two years. So when I've learned at a stamp fair that you can use it with alcoho inks - yes, you already guessed it, I've bought another one. But this time I've used it right away!
For the background you simply use a brayer to cover the Gelli Plate with alcohol ink. Then I've put a flourish stencil on top of the ink and also used some bubble wrap to add some more texture to the flourishes. Pull of the stencil and you can already guess what the result may look like. To re-activate the alcohol ink simply use a different (clean) brayer to add a thin layer of acrylic paint onto the alcohol ink. I went with white paint, you can also used colors here. Of course then you'll see that color next to/between the alcohol ink, in my case the areas between the flourishes.

Und auch für das Motiv habe ich Alcohol Ink benutzt. Dafür habe ich den Fresh Cut Flowers Background von MFT mit weißem Embossingpulver auf Yupo Paper embosst. Das geht, Ihr müsst aber sehr vorsichtig fönen und den Fön immer in Bewegung halten. Da Yupo Paper ja nichts anderes als Plastik ist, schmilzt es natürlich, wenn es zu sehr erhitzt wird.
Dann habe ich die selben Farben, die ich auch für den Hintergrund benutzt habe (übrigens Sandal, Meadow und Aqua) vorsichtig zwischen die embossten Linien verteilt. Mit einem dünnen Plastik- oder Metallstäbchen kann man in den kleinen Bereichen nachhelfen. Auch mir ist die Farbe an einigen kleinen Stellen ein wenig übergelaufen (vor allem am doch sehr dünnen Stängel), aber ich finde, das macht hier gar nichts. Dann habe ich mit einem Pinsel etwas mit Blending Solution gemixtes goldfarbenes Mixative aufgespritzt und mit dem Pinsel noch ein paar wenige kleine Flecken mit reiner Blending Solution aufgetupft.
Dann brauchte ich das Motiv nur noch entlang der embossten Linien ausschneiden und mit 3D Tape auf den fertigen Hintergrund kleben.
Also for the image I've used alcohol inks. Therefor I've white heat embossed the Fresh Cut Flowers Background by MFT onto Yupo Paper. Yes, that's possible, you only have to use the heat gun with care and always move it around. Since Yupo Paper actually is some kind of plastic it melts/wraps when it's getting too hot.
Then I've used the same colors that I've used for the background also (in my case Sandal, Meadow and Aqua) to carefully fill in the areas inbetween the embossed lines. With a thin plastic or metallic stick you can help the ink to spread into the fine/small areas. Also my color went out of the lines in a few spots, especially the quite thin stem. But I think with this technique it doesn't matter too much. Then I've used a paint brush to sprinkle on some golden Mixative mixed with Blending Solution and after that also added a few tiny drops of pure Blending Solution with my brush.
Then I only needed to cut out the image around the embossed lines and glue it onto the card. I've used dimensionals here to add some more depth.