Samstag, 12. Oktober 2019

Stempeleinmaleins - Ausgabe vom 12. Oktober 2019


 Hallo Ihr Lieben!
Beim Stempeleinmaleins legen wir heute einen Kürbis-Tag ein. Heute dreht sich alles um das orangefarbene Gemüse und wir zeigen Euch zwei Gestaltungsmöglichkeiten. Ich habe mich entschieden, eine Kürbiskarte zu machen.

Hello everyone!
Over at Stempeleinmaleins we are doing a pumpkin day today. We have two pumpkin related tutorials and I've decided to make the card.

Die Außenseite meiner Karte ist aus orangefarbenem Cardstock mit schwarzen Punkten gemacht und Halloween-ig gestaltet. 

I've made my card from orange cardstock with black dots and decorated it with a Halloween theme.


Als Motiv habe ich diese Szene mit dem Spooktacular Friends Stempelset von MFT gestaltet. Der Baum mit den Gespenstern ist schwarz auf Folie embosst und ausgeschnitten, die Gespenster sind von hinten mit einem Gelmarker ausgefüllt. Die anderen Motive sind mit Copics coloriert. 
Der Hintergrund ist mit Distress Oxide Wilted Violet, Blueprint Sketch und Black Soot gestaltet.
Der Zaun ist der Spooky Fence von LawnFawn und aus schwarzem Glitzercardstock gestanzt.

As the image I've created this scene using the Spooktacular Friends stamp set by MFT. The tree with the ghosts is black heat embosst onto acetate and cut out. Then I've filled the ghosts with a white gelly marker on the back of the acetate. For all the other images I've used my Copics. 
The background is made using Distress Oxide Wilted Violet, Blueprint Sketch and Black Soot. 
The fence is made using the Spooky Fence die by LawnFawn and cut from black glitter cardstock.


Natürlich können wir eine Karte nicht Kürbiskarte nennen, wenn nur außen beim Motiv ein Kürbis zu finden ist. 
Bei dieser Karte liegt die Überraschung im Inneren.
Den orangefarbenen Rahmen habe ich mit der Stitched Ric Rac Stanze von MFT gemacht, die Texte sind 1-Dollar-Stamps, die ich 2010 in den USA bei Michael's gekauft habe, und weiß aufembosst.

Of course we can't name a card pumpkin card when there's only a pumpkin in the image.
With this card it's all about the inside.
I've made the orange frame using the Stitched Ric Rac die by MFT, the sayings are 1 $ stamps I've bought at Michael's back in 2010 and are white heat embossed.


Hier könnt Ihr den 3D Kürbis im Inneren der Karte besser sehen. Ich gebe zu, ich habe hier ein wenig geschummelt. Aber ich habe da diese BigZ Stanze von Sizzix, die schon seit Jahren ungenutzt im Schrank liegt. Und die stanzt praktischerweise auch das Gesicht des Kürbis so aus, dass es beim Schließen der Karte ebenfalls flach gefaltet wird. Vom Prinzip her ist mein Kürbis aber nicht wirklich anders als der in der Anleitung.
Als Deko haben hier noch ein paar orangefarbene Enamel Accents Platz gefunden.

Here you get a better look at the 3D pumpkin inside the card. I have to admit I've cheated a bit here. But I have that Sizzix BigZ die lying in my drawer for years. And it does not only cut the pumpkin pieces but also a face - in a way so it can be folded flat as well when the card gets closed. But in general my pumpkin isn't really different from the one in the tutorial.
For decorations I've also added some orange Enamel Accents here.


Donnerstag, 10. Oktober 2019

Hurra, der Herbst ist da!


Hallo Ihr Lieben!
Heute darf ich wieder auf dem Stampcorner  Blog posten - und weihe mit meiner Karte auch endlich das neue Herbst-Stempelset ein. 

Hello everyone!
It's my turn again to post over at the Stampcorner Blog - and with this card I've also used the new fall stamp set for the first time.

Ist das Eichhörnchen nicht einfach zu goldig? 
Ich habe hier eine Split Front Card gemacht, die wir Euch ja vor einiger Zeit beim Stempeleinmaleins gezeigt haben. Hier klappt nur eine Schicht der Karte, bestehend aus Wolken und Gras und verbunden durch die Bäume und das Eichhörnchen, auf. Der blaue Cardstock ist bereits die Innenseite der Karte.
Auch Pilz, Eichel und Drachen sind aus dem Herbstliebe Stempelset. Alle Motive habe ich mit Copics coloriert und anschließend ausgeschnitten.

Isn't that squirrel the cutest?
I've made a Split Front Card here. Only one layer made from grass and clouds and connected by the trees and the squirrel is opening up here. The blue cardstock in the background is already the inside of the card showing through.
Also the mushroom, acorn and kite are from the fall stamp set. All images are colored with Copics and cut out by hand.


Hier könnt Ihr den Effekt ein wenig besser sehen.
Für die Bäume im Hintergrund, die dem ganzen einfach ein wenig mehr Stabilität geben, sind mit der Birch Tree Stanze von MFT gemacht. Die Wolken sind mit den Stitched Cloud Edges, das Gras mit der Grasbordüre aus dem Pop-Up Wiper Card Components gemacht. Das Smile stammt aus dem Stanzenset #Captions. 

Here you get a better look at the effect.
For the trees in the background that just stabilize the front a bit are made using the Birch Tree die by MFT. The cloud is made using the Stitched Cloud Edges, the grass is from the Pop-Up Wiper Card Components. The Smile is part of the #Captions die set.


Mittwoch, 9. Oktober 2019

Heute mal in Tracht


Hallo Ihr Lieben!
Für die nächsten drei Monate darf ich das DT von JM Creation als Gast unterstützen.

Hello everyone!
I am joining the JM Creation DT as a guest for the next three months.


Auch wenn die Wiesn - für alle Nicht-Bayern: das Oktoberfest - letzten Sonntag geendet hat. Für mich als "Münchner Kindl" waren die Dirndl- und die Lederhosn-Box ein Muss. Tracht geht hier in Bayern fast immer! Und so habe ich diese Stanzen auch als erste eingeweiht.


I know that October Fest ended last sunday. But for me as someone born and grown up in Munich the Dirndl Box and the Lederhosn Box were a must have. You can never go wrong with Tracht here in Bavaria. And so there are the first dies I've used.


Die Box ist jeweils die selbe, sie kommt auch nur mit dem Dirndl. Die Lederhose kann als Extra-Aufleger einzeln gekauft werden.
Hier habe ich das Dirndl selbst aus Designpapier mit Blumenmuster gestanzt und es mit hellblauem Organzaband ordentlich unter der Brust geschnürt. Die Dirndlbluse ist aus weißem Cardstock gestanzt, darunter befindet sich die Haut, die ebenfalls als passende Stanze im Set kommt. Mit meinen Copics habe ich den Ausschnitt ein wenig betont... ;)
Die Schürze ist aus rosafarbenem Cardstock gestanzt und ich habe hier noch farblich passendes Organzaband darum gewickelt und zur Schleife gebunden. Erfahrene Trachtler wissen: die "Dame" hier ist noch single...
Oben am Hals habe ich noch ein Kropfband mit Blume angebracht.

The box is the same for both versions and is only delivered with the Dirndl. The Lederhose can be purchased as a extra part individually.
Here I've die cut the Dirndl from designer's paper with a flower pattern and used some blue organdy ribbon to "bring it in shape". The top is cut from white cardstock, underneath I've put the skin that is made with another die from the set. I've used my Copics to add some shading and details here in an important spot... ;)
The apron is cut from pink cardstock and I've wrapped some organdy ribbon in a matching color around it and tied it to a bow. The ones that wear a Dirndl more often know: this "lady" is still available... 
To the neck I've added a Kropfband, the bavarian name for a traditional kind of choker, and added a flower charm/bead to it.


Auch die männliche Box in Lederhose hat sich schick gemacht.
Hier habe ich das Hemd aus Sticky Back Canvas gestanzt, das ich vorher auf weißen Cardstock geklebt habe. Da der Kragen gefaltet wird, habe ich die beiden Endstücke nochmals von der Rückseite des mit Canvas bezogenen Cardstocks gestanzt und auf die gefalteten Kragenteile aufgeklebt.
Unter den Kragenspitzen schaut ein umgebundenes Tuch in rot-weißem Karo hervor.
Die Teile für die Lederhose habe ich aus kraft farbenem Cardstock gestanzt und die Nähte, die auch mit gestanzt werden, mit weißem Gelmarker betont/nachgefahren. Nur die an den Hosenbeinen sind einfach so frei hand dazugemalt. 
Die Knöpfe sind aus dunkelbraunem Cardstock und mit einem Sanding Block ein wenig bearbeitet.

Also the masculine box in a Lederhose comes dressed up.
Here I've cut the shirt from some Sticky Back Canvas that I've glued onto some white cardstock prior to die cutting the pieces. The collar is folded so I had to die cut the end pieces that get folded over again from the back of the Canvas and then glued them on top of the folded ones.
Under the collar I've added a piece of red and white checked ribbon as a neckerchief.
The pieces for the Lederhose are cut from dark craft colored cardstock. Then I've used a white gelly marker to add some stitching. I've simply re-drawn the stitches that also get cut with the die. Only the ones at the bottom part are hand drewn.
The buttons are cut from dark brown cardstock and I've used a sanding block to bring out the white core a bit.


Dienstag, 8. Oktober 2019

Kaffee mit Tiger


 Hallo Ihr Lieben!
Nach meiner Kaffee-Roulette Karte von letzter Woche zeige ich heute auf dem Stamping-Fairies Blog eine weitere Karte zum Thema Kaffee. 

Hello everyone!
After my coffee roulette card from last week I am sharing another coffee themed card over at the Stamping-Fairies Blog today.

Für diese Karte habe ich den Sketch #453 von MFT umgesetzt. Das ist nicht die aktuelle Challenge, aber irgendwie hat er mich angesprochen und so habe ich ihn verwendet. 
Im Hintergrund habe ich nur ein Stück weißen Cardstock auf eine hellblaue Kartenbasis geklebt.

For the layout of this card I got inspired by sketch #453 by MFT. It's not the current one but I really like this one and so I've decided to use it.
In the background I've simply glued a piece of white cardstock onto a light blue note card.


In die Mitte der Karte habe ich ein bestempeltes Stück Cardstock geklebt. Das habe ich mit Distress Oxide Pumice Stone ganz leicht eingefärbt, dann habe ich ebenfalls mit Pumice Stone den Knitted Sweater Background darauf abgestempelt. Um einen extra Hintergrund für das Motiv zu schaffen, habe ich eine Kreisschablone aufgelegt und durch den Ausschnitt ein wenig Distress Oxide Walnut Stain aufgewischt. Das hat sich mit dem noch nicht trockenen Pumice Stone zu einer etwas eigenwilligen Farbe vermischt, aber es passt und ist nicht zu dunkel.
Unter den aufgewischten Kreis habe ich einen Streifen roten Cardstock geklebt, auf den ich weiß einen der Texte aus dem Stempelset Cup of Love aufgebracht habe.
Oben und unten unter den bestempelten Cardstock habe ich jeweils einen Streifen hellblauen Cardstock, auf den ich ebenfalls mit weißem Embossingpulver den Diagonal Stripes Background aufembosst habe, geschoben. 

I've glued a piece of decorated cardstock to the middle of my card. I've used Distress Oxide Pumice Stone to very lightly color some white cardstock in, then used Pumice Stone as well to stamp the Knitted Sweater Background on top. To create an extra background for the image I've put a circle stencil on top and added a bit of Distress Oxide Walnut Stain through the cut out. It mixed with the not yet dry Pumice Stone and created a kind of weird color but I think it fits and it isn't too dark.
Under the circle I've glued a strip of red cardstock onto which I've white heat embossed one of the sayings from the Cup of Love stamp set.
Under the background I've created I've tucked a piece of light blue cardstock to which I've added some white diagonal stripes using the Diagonal Stripes Background stamp and white embossing powder.


Als Motiv habe ich mich für den süßen Tiger aus dem Sweater Weather on Safari Stempelset entschieden. Er ist mit Copics und der No-Lines Technik coloriert. 
Darunter habe ich, mittig auf den aufgewischten Kreis, einen Kaffeebecher geklebt. Der ist mit der Mini Cafe all Day Stanze gemacht. Der Becher sowie der Dome-Deckel sind aus Folie gestanzt. Mit einem weißen Gelmarker habe ich ein paar Lichtreflexe aufgemalt, der hält auch auf Folie super. Den unteren Teil des Bechers habe ich noch einmal aus milchkaffeefarbenem Cardstock gestanzt und hinter die Folie geklebt. Der Sleeve ist aus Wellpappe, obenauf habe ich ein kleines Herz geklebt. 
Der Strohhalm ist aus rotem Cardstock gestanzt, das Muster wieder mit Gelmarker aufgemalt. Damit es unten so aussieht, als stecke der Strohhalm im Kaffee, habe ich hier mit einem Copicmarker in Farbe des Milchkaffees über den Strohhalm gemalt. Dann habe ich ihn durch einen Schlitz, den ich in die Sahnhaube geschnitten habe, gesteckt. Der Sahnehaube habe ich ebenfalls mit Copics ein paar Schatten verpasst.
Ganz zum Schluss kamen noch ein paar braune Enamel Accents auf die Karte.

For the image I went with this cute tiger from the Sweater Weather on Safari stamp set. It's colored with Copics doing some no-line coloring.
Under the tiger, in the middle of the circle, I've glued a coffee cup. This is made with the Mini Cafe all Day die. The cup and the dome lid are die cut from acetate. I've used a white gelly marker to add some light reflexes to the cup, the gelly marker also works on acetate. Then I've die cut the lower part of the cup again from milk coffee colored cardstock and glued it behind the acetate. The sleeve is cut from corrugated paper and decorated with a small die cut heart.
The paper straw is cut from red cardstock, again I've used a gelly marker to add the pattern. To make it look like the bottom is in the coffee I've used a Copic marker the color of the coffee and colored over the bottom of the straw. Then I've put it through a slid that I've cut into the cream. I've used Copics again to add some shadows to the cream.
At the end I've added some brown Enamel Accents to the card.


Montag, 7. Oktober 2019

Maritim im Oktober


Hallo Ihr Lieben!
Ich liebe das Meer - im Sommer. Darum und wohl aus dem Grund, dass ich einfach zu weit weg von der Küste wohne geht Maritim für mich eigentlich nur im Sommer. Aber da war diese wunderschöne Meerjungfrau von Stampcorner - und die wollte ich dann doch nicht ungenutzt in den Winterschlaf schicken. Und so zeige ich heute auf dem Stampcorner-Blog diese maritime Karte - auch wenn schon Oktober ist.

Hello eveyone!
I love the ocean - in summer. I guess it's because that I live far too far away from the coast that I only do maritim cards in summer. But there was this beautiful mermaid stamp - and I didn't want to send her into hibernation unused. And so I am sharing this maritim card over at the Stampcorner Blog today - even if it's october already.

Basis ist eine einfache weiße Karte, auf die ich unten mit hell-türkiser Tinte einen der Texte aus dem Magical Dragons Stempelset von MFT aufgestempelt habe. Auch haben hier drei Enamel Accents Platz gefunden. Das alles ist dunkel-türkis gemattet und auf eine weiße Kartenbasis geklebt.

I've used a piece of white cardstock and stamped one of the sayings from the Magical Dragons stamp set by MFT to it's bottom using light turquoise ink. There was also room for three Enamel Accents.  Everything is matted with dark turquoise cardstock and glued onto a white note card.


Bevor ich die Karte zusammengesetzt habe, habe ich einen gestitchten Kreis mit nach innen gerichteten Scallops aus dem weißen Stück Cardstock gestanzt. Darunter habe ich ein Stück türkisfarbenen Cardstock geklebt, den ich vorher mit der GoPress and Foil und glitzernder türkisfarbener Folie mit Fischschuppen dekoriert habe. Das glitzert so toll! 
Darauf habe ich eine Unterwasserpflanze sowie eine (grüne) Koralle geklebt. 
Die Meerjungfrau finde ich wunderschön gezeichnet. Sie ist mit Copics in grün und türkis coloriert, ausgeschnitten und mit 3D Tape auf den weißen Cardstock geklebt.
Das Hello stammt aus dem Magic Color Slider Stanzenset von LawnFawn. Ich habe es aus weißem Cardstock gestanzt, den ich ebenfalls mit der türkisfarbenen Glitzerfolie foliert habe, und habe dann per Hand eine weiße Mattung zugeschnitten, damit es sich besser vom Hintergrund abhebt. 
Der weiße Cardstock mit der Ausstanzung ist dann ebenfalls mit 3D Tape auf den Hintergrund geklebt.

Before putting the card together I've die cut a stitched circle with inward scallops from white cardstock. Behind the cut out I've put a piece of turquoise cardstock that I've added a fish dandruff pattern to using my GoPress and Foil and glittery turquoise foil. The glitter is amazing!
Onto that background I've glued a underwater plant and a (green) coral.
This mermaid is drawn so beautifully. I've colored her with Copics, cut her out and then glued her onto the white cardstock with dimensionals.
The hello is from the Magic Color Slider die set by LawnFawn. I've cut it from white cardstock that I've also foiled with the same turquoise foil. Then I've hand cut a white matting to make it stand out from the background.
Then I've glued the white cardstock with the cut out onto the background using dimensionals again.


Samstag, 5. Oktober 2019

Stempeleinmaleins - Ausgabe vom 05. Oktober 2019


 Hallo Ihr Lieben!
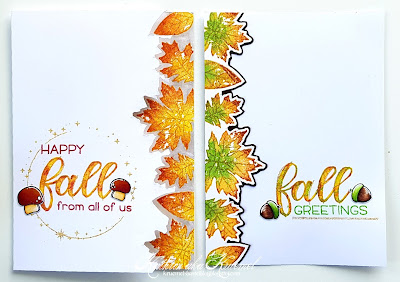
Heute zeigen wir Euch beim Stempeleinmaleins das On the Edge Stamping - eine einfache Stempelidee, mit der Ihr gleich zwei Karten auf einen Schlag dekorieren könnt.

Hello everyone!
Over at Stempeleinmaleins we are sharing a tutorial for On the Edge Stamping today - an easy way of stamping. And the best thing is that you can decorate two cards at once with your stamped areas.


Ich habe wieder herbstliche Karten gestaltet. 
Bei der Technik hinter dieser Kartenart werden die Motive jeweils an die gleiche Stelle sowie auf der Vorder- als auch der Innenseite der Karte abgestempelt. Dank der Stempeltools kein Problem mehr. Dann wird das Motiv auf der Vorderseite der Karte mit etwas Abstand als Streifen abgeschnitten. 
Bei dieser Version der Karte ist der gestempelte Streifen im inneren Teil der Karte, die Motive können bei geschlossener Karte trotzdem gesehen werden weil ja das selbe Motiv aus der Vorderseite herausgeschnitten wurde. Ich habe die tollen Herbstblätter aus dem Fall Flowers Stempelset von Clearly Besotted verarbeitet. Ich habe sie zuerst mit gelber Tinte, dann teilweise mit orangefarbener und roter Tinte abgestempelt. Anschließend habe ich die Außenlinien, jeweils ein Extra-Stempel, mit dem glitzer-goldenen Sternenstaub-Embossingpulver von Heindesign embosst.
Auf die selbe Art habe ich das "fall" gestempelt, hier habe ich die Handletter Alphabet Lowercase Stempel open und closed von Craft Emotions verwendet.
Für die anderen Textteile habe ich jeweils Teile von LawnFawn-Stempeln verwendet und sie mit dunkelroter Tinte gestempelt.
Der Sternenkreis rund um den Text ist von Scrapbook Forever und ebenfalls embosst.
Und weil ich so ganz ohne Motiv nicht auskomme, habe ich hier noch zwei Pilze aus dem Happy Hedgehogs Stempelset von MFT aufgeklebt.
Weil ich wollte, dass man die Schnittkante etwas besser sieht, habe ich rund um die Blätter noch W-Töne von Copics (W5, W2 und W0) aufgetragen. 

Again I've made some fall cards.
When doing On the Edge Stamping the images get stamped onto the same place on both the outside and the inside of the card. That really isn't a problem anymore thanks to those stamping tools like Misti etc. Then the stamped images on the front get cut out  as one strip, leaving some room between the stamped lines and where you cut. 
On this card the stamped images are on the inside and can be seen when the card is closed since the strip on the front got cut off.  I've used the beautiful leaves from the Fall Flowers stamp set by Clearly Besotted here. First I've stamped them with yellow ink, then stamped parts of it again with orange and red ink. At last I've stamped the outlines - an individual stamp for each leave - and heat embossed those with the golden-glittery Sternenstaub embossing powder by Heindesign.
I did the same process when stamping the word fall, here using the Handletter Alphabet Lowercase stamps, both open and closed, by Craft Emotions.
For the other parts of the sayings I've used different parts of different stamps by LawnFawn.
The starry circle is by Scrapbook Forever and also golden embossed.
And since I just can't live without any image I've added two mushrooms from the Happy Hedgehog stamp set by MFT here.
Since I wanted the cutting edge around the image to pop out a bit more I've used some W-toned Copics (W5, W2 and W0) around the leaves.


Hier sieht man den Effekt der ausgeschnittenen Kante ein wenig besser - auch wenn der innere Teil der Karte doch sehr überbelichtet ist.

Here you get a better look at the effect of the cut out edge - even if the inner part of the card is totally overlighted here.


Und das ist dann die zweite Karte, auf der der von der Vorderseite ausgeschnittene Streifen verwendet wird. Damit er ein wenig besser auffällt, habe ich ihn noch dunkelbraun hinterlegt.
Blätter und Text sind hier identisch zum Innenteil der Karte gearbeitet, nur habe ich zusätzlich noch grüne Stempelfarbe mit verwendet. Und statt Pilzen und Sternenkreis kamen hier nur zwei Eicheln, auch aus dem Happy Hedgehog Stempelset, zum Einsatz.

And this is the second card that you used the strip you've cut out from the front of the card on. To make that pop out a bit more I've matted it with some dark brown cardstock.
Leaves and saying are done as described for the first card with the only difference that I've added some green ink here as well. And instead of mushrooms and the starry circle I've only added two acorns, also from the Happy Hedgehog stamp set, here.


Donnerstag, 3. Oktober 2019

Nochmal Elefantenfreunde


Hallo Ihr Lieben!
In dem süßen Freunde #2 Stempelset von Stampcorner ist noch ein weiteres Motiv enthalten - und das habe ich bisher noch gar nicht verwendet. Das hole ich mit dieser Karte, die ich heute auf dem Stampcorner-Blog zeige, nach!

Hello everyone!
There's one more image in the cute elephant stamp set by Stampcorner. I haven't used this yet - and so I've put it on this card that I'm sharing over at the Stampcorner Blog today.

Im Hintergrund habe ich dunkelblauen Cardstock verwendet und darauf den neuen Brush Splatter Background von MFT mit goldfarbenem Embossingpulver aufembosst. 
Auch der Spruch unten auf der Karte ist golden auf blauen Cardstock embosst und weiß unterlegt.

In the background I've used some dark blue cardstock and golden heat embossed the new Brush Splatter Background by MFT onto it.
Also the saying, that means "I'm always here for you", is golden heat embossed onto blue cardstock and matted with white cardstock.


Und hier ist das dritte Motiv aus dem Set - Hase und Elefant mit Sternen. 
Passend dazu habe ich im Hintergrund einen 3D Stern in die Karte eingearbeitet. Dafür habe ich mit verschieden großen Sternstanzen gearbeitet. Der größe Stern ist aus dem blauen Cardstock gestanzt, dahinter befindet sich, mit 3D Tape aufgeklebt, ein Stück hellgelber Cardstock, aus dem ich einen etwas kleineren Stern ausgestanzt habe. Nach dem selben Prinzip ist auch die Lage in etwas kräftigerem Gelb gearbeitet, dahinter befindet sich dann goldener Glittercardstock. Durch das 3D Tape zwischen den Lagen bekommt der Stern eine tolle Tiefe.
Auch das Motiv, das mit Copic coloriert ist, und die Wolken sind mit 3D Tape aufeinander gesetzt und unter den Sternen auf die Karte geklebt. Zum Schluss habe ich noch zwei weitere Wolken aufgeklebt.

And here's the third image from the set - bunny and elephant with stars.
Matching the image I've added a 3D star to the card, working with different sized star dies. The biggest star is die cut from the blue background layer, behind it theres a piece of light yellow cardstock, attached with dimensionals, from which I've die cut a slightly smaller star. The layer from the brighter yellow cardstock is done the same, behind it there's some golden glitter cardstock. With the dimensionals between the layers the star gets a great depth.
Also the image, that is colored with Copics, and the clouds are put onto each other with dimensionals and then glued to the card under the star. In the end I've also added two more clouds to the card.


Mittwoch, 2. Oktober 2019

Es wird nochmal magisch


 Hallo Ihr Lieben!
Heute wird es hier nochmal magisch. Denn in dem neuen Stempelset von Scrapbook Forever mit der kleinen Hexe, die ich Euch schon am Sonntag auf einer Karte gezeigt habe, ist auch noch ein toller Zauberer enthalten. Und der wollte natürlich auch verbastelt werden.

Hello everyone!
It's getting magical again today. Because there's also a wonderful sorcerer included in the stamp set with the little witch that I've been sharing a card with on sunday. And of course he wanted to get inked up as well.

Hier habe ich zuerst den Zauberer auf weißen Cardstock gestempelt und coloriert. Dann habe ich ihn mit Masking Tape abgedeckt und den Hintergrund mit Distress Oxide Pumice Stone, Hickory Smoke und Black Soot gestaltet. Damit das nicht nur ein tristes Einheitsgrau wird, habe ich dann noch mit weißer Tinte den Bubbles Hintergrund als Tapete aufgestempelt.

Here I've stamped the sorcerer onto some white cardstock first and then colored him. After covering him with masking tape I've created the background with Distress Oxide Pumice Stone, Hickory Smoke and Black Soot. Since it look a bit sad with just the grey and black background I've stamped the Bubbles Background with white ink over the grey area as a wallpaper.


Der Zauberer ist mit Copics coloriert. Auch der Leuchtkreis um den Zauberstab herum. Den habe ich dann grob ebenfalls mit Maskiertape abgedeckt bevor ich den grauen Hintergrund gewischt habe.
Rund um den Zauberer habe ich noch ein paar golden glitzernde Sterne aufgeklebt. 

The sorcerer is colored with Copics - as is the shiny area around his wand. I've covered that area with masking tape as well before I've created the grey background. 
Around the sorcerer I've added some golden glittery stars.


Und auch wenn ich ja erst eine LED-Karte mit dem süßen Elchi gemacht habe - hier bot es sich geradezu an. Und so leuchtet die Spitze des Zauberstabs wunderbar - wenn man den richtigen Zauberspruch weiß. Nein, man muss nur wissen, wo drücken. Die Batterie habe ich am rechten Ende des Banners versteckt, das ich unten auf den schwarz eingefärbten Bereich geklebt habe und auf dem sich ein weiterer Text aus dem Stempelset befindet. 
Oh, und sorry für den Hintergrund unter der Karte. Ich musste in die hinterste Ecke unter meinem Schreibtisch kriechen um das Leuchten einfangen zu können. ;)

I know, I've already shared a LED card with Rudolph only a little ago - but with this sorcerer it seemd so perfectly fitting that I had to make another one. And so the tip of the wand is lightning - if you know the right spell. Well, of course not. You only need to know where to press on the card. I've hidden the battery under the end of the banner that I've glued onto the black background. The saying that I've stamped onto it means "you're magical". 
Oh, and sorry for the background underneath the card - it's the floor in my room. To catch the shine of the light I had to take the pic in the darkest spot underneath my crafting table. ;)


Eine Halloween-Verpackung


 Hallo Ihr Lieben!
Heute zeige ich Euch eine Halloween-Verpackung. Das war mal eine Bastelei einfach so, weil mir danach war. Ich war in einem Geschäft - natürlich wegen etwas ganz anderem - und bin über Lutscher mit "Knochenhänden" als Lutscherstiel gestolpert. Die mussten natürlich mit, natürlich mit dem Hintergedanken, sie zu verbasteln.

Hello everyone!
Today I am sharing a Halloween treat I made. It was something I made just for fun because I felt like it. I was in a store - of course looking for something completly different - and came across those lollipops with boney arms and hands as the stick. I just had to buy them, crafting in mind.


Ich habe einfach eine oben offene Box aus schwarzem Cardstock gewerkelt und passend verziert. Die Ränder der Box habe ich mit weißer Stempeltinte etwas eingefärbt. Vorne auf die Box kam ein orange hinterlegter Text von SU, den ich weiß auf schwarzen Cardstock embosst habe.

I've made a simple container, open top, from black cardstock and decorated it. I've used white ink to ink up the edges of the box. To the front I've glued a piece of black cardstock, matted orange, onto which I've white heat embossed a saying by SU.


Hinten an die Box habe ich einen ausgestanzten halben Baum von Penny Black und einen Grabstein von Cuttlebug geklebt. Bei der Grabsteinstanze, die schon uralt ist, ist auch ein passender Embossingfolder dabei. Ich habe ihn aus hellgrauem Cardstock gestanzt, nach dem Embossen die Ränder mit Distress Oxide Hickory Smoke und Black Soot eingefärbt und mit einem schwarzen Fineliner noch ein paar Risse dazugemalt. Die de-bossten Stellen mit dem Totenkopf und dem RIP habe ich mit einem weißen Gelmarker gefüllt und auf den Stein einen der Texte aus dem Graveyard Situation Stempelset von MFT gestempelt.
Für den Spuk-Charakter habe ich hier dann noch drei der süßen Geister aus dem Little Boo Agenda Stempelset von Mama Elephant aufgeklebt und mit gelber Kreise den Lichtschein der Kerze auf den Grabstein gemalt. Oben hinter die Zweige habe ich dann noch einen Vollmond gesetzt. Dafür habe ich einfach einen Kreis aus gelbem Cardstock gestanzt und mit Copics ein paar Krater aufgemalt.

To the back of the box I've glued a die cut half tree by Penny Black and a gravestone by Cuttlebug. The gravestone die, that's really an old one, comes with a matching embossing folder. I've die cut it from light grey cardstock, after dry embossing I've inked the edges with Distress Oxide Hickory Smoke and Black Soot and used a black Sharpie to add a few cracks. I've used a white gelly marker to fill the de-bossed areas (skull and RIP) and stamped a text from the Graveyard Situation by MFT onto the stone.
To add some spookyness (is that a word) I've added three of the ghosts from the Little Boo Agenda stamp set by Mama Elephant and used yellow chalk to add the shine of the candle to the gravestone. Behind the tree branches I've also added a full moon. I've simply die cut a circle from yellow cardstock and used my Copics to add a few craters to it.

Die Box habe ich dann mit hoher schwarzer Spitze und weißem Cheesecloth ein wenig ausgekleidet und den Lutscher hineingesteckt, so dass es so aussieht, als würde die Hand aus dem Grab kommen. Der Lutscher ist eigentlich einzeln eingepackt, weil das aber blöd ausgesehen hätte, habe ich ihn ausgepackt, mit Frischhaltefolie umwickelt und so in die Box gesteckt. Wird ja nicht schlecht so.

I've filled the box with some large black lace and white cheesecloth and put the lollipop inside it. Now it looks like the hand is coming out of the grave. The lollipops are wrapped individually but that didn't look that good. So I've un-wrapped it, wrapped just the candy itself with cling film and put it in the box like that. It can't get rotten, right?


Dienstag, 1. Oktober 2019

Kaffee-Roulette


Hallo Ihr Lieben!
Heute spielen wir Kaffee-Roulette! Und zwar mit dieser Karte, die ich heute auf dem Stamping-Fairies Blog zeige. 

Hello everyone!
Let's play some coffee roulette! We can do it with this card that I'm sharing over at the Stamping-Fairies Blog today. 

Ich hatte das Say it in a Starburst Stempelset von MFT vor mir liegen und da fielen mir diese Dreh-Pfeile ein, die seit Ewigkeiten bei mir im Schrank lagen. Da könnte man doch..., dachte ich mir. Kombiniert habe ich das Set mit dem Sweater Weather on Safari Stempelset und herausgekommen ist diese Karte.
Farblich bin ich mit der Karte nicht ganz so glücklich, aber irgendwie hat es sich so ergeben. 
Für den Hintergrund habe ich auf cremefarbenes Designpapier zuerst die gefüllten Kaffeebohnen mit orangefarbener Tinte abgestempelt, dann die Linien-Kaffeebohnen mit brauner Tinte darüber gestempelt. Dabei bin ich absichtlich nicht extrem genau vorgegangen, denn mir gefällt der Look. Zwischen die Kaffeebohnen habe ich dann noch ein paar der kleinen Kaffeebecher gesetzt.
Der süße Elefant und das Zebra sind mit Copics coloriert. Dem Elefanten habe ich den Kaffeebecher in die Hand gegeben, wäre ja gemein, wenn nur das Zebra was abbekommen würde!

I had the Say it in a Starburst stamp set laying on my desk and then those spinner arrows that I had in a drawer for ages came to my mind. Well, you could... I thought. Combining the stamp set with the Sweater Weather on Safari stamp set I've ended up with this card.
Colorwise I'm not really happy with this one, but somehow that's how it went. 
For the background I've stamped the filled in coffee beans with orange ink onto some cream colored cardstock, then stamped the outline coffee beans on top with brown ink. I didn't care too much that the lines in the middle go on top of each other because I liked this look better. Between the coffee beans I've added some coffee cups.
The cute elephant and the zebra are colored with Copics. I've given the elephant a cup of coffee as well. It wouldn't be fair if only the zebra gets one!


Und hier nun das Roulette. Und ja, es geht drum, wer zahlt!
Ich habe den Strahlenkreis schwarz auf weißen Cardstock gestempelt und mit einer Kreisstanze ausgestanzt. In die einzelnen Felder habe ich dann abwechselnd you und me gestempelt, auch farblich unterschiedlich. Um in einer Kreislinie zu bleiben, habe ich die Extraordinaire Circle Schablone darüber gelegt und mit am Rand der Schablone orientiert. Das You und Me ist mit einem der Stempel aus dem Piles of Fun Stempelset gemacht. Die passten nicht nur von der Größe her perfekt, es gab im Set auch einen Stempel, bei dem das You ganz am Anfang, und das Me ganz am Ende stehen. Das machte das Stempeln ganz einfach. 
In die Mitte des Kranzes habe ich einen Streifen aus hellgelbem Cardstock geklebt. Auf den habe ich ein This one is on... gestempelt. Dafür habe ich einen Stempel aus dem Gift Card Greetings Stempelset benutzt. Eigentlich lautet der Text hier This one's on me. Ich habe einfach erst das This one abgestempelt, den Streifen ein wenig verschoben damit in der Mitte Platz für den Drehpfeil ist. Dann habe ich das This One nochmal eingefärbt und vor dem Abstempeln einfach die Tinte von TH und dem E bei One weggewischt, schon passte der Text. Die Punkte sind mit einem Stift per Hand dazugemalt.

An here's the Roulette. And yes, it's about who's going to pay!
I've stamped the rays circle onto white cardstock and cut it out with a circle die. Then I've stamped You and Me into the single areas, using different colored ink as well.  To keep the words in line with the circle I've used the Extraordinaire Circle stencil, put it on top of the cardstock and used the outline of the stencil as a guideline for stamping. The You and Me is made using one of the stamps from the Piles of Fun stamp set. The words did not only fit perfectly in size but there was one saying with the You at the very beginning and the Me at the end of it. And that made stamping the words really easy. 
Across the circle I've upt a piece of light yellow cardstock onto which I've stamped a This one is on... I used one of the stamps from the Gift Card Greetings for this. It originally says This one's on me. But I simply stamped the This one onto my strip of cardstock, then moved it bit to the left to leave room for the spinner arrow. Then I've inked up the This one again and removed the ink from the TH and the E before stamping - and voilà, the saying fit. The dots are added by hand.

Also, lasst uns spielen.

So, let's play.

Tja, es sieht so aus, als würde ich Euch allen zwei Runden Kaffee schulden... ;)

Seems like I owe you all two cups of coffee... ;)


Sonntag, 29. September 2019

Eine kleine Hexe...


 Hallo Ihr Lieben!
Ab morgen gibt es die Oktober-Neuheiten von Scrapbook Forever. Ich zeige Euch heute schon mal eine Karte mit Stempeln eines der Sets. Ich finde die kleine Hexe im wahrsten Sinne des Wortes zauberhaft!

Hello everyone!
The october release by Scrapbook Forever will be available tomorrow. Today I am giving you a sneak peek with this card that I've used stamps from one of the sets. I just love this little witch!

Für die Karte habe ich den Hintergrund mit Distress Oxide Shaded Lilac, Chipped Sapphire, Hickory Smoke und Black Soot gestaltet. Die Terrassentür ist mit einer Fensterstanze von Joy Crafts gemacht. Den Bereich hinter dem Fenster habe ich ausgeschnitten und mit schwarzem Carstock hinterlegt.

For the card I've created a background using Distress Oxide Shaded Lilac, Chipped Sapphire, Hickory Smoke and Black Soot. The door is made using a cutting die by Joy Crafts. I've cut out the area behind the door and put some black cardstock behind it.


Hier ist die süße Hexe mit ihrem schwarzen Kater. Die Motive sind mit Copics coloriert, ausgeschnitten und mit 3D Tape auf den Hintergrund aufgeklebt.

Here's the cute witch with her black cat. The images have been colored with Copics, cut out and glued onto the background with dimensionals.

Aber was wäre eine Hexe, wenn sie nicht zaubern könnte?

What's a witch that can't do magic?


Natürlich kann das die Hexe auf meiner Karte. Und mit einem einfachen Zauberspruch fallen glitzernde Sterne draußen vor dem Fenster zu Boden.

Of course my witch can. And with a simple spell she's letting glittering stars tumble down to earth in front of her window.

Hier seht Ihr die Karte nochmal mit gezauberten Sternen. Hinter der Karte befindet sich ein einfacher Slider. Zieht man am Tab unten an der Karte, fährt das schwarze Cardstockteil nach unten und gibt den Blick auf die Funkelsterne frei. Für die Sterne habe ich den Sternenregenstempel aus dem Stempelset Ein kleiner Wunscherfüller mit silber-glitzerndem Embossingpulver auf den Hintergrund embosst.
Oh, und den Text, den ich einfach ins Fenster hineinragen habe lassen, findet Ihr auch im neuen Zauberset.

Here you get a look at the card with the stars showing. There's a simple slider mechanism included in this card. When you pull the tab at the bottom of the card the plain piece of black cardstock slides down and reveals the one with the stamped on stars. The stars have been heat embossed using a glittery silver embossing powder.
The saying is glued down so it overlaps with the window and means "magical moments".


Samstag, 28. September 2019

Stempeleinmaleins - Ausgabe vom 28. September 2019


Hallo Ihr Lieben!
Beim Stempeleinmaleins haben wir heute eine neue Sketch-Inspiration für Euch. Und das ist meine Umsetzung dazu.

Hello everyone!
Over at Stempeleinmaleins we have another sketch inspiration for you. And this is my take on it.

Ich habe mir das Bookworm Stempelset von Mama Elephant gegönnt. Das finde ich einfach zu süß! Und weil die Stempel eingeweiht werden wollten, habe ich meine Karte rund um das Thema Buch, Lesen, Text aufgebaut.
Zu bunte Karten sind ja nicht so meins. Ganz monochrom wollte ich aber auch nicht bleiben. Also habe ich mir ein Designpapier ausgesucht - hier türkisblau mit aufgedrucktem Text, und diese Farbe mit Grau sowie Schwarz und Weiß kombiniert.
Unten auf der Karte habe ich ein aus schwarzem Cardstock gestanztes Happy mit weißem Untergrund aufgeklebt. Dafür habe ich ein Stanzenset von Sizzix verwendet.

I recently bought the Bookworm stamp set by Mama Elephant. It's just too cute! And since the stamps wanted to see some color I've made a card about books, reading, texts. 
I have a hard time making too colorful cards but didn't want to go completly monochrome. So I went through my designer's papers and found this turquoise-blue one with a printed on text. I've picked the turquoise and combined it with greys, black and white.
To the bottom of the card I've glued a die cut happy, cut from black carstock and with some white matting. I've used a die by Sizzix here.


Und hier sind nun die süßen Motive. Die riesigen Brillen finde ich einfach klasse! Hier habe ich gleich 8 Stempel aus dem Set verwendet. Sie sind teilweise an-/aufeinander maskiert. Ich habe alle ausgeschnitten und mit 3D Tape aufeinander gesetzt. Der Bücherstapel ist eine Lage, die Bücher mit Hase und Schwein eine zweite und all die Tiere auf dem Buch die dritte. Da ich, wie gesagt, nur Grautöne zu dem Türkis verwenden wollte, ist das Schweinchen hier grau. Aber ich finde es trotzdem süß. 
Aus dem Hintergrundpapier habe ich einen Kreis ausgestanzt und die Ränder mit weißem Gesso bestrichen. Dann habe ich es weiß hinterlegt und auf das Hintergrundpapier geklebt.  
Der Text ist aus dem Stempelset Our Story von MFT. Ich habe ihn auf zwei Banner aus schwarzem Cardstock weiß embosst, weiß hinterlegt und ebenfalls mit 3D Tape aufgeklebt. 
Zum Schluss habe ich noch ein paar türkisfarbene Enamel Accents auf der Karte verteilt, alles schwarz gemattet und auf eine weiße Grundkarte geklebt.

And here are the cute images. I just love their huge glasses! Here I've used 8 different stamps from the set. Partly they are stamped together, doing some masking. I've cut all of them out and used dimensionals to put the scene together. The stacked books are one layer, the standing books with the bunny and pig another one and the last one is made of all those animals on the open book. As mentioned I only combined greys with the turquoise, so also the piggy is grey. But I still think he's a real cutie.
I've die cut a circle from the designer's paper and put some white Gesso onto the edges. Then I've matted it white and glued it onto the card.
The saying is from the Our Story stamp set by MFT. I've white heat embossed it onto two strips of black cardstock, matted them white and glued them onto the card using dimensionals again.
In the end I've added some turquoise Enamel Accents, matted the whole panel black and glued it onto a white card base.


Donnerstag, 26. September 2019

Eine Box zu Halloween


 Hallo Ihr Lieben!
Mir war schon wieder nach Halloween - und so zeige ich heute diese Box auf dem Kulricke-Blog.

Hello everyone!
I felt like doing some Halloween crafts again - and so I am sharing this box over at the Kulricke Blog today.


 Ich habe hier die Schoko-Ei Box aus schwarzem Cardstock gestanzt und mit der kleinsten der Nesting Rectangle Small Stanzen ein Fenster in die Vorderseite gestanzt. Außen habe ich die Box ein wenig mit weißer Tinte betupft, innen habe ich Designpapier mit Zickzack-Muster in Halloween-Farben aufgeklebt.

Here I've used a box die and cut it from white cardstock. I've added a small rectangle cut out off the front as a window. I've used a white ink pad on the outside of the box and glued some designer's paper with a zig zag pattern in Halloween-ish colors to the insides.


Vorne habe ich die Box mit dem kleinen Zauberer aus dem Stempelset Felix Zauberhaft Minis sowie dem kleineren der Kürbisse dekoriert. Eigentlich hat der Kürbis ja die Skyline von Köln als Gesicht. Da ich selbst mit Köln jetzt  nicht so viel zu tun habe, habe ich diesen Teil des Stempels einfach herausgeschnitten und stattdessen ein traditionelles Halloweengesicht per Hand dazugemalt. 
Hinter Felix und Kürbis habe ich noch das Gras aus dem Schattenbox Stanzenset geklebt.
Gefüllt ist die Box übrigens mit einem Lutscher mit tollem Knochenhand-Stiel sowie ein wenig Cheesecloth.

To the front of the box I've glued this little magician penguin and a Jack-O-Lantern. This one originally has the skyline of Cologne as the face. Well, I am in no way connected to Cologne so I've simply cut out this part of the stamp and handdrew a traditional Jack-O-Lantern face. 
Behind the pumpkin and the penguin I've added some grass, cut from yellow cardstock.
By the way, the box is filled is a lollipop with a wonderful spooky boney hand stick and some cheesecloth.


Oben an die Verschlusslaschen habe ich noch das Wort Boo auf einem Banner geklebt. Dafür habe ich das ABC Banner Stanzenset benutzt, das gleichzeitig Banner und Buchstaben stanzt. Die Buchstaben-Ausschnitte habe ich mit demselben Designpapier hinterlegt, das ich auch für die Verkleidung der Innenseiten verwendet habe. 
Um die Box zu schließen habe ich durch die Löcher in den Laschen ein Stück orangefarbenes Garn gezogen und zur Schleife gebunden.

To the front top flap I've glued the word boo on a banner. I've used the ABC Banner dies by Kulricke which die cuts banners and letters at the same time. Behind the letter cut outs I've glued some of the same designer's paper I've also used to cover the inside of the box.
To close the box I've put some orange twine through the holes in the flaps and tied it to a bow.