Donnerstag, 16. Juni 2022

Maritimer Bär


 Hallo Ihr Lieben!
Heute wird es wieder maritim hier auf dem Blog. Denn heute habe ich eine weitere Karte mit dem Matrosen Set aus dem Juni-Release von Stampcorner für Euch. Dieser süße Bär ist nämlich auch im Set enthalten. Und der wollte natürlich auch auf eine Karte. Und die zeige ich heute auf dem Stampcorner Blog.

Hello everyone!
We're going maritime again today. Because I have made another card using the maritime stamp set from the june release by Stampcorner. This cute bear is included in this set as well, and of course I wanted to make a card with him. And this card I'm sharing over at the Stampcorner Blog today.

Als Hintergrund habe ich diesmal einen Bogen aus dem Paper Pack 04 von Stampcorner benutzt. Das ist türkisfarben mit weißem Ankerdruck. Und türkis-braungelb finde ich auch eine spannende Kombi. Das Papier habe ich dunkelgrau gemattet und auf einen weißen Kartenrohling geklebt.

For the background I used a sheet from the Paper Pack 04 by Stampcorner. It's turquoise with white anchors printed all over. And I think, turquoise and yellowish-brown is a great color combo, too. I've matted the paper dark grey and glued it onto a white note card.


Und hier seht Ihr den süßen Bär genauer. Ich habe ihn mit Copics coloriert und anschließend ausgeschnitten. Dann habe ich ihn in einen Polaroid-Rahmen, gestanzt aus weißem Cardstock, gesteckt. Den restlichen Ausschnitt des Rahmens habe ich mit einem Bogen aus dem Paper Pack 02 hinterlegt und anschließend alles ebenfalls grau gemattet.
Unten auf den Rahmen habe ich ein Papierschiffchen und ein gestempeltes Ahoi geklebt - beides ebenfalls aus dem Stempelset. 
Auf der rechten Seite habe ich aus gelbem Cardstock mit einer Stanze von CraftEmotions gestanzte Rohrkolben hinter den Rahmen gesetzt. Die Kolben habe ich mit Copics braun eingefärbt.
Anschließend habe ich aus dem selben gelben Cardstock drei Sterne in unterschiedlichen Größen ausgestanzt und sie hinter dem Polaroid angeordnet. Der mittlere Stern ging irgendwie komisch in die Rohrkolben über, deswegen habe ich einen kleineren Stern aus dem grau-weiß gestreiften Designpapier geschnitten und ihn auf den gelben Stern geklebt. So passte das besser.
Da mir das Ahoi allein zu wenig Text war, habe ich noch zwei Stempel aus dem Set Kleine Worte verwendet und sie mit Versafine Clair Morning Mist, das ich auch zum Stempeln des Wortes Ahoi benutzt habe, auf schmale Streifen weißen Cardstocks gestempelt. Die habe ich oberhalb des Polaroids auf die Karte geklebt.
Zum Schluss habe ich dann noch grau-holografische Pailetten von Simple and Basic auf der Karte verteilt. 

And here you get a better look at the cute bear. I colored him with Copics and cut him out. Then I glued him into a polaroid frame, die cut from white cardstock. I covered the rest of the inner part of the frame with a piece of cardstock from the Paper Pack 02 and then matted the polaroid again with dark grey cardstock.
To the lower part of the polaroid I've attached a paper boat and a stamped ahoy - both again from the same stamp set.
Onto the right side I've put some cattails, die cut from yellow cardstock using a die by CraftEmotions. I colored the upper parts in a dark brown with my Copics.
Then I've die cut three stars in different sizes from the same yellow cardstock and tucked them behind the frame. There really wasn't any contrast between the cattails and the middle sized star so it looked kind of weird. I've cut another star from the grey and white striped patterned paper and glued that on top of the yellow star. Now I liked it way better.
Since just the ahoy wasn't enough text for my taste, I've stamped two little greetinsg, meaning best wishes from the heart, stamping them with Versafine Clair Morning Mist onto strips of white cardstock and glued those abbove the polaroid. I had also used that ink to stamp the ahoy.
For decorations I added some grey holographic sequins by Simple and Basic to my card.

Mittwoch, 15. Juni 2022

Create a Smile Moodboard Challenge


Hallo Ihr Lieben!
Was, schon wieder zwei Wochen vergangen? Das bedeutet ja, dass heute eine neue Create a Smile Challenge startet. Dieses Mal wieder mit einem tollen Moodboard:
 
Hello everyone!
What, another two weeks have passed again? That means, that today the new Create a Smile Challenge goes live. For this fortnight we have another great moodboard for you again:
 
Im April-Release gab es ja den tollen Desert-Stencil. Und den wollte ich unbedingt verwenden. Und die Idee zu meiner Karte war recht schnell da.

There was the great Desert stencil  included in the april release, that I wanted to use. And the idea for the card popped up pretty quick in my head.


Und als ich dann den "Hut ab" Text im Lama-Set entdeckt hatte, stand für mich fest, dass ich einfach eine interaktive Slider Card mit "davonfliegendem" Hut machen musste. Oben seht Ihr die Karte in Aktion.

And after I had seen the "hats off" text included in the Llama Set I just knew I had to make an interactive slider card. You can see it in action on the GIF above.


Ich habe die Farben des Moodboards aufgegriffen und mich dabei vor allem von dem Sonnenuntergang am Meer Bild inspirieren lassen. Diesen Sonnenuntergang habe ich dann in die Wüste versetzt.
Ich habe den Desert Stencil für die Sonne, die Gräser und die Hügelkette verwendet. Den Himmel samt Sonne habe ich mit Distress Oxide Antique Linen, Mustard Seed, Saltwater Taffy, Seedless Preserves und Wilted Violet gewischt, die Hügelkette mit Wilted Violet und Black Soot. Mit Black Soot habe ich dann auch die Gräser auf den Wüstenboden gewischt.
Nur auf dem oberen Bereich des Himmels habe ich dann einige kleine Wassertropfen sowie kleine weiße Sprenkel verteilt.

I picked up the colors in the moodboard and got mostly inspired by the sunset at the sea picture and transfered this sunset into the desert.
I used the Desert stencil to create the sun, the grass and the hillside border. I used Distress Oxide Antique Linen, Mustard Seed, Saltwater Taffy, Seedless Preserves and Wilted Violet for the sky and sun and Wilted Violet and Black Soot for the hills and ground. I also used the Black Soot to ink the grass onto the ground.
I spritzed some tiny drops of water and some small white speckles only onto the upper area of the sky. 


Alles Motive auf meiner Karte sind aus dem Hut Ab Stempelset. Das Lama, die Steine, die Kakteen und natürlich der Sombrero sind alle mit Copics coloriert, mit einem weißen Gelstift habe ich die Details hinzugefügt. 
Hinter der Karte versteckt sich ein Slider aus einem Streifen Folie. Zieht man oben am fast unsichtbaren Tab, dann geht dem Lama der Hut hoch.... Natürlich nur im positiven Sinn! Die Motive sind mit unterschiedlich dickem 3D Tape auf die Karte geklebt. 
Und eigentlich hatte meine Szene hier schon fertig, aber dann fiel mir noch der süße kleine Schnurrbart ins Auge und ich konnte einfach nicht anders, als dem Lama den auch noch zu verpassen. Ich finde den einfach zum Piepen!
 
All images on my card are from the Llamazing stamp set. The llama, the stones, the cacti and of course the hat are all  colored with Copics, then I added some details and highlights with a white gel pen. 
I included a slider element in the card, made from a strip of acetate. If you pull the nearly invisible tab at the top of the card, the hat flies up in the air and gives the llama free sight. I've glued all images onto the card using foam tape in different thicknesses.
And I had already finished my scene here when the cute small mustache included in the stamp set catched my eye. I just couldn't resist to glue it into the llama's face. I just love it!


Mein ursprünglicher Plan war, den Text unten auf der Karte anzubringen. Aber dafür hatte ich den Himmel zu "lang" gewischt. Also habe ich ihn kurzerhand nach oben versetzt. So passt auch die Partydeko hier viel besser, finde ich.
Auch die weiß embossten Texte sind aus dem Hut Ab Stempelset. Bei dem unteren habe ich das Wort Fiesta, das eigentlich gestempelt wird, durch ein gestanztes Party ersetzt. Dafür habe ich das Wort mit der Party Mono Stanze einmal aus weißem Cardstock gestanzt und mit den selben Farben, die ich auch für den Himmel verwendet habe, gewischt, diesmal allerdings oben hell und unten dunkel. So setzt er sich gut vom Himmel ab. Zusätzlich habe ich das Wort noch 4 mal aus schwarzem Cardstock gestanzt. Drei davon habe ich aufeinander- und dann die gewischte Lage zuoberst geklebt. Das letzte schwarze Stanzteil habe ich dann ein wenig versetzt aufgeklebt, so dass ein Schatten entstanden ist. So hebt sich das Wort noch besser vom Himmel ab. 
Für die Deko kamen nochmal der Sombrero sowie das Banner, das eigentlich das Lama schmückt, zum Einsatz. 

My original plan was, to put the text onto the bottom of the card. But for that I had made the sky too large. So I changed my mind and put it at the top of the card. That way the party decorations look more in place, too.
Also the white embossed texts are from the Llamazing stamp set. I replaced the word fiest, that the stamp would have stamped, with a die cut party word. I've die cut that with the Party Mono die from white cardstock and then used the same colors, that I had used to ink up the sky, to ink up the word, just starting light at the top and dark at the bottom here. This way it is better visible in the sky made with the same colors. Then I've die cut the word four more times from black cardstock. I've stacked three of them and used the inked up word as the top layer. The fourth black die cut I glued down a bit off to create a shadow effect. Now it's even better visible on the background.
As decorations I used the hat again and also the banner, that originally decorates the llama.

Dienstag, 14. Juni 2022

LawnFawnatics Challenge #126


Hallo Ihr Lieben!
Nach einigen Wochen komme ich endlich dazu, mal wieder eine Karte für die LawnFawnatics Challenge zu machen! Momentan könnte jeder Tag 40 Stunden haben und er wäre immer noch zu kurz. Und so bin ich einfach nicht dazu gekommen. Aber jetzt! Das Thema lautet Beach VS Mountains. Man soll eine Karte mit dem bevorzugten Urlaubsziel Strand oder Berge machen. Natürlich geht auch beides. Bei mir fiel die Entscheidung da nicht schwer - ich liebe den Strand und mag die Berge so gar nicht. Da fühle ich mich immer eingeengt. Da ist die Weite am Meer schon etwas ganz anderes! Und so ist diese Karte mit Meeresszene entstanden.
 
Hello everyone!
After several weeks I finally managed to get a card for the LawnFawnatics Challenge done! Right now even a 40 hour day would still be too short to get everything done. And so I simply didn't find the time. Until now! The theme is Beach VS Mountains. Make a card referring your preferred vacation destination, beach or mountains. Well, both works as well. For me the decision was pretty easy. I love the beach and don't like the mountains, I always feel kind of caged in there. All the open space at the beach is what I need and want. And so I made this card with a beach scene.

Basis für die Karte bildet ein weißer Kartenrohling, um die komplette Szene herum habe ich einen der Stitched Rectangle Frames, gestanzt aus hellblauem Cardstock, als Rahmen gesetzt.

I used a white note card as my card base and later put one of the Stitched Rectangle Frames, cut from blue cardstock, on top of my scene to frame it.


Ich habe auf meiner Karte 3 Lagen - plus Rahmen - jeweils mit 3D Tape aufeinander gesetzt.
Im Hintergrund befindet sich ein Stück Cardstock mit Himmel und Sonne. Dafür habe ich den Sunburst Backdrop aus weißem Cardstock gestanzt, mit Distress Oxide Squeezed Lemonade, Tumbled Glass und Mermaid Lagoon gewischt und ein paar Wassertropfen darauf verteilt. Von diesem Stanzteil habe ich nur etwa die Hälfte verwendet, so dass die Sonne am oberen Rand meiner Karte sitzt.
Unten habe ich dann türkisfarbenen Cardstock aufgeklebt, den ich mit einer der Slimline Simple Stitched Hillside Stanzen ausgestanzt habe - der bildet natürlich das Meer. 
Auf dem Meer schwimmt ein Segelschiff aus dem Stempelset Lovable Legend und direkt auf den Himmel habe ich noch eine kleine Insel aus dem Plan On It Stempelset aufgestempelt. 
Die nächste Lage bilden ein paar Palmen. Dafür habe ich den Tropical Backdrop aus weißem Cardstock gestanzt, auch die einzeln im Set enthaltenen Palmenteile. Die habe ich mit Copics coloriert und dann auf die Palmen im Rahmen geklebt. Um den eigentlich querformatigen Hintergrund an meine hochformatige Karte anzupassen, habe ich ihn einfach mittig geteilt und dann auf den Hintergrund aufgeklebt. Da der untere Teil der Karte komplett überdeckt ist, sieht man die Quer"strebe" unten gar nicht, oben ist sie später unter dem Rahmen versteckt. 
In der Palme rechts sitzt noch ein Papagei aus dem Set Ahoy Matey.

I created 3 layers - plus the frame - on my card, glueig them on top of each other with foam tape.
In the background there's a piece of cardstock with the sky and sun. I've cut the Sunburst Backdrop from white cardstock, inked it up with Ditress Oxide Squeezed Lemonade, Tumbled Glass and Mermaid Lagoon and then put a few droplets of water on top of the ink. I only used about half of this die cut, so I was able to move the sun to the top of my scene.
To cover the lower area of my card I cut a piece of turquoise cardstock with one of the Slimline Simple Stitched Hillside dies and glued it down to create the ocean.
On the sea there's sailing a boat from the Lovable Legend stamp set and I stamped a tiny island from the Plan On It set directly onto the sky.
The next layer is made from a few palm trees. I've cut the Tropical Backdrop from white cardstdock, also the individual palm tree pieces from the set, and colored them with Copics and glued them onto the palm trees in the frame. To make the landscape frame fit my portrait card I simply cut the frame apart at the top and bottom and then glued them on to the background, letting the frame pieces overlap. Since the bottom of my card is completly covered I was able to hide the bottom frame area there, the top frame overlap is covered by the frame around the scene later.
I also put a parrot from the Ahoy Matey stamp set onto the palm tree on the right. 


Star meiner Karte sind natürlich die Katzen aus dem Simply Celebrate Critters Stempelset. Die hängen über einen verwitterten Bretterzaun am Strand und laden uns ein, sie am Strand zu treffen. Dafür haben sie mit weißer Farbe extra eine Nachricht auf die Bretter geschrieben! Na hoffentlich gibt das keinen Ärger... ;)
Für den Zaun habe ich ein mittelgraues Stempelkissen leicht über ein Stück hellgrauen Cardstock gezogen und dann mit weißer Tinte den Woodgrain Backdrop darüber gestempelt. Das Cardstockstück habe ich dann in gleich breite Streifen geschnitten und mit einem Streifen dahinter verbunden. Auf die Bretter habe ich dann mit dem Quinn's Capital ABC Stempelset die Buchstaben für das Wort Beach weiß aufembosst und mit einem weißen Gelstift ein paar Farbtropfen von den Buchstaben herunterlaufen lassen. 
Quer über das aufgestempelte Beach habe ich noch ein Stück grauen Cardstock geklebt, auf dem der Text "sea you at the" aufgestempelt ist. Dafür musste ich ein wenig in die Trickkiste greifen. Ich habe verschiedene Worte - und im Fall von sea und at sogar nur Wortteile - aus den Stempelsets Plane and Simple und Reveal Wheel Holiday Sentiments mit schwarzer Tinte aufgestempelt. Auf dem Schild und auch auf den Latten am Zaun habe ich dann mit einem grauen Fineliner noch kleine Punkte als Nägel aufgemalt. 
Die süßen Katzen sind wieder mit Copics coloriert. Einer der Katzen habe ich die Taucherbrille aus dem Pool Party Set aufgesetzt, eine andere trägt die Sonnenbrille aus dem selben Stempelset. Dann habe ich sie ausgeschnitten und hinter den Zaun geklebt. 
Vor dem Zaun liegt schon jede Menge Sand. Ich habe ein Stück kraftfarbenen Cardstock wellenförmig ausgestanzt und dann mit den Sandy Beach Accents Stanzen einige Schlitze hineingestanzt. Dann habe ich dem Sand mit Copics und einem weißen Gelstift Struktur verliehen. 
In die kleinen eingetanzten Sandhügel habe ich dann den Schwimmring und den Wasserball aus dem Set Pool Party und einige Muscheln aus dem Set On the Beach gesteckt. Und dort steht auch noch der Farbeimer mit der weißen Farbe samt Pinsel - beides aus dem Set Chirpy Chirp Chirp -, mit dem die Katzen das Wort Beach auf den Zaun geschrieben haben.
Ganz zum Schluss habe ich dann mit einem weißen Gelstift noch einige Akzente, wie z. B. die Reflektionen auf dem Wasser, aufgemalt.

Of coursse the cute cats from the Simply Celebrate Critters stamp set are the stars of my card. They are looking over a weathered wooden fence, inviting us to meet them at the beach. They even wrote a message onto the fence with white paint. I really hope they don't get in troube for that! ;)
For the fence I lightly dragged a middle grey ink pad over a piece of light grey cardstock and then stamped the Woodgrain Backdrop on top, using white ink. I then cut the piece of cardstock into even strips and connected them with a small cardstock strip that I glued onto the back. Onto the individual wood boards I white heat embossed the letters for the word beach, using the Qinn's Capital ABC stamp set, then used a white gel pen to add a few drips of paint dripping down from the letters.
Above the word beach I glued a small strip of cardstock, onto which I've stamped the "sea you at the" part of the text. I had to do some thinking outside the box for that. I used different words - and in case of the sea and the at even only parts of words - from the Plane and Simple and the Reveal Wheel Holiday Sentiments stamp sets and stamped them down with black ink. Onto the "sign" and also the boards of the fence I added a few nails, simply making dots with a dark grey fineliner.
The cute cats are again colored with Copics. One of the cats is wearing the goggles from the Pool Party stamp set, another one is wearing sunglasses from the same stamp set. I cut the cats out and glued them behind the fence.
In front of the fence there's already lots of sand. I've cut the top edge of a piece of craft colored cardstock in a wavy shape, then die cut a few slits with the Sandy Beach Accents into the cardstock. To make the cardstock look like sand I added some structure with Copics and a white gel pen.
I put the intertube and the ball from the Pool Party stamp set and a few sea shells from the On the Beach set into the slits. And that's also where the cats left the can of white paint and the brush, both from the Chirpy Chirp Chirp stamp set, that they used to write the word beach onto the fence.
In the end I used a white gel pen to add a few white accents, like the reflections on the water.

Montag, 13. Juni 2022

Wenn der Chef in Pension geht....

 
Hallo Ihr Lieben!
Wenn der Chef in Pension geht, dann mag so mancher froh darüber sein. Wenn der Chef aber auch ein Freund ist, dann gönnt man ihm die Pension natürlich, ist aber auch ein wenig traurig darüber. Wobei gleich gesagt werden darf, dass der "Neue" dem "Alten" in nichts nach steht. Aber eine besondere Karte darf es dann doch sein. Und die zeige ich Euch heute.

Hello everyone!
When the boss retires some might be glad about it. But when said boss is also a good friend, then of course you're happy for him but also sad to see him leave. But I can say that the new boss is as good as the old one. Well, of course this needed a special card. And that I'm sharing with you today.
 
Ich habe hier eine Trifold Slimline Card gemacht. Sie ist aus weißem Cardstock gewerkelt und mit dunkelblauem Cardstock beklebt. 
Für die aus weißem und matt silbernem Cardstock gestanzten Buchstaben habe ich das Impact Alphabet Stanzenset von MFT benutzt, der auf weißen Cardstock gestempelte Text ist von SU. Rund um das Wort habe ich kleine silberne Sternchen geklebt und außerdem einen Rahmen mit einem weißen Gelstift aufgemalt. 
Und im unteren Bereich geht es mit dem Dienstfahrzeug ganz schnell in den Ruhestand. 
 
I made a trifold slimline card here. Its base is made from white cardstock and I glued some dark blue cardstock on top.
For the letters, die cut from white and matte silver metallic cardstock, I used the  Impact Alphabet die set by MFT, the rest of text stamped onto white cardstock is by SU. The text means "as a farewell". I glued some small silver star shaped sequins around the text and also added a frame with a white gel pen around the whole front.
And on the bottom of the card the chef is heading as fast as possible into retirement.


Das Auto lässt sich natürlich mit einem Slider Mechanismus über die Karte ziehen. In den Slider habe ich außerdem einen Stromkreis eingebaut, der das Blaulicht auf dem Dach des Autos blinken lässt.

Of course the car can be moved across the card with a slider mechanism. I also added a circuit to the slider to make the light on top of the car blink.


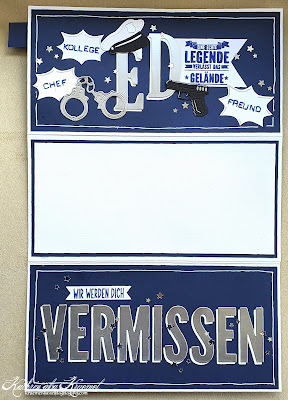
Öffnet man die erste Lage der Karte, dann sind zwei dekorierte Panele zu sehen.

When you open the top layer of the card you get to see two decorated panels.


Um ein einheitliches Bild zu kreieren, habe ich alle Lagen mit blauem Cardstock beklebt. Außerdem finden sich überall die sternchenförmigen Pailetten und der weiße Rahmen.
Hier auf dem obersten habe ich dann den Namen des Chefs, dekoriert mit dem ehemaligen Arbeitsmaterial. Der Text aus dem Stempelset Rente von Stampcorner passte hier einfach perfekt. Ich habe ihn auf ein Banner aus weißem Cardstock gestempelt und unter dem D festgeklebt. Für den Namen, der doch recht kurz ist, habe ich ein Alphabetset von SU verwendet, das war größer und füllte somit mehr der Karte aus. 
Außerdem habe ich kleine Comic-Blasen mit den Worten Chef, Kollege und Freund in blau bestempelt und die mit auf dem Cardstock verteilt.

To get a uniform look I covered all layers on the card with blue cardstock. I also added the star shaped sequins and the white frames to all the layers.
Hier on the top layer I glued down the letters for the boss' name and put some of the work material around it. Next to the D I glued down a bannner, cut from white cardstock, onto that I had stamped a "a real legend is leaving" text, stamped with blue ink. Since the name is really short I used a alphabet die set by SU to cut the letters. Those are larger and fill up more of the card panel.
I also stamped the words boss, colleague and friend with blue ink onto some comic bubbles and glued those around the name.


Die hier untere Lage ist die, die bei komplett geöffneter Karte nicht sichtbar ist. 
Hier habe ich wieder mit dem Impact Alphabet Stanzenset die Buchstaben für das Wort Pension gestanzt und dabei das O durch einen gestanzten Polizeistern ersetzt. 
Auch hier ist der Text aus dem Stempelset Rente von Stampcorner. Ich habe ihn wieder mit blauer Tinte abgestempelt und dabei die eigentlich vier-zeilige Anordnung in zwei-zeilig abgeändert. Die beiden Cardstockstreifen habe ich dann ober- und unterhalb des gestanzten Wortes aufgeklebt.

This now bottom layer is the one that won't be visible when the card is opened completly.
I used the Impact Alphabet die set again to die cut the word retirement and used a die cut police badge as an O here.
The stamped text here means "old enough to leave, young enough to enjoy the free time". I used blue ink again to stamp the text onto two strips of white cardstock and then glued those above and under the die cut word.


Und so sieht dann die komplett geöffnete Karte aus. Im mittleren weißen Bereich ist Platz für persönliche Worte und Unterschriften.

And this is the completly opened card. In the white middle section there's room for a personal message and the signatures.


Auf der untersten Lage habe ich dann noch ein "wir werden Dich vermissen" untergebracht, wieder aus einer Kombi aus Stempeln - hier aus dem Stempelset Eule von Stampcorner - und gestanzten Buchstaben gemacht.

Onto the bottom layer I've written a "we're going to miss you" text, again made with a combination of stamps and die cut letters.

Sonntag, 12. Juni 2022

Eine Box zum 40. Geburtstag

 
Hallo Ihr Lieben!
Ich wurde mal wieder um eine Explosionbox zu einem 40. Geburtstag gebeten - und hier ist sie.

Hello everyone!
Once again I was asked to make an explosion box for a 40th birthday - and this is it.

Ich habe die Box aus weißem Cardstock gewerkelt. Die Seitenteile der Box sind jeweils mit grauem Designpapier mit Holzmuster beklebt. Auf den Seiten habe ich dann erst ein Stanzteil, gemacht aus weißem Cardstock mit der Delightful Digits Stanze von TheGreetery aufgeklebt. Das musste ich von der Größe her natürlich an die Größe meiner Box anpassen, wodurch der Rahmen außenrum verloren ging ung einige Zahlenteile einzeln waren. Die habe ich dann einfach wieder an ihren Platz zurück geklebt.
Auf jeder der Seiten befindet sich ein Wellenkreis aus schwarzem Cardstock, darauf ein Kreis aus rotem Cardstock und darauf jeweils eine 40, gestanzt mit den Bold Numbers von TheGreetery aus goldenem Cardstock. Außerdem habe ich hier jeweils ein paar goldene Perlen mit aufgeklebt.

I've made the box from white cardstock. The sides of the box are all decorated the same: I glued some grey patterned paper with a wood pattern onto them. On top I glued a number background, die cut from white cardstock with the Delightful Digits die by TheGreetery. I had to make this fit my box sizewise, which meant I had to cut off the frame around the numbers, so a few pieces fell off. I simply glued those back into place.
Then I attached a scalloped circle cut from black cardstock, a smaller circle cut from red cardstock and on top a 40. These were die cut from golden mirror cardstock with the Bold Numbers dies by TheGreetery. I also added a few golden pearls here.


Auch der Deckel ist aus weißem Cardstock gemacht und mit demselben Designpapier beklebt. 
In der Mitte befindet sich hier eine große Geburtstagstorte. Als Unterlage dafür habe ich ein weißes Doily benutzt. Vor dem Doily habe ich ein rundes rotes Banner aufgeklebt, auf das ich mit weißem Embossingpulver einen Geburtstagsgruß aufembosst habe. 
Auch hier habe ich wieder goldene Perlen als Deko verwendet.

Also the lid is made from white cardstock and covered with the same patterned paper.
In the center there's a large birthday cake. I glued a white doily onto the lid to place the cake on top. In front of the doily I glued down a red, half round banner, onto that I've white heat embossed a birthday greeting.
Again I added some golden pearls as decoration.


Und hier ist die Geburtstagstorte - aus hellem Teig, mit Fruchtfüllung und dickem Schokoladenüberzug. Oben auf der Torte befinden sich Sahnetupfer mit Herzdeko und natürlich die Geburtstagskerze. Anzünden sollte man die in diesem Fall aber lieber nicht. 
Die Torte ist aus Cardstock gewerkelt, den Schoko-Drip habe ich mit einer Stanze von MarthaStewart gemacht. Für die Sahnetupfer habe ich Plusterfarbe in weiß benutzt und nach dem Aufpuffen die Herzdeko darauf geklebt.

And here's the birthday cake - a light dough with some fruit filling and a thick layer of chocolat. 
On top of the cake there are some cream puffs and of course the birthday candle. You shouldn't light up this one, though.
The cake is made from cardstock, the edge of the chocolat drip is made with a punch by MarthaStewart. For the cream puffs I used some puff paint and after puffing it up I glued the heartshaped confetti on top.


Und so sieht die geöffnete Box aus.

And this is the opened box.


Verschenkt wurde ein Brunch-Gutschein. Also habe ich ein Cafè in der Mitte der Box eingerichtet.
Der Boden ist wieder mit dem Designpapier mit Holzmuster beklebt, an den Wänden habe ich farblich passendes Designpapier als Tapete aufgeklebt. Ich gebe zu, mein Cafè ist nicht gerade das modernste, aber es hat sich beim Basteln einfach so ergeben. Und zumindest finde ich es gemütlich. 
Auf die beiden aufstehenden Wände der Box habe ich Fenster aufgeklebt. Durch die sieht man den Himmel und die Skyline einer Stadt. Außerdem habe ich hier den Namen des Cafès auf die Scheiben foliert - äh weiß aufembosst. Dafür, sowie für einige der Teile auf dem Tisch, habe ich das Stempelset Coffeeshop von HoneybeeStamps verwendet. 
Innen an die Fenster habe ich dann rote Vorhängemit goldenen Vorhangstangen gehängt.
Und am Boden der Box steht noch ein Schild, dass einen Brunch für 10.00 Uhr ankündigt. 

With the box they were giving away a voucher for a brunch together. So I created a cafè in the center of my box.
The ground is again covered with the patterned paper with the wood pattern, onto the walls I've put some patterned paper in a matching color as a wallpaper. I have to admit, this cafè isn't the most modern one I've seen, but that's just how it turned out while I was making it. And at least it looks cozy, don't you agree?
Onto the two standing sides of the box I've glued windows. You can see the sky and the skyline of a city through them. And onto the windows I've written - em, white heat embossed - the name of the cafè. For this logo and also some of the accessoires on the table I've used the Coffeeshop stamp set by HoneybeeStamps.
I also hung up some red curtains with golden rods.
And on the ground there's a sign, saying there will be a brunch today at 10 am.


In der Mitte der Box steht schon ein gedeckter Tisch. Dort stehen neben Kaffees, Tellern und einer Blumenvase auch schon mal Sektgläser bereit. 

In the center of the box there's a table. Besides some cups of coffee, plates and a flower vase there are also four glasses of champagne ready to be emptied.


In die Taschen der beiden anderen Seiten der Box habe ich einmal ein Kärtchen mit einem aufgeklebten Wort Gutschein gesteckt und einmal ein Kärtchen für persönliche Grüße und die Unterschriften der Schenkenden.
Das Wort Gutschein ist mit der Gutscheinstanze von Stampcorner aus rotem und schwarzem Cardstock gestanzt, versetzt aufeinander und dann auf das Kärtchen geklebt.
Der Text auf der anderen Karte ist ebenfalls mit Stempeln von Stampcorner gemacht - einmal mit dem Set Kleine Worte und dann dem Stempel Lasst die Korken knallen. Bei dem habe ich den wegspringen Sektkorken weggelassen und außerdem die Anordnung der Worte verändert. 
Als Deko habe ich auf beiden Kärtchen wieder goldene Perlen aufgeklebt.

In the pockets of the two other sides of the box I've put two little cards - one with a glued on voucher word and one for some personal words and for the people giving away the box to sign.
The word voucher is die cut from red and black cardstock, stacked and then glued onto the card.
The text on the other card means "It's your birthday - uncork the champagne". 
Onto both of these cards I glued some golden pearls again as embellishments.

Donnerstag, 9. Juni 2022

Karte zum Ruhestand


 Hallo Ihr Lieben!
Heute habe ich noch eine Karte zum Ruhestand zu zeigen - momentan brauche ich da einige von. Tja, was macht man da? Motivtechnisch tue ich mich da oft echt schwer. Aber dann kam das Stempelset Nur kein Stress von Stampcorner zwischen die Finger. Und so ist die Idee zu dieser Karte entstanden, die ich heute auf dem Stampcorner Blog zeige.

Hello everyone!
Today I have another retirement card to share - I need quite a few of these in the coming weeks. Well, what to make? Sometimes I find it really hard to decide on an image or design. But then I came across as stamp set by Stampcorner and the idea for this card, that I'm sharing over at the Stampcorner Blog today, was born. 

Hier habe ich ein Stück weißen Cardstocks schwarz gemattet und auf einen weißen Kartenrohling geklebt. 
Im oberen Bereich habe ich mit einem Blending Brush etwas Distress Oxide Tumbled Glass aufgewischt und dann das Opaque White von Copic mit einem Pinsel darüber gespritzt. Den unteren Teil der Karte habe ich weiß gelassen.

Here I matted a piece of white cardstock black and glued it onto a white note card.
I used a blending brush and Distress Oxide Tumbled Glass to lightly ink the upper part of my card blue, then flicked some of the Opaque White by Copic onto it with a small brush.
 

 Die süße Schildkröte aus dem Stempelset Nur kein Stress... ist mit Copics coloriert. Die hat so einen tollen gelangweilten Gesichtsausdruck! Um sie noch chilliger zu machen, habe ich ihr außerdem ein aus dem Mund hängendes Gänseblümchen verpasst. Coloriert habe ich mit Copics in verschiedenen Grüntönen und die Schildkröte anschließend ausgeschnitten.
Als Rahmen für die Schildkröte habe ich die Magic Iris Tropical Leaves Add-On Stanze von LawnFawn aus grünem Cardstock gestanzt und dann von innen her mit Distress Oxide Peeled Paint und Forest Moss schattiert. Die weißen Details auf der Schildkröte und dem Blätterkreis sind mit einem weißen Gelstift gemacht.
Hinter die Schilkröte habe ich dann noch das Schild aus dem neuen Stempelset Rente von Stampcorner gesetzt. Da das Schild eigentlich in die andere Richtung zeigt, habe ich es zweimal gestempelt, einmal nur den Pfahl und einmal das Schild ausgeschnitten und das Schild dann auf den Kopf gedreht wieder auf den Pfahl geklebt. Darauf habe ich dann das Wort Ruhestand gestempelt und auch das Schild mit Copics coloriert. Und so läuft die Schildkröte dann auch in die richtige Richtung.

This cute turtle is from the Nur kein Stress... stamp set and colored with Copics. I love the bored look on her face! To make her look even more chilled I also added a little flower, hanging from her mouth, to the image. I did the coloring with Copics in different shades of greens and then cut the turtle out.
As the frame for my turtle I've die cut the Magic Iris Tropical Leaves Add-On by LawnFawn from green cardstock and then shaded it from the center with Distress Oxide Peeled Paint and Forest Moss. For the white details on the turtle and the leaves I used a white gel pen. 
Behind the turtle I've added a sign saying "retirement". The sign oringally shows in the opposite direction. So I stamped the image twice. used the stem from one and the sign from the other one. I cut both out and glued the sign upside down onto the stem. I stamped the word retirement onto it and then colored the sign with Copics. Now the turtle is moving into the right direction.


Da ich das Chill-Kröten Wortspiel so toll fand, habe ich es auf meiner Karte integriert. Ich habe die Buchstaben für das Wort Chill mit dem Handletter Uppercase Alphabet von CraftEmotions aus schwarzem Cardstock und einem Bogen Designpapier ausgestanzt und beide jeweils leicht versetzt aufeinander geklebt. Diese Buchstaben habe ich dann unterhalb des Blätterkranzes auf die Karte geklebt. Da die Blätterspitzen unter den Buchstaben gestört haben, habe ich sie im unteren Bereich des Kranzes gerade weggeschnitten.
Unterhalb des Wortes Chill habe ich ein Kröte direkt auf die Karte gestempelt. Dafür habe ich den hinteren Teil des eigentlichen Chillkröte-Stempels aus dem Set Nur kein Stress.... verwendet.
Und darunter kam ein weiterer Stempel aus dem Set Rente zum Einsatz. Der enthält eigentlich noch zwei weitere Zeilen, mir haben aber nur diese beiden zur Schildkröte besser gefallen. Deshalb habe ich nur diese beiden abgestempelt und dann die schwarze Linie darunter einzeln wieder dazugestempelt, so dass der Text auch einen passenden Abschluss hat.

I just loved the Chillkröte pun so I included it in my design. We call a turtle Schildkröte in german, which sounds pretty similar to chillkröte. I've die cut the letters for the word chill with the Handletter Uppercase Alphabet die set by CraftEmotions from both black cardstock and some patterned paper. Then glued the black letters behind the ones cut from patterned paper as a shadow and glued them under the leaves frame onto the card. Since the tips of the leaves were kind of disturbing under the letters I cut the bottom of the leaves circle straight.
Under the word Chill I stamped the word kröte directly onto the white cardstock. And to finish my text on this card I stamped a "old enough to leave" text onto the bottom of the white cardstock.

Dienstag, 7. Juni 2022

Wünsche werden Wirklichkeit

 
Hallo Ihr Lieben!
Ich habe wieder einen der Mini-Stempel von Create a Smile getauscht. Und wie schon letztes Mal, wollte ich auch diesmal eine passende Karte mit dem Stempelchen mitschicken. Ich habe die Lotusblüte getauscht - und da kam mir die Idee zu dieser Karte.

Hello everyone!
Again I've swapped one of the mini stamps by Create a Smile. And like last time I wanted to send a matching card with the stamp. I had a double of this flower - and it inspired me to make this card.

Äh, muss bei der kleinen Blume noch jemand ganz spontan an Biene Maja denken? Ich habe keine der neuen Folgen gesehen, aber bei den alten drehten sich im Abspann Seerosen mit den verschiedenen Charakteren darin und schwammen davon. Das kam mir beim Basteln der Karte ganz plötzlich wieder in Erinnerung! So, jetzt aber zur Karte selbst.
Ich habe hier erst die grünen Hügel mit Distress Oxide Mowed Lawn auf ein Stück Aquarellcardstock gewischt. Der Himmel darüber ist mit Tumbled Glass gemacht, für das Wasser habe ich Mermaid Lagoon und Salty Ocean verwendet. 
Auf den Himmel habe ich einige kleinen Wolken, gemacht mit den Weather Stanzen von Create a Smile, geklebt.
Später habe ich den Hintergrund schwarz gemattet und auf einen weißen Kartenrohling geklebt.

I first inked the grassy hills with Distress Oxide Mowed Lawn onto a piece of watercolor paper. The sky above it is made with Tumbled Glass, for the water I've used Mermaid Lagoon and Salty        Ocean.
I glued a few small white clouds onto the sky, cut with the Weather die cut set by Create a Smile.
Later I matted the background with black cardstock and glued it onto a white note card.


Auf den gewischten Hintergrund habe ich dann das Wort Wünsche aus dem Stempelset Wunschkonzert sowie die Seerosen mit schwarzer Tinte abgestempelt und darunter mit einem vollflächigen Stempel die Spiegelungen mit dunkelgrauer Tinte auf das Wasser gestempelt. 
Mit einem nassen Pinsel habe ich dann die Distress Oxide Farbe aus den gespiegelten Seerosen wieder abgenommen und dann alle Blumen mit ZIG Markern coloriert. Da das Blau des Wassers nicht komplett abnehmbar ist, wirkt die Spiegelung der Blüten noch echter, finde ich.
Mit der Desert Stencil habe ich dann noch das Gras mit Rustic Wilderness ans Ufer und mit weniger Farbe auch als Spiegelung aufs Wasser gestencilt. 
Auf die einzelnen Motive und Elemente habe ich dann mit Polychromos noch einige Details gemalt, wie z. B. einige dunkle Striche in die Grasbüschel.
Der Rest des Textes ist dann direkt auf das Wasser gestempelt.
Mit einem weißen Gelstift habe ich noch etwas Bewegung auf die Wasseroberfläche gemalt. Außerdem habe ich die Spiegelung des Worts Wünsche etwas verwischt. Dafür habe ich einfach zuerst leicht mit einem mittelgrauen Polychromo das Wort nachgefahren und habe das Grau dann mit einem farblosen Polychromo nach links und rechts verwischt.
Und weil am See ja doch immer ein paar Tiere unterwegs sind, habe ich noch die Biene und den Schmetterling aus dem Set Heute wird Gut abgestempelt, coloriert, ausgeschnitten und auf die Karte aufgeklebt.

Onto the inked up background I stamped the large word and the water lillies with black ink and used a solid stamp to stamp the reflections of the word and flowers onto the water. The text on this card means "wishes do come true".
I used a wet brush to pick up the Distress Oxide from the mirrored flowers and then colored all flowers with ZIG markers. Since the blue from the mirrored flowers doesn't come off completly, I think the reflections look even more realistic.
With the Desert stencil I added some grass to the shore line and - with less ink - also onto the water surface.
 I used polychromos to add some fine details, like a few darker strokes onto the grass.
With a white gel pen I added some lines across the water to add some movement to it and I also made the mirrored word a bit blurry. I simply used a middle grey Polychromo and covered the mirrored word with those, then used a colorless Polychromo, going over the word from left to right.
And since there are always a few animals at a lake I stamped the little bee and butterfly from the Good Day stamp set, colored them, cut them out and glued them onto the scene.

Samstag, 4. Juni 2022

Stempeleinmaleins - Ausgabe vom 4. Juni 2022

 
Hallo Ihr Lieben!
Es ist wieder Samstag und somit Stempeleinmaleins-Zeit! Diesmal haben wir für Euch die Anleitung für diese Blockkarte.

Hello everyone!
It's saturday again and that means, it's time for Stempeleinmaleins! This week we have the tutorial for this block card for you.


Die Kartenfront besteht aus sechs Quadraten. Ich tue mich immer schwer, die Bereiche auf solchen Karten individuell zu gestalten. Und so habe ich hier zwar Quadrate aus pinkfarbenem Designpapier mit weißen Punkten auf meinen Grundkarte aus hellgrünem Cardstock geklebt, darüber dann aber ein großes Blumenmotiv gesetzt. Blumen - wen wunderts! Aber momentan mag ich die so gerne.
Hier habe ich das Stempelset Radiant von PennyBlack verwendet. Ich habe das große Motiv mit der FadeOut Tinte von InkOn3 gestempelt, die beiden Blüten oben angefügt und dann alles mit Copics coloriert. Für die feinen Details habe ich dann zu Polychromos gegriffen. Ein paar Spritzer weißer Acrylfarbe durften über dem Motiv nicht fehlen. Anschließend habe ich das Motiv per Hand ausgeschnitten und dabei auch die vielen kleinen Bereiche im Inneren des Motivs mit ausgeschnitten. Die Arbeit war es wert, denn so sieht man doch das Designpapier im Hintergrund etwas besser. Aufgeklebt ist das Motiv mit 3D Tape.
Für den Text habe ich das thanks mit einer Stanze von MFT einmal aus hellgrünem, viermal aus weißem Cardstock gestanzt und alle Lagen aufeinander geklebt, die grüne natürlich zuoberst. Dann habe ich per Hand einen passenden Schatten aus weißem Cardstock geschnittenund alles mit 3D Tape auf das Motiv geklebt. Ergänzt habe ich den Text dann mit einem gestempelten many, mit einem Stempel aus dem Set Itty Bitty Birthdays von MFT schwarz auf weißen Cardstock gestempelt. Das habe ich über das thanks aufgeklebt.
Als Deko habe ich einige hellgrün-irisierende Perlen um das Motiv verteilt.

The card front is made from 6 squares. I always have a hard time decorating those individually. And so I glued squares of a pink patterned paper with white dots onto the card base, made from light green cardstock. And then I placed a big flower image on top of it. Flowers - anyone surprised? But I just love them so much at the moment....
Here I used the Radiant stamp set by PennyBlack. I stamped the large image with the FadeOut ink by InkOn3 and added the two flowers to the top. ThenI colored the image with Copics, added some details with Polychromos and spritzed some white acrylic paint over the image. I've fuzzy cut the image and also took the time to cut out all the white spaces inbetween the different parts of the image. It definately was worth the time and effort because now you get glimpses of the patterned paper through those little cut outs. I glued the image onto the card with foam tape.
For the text I've die cut a thanks using a die by MFT - once from light green and four times from white cardstock. I've stacked those, of course putting the green one on top, then cut a matching shadow from white cardstock by hand. Again I used foam tape to glue the word onto the flowers. To finish the text I've black stamped a little many from the Itty Bitty Birthdays stamp set by MFT onto white cardstock and glued it above the thanks.
For decorations I added some light green iridescent pearls around the image.


Hier seht Ihr die dreidimensionale Form und die Abstufungen der Karte besser. Sie steht übrigens problemlos von selbst.

Here you get a better look at the different steps of the card top and also the dimensionality. By the way, the cards stands on its own perfectly.


Das ist die Rückseite meiner Karte. Ich habe sie sehr ähnlich zur Vorderseite gestaltet, hier aber nur einen Teil des großen Motives verwendet. So war genug Platz für einen etwas größeren Text. Das you ist wieder mit einer Stanze von MFT gemacht und genauso gestapelt wie auch das thanks auf der Vorderseite. 
Der gestempelte Text ist diesmal aus dem Anything but Basic Friendship Set, ebenfalls von MFT.

This is the back of my card. I decorated it pretty similar to the front, but only used part of the large flower image here. That left room for a larger saying. The you is again made with a die by MFT and stacked exactly like the thanks on the front.
The stamped parts of the text here are from the Anything but Basic Friendship stamp set, also by MFT.


Und falls Ihr Euch nun fragt, wie man diese Karte denn versenden soll - sie lässt sich ganz einfach flach zusammenlegen und passt so in einen ganz gewöhnlichen Briefumschlag...

And in case you're wondering how this card could be mailed - it can easily be folded flat and then fits into a regular envelope....

Donnerstag, 2. Juni 2022

Lots of Love from me to you

 
Hallo Ihr Lieben!
Seit gestern gibt es das Juni-Release von Stampcorner, und darunter ist auch ein neues Set mit maritimen Motiven von Growi Design. Und eines dieser Motive hat es auf diese Karte geschafft, die ich heute auf dem Stampcorner Blog zeige.

Hello everyone!
The june release by Stampcorner is available since yesterday, and one of the new stamp sets comes with maritime images designed by Growi Design. One of them made it onto this card, that I'm sharing over at the Stampcorner Blog today.

Bei einer meiner letzten maritimen Karten hatte ich ja angekündigt, statt blau-weiß mal etwas rot mit zu verwenden. Gesagt, getan! Okay, viel rot, kombiniert mit etwas grau und weiß. Aber die Kombi gefällt mir auch richtig gut!
Für den Hintergrund habe ich einen der Bögen aus dem Paper Pack 02 von Stampcorner zugeschnitten, schwarz gemattet und auf einen weißen Kartenrohling geklebt. Zuvor habe ich noch etwa schwarze Acrylfarbe darauf gespritzt. 
Für den Kreis habe ich ein weiteres Designpapier aus dem selben Paper Pack verwendet und auch den schwarz gemattet. Der bildet den Hintergrund für mein Motiv. Ich habe ihn links etwas über den Kartenrand überhängend aufgeklebt und den Überstand weggeschnitten.

When I shared one of my last maritime cards here on the Blog I already mentioned that I wanted to try to add some red to the usual blue and white color combo that I always seem to use for this type of cards. Well, I did it! Okay, maybe it's lots of red with just a bit of white and grey. But I really like this color combo!
For the background I used one of the papers from the Paper Pack 02 by Stampcorner, cut it down, matted it black and glued it onto a white note card. Before I flicked some black acrylic paint mixed with a bit of water onto it.
For the circle I used another paper from the same paper pack and matted it black as well. This is the background for my image. I glued it down hanging a bit over the left edge of the card and then trimmed off the overhang.


Und hier ist der goldige Hase aus dem neuen Set! Ich habe ihn mit Copics in weiß und rot coloriert und finde, die Farbe steht ihm wundervoll! 
Da er mit den Händen ein Herz formt, habe ich mich dafür entschieden, ein großes Love als Text über die Karte zu setzen und das O durch den Hasen zu ersetzen. Ich habe die Buchstaben mit der Heartfelt Love Stanze von MFT aus rotem Cardstock gestanzt und die schwarze Mattung per Hand geschnitten. Und beim Hervorholen der Wortstanze, fiel mir dieser Zaun in die Hand, der aussieht, als wäre er aus Treibholz gemacht. Also habe ich den auch aus verwendet. Er ist aus weißem Cardstock gestanzt und hinter das Wort samt Hasen geklebt. Dann habe ich alles auf den Kreis und auf die Karte geklebt.
Seht Ihr die süßen kleinen Zweige mit den herzförmigen Blättern zwischen den Buchstaben? Die sind ebenfalls aus dem neuen Set. Ich habe sie mit roter Tinte abgestempelt, per Hand ausgeschnitten und auf die Buchstaben geklebt. Das selbe habe ich mit den Herzen gemacht, die zwischen den beiden Ohren des Hasen in der Luft schweben.
Um meinen Text zu komplettieren, habe ich zwei Stempel von LawnFawn benutzt. Sie sind aus den Sets Offset Saying Christmas und Special Delivery. Ich habe sie jeweils mit weißem Embossingpulver auf schwarzen Cardstock embosst, ausgeschnitten und mit 3D Tape über und unter dem ausgestanzten Wort aufgeklebt.
Zum Schluss habe ich auf den Buchstaben und dem Motiv noch Highlights mit einem weißen Gelstift hinzugefügt.

And here's the cute bunny from the new set. I colored him with Copics and reds and light greys and think, those colors suit him perfectly!
Since he's forming a heart with his hands I decided, to add a bit die cut love all across the card as my text, replacing the O with the bunny. I used the Heartfelt Love die by MFT to die cut the letters from red cardstock and then cut the black matting by hand. And when I pulled out this word die, I came across this fence die, that looks like the fence is made from driftwood. So I decided to use this as well. I've die cut it from white cardstock and glued it behind the word and the bunny. Then I glued everything onto the circle and card.
Have you seen those cute little branches with heartshaped leaves? Those are also from this new set. I stamped it with red ink onto white cardstock, fuzzy cut them and then attached them onto the letters. I did the same with the little hearts, floating between the bunny's ears.
To complete my text I used two stamps by LawnFawn. They are from the sets Offset Saying Christmas and Special Delivery. I've white heat embossed them onto strips of black cardstock and glued them above and under the die cut word.
In the end I added some highlights to the image and letters, using a white gel pen.

Mittwoch, 1. Juni 2022

Create a Smile Sketch Challenge

 
Hallo Ihr Lieben!
Heute startet eine neue Create a Smile Challenge - die erste im Juni! Ist es nicht verrückt, wie schnell die Zeit rennt? Und wie Ihr es Euch sicher schon gedacht habt, gibt es diesmal wieder einen Sketch für Euch.

Hello everyone!
A new Create a Smile Challenge starts today - the first one in june. Isn't it crazy how time flies? As you might already guessed it, this time we have a new sketch for you.


Ich liebe es, nach den Sketchen von Create a Smile zu arbeiten. Sie lassen so viel Platz für eigene Ideen und Spielraum und inspirieren mich einfach immer. Diesmal ist diese Karte danach entstanden:

I love to work with their sketches. They leave so much room for my own ideas and freedom for my own interpretation. This time the sketch inspired me to make this card:


Ich wollte unbedingt die tollen Schmetterlinge aus dem Stempelset Butterflies verwenden. Die waren dann aber ein wenig zu groß, also habe ich kurzerhand eine Slimline Card gemacht, um alle vier auf der Karte unterzubringen, ohne dass sie sich gegenseitig stoßen.
Ich habe hier helltürkisfarbenen Cardstock verwendet und mit der Organic Shapes Stencil, die ebenso wie die Schmetterlinge aus dem noch recht frischen April-Release stammen, sowie Distress Oxide Peacock Feathers vier Flecken auf den Cardstock gewischt. 
Mit der zweitkleinsten der Stitched Square Frames Stanze habe ich dann vier Quadrate aus dem selben helltürkis farbenen Cardstock gestanzt, sie auf ihren späteren Platz auf der Karte gelegt und die Flecken darunter so auf die kleinen Quadrate gewischt, dass sie später fortlaufend auf der Karte sind. Dann habe ich die kleinen Quadrate weiß gemattet und mit 3D Tape auf die Karte geklebt. Anschließend habe ich noch weiße Acrylfarbe über die Karte gespritzt.

I really wanted to use those beautiful butterflies from the Butterflies stamp set. But those were a bit too large so I decided to make a slimline card to avoid those poor butterflies colliding in their flight.
I used a piece of light turquoise cardstock here and the Organic Shapes stencil, which is from the not so long ago release april release, as are the butterflies, and Distress Oxide Peacock Feathers to add four splotches of dark turquoise to my cardstock.
I then cut four squares from the same light turquoise cardstock using the second smalles of the Stitched Square Frames dies. I placed those where I wanted them to be on the card later, put the stencil back on and added the parts of the splotches to the squares as well. I wanted the splotches to fit onto the card seemlessly. I matted the little squares white and glued them onto the background with foam tape. Then I spritzed some white acrylic paint over the background.


Die Schmetterlinge habe ich mit der No-Line Tinte von InkOn3 gestempelt und dann mit Copics coloriert. Die Details wie Fühler und Gesicht habe ich dann mit einem schwarzen Fineliner wieder eingezeichnet. Um die Flügel zu verzieren, habe ich die feinen Linien des Motives hier mit einem weißen Gelstift nachgemalt. Außerdem habe ich einen klare Glaze-Pen verwendet und kleine glänzende Punkte auf die Flügel gemalt. Sie sind ganz subtil, glänzen aber wunderbar und lassen die Flügel beim Hin- und Herdrehen der Karte toll gänzen.
Auch die Schmetterlinge habe ich mit 3D Tape auf die Quadrate geklebt.
Da die Karte natürlich recht groß ist, brauchte ich noch einige zusätzliche Elemente, um die Karte zu füllen. Deswegen habe ich mit zwei der Wolken-Stanzen aus dem Weather Stanzenset Wolken aus weißem Cardstock und Vellum gestanzt und um die Quadrate herum aufgeklebt. Dann habe ich noch einige Herzen mit der Herz-Stanze aus dem DinLang Postage Stanzenset aus dunkler türkisfarbenem Cardstock gestanzt und um die Wolken herum aufgeklebt.

The butterflies are stamped with the no-line ink by InkOn3 and then colored with Copics. I used a black fineliner to add the details like the faces and antennas after I had finished the coloring. To decorate the winges I used a white gel pen to re-draw the fine details the images have but that weren't visible due to the no-line coloring. I also used a clear Glaze pen to add a dotted pattern to the wings. Those are hardly visible, but when the card gets moved they give the wings a beautiful shine.
I glued the butterflies onto the squares with foam tape again.
Since the card is quite big I needed some additional elements to fill it. So I used two of the cloud dies from the Weather die set and cut clouds from white cardstock and vellum. I glued those down around the squares. I also die cut some hearts from some darker turquoise cardstock, using a die from the DinLang Postage die set, and glued those down between the clouds.


Auf der rechten Seite befinden sich zwei weitere Schmetterling, mehr Wolken und Herzen. Und hier ist auch der Text meiner Karte untergebracht. 
Ich habe den oberen Teil des Textes mit einem der Stempel aus dem Set Dicke Freunde und weißem Embossingpulver auf die Karte embosst. Das Wort Sommer im Stempel habe ich dabei abgedeckt und dann durch ein gestanztes Wort ersetzt. Dafür habe ich das Lemon Alphas Stanzenset benutzt. Die Buchstaben sind wunderbar klein, um auch größere Worte auf eine Karte zu bringen, ohne dass sie diese komplett ausfüllt. Außerdem liebe ich die Schattenstanzen zu den einzelnen Buchstaben. Ich habe die Buchstaben aus dem dunkler türkisfarbenen Cardstock, die Schatten aus weißem Cardstock gestanzt. Nach dem Aufeinanderkleben habe ich dann die Buchstaben wieder mit 3D Tape auf die Karte geklebt.

On the right side of the card there are two more butterflies, together with more clouds and hearts. And I also added my sentiment on this side.
I white heat embossed one of the texts from the Best Bugs stamp set, masking the last word of the text when stamping it so I could replace it with a die cut one.  I've die cut the letters with the Lemon Alphas die set. I love the size of these, you can wonderfully create some longer words without them filling the whole card. And of course I love the shadow die that's included for each letter. I've die cut the letters from the darker turquoise cardstock that I had also used for the hearts and some white cardstock for the shadows. After I glued the letters onto their shadow I used foam tape again to glue the letters onto the card.


Zum Schluss habe ich dann noch meinen dekorierten Cardstock mit dem dunkler türkisfarbenen Cardstock gemattet und beides auf eine weiße Slimline-Karte geklebt.

In the end I matted my decorated cardstock with the darker turquoise cardstock and glued everything onto a white slimline card base.