Freitag, 15. September 2023

MFT 2023 Card Design Superstar - Clean and Simple

 
Hallo Ihr Lieben!
Heute zeige ich Euch noch meine Clean and Simple Karte, die ich für den 2023 MFT Card Design Superstar Contest gemacht habe. 
Das war die erste Karte, die ich dafür gemacht habe. Man möchte meinen, weil CaS am einfachsten ist. Aber für mich ist es, ehrlich gesagt, die schwerste Kategorie. Ich weiß einfach nicht, wann genug ist. Vor kurzem habe ich festgestellt, dass es für mich nur funktioniert, wenn ich mir ein zeitliches Limit gebe. Hier waren es 45 Minuten - die Trockenzeit und das Heraussuchen der Stempel etc. nicht mit eingerechnet. 

Hello everyone!
Today I am sharing the last card I made for the 2023 MFT Card Design Superstar contest - it's for the Clean and Simple category.
It was actually the first card I made for the contest. You might think because CaS is the easiest of the three categories. But for me it's the hardest. I never know when to stop. Recently I found out, that CaS only works for me, when I put myself on a time limit. Here it was 45 minutes, not counted the drying time and picking out the stuff I wanted to use.

Wie hier in Bayern sind ja die letzten, die mit der Schule wieder starten - am Dienstag war es soweit. Ich habe keine schulpflichtigen Kinder mehr, aber ich denke, all das "1. Schultag" in den Läden, der Werbung, dem Radio hat mir irgendwie inspiriert, eine "back to school" Karte zu machen.

We here in Bavaria are the last ones to re-start school - tuesday was the day. I don't have kids in school anymore, but I think all the "1st day of school" stuff and themes in the shops, the adds and the radio somehow inspired me to make a back to school card.


Zuerst habe ich quer auf ein Stück weißen Cardstock zwei Pinselstriche mit roter Tinte aufgestempelt. Dafür habe ich Stempel aus dem Set Abstract Art benutzt. Die sind eigentlich zu kurz - ich habe rechts den hinteren Teil der Striche nochmal aufgestempelt und die Nahtstelle später mit dem Motiv überdeckt. 
Das Motiv besteht aus Bücherstapel und Apfel - die Motive sind aus dem Set Class Act. Ich habe sie schwarz auf weißen Cardstock gestempelt und bewusst nur den Apfel sowie zwei der Labels auf den Büchern mit Copics rot coloriert. Den Apfel habe ich außerdem mit einer Schicht Glossy Accents überzogen. Dann habe ich alles per Hand ausgeschnitten und mit 3D Tape auf die Karte geklebt.
Mit dem Lines Letters Stempelset und wieder schwarzer Tinte habe ich die Buchstaben A, B und C gestempelt, wieder per Hand ausgeschnitten und mit dünnem 3D Tape etwas wonky links neben dem Bücherstapel befestigt. 
Dann fehlte mir noch ein kleinerer Text. Der ist aus dem Itty Bitty Baby Stempelet und weiß auf schwarzen Cardstock embosst. Den Streifen habe ich dann wieder mit dünnem 3D Tape aufgeklebt.
Als Deko hatte ich dann zuerst nur die fünf kleinen schwarzen Glitzersteine angebracht. Und dann habe ich beschlossen, noch vier Kreise mit aufzukleben. Die habe ich mit den Mechanismus-Stanzen aus dem Interactive Swing Stanzenset aus schwarzem Cardstock gestanzt. Wie gut, dass dann die Zeit fast um war, ich hätte da schon wieder weitere Ideen gehabt....

First I stamped two brush strokes with red ink across a piece of white cardstock. I used stamps from the Abstract Art stamp set here. They are too short for this design - I stamped the end of each stroke a second time on the right side of the cardstock and later covered the area, where the strokes overlap, with my image.
For the image I went with a stack of books and an apple - the images are from the Class Act stamp set. I stamped them with black ink onto white cardstock and on purpose only colored the apple and two of the labels on the books red, using my Copics. Onto the apple I put down a layer of Glossy Accents. Then I cut the images out by hand and adhered them with foam tape to my background.
Using the Lined Letters stamp set and black ink I stamped the letters A, B and C, cut them out by hand again and then attached them with thin foam tape to the left of the books.
Then I needed a sub sentiment. This one's from the Itty Bitty Baby stamp set and white embossed onto black cardstock. I used thin foam tape again to attach the strip.
To deorate my card I started with the five small black rhinestones. And then I decided, I'd like to add four cirles, too. I die cut those from black cardstock using the mechanism dies from the Interactive Swing die set. Luckily those 45 minutes were nearly over by then, because I already had more ideas of what else I can put on this card...


Also habe ich meinen dekorierten Cardstock nur noch mit Designpapier aus dem Black and White Paperpad gemattet und alles auf einen weißen Kartenrohling geklebt.

So I only used some paper from the Black and White paper pad to mat my decorated cardstock and adhered everything to a white note card.

Donnerstag, 14. September 2023

Glücksbringer

 
Hallo Ihr Lieben!
Einen Glücksbringer kann man ja immer gebrauchen, normalerweise sind das aber Schlüsselanhänger, Kuscheltiere oder ähnliches. Ich zeige heute auf dem Stampcorner Blog eine Karte als Glücksbringer.

Hello everyone!
We all need a lucky charm evey now and then, but usually those are key chains, stuffed animales or things like that. Today over on the Stampcorner Blog I am sharing a card as a lucky charm.

Für den Hintergrund habe ich ein Stück weißen Cardstock sowie einen zusätzlichen Streifen verwendet und mit Distress Oxides gewischt. Da ich ein wenig Angst hatte, dass die grüne Farbe, gerade jetzt im Herbst, schnell halloween-ig aussieht, habe ich mich für Cracked Pistacchio, Lucky Clover und Rustic Wilderness entschieden, da sie alle recht viel Blauanteil haben. 
Ich habe schon ewig keinen Bokeh-Hintergrund mehr gemacht, also wurde es mal wieder Zeit. Dafür habe ich, nur auf das größere Cardstockstück, mit weißer Stempelfarbe und einem Stencil Kreise aufgewischt - die größeren schwächer, die kleineren intesiver und die großen teilweise überlappend. Dann habe ich noch den neuen Hintergrund mit goldenem Embossingpulver aufembosst.

For the background I inked a larger piece and a smaller strip of white cardstock with Distress Oxides. I was a bit afraid that the green color, especially now in fall, might look a bit halloween-ey, so I went with Cracked Pistacchio, Lucky Clover and Rustic Wilderness. All of these have more blues than colors like Mowed Lawn or Twisted Citron.
I haven't made a bokeh background in a long time, so it was about time. So I inked circles with white ink and a stencil only onto the larger piece of cardstock - the larger circles quite soft, the smaller ones more intense, letting those smaller ones overlap the larger ones. Then I used gold embossing powder to heat emboss the background onto this piece of cardstock.


Für den großen Text war die neue Glücksbringer-Stanze perfekt. Ich habe sie dreimal aus weißem Cardstock und einmal aus matt-goldenem Metallic Cardstock gestanzt und die Teile aufeinander geklebt. Dann habe ich die Stanze auf den schmäleren gewischten Cardstockstreifen gelegt, die Außenlinien mit dem Bleistift nachgefahren und entlang dieser Linie ausgeschnitten. Rechts und links davon habe ich die Kante des Cardstocks mit einer Grasbordüren-Stanze gestanzt. Nun konnte ich die gestackten Worte auf den Cardstockstreifen kleben.
Kleeblätter und Pilze gelten ja allgemein als Glücksbringer. Der Klee ist aus dem Ernestine Stempelset. Ich habe ihn ebenfalls gold auf weißen Cardstock embosst und dann mit Polychromos etwas coloriert. Dann habe ich die Kleeblätter ausgeschnittenund auf und hinter dem Streifen mit dem Text aufgeklebt. Der Glückspilz ist aus dem Set Coole Pilze. Das Set finde ich klasse, die Pilze haben alle so tolle Gesichter. Dieser hier ist wohl eigentlich eher ein Steinpilz - aber mit den richtigen Farben und ein paar Punkten wird er zum Fliegenpilz. Ich habe ihn mit Copics coloriert und die Punkte und Details mit einem weißen Gelstift aufgemalt. Und irgendwie dachte ich, der Pilz hätte eine Brille auf. Also habe ich die "Brillengläser" mit Glossy Accents überzogen. Erst dann habe ich gemerkt, dass ja der Bügel auf der Nase fehlt und die Brille die Augen sind. Aber das macht nichts, so strahlen sie schön. Auch den Pilz habe ich ausgeschnitten.
Als kleinen Text unter dem gestanzten Wort Glücksbringer habe ich noch einen Text mit Stempeln aus den Sets Kleine Worte und Kleine Worte 2 zusammengesetzt. Dabei habe ich zwischen den Worten viel und Erfolg etwas Platz für die Schleife des g gelassen. Die Texte hier habe ich weiß auf schwarzen Cardstock embosst.

For the large text the new Glücksbringer - lucky charm - die was perfect. I die cut it three times from white cardstock and once from matte gold metallic cardstock and stacked them. Then I put the die onto the smaller inked cardstock piece and drew the outlines onto the cardstock with a pencil, then cut along this line. To the left and right of this line I cut the edge with a grass border die. Now I glued the stacked die cuts onto the cardstock.
Fourleaf clovers and mushsrooms are symbols for lucky charms. The clover is from the Ernestine stamp set. I also gold heat embossed them onto white cardstock and then used Polychromos to color them. Then I cut them out and glued them onto and behind the smaller cardstock strip with the text. The mushroom is from the Coole Pilze stamp set. I love this set, the mushrooms all have such happy faces. I guess this one actually is a porcino, but colored in the right colors and with a few white dots it makes a great lucky charm. I colored him with Copics and used a white gel pen to add the dots. And I somehow thought, he's wearing glasses, so I covered the "glasses" with Glossy Accents. It was just then that I realized that these are actually his eyes, but I don't care, now they have a nice shine. Then I used my scissors to cut the mushroom out, too.
I felt like I needed a little subtext. So I white heat embossed a " thinking of you - good luck" text onto a strip of white cardstock, leaving a gap between the good and luck for the g of the die cut word. 


Ich habe den Cardstockstreifen mit dem Text mit dickem 3D Tape auf den Hintergrund geklebt und den Pilz, versehen mit dünnem 3D Tape, dahinter geschoben. Als Deko habe ich noch drei kleine Herzen aufgeklebt - auf die Idee hat mich ein weiteres der Motive aus dem Pilz-Set gebracht. Zum Schluss habe ich alles schwarz gemattet und auf einen weißen Kartenrohling geklebt.

I attached the cardstock strip with the text with thick foam tape onto the background and put the mushroom, with some thin foam tape on the back, behind it. As decoration I added three little white heart - I got the idea when I looked at another once of the mushroom images from the stamp set. To finish the card, I matted the cardstock black and adhered it to a white note card.

Dienstag, 12. September 2023

Have a flappy fall

 
Hallo Ihr Lieben!
Das letzte LawnFawn Release war ja mal wieder ziemlich umfangreich, und so gibt es noch das ein oder andere unbenutzte Produkt hier. Unter anderem die Winter Birds. Ich bin noch so gar nicht bereit für Winterkarten - die werde ich im Oktober, November, Dezember, Januar und evtl. Februar wohl noch zur genüge machen. Aber ich wollte das Set so gerne einweihen! Da es ja auch im Herbst schon mal so kalt wird, dass man Mütze und Schal gut gebrauchen kann, habe ich die Vögel einfach in den Herbst verlegt. Passt genauso gut!

Hello everyone!
LawnFawn's latest release was once again a huge one and so I still have quite a few products I haven't used yet. Like the Winter Birds. I am so not ready to make winter cards - I know I will make plenty of them during october, november, december, january and most likely also february. But I really wanted to use that set. Since some days in fall are so cold that you can really use a scarf and a warm hat I simply used those birds on a fall card. Works as well!

Der Hintergrund der Karte besteht aus einem grünen und einem blauen Bogen aus dem Spiffy Speckles Paper Pad. Das blaue Papier habe ich rundum mit Distress Ink Speckled Egg, das grüne von unten her it Bundled Sage gewischt. Dann habe ich aus dunkelbraunem Cardstock und aus dem grünen Designpapier die Simple Stitched Tree Border Stanze ausgestanzt und die Bäume vom grünen Papier weggeschnitten. So erhält man einen perfekt passenden Hügel für die Bäume. Dann habe ich beide Lagen aufeinander und anschließend auf das blaue Designpapier geklebt.

The background of this card is made from a green and a blue sheet of the Spiffy Speckles patterned paper pad. I used Distress Ink Speckled Egg to shade the outer edges of the blue paper and Bundled Sage at the bottom of the green paper. Then I die cut the Simple Stitched Tree Border die once from dark brown cardstock and once from the green patterned paper and cut off the trees of the green paper. Now both layers fit on top of each other perfectly and I end up with brown trees and a green hill. I glued both pieces together and then onto the blue paper.


Mir war von vornherein klar, dass ich zusammen mit dem Winter Birds Set unbedingt auch das neue Build a Birdhouse Stanzenset benutzen wollte. Aber ich wollte das Vogelhaus nicht auf einen Pfosten stellen, also brauchte ich einen dicken Ast, an dem ich es aufhängen konnte. Nach ein wenig Überlegen kam mir die Idee, den Leafy Tree Backdrop Landscape Hintergrund zu benutzen, ihn aber zu drehen. So wird aus dem Baum, der mit dieser Stanze gestanzt wird, kurzerhand ein Ast, der quer über die Karte geht. Ich habe den Hintergrund aus hellbraunem Cardstock gestanzt und mit Distress Ink Ground Espresso etwas schattiert. Aus dem Leafy Tree Backdrop Portrait Set habe ich dann noch eine der Blattstanzen benutzt und Blätter aus dunkeltürkisfarbenem Designpapier aus dem Watercolor Wishes Paper Pad gestanzt. Die habe ich dann hinter den Baum/Ast gesetzt.
Als Lage darauf und für den Herbstlook habe ich dann noch den Fall Leaves Backdrop aus weißem Cardstock gestanzt. Da ein kompletter Rahmen zu viel der Szene verdeckt hätte, habe ich die Blätter an der linken, der unteren sowie der untere Hälfte der rechten Kante weggeschnitten und dabei nur unten links in der Ecke zwei Blätter stehenlassen. Dann habe ich sie mit Distress Oxide Antique Linnen, Squeezed Lemonade, Bundled Sage, Speckled Egg und Weathered Wood eingefärbt. Ich weiß, das sind nicht unbedingt die klassischen Herbstfarben, aber ich wollte mal etwas anderes als rot und orange. 

I knew from the start that I wanted to use the new Build a Birdhouse die set with thoe Winter Birds. But I didn't want to put it on a post so I needed a branch large enough to hang the birdhouse onto. After a bit of thinking I got the idea of using the Leafy Tree Backdrop Landscape die and turn it 90 degrees. This way the tree, that the die cuts, becomes a branch that goes all across the card. I die cut it from light brown cardstock and shaded it with Distress Ink Ground Espresso. Then I used one of the leaves die from the Leafy Tree Backdrop Portrait set and cut some leaves from a dark turquoise patterned paper from the Watercolor Wishes paper pad and put those behind the tree/branch.
For the fall look I put the Fall Leaves Backdrop, die cut from white cardstock, on top. Since a complete frame would have covered too much of my scene I used my scissors to cut off the leaves of the left, the bottom and half of the right edge, only keeping two leaves in the bottom left corner. Then I inked them with Distress Oxide Antique Linnen, Squeezed Lemonade, Bundled Sage, Speckles Egg and Weathered Wood. I know, this is not the traditional fall color palette but I wanted something different than the usual reds and oranges.


In der Mitte der Karte hängt das Vogelhaus, das gerade herbstlich dekoriert wird. Ich habe es aus Cardstock sowie Designpapier mit verwittertem Holz-Muster gestanzt und zusammengeklebt. Die Cardstockstücke habe ich mit Copics etwas schattiert. Dekoriert habe ich das Haus mit einem kleinen Kürbis - Teil der Kürbisreihe aus dem Simply Celebrate Fall Set -, einem Pilz aus dem Tree House Set sowie zwei weiteren Blättern, diesmal aus gelbem Designpapier gestanzt. 
Die beiden Vögel sind natürlich aus dem Winter Birds Set. Der Vogel auf der rechten Seite hat eigentlich keine Mütze auf, sie ist aber im Set enthalten. Und da der Vogel links einen Schal trägt, sollte der andere Vogel natürlich dazupassen. Außerdem habe ich ihnen einen Beerenzweig bzw. einen Tannenzapfen in den Schnabel gegeben. Auch diese Stempel sind im Winter Birds Set enthalten. Coloriert habe ich wieder mit Copics und mich weiter an die gelb-grün-blaue Farbkombi gehalten. 
Unten rechts auf der Karte war dann Platz für einen Text. Dafür habe ich zwei Stempel aus den Sets Hay There, Hayrides und Flappy Holiday kombiniert und weiß auf grauen Cardstock embosst. 

In the center of the card I've hung the birdhouse, that is getting decorated for fall by the two birs. I die cut it from cardstock and patterned paper with a weathered wood look. I shaded the pieces cut from plain cardstock with my Copics and then put it together. To decorate the house I added a small pumpkin - one of the pumpkin row from the Simply Celebrate Fall set -, a mushroom from the Tree House ie set and two more leaves, this time cut from yellow paper. 
Of course the two birds are from the Winter Birds set. The one on theleft originally isn't wearing a hat, but there is one included in the set. And since the bird on the left is wearing a scarf, I wanted the other one to match. I also put a twig with berries and a pinecone into their beaks. Again those come in the Winter Birds set.
I used my Copics to color the images and went with the blue, yellow and green color combo again. 
On the bottom right there was room for a sentiment. I combined two stamps from the sets Hey There, Hayrides and Flappy Holiday and white heat embossed the text onto grey cardstock.


Die Läden am Fenster/an der Tür des Vogelhauses können geöffnet werden - darin sitzt ein kleiner Vogel in seinem warmen Nest und freut sich über die Herbstvorbereitungen, die von statten gehen. Auch diese Motive sind aus dem Winter Birds Set. Den Ausschnitt im Vogelhaus habe ich mit dunklem Papier mit Holzmuster hinterlegt. 

The shutters of the window/door of the bird house can be opened. Inside there's a little chick sitting in a warm nest, getting all excited about the fall decorations going on. 
Also these images can be found in the Winter Birds set. Behind the circle cut out of the birdhouse I put  a piece of dark patterned paper, again with a wooden pattern.


Zum Aufeinanderkleben der einzelnen Lagen habe ich dünnes bzw. dickes 3D Tape benutzt.
Zum Schluss habe ich noch einen Rahmen aus goldenem Glitterpapier gestanzt und oben auf die Blätterlage geklebt. Auf die Beeren in der Blätterlage und am Beerenzweig im Schnabel des Vogels habe ich goldene Stickles aufgetragen. Dann habe ich alles auf einen weißen Kartenrohling geklebt.

To put the different layers together I used thin and thick foam tape.
Then I die cut a frame from gold glitter paper and glued it on top of the leaf frame. Onto the berries in that frame and also the twig in the bird's beak I put some gold Stickles, then I put everything onto a white note card.
 

Montag, 11. September 2023

MFT 2023 Card Design Superstar Contest - Coloring Virtuoso

 
Hallo Ihr Lieben!
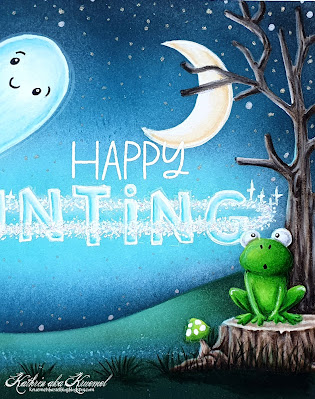
Heute zeige ich Euch die Karte, die ich für die Coloring Virtuoso Kategorie des 2023 Card Design Superstar Contests von MFT gemacht habe. 

Hello everyone!
Today I am sharing with you the card I made for the coloring virtuoso category of the 2023 Card Design Superstar contest by MFT.

Beim Colorieren kann ich ich ja total verlieren. Und so habe ich hier auch eine komplett colorierte Karte ohne Stanzteile gemacht. Okay, so ganz ohne Stanzteil bin ich dann doch nicht ausgekommen, aber dazu gleich mehr.
Auch der Hintergrund ist nicht wirklich coloriert - ich habe ihn mit Distress Inks gewischt. Dafür musste ich natürlich zuerst die Motive auf meinen weißen Cardstock stempeln. Ich habe helle Tinte verwendet, die man dann nach dem Colorieren in No-Line Technik nicht mehr sieht. Dort, wo die Motive überlappen, habe ich mit Masking Tape gearbeitet.
Für den Boden habe ich ebenfalls aus Masking Tape einfach per Hand einen Hügel geschnitten, so konnte ich den in einer anderen Farbe wischen. Und dann wollte ich zwei große Bäume als eine Art Rahmen für meine Szene. Da ich kein Stempelset mit einem passenden Baum habe, habe ich einfach den Baum aus dem Stanzenset Haunted House Stanzenset zweimal aus Masking Tape gestanzt, jeweils einen Baum links und rechts halb aufgeklebt und sie später mit coloriert. Da der Baum auf der linken Seite etwas wenig Äste hat, habe ich hier einfach mit den Ästen auf der rechten Seite, die ich ja nicht brauchte, ein wenig aufgefüllt. 
Den Himmel habe ich dann mit Distress Ink Salvaged Patina, Peacock Feathers, Uncharted Mariner und Black Soot gewischt, den Boden mit Pine Needles und Black Soot. 

I can totally get lost in the coloring of an image. So I made a completly colored image without any die cuts. Well, that's not true, I ended up using two die cuts, but more about that soon. 
Also the background isn't really colored - I inked it with Distress Inks. Of coure I first had to stamp my images onto the white cardstock. I used some light ink that isn't visible after no-line coloring the images. Where the images overlap I did some masking.
For the ground I cut a wavy piece from masking tape, simply using my scissors. This way I was able to ink that area in a different color. And I really wanted two large trees as some kind of frame for my scene. Since I don't have a stamp set with a tree large enough, I die cut the tree from the Haunted House die set twice from masking tape, attached about half a tree onto each each side of the cardstock and later colored the trees in. The tree is a bit bare on the left side, so for the tree on the right side I used some of the branches on the right of the tree, that I didn't need here, to fill the tree a bit. 
I inked the sky with Distress Ink Salvaged Patina, Peacock Feathers, Uncharted Mariner and Black Soot, for the ground I used Pine Needles and Black Soot. 


Auf der linken Seite meiner Szene habe ich die süße Katze aus dem Set Witch Way is the Candy und zwei Kürbisse vor den Baum gesetzt. Die sind aus den Sets Witch Way is the Candy und Autumn Blessings. 
Alle Motive auf der Karte habe ich erst ganz rudimentär und eher hell mit Copics coloriert und dann mit Polychromos und Prismacolor nachgearbeitet. Die Highlights und einige Details habe ich ganz zum Schluss mit einem weißen Gelstift hinzugefügt, für die Gesichter der Figuren kam ein schwarzer Fineliner zum Einsatz. 

On the left side of my scene I placed the cute cat from the Witch Way is the Candy stamp set and two pumpkins in front of my tree. The pumpkins are from the Witch Way is the Candy and the Autumn Blessings set. 
First I used my Copics to add a very simple and quite light layer of color to all the images on this card, then brought in my Polychromos and Prismacolor for a more details coloring. At the very end I used a white gel pen to add some highlights and a few details, the faces of the images are re-drawn with a black fineliner. 


Auf der rechten Seite der Karte steht ein Baumstumpf aus dem Hugs make Everything Better Stempelset auf dem der Frosch aus dem Witch Way is the Candy Set sitzt. Aus dem selben Set ist auch der Mond, den ich hinter die Äste des Baums gesetzt habe.

On the right side of the card there's a tree stump from the Hugs make Everything Better stamp set, on it sits the little frog from the Witch Way is the Candy set. And from the same set is also the moon, that I put in the sky behind the branches of the tree.


Hauptelement der Karte ist natürlich der kleine Geist mitsamt dem Text. Der Geist freut sich so sehr, dass er an diesem einen Tag im Oktober endlich ganz frei herumspuken kann. 
Das Wort Haunting habe ich mit Buchstaben aus dem Set Hip Hip Yay Alphabet zuammengesetzt. Zuerst habe ich die Buchstaben mit heller Tinte abgestempelt und vor dem Wischen des Himmels ebenfalls maskiert, dann habe ich sie auf die selbe Weise wie den Rest der Motive coloriert. Ganz zum Schluss habe ich dann die Outlines, genauso wie beim Geist, nochmal mit weißer Stempelfarbe obenauf gestempelt. So scheinen die Buchstaben zu leuchten.
Mit einem feinen Pinsel und weißer Stempeltinte habe ich dann die "Spukspur" des Gespensts rund um die Buchstaben aufgetragen - einmal davor, einmal dahinter verlaufend und dann bis zum Geist führend. Die weiße Tinte habe ich eher sanft aufgewischt und dann ganz viele weiße Punkte mit einem weißen Gelstift darauf gemalt. Außerdem habe ich hier noch ein wenig Stickles mit aufgetupft. 
Anschließend  habe ich noch das Happy aus dem Ghostly Greetings Stempelset, aus dem übrigens auch das kleine Gespenst ist, mit weißem Embossingpuler über dem Haunting aufembosst. 

Main element on my card is the little ghost and the text. The ghost is so excited that he can spook around completly freely that one day/night in october.
I used stamps from the Hip Hip Yay Alphabet set to write the word haunting. I first stamped it with the light ink and masked them off before I inked the sky, then I colored them exactly like I did the other images on the card. At the very end I used white ink, to stamp the outlines again. I did the same with the ghost. This way, the letters seem to glow.
With a fine brush and white ink I drew the ghost's trail around the word haunting - one across the word on top of it, one behind it and then I connected it with the ghost. I usesd a quite soft hand with the white ink, then used a white gel pen to put lots of tiny dots onto it. I also added small dots of Stickles here.
I white heat embossed the word Happy from the Ghostly Greetings stsamp set, from which the ghost is as well, above the word haunting.


Unten in die Wiese habe ich eine Art Spiegelung des Lichts, das vom Text aus geht, in die Wiese gemalt. 
Als letzten Schritt habe ich dann noch kleine Sterne mit einem silbern-glitzernden Gelstift in den Himmel gemalt (die sieht man von oben fast nur in den dunklen Bereichen des Himmels) und den Cardstock auf einen weißen Kartenrohling geklebt.

I added some kind of glow from the word onto the grass under it.
As a last step I put dots with a silver glitter gel pen into the sky as stars (from top you can nearly see them in the darkest areas of the sky best) and attached the cardstock to a white card base.

Sonntag, 10. September 2023

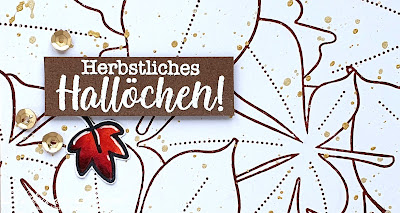
Herbstliches Hallöchen!

 
Hallo Ihr Lieben!
Während ich nach einigen Jahren Pause hoffentlich - man weiß ja nie, was last minute dazwischen kommt - auf dem Stempelmekka bin, zeige ich Euch hier eine Karte, die ich der Create a Smile Facebookgruppe bereits vor knapp zwei Wochen gezeigt habe. Dort war nämlich dazu aufgerufen worden, mal aus seiner Komfortzone herauszutreten und dann eine Karte zum Thema Herbst zu machen. Nur den Blogpost hatte ich bis jetzt einfach nicht geschafft. 

Hello everyone!
While I finally and after a few years am at Stempelmekka, the biggest stamp fair in Germany, again (at least where I hope I'll be because you never know what plans have to change last minute) I am sharing with you a card, that I shared in the Create a Smile FB group already nearly two weeks ago. They were asking us to step out of our comfort zone and then make a fall card - and until now I didn't have the time  to make the blog post.

Hm, meine Komfortzone kenne ich. Aber was fällt mir schwer? Erstmal alles, das man nicht zu 100 % unter Kontrolle hat - Alcohol Ink Hintergründe, Shimmer Powder etc z. B., auch wenn ich die immer wieder gerne mal verwende. Dann definitiv Clean and Simple! So sehr ich es mir auch vornehme, die Karten sind immer "ein bisschen (viel) mehr". Da fiel mir eine Diskussion wieder ein, die wir vor kurzem hatten und wo jemand 15-Minuten-Stempeln vorgeschlagen hat. Okay, 15 Minuten sind für mich absolut unrealistisch. Also habe ich mir eine Stunde gegeben und im Vorfeld bereits die Stempel, die ich verwenden wollte, herausgesucht. Und so ist dann diese Karte entstanden.
Für den Hintergrund habe ich den Herbstlaub Stempel mit brauner Tinte auf weißen Cardstock gestempelt und mit goldener Metallic Watercolor bespritzt. 

Well, I know my comfort zone pretty good. But what is hard for me? First of all everthing I can't control completly - like alcohol ink backgrounds, powders etc, even if I really like to use all of these every now and then. Then definately clean and simple. No matter how hard I try, my cards are always "a (whole) lot more". And then I remembered a discussion we had recently, when someone suggested 15 minutes stamping. Well, 15 minutes are in no way managable for me. So I gave myself one hour to finish this card and also picked the stamps I wanted to use ahead. And that's what I came up with.
For the backround I stamped the Herbstlaub stamp with brown ink onto white cardstock and flicked some gold metallic watercolor on top.


Im oberen Bereich der Karte habe ich meinen Text aufgebracht. Der ist aus dem Set Der Herbst ist Da und weiß auf braunen Cardstock embosst. Ich habe ihn mit 3D Tape aufgeklebt und ein Herbstblatt aus dem Set Igelfreunde ein wenig darunter geschoben.

In the upper area of my card I placed the text. It means "fall-ish hello" and is white heat embossed onto brown cardstock. I attached it with foam tape and tucked a fall leave from the Igelfreunde stamp set under it.


Als Motiv, das ja wegen der kurzen Zeit, die zum Colorieren blieb, eher klein ausfallen musste, habe ich mich für den süßen Igel mit dem Regenschirm entschieden. Und ich konnte einfach nicht anders, und habe noch einen Apfel, einen Pilz und eine Eichel dazu gesetzt. Da ich die Karte eher monochrom mit roten Akzenten gestalten wollte, habe ich nur den Apfel, das Herbstblatt unter dem Text und den Regenschrim in leuchtendem Rot coloriert, für den Rest habe ich Brauntöne verwendet. Coloriert habe ich mit Copics. Igel, Apfel und Eichel sind wieder aus dem Set Igelfreunde, der Pilz aus dem Herbst Minis Set. 
Unter den Igel habe ich ein braunes Oval, gestanzt mit dem Shadows and Flowers Set, als Boden gesetzt. Und zum Aufkleben nur des Igels habe ich wieder 3D Tape verwendet.

As my image, that had to be kind of small due to the small amount of time I had to color it, I went with this cute hedgehog with his umbrella. And I just couldn't resist and added an apple, a mushroom and an acorn. Since I wanted my card more in a monochrome brown look with some red accents I colored just the apple, the fall leaves under the text and the umbrella in a bright red and sticked to browns for the rest of the images. I used Copics for my coloring. 
Under the hedgehog I put a brown oval, cut with the Shadows and Flowers die set, as the ground. And only behind the hedgehog I used some foam tape again.


Ich war doch sehr versucht, noch einige weitere Elemente auf die Karte zu packen. Zweige aus Vellum z. B. Aber zack - war die Stunde fast um. Also habe ich nur noch ein paar goldene Pailetten aufgeklebt, den Cardstock braun gemattet und auf einen weißen Kartenrohling geklebt. Und ich glaube, das war ganz gut so - den clean and simple wäre die Karte dann sicher nicht mehr gewesen!

I was really tempted to add a few more elements to the card - like some branches cut from vellum. But bam - the hour was nearly over. So I only added a few gold sequins, matted my cardstock brown and adhered it to a white note card. And I think, that wasn't too bad, because otherwise this card would not be anything like clean and simple!

Freitag, 8. September 2023

MFT 2023 Card Design Superstar - Box Card Master

 
Hallo Ihr Lieben!
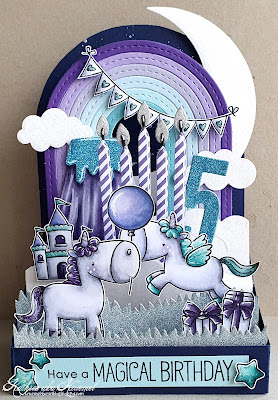
Auch in diesem Jahr gibt es wieder den Card Design Superstar Contest von MFT - und nach einer Pause letztes Jahr, wegen einer Urlaubsreise hatte ich es einfach nicht geschafft, habe ich ich entschieden, dieses Jahr wieder teilzunehmen. Und so zeige ich Euch heute meine Karte für die Kategorie "Box Card Master".

Hello everyone!
Also this year MFT is doing the Card Design Superstar Contest - and after a break last year (we were on vacation and I simply didn't have time to make a card) I've decided to join again this year. So today I am sharing my entry for the "Box Card Master" category. 

Meine kleine Nichte hatte gerade Geburtstag - und wie alle kleinen Mädchen steht sie auf Einhörner, Regenbogen, Glitzer, Pink und Lila. Über Pfingsten waren wir zusammen im Urlaub und sie brachte jeden Tag Feen, Pegasusse, Ein- und Alihörner (ja, ich habe aufgepasst!) mit an den Strand. Dort durfte ich dann mit ihr spielen und die Figuren mussten teilweise die wildesten Abenteuer inklusive ausbrechenden Vulkanen, die von bösen Zauberern beherrscht werden, überstehen.
Während die Kombi aus pink und lila ein absolutes No-Go für mich ist, lässt sich der Rest doch eher einfach umsetzen.

My little niece just celebrated her birthday - and like all  little girls she loves unicorns, rainbows, glitter, pink and purple. We were on vacation together back in june and everyday she brought all those fairies, Pegasusses (is that the right plural of these?), unicorns and alihorns (yes, I paid attention!) to the beach. I had to play with her and the creatures had to survive some really wild adventures including volcanos that are ruled by evil sorcerers. 
Well, while the color combo of pink and purple is a complete no-go for me, putting all the rest on a card wasn't that hard.


Ich habe keine der Box Card Stanzen von MFT, also habe ich meine Teile per Hand ausgemessen und zugeschnitten. Hat sicher etwas länger gedauert, aber dafür konnte ich sie so von der Größe her genau so machen, wie ich wollte. Die Querlagen habe ich dann jeweils aus dunkelblauem Cardstock geschnitten, aus dem auch der Körper meiner Box Card ist, und Gras- bzw. Wolken-Lagen aus Glitterpapier darauf geklebt.
Auf der hintersten Zwischenlage befindet sich ein Regenbogen. Da ich meine Karte in Blau, Türkis und Lila gehalten habe, habe ich auch die Bögen des Regenbogens in diesen Farben gehalten. Den Regenbogen habe ich mit der Stitched Tall Rainbow Stanze gemacht. Die habe ich auch für meine Rückwand verwendet - ich habe sie auf ein Stück dunkelblauen Cardstock gelegt, die Außenlinie der Stanze nachgefahren und dann mit etwa 1 cm Abstand dazu den Cardstock mit der Schere ausgeschnitten. Dann habe ich silberfarbene Metallic Watercolor daraufgespritzt.
Auf der linken Seite des Regenbogens befindet sich neben einer Wolke aus weißem Glitter Cardstock noch ein lilafarbener Vulkan, der türkisfarbenen Glitter spuckt. Ihr seht, ich habe mich an den Abenteuern der Einhörner am Strand orientiert. Für den Vulkan habe ich die Volcano Stanzen verwendet, die Wolken sind mit den Puffy Clouds gestanzt. Und da ich tatsächlich auch keine Wolken Borderstanzen von MFT habe, habe ich die hintere Wolkenlage vor dem Vulkan mit dem "Laub" des Interactive Swing Stanzensets gestanzt. Die Wolken in der Reihe davor habe ich mit der Falling From the Clouds Stanze gemacht und die äußeren Bögen, an deren Stelle sich eigentlich ein Rahmen befindet, per Hand zugeschnitten. Auf diese zweite Lage habe ich ein Wolkenschloss geklebt. Das ist, genauso wie die Einhörner, aus dem Magical Unicorns Stempelset. Ich habe alle Motive und auch den Vulkan mit Copics coloriert.
Die beiden Graslagen auf den vorderen Lagen - die vorderste ist mit 3D Tape hinter die Front der Box geklebt - habe ich aus blau-silbernem Glittercardstock mit den Grassy Hills Stanzen gestanzt. 
Dem Einhorn auf der vorderen Graslage habe ich einen Luftballon aus dem Stempelset Adorable Elephants in den - nicht vorhandenen - Mund gegeben. 

I don't have any of MFT's box card dies, so I measured and cut the pieces myself. For sure that took longer, but that way I was able to make the card exactly the size I wanted to. The inner layers I cut from dark blue cardstock, that I also used for the base of my box card, and attached grass- and cloud layers cut from glitter cardstock on top.
On the inner layer in the back I put a rainbow. Since I wanted to go with blue, turquoise and purple for my card I also used those to cut the arches of my rainbow. I used the Stitched Tall Rainbow die to die cut the rainbow. And I used the same die to create the back of my card. I simply put the die onto a piece of dark blue cardstock, traced the outside edge of the die with a pencil and then cut the cardstock out with my scissors, cutting with a distance of about 1/4" of the pencil line. Then I flicked some silver metallic watercolor onto the cardstock.
On the left side of the rainbow theres a purple volcano with some turquoise glitter-lava. As you can see, I stuck to the advventures those unicorns had to survive at the beach. To cut the volcano I used the Volcano die and for the clouds, that I cut from white glitter cardstock, I used the Puffy Clouds. And since I really don't have any cloud border dies by MFT, I die cut the back layer of clouds in front of the volcano with the "leaves" of the Interactive Swing die set. The clouds on the layer in front of that I die cut with the Falling From the Clouds die, cutting the outer piece, wher the die cuts a frame, with my scissory into a rounded shape. On this second layer from the back I attached a castle. This and the unicorns are all from the Magical Unicorns stamp set. I colored all images, also the volcano, with Copics. 
The grass layers on the two front layers - the one in the very front I attached with some foam tape to the back of the front of my box card base - I die cut with the Grassy Hills dies from some blue-silver glitter cardstock.
And the unicorn behind that front layer I let hold a balloon from the Adorable Elephants stamp set with his mouth.


Auf der rechten Seite der Karte habe ich im Hintergrund einen Mond, mit der Over the Moon Stanze wieder aus weißem Glittercardstock gestanzt, aufgeklebt.
Auf dem Regenbogen befindet sich auch hier eine kleine Wolke. Außerdem habe ich ein Partybanner mit Herzen über den Regenbogen gespannt. Das ist aus dem Kissing Both Stempelset.
Natürlich dürfen auf einer Geburtstagskarte Kerzen nicht fehlen! Die sind mit der Wish Big Stanze aus einem lila-weiß gestreiften Bogen aus dem Stripe Splash Paper Pad gestanzt. Ich weiß nicht, wie es Euch  geht, aber Geburtstagskerzen müssen gestreift sein! Damit die doch recht hohen Kerzen gut stehen, habe ich sie mit weißem Cardstock hinterlegt. Die Flammen habe ich aus silberfarbenem Glittercardstock gestanzt. Aus dem war zuerst auch die 5, aber so ging die Zahl irgendwie unter. Also habe ich sie nochmal aus türkisfarbenem Glittercardstock gestanzt und auf die silbernfarbene geklebt. Gestanzt habe ich sie mit dem Impact Numbers Stanzenset. 
Das Einhorn, das auf der Lage davor quer über die Karte springt, habe ich mit Flügeln in ein Alihorn verwandelt. Und auf der vordersten Lage stehen noch zwei verpackte Geschenke. Die dürfen an einem Geburtstag natürlich auch nicht fehlen! Sie sind aus dem Stempelset Secret Santa. 

On the right side of the card I adhered a moon onto the backdrop, die cut again from white glitter cardstock using the Over the Moon die. 
Also on this side I attached a little cloud to the rainbow. And I hung up a party garland with tiny hearts across the rainbow. This one's from the Kissing Booth stamp set.
Of course a birthday card needs some birthday candles! I die cut those with the With Big die from a purple and white striped sheet from the Stripe Splash paper pad. I don't know if it's the same for everyone, but for me birthday candles need to have stripes! To make sure the quite tall candles stand up nicely, I backed them with some white cardstock. The flames I die cut from silver glitter cardstock. From that I had also cut the #5, but that kind of got lost on the finished card. So I die cut it again from turquoise glitter cardstock and glued that on top of the silver one. I used the Impact Numbers die set to cut the number.
The unicorn, that's jumping across the card on the second grass layer, I turned into an Alihorn by adding some wings. And on the front most grass layer I adhered two nicely wrapped gifts, that of course are a must have on a birthday! Those are from the Secret Santa stamp set.


Hier...

Here...
 

 und hier kann man die einzelnen Dekoelemente und Motive der Karte nochmal besser sehen.
Die Herzen auf dem Partybanner, die Hörner und Schweife der Einhörner, die Flügel des Alihorns und die türkisfarbenen Zinnen der Burg habe ich mit Stickles beglittert. 

and here you get a better look at the decorations and images I put onto this card.
Onto the hearts on the party banner, the horns and tails of the unicorns, the wings of the Alihorn  and the turquoies pinnacles of the castle I put some Stickles.


Natürlich lässt sich meine Karte, wie es sich für eine Box Card gehört, auch flach zusammenlegen. Sie ist recht groß und wohl nur schwer zu verschicken. Da ich aber sowieso ein Paket gesendet habe - das Geschenk musste ja auch zum Geburtstagskind - macht das gar nichts.
Vorne auf die Front meiner Box Card habe ich noch einen Geburtstagtext aufgeklebt. Der ist englisch, da sie aber eh noch nicht lesen kann, kann es beim Vorlesen ja auch gleich übersetzt werden. Der Text ist aus zwei Stempeln zusammengesetzt - have a magical ist aus dem Set Secret Santa, das Birthday dahinter aus dem Set Adorable Elephants. Ich liebe es, wenn Firmendie gleichen Schriftarten und -größen für verschiedene Sets verwenden, so kann man Texte auch mal problemlos anpassen. Ich habe den Text schwarz auf türkisfarbenen Cardstock gestempelt und auf die Box geklebt. Als Deko habe ich dann noch drei, ebenfalls mit Stickles beglitterte Sterne, aus dem Magical Unicorns Set aufgeklebt.

Of course my carad can be put flat, as it's normal for a box card. This card turned out pretty big and I'm sure, mailing it would be pretty hard. But since I sent a box anyway - of course I had to send a present! - I didn't care about the size of the card.
Onto the front of my card base I put a text. It's english, but since she can't read yet anyway, they can translate it when they read the text to her. I stamped the text with black ink onto a piece of turquoise cardstock, combining two stamps for it. The have a magical is from the Secret Santa stamp set, the birthday from the Adorable Elephants set. I love when brands use the same type and size of font for different sets, it makes it so easy to create a custom text. I adhered the text to the front of my card and added three stars, again covered with Stickles, from the Magnical Unicorns stamp set next to it.

Donnerstag, 7. September 2023

Freupost!

 
Hallo Ihr Lieben!
Das September-Release von Stampcorner ist wieder so umfangreich - ich bin gar nicht dazugekommen, für alles einen Sneak zu zeigen. Deswegen gibt es heute auf dem Stampcorner Blog diese Karte, auf der ich eine weitere der Neuheiten verarbeitet habe. 

Hello everyone!
Stampcorner's september release was so huge, I didn't even get around to share a sneak for every product. So today over on the Stampcorner Blog I am sharing this card, that I used another of the new products on.

Der Hintergrund hat mich einige Nerven gekostet. Eigentlich hatte ich hier Designpapier verwendet, als dann aber alles zusammengesetzt war, hat mir das so überhaupt gar nicht mehr gefallen. Also habe ich alles wieder auseinander gebaut und stattdessen ein Stück hellgrauen Cardstocks zugeschnitten. Auf den habe ich dann mit weißer Stempelfarbe den Romantic Script Background von MFT aufgestempelt. Der ist schon älter, jeder Schriftstempel passt hier natürlich zum Thema Post.

The background for this card really cost me at least 5 years of my life. I originally had used patterned paper but once everything was put together I so didn't like it. So I took everything apart again and cut a piece of light grey cardstock instead. I used white pigment ink to stamp the Romantic Script Background by MFT onto it. It's an older stamp, but of course any text background would work with the mail theme of the card.


Das hier neu verwendete Produkt ist natürlich die Freupost-Stanze. Die habe ich viermal aus schwarzem und einmal aus rotem Cardstock gestanzt. Die schwarzen Teile habe ich aufeinander geklebt, den roten erst mit Copics etwas schattiert und dann leicht versetzt obenauf geklebt.
Als Hintergrund für das Motiv passte natürlich eine der Postage Stitch Stanzen super. Ich habe sie aus weißem Cardstock gestanzt, den Rand außerhalb der gestitchten Linien abgedeckt und dann das Innere mit Distress Oxide Speckled Egg, Stormy Sky und Weathered Wood gewisht. Dann habe ich noch etwas Copic Opaque White aufgespritzt.
Das süße Motiv ist die Maus aus dem Set Post für Dich. Ich habe sie mit Copics coloriert und ausgeschnitten.
Und da die Post ja nicht einfach angeflogen kommt, habe ich noch einen Briefkasten auf die Karte gepackt, aus dem die Maus den Brief gerade herausgezogen hat. Sie schaut fast so, als würde sie denjenigen suchen, der den Brief in ihren Briefkasten gesteckt hat. Für den Briefkasten habe ich das Mailbox Stanzenset von MFT benutzt und den oberen Teil aus silberfarbenem, metallischem Cardstock gestanzt. Die übrigen Teile sind aus weißem Cardstock gestanzt und mit Copics coloriert. Außerdem habe ich noch einige der Briefe aus dem selben Set ausgestanzt und ebenfalls mit Copics schattiert. Auf die Lasche des Kuverts habe ich jeweils ein kleines rotes Herz geklebt.
Das kleine für dich, das ich unter das gestanzte Wort Freupost gesetzt habe, ist aus dem Stempelset Kleine Worte und weiß auf schwarzen Cardstock embosst. Dann habe ich alle Teile auf die Briefmarke geklebt.
 
Of course the new product I used here is the "Freupost" (happy mail) die. I die cut it four times from black cardstock and stacked those pieces. Then I cut it once from red cardstock, shaded it with my Copics and put it on top of the black ones just a bit off.
As the backdrop for my image one of the Postage Stitch dies was perfect. I die cut it from white cardstock, masked off the areas outside the stitched lines and inked the inner area with Distress Oxide Speckled Egg, Stormy Sky and Weathered Wood. Then I flicked some Copic Opaque White on top.
The cute image is the mouse from the Post für Dich stamp set. I colored her with Copics and cut her out.
And since the mail doesn't just come flying by, I put a mailbox onto the card, from which the mouse just pulled a letter. She looks a bit like she's trying to see who put it into her mailbox. For the mailbox I used the Mailbox die set by MFT and cut the top from silver cardstock with a metallic look. The other pieces I cut from white cardstock and colored them with Copics. I also die cut a few letters from the same die set and also shaded those with Copics. Onto the flap of each envelope I glued down a small heart confetti.
The smaller text means "for you" and is white heat embossed onto black cardstock. Then I attached all the pieces onto the post stamp die cut.


Hinter die Briefmarke habe ich dickes 3D Tape gesetzt. Dann habe ich auf der Karte einige Kreise, gestanzt aus scharzem Cardstock, unter die Briefmarke geschoben und die Briefe jeweils mit dünnem 3D Tape darauf geklebt. Dann habe ich die Briefmarke festgeklebt.
Zum Schluss habe ich alles noch schwarz gemattet und auf einem weißen Kartenrohling befestigt.
 
Behind the postage stamp I put some thick foam tape. Then I stuck a few circles, die cut from black cardstock, under the postage stamp and added the die cut letters with foam tape before sticking the postage stamp with the images down.
To finish the card, I matted the cardstock black and attached everything to a white note card.

Mittwoch, 6. September 2023

Halloween mal ganz cute!

 
Hallo Ihr Lieben!
Ich weiß nicht, warum ich so gerne Halloween-Karten mache. Ich verschicke sie nicht mal! Aber schließlich ist Stempeln mein Hobby, und da darf es dann ruhig das sein, was Spaß macht. 
Heute wird es mal extra cute.
 
Hello everyon!
I have no idea why I enjoy making Halloween cards so much. I don't even send them! But card making is my hobby, and so I just do whatever I feel like.
Today's card is not scary at all but extra cute.
 
Ich gehe meine Karten ja immer unterschliedlich an. Mal inspiriert mich ein Song, ein Film, ein Bild, mal ist es ein Stempel den ich unbedingt verwenden möchte, manchmal gehe ich einfach nur durch meine Stempel und schaue, was mich anspringt. Hier wusste ich nur, dass ich den Hexenhut von HoneybeeStamps benutzen wollte und ihn irgendjemand oder -etwas tragen sollte. Also habe ich alle meine Halloweenstanzen hervorgeholt und dann kam eins zum anderen.
Für den Hintergrund habe ich den Dotted Moon and Stars Backdrop von LawnFawn aus weißem Papier gestanzt und mit Distress Oxide Cracked Pistacchio, Peacock Feathers, Uncharted Mariner und Black Soot gewischt.
Da ich zuvor alle Elemente auf der Karte ausgelegt hatte, wusste ich schon, dass recht viel darauf los sein wird. Also habe ich auf Spritzer jeglicher Art verzichtet. Dafür habe ich den Hintergrund mit grünem Glitter Cardstock hinterlegt, der nun durch die ausgestanzten Sterne und Monde zu sehen ist.
 
I always take a different aproach to my cardmaking. Sometimes I get inspired by a song, a movie or a picture, sometimes it's a stamp I really want to use, other times I just go through my stuff and see, what's speaking to me. Here all I knew was, that I wanted to use this witch's hat by HoneybeeStamps and wanted it someone or -thing to wear it. So I brought out all my Halloween dies and then one thing led to the next.
For the background I die cut the Dotted Moon and Stars Backdrop by LawnFawn from white cardstock and inked it with Distress Oxide Cracked Pistacchio, Peacock Feathers, Uncharted Mariner and Black Soot.
 I had already laid out all my elements so I knew that there will be lots going on on this card. So I skipped any type of spatters. But I put some green glitter cardstock behind the background, that can now be seen through the cut out stars and moons.


Aus cremefarbenen Cardstock habe ich dann den Mond mit der Over the Moon Stanze von MFT gestanzt und die Ränder erst ein wenig mit Distress Oxide Mowed Lawn gewischt. Das war mir dann aber irgendwie doch zu heftig, also habe ich noch etwas Cracked Pistacchio darüber gelegt.
Aus Vellum habe ich die Schleierwolken aus dem Cloud Cover Stanzenset gestanzt und aufgeklebt. Um den Kleber so gut wie möglich zu verstecken, habe ich die Stanzteile durch meinen Xyron gedreht, so ist der Kleber zumindest gleichmäßig verteilt und es gibt keine unschönen Batzen/Flecken.

From cream colored cardstock I die cut the moon with the Over the Moon die by MFT and then first inked the edges lightly with Distress Oxide Mowed Lawn. The color looked a bit too bright to me, so I put some Cracked Pistacchio on top to tone it down.
From vellum I die cut those kind of eerie clouds using the Cloud Cover die set, then attached them. To hide the glue as good as possible I ran the die cut through my Xyron. This way the glue is spread evenly and there are no ugly splotches visible.


Am unteren Rand der Karte habe ich jede Menge Motive verteilt, fast alle sind aus weißen Stanzteilen, die ich mit Copics coloriert habe, gemacht.
Da sind zwei der Kürbisse aus dem Stitched Pumpkins Set von LawnFawn, einige grüne Pilze aus einem Stanzenset von CraftEmotions, ein Schild mit Text, gemacht mit einer Stanze von Magnolia, ein Hexenbesen, ein paar kleine Geister und natürlich das Hauptmotiv samt Hexenhut. Hut und Besen sind aus dem Set Toil and Trouble von HoneybeeStamps, die Geister aus einem Stanzenset von Memorybox. Wie schon gesagt, habe ich alle Teile mit Copics coloriert und zusätztlich einen weißen Gelstift benutzt. 

Along the bottom edge of my background I placed a lot of images and elements, nearly all of them made from white die cuts, that I colored with Copics.
There are two pumpkins from the Stitched Pumpkins die set by LawnFawn, a few green mushrooms using a die by CraftEmotions, a sign with a text, made using a die by Magnolia, a witch's broom, a few tiny ghosts and of course the main image with the witch's hat. Hat and broom are from the Toil and Trouble die set by HoneybeeStamps, the ghosts from a die set by Memorybox. As already mentioned did I die cut all of them from white cardstock, then colored them with Copics. For some details I used a white gel pen.


Ich wusste, dass irgendjemand den Hut tragen sollte - und dass das kein Kürbis sein soll. Also habe ich überlegt und mir fiel Katze ein. Beim Durchsehen meiner Motive bin ich dann über diese Süße hier gestolpert. Sie ist Teil eines Weihnachtsstempels von Whiff of Joy und sitzt eigentlich einem Paket samt Vogel gegenüber. Ich habe das Motiv als Digi - keine Ahnung, ob es das so gab, oder ob es daher kommt, dass ich in deren Designteam war und hin und wieder, wenn es recht knapp mit dem Versenden wurde, haben wir ein Motiv auch mal als Digi bekommen. Es war auf jeden Fall perfekt, denn so konnte ich die Größe der des Hutes anpassen. Geschenk und Nikolausmütze, die die Katze eigentlich trägt, habe ich einfach beim Ausschneiden weggeschnitten.
Auf das Schild im Hintergrund habe ich mit grüner Tinte ein Boo to You aus dem Itty Bitty Boos Stempelset von MFT aufgestempelt.
Die kleinen Geister habe ich wieder aus Vellum gestanzt - wie also aufkleben? Ich habe sie einfach auf den Cardstock gelegt und durch die ausgestanzten Augen hindurch Kleber aufgetragen. In den habe ich dann winzige schwarze Glitzersteine gesetzt, die nun die Augen der Geister sind und sie gleichzeitig festhalten. Bei der Gelegenheit habe ich dann den kompletten Container mit den schwarzen Steinchen vom Tisch geworfen - aber das ist eine andere Geschichte/Tragödie...

I knew, that I wante someone to wear to hat - and that I didn't want it to be a pumpkin. A cat would be great! When going through my images I came across this cutie. It's part of a christmas stamp by Whiff of Joy and usually is sitting in front of  a gift with a bird flying above it. I have this image as a digi stamp - I have no idea if it was sold like that or if it's because of the fact that I was in their designteam and every now and then, when shipping time was short, I got an image as a digi. Here having the digi was perfect because that meant, I was able to make it the perfect size for the hat. The gift, bird and Santa hat, that the cat is originally wearing, I simply cut off when cutting the image out.
With green ink I stamped a Boo to You from the Itty Bitty Boos stamp set by MFT onto the sign behind the cat.
The little ghosts I cut again from vellum - so how should I adhere those? I simply laid them onto my background and put glue into the little cut out eyes. Then I placed some tiny black beads into the glue that are now the ghosts eyes and also tack them down. While doing this step I knocked over - and off the table - my whole container of those tiny black beads. But that's a different story/tragedy...


Die Motive habe ich dann mit dickem und dünnem 3D Tape unten auf den Hintergrund geklebt. Und damit nicht nur die Sterne im Hintergrund glitzern, habe ich auf die Schleife am Hexenhut und auf den Mond noch etwas Stickles aufgetragen. Anschließend habe ich alles auf einen weißen Kartenrohling geklebt.

I attached the images with thin and thick foam tape to the bottom of my background. And since I didn't want only the stars to glitter, I put some Stickles onto the Moon and the bow on the witch's/cat's hat. Then I adhered everything to a white note card.