Sonntag, 8. Oktober 2017

Es gibt Tee


Hallo Ihr Lieben!
Heute zeige ich eine weitere Karte auf dem Noor!Design UK Blog. Sie ist blau - und nein, ich meine nicht das Mädchen auf der Karte sondern natürlich die Karte selbst!

Hello eveyone!
Today I am sharing another card over at the Noor!Design UK Blog. It's blue with a hint of light brown and white. Did I mention I am not a colorful person? ;)

Ich habe Designpapiere in verschiedenen Blautönen zugeschnitten und mit braunem Cardstock gemattet. Das bringt etwas Kontrast. Auf die unterste Lage habe ich etwas Spitze gesetzt. 

I used designer's papers in different shades of blue and matted them using light brown cardstock to add some contrast. On the biggest piece of paper I've added some white lace.


Das Motiv finde ich echt knuffig - aber ich habe mich damit irgendwie schwer getan. Zwei Abdrücke wanderten in den Müll, nachdem ich angefangen hatte, sie zu colorieren. Bis mir dann die Idee kam, das Motiv mit weißem Pulver auf braunen Cardstock zu embossen und nur das Mädchen ein wenig mit Farbe zu füllen. Außerdem habe ich ein paar kleine Details wie die Herzen und die Kirsche auf dem Muffin ganz leicht eingefärbt.
Das Motiv habe ich weiß hinterlegt und dafür die Bordürenstanze verwendet.

I think this is a really cute image - but somehow I had a hard time with it. Two stamped images went into trash after I've started coloring them in. And then I had the idea of heat embossing it with white powder onto light brown cardstock and just color in the girl a bit. I also colored in a few smaller details like the hearts and the cherry on the cupcake.
I've put some white cardstock underneath the image and used a border die here.


Nachdem der Rest ja eher schlicht ist, durfte die Deko etwas stärker ausfallen. Die schöne weiße Blüte ist von einem Stück Spitze abgeschnitten, die langen Bänder darunter habe ich drangelassen. Dazu kamen zwei Pixie Bloosoms, ein Metall-Blatt und der süße Teekannen-Charm, den ich mit etwas Twine angebunden habe.

Since the rest of my card is kind of simple I added a few more decorations. The beautiful white flower is cut from a piece of lace, the longer pieces of that lace is what you can see under the flower. I also added two Pixie Blossoms, a metal leave and that cute tea pot charm that I tied to my card with a piece of twine.


Und damit nicht nur die untere Ecke dekoriert ist, habe ich oben am Motiv noch etwas mehr angebracht. Ich habe das Metall-Herz auff die Karte geklebt und daran diese süße herzförmige Flasche angebunden, die ich blauem Glitter gefüllt habe.

Since all the decorations were put in one corner I decided I need more on the other side. So I glued the metall heart onto my card and tied that cute heart shaped bottle to it - after filling it with some blue glitter.


Samstag, 7. Oktober 2017

Stempeleinmaleins - Ausgabe vom 7. Oktober 2017


Hallo Ihr Lieben!
Heute zeigen wir Euch beim Stempeleinmaleins eine"Verpackung für Minzbonbons" - man darf ja heutzutage gar nichts mehr sagen oder zeigen... Die Anleitung enthält sowohl die Maße für normale, als auch die Mini-IhrWisstSchonWas.

Hello everyone!
Over at Stempeleinmaleins we are sharing a tutorial for a mint gift today. The tutorial give measurements to make a box for both the regular as well as the mini mints.


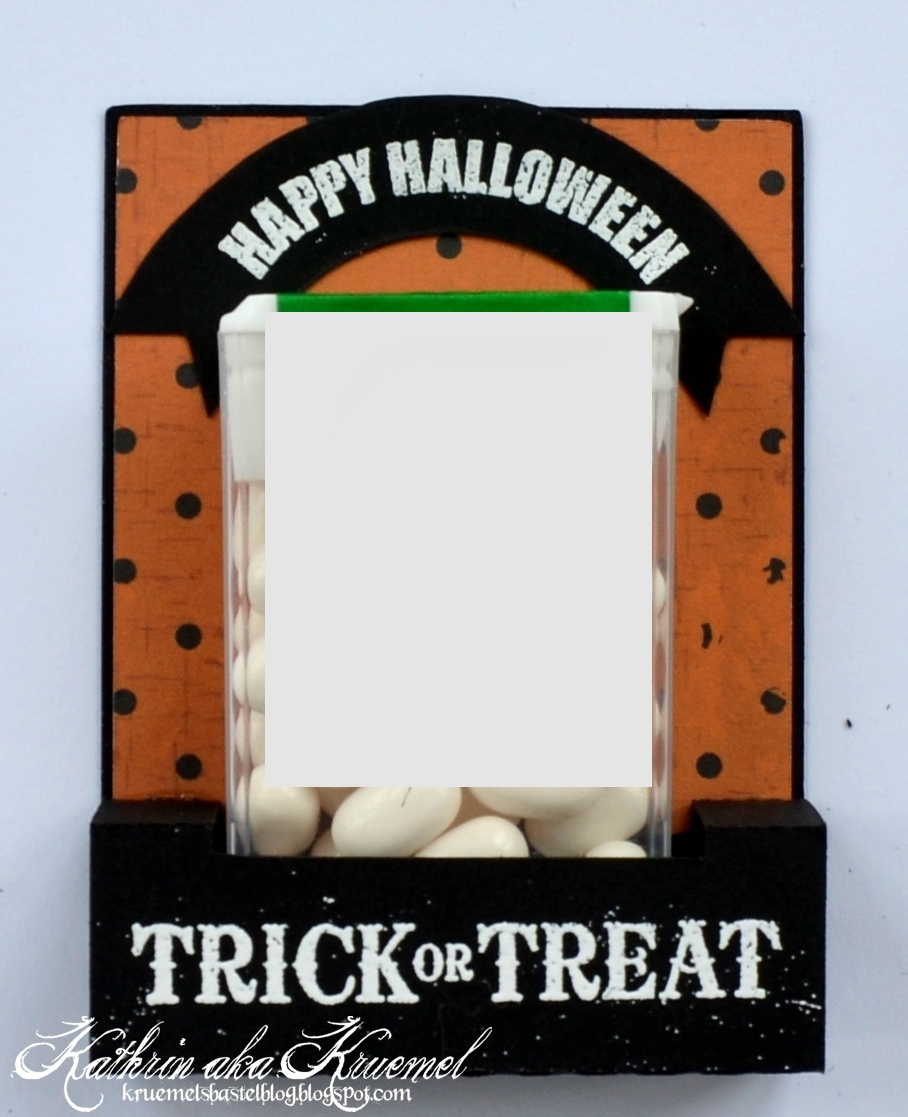
Meine Verpackung für die normal-großen Mints ist schon mal halloween-ig dekoriert. Denn dafür bietet sich diese Verpackung ja an. 
Auf der Vorderseite habe ich die beiden Kürbisse und den Geist von Magnolia aufgebracht. Dahinter befinden sich ein paar Wolkenschleier, Cheesecloth, ein Grabstein und zwischen den Kürbissen noch etwas Gras. Auch eine kleine Schleife durfte nicht fehlen.

My box for the regular sized mints is decorated as a Halloween gift. This is something those boxes really seem to be perfect for.
To the front I've added those two pumpkins ans the ghost by Magnolia. Behind those there are a few clouds, a gravestone and some cheesecloth. There's also some grass between the pumpkins and I also added some twine here.


Den inneren Teil habe ich mit "Trick or Treat" bestempelt und weiß embosst. Dass das Embossingpulver hier etwas am Cardstock kleben blieb, finde ich toll, denn das passt zu Halloween, finde ich.
Oben habe ich noch ein Happy Halloween, ebenfalls embosst, auf ein Banner gestempelt und aufgeklebt.

The inner part was decorated with a Trick or Treat saying that is heat embossed using white embossing powder. That there were a few smaller pieces sticking to the cardstock here is something I really like because it goes great with Halloween.
For the top I've stamped - and also heat embossed - a Happy Halloween onto a banner and glued to the inner part.

Und hier habe ich noch meine Version für die Mini-Mints. Das waren die Swaps, die ich dieses Jahr fürs Mekka vorbereitet hatte. Die Mini World Schnecke von Magnolia war geradezu perfekt - es ist hier wirklich nicht viel Platz für Deko. Aber bisschen was geht immer, oder?

And  here is my version of the mini mints box. Actually these are the swaps I made for a stamp fair that was held in September. That cute Mini World snail by Magnolia seemed perfect - there's really not much room for decorations here. But there's always room for some, right?


Donnerstag, 5. Oktober 2017

Eine Einhornkarte


Hallo Ihr Lieben!
Heute zeige ich auf dem Kulricke Blog diese Einhorn-Karte. Und was wäre eine Karte mit Einhorn ohne ein wenig Magie?

Hello everyone!
Today I am sharing this unicorn card over at the  Kulricke Blog. And what'd a unicorn card be without a little magic?


So sieht die geschlossene Karte aus. 
Ich habe das Mini-Einhorn abgestempelt, coloriert und ausgeschnitten. Anschließend habe ich es auf eine Wolke aus weißem Glitzerpapier geklebt. Die große Wolke habe ich zerschnitten, damit sie nicht zu weit ins Fenster ragt.
Der Text ist ebenfalls aus dem Mini-Einhorn Stempelset.
Oben über der Karte habe ich dann noch den Kometen aus dem Stanzenset Sternglanz aufgeklebt, gestanzt aus goldenem Glittercardstock. Dieser Cardstock ist mit einer Schicht Klarlack oder auch Kleber überzogen. Dadurch glitzert er zwar nicht mehr so extrem, der Glitzer kann aber auch nicht abgehen.

This is the closed card.
I stamped the mini unicorn, colored it in and cut it out. Then I've put it onto the big cloud that was cut in half so it wouldn't cover too much of the window.
The saying means "a unicorn makes your world sparkle".
To the top I've added a die cut star, cut from golden glitter cardstock. This cardstock has a layer of glue or clear paint on top of the glitter. That deludes its sparkle a bit but you don't have your hands full of glitter that came off either.


Wie Ihr wohl schon auf dem ersten Bild gesehen habt, kann der Teil mit dem Text zur Seite gezogen werden. Darunter kommt dann diese Szene mit Regenbogen zum Vorschein - passend zum Text nur aus Glittercardstock gestaltet.
Damit sich der Slider-Teil beim Auf- und Zuschieben nicht an den Lagen der Szene verfangen kann, habe ich den Regenbogen, die Wolken und die Sterne aus dem türkisfarbenen Glitzerhintergrund passend ausgestanzt und die andersfarbigen ausgestanzten Teile passend wieder eingesetzt. 

As you may have seen on the first picture already the part with the text can be pulled aside. Underneath there is this scene with a rainbow - matching the saying cut only using glitter cardstock. To avoid that the sliding part somehow gets stuck on the die cut pieces I've die cut the shapes of the dies from the turquoise cardstock in the background and then put in the individual pieces again.


Mittwoch, 4. Oktober 2017

Ein magischer Treat


Hallo Ihr Lieben!
Ich glaube, ich erwähnte es bereits - ich liebe es, zum Thema Halloween zu basteln! Darum, und weil es mir die Fa-Boo-Lous Friends total angetan haben, zeige ich heute auf dem Stamping-Fairies Blog eine Halloween-Verpackung. Die sieht von außen aus wie eine normale Box, die ich aus schwarzem Cardstock gewerkelt habe.

Hello everyone!
I thing I already mentioned that I love halloween themed crafts. Because of that and because those Fa-boo-lous Friends stamps are so cute I am sharing a halloween box over at the Stamping-Fairies Blog today. This looks like a simple box, cut from black cardstock, on the outside, but there's more inside.

Das Papier im Hintergrund habe ich selbst gemacht. Dafür habe ich den Make your Mark Background mit Distress Ink Black Soot auf weißen Cardstock gestempelt. Da das Distress Ink langsam trocknet, konnte ich dann klares Embossingpulver aufstreuen und schmelzen. Dann habe ich Distress Ink Wilted Violet benutzt, um das weiße Papier einzufärben. Warum ich nicht einfach lilafarbenen Carstock benutzt habe? Ich wollte sichergehen, dass der Hintergrund farblich zu meinem Wolkenhintergrund passt. Den habe ich mit der Mini Cloud Edges Schablone und Distress Ink Wilted Violet und Blueprint Sketch gestaltet. 
Darauf kam dann eines der Peek-a-boo Wonky Windows. Da sie so schief sind, finde ich die gerade für Halloween einfach klasse.
Der Baum, der Mond und die langgezogene Wolke aus dem Stanzenset Spooky House ergänzen meine Szene - den Hügel habe ich einfach mit der Hand geschnitten.
Vorne auf die Box kamen dann zwei der Grabsteine aus dem Stempelset Grave Situation, die ich maskiert und dann ausgeschnitten habe. Und dann kamen der kleine Geist, die Hexe und die Fledermaus - die für sie richtig herum vom Rahmen hängt - zum Einsatz. 

The paper in the background was made stamping the Make your Mark Background onto white paper, using Distress Ink Black Soot. Since those inks are slowly drying I covered the lines with clear embossing powder and melted it. Then I used Distress Ink Wilted Violet to color the white paper in. Why I didn't go with a purple carstock instead? Because I wanted to make sure the background matches my clouds. Those were made using the Mini Cloud Edges Stencil and Distress Ink Wilted Violet and Blueprint Sketch.
Then I added one of the Peek-a-boo Wonky Windows. Since they are kind of crooked I think they are perfect for Halloween.
The tree, moon and long cloud from the Spooky House die set were used for my scene - the hill was simply handcut.
I also added two gravestones from the Grave Situation stamp set. They were masked and cut out. And then I added the cute little ghost, witch and bat - who is hanging down from the frame just like bats do.


So sieht die geöffnete Box aus. Beim Öffnen fahren die Marshmallows, die in geschlossenem Zustand in der Box liegen, heraus.
Die Papiere innen habe ich genauso wie das auf der Außenseite gemacht.

This is the opened box. When you open it, the marshmallows, that are inside the box when it is closed, come out of the oval cutout.
The papers inside were made just like the one on the outside. 


Innen habe ich die kleine Mumie in den Decke geklebt. Und da ich wollte, dass es so aussieht, als würde sie schweben, habe ich einen der Oval Shadows daruntergesetzt.

On the lid I used the cute mummy. Since I wanted it to look like it's hovering I used one of the Oval Shadows here.


Und dies ist die Box. Der Ausschnitt ist mit einem der Stitched Oval Stax gemacht. Und die kleine Spinne hat sich hier auch niedergelassen.

And this is the box. The cutout was made using one of the Stitched Oval Stax. And the little spider made herself a home here as well.


Montag, 2. Oktober 2017

October Challenge bei Noor!Design UK


Hallo Ihr Lieben!
Bei Noor!Design UK startet die  neue Challenge mit dem Thema "Fall Colors". Also, einmal in den Erdtöne-Farbtopf gegriffen und entstanden ist diese Karte.

Hello everyone!
Over at Noor!Design UK the new challenge goes life and our theme is "Fall Colors". So, grab those warm earthy colors like I did to make this card.

Das blaue Designpapier von Maja Design hätte mich im ersten Moment zu einer Männer-Karte inspiriert, aber durch die braunen Streifen passt es auch sehr gut zum Thema. Und mit den übrigen Papiere kombiniert wird daraus ein herbstlicher Farbenmix.

The blue designer's paper by Maja Design would have inspired me to a men's card at first look but with the brown stripes it also goes great with the theme. And combined with the other papers I got  a fall-ish mix of colors.


Das Motiv von LDRS passt ebenfalls prima zu Thema. Die vielen Blumen, die die Dame hält bzw. auf dem Kopf trägt erinnern mich an die typischen Herbstgestecke. Coloriert habe ich wie immer mit Copics. Damit sich das Motiv gut genug vom Untergrund abhebt, habe ich ein weißes Doily mit auf meine Karte geklebt.

The image by LDRS is also great for this theme. With the many flowers she's holding or having in her hair she reminds me of those beautiful fall flower bouquets. As usually I did the coloring with Copics. To make the image pop out enough from the background I added a white doily to my card.


Und hier ist meine Deko. Neben einem Chipboard-Kreis mit Blüten habe ich noch eine weiße Blume und ein metallenes Blatt verwendet. Und für den extra Herbst-Touch sorgt ein kleiner Tannenzapfen und zwei orange-rote Beeren.

And this is what did to decorate my card. Beside the circle from chipboard I also added a white flower and a metal leave. And for the extra fall touch I also added a mini pinecone and two orange-red berries.


Sonntag, 1. Oktober 2017

Oktober-Challenge bei Stamping-Fairies


Hallo Ihr Lieben!
Heute startet die neue Challenge bei Stamping-Fairies. Und da es schon Oktober ist, haben wir uns für das Thema Halloween entschieden. Ich habe diese Karte gemacht - die süßen Stempel von MFT mussten unbedingt eingeweiht werden!

Hello everyone!
Today we are starting a new challenge over at Stamping-Fairies. And since it is october already we went with the theme of Halloween. This is my card - those cute stamps by MFT wanted to get inked up.

Wie gesagt, die Stempel aus dem Fa-Boo-Lous Friends Stempelset haben es mir angetan. Ich finde die einfach zu genial! Hier haben es der Kürbis, die Fledermaus und die Mumie auf meine Karte geschafft. Auch der Text ist aus diesem Set. Normalerweise schneide ich Motive ja mit der Hand aus, aber hier habe ich mir das passende Stanzenset dazu gegönnt - gerade die kleineren Teile wie Spinne und Spinnennetz wären doch etwas frickelig per Hand auszuschneiden gewesen.

As I said before, those stamps from the Fa-Boo-Lous Friends stamps set are totally my type of thing. I just love them! Here I used the pumpkin, the bat and the mummy, and the saying. Usually I hand-cut my images but here I went with the matching dies - especially those smaller images like the spider or cobweb would  have been a pain to cut by hand.

Als Basis habe ich hier eine schwarze Karte verwendet und unten eine orangefarbene Schleimbordüre aufgeklebt. Den Rand der Papiere darüber habe ich mit der Stitched Triple Peek-a-boo Window and Edge Stanze  gemacht. Um den gestrichelten Rand am weißen Papier habe ich per Hand herumgeschnitten. Die beiden Kreise habe ich so angeordnet, dass sie die beiden Os von Boo! bilden. Das B und das Ausrufezeichen habe ich dann passend daneben geklebt.

As a base I went with a black card and added a gooey border cut from orange cardstock. The edges of the white and designer's paper were cut using the Stitched Triple Peek-a-boo Window and Edge die. I simply hand cut around the stichted edge of the white paper. 
I place the two circles so they create the Os of the Boo! and added the B and the exclamation mark so they completed the text.


Und hier sind Fledermaus und Mumie nochmal nähter aufgenommen. Die Fledermaus ist auf das Designpapier geklebt, die Mumie habe ich mit 3D Tape festgemacht.

And here's a close-up of the bat and mummy. The bat is glued to the designer's paper, the mummy is added using foam tape.


Samstag, 30. September 2017

Stempeleinmaleins - Ausgabe vom 30. September 2017


Hallo Ihr Lieben!
Heute startet beim Stempeleinmaleins unsere neue Challenge. Und weil er leider schon mindestens einen Fuß in der Tür hat, haben wir ihn gleich zum Thema gemacht: den Herbst.
Ihr seht es vielleicht, ich bin noch nicht wirklich bereit dafür. Darum habe ich zwar ein herbstliches Motiv und passeden Text gewählt, farblich aber mit blau und grün bin ich dann doch eher noch im Sommer unterwegs...

Hello everyone!
Today we at Stempeleinmaleins are starting our new challenge. And since it's not only standing in front of the door but having at least knocked a few times we made it our theme: fall. 
Maybe you can see that I'm so not ready for it yet. So I used a fall-ish image and matching saying but colorwise I went with a little more summer-ish by using green and light blue.

Das Motiv, das ich benutzt habe, ist von Sugar Nellie. Die benutze ich ja auch viel zu selten! Aber hier passte es. Es ist mit Copics coloriert, darunter liegt der Spinnwebenkreis von Marianne Design. Den hatte ich letztes Jahr zu spät gekauft, darum war er noch jungfräulich... 
Etwas Cheesecloth, Blumen, ausgestanzte Blätter und Zweige sowie ein Tag in Holzoptik von Magnolia haben ebenso einen Platz gefunden wie etwas breite Spitze und der Siegelstempel von Catslife Press.

The image I used is by Sugar Nellie. I am using those way not often enough! But here it was the perfect pick. It's been colored in with Copics and there's a die cut spider web circle by Marianne. I bought it last year but it was too late for any fall-ish cards so it was unused until now. 
I also added some cheesecloth, flowers, die cut leaves and twigs, a die cut tag with a wooden pattern by Magnolia and some wide lace. The saying is one of the seal stamps by Catslife Press.


Freitag, 29. September 2017

Eine herbstliche Karte mit Bären und Drachen


Hallo Ihr Lieben!
Den beiden Bären auf meiner Karte, die ich heute auf dem Stamping-Fairies Blog zeige, macht der Herbstwind gar nichts aus. Sie nutzen ihn zum Drachensteigen!

Hello everyone!
Those two bears on my card, that I am sharing over at the Stamping-Fairies Blog today, don't get bothered by the wind outside. Instead they went out to let their kite fly.

Die Karte ist nach einem der Sketche von MFT entstanden - bei manchen habe ich einfach sofort eine Idee im Kopf. So war es mit dieser Karte. 
Der Text ist aus dem Polar Bear Pals Stempelset.

The card was made following one of the sketches over at MFT - at some I only have to look and get an idea. Like with this one.
The saying is from the Polar Bear Pals stamp set.


Und hier könnt Ihr meine Szene - kann man das in diesem Fall so nennen? - besser sehen.
Die beiden Bären sind natürlich aus dem Bitty Bears Stempelset. Das finde ich klasse, denn es ist für jede Gelegenheit der passende Bär dabei. 
Den weißen Cardstock hinter den runden Fenstern habe ich blau gewischt und darauf dann einen der Modern Trees in Herbstfarben aufgestempelt. Da der Baum ja schlecht in der Luft schweben kann, habe ich einen der Grassy Hills davorgesetzt.
Der Drachen aus dem Adorable Elefants Stempelset ist ausgeschnitten und außen auf die Karte geklebt. Vom Bär zum Drachen habe ich etwas Twine gespannt. Ich weiß, eigentlich hätte die Schnur oberhalb des Cardstocks laufen müssen, sind doch Drachen und Bären auch darauf angebracht. Aber der braune Strich quer über die Karte sah komisch aus.
Da der Drachen allen oben etwas fad aussah, habe ich noch zwei Wolken aus dem Beach Scene Builder Stanzenset aufgeklebt.

And here you get a better look at the scene I created - if you can all this a scene.
Those two bears are from the Bitty Bears stamp set. I just love this one, there's a bear for ever occasion in it.
The white cardstock behind the round cutouts was inked in with blue ink. Then I stamped one of the Modern Trees into the lower window, using fall-ish colors. And since the tree can't fly around - it's not that windy - I've put one of the Grassy Hills in front of it.
The kite is from the Adorable Elephants stamp set. I've cut it out and glued it to the outside of my card. I've connected bear and kite with some brown twine. I know, the twine should have gone on top of the carstock since both kite and bears are glued onto it as well. But that brown line across the card looked kind of strange.
Since the kite alone looked a bit boring in the top window I also added two clouds from the Beach Scene Builder die set.


Mittwoch, 27. September 2017

Eine Shaker-Card


Hallo Ihr Lieben!
Kennt Ihr das - Ihr kauft eine Stanze und dann liegt sie doch einige Zeit unbenutzt herum. So ging es mir mit der Star Shaker Stanze von MFT. Aber auf dieser Karte, die ich heute auf dem Blog von Stamping-Fairies zeige, kam sie nun endlich zum Einsatz.

Hello everyone!
Do you know this - you buy a die and then it lies around unused for quite some time. That's what happened to this Star Shaker die by MFT at my house. But know I finally used it on this card, that I am sharing over at the Stamping-Fairies Blog today.

Es ist - wie öfter in letzter Zeit - eine weniger niedliche Karte geworden. Aber genau so eine brauchte ich. 
Für den Hintergrund habe ich den Abstract Background mit weißem Embossingpuler von Ranger auf Aquarellpapier embosst und dann das Papier teilweise mit Distress Ink Salty Ocean eingefärbt. Das ist die einzige Methode, wie ich Wasserfarbenhintergründe für mich zufriedenstellend hinbekomme. Aus dem Papier habe ich dann den kleineren Stern der Star Shaker Stanze ausgestanzt und ihn so auf das schwarze Papier im Hintergrund aufgeklebt, dass er genau im Fenster sitzt. Später bin ich dann auf die Idee gekommen, dass ich den Star Shaker Pouch auch einfach auf die komplette Karte hätte kleben können und dann den schwarzen Sternrahmen drumrumkleben. Aber naja, warum einfach wenn es auch kompliziert geht, oder?
Der Shaker Pouch ist mit kleinen silbernen Pailetten und kleinen dunkelblauen Kugeln gefüllt. 
Quer über die Karte habe ich zweimal die gebogene Fringed Scalloped Border aufgeklebt, die ich aus silberfarbenem Glittercardstock gestanzt habe. Ich habe sie so zugesschnitten, dass sie im Fenster nicht zu sehen ist. 
Rundum auf der Karte habe ich ein paar Metallic-Punte in silber und blau aufgeklebt.

Like more often lately I made a not so cute card. But that's exactly what I needed.
For the background I stamped and heat embossed the Abstract Background onto watercolor paper using white embossing powder. Then I colored in parts of the paper with Distress Ink Salty Ocean. This is the only way I get watercolor backgrounds I am happy with. 
Then I've die cut the smaller star from the Star Shaker die set from the finished background and glued it to the black matting so it would be exactly inside the frame later. Well, after doing so I found out that it would have been easier to simply glue the Star Shaker Pouch onto the background and cover it with the black star frame. But well, why going the easy way, right?
The Shaker Pouch is filled with small silver sequins and tiny dark blue beads. 
Across the card I've glued two of the Scalloped Fringed Borders, cut from silver glitter cardstock. I've cut it so it isn't covering any of the paper inside the shaker.
I also added a few metallic dots in silver and blue onto the background.


Unten auf der Karte habe ich dann noch ein Hello - gestanzt mit einer der Stanzen aus dem Thanks + Hello Stanzenset - aufgeklebt. Ich habe ein paar Highlights mit weißem Gelstift aufgemalt und das Wort dann mit Glossy Accents überzogen.

To the lower right corner I've glued a die cut hello from the Thanks & Hello die set. I've added a few highlights using a white gel marker and then covered the word with Glossy Accents.


Montag, 25. September 2017

Eine Card-in-a-Box zu Halloween


Hallo Ihr Lieben!
Der Herbst macht sich immer mehr bemerkbar. Ich denke, da ist es vertretbar, auch schon an Halloween zu denken. Ich bastel dafür ja wahnsinnig gerne. Und darum zeige ich heute auf dem Kulricke-Blog diese Card-in-a-Box.

Hello everyone!
When looking outside the window there are more and more signs of fall visible. So I think it's okay to post a Halloween card - I love crafting for Halloween. And so I am sharing this card in a box today over at the Kulricke Blog.


Das hier ist der Hauptteil der Karte, mit vielen Lagen. Das kann man aber bei so einer Card in a Box ganz nach persönlichem Geschmack machen.
Ich habe vorne eine ausgestanzte Grasbordüre, ausgestanzt aus grauem Cardstock, aufgeklebt. Dahinter ist das ausgestanzte Wort Halloween. Das ist aus schwarzem Cardstock gestanzt, mit einem weißen Gelstift habe ich ein paar Highlights gesetzt und das Wort dann auf einen Streifen Folie geklebt. So konnte ich es höher als das Gras anbringen, Felix dahinter ist aber trotzdem gut zu sehen.
Dann kommt Felix. Der ist eigentlich Felix Hurra und hat sich hier als Geist verkleidet - und ich hoffe, man kann das erkennen. Ich habe den Stempel mit heller Tinte abgestempelt, den Umriss des Geisterkostüms mit einem Bleistift dazugemalt und alles dann mit Copics coloriert, in schön hellen Farben. So sieht es so aus, als würde man Felix durch ein dünnes Tuch sehen. Und nein, er hat sich keinen chinesischen Schnurrbar wachsen lassen - das Tuch musste ja um den Schnabel ein paar Falten werfen! ;)
Die Lage dahinter bildet das Schild aus dem Stempelset Zahlen. Das habe ich coloriert, per Hand ausgeschnitten und dann den Text darauf geschrieben.
Nun brauchte ich noch etwas Höhe. Da schien mir ein Berg genau das richtige. Der ist mit der Berge Stanze gemacht. Ich habe oben wieder ein paar Highlights aufgemalt und den Berg von unten mit schwarzer Tinte gewischt, die nach oben ins Grau übergeht. So sieht der Berg plastischer aus.
Und ganz hinten habe ich dann dunkelblauen Cardstock aufgeklebt, auf den ich Wolken, ein paar Sterne und einen Vollmond aufgeklebt habe, der hinter dem Berg aufgeht.

This is the main part of my card, made with many layers. But the great thing about a card in a box is that you can add as many or as few as you like.
To the front I've glued a grass border, punched from grey cardstock. Behind it I've added a die cut Halloween. It's cut from black cardstock, then I've added a few highlights with a white liner and glued the word onto a strip of transparency. That made it possible to set it higher than the grass but you can still see the image behind it clearly.
Then there is Felix. Originally this is Felix Happy who dressed up as a ghost here - and I hope that can be seen clearly. Therefor I've stamped the image with ligth ink and then used a pencil to hand draw the ghost costume around him. Then I've colored everything in with my Copics, using light colors so it looks like you can see Felix through a costume from light fabric. And no, he didn't grow himself a chinese mustache - the costume had to create a few folds around his beak, right? ;)
The next layer is decorated with a sign from the Zahlen stamp set. I've colored it in, cut it out and then wrote the saying on it by hand.
For the next layer I needed some height - and a mountain seemed perfect for it. I used the Berge die here and added a few highlights again. I also used black ink from the bottom of the mountain, getting grey to the top to make it look more realistic.
And to the back panel I've added some dark blue cardstock that I glued some clouds, hand painted stars and a full moon to, that is now rising behind the mountain.


Das hier ist der vordere Teil der Karte. Hier habe ich die Zahlen 31, ausgestanzt mit den passenden Stanzen, und das Wort Oktober aus dem Stanzenset Monate I auf einen schwarzen Stitched Circle aufgeklebt, und das ganze dann auf ein weiteres Quadrat aus dunkelblauem Cardstock.

This is the front part of my card. Here I glued the numbers, cut out with the matching dies, and the die cut word October from the Monate I die set onto a black Stitched Circle and then glued all this onto another square from dark blue cardstock.


Hier sieht man den 3D-Aufbau der Karte besser - und auch die beiden seitlichen Teile. Die sind jeweils mit einem der Häuser und Wolken beklebt. Außerdem habe ich hier eine weitere Grasbordüre aufgeklebt. Um etwas Farbe ins Spiel zu bringen, habe ich hier jeweils noch ein Stück orangefarbenes Band um das Seitenteil gewickelt und verknotet.

Here you see the 3D layers a bit better - and also those two side parts. Onto those I glued one of the houses and more clouds. I also used more grass borders here and to add some color I've tied some orange ribbon around those parts.


Und so sieht die zusammengefaltete Karte aus. Wie Ihr seht, manchmal muss man nur etwas Einfallsreichtum entwickeln, um Stempel einem gewissen Thema ein wenig anzupassen.

And this is what the card looks like folded flat. As you can see, you have to think outside the box sometimes to make a stamp match a certain theme.


Sonntag, 24. September 2017

Spaß im Herbst


Hallo Ihr Lieben!
Ich weiß, vor einer Woche habe ich noch gesagt, ich verlängere den Sommer. Aber irgendwie entkommt man dem Herbst doch nicht. Und so zeige ich heute auf dem Noor!Design UK Blog diese Herbstkarte.

Hello everyone!
I know, a week ago I wrote that I am extending summer. But you really can't escape fall. So I am sharing this fall-ish card over at the Noor!Design UK Blog today. 

Das tolle Papier mit den herbstlich gefärbten Blättern  war das, woran ich die anderen Farben auf meiner Karte angepasst habe. So kam ein warmes Grün und ein Cremeweiß dazu. 

The great paper with the colorful leaves was what I made the other colors on my card match. So I added a warm green and a neutral ceme white paper.


Das Motiv von Dreamerland Crafts habe ich dann ebenfalls in Erdtönen coloriert. Ich liebe den Look des Motivs, der mich ein wenig an alte Kinderbücher erinnert. Und ich kann mir vorstellen, wie die beiden mit dem Rad durch einen Haufen Herbstlaub fahren.

The image by Dreamerland Crafts is also colored in using warm earth tones. I love the look of this image that reminds me of those old children books. And I can imagine those two riding through a pile of fallen leaves.


With the decorations I created some kind of garden that those two cuties can ride by. Here I used a chipboar flower, a piece of a white wooden fence, a metall leave and a flower. I also added two of the Glass Stamen, just as they not as a flower center.


Freitag, 22. September 2017

Die erste Weihnachtskarte des Jahres


Hallo Ihr Lieben!
Ja, ich weiß, es ist noch etwas Zeit, aber irgendwann muss sie ja kommen: die erste Weihnachtskarte des Jahres. Und die habe ich gestern auf dem Vildastamps Blog gezeigt. 

Hello everyone!
Yes, I know, there's still some time. But one day I had to post it: the first christmas card of this year. So here it is, and I've been sharing it yesterday over at the Vildastamps Blog. 

Ich habe mich, was Glitzer etc angeht, noch etwas zurückgehalten. Und so ist eine eher schlichte, edle Karte entstanden. Im Hintergrund habe ich graues und eisblaues Designpapier verwendet. Der Stern aus dem Stempelset Squares, Circle and Star ist mit silbernem Pulver embosst, ausgeschnitten und zwischen die Papiere geklebt. Ein paar kleinere ausgestanzte Sterne kamen ebenso auf die Karte wie Cheesecloth und Spitze in verschiedenen Breiten.

I kept it easy regarding glitter an co. So this turned out as a more simple but elegant card. In the background I used grey and ice blue designer's paper. The star from the Squares, Circle and Star stamp set is heat embossed using silver embossing powder and put between the designer's papers. A few smaller die cut stars and some cheesecloth and laces in differend width found a place on my card as well.


Für das Hauptelement habe ich die Wings abgestempelt und coloriert. Dann habe ich sie mit Maskiertape abgedeckt und drumherum die Christmascollage in hellblau abgestempelt. Beim Ausschneiden des Hintergrunds habe ich dann um die überstehenden Teile der Flügel herumgeschnitten. Das gibt einen leichten 3D-Effekt. Ein paar kleine silberne Pailetten habe ich auch noch auf den Hintergrund geklebt, damit es zumindest ein wenig funkelt.
Den Text aus dem Merry Christmas x2 Set habe ich wieder embosst, bannerförmig zugeschnitten und quer über das Motiv geklebt.

For the main element I stamped and colored in the wings. Then I've covered them with masking tape and stamped the Christmascollage oer/around the wings using light blue ink. When cutting out the background I've cut around the parts of the wings that go over the background which adds a slight 3D effect. To add at least a little sparkle I've added a few silver sequins to the background.
The saying from the Merry Christmas x2 stamp set is heat embossed again, then cut out in a banner shaper and glued across the image.


Donnerstag, 21. September 2017

Eine Fee im Sonnenaufgang

Hallo Ihr Lieben!
Auf dem Blog von Vildastamps zeige ich Euch heute diese Karte mit Fee.

Hello everyone!
Over at the Vildastamps Blog I am sharing this card with a fairy today. 

Für meine Karte habe ich die Weidenstanze als Grundlage für diese Szene verwendet. Dahinter befindet sich eine ausgestanzte Wellenlinie, hinter der die Sonne gerade aufgeht. Unten auf die Wolken habe ich das niedrigere der Gräser aus dem Grass Kit aufgestempelt. Damit es nicht zu flach wirkt, habe ich hier zwei verschiedene Farben von Distress Ink verwendet - Peeled Paint und Black Soot. Für noch mehr Tiefe sorgen die ausgestanzten Blumen im Vordergrund.

For my card I used the willow tree die as the base of my scene. Behind it I've added a die cut line of clouds behind which the sun is rising. To the bottom of the clouds I've stamped the lower one of the stamps from the Grass Kit. To not make it look to flat I used two different Distress Ink colors here - Peeled Paint and Black Soot. The die cut flowers in the front are adding some more depth to my card.


Die süße Fee ist aus dem Stempelset Puck and Sebille. Sie scheint dem kleinen Vögelchen beim fliegen helfen zu wollen. Da ich die verschiedenen Ebenen meiner Karte mit 3D Tape aufgeklebt habe, konnte ich sie nicht direkt auf die Karte stempeln, sondern habe sie nach dem Stempeln auf weißes Papier ausgeschnitten und extra aufgeklebt.
Für die Sonne habe ich den Kreis aus dem Squares, Circle and Star Stempelset abgestempelt und anschließend mit einer Schablone die Strahlen hinzugefügt. Das alles habe ich dann klar embosst, um den blauen Hintergrund drumherum wischen zu können.
Ein paar kleine goldene Pailetten sind alles an Deko, was ich hier verwendet habe. 

This cute fairy is from the Puck and Sebille stamp set. She seems to help the little bird learning to fly. Since I glued the different layers of my card down using foam tape I wasn't able to stamp her directly onto my card. Instead I stamped her on white cardstock, cut her out and glued her in place.
For the sun I used the circle from the Squares, Circle and Star stamp set, stamped it using yellow ink and then added the rays with a stencil. All of the yellow areas were then covered with clear embossing powder so I was able to add the blue background around the sun.
A few golden sequins were all I used for decoration here.