Mittwoch, 13. September 2017

Eine Karte mit Igel


Hallo Ihr Lieben!
Heute darf ich wieder eine Karte auf dem Stamping-Fairies Blog zeigen. Und ja, sie ist schon wieder blau...

Hello everyone!
Today I am sharing another card over at the Stamping-Fairies Blog. And yes, I used blues again...

Ich habe hier ein kleiners Quadrat aus Designpapier auf ein größers geklebt, beide sind weiß gemattet. Auf dem kleineren habe ich zwei der Stitched Clouds von MFT aufgeklebt.
Darauf kam ein ebenfalls weiß gematteter Stitched Circle. Da mir der nur aus einfarbigem Cardstock zu fad war, habe ich hier den Abstract Background aufgestempelt und mit weißem Embossingpulver embosst. 

Here I glued a smaller square of designer's paper onto a bigger one, both with some white matting. To the smaller one I've added two of the Stitched Clouds by MFT.
On top of that I've glued a Stitched Circle, also with some white matting. And since it was too plain from cardstock only I stamped the Abstract Background on it and heat embossed it with white powder. 


Quer über den Kreis habe ich zuerst etwas breite Spitze gelegt, darauf kam die gerade der Fringed Scalloped Borders. Die verbreiten irgendwie ein tolles Partyflair.
Und darüber habe ich die Precious Polaroids angebracht. Es ist die drittgrößte Größe aus dem Set, in den Bildausschnitt habe ich die süßen Igel aus dem Happy Hedgehogs Stempelset gesetzt. Die Idee mit dem "Platzhalter" habe ich vor einiger Zeit mal gesehen und fand sie toll. Hier werden nur die äußeren Linien gestempelt, darum herum habe ich dann den Hintergrund gestaltet. Der Text ist aus dem Penguins in Paradise Stempelset, der passte einfach perfekt.
Ein paar Blumen und der Heart Shaped Balloon geben der Karte dann den letzten Schliff.

Across the circle I've put some wide white lace and then the straight one of the Fringed Scalloped Borders. Those add a great party flair.
On top of that I've added the Precious Polaroids. I used the second biggest die here and stamped those cute hedgehogs from the Happy Hedgehogs stamp set into the area where the photo would be. The idea with the "ghost image" is something I saw some time ago and loved it. Here only the outlines get stamped, then I've created the background around it. The saying is from the Penguins in Paradise stamp set and was just perfect.
A few flowers and the Heart Shaped Balloon were all I needed to finish this card.


Montag, 11. September 2017

Eine Glückstäfelchen-Verpackung


Hallo Ihr Lieben!
Wie Ihr wisst, liebe ich es, Kleinigkeiten zu verpacken. Und als ich diese Glückstäfelchen gesehen habe, sind sie mir, einfach so, in den Einkaufswagen gehüpft. Auf den kleinen Schokoladen steht "Glückstäfelchen" und es befindet sich in jedem ein Glücksspruch. Eines davon habe ich bereits verpackt und zeige mein Werk heute auf dem Kulricke-Blog.

Hello everyone!
As you all know I love to make boxes for little give aways. And when I saw these chocolats they just jumped into my cart. There's "lucky bar" printed on it and there is a saying hidden inside each single wrapped chocolat. So, one of them is already wraped up and I am sharing my creation today over at the Kulricke-Blog.

Für die Verpackung habe ich die Taschentuchverpackung benutzt und etwas abgewandelt, damit die Schokolade auch hineinpasst. Dafür habe ich den Klebestreifen weg- und die beiden Teile an der gestrichelten Linien auseinandergeschnitten. Rechts und links kam ein 1 cm hoher Streifen und damit unten nichts rausrutscht habe ich auch dort einen kleinen Steg eingearbeitet. 
Die Farben sind etwas gewöhnungsbedürftig - orange und rosa. Aber so ist die Schokolade verpackt, darum habe ich mich daran orientiert und braun hinzugenommen.

For this I used the Taschentuchverpackung and changed it a bit to make the chocolat fit in. Therefor I just cut off the flap and cut the two other pieces apart. Then I simply added a cardstock strip of  1 cm to the sides and, to avoid the chocolat from falling out at the bottom, added a small piece of cardstock here as well.
The colors are a little weird, orange and pink. But that's what the chocolat is wrapped in and so I went with these and added some brown.


Aus der Vorderseite habe ich das Herz aus dem Movers und Shapers Set ausgestanzt. Für den Rahmen habe ich es ein weiteres Mal ausgestanzt und außen herum mit etwas Abstand mit der Hand geschnitten.
Das Kleeblatt aus dem Baum und Blatt Stanzenset passte wunderbar zum Thema Glück. Und der sich so doll freuende Felix aus dem Felix und seine Freunde Minis 2 Stempelset durfte auch mit auf die Verpackung. Er sitzt auf etwas Spitze, außerdem habe ich ein paar Glitzersteine und Blumen mit aufgeklebt.

From the front I've die cut the heart from the Movers and Shapers Set. For the frame I've die cut it again from brown cardstock and cut around with my scissors.
The clover from the Baum und Blatt die set goes great with the theme of luck. And this little Felix from the Felix und seine Freunde Minis 2 stamp set wanted to jump on as well. He's sitting on some pink lace and I also added a few rhinestones and flowers.


In der Verpackung sitzt ein Streifen Cardstock. Die Schokolade ist so aufgeklebt, dass man den Text durch den Herzausschnitt lesen kann. Oben habe ich mit der kleineren Euroloch-Stanze eine Öffnung ausgestanzt, durch die ich das Band gezogen habe. Außerdem habe ich hier noch die Für Dich Stanze benutzt. 

Inside the box there is a strip of cardstock. The chocolat was glued onto it so you can read the text printed on it through the cut out heart. I used the smaller of the Euroloch dies to cut out the opening on the top and put some ribbon through it. I also used a die cut "for you" here.


Sonntag, 10. September 2017

Ein Samentütchen


Hallo Ihr Lieben!
Mit diesem Werk mache ich es offiziell - ich bin ein neues Mitglied im Noor!Design UK DT! Und auf dem Blog darf ich jeden Sonntag ein Werk von mir zeigen.
Zum Start habe ich dieses Samentütchen gewerkelt, das ich herbstlich dekoriert habe.

Hello everyone!
With this it's officiell - I am a new DT member over at the Noor!Design UK DT. And over at the blog I am sharing a new project every sunday.
To start with I made this seed bag that I decorated with a fall theme.

Das Samentütchen ist mit der Stanze von Marianne Design entstanden. Und das enthält nicht nur das Samentütchen selbst, sondern auch viele kleine Teile zur Deko, z. B. die Sonnenblume oder auch das Schild.
Das Tütchen ist aus einem Papier  mit Holzsturktur aus dem Noor's Favourites Paper Pack  ausgestanzt. Darauf kam eine Lage Cheesecloth, etwas weißer Cardstock und darauf dann noch die Auflage für das Tütchen. Die habe ich aus gepunktetem Designpapier aus dem Berry Sweet Paperbloc ausgestanzt.
Einige der Papiere habe ich an den Rändern weiß eingefärbt. Dafür habe ich die weißes Gesso von Dutch Doobadoo verwendet.

The seed bag is made using the die by Marianne Design. And this set not only contains the seed bag itself but also lots of decorations like the sunflower and the label.
The bag is cut from a paper with a wooden print that comes in the Noor's Favourites Paper Pad. On top of it I've added some Cheesecloth, white cardstock and then the blue designer's paper  with the white dots. This is from the Berry Sweet Paperbloc.
I've added some white paint to the edges of some of the papers and used the white Gesso by Dutch Doobadoo for it.


Als Motiv habe ich die süße Farmer Tilda verwendet und passend zu den von mir verwendeten Papieren coloriert. 

For the image I used this cute Farmer Tilda and colored her in with my Copics, using colors matching the papers I used.


Hier könnt Ihr die Sonnenblume aus dem Set noch besser sehen. Sie besteht aus einzelnen Teilen und die können prima mit den anderen Teilen aus dem Set kombiniert werden, um auch andere Pflanzen gestalten zu können.

Here you get a better look on the sunflower. It's put together from different die cuts that can be combined with other dies from the set to create other flowers.


Und hier habe ich noch eine Nahaufnahme von meinem Label. Ich habe darauf Happy Fall geschrieben. Die Buchstaben sind mit der Alphabets and Numbers Stanze von Noor!Design gemacht.

And here ich have a close-up of the labe. I worte Happy Fall on it and used the Alphabet and Numbers die by Noor!Design to cut the letters out.


Donnerstag, 7. September 2017

3D Door Card mit Tutorial


Hallo Ihr Lieben!
Heute bin ich wieder dran, auf dem AltairArt Blog zu posten. Und diesmal habe ich ein Tutorial für eine 3D Door Card gemacht. Mit den tollen Papieren aus der Holy Mountains Serie bekommt die Tür einen tollen rustikalen, abgeblätterten Look.

Hello everyone!
Today it's my turn again to post over at the AltairArt Blog. And this time I've made a tutorial for a 3D Door Card. With those great papers from the Holy Mountains series the door gets a great rustic look.

Die Tür ist aus verschiedenen Lagen des Designpapiers aufeinander geklebt, wobei ein paar Panele in ausgeschnittene Fenster eingesetzt werden und so der 3D Look hervorgehoben wird.

The door is created from different layers of designer's paper, adding a few panels and cut outs to create that 3D look.


Und auch wenn ich den Sommer gerne noch für ein paar Monate länger hätte - wir gehen langsam auf den Herbst zu. Darum habe ich meine Tür schon mal herbstlich geschmückt. Dafür habe ich ein paar Äste aus braunem Cardstock ausgestanzt, darüber kamen Äste mit Blättern und einzelne Blätter aus Designpapier dazwischen. Darüber habe ich dann eine Schleife und zwei kleine Banner mit einem Text angebracht.
Der Türgriff ist aus einem kleinen ausgestanzten Label mit einem aufgesetzten kleinen Kreis gestaltet.
Die Tür habe ich auf ein Stück nur leicht gemustertes Designpapier geklebt, das die Hauswand darstellen soll.

And even if I'd love to keep summer a few more months - we're heading into fall soon. So I've added some fall-ish decorations to my door. Therefor I've die cut a few branches from brown cardstock and put a few branches with leaves and a few single leaves inbetween. On top of that I've added a bow and two banners with a text stamped on.
The door knob is made from a small punched out label with a small circle on top.
The door is glued onto a piece of designer's paper with only a slightly visible pattern that is meant to be the house wall.


Montag, 4. September 2017

Eine Urlaubskarte


Hallo Ihr Lieben!
Während Ihr das lest, sitze ich gerade im Flieger auf dem Weg nach Hause. Für  mich ist der Urlaub also bereits so gut wie vorbei. Aber es gibt ja Leute, die erst jetzt starten - und für so jemanden ist diese Karte entstanden, die ich heute auf dem Kulricke-Blog zeige.

Hello everyone!
While you're reading this I am sitting in a plane on my way back home from vacation. So holidays are nearly over for me. But there are people that start only now - and for one of those I made this card that I am sharing over at the Kulricke-Blog today.


Ich habe eine Pop Up Slider Karte gemacht. So sieht sie geschlossen aus. 

I made a pop up slider card - and this is what it looks closed.


Zieht man oben am Band, dann stellt sich der Teil mit dem Motiv auf. Darunter ist Platz für einen Gruß. Ich habe hier einen der Stempel aus dem Set Reise Welt aufgestempelt. Aus demselben Set ist auch das "Urlaub", das ich auf den Tag gestempelt habe.

If you pull the ribbon, the part with the image stands up. In the area that can be seen now there's room for a greeting. Here I stamped "I just wanted to wish you a safe traveling" on. The word on the tag means "vacation".


Und hier seht Ihr das Motiv genauer. Ich habe hier das Auto aus dem Stempelset 100 % Mann abgestempelt und mit der passenden Stanze ausgestanzt. Kennt Ihr diese alten Autos, die Holzelemente in den Türen haben? Genau daran erinnert mich dieses Auto. Und da es ja alt ist, habe ich ein paar rostige Stellen mit coloriert.
Im Hintergrund habe ich ein blau-weiß gestreiftes Designpapier aufgeklebt, darauf kamen die Wolken, eine Palme und das ausgestanzte Auto.

And here's a close-up of the image. I used the car from the 100 % Mann stamp set and cut it out using the matching die. Do you know those old cars that have wooden planks inside the doors? That's exactly what this car reminded me of. And since it's an old car I also added some rusty areas while coloring it in.
In the background I used a blue and white striped designer's paper and put the clouds, a palm tree and the die cut car on top of it.


Samstag, 2. September 2017

Stempeleinmaleins - Ausgabe vom 02. September 2017


Hallo Ihr Lieben!
Mit unserer ersten Anleitung nach der Sommerpause zeigen wir Euch beim Stempeleinmaleins eine kombinierte Easel- und Treppenkarte. Ich bin ehrlich, Treppenkarten liegen mir so gar nicht. Aber diese hier ist die erste, mit der ich zufrieden bin!

Hello everyone!
With our first tutorial after our summer break we at Stempeleinmaleins are sharing a combined easel and step card. To be honest, I don't like making those step cards. But this one is the first one I am happy with!


Der Sommer neigt sich dem Ende entgegen. Darum dachte ich mir, ich mache noch einmal eine maritime Karte.
Für den Hauptteil der Treppenkarte habe ich ein Papierschiff abgestempelt und davor und dahinter Wellen gesetzt. Das Schiff ist in einen Kreis geklebt, der wiederum auf einem Quadrat klebt. Rot-weiß gestreift gehen bei maritim genausogut wie Sterne... Ich habe hier beides verwendet. Ein paar Wolken und Möwen habe ich genauso untergebracht wie das Ahoi von Kulricke.
Auf die Wellen habe ich mit einem weißen Sharpie kleine Schaumkronen aufgetupft.

Summer is coming to an end. So I decided to make one last maritim card.
For the main part of the step card I stamped a paper boat and put some die cut waves behind and in front of it. The boat is glued to a die cut circle which is then glued to a square. Red and white stripes are as great for maritim card as stars - I combined both on my card. A few clouds and sea gulls also found a place on this card, so did a die cut Ahoi by Kulricke.
I used a white Sharpie to add some foam crowns to the waves.

Und hier ist der Easel-Teil der Karte. Hier habe ich die Fischernetz-Stanze von Marianne Design aufgeklebt, darauf kam ein Streifen Designpapier, etwas blaues Wellenband und Cheesecloth. Den Text aus dem Stempelset Ahoi von Kulricke habe ich auf eine ausgestanzte Papierrolle aufgestempelt und davor noch einen Anker gesetzt.

And here is the easel part of my card. I used the fisher net die by Marianne Design here, put a strip of designer's paper across the card and added some blue wavy ribbon and cheesecloth. The saying "get on board, we're going to the sea" is stamped onto a die cut paper roll and I've put an anchor to the left corner.


Freitag, 1. September 2017

Die September-Challenge bei Stamping-Fairies


Hallo Ihr Lieben!
Da heute der erste des Monats ist, startet heute unsere neue Challenge auf dem Stamping-Fairies Blog. Diesmal lautet unser Thema "MFT und/oder Tim Holtz Stencil". Ihr sollt also Schablonen verwenden.

Hello everyone!
Since it's the first of the month today we are starting our new challenge over at the Stamping-Fairies Blog. Our theme this month is "MFT and/or Tim Holtz stencil" - so use your stencils this time!

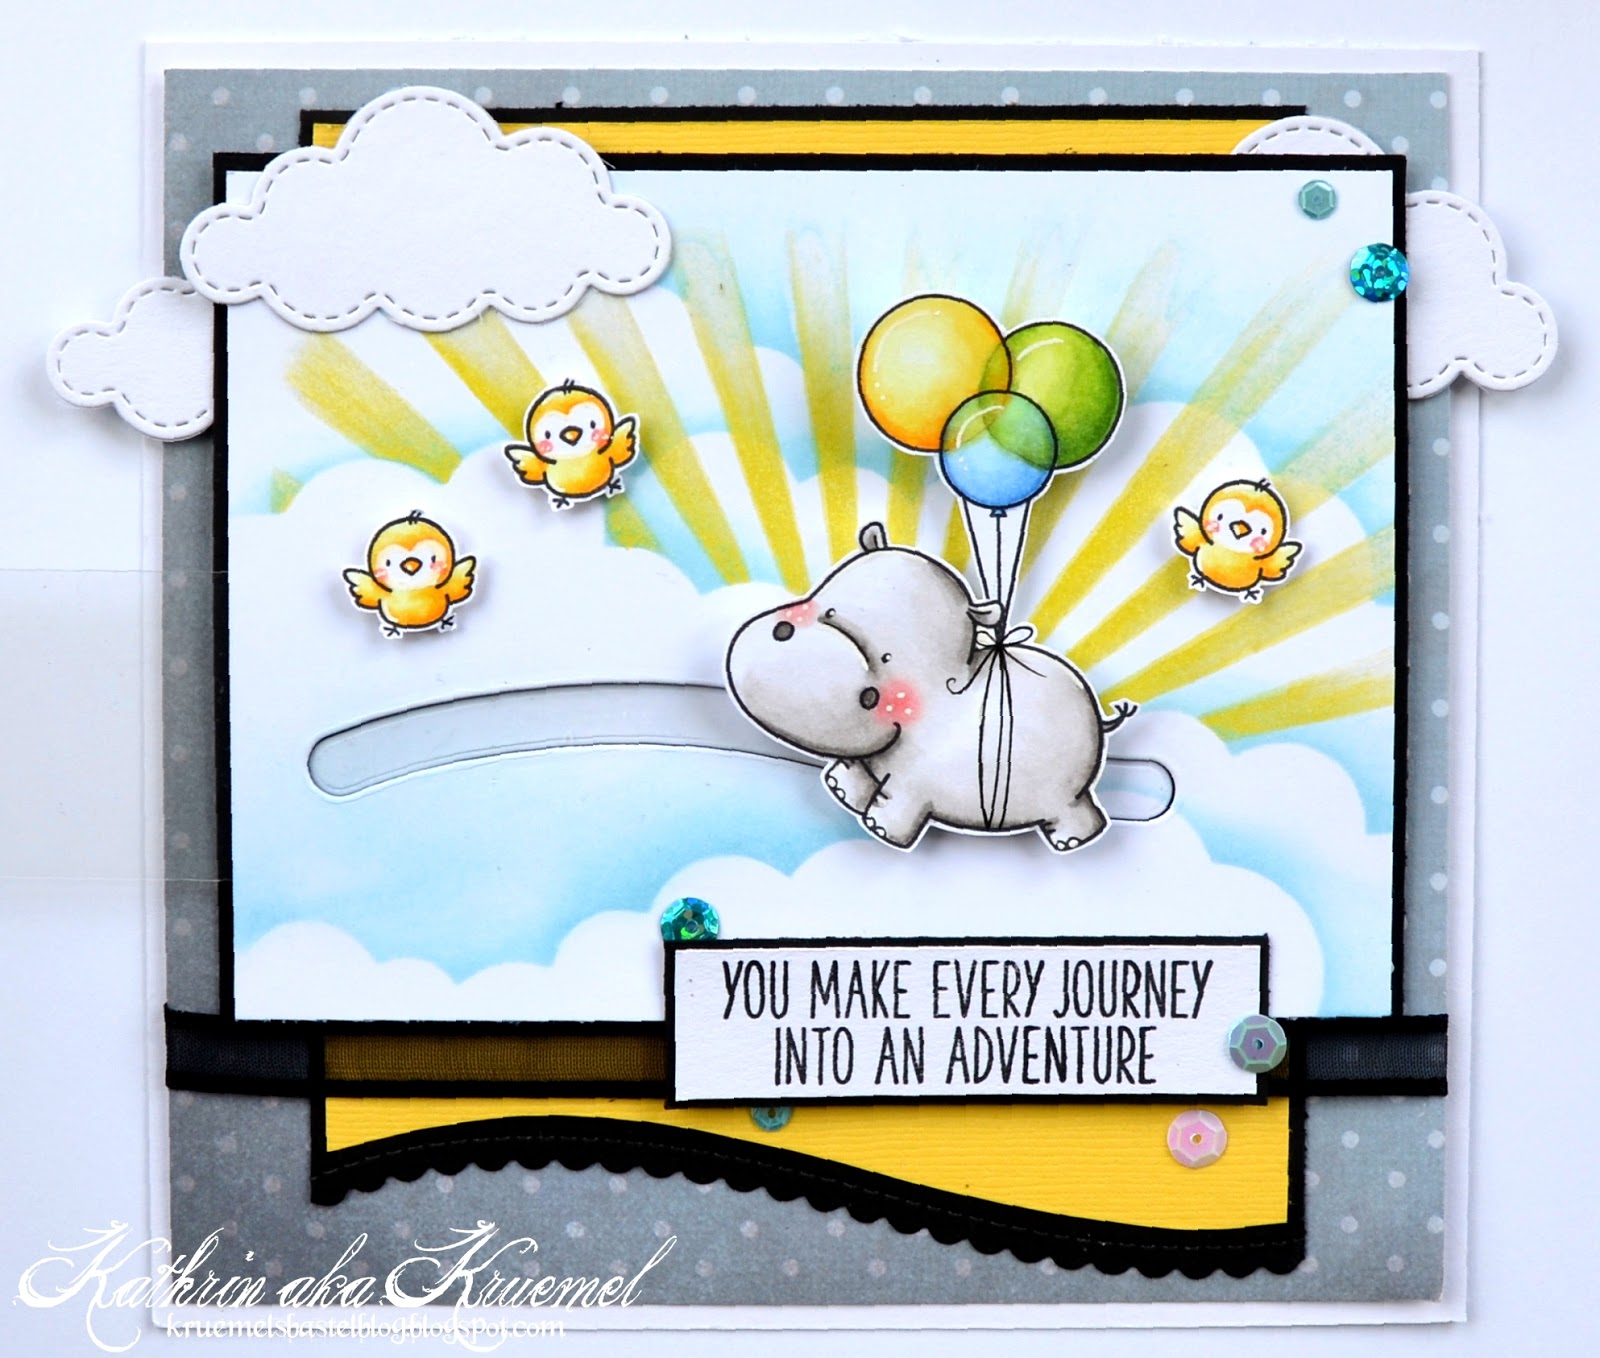
Ich habe hier eine quadratische Karte gemacht und auf das Designpapier einen Streifen schwarzen Cardstock gelegt, dessen unteres Ende ich mit einem der Stitched Scalloped Basic Edges 2 ausgestanzt habe. Darauf habe ich dann ein an die Rundung angepasstes Stück gelben Cardstock geklebt.
Am oberen Ende der Karte habe ich dann die Stitched Clouds aufgeklebt - ich kann einfach nicht ohne Lagen... ;)

I  made a square card and put a piece of black cardstock on top of the designer's paper. The lower end of this cardstock was cut using one of the Stitched Scalloped Basic Edges 2 dies. On top of that I've put some yellow cardstock, cutting it matching the curves of the black one.
To the top of the card I've glued the Stitched Clouds - I just can't live without a few layers.. ;)


Das Thema Stencils habe ich mit zwei Schablonen von MFT umgesetzt: den Radiating Rays und den Mini Cloud Edges. Zuerst habe ich die Wolken-Schablone dort auf den Cardstock gelegt, wo ich die Wolkenlinie haben wollte. Darauf kam dann die Strahlen-Schablone und ich habe mit Distress Ink Squeezed Lemonade die Strahlen aufgewischt. Anschließend habe ich auf die gelbe Tinte klares Embossing Pulver aufgetragen und geschmolzen. So konnte ich im Nachhinein die Wolken mit Distress Ink Broken China aufwischen, ohne das gelb irgendwie zu verfärben.
Die Idee, den süßen Hippo aus dem Happy Hippos Stempelset an die Ballons zu binden, habe ich bei der Vorschau der neuen Motive auf dem MFT-Blog gesehen und wusste, das muss ich auch machen. Auch die süßen Vögelchen sind aus diesem Set.
Und weil sich mein Hippo auch bewegen sollte, habe ich eine der Slider-Stanzen aus dem Surf and Turf Set aus dem Cardstock mit dem aufgewischten Motiv ausgestanzt. Nun kann das Nilpferd gemächlich über den Himmel gleiten.
Der Text, der hier irgendwie super passte, ist aus dem Sweet Forest Friends Stempelset. 

To meet the theme of stencils I used two by MFT: the Radiating Rays and the Mini Cloud Edges. First I've put the cloud stencil on my cardstock where I wanted the cloud line to be. Then I've put the rays stencil on top of that and used Distress Ink Squeezed Lemonade to bring on the rays. Afterwards I've covered the yellow ink with clear embossing powder and melted it. That made it possible to add the cloud lines with Distress Ink Broken China afterwards without messing up the yellow ink of the rays. 
I've seen the idea to tie the balloons around the cute hippo's belly when the new images were shown over at the MFT blog - and I knew I had to do this, too. The Hippo, the balloons and the birdies are all from the Happy Hippos stamp set. 
And since I wanted my hippo to move around a bit I used one of the dies from the Surf and Turf die set to cut the slid into the paper that I'd added the clouds/rays to. Now the hippo is able to slowly fly across the sky.
The saying, that I think goes great with my card, is from the Sweet Forest Friends stamp set.


Und hier habe ich noch ein Bild, für das ich das Nilpferd auf der Karte ein wenig habe fliegen lassen. Ich gaube nicht, dass Ihr ein Video braucht um zu sehen, wie eine Sidercard funktioniert, oder?

And here I have another picture where I moved the hippo a bit. I don't really think you need a video of this slider, do you?


Dienstag, 29. August 2017

Felix mit Blatt


Hallo Ihr Lieben!
Heute darf ich wieder eine Karte auf  dem Kulricke-Blog zeigen. Es gibt ja nicht nur sonnige Tage im Leben - wichtig ist, was man aus jedem einzelnen Tag macht. Und mit der Weisheit im Hinterkopf ist diese Karte entstanden.

Hello everyone!
Today I am sharing another card over at the Kulricke Blog. There are not only sunny days in life - it's all about what you make of every single day. And with this in mind I made this card.

Ich habe mich für grünes und türkisfarbenes Designpapier entschieden, wobei das türkis sehr dezent ist. Etwas Spitze und Cheesecloth muss einfach sein, genauso wie ein paar Blüten. Unter die habe ich das Kleeblatt und eines der Blätter aus dem Baum und Blatt Stanzenset daruntergesetzt.
Der Spruch aus dem Stempelset Dich #2 passt so schön zu meiner Idee...

I went with green and turquoise designer's paper, with a very light turquoise. Some cheesecloth and lace are as much a must as the flowers. I've put the clover and one of the leaves from the Baum und Blatt die set underneath those flowers.
The saying means "enjoy life" and goes so great with what I had in mind.


Als Hauptelement habe ich einen der Nesting Stitched Circles aus türkis-blauem Cardstock ausgestanzt und die Ränder weiß eingefärbt. Darauf kamen dann ein paar Wolken, aus denen Regentropfen fallen. Die Regentropfen sind, ebenso wie die Pfütze, mit Glossy Accents überzogen, damit sie schön glänzen.
Und Felix mit Blatt tut genau das, was der Text sagt - er genießt das Leben, auch wenn mal nicht eitel Sonnenschein ist. Er ist mit Copics coloriert, auf der Mitte des Blattes befindet sich ebenfalls Glossy Accents. Es sollte so aussehen, als würde dort das Wasser ablaufen und von der Spitze herabtropfen. Deswegen habe ich dort auch einen weiteren Regentropfen aufgeklebt.

As the main element on my card I've die cut one of the Nesting Stitched Circles from a turquoise-ish blue cardstock and added some white paint to the edges. On top of that I've put a few clouds from which those raindrops are falling down. The raindrops, as well as the puddle, are covered with Glossy Accents to give them a nice shine.
And Felix mit Blatt is doing exactly what the text says - he's enjoying life, even if there's no sunshine on that day. He's been colored in with Copics and there's some Glossy Accents in the middle of the leave again. I wanted it to look like the water is running down from there. That's why I've added another raindrop to the tip.


Samstag, 26. August 2017

Stempeleinmaleins - Ausgabe vom 26. August 2017


Hallo Ihr Lieben!
Was?!?! Wo ist die Zeit hin?!?! Der Sommer ist ja schon fast zu Ende! Das bedeutet aber auch, dass die Sommerpause beim Stempeleinmaleins vorüber ist. Und wir starten wie jedes Jahr mit einer neuen Challenge wieder. Diesmal haben wir wieder einen Sketch für Euch.

Hello everyone!
What?!?! Where did time go?!?! Summer has nearly come to an end! But that also means that our summer break over at Stempeleinmaleins has ended. And as every year we are back with a new challenge, which is a sketch this month.

Ihr seht, meine Karte ist doch noch sehr sommerlich... Ich habe hier einen meiner Uchi's Animation Stempel ausprobiert. Die finde ich wirklich klasse. Und damit Ihr auch seht, worum es geht, habe ich ein kurzes Video am Ende des Beitrags für Euch. Ein sehr kurzes, denn meine Kamera hat sich geweigert, länger als 10 Sekunden zu filmen. Der war wohl auch zu heiß... ;)

As you can see my card is still a lot summer-ish... I used one of me Uchi's Animation Stamps here. I just think they are great. And to give you an idea what those do I made a short video for you which is added to the end of this post. It's a really short video because my camera decided to not make any videos longer than 10 seconds. I guess it was to hot for it, too... ;)


Ich habe hier wieder eine der Meerjungfrauen von MFT benutzt, der passende Text ist auch aus dem Set. Mal wieder mit Copics und "no-lines" coloriert. 
Ansonsten habe ich mich an braun und türkis gehalten, eine Wellenbordüre und etwas Seetang, einen Seestern und einige Pailetten auf der Karte verteilt. 

Again I've used one of the mermaids by MFT, the matching saying also came in this set. It's once again colored in with Copics and "no lines". 
I went with brown and turquoise for this card, added a die cut wave border and some sea weed, a starfish and a few sequins to my card.

Und hier das versprochene Video:
And here's the promised video:


Mittwoch, 23. August 2017

Ein Pinguin im Urlaub


Hallo Ihr Lieben!
Heute zeige ich Euch auf dem Stamping-Fairies Blog, wie so ein Pinguin seine Sommerferien verbringt...

Hello everyone!
Over at the Stamping-Fairies Blog I am showing what penguins do in vacation...

Hauptelement ist, wie meist bei meinen Karte mit MFT, eine Szene. Der Rest der Karte ist eher einfach gehalten. Hier habe ich zwei verschiedene Designpapiere im Hintergrund verwendet, auf die ich dann die Szene gesetzt habe.

Main element is, like on most my cards with products by MFT, a scene. The rest of the card is kept pretty simple. Here I used two different designer's papers in the background and put the scene on top of it.


Und hier ist der Pinguin, der Euch einen Einblick in seine Urlaubsaktivitäten gibt. Genauer gesagt ist es eine Pinguin-Dame, und die hat sich für den Strand ein wenig in Schale geworfen. Dafür habe ich einfach die Hibiskus-Blüte, die wie der Pinguin, die Palme und der Text aus dem Stempelset Penguins in Paradise ist, als Kopfschmuck zum Pinguin maskiert. Alle Motive sind wieder mit Copics und ohne sichtbare Stempellinien coloriert. Das macht zwar mehr Arbeit, aber ich finde den Effekt so süß, denn die Motive wirken irgendwie realistischer.

And here is the penguin that agreed giving you a peek at his summer activities. Actually, this is a penguin lady and she made herself a real beach beauty by putting a flower on her head. Therefor I simply did some masking to put the flower, that came along with the penguin, the palm tree and the saying in the Penguins in Paradise stamp set, on top of her head. All images are again colored in with Copics and doing the no-line technique. It's more work to color an image in that way but I love the effect.

Als Grundlage für meine Szene habe ich eines der Single Stitched Rectangle Frames aus türkisfarbenem Cardstock gestanzt und darauf dann die Szene aufgebaut. Die besteht aus zwei der Ocean Waves sowie Wolken und Insel aus dem Stanzenset Beach Scene Builder.
Der Text ist türkisfarben gemattet und weil mir noch irgendwas fehlte, habe ich hier noch einige Muscheln, ebenfalls aus dem Beach Scene Builder Set, ausgestanzt und aufgeklebt.

As a base for my scene I've diecut one of the Single Stitched Rectangle Frames from turquoise carstock and then built my scene on top of that. The scene is made using the Ocean Waves dies and clouds and island from the Beach Scene Builder die set.
The saying got some turquoise matting and since I was missing something I've also added a few seashells, also from the Beach Scene Builder set.


Dienstag, 22. August 2017

Urlaubsgrüße


Hallo Ihr Lieben!
Heute zeige ich Euch meine zweite Karte für Vildastamps Blog diesen Monat. Und wie gestern angekündigt, ist sie ähnlich und trotzdem total anders als die Trauerkarte, die ich gestern gezeigt habe.

Hello everyone!
Today I am sharing my second card for Vildastamps Blog this month. And as announced yesterday, it's similar and still totally different than the sympathy card I've been sharing yesterday.

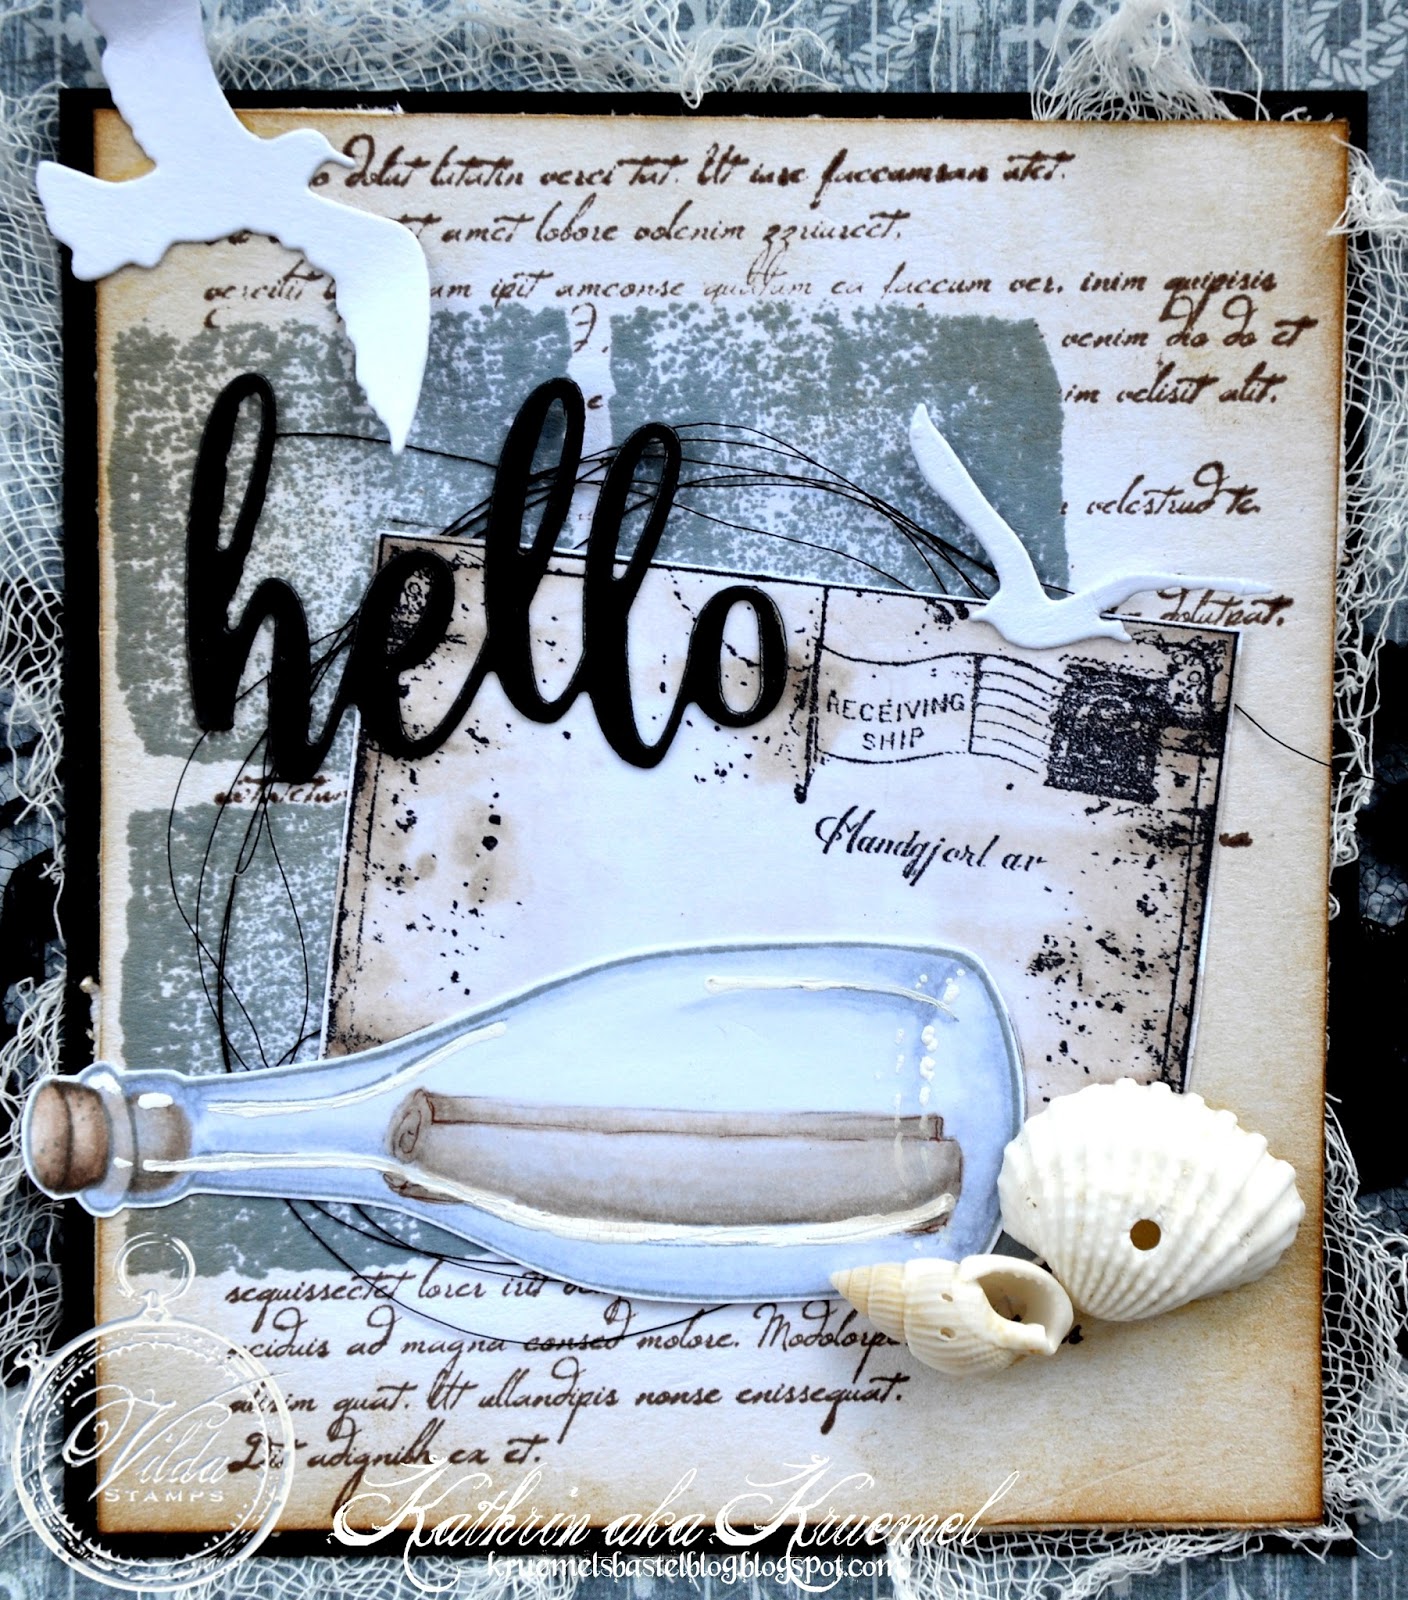
Vielleicht habt Ihr die Ähnlichkeiten und Unterschiede schon gesehen. Im Hintergrund habe ich wieder ein Designpapier - diesmal mit maritimem Druck - verwendet und darauf die breite Spitze und Cheesecloth angebracht.

Maybe you've already spottet the similarities and differences. In the background I used some designer's paper again - this time with a maritim print - and added the wide lace and the cheesecloth on top of it.


Auf den weißen Cardstock - die Ränder sind braun gewischt - habe ich denselben Hintergrund mit den Quadraten aus dem Squares, Circle and Star und der Schrift des Letter Context Stempels gefertigt. Ich habe hier für die Quadrate ein blau-grau verwendet.
Dann habe ich die Postcard abgestempelt, ausgeschnitten und leicht schräg auf die Karte geklebt. Und davor kam dann die größte der Glass Bottles, coloriert mit Copics.
Ein paar Muscheln habe ich auch noch gefunden und aufgeklebt, passt doch zu Urlaubsgrüßen. Der Text, diesmal ein hello, ist wieder aus schwarzem Cardstock gestanzt, auch die Möwen und das schwarze Garn sind gleich wie auf der Trauerkarte gestern.

On the white cardstock - the edges are inked with brown ink - I created the same background like I did  on the sympathy card using the Squares, Circle and Star and the Letter Context stamp sets. Here I used a grey-ish blue for the squares.
Then I stamped the Postcard stamp, cut it out and put it slightly turned onto my card. And in front of that I've added the biggest from the Glass Bottles stamp set, colored in with Copics.
I also found a few sea shells and glued them onto my card, they go great with the vacation greeting theme. The saying, this time a hello, is again cut from black cardstock and the sea gulls and black yarn are the same like I used on the sympathy card I shared yesterday.


Und hier habe ich noch eine größere Aufnahme der Flasche. Sie ist mit grauer Tinte gestempelt und, wie gesagt, mit Copics coloriert. Innen hinein habe ich eine Schriftrolle gemalt und somit eine Flaschenpost kreiert.

And here I have a close-up of the bottle. I'ts been stamped with grey ink and, like I mentioned, colored in with Copics. Then I hand drew a paper roll into it to create a message in a bottle.


Montag, 21. August 2017

Eine Trauerkarte


Hallo Ihr Lieben!
Heute darf ich Euch wieder die erste meiner Karten für diesen Monat auf dem Vildastamp Blog zeigen. Und diesen Monat habe ich mal zwei "gleiche" Karten gemacht, die aber trotzdem total unterschiedlich sind. Die zweite Karte zeige ich Euch wieder morgen. Heute fange ich mit einer Trauerkarte an, die ja auch mal sein muss...

Hello everyone!
Today I am sharing the first of two cards I made for the Vildastamps Blog this month. And this month I tried to make two cards that are similar in one way and still turned out completly different. I'll share with you the second card over here on my own blog tomorrow, so let's start with a sympathy card. Sadly those are needed every now and then...

Im Hintergrund habe ich ein leicht grau gemustertes Designpapier verwendet, eine breite Spitze darauf gesetzt und etwas Cheesecloth untergebracht.

In the background I used a slightly patterend grey paper and added a wide lace and some cheesecloth.

Ich habe hier die vier Quadrate aus dem Squares, Circle and Star Stempelset abgestempelt und die Farbe absichtlich so verwaschen aufgetragen. Sonst wären die Quadrate zu hart geworden. Dann habe ich sie mit Maskingtape abgedeckt und den Letter Context darüber gestempelt. Und darauf kam dann die große Pusteblume aus dem Silhouette Nature Stempelset. Von der Blüte habe ich ein paar einzelne Samen - auch aus dem Set - wegfliegen lassen.
Als Deko kam dann eine weiße Feder, etwas schwarzes Garn und darauf das ausgestanzte Wort LOVE darauf. Ich hatte sonst nichts passendes an Text da und denke, man erkennt auch so, dass es eine Trauerkarte ist. 
Zum Schluss kamen noch ein paar Glitzersteine und eine weiße Möwe auf die Karte.

Here I stamped the four squares from the Squares, Circle and Star stamp set onto my paper. It was my intention to not have the squares stamped completly because I thought they would look too hard. Then covered it with masking tape and stamped the Letter Context stamp over the squares. On top of that I stamped the big dandelion from the Silhouette Nature stamp set and let a few seeds, also from this set, fly away.
As decorations I added a white feather, some black yarn and on top of that a die cut LOVE. I didn't have any other matching text die and think it is still obvious that this is a sympathy card.
In the end I added a few rhinestones and a white sea gull.


Sonntag, 20. August 2017

Da fliegt eine Sternschnuppe...


Hallo Ihr Lieben!
Vor rund einer Woche waren ja die Persiaden mit all den tollen Sternschnuppen. Und die haben mich zu dieser Karte inspiriert, die ich heute auf dem Kulricke-Blog zeige.

Hello everyone!
About a week ago the Persiaden - don't know if you call it the same in the english - happened with all the shooting stars. And those inspired me to make this card that I am sharing over at the  Kulricke Blog today. 

Ich habe ein dunkelblaues Designpapier mit Sternendruck für den Hintergrund gewählt und darauf ein großes Doily gesetzt. Zwei gelbe Sterne und Cheesecloth fanden darauf und darunter Platz. In der Mitte der Karte habe ich dann einen gewellten schwarzen Kreis und darauf einen der Nesting Stitched Circles gesetzt. Aus dem "normalen" Kreis habe ich ein Segment ausgeschnitten, ich wollte, dass sich der Kreis dreht, der Eisbär aber nicht. Also habe ich ihn mit einem Abstandspad innerhalb des Ausschnittes auf den gewellten Kreis geklebt. Die Kreise sind mit einem Brad verbunden. Oben habe ich noch den Kometen aus dem Stanzenset Sternglanz aufgeklebt (das Set konnte ich im Onlineshop derzeit leider nicht finden) und mit verdünnter weißer Acrylfarbe den Sternenhimmel gestaltet. Und warum das alles? Das zeige ich Euch weiter unter in einem weiteren Video.

I used some dark blue designer's paper with a star's pattern and put a big doily on top of it. Two yellow stars and some cheesecloth found place underneath/on top of the doily. Then I've put a scalloped circle and one of the Nesting Stitched Circles - both cut from black cardstock - in the middle of my card. From the "regular" circle I've cut out a strip. I wanted the circle to be able to turn, but the ice bear should stay in place. So I've glued him within the cutout onto the scalloped circle, using a dimensional pad. The circles are connected with a brad. I also glued a shooting star from the Sternzauber die set to the top edge of the circle and used some white acrylic paint - mixed with water - to create the night sky. Why all that? I'll show you later in another video I've made.


Und hier ist Eisbär Luke, der in den Himmel schaut und die Sternschnuppe bewundert. Er sitzt auf einer Eisscholle und davor habe ich zwei Reihen Wellen geklebt. Da die auch in der Nacht ein paar Schaumkronen haben, habe ich diese mit einem weißen Marker aufgemalt.
Der Text, der einfach perfekt passt, ist aus dem Stempelset Sternglanz.

And here is Luke the ice bear, looking into the sky and watching the stars fall. He's sitting on an ice floe and I've added two rows of die cut waves in front of him. Since those wear a foam crown even during night I've added those with a white marker.

Und hier nun das Video:
And here's the promised video:


Freitag, 18. August 2017

Eine interaktive Karte


Hallo Ihr Lieben!
Heute zeige ich eine weitere Karte auf dem Stamping-Fairies Blog. Auf den ersten Blick eher unspektakulär, da fehlt doch was.... Aber lasst Euch vom ersten Eindruck nicht täuschen, die Karte hat mal wieder ein kleines Gimmick eingebaut...

Hello everyone!
Today I am sharing another card over at the Stamping-Fairies Blog. It look kind of plain at first sight, like there's something missing. But don't judge it by its first impression, there's some magic in this card again...

Aber erstmal ein paar Detail, ich spanne Euch noch ein wenig auf die Folter.
Für den Hintergrund habe ich den Wavy Coloring Book Stempel von MFT mit weißem Embossing Pulver auf Aquarellcardstock embosst und anschließend mit Distress Ink Peacock Feathers coloriert, mit viel Wasser.
Für die Wellen im Vordergrund habe ich die Ocean Waves Stanzen aus türkisfarbenem Cardstock ausgestanzt und die Ränder mit einem Sanding Block abgeschmirgelt.
Die Szene habe ich mit Stempeln aus dem Stempelset Mermazing gemacht. Der Stein und die Muschel sind mit Copics coloriert, dann habe ich den Hintergrund mit dem Airbrushgerät gemacht und dabei auch eine ganz dünne Schicht über die Motive gelegt. Die Fische habe ich dann mit Distress Oxide Fired Brick, die Koralle und Wasserpflanzen mit Iced Spruce, Spiced Marmelade und Peeled Paint aufgestempelt.

But before I reveal the magic I'll give you some generell informations on this card.

For the background I heat embossed the Wavy Coloring Book stamp by MFT onto watercolor paper using white embossing powder. Then I've colored it in using Distress Ink Peacock Feathers and lots of water.
For the waves in the foreground I've die cut the Ocean Waves dies from turquoise cardstock and then sanded the edges a bit.
The scene is made using stamps from the Mermazing stamp set. The stone and the shell are colored in with Copics, then I used my airbrush machine to create the background and also lay a thin layer of color on top of the stone and shell. Then I used Distress Oxide Fired Brick to stamp the fish, Iced Spruce, Spiced Marmelade and Peeled Paint for the underwater plants and coral.

Hier habe ich noch ein weiteres Bild der Karte:

Here I have another picture of my card:


Hey, wo kommt denn auf einmal die Meerjungfrau her?!?! Das ist die angekündigte Magie... Auf der Karte steht ja "ich möchte Dich BALD sehen" - und manche Wünsche werden sofort erfüllt. ;)
Naja, man konnte ja schon erahnen, dass sich da noch irgendwas verbirgt, mit dem Brad mitten in der Szene... Im zweiten Motiv sitzt das zum Glück so, dass es eine Brosche der Meerjungfrau sein könnte. Die junge Dame ist wieder mit Copics coloriert.

Hey, where did that mermaid come from?!?! Well, that's the magic I talked about... On the card there's written "I need to see you SOON" - and some wishes are granted immediatey. :)
Well, you could already tell from the first picture that there was something hidden underneath the scene, with the brad right in its middle. On the second image the brad is luckily in a good spot so it could be some fancy brooch the mermaid is wearing. This little cutie is again colored in with Copics.

Und um Euch die Magie komplett zeigen zu können, habe ich wieder ein Video für Euch gemacht. Die Kartenart heißt übrigens Magic Reveal Spinner Card:

And to really show you the magic I made another video for you. This type of card is calle a Magic  Reveal Spinner Card: