Samstag, 14. November 2020

Stempeleinmaleins - Ausgabe vom 14. November 2020

 
Hallo Ihr Lieben!
Beim Stempeleinmaleins machen wir weiter mit weihnachtlichen Themen - heute mit einem Adventskranz in der Box. 

Hello everyone!
Over at Stempeleinmaleins we are continueing our christmas themed tutorials - this week we have this advent wreath in a box.


Wie der Name schon verrät, kommt der Adventskranz praktisch verpackt in einer Box, die nur 7 x 7 x 7 cm groß ist. So kann er überall mithingenommen werden. Und so kann man sich überall in Null-Komma-Nix ein wenig Adventsstimmung schaffen.

As the name indicates, this advent wreath comes in a little box that only measures 7 x 7 x 7 cm. With this size it's easy to be taken with you - and in just a second you can add some christmas atmosphere to wherever you are.


Den Deckel der Box habe ich mit goldenem Glittercardstock beklebt, darauf kam ein aus dunkelgrünem Cardstock gestanzter Kranz, für den ich eine Stanze von Magnolia verwendet habe. Dekoriert ist er mit jede Menge weißen Perlen.
Außerdem habe ich einen Stern aus grünem Designpapier mit weißen Punkten (von MFT) sowie einen Tannenzapfen, gemacht mit einer Stanze von SU, aufgeklebt. Den Tannenzapfen habe ich mit weißer Strukturpaste beschneit. 
Der Text "Adventskranz to Go" ist ein Stempel von JM-Creation und mit goldenem Embossingpulver auf weißen Cardstock embosst.
Und eine kleine Schleife hat auch noch Platz gefunden, deren Enden vorne über die Kante der Box herabhängen.

The lid is covered with golden glitter cardstock, on top I've glued a wreath die cut from dark green designer's paper. I've used a die by Magnolia here and decorated it with lots of white pearls.
I've also added a star (by MFT), die cut from designer's paper with white dots, and a pine cone to the top. The pine cone is cut with a die by SU and I've added some white modelling paste as snow.
The text means "advent wreath to go". It's golden heat embossed onto a strip of white cardstock.
And there was also room for a little white bow, the ends of the ribbon are hanging down over the edge at the front of the box.


Die vier Seitenteile der Box sind alle identisch dekoriert. Ich habe sie erst mit goldenem Glittercardstock beklebt, dann kam eine kleinere Lage des grünen Designpapiers darauf. Aus der habe ich mittig einen Stern von MFT - ja, der als Deko auf der Oberseite benutzt Stern ist der hier herausgeschnittene Teil - ausgestanzt. Außerdem habe ich die Ränder mit weißer Strukturpaste eingeschmiert. 
Das grüne Designpapier ist mit 3D Tape aufgeklebt. Als Deko kam noch eine weiße Perle nebenden Stern. 
Außerdem habe ich an zwei der Seiten kleine Ausschnitte ausgestanzt, die das Abziehen des Deckels einfacher macht. Leider habe ich daran erst gedacht, als die Seiten bereits dekoriert waren - und die meisten Handstanzer habe ich nicht mehr über das 3D Tape bekommen. Darum sind die Grifflöcher etwas kleiner ausgefallen.

The four sides of the box are all decorated identically. I've glued a square of the golden glitter cardstock onto them, then added a smaller layer of the green designer's paper. From this I've die cut a star by MFT - and yes, the star used on top of the box is the cut out piece from one of the sides. I've also added some more modelling paste to the edges of the designer's paper.
The patterned paper is glued down with dimensionals and I've added a white pearl next to the star on each of the sides.
I've also cut a piece from two of the sides to make pulling the lid off easier. Well, I didn't think of it until the boxes were decorated and due to the dimensionals I wasn't able to put the lid into most of my hand punches. So my holes are a bit smaller.


Zieht man die innere Box aus der Hülle, kann man sie aufklappen -und erhält einen vollständigen Adventskranz. Auch eine kleine Schachtel Streichhölzer habe ich mit hineingepackt, die passt ganz einfach mit in die Box. Damit sie schön festlich aussieht, habe ich sie mit goldenem Glittercardstock beklebt und mit drei Ilexblättern sowie drei Perlen dekoriert.
Die innere Box habe ich aus dunkelgrünem Designpapier geschnitten. Um die Teelichter kamen kleine Kränze, die selbe Stanze, die ich auch für den Kranz auf der äußeren Box benutzt habe, diesmal aber aus goldene Glittercardstock gestanzt.
Aus vielen Ilexblätter, gestanzt aus hellgrünem Cardstock und dem grünen Designpapier, habe ich einen Kranz aufgeklebt. Dazwischen sitzen wieder weiße Perlen und außerdem kleine goldene Pailettensterne. 
Außerdem habe ich an jedem Teelicht eine kleine weiße Schleife angebracht.

When you pull the inner box out it can be laid flat - and turns into a complete advent wreath. Also a small box of matches fits into the box. To make it look nice I've wrapped it in golden glitter cardstock and added three holly leaves and three pearls as berries onto it.
The inner box is made from dark green cardstock. I've glued a die cut wreath around each tea light using the same die that I've also used to cut the wreath on top of the out box, just using golden glitter cardstock this time.
From a lot of die cut holly leafes, cut from light green cardstock and the green designer's paper, I've built a wreath. Inbetween the leafes I've added more of the white pearls and also some small golden star shaped sequins.
I've also glued a little white bow to each of the lights.


Um die Teelichter habe ich goldenes Glitzer-Washi geklebt.
In der Mitte der Box habe ich erst wieder goldenen Glittercardstock aufgeklebt, darauf kam ein Stück weißen Cardstocks. Auf den habe ich mit goldenem Embossinpulver einen Text von SU aufembosst. Außerdem habe ich hier mit einem grünen Fineliner einen Rahmen gemalt und einen weiteren Stern aus Designpapier sowie zwei Perlen aufgeklebt.

I've wrapped the aluminium cups of the tea lights with golden glitter washi.
In the middle of the box I've glued one more piece of the golden glitter cardstock, then added a piece of white cardstock on top. Onto that I've golden heat embossed a christmas text by SU. I've also used a green fineliner to hand draw a frame and glued down another star cut from patterned paper and two more pearls.

Donnerstag, 12. November 2020

Wer schaut denn da hinter der Tür hervor?

 
Hallo Ihr Lieben!
Heute zeige ich auf dem Stampcorner Blog eine Idee mit dem süßen Mini Weihnachtsmann. Und wie man sieht, ist der schon bereit für Weihnachten!

Hello everyone!
Over at the Stampcorner Blog I am sharing a card idea using the cute Mini Santa stamp. And as you can see he's already prepared for christmas!

Ich habe hier ein Stück weißen Cardstock mit Distress Oxide Aged Mahogany und der Mauerstencil Small Brick Wall von MFT in eine Hauswand verwandelt. Den weißen Cardstock habe ich schwarz gemattet und auf einen weißen Kartenrohling geklebt. Meine Karte hat ein etwas ungewöhnliches Format, aber ich wollte die Tür und Santa beide darauf unterbringen, ohne eine quadratische Karte zu machen. So ist sie nun 12 cm breit und 15 cm hoch, aber wenn man sie persönlich übergibt, macht das ja nichts.
Unten an der Tür habe ich eine Treppe angebracht - die besteht einfach aus einem Stück grauen Cardstocks, den ich oben etwas angeschrägt und unten mit Disterss Oxide Hickory Smoke gewischt habe. Auf der Treppe steht eine kleine Laterne, gemacht mit einer Stanze aus dem Mushroom House Stanzenset von LawnFawn. 

Here I've turned a piece of white cardstock into a house wall by covering it with Distress Oxide Aged Mahogany through the Small Brick Wall stenncil by MFT. Then I've matted the cardstock with black cardstock and glued it onto a white note card. My card has a slightly strange size but I wanted both the door and Santa to be on the card and not hang over one of the edges without having to make a square card. But I guess when you hand it out directly that doesn't matter.
Under the door I've added a door step. This is simply made from a strip of grey cardstock. I've cut off the top corners and added some Distress Oxide Hickory Smoke to the bottom of it. On the stair there's a lantern for decorations, made using a die from the Mushroom House die set by LawnFawn. 


Hier ist der süße Santa - gut gelaunt mit Daumen hoch. Ob as wohl das Zeichen ist, dass alles bereit für die Bescherung ist? Ich habe ihn mit Copics coloriert, ausgeschnitten und hinter die Tür geklebt.
Die Tür ist aus braunem Cardstock gemacht, das ich mit Holzmuster bestempelt habe. Sie besteht aus einem Rechteck, für das ich eine Stanze von Crealies benutzt habe. Aus dem kompletten Rechteck habe ich das Fenster aus dem Stanzenset Slim Window Dressing von MamaElephant gestanzt. 
Dann habe ich mit derselben Rechteckstanze sowie einer kleineren einen Rahmen gestanzt und aus dem Mittelteil noch die anderen Teile, für die ich jeweils Partial Diecutting gemacht habe, damit die gestitchten Linien auch auf diesen Teilen komplett vorhanden sind. Diese Teile habe ich dann ebenfalls mit Holzmuster bestempelt, teilweise längs, teilweise quer, damit sich die Teile besser voneinander abheben. Sie sind mit 3D Tape aufeinander geklebt.
Hinter das Fenster in der Tür habe ich eine Lage Vellum und ein Stück grauen Cardstock geklebt. Das Türschloss und der -knauf sind wieder aus dem Mushroom House Stanzenset von LawnFawn. Die Tür ist mit einem Kranz dekoriert, den ich mit Distress Oxide Lucky Clover ein wenig schattiert habe. Die Schleife mit dem Text habe ich frei Hand geschnitten, mit Copics coloriert und dann den Text ebenfalls frei Hand mit einem weißen Gelmarker darauf geschrieben.

Here's the cute Santa - in a good mood and with a thumbs up. Is this the sign that everything is already finished and ready? I've colored him with Copics, cut out and glued behind the door. 
The door is made from a rectangle cut from brown cardstock, using a die by Crealies. I've stamped some wood pattern onto it with brown ink. I've die cut the window from the Slim Window Dressing die set by MamaElephant from it.
Then I've used the same rectangle die and a smaller one to create a frame and also some smaller pieces cut from the left over cardstock of the frame. I did some Partial Diecutting on the smaller pieces to have the stitched lines all around all the edges. Then I've stamped a wood pattern onto them again, changing direction on the smaller one so they look different than the complete rectangle behind it. I've glued the pieces on top of each other with dimensionals.
Behind the window in the door I've glued some Vellum and a piece of grey cardstock. The door lock and the knob are again from the Mushroom House die set by LawnFawn. The door is decorated with a wreath, die cut from green cardstock and shaded with some Distress Oxide Lucky Clover. The tails of the bow are cut by hand, colored with Copics, then I've written a "merry christmas" onto them with a white gel marker, writing it by hand since I didn't have a matching text stamp with a vertically written text. 

Mittwoch, 11. November 2020

Ein Kaffee-Gutschein

 
Hallo Ihr Lieben! 
Heute habe ich mal die kleine Gutscheinumschlag-Verpackung von JM-Creation eingeweiht. Diese Stanze stanzt einen kleinen Umschlag, in den man entweder Grüße oder auch einen kleinen Gutschein packen kann.

Hello everyone!
Today I have made a gift card envelope using a new die by JM-Creation. This die cuts a small envelope that you can either write or stamp some greetings in oder you can use it as a gift card holder.

Ich habe meinen Umschlag aus hellbraunem Cardstock gestanzt, passend zum Kaffeethema meiner Dekoration. Das hellbraun schaut so lecker nach Milchkaffee aus. 
Auf die Vorderseite habe ich dann ein Stück dunkelbraunen Cardstock geklebt. Darauf kam der große Coffee To Go Becher, mit Copics in braun, grau-braun und türkis coloriert. Und als Text passt da natürlich das "Gute Laune Macher", das mit dem Kaffee-Faultier im Set kommt, perfekt. Ich habe die Worte auf türkisfarbenen Cardstock gestempelt, die einzelnenWörter ausgeschnitten, weiß gemattet und mit 3D Tape aufgeklebt.

I've die cut my envelope from light brown cardstock. Matching the coffee theme of my envelope since this color reminds me a lot of a yummy cup of milk coffee. 
Onto the front I've glued a piece of cardstock, cut from dark brown color. Then I've added the big Coffee To Go cup, colored with Copics in brown, grey-ish brown and turquoise. The text means something like "this makes you happy". I've stamped it onto turquoise cardstock, cut out the words, matted them white and glued them down with dimensionals.


So sieht der geöffnete Umschlag aus - er besteht nur aus einem Teil und muss nicht geklebt werden.

This is the opened envelope - it's only made from one piece and you don't need to do any glueing. 


Innen habe ich auf den mittleren Bereich wieder ein Stück dunkelbraunen Cardstock geklebt. Darauf kam ein kleiner Notizzettel, der im Set mit dem Umschlag kommt. Den habe ich aus weißem Cardstock gesetanzt un mit Distress Ink Pumice Stone an den Rändern ein wenig eingefärbt.
Darauf kam ein kleines Fähnchen aus türkisfarbenem Cardstock, auf das ich ein "mach' mal Pause", das ebenfalls aus dem Stempelset Faultier Kaffee stammt, abgestempelt.

On the inside I've added another rectangle cut from dark brown cardstock. Then I've put a small paper with a note pad edge, that also comes with the envelope die. I've die cut it from white cardstock and added some Distress Ink Pumice Stone to the edges. 
On top I've glued a small banner cut from turquoise cardstock onto which I've stamped a "take a break" text.


Und auch die Rückseite des Umschlags ist ein ganz kleinwenig dekoriert. Hier habe ich die drei Herzen aus dem Stempelset Schoki mit Herz weiß aufembosst und dann die Punkte zwischen den Herzen mit türkisfarbenen Enamel Accents überklebt.

And also the back of the envelope is a tad bit decorated. I've white heat embossed three little hearts onto the flap and then glued two turquoise Enamel Accents between them. 


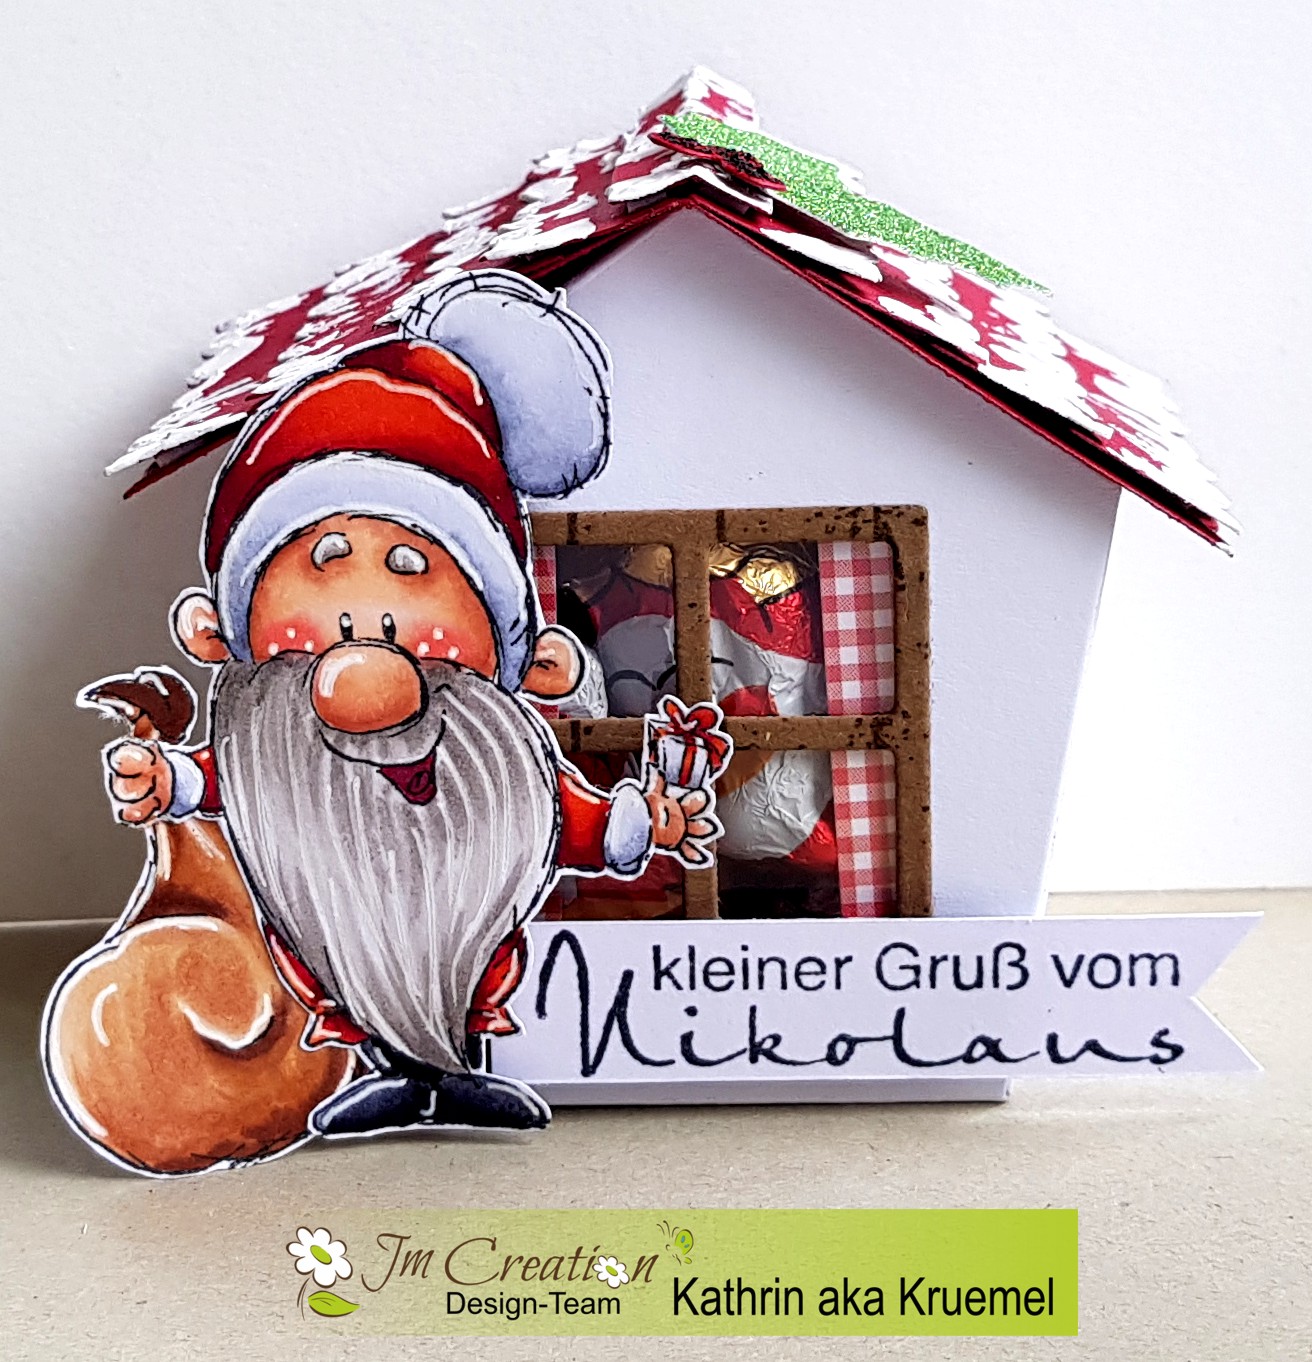
Das Haus vom Nikolaus


 Hallo Ihr Lieben!
Na, sind alle Eure Stiefel schon sauber geputzt, damit der Nikolaus bald  etwas hineinfüllen kann? Vor meinem kleinen Häuschen ist er sogar schon angekommen.

Hello everyone!
It's St. Nikolaus day on december 6th - he'll fill the good kids' boots with candies, oranges and nuts the night of december 5th. Well, if the kids did clean them properly before. And St. Nikolaus already made to this little house here.

Ich habe hier die Vogelhausstanze von JM-Creation benutzt, um die Hausbox zu werkln. Die Box ist aus weißem Cardstock gestanzt, der Fensterrahmen aus braunem Cardstock, den ich mit dem Holzhintergrund bestempelt habe. Von innen habe ich Folie gegen den Fensterausschnitt geklebt, denn natürlich ist das Haus mit ein paar Leckereien gefüllt, und die sollen ja nicht herausfallen. Außerdem habe ich innen noch zwei Streifen rot-weiß karierten Cardstocks als Vorhänge aufgeklebt.
Das süße Motiv ist Nikolaus Norbert. Eigentlich wollte ich ihn nur mit Geschenk, aber ohne den Sack verwenden. Deswegen hatte ich den Sack bereits weggeschnitten - einfach, weil mir das Motiv sonst zu breit geworden wäre. Aber dann habe ich mich entschieden den Sack etwas näher am Körper wieder anzukleben. Coloriert habe ich ihn mit Copics. Damit er sich nicht den Kopf am Dach des Hauses stößt, habe ich ihn mit aufgedoppeltem 3D Tape auf das Haus geklebt.
Der Text ist aus dem Stempelset Gruß vom Nikolaus. Ich habe ihn auf ein kleines, per Hand geschnittenes Banner gestempelt und dann mit 3D Tape - diesmal einfach genommen - neben dem Nikolaus aufs Haus geklebt.

Here I've used a bird house die to create a house shaped box. I've die cut it from white cardstock, the window is cut from brown cardstock that I've stamped a wood pattern onto. I've added a piece of transparency to the inside of the box to close the window. Of course it's filled with some chocolats and I don't want those to fall out. I've also added two strips of red and white checked designer's paper as curtains to the inside of the box.
The cute image is Norbert. I had planned to use him without his sack and so I've cut it off. The image would just have been to wide for the house. But then I thought that Nikolaus isn't real without his sack so I've glued it to the image again, moving it closer to Nikolaus. The image is colored with Copics. I didn't want him to bang his head on the roof so I've doubled up some foam tape and used that to glue him to the house. 
The text means "greetings from St. Nikolaus". I've stamped it onto a hand cut banner and glued it to the box with foam tape, this time not doubling it up.


Das Dach ist aus rotem Cardstock gestanzt. Im Set ist auch noch eine Stanze für eine einzelne Dachziegelreihe enthalten. Die habe ich achtmal ausgestanzt und mit Strukturpaste ein wenig beschneit. Dann habe ich sie so aufgeklebt, dass die geraden Kanten direkt auf dem Dach, die gewellten mit 3D Tape darauf angeklebt sind. So bekommt das Dach mehr Struktur. Als First habe ich noch eine weitere Ziegelreihe gestanzt, die Wellen weggeschnitten, den Streifen mittig längs gefalzt und mit 3D Tape oben aufs Dach geklebt.
Dekoriert habe ich das Dach mit zwei Ilexblättern, mit der Tannenkranz-Stanze aus grünem Glittercardstock gestanzt, sowie drei roten Beeren aus dem selben Stanzenset. Die Beeren habe ich noch mit roten Stickles überzogen, damit sich das Rot besser vom Dach abhebt.

The roof is cut from red cardstock. In the bird house die set there's also an single row of shingles. I've die cut those eight times and added some modelling paste as snow. Then I've glued them to the roof - the straight edge directly onto the roof, the scalloped edge with some foam tape underneath.
I've decorated the roof with two holly leaves die cut from green glitter cardstock and some red berries. Since I've die cut those from the same cardstock that I've also used for the roof I've covered the berries with red Stickles so they would stick out more.


Und wie kommt man nun an die Leckereien im Inneren des Hauses? Auch daran habe ich gedacht. Ich habe die eine Seite des Daches fest auf die Box geklebt, auf der anderen Seite habe ich zwei kleine Stücke Klettverschluss aufgeklebt. So kann die eine Seite des Daches aufgeklappt werden.

And how do you get to the treats inside the house now? Well, of course I've thought of that as well. I've glued one side of the roof onto the box, for the other side I've used two pieces of Velcro. Now this side can be lifted up.

Dienstag, 10. November 2020

Und nochmal "hugs"


 Hallo Ihr Lieben!
Letzte Woche hatte ich ja eine Herbstkarte mit einem großen, ausgestanzten HUGS darauf auf dem Stamping-Fairies Blog gezeigt. Nun, ich hatte die Buchstaben zum Ausstanzen so schön gerade auf dem Cardstock angeordnet, damit das Muster stimmt. Das Stück, aus dem ich die Buchstaben ausgestanzt hatte, lag noch auf meinem Tisch. Ich wollte es gerade wegwerfen, als ich dachte, es ist dafür doch eigentlich zu schade. Und so zeige ich heute eine weitere Karte mit "HUGS". 

Hello everyone!
Last week over at the Stamping-Fairies Blog I've shared a fall card with a big, die cut HUGS on it. Well, I had the letters lined up all straight to stay within the pattern with the die cut word. The piece that I've die cut the letters from was still on my table. I was about to throw it away when I thought it would be a shame because it could be used on another card. So I'm sharing another card with "HUGS" today. 

Ich wollte bei dieser Karte eine frostigen Look mit einem warmen Touch. Deswegen habe ich mich für weißen Cardstock für den Hintergrund entschieden, den schwarz gemattet und auf einen weißen Kartenrohling geklebt.

I wanted a frosty look with a warm touch for this card. So I've decided to go with a white background, matted it black and then glued the two layers onto a white note card.


Den Cardstockstreifen, aus dem ich mit den Impact Alphabet Stanzen die Buchstaben ausgestanzt habe, hatte ich ja mit dem Diagonal Stripes Background von MFT und klarem Embossingpulver bestempelt. Hier habe ich dann Distress Ink Stormy Sky aufgetragen, wieder von dunkler im unteren Bereich nach hell im oberen Bereich. Dann habe ich ein Stück cremefarbenes Designpapier mit goldenen Folienpunkten darauf aus dem Let it Shine Papierblock von LawnFawn mit dünnem 3D Tape dahinter geklebt. 
Der süße Bär und die Vögelchen sind aus dem Stempelset Better Together von MFT. Ich habe sie ganz bewusst nur ein klein wenig coloriert - rote Bäckchen, blau für die Mütze und den Schal der Vögel sowie ein wenig grau für die Schnauze und den Bauch des Bären. Dann habe ich sie hinter bzw. auf den Streifen mit dem ausgestanzten Wort geklebt. Für die Vögel habe ich wieder 3D Tape benutzt. 
Die Texte sind alle mit weißem Embossinpulver auf blauen Cardstock embosst. Das Sending Warm ist aus dem Stempelset Sweater Weather in the Woods, das from me to you aus dem Set Spooktacular Friends.
Für den warmen Touch und um das Gold im Designpapier nochmal aufzugreifen habe ich dann noch goldene Pailetten und kleine goldene Folienherzen auf der Karte verteilt.

The cardstock strip, that I've die cut the letters with the Impact Alphabet dies from, was clear heat embossed with the Diagonal Stripes Background by MFT. Then I've added Distress Ink Stormy Sky to it, again from dark in the bottom to light at the top. I've glued a piece of cream colored designer's paper with small golden foiled dots on it from the Let it Shine paper pad by LawnFawn behind the cardstock, using dimensionals. 
The cute bear and the birdies are from the Better Together stamp set by MFT. I only added a touch of color to the images - light red for the cheeks, blue for the hat and scarf of the birds and some grey for the face and belly of the bear. Then I've glued them behind and on top of the cardstock strip with the die cut letters. Again I've used dimensionals to glue down the birds. 
The sayings are all white heat embossed onto blue cardstock. The Sending Warm is from the Sweater Weather in the Woods stamp set, the from me to you from the Spooktacular Friends set.
For a warm touch and to pick up the gold from the foil dots again I've added some golden sequins and small golden foil hearts to my card.


Und weil man es auf den anderen Bildern nicht sehen konnte, habe ich hier versucht, das Gold auf dem Designpapier auf einem Foto einzufangen. Ohne sie hätte ich wohl eher zu silbernen Pailetten gegriffen, aber so passen die goldenen wunderbar.

And since you weren't able to really see the golden foil on the other pics I've tried to catch it here on this one. Without those dots I most likely would have used silver sequins here, but with this designer's paper the golden ones fit perfectly. 

Sonntag, 8. November 2020

Wonderful holiday season

 
Hallo Ihr Lieben!
Kennt Ihr das - Ihr habt eine Idee zu einer Karte im Kopf. Und dann geht alles schief - es fehlt ein Motiv, ein Papier, das Ihr unbedingt benutzen wollt, dann hängt das Paket bei der Post, dann ist keine Zeit zum Basteln... So ging es mir hier und so dauerte es ein wenig, bis die Idee endlich aus dem Kopf durfte. Aber nun war es soweit und so ist diese Karte entstanden.

Hello everyone!
Do you know this situation - you have a card idea in mind. And then everything goes wrong - you're missing a special image, a sheet of paper you so badly want to use, the order is delivered way later than expected, then there's no time for crafting... That's what happened to me an so it took some time until I was finally able to realize that card idea. But now it happened and so this card was made.

Ich habe hier eine Slimline Card gemacht, allerdings nicht im klassischen Format sondern ein wenig an meine Idee angepasst. Sie ist etwas schmäler, dafür einen Ticken höher. 
Im Hintergrund habe ich das traumhafte Papier Mittens Remix von LawnFawn benutzt, das so toll verträumte Schneeflocken aufgedruckt hat. Die Ränder habe ich ein wenig mit Distress Ink Peacock Feathers und Hickory Smoke dunkler gefärbt.
Auf dem Hintergrund habe ich ein paar Birkenstämme aufgeklebt. Die sind mit der Birch Tree Stanze aus weißem Cardstock gestanzt und mit Copics ein paar Akzente aufgemalt. Dann kam eine Lage Schnee, davor ein Zaun. Ich habe ihn mit der Picket Fence Border Stanze aus hellbraunem Cardstock gestanzt, dann mit dem Woodgrain Backdrops Stempel die Holzstruktur aufgestempelt und den Zaun noch ein wenig mit Distress Ink Ground Espresso an einigen Stellen dunkler gefärbt. Die Spitzen der Zaunlatten habe ich mit einem weißen Gelmarker per Hand beschneit.  
Oben links auf die Karte habe ich noch einen Text aufgeklebt. Er ist aus dem Stempelset Reveal Wheel Holiday Sentiments und mit schwarzer Tinte auf ein Banner aus weißem Cardstock gestempelt.

I've made a slimline card here, but it's not in the traditional size but changed a bit to match my idea. It's a bit narrower and a bit higher.
In the background I've used the beautiful Mitten Remix Paper by LawnFawn with the wonderful snowflake print. I've made the edges a bit darker with Distress Ink Peacock Feathers and Hickory Smoke.
Onto the background I've glued a few trees. They are die cut from white cardstock with the Birch Tree dies, then I've added some details with Copics. On top of that I've glued a layer of snow and then a fence. I've die cut that from light brown cardstock with the Picket Fence Border die, then used the Woodgrain Backdrops stamp to add the wood structure. I've also used Distress Ink Ground Espresso to darken the fence in a few areas. With a white gel marker I've added some snow caps on top of the pickets.
To the top left corner of the card I've added a sentiment. It's from the Reveal Wheel Holiday Sentiments stamp set and stamped with black ink onto a strip cut from white cardstock.
 

 Auf der linken Seite steht ein schön geschmückter Weihnachtsbaum, der auch ordentlich beschneit ist. Er ist aus dem Stempelset Christmas Dreams. Er wird von Papa Maus mit Kind bestaunt, die gerade aus dem Wald kommen, wo sie einen Weihnachtsbaum ausgesucht haben, den sie nun auf dem Schlitten nach Hause ziehen. Schlitten und der Baum darauf sind aus dem Stempelset Toboggan Together. Der Baum wird vollflächig gestempelt, also habe ich ihn mit grüner Tinte abgestempelt und mit Copics ein paar Schattierungen hinzugefügt. Die Kufe des Schlittens habe ich zudem silbern embosst, ausgeschnitten und auf die schwarz gestempelte Kufe aufgeklebt. Der Schnee auf dem Tannenbaum ist wieder mit einem Gel Marker aufgemalt.
Die Mäuse sind aus dem Set Dandy Day, die Mütze, die Papa Maus auf dem Kopf trägt, aus dem Holiday Party Animal Set. 
Der große Tannenbaum ist ebenfalls mit Copics coloriert, die Tannenbaumspitze ist mit Glossy Accents überzogen. 
Vor dem Zaun steht auch noch eine Straßenlaterne aus dem Stempelset Winter in the Park. Die Lampen sind ebenfalls mit Glossy Accents überzogen. Außerdem ist die Laterne - genauso wie die zweite auf der rechten Seite der Karte - mit einer roten Schleife weihnachtlich geschmückt. Die ist aus dem Stanzenset Build a House Christmas Add-On. 
Hier habe ich auch noch eine weitere Lage Schnee aufgeklebt.

On the left side of the card there's a beautifully decorated tree that's covered in lots of snow. It's from the Christmas Dreams stampm set. Papa Mouse and his kid, that are coming from the woods where they've picked their christmas tree and are bringing it home on a sleigh now, are admiring the decorated tree. The sleigh and the tree on it are from the Toboggan Together stamp set. The tree is a solid stamp so I've stamped it with green ink and added some details with Copics. I've also silver heat embossed the blade, cut it out and glued it on top of the black stamped one. The snow on the tree is again made with a white gel marker.
The mice are from the Dandy Day stamp set, the hat that papa mouse is wearing, is from the Holiday Party Animal set.
The big tree is also colored with Copics, the tree topper is covered with Glossy Accents.
In front of the tree there's also a street lamp from the Winter in the Park stamp set. The lanterns are also covered with Glossy Accents. And the lamp - as well  as the second one on the right side of the card - is decorated with a red bow. This one's from the die set Build a House Christmas Add-On.
I've also added another layer of snow here.


Und das ist der Teil der Karte, der mich eigentlich auf die ganze Idee gebracht hat. Auch wenn ich es eigentlich ein wenig anders geplant hatte. 
Ich habe hier mit der Build a House Stanze sowie den Add-Ons Christmas und Gingerbread House ein Haus gebaut. Mit dem Woodgrain Backdrops Stempel habe ich wieder eine Holzstruktur aufgestempelt, auch die Ecken sind wieder dunkler gewischt. Der Schornstein auf dem Dach ist aus dem Stanzenset Mushroom House.
Die Bäckermäuse sind inzwischen so bekannt für ihre Leckereien, dass sie eine Bäckerei eröffnet haben. Und die heißt natürlich "the GingerbreadMouse". Das Schild ist am PC geschrieben und ausgedruckt. 
Die Tür ist mit einem Kranz geschmückt, das Schaufenster zeigt einige der im Laden angebotenen Leckereien. Ich habe hier Stempel aus den Sets Ho-Ho-Holidays und A Creature was Stirring benutzt. Die Lichterkette im Dachgiebel hängt bereits, eine weitere wird von der Maus auf der Leiter gerade aufgehängt. Lichterkette und Leiter sind aus dem Set Cheery Christmas, die Lampen der Lichterketten sind wieder mit Glossy Accents überzogen. Die Maus auf der Leiter stammt aus dem Set A Creature was Stirring. 
Neben der Bäckerei steht ein Schild, das darauf hinweist, dass die Bäckerei geöffnet ist. Das Schild ist aus dem Set Village Shops. Und es zeigt nicht nur, dass die Bäckerei geöffnet ist, sondern gleichzeitig ist es auch ein Hinweis, dass man hier auf der Karte noch etwas öffnen kann...

And this is the part of the card that started the whole idea. Even if I had to change it a bit.
With the Build a House die and the Add-Ons Christmas and Gingerbread House I've built that house. Again I've used the Woodgrain Backdrops stamp set to add a wooden texture and I've also inked the edges again. The chimney on the roof is from the Mushroom House die set. 
The baking mice are so famous for their yummy creations that they opened up their own bakery. And of course they had to name it "the GingerbreadMouse". The sign is made with my laptop and printed with my home printer. 
The door of the bakery is decorated with a wreath, in the shop window there are displayed some of the yummy creations the mice are selling. I've used stamps from the sets Ho-Ho-Holidays and A Creature was Stirring here.
The string of lights under the roof are already put up, and the mouse on the ladder is about to hang up another one. Lights and ladder are from the Cheery Christmas stamp set, the lights on both strings are covered with Glossy Accents. The mouse on the ladder is from the A Creature was Stirring set.
Next to the bakery there's a sign telling everyone that the bakery is open. It's from the Village Shops stamp set. But it does not only show that the baker is open, it's also a little hint that there's something to open on the card...


Denn ich gebe Euch hier auch einen Einblick ins Innere der Bäckerei. Ich habe das Haus einfach zweimal gestanzt und bestempelt, nur die oberen Teile aufeinander geklebt und das obere Haus über dem Vordach gefalzt. 
Hier ist der Bäcker gerade dabei, letzte Hand an ein Lebkuchenhaus zu legen. Und sein Gehilfe gönnt sich eine Tasse heiße Schokolade. Lebkuchenhaus, Kuchenständer und Bäckermäuse sind aus dem Stempelset A Creature was Stirring, der Mehlsack im Hintergrund aus dem Set Baked with Love und die Tasse, die die rechte Maus in den Händen hält, aus dem Set Holiday Helpers, ebenso die Zuckerstange. 
Und im Hintergrund steht noch der Ofen. Dafür habe ich das Stanzenset Magic Picture Changer Oven Add-On benutzt und den Ofen nur in der Höhe ein wenig verkürzt. 
Ich weiß, perspektivisch ist das ganze im Inneren nicht perfekt, aber mir hat die Idee so gut gefallen.

Because I'm also giving you a look at the inside of the bakery. I've die cut and stamped onto the house twice, glued the top together and scored the upper house just above the fly. 
On the inside the chef baker is working on finishing one of their gingerbread houses while the other mouse is helping herself to a cup of hot chocolat. Gingerbread house, cake stand and mice are from the A Creature was Stirring stamp set, the sack of flour from the Baked with Love set and the cup the mouse is holding, as well as the candy cane, are from the Holiday Helpers stamp set. 
In the background you can see the oven. I've used the Magic Picture Changer Oven Add-On die set and only made the oven a bit narrower to fit into the house.
I know, the inside of the house isn't perfect when it comes to perspective but I liked that idea so much... 

Samstag, 7. November 2020

Stempeleinmaleins - Ausgabe vom 7. November 2020


Hallo Ihr Lieben!

Adventskalender sind etwas tolles - und am liebsten möchte man für jeden Freund/Freundin einen basteln. Aber sie machen auch viel Arbeit. Beim Stempeleinmaleins zeigen wir Euch heute eine Variante mit einer kleiner Box für jeden der vier Adventssonntage. Der ist natürlich viel schneller gemacht als einer mit 24 Boxen und so kann man auch mehr Menschen eine Freude machen.

Hello everyone!

Advent calendars are great - and you'd love to make one for each of your friends. But they are also a lot of work. Over at Stempeleinmaleins we are sharing a version with one gift for each of the advent sundays. Of course those are made so much quicker than the ones with 24 boxes and that means you can make one for more of your loved ones.


Geschlossen bildet der Adventskalender ein Quadrat, das mit einem Band zusammengehalten wird.

Dekoriert habe ich es mit diesen süßen Mäusen von Impronte d'Autore, die schon in Weihnachtsstimmung sind. Ich habe sie mit Copics coloriert und ausgeschnitten. Im Hintergrund befindet sich ein Kreis aus goldenem Spiegelcardstock, auf dem ein Kreis aus dunkelblauem Cardstock aufgeklebt ist. Aus schwarzem Cardstock habe ich eine Kleinstadt-Silhouette ausgestanzt und auf den Nachthimmel geklebt, davor befindet sich eine Lage Schnee. Unter den Mäusen habe ich einen Streifen schwarzen Cardstock aufgeklebt, auf den ich mit goldenem Embossinpulver einen Adventsgruß von JM-Creation aufembosst habe. Zum Schluss habe ich mit einem weißen Gelmarker noch viele Schneeflocken über die Szene gesetzt.

The closed advent calendar builds a square that gets hold together by a piece of ribbon.

I've deocrated my calendar with these cute mice by Impronte d'Autore. They are already in christmas mood. I've colored them with Copics and cut out. In the background there's a circle cut from golden mirror cardstock with a slightly smaller circle cut from dark blue cardstock glued on top. Then I've added a town silhouette cut from black cardstock, with a layer of snow glued under it. Under the mice I've added a strip of black cardstock onto which I've heat embossed a "have a wonderful christmas time" saying with golden embossing powder. In the end I've covered the whole scene with lots of snowflakes, drawn with a white gel marker.


So sieht der geöffnete Kalender dann aus.

This is the opened calendar.


Alle Teile sind mit Schneeflocken-Designpapier in eisblau beklebt.

Oben auf die Boxen habe ich Schneeflocken, gestanzt aus weißem Cardstock,  sowie einer der Zahlen von 1 bis 4 dekoriert. Die Zahlen habe ich aus goldenem Spiegelcardstock gestanzt.

All parts of the calendar are covered with an ice blue designer's paper with a snowflake print.

On top of the boxes I've glued a snowflake, die cut from white cardstock, and one of the numbers from 1 to 4. The numbers are die cut from golden mirror cardstock.


Die Boxen bestehen aus zwei Teilen, der obere kann nach oben abgezogen werden. Darin kann man dann eine nette Kleinigkeit verstecken. Ich habe meine Boxen zudem mit dunkelblauen "geschredderten Papierstreifen" gefüllt. 

The boxes are made from two cubes, the top ones can be pulled off. Inside there's room for a little gift. I've also filled my boxes with some of those shredded paper strips in dark blue.


Freitag, 6. November 2020

Oh Christmas Tree

 
Hallo Ihr Lieben!
Auf dem LawnFawn Challenge Blog gibt es eine neue Challenge: Oh Christmas Tree. Diesmal soll der Weihnachtsbaum im Fokus der Karte stehen. Und das ist meine Idee dazu.

Hello everyone!
There's a new challenge over at the LawnFawn Challenge Blog: Oh Christmas Tree. This time the tree has to be in the focus of a card. And this is my idea for this theme.

Ich hatte ein wenig überlegt, wie ich den Baum wirklich in den Fokus stellen kann. Eine klassische Weihnachtsszene mit Geschenken, Kamin etc passte da für mich nicht so recht. Aber dann kam mir die Idee, einen geschmückten Tannenbaum in den Winterwald zu stellen - natürlich bei Nacht. So konnte ich alle Motive in grau colorieren und nur der Baum ist wirklich bunt, dazu ein dunkles Blau für den Himmel.
Der Himmel ist mit Distress Oxide Blueprint Sketch, Chipped Saphire und Black Soot gewischt, mit Wasser besprenkelt und dann habe ich mit silberner Schimmer-Watercolor noch Sterne aufgespritzt. Selbt hier wollte ich keine extra Farbe ins Spiel bringen.

I was thinking about how I could make the tree the real focus of my card. A traditional card with presents and a fireplace just didn't really fit the theme for me. But then I had the idea of putting a decorated tree into the winter-y woods - of course at night. That way I could use lots of grey and only use colors for the tree itself. I also allowed some dark blue for the sky.
The sky is made with Distress Oxide Blueprint Sketch, Chipped Saphire and Black Soot, adding a few water drops on top and then flicking some silver shimmer watercolor over the sky for stars. Even for those I didn't want to use another color.


Für die Szene habe ich im Hintergrund die Over the Mountain Borders - beide der Stempel aus dem Set - abgestempelt und in Grautönen coloriert. Die hintere Lage ist direkt auf den Himmel-Hintergrund, die davor mit dünnem 3D Tape darauf geklet. 
Als dritte Lage habe ich aus weißem Cardstock und einer der Slimline Simple Stitched Hillside Borders einen weiteren verschneiten Hügel gestanzt. Auf den kamen dann die süßen Mäuse aus dem Stempelset Dandy Day. Sie sind mit Copics in Grau coloriert, nur ein wenig gelb spiegelt das Strahlen der Lichter am Baum auf den Körpern. 
Der vordere Schneehügel ist ebenfalls mit 3D Tape aufgeklebt, die Maus ganz links ist auf dem mittlerenHügel, die anderen auf dem vordersten Hügel aufgeklebt. Den habe ich dann ebenfalls ein wenig mit Copics schattiert, dazu ein paar Mäuse-Fußspuren in den Schnee gemalt. Außerdem sieht man hier die Reflexion der Lichter am Baum ein wenig. 
Der Baum ist aus dem Stempelset Christmas Dreams. Den habe ich in rot, grün und gold coloriert. Mit goldenen Stickles und weißem Gelmarker habe ich Lichter und Girlanden auf den Baum gemalt. Außerdem sind die Christbaumspitze und die Kugelgirlanden mit Glossy Accents überzogen. Dann habe ich auch den Baum auf die Karte geklebt.
Die Mäuse sind so fasziniert vom glitzernden Baum, dass sie nicht einmal bemerken, dass Santa just in diesem Moment über sie hingwegfliegt. Der ist aus dem Stempelset Ready, Set, Snow und mit schwarzem Embossingpulver auf den Nachthimmel embosst.
Unten auf den Hügel habe ich dann noch einen Text aus dem Stempelset Ho-Ho-Holidays, ganz einfach mit schwarzer Tinte direkt auf den Cardstock, gestempelt.

For the scene I've used both tree borders from the Over the Mountain Borders stamp set. They are stamped and then colored in greys with Copics. The back hill is glued directly onto the night sky background, the middle one onto the back one with thin dimensionals.
As a third layer I've die cut another hill using one of the Slimline Simple Stitched Hillside Borders. Onto that I've glued the cute mice from the Dandy Day stamp set. They are colored grey with Copics, I just added a bit of yellow to mirror the glow of the tree on their bodies. 
The hill in the front is also glued down with dimensionals. The mouse on the very left is glued to the middle hill, the others on the top one. I've added some shading to that hill and also a few mice foot prints in the snow and the reflections of the lights on the tree.
The tree is from the Christmas Dreams stamp set. I've colored it in t red, green and gold. With golden Stickles and a white gel marker I've added lights and garlands to the tree. The tree topper and the baubles garland are also covered with Glossy Accents. Then I've glued the tree onto the card.
The mice are so amazed by the glowing tree that they don't realize that Santa is flying over them in just that moment. He's from the Ready, Set, Snow stamp set and black heat embossed onto the night sky.
Onto the front hill I've also stamped a greeting from the Ho-Ho-Holidays stamp set, simply stamping it directly onto the cardstock with black ink.


Und hier habe ich noch ein Bild, auf dem man das Funkeln des Baumes besser sehen kann. 
Hinter der Christbaumspitze habe ich übrigens mit gelber Schimmer-Kreide noch deren Lichtschein auf den Himmelhintergrund gemalt.

And here I've another pic that shows the sparkle of the tree better.
Behind the tree topper I've added a halo using yellow shimmer chalk. 

Donnerstag, 5. November 2020

Gechillte Weihnachten

 
Hallo Ihr Lieben!
Ich denke, wir alle kennen das: die "stille" Zeit vor Weihnachten ist von Hektik geprägt und selbst an Heiligabend gibt es so viel zu tun. Dass es auch anders geht, zeigt Euch das kleine Faultier auf meiner Karte, die ich heute auf dem Stampcorner Blog zeige. Und vielleicht sollten wir es uns alle - zumindest ein wenig - zum Vorbild nehmen.
 
Hello everyone!
I guess most of all agree with me - christmas time is so stressful and even on Christmas Eve there's so much left to do. That it could be different is what the little sloth on this card, that I'm sharing over at the Stampcorner Blog today, is showing. And maybe we all should do it like him - at least a bit.
 
 Ich habe hier mit einer der Stitched Scallop Basic Edges 2 von MFT ein Stück weißen Cardstock am linken Seitenrand zugestanzt und dann den Cardstock so klein geschnitten, dass rechts und links noch etwas von dem grünen Designpapier mit den weißen Punkten aus dem Let it Shine Papierpack von LawnFawn, das ich hinter den weißen Cardstock geklebt habe, zu sehen war. Dann habe ich den Hintergrund auf einen weißen Kartenrohling geklebt.

I've used one of the Stitched Scallop Basic Edges 2 by MFT to cut the edge of a piece of white cardstock into a wavy scalloped shape. Then I've cut the white cardstock small enough so some of the green designer's paper with the green dots from the Let it Shine paper pad by LawnFawn, that I've put behind this white cardstock, is visible on both sides. Then I've glued the background onto a white note card. 


Dann habe ich mit Distress Ink Crackling Campfire einen Kreis auf den weißen Cardstock gewischt und außen am Rand noch etwas Candied Apple aufgetragen, um das Rot dort zu intensivieren. 
Das süße Weihnachts-Faultier hat es sich auf einem Tannenzweig gemütlich gemacht. Eigentlich liegt es auf einem normalen Ast - ich habe den als Guideline benutzt und mit Copics einfach kleine grüne Striche davon wegführend gemalt. Schon wird aus dem Zweig ein Tannenzweig - nur das Ausschneiden des Motives war so etwas frickeliger. Dafür sieht es nun so aus, als läge der Kleine im Weihnachtsbaum. Um den Eindruck noch zu verstärken, habe ich noch eine Zuckerstange aus dem Set Freunde X-Mas ausgeschnitten und in den Zweig gehängt. Ich habe einen kleinen Schlitz in den Tannenzweig geschnitten und die Zuckerstange dort durchgesteckt. 
Mit den Alphanumeric Shadows Lower Stanzen von Sizzix habe ich das Wort xmas ausgestanzt. Die Außenlinien sind aus schwarzem Cardstock gestanzt, die inneren Teile aus rot-weiß gestreiftem Designpapier, ebenfalls aus dem Let it Shine Papierpack, gestanzt und eingeklebt. 
Durch zwei kleine schwarze Cardstockstücke habe ich dann den Text ergänzt. Das Let's Chill ist aus dem Penguins in Paradise Stempelset von MFT, das It's aus dem Sky High Stempelset. Beide sind mit weißem Embossingpulver aufembosst. 
Mit goldener Glitterpaste und der Card-Sized Star Confetti Stencil habe ich dann ein paar Sterne über der Karte verteilt und zum Schluss auch noch ein paar Schneeflocken aufgeklebt. Die sind aus dem Magic Iris Snow Globe Add-On Stanzenset von LawnFawn - und sie lagen noch von meinem letzten Projekt auf meinem Schreibtisch.

Then I've added a circle onto the white cardstock with Distress Ink Crackling Campfire and added some Candied Apple to the outer edge to intensify the red a bit. 
The cute sloth is by Stampcorner and is chilling on a fir branch. Well, originally it's just laying on a regular branch. I've used this as a guideline and adde small strokes with green Copics to turn the branch into a fir branch. It just made cutting the image out a bit harder. But now it looks like the sloth is chilling in his christmas tree. And of course a christmas tree needs some decorations, so I've also added a candy cane.
Using the Alphanumeric Shadows Lower die set by Sizzix I've written the word xmas. The outlines are cut from black cardstock, the inner parts of the letters I've cut from red and white striped designer's paper, also from the Let it Shine paper pad, and glued them in place. 
I've finished the text by adding two small pieces of black cardstock onto which I've white heat embossed the words Let's Chill (from the Penguins in Paradise stamp set by MFT) and It's (from the Sky High stamp set).
Using some golden glitter paste and the Card-Sized Star Confetti stencil I've added a few stars to the card, then also added some snowflakes. Those are cut with the Magic Iris Snow Globe Add-On die set by LawnFawn - and were left overs from another card I've made.

Mittwoch, 4. November 2020

Weihnachtpost!

 
Hallo Ihr Lieben!
Ich liebe es ja, wenn man Stempel mit minimalen Änderungen etwas zweckentfremden kann. In diesem Fall reichte schon eine andere Farbwahl sowie etwas aufgemalter Schnee. Und schon ist Weihnachtspost im Briefkasten!

Hello everyone!
I love when you can turn an image to be used for a different occasion by simply changing it a tiny bit. In this case it was just enough to use some different colors and adding some snow. And well, here's some christmas mail!

Ich habe hier kraftfarbenen Carstock als Basis genommen und ihn so zugeschnitten, dass oben und unten Platz für einen etwa 1 cm breiten Streifen aus hellblauem Cardstock blieb. Die beiden Lagen habe ich dann auf einen weißen Kartenrohling geklebt. 
Auf den kraftfarbenen Cardstock habe ich dann kleine Schneeflocken aus dem Stempelset Es ist kalt draußen weiß aufembosst. 

I went with some craft colored cardstock for the base and cut it so I could add a strip of cardstock about 1 cm high to both the bottom and the top. Then I've glued both layers onto a white note card.
Onto the craft colored cardstock I've white heat embossed some small snowflakes.


Der tolle Briefkasten hat eigentlich keinen "Grund" auf dem er steht. Also habe ich dort einen Schneehaufen dazugemalt. Auch der Schnee auf dem Dach und dem Holzbrett sind beim Colorieren hinzugefügt. Ansonsten habe ich einfach den Briefkasten aus dem Set Ein stempeliger Gruß so wie er ist verwendet und ihn mit Copics coloriert. Schon allein ein grüner statt weißer Umschlag macht hier in der Optik viel aus - er wirkt gleich festlicher. 
Halt, eine weitere Änderung habe ich doch noch vorgenommen - ich habe den Kamin auf dem Dach mit dem Ilex samt Beeren aus dem Stempelset Christbaum und Co überklebt. Die Motive habe ich übrigens nicht direkt auf dem kraftfarbenen Cardstock coloriert. Das wäre mit Polychromos oder ähnlichem zwar gegangen, aber ich mag die Leuchtkraft der Copics. Also habe ich auf weißen Cardstock gestempelt, coloriert, die Motive ausgeschnitten und auf den Hintergrund aufgeklebt.
Das Post für Dich ist ebenfalls aus dem Stempelset Ein stempeliger Gruß und auch weiß auf den Hintergrund aufembosst. Und damit Weihnachstpost daraus wird, habe ich das Wort Weihnachts mit den ABC 1 Stanzen aus grünem Designpapier mit winzigen weißen Pünktchen ausgestanzt und quer über die Karte geklebt. 
Als Finish habe ich noch kleine grüne Pailetten auf der Karte verteilt.

The great mail box originally hasn't any ground to stand on. So I've simply added a pile of snow there. Also the snow on the roof and the square wood stand were added while coloring the image. The Rest is used just as it is and colored with Copics. Just coloring the envelope in a christmas-sy green instead of white changes the look of the image - it looks so much more festive. 
Stop, I've made another change. There's originally a chimney with a heart on the roof - I've glued the holly leaves and berries over it. By the way, I didn't stamp the images directly onto the craft colored cardstock. It would have been possible to color them with Polychromos but I like the bright colors of Copics. So I've stamped them onto white cardstock, colored them, cut them out and glued them onto the background.
The white text means "mail for you". It was white heat embossed onto the craft cardstock. To turn it into christmas mail I've die cut the german word for christmas from green designer's paper with tiny white dots and glued them across the card.
To finish the card I've added a few small green sequins.

Dienstag, 3. November 2020

HedgeHUGS

 
Hallo Ihr Lieben!
Weihnachten ist noch 1,5 Monate entfernt - und wenn ich jetzt schon nur Weihnachtskarten werkle, dann werde ich des Themas wohl bald überdrüssig. Mal abgesehen davon, dass ich natürlich auch noch so überhaupt nicht in Weihnachtsstimmung bin. Offiziell haben wir ja noch Herbst, also habe ich beschlossen, heute auf dem Stamping-Fairies Blog eine Herbstkarte zu zeigen.  Und das ist gleichzeitig auch meine monatliche "Benutze-einen-älteren-Stempel"-Karte.

Hello everyone!
Christmas is still 1,5 months away - and when I make christmas cards only will be fed up of them by december. Not to mention that I am not in any christmas mood yet as well. Officially it's still autumn so I've decided to share this fall-ish card over at the Stamping-Fairies Blog today. And it's also my monthly "use-at-least-one-older-stamp" card.

Hier habe ich für den Hintergrund weißen Cardstock mit Distress Oxide Bundled Sage, Tumbled Glass und Salty Ocean gewischt und ein paar feine Wassertropfen darauf verteilt. 
Für die Birken habe ich die Birch Tree Stanzen von MFT benutzt, die Blätter sind aus weißem Cardstock gestanzt und mit Copics coloriert. 
Den weißen Cardstock habe ich dann schwarz gemattet und auf einen weißen Kartenrohling geklebt.

Here I've inked up some white cardstock with Distress Oxide Bundled Sage, Tumbled Glass and Salty Ocean and then added a few small drops of water to it. 
For the trees I've used the Birch Tree die set by MFT, the leafes are cut from white cardstock and colored with Copics.
Then I've matted the background with black carstock and glued it onto a white note card.


Für das "Hugs" habe ich zuerst den Diagonal Stripes Background mit klarem Embossingpulver auf weißen Cardstock embosst und daraus mit den Impact Alphabet Stanzen die Buchstaben ausgestanzt. Die habe ich dann mit Distress Ink Crackling Campfire eingefärbt. Dabei habe ich unten viel, oben nur wenig Farbe aufgetragen. Ich finde es genial, wie dieser Farbton selbst von rot zu orange wechselt.
Die Buchstaben habe ich mit 3D Tape auf die Karte geklebt.
Davor kamen zwei Lagen orangefarbenen Cardstocks, bei denen ich die Kanten mit den Grassy Hills Stanzen gestanzt habe. Außerdem habe ich die Cardstockstücke mit Distress Oxide Gathered Twigs ein wenig eingefärbt und zusätzlich Distress Ink Ground Espresso, vermischt mit ein wenig Wasser, mit einem Pinsel aufgespritzt. Auch diese beiden Lagen sind dann mit 3D Tape auf die Karte geklebt.
Die Worte Sending Hedge sind mit weißem Embossingpulver auf braunen Cardstock embosst und über die Birkenstämme geklebt.  Das gestanzte Wort Hugs ergänzt den Text.

For the "Hugs" I've first clear heat embossed the Diagonal Stripes Background onto some white cardstock, then die cut the letters from it using the Impact Alphabet dies. Then I've colored those with Distress Ink Crackling Campfire, adding lots of color to the bottom and just a bit to the top of the letters. I love how this color changes from red to orange on its own. The letters are glued onto the card with dimensionals.
Next I've added two layers of orange cardstock, that I've used the Grassy Hills dies to cut the edges. I've also inked those up a bit with Distress Oxide Gathered Twigs and added some brown color splats using Distress Ink Ground Espresso, mixed with a bit of water. Also those two layers are glued onto the card with foam tape.
The words Sending Hedge are white heat embossed onto brown cardstock and glued onto the birch trees. The die cut word Hugs completes the text on this card.


Und hier ist das Motiv.  Ich habe hier die süßen Happy Hedgehogs benutzt. Aus diesem Set ist übrigens auch der Text. Ich habe die Motive mit Copics coloriert, ausgeschnitten und ebenfalls mit 3D Tape auf die Karte geklebt.
Der Baumstamm alleine war mir ein wenig zu fad. Deswegen habe ich noch buntes Laub aus dem Stempelset Fall Friends, ebenfalls mit 3D Tape, davor geklebt.

And  here's the image. I've used the cute Happy Hedgehogs stamp set here. The text ist from this set as well. I've colored the images with Copics, cut them out and glued them onto the card with dimensionals. 
And since the log seemed a bit sad on its own I've also stamped the cluster of fallen leafes from the Fall Friends stamp set and glued them in front of the log, again with dimensionals.