Dienstag, 15. Februar 2022

To brighten your day


Hallo Ihr Lieben!
Na, habt Ihr schon die ersten Schneeglöckchen gesehen? Falls nicht, dann bringe ich sie Euch mit dieser Karte ins Haus.


Hello everyone!
Have you seen the first Snow Bells already? If not, I'm bringing some of them to your home today, with this card. 

Ich habe hier eine Crate Card gemacht, eine Idee, die ich bei Splitcoaststampers gesehen habe. Das ist eigentlich eine Box Card, die Box ist aber wie eine Holzkiste gestaltet. Und in meiner Box wachsen die ersten Schneeglöckchen.

I made a Crate Card here, an idea I've seen over at Splitcoaststampers. It's a box card, but the box part is made like a wooden crate. And in my box the first Snow Bells are blooming.


Ich habe bewusst die Kiste etwas abgenutzt aussehen lassen, quasi als Kontrast zu den frischen und weißen Schneeglöckchen. Und ich finde, das Ganze sieht wunderbar frühlingshaft aus.

I made my crate look a bit shabby as a contrast to the fresh and white flowers. And I think, the whole card looks so wonderfully spring-ish.


Die Schneeglöckchen sind mit dem Snow Bells Stempelset von CraftEmotions gemacht. Ich habe sie mit dem No-Line Fadeout Kissen von InkOn3 abgestempelt und dann mit Copics coloriert. Zum Schluss habe ich ein paar der äußeren Blattlinien mit einem dunkelgrünen Polychromo akzentuiert und sie per Hand ausgeschnitten.
Unter die Schneeglöckchen, quasi auf die Zwischenstege der Box Card, habe ich kleine Schneehäufchen geklebt. Die habe ich mit den Grounding Elements Stanzen von MFT aus weißem Cardstock gestanzt und teilweise etwas gekürzt, damit sie in meine Box passten.

The Snow Bells are made using the Snow Bells stamp set by CraftEmotions. I stamped them with the No-Line Fadeout ink pad by InkOn3 and then colored them with Copics. In the end I used a dark green Polychromo to add some depth to the darkest areas of the leaves and did some fussy cutting to cut them out. 
Under the Snow Bells, onto the inner pieces of the box card, I've glued some small snow pieces. I've die cut those from white cardstock using the Grounding Elements die set by MFT and cut off the end pieces of some to make them fit into my crate.


Die Kiste habe ich aus dem Woodgrain Cardstock von Ranger/Tim Holtz geschnitten. Um die Schlitze hineinzustanzen, habe ich eine der Stanzen aus dem Hearts in a Row Vertical Stanzenset von MFT benutzt.
Anschließend habe ich den weißen Cardstock erst mit Distress Spray Stain Walnut Stain und Wasser besprüht - auch die Rückseite, da die ja durch die Schlitze sichtbar ist -, nach dem Trocknen habe ich mit der weißen Distress Crayon die Struktur hervorgehoben.
Für den Text habe ich einen Stempel aus dem Set A Very Sweet Somebunny von MFT benutzt. Der passte von der Höhe perfekt auf die Ausschnitte, die aus der Kiste gestanzt wurden. Diese Streifen habe ich dann nur mit etwas Distress Oxide Pumice Stone eingefärbt und an den Ecken noch etwas Weathered Wood hinzugefügt. 
Die Cardstockstreifen mit dem Text sind mit 3D Tape auf die Kiste geklebt, zum Schluss habe ich noch eine Schleife aus hellblauem Organza oben an die Kiste gebunden.

The crate is made from the Woodgrain Cardstock by Ranger/Tim Holtz. To die cut the slits into the crate I used one of the dies from the Hearst in a Row Vertical die set by MFT.
Then I first sprayed the crate pieces with Distress Spray Stain Walnut Stain and Water - also the backside since this is visible through the slits -, after the pieces had dried I used a white Distress Crayon to bring out the wooden pattern. 
For the text I used one of the stamps from the A Very Sweet Somebunny stamp set by MFT. It was perfect to fit onto the pieces of cardstock that I had left over from cutting the slits into the crate. I inked up these strips with a bit of Distress Oxide Pumice Stone and added  a bit of Weathered Wood to the left and right sides.
The strips with the texts are glued onto the crate with foam tape, in the end I've tied a piece of blue organdy ribbon to the crate and tied it to a bow.

Samstag, 12. Februar 2022

Lots of Love from Far Away

 
Hallo Ihr Lieben!
Es wird wieder blumig heute! Ich weiß nicht, ob es der anstehende Frühling ist, oder ob mir Blumenmotive momentan einfach so gut gefallen. Aber ich könnte sie auf jeder Karte verarbeiten! Keine Angst, dazu kommt es nicht. 
Diese Karte hat sich inzwischen auf den Weg zu meiner Mom gemacht - als Valentinstagsüberraschung.

Hello everyone!
It's getting floral again today! I habe no idea if it's the fact that spring is just around the corner, or if I am just in love with flower images at the moment. I could use those on every card! Don't worry, that won't happen.
This card is now on the way to my mom's - as a little Valentine's surprise!

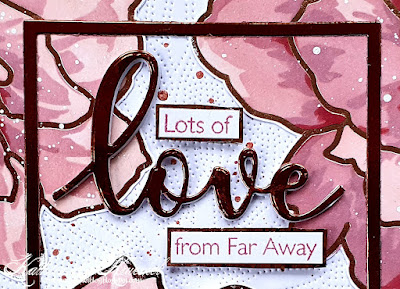
Hier habe ich die geniale Golden Days Hotfoil Plate von Altenew sowie die dazu passenden Stencils benutzt. Die Blüte ist riesig! Deswegen hat mir hier auch eine einzige gereicht, um fast die komplette Karte damit zu bedecken. Ganz abdecken wollte ich den weißen Cardstock im Hintergrund aber doch nicht - denn den habe ich zuvor mit der Dotted Starburst Stanze von Altenew gestanzt - oder in diesem Fall vielleicht eher geprägt. 
Anschließend habe ich rosegoldene Metallic Watercolor auf den weißen Cardstock gespritzt, allerdings eher spärlich eingesetzt. Ich wollte nur einen kleinen Farbklecks dort.

Here I used the wonderful Golden Days hotfoil plate by Altenew and the matching stencils. This flower is ginormous! That's also why just one was enough to cover nearly the whole card front. I didn't want to cover the white cardstock completly because I had used the Dotted Starburst die by Altenew to add the wonderful dotted pattern to it.
Then I spritzed some rose gold metallic watercolor onto it, making sure to not add too much. I just was after a little bit of color there.


Hier seht Ihr die Blume genauer - okay, einen Teil davon. Ich habe sie mit rosegoldener Folie auf weißen Cardstock foliert. Die Folierung ist mir nicht perfekt gelungen - da es aber bereits der dritte Versuch war, habe ich mich damit zufrieden gegeben. Das lag nicht an der Hotfoil Plate an sich - ich hatte bereits einen perfekten Abdruck. Aber nach dem Einfärben mit den Stencils, fand ich es eine gute Idee, Wasser darüber zu sprühen, damit die Farben etwas ineinander verlaufen. Das Ergebnis hat mir gar nicht gefallen, also wanderte diese Blume in die Tonne. Und beim zweiten Folierversuch bin ich mit der Folie verrutscht.... Also musste Versuch 3 einfach zum Einsatz kommen.
Durch die Stencils habe ich die Blume mit Distress Inks coloriert. Ich habe Spun Sugar, Victorian Velvet und Aged Mahogany verwendet. Das Victorian Velvet kam gleich zweimal zum Einsatz: bei Stencil 2 nur leicht, bei Stencil 3 dann satter aufgewischt. Außerdem habe ich etwas weiße Acrylfarbe auf das Motiv aufgespritzt.
Anschließend habe ich die Blume per Hand ausgeschnitten und unten auf den Hintergrund geklebt. Die überstehenden Teile habe ich abgeschnitten und dann oben am Rand der Karte angeklebt.

Here you get a closer look at the flower - well, a part of it. I foiled it with rose gold foil onto white cardstock. The foiling isn't perfect here, but since it was my 3rd attempt I decided to use it. Well, the problem wasn't the hotfoil plate - I already had a perfect foiled image. But after inking it up I thought it a good idea to spray it with water to make the colors run into each other. And I so didn't like how that turned out that I decided to re-do it. And when foiling the flower for the second time I moved my foil and the image wasn't complete. So attempt #3 just had to be used!
I inked the flower using the matching stencils and Distress Inks. I went with Spun Sugar, Victorian Velvet and Aged Mahogany. The Victorian Velvet was used twice: for color layer #2, applying just a thin layer of color, and for color layer #3, then putting it down with a heavier hand. I also spritzed some white acrylic paint over the image.
I then cut out the flower by hand and glued it onto the bottom of my backcground. I cut off the overhanging parts of the flower and glued those to the top edges.


Auf meine Karte habe ich einen Rahmen aus rosegoldenem Spiegelcardstock aufgeklebt - und zwar so, dass er im oberen Bereich der Karte oben auf dem Motiv aufliegt, im unteren Bereich die Blume den Rahmen verdeckt. Das hat mir nicht nur vom Design her gut gefallen, sondern ich habe damit auch die Rahmenstanze passend für das Din-Format gemacht. Ich habe den Rahmen mit der A2 Thin Frames von HoneyBeeStamps gestanzt. Der ist aber auf das amerikanische Format ausgelegt und war somit zu kurz für meine deutsche Kartengröße. Da aber das Motiv den unteren Teil des Rahmens verdeckt. merkt man nicht, dass er zu kurz ist. 
Das Wort Love ist mit der Love Ornament Stanze von HeroArts gestanzt - einige Male aus weißem Cardstock und als oberste Lage wieder aus rosegoldenem Spiegelcardstock. Den runden Rahmen habe ich einfach weggeschnitten. 
Ergänzt habe ich den Text mit einem Stempel aus dem Feel Better Stempelset von MFT. Den habe ich mit dem Victorian Velvet Stempelkissen auf weißen Carstock gestempelt und den dann wieder rosegold hinterlegt. Anschließend habe ich die Textstücke mit 3D Tape aufgeklebt.

I glued a frame cut from rose gold mirror cardstock onto my frame - putting it on top of the images at the top edge of my card and putting the flower on top of the frame at the bottom. I did not only like this designwise, it also helped me to make the frame fit the german DIN size of my card. I used the A2 Thin Frames dies by HoneyBeeStamps, which is made to fit the american standard card size, so it was too short for my german card size. But since the flower at the bottom covers the bottom edge of the frame, you don't see that!
The word love is die cut with the Love Ornament die by HeroArts - a few times from white cardstock and for the top layer again from rose gold mirror cardstock. I simply cut off the round frame around the word.
I finished the text with a stamp from the Feel Better stamp set by MFT. I stamped it onto white cardstock using the Victorian Velvet ink pad, then matted the strips again with rose gold mirror cardstock and glued them onto the card with dimensionals.


Den weißen Cardstock habe ich ebenfalls mit rosegoldenem Spiegelcardstock gemattet und dann alles auf einen weißen Kartenrohling geklebt.
Und weil mir die große Blume ein wenig zu nackig war, habe ich dort noch ein paar weiße Halbperlen aufgeklebt.

Again I used rosegolden mirror cardstock to mat the white cardstock, then glued everything onto a white note card.
And since the big flower looked a bit plain I added a few white pearls to it.

Freitag, 11. Februar 2022

LawnFawnatics Challenge #118

 
Hallo Ihr Lieben!
Seit kurz vor Weihnachten bin ich einfach nicht dazugekommen, an einer der LawnFawnatics Challenges teilzunehmen. Da kommt das Thema der neuen Challenge #118 doch gerade recht: clean and simple. So zum Wieder-Reinkommen und so... Nun, ich bin ganz ehrlich, clean and simple und LawnFawn, das widerspricht sich in meinem Fall. Die Stempel und Stanzen passen einfach alle so gut zusammen, dass ich versucht bin, hier noch ein Tierchen und da ein Accessoire anzubringen - und schon ist meine Karte alles andere als clean and simple. Aber hey, Herausforderung angenommen!
Um gar nicht erst in Versuchung zu kommen, habe ich mir von vornherein nur eine Kombination aus drei Stempelsets erlaubt - das sind dann Wild for You, Toucan Do It und Big Scripty Words geworden. Eine Stanze sowie eine Stencil habe ich dann doch noch dazu verwendet. 
Mein Enkel, knapp über ein Jahr alt, liebt Tiere - und momentan "brüllt" jedes Tier. Vor einigen Tagen hatte ich einen Rock mit großen Flamingos zwischen vielen Blättern an. Die hat er immer angeschaut, darauf gedeutet und das Brüllen angefangen. Und das hat mich dann zu dieser Karte inspiriert. 

Hello everyone!
I didn't make it to join the LawnFawnatics challenges since a little before christmas. So the new theme of challenge #118 is the perfect one to start again: clean and simple. Well, to tell the truth, clean and simple and LawnFawn, that's something that hardly works for me. Their stamps and dies all work together so wonderfully, that I am always tempted to add another critter here and another accessoire there - and bang, my card is everything but clean and simple. But hey, challenge accepted!
To not even get tempted, I only allowed myself three stamp sets for this card - I picked Wild for You, Toucan Do It and Big Scripty Words. I also threw in a die and a stencil.
My grandson, just a bit over 1 year old, loves animals - and at the moment each of them roars. A few days ago I was wearing a skirt with big flamingos between large leaves. He always looked a the flamingos, pointed at them and starting roaring. And that's what inspired me to make this card.

Für den Hintergrund habe ich hellgrünen Cardstock verwendet und mit der Tropical Leaves Background Stencil und Distress Oxide Bundled Sage die Blätter aufgewischt. Da das so Ton in Ton doch ein wenig platt aussah, habe ich mit einem weißen Gelstift einige Highlights auf die Blätter gemalt. Außerdem habe ich grüne Metallic Watercolor darüber gespritzt - nur ein bisschen. 
Später habe ich, ebenfalls mit einem weißen Gelstift, einen Rahmen per Hand aufgemalt, den grünen Cardstock schwarz gemattet und alles auf einen weißen Kartenrohling geklebt.

For the background I used a piece of light green cardstock and stenciled the leaves onto it using the Tropical Leaves Background stencil and Distress Oxide Bundled Sage. Being all tone in tone this background looked a bit flat, so I used a white gel pen to add a few highlights to the leaves. I also spritzed some green metallic watercolor over the stenciled leaves, just a bit.
Later I used the white gel pen again to add the frame by hand, matted the cardstock black and glued it onto a white note card.


Ich musste hier einfach einen Löwen mit auf die Karte bringen - der brüllt ja wirklich. Er ist aus dem Stempelset Wild for You, ebenso die Krone, die ich am Geburtstagskind aufgesetzt habe. 
Alle Motive auf der Karte sind mit Copics coloriert. 
Der Tukan ist aus dem Set Toucan do It. Ich wollte nicht zu viele verschiedene Farben auf meiner Karte verwenden, deswegen habe ich ihn mit den selben Tönen coloriert, die ich auch für den Löwen verwendet habe. 
Hinter dem Tukan habe ich eine Palme gepflanzt - hier fehlte irgendetwas Hohes auf der Karte. Die ist aus dem Tropical Backdrop Stanzenset. Ich habe sie aus weißem Cardstock gestanzt und ebenfalls mit Copics coloriert. Von den Grasbüscheln habe ich auch gleich noch zwei als Hintergrund für den Löwen gestanzt.
Der Text auf der Karte ist aus jeweils einem Stempel aller drei "erlaubter" Stempelsets zusammengebaut und jeweils weiß embosst. 
Das Wort birthday ist aus dem Set Big Scripty Words und auf grünen Cardstock embosst. Dann habe ich ihn mit der dazugehörigen Stanze ausgestanzt. Davon habe ich 4 Teile aus grünem sowie zwei aus schwarzem Cardstock gestanzt und aufeinander geklebt, die schwarzen Teile einnmal nach unten links und einmal noch oben rechts versetzt. So habe ich eine fast komplette Schatten-Lage kreiert, ohne war der Kontrast zum grünen Hintergrund einfach nicht hoch genug. 
Have a Wild ist aus dem Set Toucan do It, das #partyanimal aus dem Set Wild for You. Sie sind jeweils auf schwarzen Cardstock embosst.
Beim Aufkleben habe ich unterschiedlich hohes 3D Tape verwendet, so dass die kleinen Texte etwa gleich hoch, die Tiere höher als das gestackte Wort birthday ist. Die Palme ist direkt auf den Hintergrund geklebt.
Ganz zum Schluss haben dann noch 5 kleine grüne Pailetten den Weg auf die Karte gefunden.

I just had to include a lion in my design - since this animal roars really. It's from the Wild for You stamp set, also the  birthday crown, that I put on his head.
All images are colored with Copics.
The toucan is from the Toucan do It set. I didn't want to use too many different colors on this card so I colored it with the same colors that I had used for the lion.
Behind the toucan I planted a palm tree - there was something tall missing on the card. I've die cut rom white cardstock with one of the dies from the Tropical Backdrop die set and then colored it with Copics. I also die cut two more grass pieces to glue behind the lion.
The text on the card is put together using one stamp from each of the "allowed" three stamp sets, that I white heat embossed.
The word birthday is from the Big Scripty Words stamp set and heat embossed onto green cardstock. Then I cut it out with the matching die. I also cut three more pieces from green and two from black cardstock with this outline die. I stacked them all on top of each other, putting one of the black ones a bit off to the bottom left and the other one to the top right. This way I created a nearly whole shadow around the word, the contrast between the background and the green cardstock just wasn't high enough without the black.
Have a wild is from the Toucan Do It set, #partyanimal is from the Wild for You set. I heat embossed both onto black cardstock. 
When glueing the elements onto the card I used foam tape in different thicknesses. The small texts are about the same height as the stacked birthday word, the animals are a bit higher. The palm tree is glued directly onto the background.
In the end 5 small green sequins found their way on the card as well.

Donnerstag, 10. Februar 2022

Du bist großartig!

 
Hallo Ihr Lieben!
Heute zeige ich auf dem Stampcorner Blog eine Karte mit einem der Februar-Neuheiten Sets. Das ist schon ziemlich sommerlich, aber ich habe den "Sommer" dann ein wenig abgemildert. Und so ist diese Karte zum Mutmachen entstanden.

Hello everyone!
Today I am sharing a card over on the Stampcorner Blog, for which I've used one of the sets from the february release. It's a pretty summer-ish one, but I "muted" the summer a bit. And so I ended up with this card, made to remind someone of his strength.

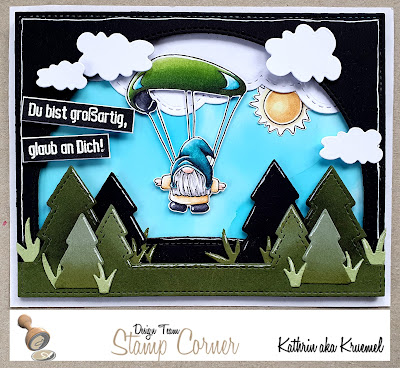
Ist der kleine Gnom am Gleitschirm nicht toll? Er brauchte natürlich eine passende Umgebung. Und so fliegt er nun im Sonnenschein über Wiesen und Wald. 
Für den Text auf der Karte habe ich verschiedene Stempel aus den Sets Danke und Träume kombiniert und mit weißem Embossingpulver auf schwarzen Cardstock embosst. Dann habe ich die Streifen weiß gemattet und später mit 3D Tape auf den Rahmen der Karte geklebt.

Isn't this little gnome with his parachute a cutie? Of course he needed the right surrounding. And so he's flying in the sunshine over meadows and woods.
The text means "you're great - believe in yourself". I white heat embossed it onto strips of black cardstock, matted them white and later glued them onto the frame of my card, using dimensionals.


Für den Himmel habe ich das zweite Stück Yupo benutzt, das ich von meiner Alcohol Ink Press-Technik von letzter Woche noch über hatte, das wollte ja auch zum Einsatz kommen. Die verwendeten Alcohol Inks sind Aqua und Turquoise sowie Blending Solution.
Für den Wald und die Wiesen habe ich den Forest Backdrop von LawnFawn benutzt. Ich habe ihn einmal aus schwarzem und einmal aus grünem Cardstock gestanzt und das grüne Stanzteil unten entlang der Kante in der Mitte neben den Bäumen abgeschnitten. Aus dem selben Stanzenset sind die zusätzlichen Bäume und das Gras, die ich aus schwarzem und grünem Cardstock gestanzt habe. Damit nicht alle grünen Bäume gleich sind, habe ich sie mit Distress Oxide Bundled Sage, Peeled Paint und Black Soot ein wenig schattiert. 
Der dunkle Hügel im Hintergrund ist mit einer der Slimline Simple Stitched Hillside Stanzen von LawnFawn gemacht. 
Ich habe alle Teile übereinander geklebt und dann auf den schwarz gestanzten Forest Backdrop geklebt. 
Den kompletten Rahmen habe ich dann mit 3D Tape auf das Yupo geklebt und zuvor noch eine Wolkenbordüre im oberen Bereich aufgeklebt. Hinter dieser schaut die Sonne hervor, die ebenfalls aus dem Sommer Gnome Stempelset ist.
Und weil der schwarze Rahmen oben doch etwas sehr prominent war, habe ich dort noch ein paar kleine weiße Wölkchen, gemacht mit Stanzen aus dem Slimline Meadow Stanzenset von WhimsyStamps, aufgeklebt.

For the sky I used the second piece of Yupo that I had left over from doing the Alcohol Ink Press Technique last week. This one shouldn't go to waste. The alcohol inks used were Aqua and Turquoise, combined with Blending Solution.
For the wood and meadow I used the Forest Backdrop by LawnFawn. I've die cut it once from black and once from green cardstock, then cut the sides of the green piece off along the edge in the middle. The additional trees and the grass, that I die cut from green and black cardstock again, are from the same die set. To make the trees vary a bit in color I used Distress Oxide Bundled Sage, Peeled Paint and Black Soot to shade them a bit.
The dark hill in the background is made with one of the Slimline Simple Stitched Hillside dies by LawnFawn. 
I glued all pieces together and then onto the Forest Backdrop, die cut from black cardstock.
I adhered the complete frame onto the Yupo, using foam tape, and added a layer of white clouds to the top. From behind those clouds the sun is peaking out.
And since all the black looked a bit hard in the top I added a few puffy clouds, die cut from white cardstock with dies from the Slimline Meadow die set by WhimsyStamps.


Und hier ist der kleine Gnom in Großaufnahme. Er ist aus dem Stempelset Sommer Gnome. Eigentlich steht das Wort Sommer im Gleitschirm, aber nach Sommer war mir noch nicht. Also habe ich zum Skalpell gegriffen und in einer kleinen Operation das Wort aus dem Stempel herausgeschnitten. Ich kann es ja jederzeit wieder einsetzen. 
Coloriert habe ich den kleinen mit Copics, die weißen Highlights sind mit einem Gelpen gemacht. Dann habe ich ihn ausgeschnitten und mit dünnerem 3D Tape auf den Himmel geklebt.

Here's a close up of the little gnome. Originally there's the word summer written across his parachute, but I didn't feel like making a summer card yet. So I brought out my craft knife and did a little stamp surgery, cutting the word out of the stamp. I can put it back in whenever I want.
I colored the gnome with Copics and used a white gel pen for the highlights. Then I've cut him out and glued him onto the sky with some thinner foam tape.

Mittwoch, 9. Februar 2022

Create a Smile Sketch Challenge

 
Hallo Ihr Lieben!
Heute gibt es wieder eine neue Create a Smile Challenge - wie immer, mit der Chance auf den Gewinn eines 25-Euro-Gutscheins für den Shop. Und diesmal haben wir einen weiteren Sketch für Euch: 

Hello everyone!
Today we're starting a new Create a Smile Challenge - as always you have the chance to win a 25 Euro gift card for the shop. And this time we have another great sketch for you:

Wie Ihr seht, lässt auch dieser Sketch wieder viel kreativen Freiraum. Und mich hat er zu einer Frühlingskarte inspiriert.
 
As you can see, again the sketch leaves a lot of room to use it creatively. And it inspired me to make a spring card:
 

 Ja, ich bin absolut bereit für den Frühling! Und um diese Jahreszeit werde ich immer ungeduldig. Also hole ich ihn mir zumindest ins Bastelzimmer.
Ich habe die unteren Ecken eines Stückes weißen Cardstocks mit dem Corner Chomper abgerundet, ihn dann mit ganz hellblauem Cardstock gemattet und auf einen weißen Kartenrohling geklebt.

I am so ready for spring to arrive. And each year around this time I start to get impatient. So at least I brought it into my craft room.
I used my Corner Chomper to round the bottom two corners of a piece of white cardstock, then glued it onto some very light blue cardstock as the matting and glued both layers onto a white note card.
 

 Für den Hintergrund habe ich die Cloud Pattern Stencil auf ein weiteres Stück weißen Cardstocks gelegt und dann die Unterseiten der Wolken ganz leicht mit Distress Ink Pumice Stone gewischt. Anschließend habe ich durch die Stencil Embossingtinte mit dem Embossing Daubber von Ranger aufgetragen und nach dem Entfernen der Schablone klares Embossingpulver aufgetragen. Durch den Sponge Daubber läuft minimal Tinte unter die Stencil - kann aber auch daran liegen, dass mein Daubber nagelneu war und ich wohl etwas viel Tinte in den Schwamm gedrückt habe. Aber das verleiht den Wolken einen wunderbar fluffigen Look.
Nach dem Schmelzen habe ich Distress Ink Salvaged Patina über den weißen Cardstock gewischt - oben dunkler, nach unten hin ein klein wenig heller. 
Dann habe ich mit der zweitgrößten der Stitched Square Frames Stanzen den Hintergrund ausgestanzt. So wird das Muster auf dem Rahmen fortgesetzt, trotzdem hat das Motiv einen Rahmen.
Die tollen Schneeglöckchen sind aus dem Set Endlich Frühling. Dazu habe ich die Biene aus dem Set Heute wird gut kombiniert. Alle Motive habe ich mit der No-Line Technik mit Copics coloriert und um die äußeren Linien etwas mehr zu definieren - da bin ich mit Copics meist ein klein wenig ungenau - habe ich hier noch Polychromos verwendet. Damit kann ich dann doch feiner arbeiten, als mit den Copics. Die Highlights sind mit einem weißen Gelpen gemacht.
Ich habe die Motive ausgeschnitten und dann mit 3D Tape auf den Wolkenhintergrund geklebt.

For the background I put the Cloud Pattern stencil onto another piece of white cardstock and then lighly inked the bottom of each cloud with Distress Ink Pumice Stone. Then I used the Embossing Daubber by Ranger to add embossing ink to the clouds. I covered them with clear embossing powder and melted it. Due to the daubber the ink flows a tiny little bit under the edges of the stencil - but it maybe me since I used a brand new one and it seems like I saturated my felt a bit too much. But it adds a nice fluffy look to the clouds.
I used Distress Ink Salvaged Patina to ink up the sky - I went darker at the top and just a bit lighter towards the bottom.
Then I used the second largest of the Stitched Square Frames dies to cut out the background. This way the pattern continues on the frame, but the images still has a frame.
Those beautiful snow bells are from the Finally Spring - just the german version - stamp set. I combined the bee from the Good Day stamp set. All images are colored doing some no-line coloring with my Copics. To define the outer lines a bit more - I tend to be a bit sloppy with my Copics here - I used some Polychromos. It's so much easier to get a very fine line with those. For the highlights I used a white gel pen.
I cut out the images and glued them onto the background with foam tape.


Anschließend habe ich den Rahmen ebenfalls mit 3D Tape um das Motiv geklebt. 
Nun fehlte noch ein Text - bei mir sind es sogar zwei geworden. 
Den unteren Text habe ich mit zwei Stempeln aus dem Set Endlich Frühling gemacht. Ich habe sie mit schwarzer Tinte auf weißen Cardstock gestempelt und dann mit einer der Useful Banners Stanzen ausgestanzt. 
Außerdem fand ich, dass ein weiterer kleiner Text oben rechts nicht schaden könnte. Also habe ich einen Text aus dem Set Heute wird gut verwendet. Auch er ist schwarz gestempelt und mit einer weiteren der Useful Banners Stanze ausgestanzt.
Beide Text sind mit aufgedoppeltem 3D Tape aufgeklebt, so dass die Texte die höchste Lage meiner Karte bilden.
Ganz zum Schluss habe ich noch ein paar klare Glitzersteine um den unteren Text herum verteilt.

Then I glued the frame around the image, again using foam tape.
Now all my card was missing was a text. I even added two.
The lower one means "it smells like spring". It's also from the Finally Spring stamp set. I stamped it with black ink onto white cardstock, then used one of the Useful Banners dies to cut it out.
I also felt like another text in the top right couldn't hurt. So I used a text from the Good Day stamp set, meaning "yay, great!" - but you have to say it in a very soft and longing voice. Again I stamped it black and used another one of the Useful Banners dies to cut it out.
Both texts are glued down with doubled up foam tape, so the texts are the highest layer on this card.
In the end I added a few clear rhinestones around the bottom text.

Dienstag, 8. Februar 2022

Sending Love, Hugs and Kisses


Hallo Ihr Lieben!
Im Januar-Release von MFT gab es jede Menge Artikel rund um das Thema Liebe. Zeit, sie also noch vor Valentinstag einzuweihen! Und das tue ich mit dieser Karte.


Hello everyone!
There were lots of items around the theme of love included in the january release by MFT. So, time to ink those up if I want to use them for Valentine's cards! And I did so for this card. 

Für diese Karte habe ich einen Hintergrund aus zwei Teilen gestaltet, auf dem aber ein Muster fortlaufend zu sehen ist.
Ich habe die beiden Teile aus weißem Cardstock zugeschnitten bzw. mit der Framed Greetings Cover-Up Stanze von MFT ausgestanzt. Dann habe ich beide so aufeinander liegend, wie sie auch später auf der Karte sein sollen, in meine Stempelhilfe gelegt. Den Never-Ending Love Background habe ich dann mit Versamark erst auf das gestanzte Cover-Up gestempelt, anschließend nur das Cover aus der Stempelhilfe entfernt und auch auf das komplette Stück Cardstock den Hintergrund aufgestempelt. Um sicherzustellen, dass mir die Lagen dabei nicht verrutschen, habe ich eines der großen Sticky Grid Sheets in meine Stempelhilfe gelegt und dabei nur die obere Schutzschicht abgezogen. Ich weiß, die sind eigentlich gemacht, um Stanzen auf den Stanzplatten der Big Shot an Ort und Stelle zu halten. Aber auch hierfür eignen sie sich super! Und wenn die eine Seite nicht mehr klebt, nutzt man einfach die Rückseite!
Nach dem Stempeln habe ich die Cardstockstücke mit klarem Embossingpulver bestreut und das dann geschmolzen. 
Das  Cover-Up habe ich mit Distress Oxide Hickory Smoke und Black Soot gewischt, für das komplette Stück habe ich Crackling Campfire, Fired Brick und Aged Mahogany genutzt. 
Ich habe beide Teile mit Foam Tape aufeinander geklebt - und siehe da, das Muster sieht aus, wie in einem Stück gestempelt. Ich finde, das bringt das ganze Design zusammen. 

For this card I created a background from two pieces but with a matching pattern.
I used white cardstock to cut the base of my card and die cut the Framed Greetings Cover-Up by MFT from another piece of white cardstock. Then I put both into my Misti, laying them on top of each other exactly how they would be on my card later on. I stamped the Never-Ending Love Background first onto the Cover-Up using Versamark, then removed the Cover-Up from my Misti and stamped the background onto the solid piece of cardstock. To make sure I don't accidentally move one of the layers while stamping them, I put one of the big Sticky Grid Sheets into my Misti, only pullling of the top protector sheet. I know, those are made to hold your dies in place on the cutting plate of your Big Shot. But they work as well for stamping - and once the sheet isn't sticky anymore you can simply use the other side of it!
After stamping I put some clear embossing powder onto the cardstock pieces and melted it.
I used Distress Oxide Hickory Smoke and Black Soot to ink up the Cover-Up, for the solid piece of cardstock I used Crackling Campfire, Fired Brick and Aged Mahogany.
I glued both pieces on top of each other using foam tape - and voilà, the pattern looks like stamped at the same time onto both pieces. I think, this really brings the design together.


In die Mitte, quer über die Karte, habe ich ein großes Love gesetzt. Dafür habe ich die Buchstaben aus weißem, das Herz aus rotem Cardstock mit der Heartfelt Love Stanze ausgestanzt. Dann habe ich alles auf schwarzen Cardstock geklebt, das Herz ist mit 3D Tape aufgeklebt. Zuerst hatte ich es ebenfalls direkt aufgeklebt, später aber entschieden, dass es mir höher gesetzt besser gefällt, also habe ich einfach ein weiteres Herz ausgestanzt und über das bereits aufgeklebte gesetzt. Per Hand habe ich dann den schwarzen Cardstock mit etwas Abstand ausgeschnitten, um einen schwarzen Rand rund um das Wort zu erhalten.
Die beiden süßen "schwanzhaltenden" Lemuren sind aus dem Stempelset You Are my Happy Place von MFT. Ich habe sie mit Copics coloriert, ausgeschnitten und mit 3D Tape so auf dem Hintergrund befestigt, dass die beiden auf dem Herz zu sitzen scheinen.
Die kleinen Texte sind aus dem Set Itty Bitty Love. Ich habe sie mit weißem Embossingpulver auf schwarzen Cardstock embosst, ausgeschnitten und ebenfalls mit 3D Tape aufgeklebt. Für das Wort Sending habe ich von dem Text Sending Hugs nach dem Stempeln einfach das Hugs weggeschnitten.
Ganz zum Schluss habe ich als Deko noch ein paar kleine Herzen, gestanzt aus weißem Cardstock, auf der Karte verteilt.

In the center I glued a big die cut Love across my card. I've die cut the letters from white, the heart from red cardsdtock using the Heartfelt Love die. Then I glued the pieces onto black cardstock, using dimensionals for the heart. First I had glued it directly onto the black paper as well, but later I decided that I liked it better raised. So I simply die cut another one and glued it on top of the one I had already glued down. I used my scissors to hand cut the black cardstock, cutting around the word with a bit of a distance to recieve a black matting.
Those two cute lemurs, that have twisted their tails what's like holding hands for humans, are from the You Are my Happy Place stamp set by MFT. I colored them in with Copics, cut them out and glued them onto the background with dimensionals, making it look like they are sitting on top of the heart.
The little texts are from the Itty Bitty Love stamp set. I white heat embossed them onto black carstock, cut them out and used dimensionals again to glue them onto the card. For the word sending I cut off the word hugs from a sending hugs text, after I had stamped it.
To finish this card I added a few small hearts, die cut from white cardstock.

Samstag, 5. Februar 2022

Stempeleinmaleins - Ausgabe vom 05. Februar 2022

 
Hallo Ihr Lieben!
Beim Stempeleinmaleins zeigen wir Euch heute eine Trifold Box, die Ihr für alle möglichen Gelegenheiten verschenken könnt. Und auch, wenn die Farbkombi meiner Box es vielleicht vermuten lässt, meine habe ich nicht für Valentinstag, sondern für einen Geburtstag gemacht.

Hello everyone!
Over at Stempeleinmaleins we are sharing this Trifold Box with you today. The box can be made for a lot of different occasions. And even if it might look like this was made for Valentine's Day because of the colors I used, it isn't. I made it as a birthday gift.


Die Box ist nicht nur farblich unterteilt - es sind auch zwei Lagen, aus denen die Box besteht. Die untere Box ist aus Designpapier gemacht. Ich habe eines gewählt, das auf der einen Seite rot mit einem weißen Muster ist, die Rückseite ist einfarbig rot, was dann auch innen toll aussieht.
Den oberen Teil meiner Box habe ich aus ganz normalem weißem Cardstock gemacht.

The box is not only optically divided into two parts - this box is made of two layers. I've made the lower box from a red patterned paper with a white pattern on one side, the other side is plain red, which makes the inside of the box look nice as well.
The upper box(es) are made from plain white cardstock.


Geschlossen wird die Box mit einer großen Schleife aus rotem Organzaband. Daran habe ich einen doppelten Tag gebunden. Den unteren, etwas größeren habe ich aus demselben Designpapier geschnitten, das ich auch für die untere Box verwendet habe. Darauf habe ich ein weißes Tag gesetzt, auf das ich einen Spruch von Kulricke gestempelt habe. Festgebunden ist das Tag mit einem Stück silberfarbenem Band, vor dem Aufziehen des Tags habe ich noch einen herzförmigen Charm auf das Band aufgefädelt.
Und weil die Oberseite so rein weiß doch etwas fad aussah, ich aber keine weitere Deko aufkleben wollte, habe ich zumindest  noch einen Rahmen mit einem dunkelroten Fineliner aufgemalt.

The box is closed with a big bow made from red organdy ribbon. I tied a double tag to it. The lower, slightly larger one is made from the same patterned paper, that I used to make the lower box. On top I added a white one onto which I stamped a "best wishes". I used some silver twine to tie the tag to the big bow and before tieing it to a knot I also added a silver heart shaped charm.
And since the plain white looked kind of boring on the top of the box, but I didn't want to add any decorations there, I at least used a red fineliner to hand draw a frame.


Und so sieht die geöffnete Box aus. Die weißen Boxen lassen sich zur Seite rollen, in der Mitte befindet sich die große Box aus Designpapier. 
Auf die kleineren weißen Boxen habe ich wieder einen Rahmen aufgemalt. Außerdem habe ich hier jeweils ein kleines Herz, gestanzt aus rotem Cardstock, sowie einen silber-glitzernden Nuvo Drop aufgebracht.

And this is the opened box. The white boxes roll to the sides, in the center there's the larger box made from patterned paper.
Onto the white boxes I drew a frame again. I also added a little heart, punched from red cardstock, and a silver glittery Nuvo Drop onto each of those boxes.


Auf die große Box in der Mitte habe ich dann doch noch etwas Deko aufgeklebt. Man muss ein wenig aufpassen, dass die Deko nicht zu hoch wird, sonst lassen sich die weißen Boxen nicht flach darüber legen. Aber mit dieser Deko schließt die Box noch prima.
Ich habe zu unterst ein weißes Doily aufgeklebt, darauf kam ein Kreis aus weißem Cardstock sowie einer aus dunkelrotem. Auf den roten Cardstock habe ich einen kreisförmigen Geburtstagstext von Kulricke weiß aufembosst. 
Als nächstes habe ich einen gewellten Kreis aus silbernem Glittercardstock aufgeklebt, in dessen Mitte kam wieder ein Kreis aus rotem Cardstock. Den Abschluss bildet ein weißer Kreis, auf den ich einen weiteren Text von Kulricke schwarz aufgestempelt habe. Und als Deko kamen auch hier ein paar der silber-glitzernden Nuvo Drops zum Einsatz.

Onto the large box in the middle I added some decorations. You have to take care that the decoration isn't too thick or the box won't close flat. But with what I added here it still works great.
At the bottom I glued a white doily onto the lid of this box, on top I added a circle cut from white cardstock and then another one, cut from red cardstock. Onto this one I white heat embossed a text circle with a birthday greeting.
The next layer is a scalloped circle, die cut from silver glitter cardstock, in its center I glued down another red circle. As the last layer I used another white circle, onto which I stamped a "it's your day" text with black ink. And again I added a few silver glittery Nuvo Drops here.

Donnerstag, 3. Februar 2022

Piep, Piep!

 
Hallo Ihr Lieben!
Heute habe ich eine weitere frühlingshafte Karte im Gepäck, die ich auf dem Stampcorner Blog zeige. Und auch, wenn sie ohne Rosa und fast ohne Rot auskommt, wäre es auch eine tolle Karte für den Valentinstag. 

Hello everyone!
Today I'm sharing another spring-ish card over at the Stampcorner Blog. And even if I didn't use any pink and just a hint of red, this card would also make a great Valentine's Card.

Für den Hintergrund meiner Karte habe ich meine Alcohol Inks mal wieder ausgepackt und eine Technik von Jennifer McGuire ausprobiert. Dabei wird Alcohol Ink mit Blending Solution auf Yupo getropft, dann wird ein weiteres Stück Yupo darübergelegt und beide zusammengepresst. Je nachdem, wie oft man den Vorgang wiederholt, entstehen unterschiedliche Effekte. Ich habe hier die Alcohol Ink Farben Aqua und Turquoise und viel Blending Solution verwendet, da ich einen zart-blauen Hintergrund wollte. 
Die Herzen darauf habe ich dann mit Lift Ink Technik gemacht. Ich habe etwas von der Lift Ink Tinte auf ein Stück Filz gegeben und sie dann durch die Lots of Hearts Background Stencil von LawnFawn gedrückt. Zuerst hatte ich das mit dem Lift Ink Kissen versucht, das gab aber nicht so einen tollen Effekt. Also habe ich ein paar Tropfen des Lift Ink Reinkers auf das Schwämmchen aufgetragen, und damit klappte es super! Nach dem Wegtupfen/-wischen der Lift Ink Tinte, waren die Herzen wunderbar erkennbar! Natürlich nicht so gut, wie mit farbiger Tinte, aber das ist eben der Effekt der Lift Ink Tinte, und genau so ein subtiles Muster wollte ich Hintergrund. 

For the background of my card I brought out my Alcohol Inks and tried a technique by Jennifer McGuire. She's putting Blending Solution and Alcohol Inks onto a piece of Yupor, then puts another piece of Yupo on top and presses them together. Depending on how often you repeat this step, you end up with different patterns and intensities. I used the alcohol ink colors Aqua and Turquoise here and lots of Blending Solution since I was after a light and dreamy background. 
To add the hearts to my Yupo I did the Lift Ink technique. I've put some of the Lift Ink onto one of the felt blending pads and then put it through the Lots of Hearts Background Stencil by LawnFawn. First I took the Lift Ink from the Lift Ink pad, but that didn't work too well. So I've put a few drops from the Lift Ink Reinker onto the felt and that worked like a charm! After dabbing/wiping the Lift Ink away, the hearts were perfectly visible. Of course not as crisp as if using colored ink, but that's how the Lift Ink works and that's exactly the subtle pattern I was after.


Für das Motiv habe ich den Wellensittich aus dem Oops Stempelset aus dem Januar-Release benutzt. Allerdings ist es bei mir kein Wellensittich, sondern ich habe ihn eher wie eine Mischung aus Rotkehlchen und Rotschwanz coloriert. Wellensittiche sitzen doch eher selten in Nestern im Garten. Aber genau das hatte ich vor.  Ich habe den Vogel mit Copics coloriert und ein paar Details mit einem weißen Gelpen hinzugefügt.
Für das Nest habe ich die Tasse aus dem Lovely Latte Stanzenset von LawnFawn benutzt! Ich habe die gefüllte Tasse zweimal aus braunem Cardstock gestanzt, dann jeweils die Henkel sowie einen Teil der Rundung unten weggeschnitten. Bei einem der Teile habe ich außerdem die obere Kante in die andere Richtung gerundet. Das geht ganz einfach mit Hilfe der schmalen Ovalstanze aus dem Set. Dann habe ich das vordere Teil mit dem Intertwine 3D-Embossingfolder von Sizzix geprägt. Damit das Muster besser rauskommt, habe ich diesen Teil des Nestes mit Distress Oxide Gathered Twigs gewischt, den hinteren Teil habe ich mit Ground Espresso abgedunkelt. Dann habe ich beide Teile mit 3D Tape aufeinander geklebt. 
 Auch für den Ast, auf dem das Nest steht, habe ich etwas um die Ecke gedacht - es ist eigentlich ein Baum aus dem Slimline Meadow Stanzenset von WhimsyStamps! Ich habe ihn aus dem dunkelbraunen Woodgrain Cardstock von LawnFawn gestanzt und mit einem weißen Stempelkissen die Details ein wenig hervorgehoben. Den hinteren Ast habe ich per Hand abgeschnitten und etwas nach rechts versetzt hinten gegen das Nest geklebt. Der andere Teil des Astes ist vorne auf das Nest geklebt. 
Dann habe ich den Vogel ins Nest gesetzt und einige der kraftfarbenen geshredderten Papierstreifen hinter den vorderen Teil des Nestes geklebt, dass sie in alle Richtungen wegstehen. 
Ich habe den Vogel samt Nest und Ast auf den Hintergrund geklebt. Über das Motiv kam der Text, der ebenfalls aus dem Oops Stempelset ist. Ich habe ihn mit schwarzer Tinte auf braunen Cardstock gestempelt und aufgeklebt. 
Zwischen Text und Motiv habe ich noch drei Herzen, gestanzt aus rotem Cardstock mit den Herzenstanzen aus dem Hearts and Stars Skinny Tag Stanzenset von LawnFawn, aufgeklebt.

For the image I used the budgie stamp from the Oops stamp set from Stampcorner's january release. But I changed him while coloring, now he looks more like a garden bird. Budgies hardly ever sit in a nest in a tree in the garden. But that's exactly what I had in mind. I colored him with Copics and added a few details with a white gel pen.
For the nest I used the cup from the Lovely Latte die set by LawnFawn! I've die cut the solid cup twice from brown cardstock, then cut off the handle and also some of the rounded bottom from both pieces. I used the skinny oval die from the set to turn the rounding at the top inwards, then used the Intertwine 3D embossing folder by Sizzix to add some texture to this piece. To make the pattern even better visible, I applied some Distress Oxide Gathered Twigs. And I used Ground Espresso on the back piece to darken it up even more. Then I glued both pieces together with dimensionals. 
Also for the branch, on which the nest is standing, I did some thinkingn outside the box. Originally it's a tree from the Slimline Meadow die set by WhimsyStamps. I've die cut it from a piece of the dark brown woodgrain cardstock by LawnFawn and swiped a white ink pad over the branch/tree, to bring out the pattern a bit more. I've cut off the two top branches and glued them behind the nest, moving them a bit further to the right. The other part of the branch is glued to the front of the nest. 
Then I sat the bird into the nest and added a few pieces of these craft colored shredded paper strips behind the top part of the nest, making sure, they stick out into different directions.
I glued the bird with the nest and branch onto the background. Above the image I added a text, that means "peep, peep, I love you" - which rhymes in german. I stamped the text with black ink onto a strip of brown cardstock and glued it down. 
Between the image and text I added three hearts, die cut from red cardstock with the heart dies from the Hearts and Stars Skinny Tag die set by LawnFawn. 


Und weil der Vogel so nur vor blauem Hintergrund ein wenig verloren aussah, habe ich noch einen Blätterrahmen hinzugefügt. Der bringt dann auch den frühlingshaften Touch auf die Karte.
Ich habe die Lots of Leaves Cover-Up Stanze von MFT aus hellgrünem Cardstock gestanzt, dann habe ich ihn vom Rand her mit Distress Oxide Mowed Lawn und Rustic Wilderness abgedunkelt. 
Und auch ein paar Spritzer durften nicht fehlen. Hier habe ich goldene Schimmer-Watercolor und weiße Acrylfarbe aufgespritzt.
Dann habe ich den Rahmen mit 3D Tape auf den Hintergrund und alles auf einen weißen Kartenrohling geklebt. 

And since the bird looked a bit lost in his nest with just the blue background, I added a leafy frame. This also adds the spring-ish touch to the card.
I've die cut the Lots of Leaves Cover-Up die by MFT from light green cardstock, then darkened it up from the outside with Distress Oxide Mowed Lawn and Rustic Wilderness.
And of course I also had to add a few splatters. Here I did them with some golden metallic watercolor and some white acrylic paint. 
Then I glued the frame onto the background using foam tape and glued everything onto a white note card.

Mittwoch, 2. Februar 2022

Golden Oldies Februar 2022


Hallo Ihr Lieben!
In meiner Reihe Golden Oldies, die ich auf jeden Fall für mich fortsetzen werde, ist diesen Monat eine blumige Geburtstagskarte entstanden. Sie zeigt ein klein wenig die Sehnsucht nach dem Frühling, auf den wir aber wohl doch noch etwas warten müssen. Aber zumindest auf der Karte ist er schon zu erahnen, auch wenn sie farblich ganz schlicht und eher edel gehalten ist.

 
Hello everyone!
For this month's Golden Oldies card I made a floral birthday card. I am definately going to continue this series! The card shows a bit my longing for spring, but I know we still have to wait some time for it to arrive. But at least you can feel it on this card, even if it is a more elegant and simple card colorwise.
 
 Für den Blumenhintergrund habe ich drei verschiedene Blumenstempel von MFT kombiniert und per Masking übereinander gestempelt: Freshly Picked Bouquet, Flowers in Bloom und Fresh Cut Flowers. Ich habe sie alle nur mit schwarzer Tinte auf ein Stück weißen Cardstock gestempelt, und zwar so, dass die Motive über die linke Kante des Cardstock hinausragten. Den habe ich später noch weiter zugeschnitten, so dass von dem Designpapier, mit dem ich den Cardstock hinterlegen wollte, links ein breiterer Streifen sichtbar blieb. Über die Nahtstelle habe ich einen Streifen goldenen Gitzercardstocks geklebt. 
Über das fertig gestempelte Motiv habe ich den Brush Splatter Background gestempelt und mit glitzernd goldenem Embossingpulver embosst. Mal eine Alternative zu den "handgemachten" Spritzern. 

For the flowers in the background I combined three different flower images by MFT and did some masking to stamp them on top of each other: Freshly Picked Bouquet, Flowers in Bloom and Fresh Cut Flowers. I stamped them all with black ink onto a piece of white cardstock, letting the rest of the images hang over the left edge of my cardstock. Later I cut that even more narrow so a wider portion of the patterned paper that I used to mat my cardstock would be left visible. Over the seam I placed a thin strip of golden glitter cardstock.
Over the stamped image I heat embossed the Brush Splatter Background, using a golden glitter embossing powder. This is a great alternative to the "handmade" splatters.


Für den Hauptteil des Textes auf der Karte habe ich meine Hotfoil Machine wieder ausgepackt. Die nutze ich in letzter Zeit echt viel - vielleicht weil ich in der Weihnachtszeit, wo Schimmer und Glanz ja ganz hoch im Kurs stehen, so richtig auf den Geschmack gekommen bin. 
Ich habe die You Impress Me Hotfoil-Stanze von MFT mit goldener Glimmerfolie auf weißen Cardstock foliert. Anschließend habe ich das folierte Wort mit der All About You Stanze ausgestanzt, die perfekt einen Cardstockrand um das folierte Wort stehen lässe. 
Ergänzt habe ich den Text mit zwei Stempeln aus dem Bitty Birthday Wishes Stempelset. Ich habe sie mit goldenem Embossingpulver auf schmale Streifen schwarzen Cardstocks embosst, anschließend habe ich den Text teilweise mit 3D Tape auf die Karte geklebt. Das folierte Wort you habe ich noch dreimal mit einem aus schwarzem Cardstock gestanztem You hinterlegt. Der schwarze Schatten sorgt gleichzeitig für Höhe und etwas Kontrast zum Hintergrund. 
Ganz zum Schluss habe ich dann noch ein paar goldene Glitzersteine rund um den Text verteilt.

For the main part of the text on my card I brought out my hotfoil machine again. I am using it quite often lately - maybe because I really learned to enjoy this machine during christmas time, when shimmer and shine are used on nearly every card.
I foiled the you with the You Impress Me hotfoil plate by MFT onto some white cardstock, using a shimmery golden foil. Then I used the All About You die to cut the foiled word out. This die leaves a perfect edge of cardstock around the foiled word.
I finished the text with two stamps from the Bitty Birthday Wishes stamp set. I golden heat embossed them onto two strips of black cardstock, then glued the wholte text onto my card, using dimensionals for a few of them. I also put three stacked die cut yous, cut from black cardstock, under the foiled word. The black shadow adds some more dimension and also more contrast between the background and the cut out word.
 In the end I glued a few golden rhinestones around my text.


Und weil die Folierung und das Embossingpulver auf den Bildern von oben mal wieder nicht so toll rüberkommen, habe ich noch ein weiteres Bild für Euch. Der Glanz der Karte gibt ihr einen besonders edlen Touch, finde ich.

And since the foiling and embossing powder once again isn't visible that great on the picture taken from above, I took another one for you. The shimmer and shine on this card give it a very elegant touch.

Dienstag, 1. Februar 2022

Glückspost für dich

 
Hallo Ihr Lieben!
Heute ist es soweit - es gibt ein neues Release von Stampcorner! Und eines der süßen Motive habe ich für Euch auf dieser Karte verarbeitet. Und eine neue Stanze hat sich auch gleich mit auf die Karte geschlichen!

Hello everyone!
The 1st of february is here - and it bring a new release by Stampcorner. I used one of the cute images on this card. Oh, and a new die also makes it appearance here!

Für meine Karte habe ich ein Stück weißen Cardstock genommen, einen kleinen Streifen unten mit Maskingtape abgedeckt und den Himmel mit Distress Oxide Mermaid Lagoon und Tumbled Glass gewischt. Dann habe ich ein paar Wassertropfen darauf verteilt. Beim Wischen habe ich bewusst nicht bis ganz zum Rand gearbeitet. Anschließend habe ich den gerade gewischten Himmel abgedeckt und als Boden Hickory Smoke aufgetragen.
Die beiden Texte sind jeweils aus rotem Cardstock gestanzt. Ich habe jeweils drei Lagen aufeinander geklebt, um für etwas Dimension zu sorgen. Das Glückspost ist eine etwas ältere Stanze von Stampcorner, das Für dich mit dem Herz, vom Stil her wie auch die Von Herzen Stanze gearbeitet, ist die schon erwähnte neue Stanze. Für die Highlights habe ich einen weißen Gelpen benutzt. 

For my card I've cut a piece of white cardstock down, then masked off a little strip at the bottom by covering it with masking tape and inked the sky with Distress Oxide Mermaid Lagoon and Tumbled Glass. Then I sprinkled a few droplets of water on top. I intentionally didn't ink all the way to the edge here because I wanted the color to kind of fade out. Then I covered the just created sky and inked the bottom with Hickory Smoke to create a ground.
The two texts are die cut - I've cut three each of them from red cardstock and stacked them to add some dimension to the card. The top text means "happy mail", the one at the bottom means "from the heart". I added a few highlights with a white gel pen.


Und hier könnt Ihr das Motiv endlich genau erkennen. Man sieht dem Igel an, wie sehr er sich freut, schöne Post zu verschicken!
Ich habe ihn mit Copics coloriert. Bei Igeln weiß ich immer nicht so genau, in welcher Farbe ich die Stacheln machen soll. Hier habe ich sie mit W-Tönen einfach schattiert und anschließend die feinen braunen Linien mit Polychromos darüber gesetzt. So sind sie sowohl grau als auch braun, was ich doch ganz realistisch finde.
Für den Briefkasten habe ich eine Stanze aus einem Set genommen, das ich vor einiger Zeit bei Action erstanden habe. Ich habe den Briefkasten aus orange-rotem und rotem Cardstock gestanzt, den Briefschlitz schwarz hinterlegt und alle Teile zusammengesetzt. Die ausgestanzten Teile des Briefschlitzes habe ich als Beine angeklebt. 
Auf das rote Feld am Briefkasten habe ich das Wort Post weiß aufembosst - das ist ebenfalls aus dem Stempelset mit dem Igel. Die  drei Ausrufezeichen dahinter habe ich wegmaskiert, dafür habe ich darunter ein paar Linien mit einem weißen Gelmarker "aufgeschrieben". So sieht es aus, wie die Leerungszeiten. 
Damit der Briefkasten ein wenig metallisch aussieht, habe ich ihn mit einem klaren Wink of Stella Stift beglittert. 
Über dem Igel habe ich das Herz, das aus dem Für Dich Text gestanzt wird, aufgeklebt, das zweite, kleinere Herz habe ich dann per Hand zugeschnitten.
Zum Schluss habe ich den dekorierten Cardstock schwarz gemattet und alles auf einen weißen Kartenrohling geklebt.

And here you get a closer look at the image. You can really tell how much joy it brings to this little hedgehog to send out some special mail.
I colored him in with Copics. And with Hedgehogs I'm never sure which colors to use for the spikes. Hier I used some W-tone Copics and then added some fine brown lines with Polychromos. Now they are both grey and brown and I think that looks kind of realistic.
For the mailbox I used a die again. I've die cut it from orange-red and dark red cardstock, put some black cardstock behind the slit and put it together. I used the cut outs from the slit to create some legs for it to stand on.
Onto the red area on the mailbox I white heat embossed the word post, then added a few "written" lines under it with a white gel pen. Here in Germany they always have a sign on the mailboxes, stating when they get emptied. I wanted to get this look on my mailbox. 
To make the mailbox look a bit more like metall, I covered it with a clear Wink of Stella pen.
Over the hedgehog I added two hearts. The larger one is the one that gets cut out of the for you text, the smaller one is simply cut by hand.
In the end I've matted my decorated cardstock black and then glued everything onto a white note card.