Mittwoch, 17. August 2022

Altenew August 2022 Inspiration Challenge

 
Hallo Ihr Lieben!
Heute zeige ich Euch die Karte, die ich für die August 2022 Inspiration Challenge von Altenew gemacht habe. Es gibt ein Foto und dazu das Thema, eine Geburtstagskarte zu machen.

Hello everyone!
Today I'm sharing with you the card I made for the August 2022 Inspiration challenge by Altenew. There is an inspiration picture and a theme of making a birthday card with it.


Ich bin ganz ehrlich, bei der Farbkombi denke ich eher an Herbst als an Sommer - vielleicht, weil es bei uns diese roten Adirondack Stühle nicht gibt. Aber als die Karte fertig war, fand ich sie doch schön sommerlich und war selbst ein wenig überrascht.

Honestly, with the colors on the picture I'm more thinking fall instead of summer - maybe because we con't have those red Adirondack chairs. But when I had finished my card I though it turned out quite summer-ish and was a bit surprised myself.


Für den Hintergrund habe ich mir 3 Reinker in den Farben um das Inspirationsfoto gesucht und dann ein Stück Watercolor Paper damit streifenweise eingefärbt - oben hell  und nach unten dunkler werdend. Dabei habe ich oben mit der hellsten Farbe pur angefangen, nach unten hin immer mehr vom rötlichen Farbton dazugemischt und wieder weiter unten vom Braunton ewas druntergemischt. So gehen die Farben schön ineinander über, trotzdem ist jede Farbe gut abgegrenzt.
Dann habe ich mit der Dotted Tiles Debossing Stanze ein Muster in den Cardstock geprägt und ihn mit weißem Copic Opaque bespritzt. Anschließend habe ich ihn kleiner geschnitten. Für das deutsche Kartenformat hätte ich ihn eh zuschneiden müssen, ich habe gleich mehr davon weggeschnitten, so dass später ein schöner breiter Rand des weißen Cardstocks des Kartenrohlings sichtbar bleibt. 

For the background I picked three re-inkers in colors that I thought match the color stripes around the inspiration picture, then colored a piece of watercolor with them in a striped pattern. I used the lightest color on top and got darker towards the bottom. I used the lightest ink just with water for the lightest strip, then started adding a bit and then more of the red color and then mixed in some brown. Now there is some kind of soft difference between the colors but still each stripe is noticable.
Then I used the Dotted Tiles Debossing die to cut the pattern into the background and splattered some Copic Opaque White on top. Next I cut the cardstock down. I would have to anyways to make the background match the german standard card size so I decided to cut off even more to end up with a nice wide border from the white card base around my background.


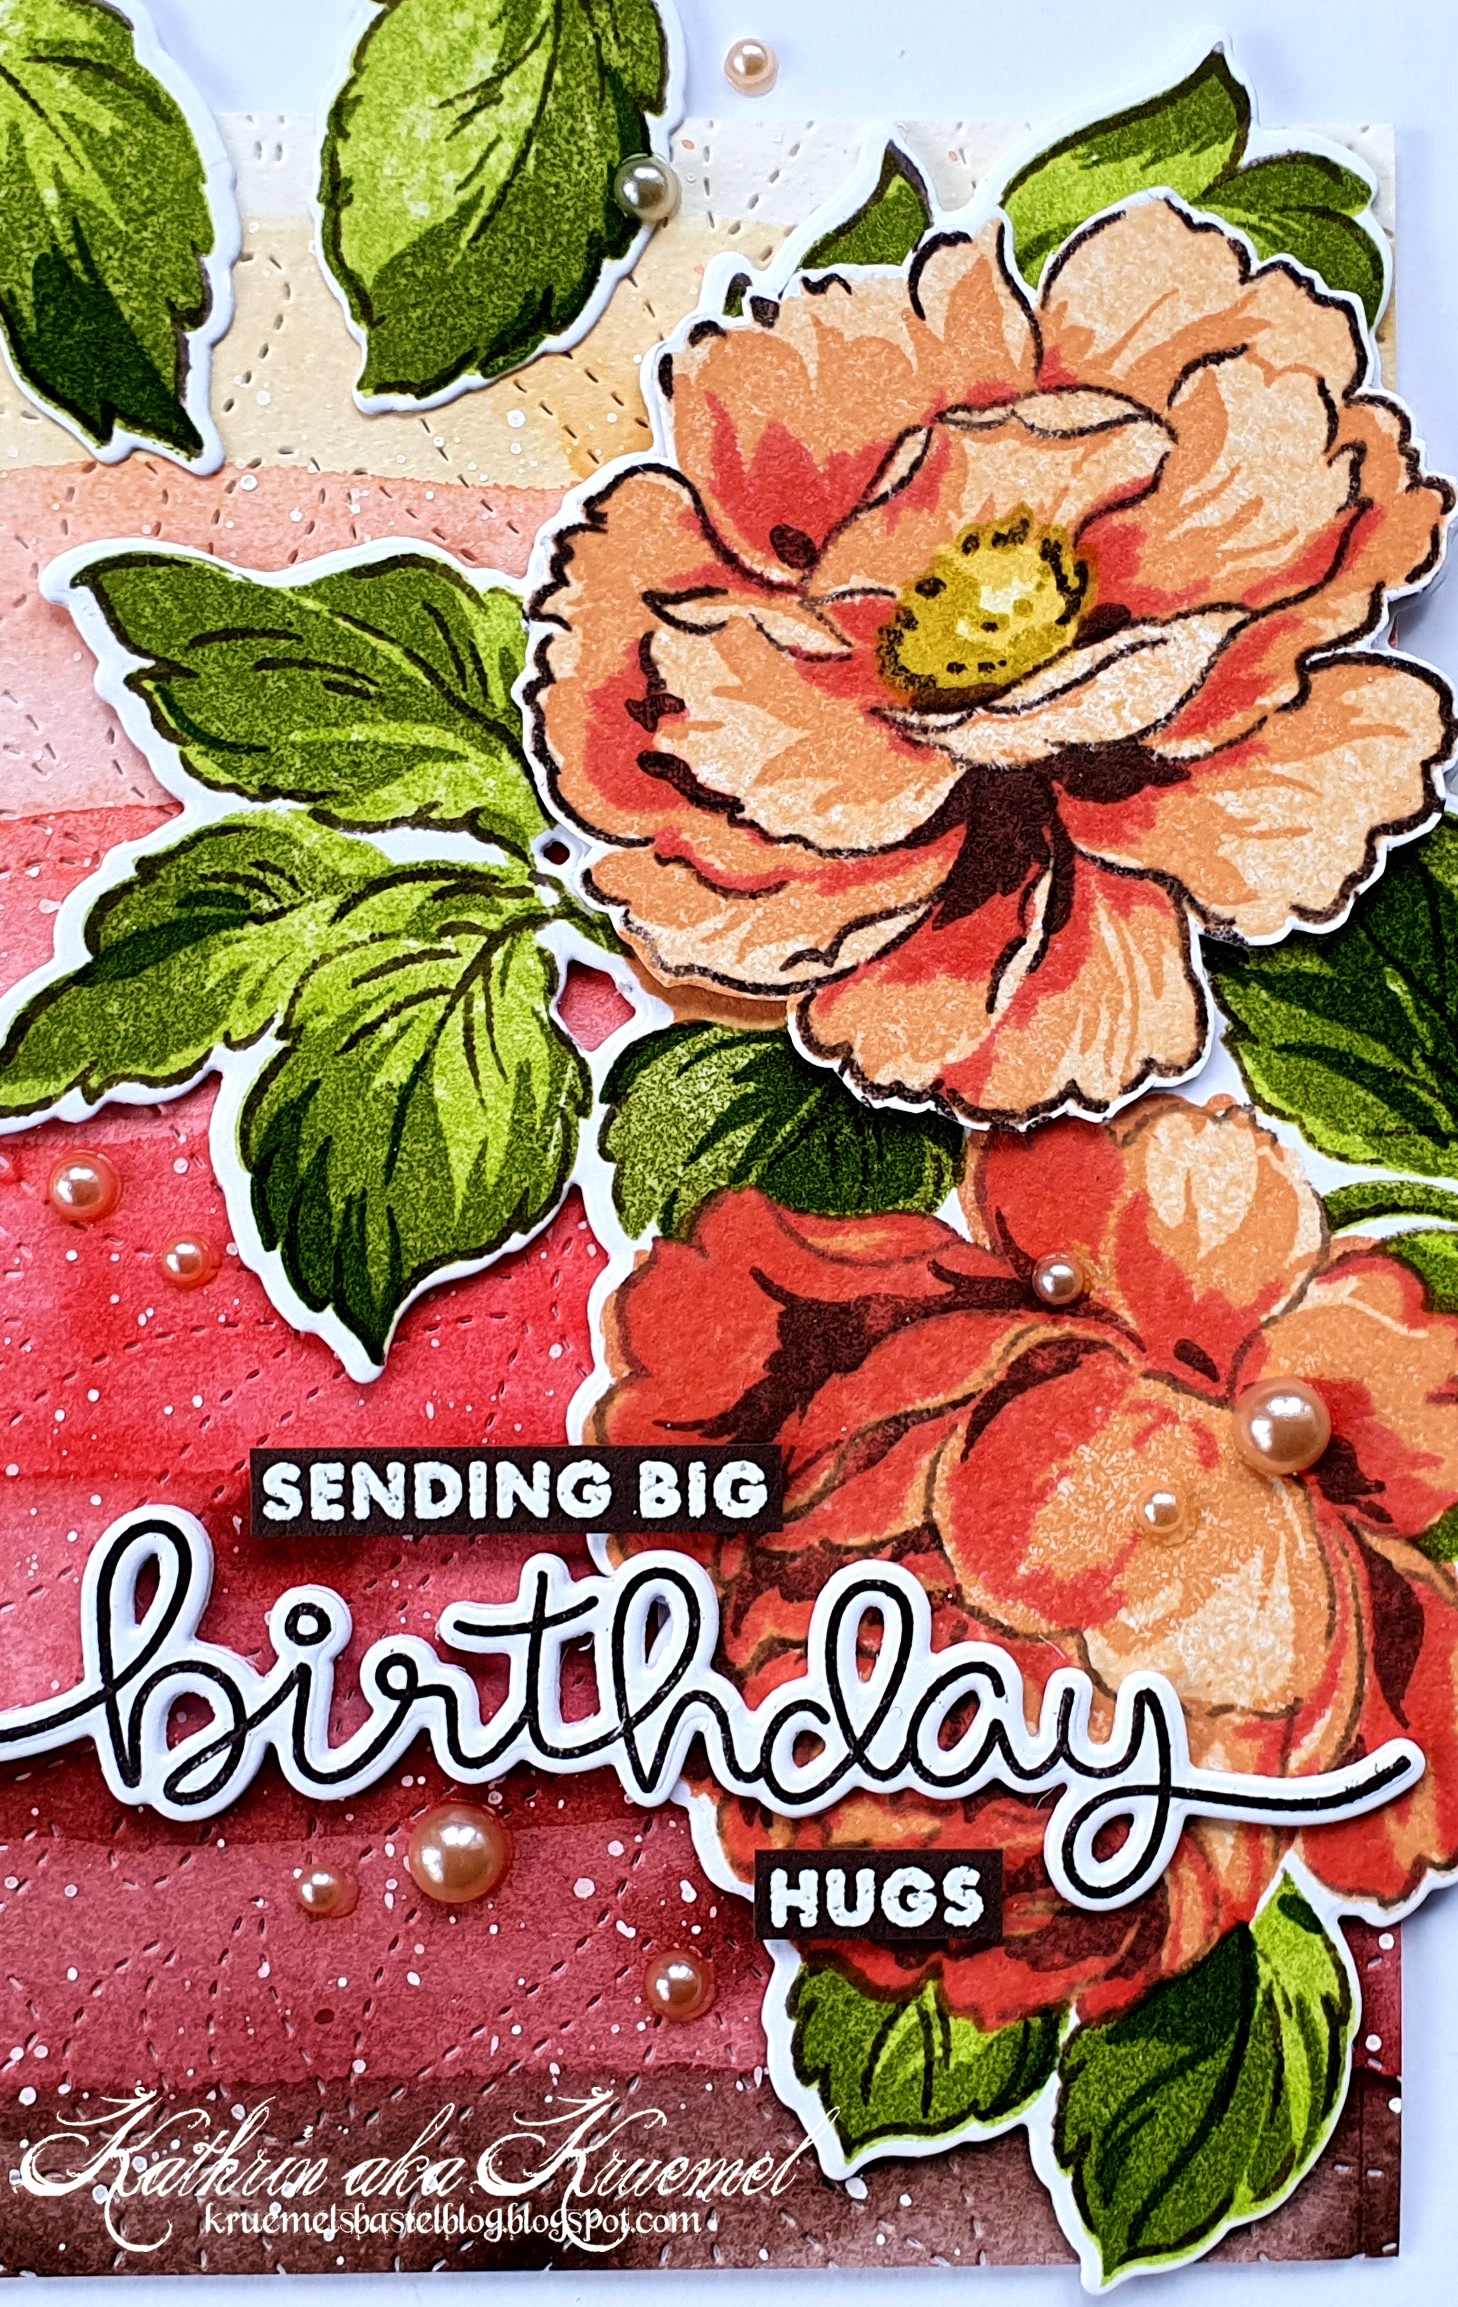
Als Motiv habe ich die tollen Blüten aus dem Set Bountiful Bouquet gewählt. Damit die Outlines nicht zu hart sind, habe ich sie mit dunkelbrauner Tinte gestempelt. Dann habe ich die Blüten in Aprikot, Koralle, Worn Lipstick und dunkelbraun gestempelt - und dabei einen wilden Mix von verschiedenen Stempelkissenherstellern verwendet. 
Im Inspirationsbild sind einige leuchtend hellgrüne Blätter zu sehen. Mit diesem Ton habe ich die Basis meiner Blätter gestempelt und dann dunklere Grüntöne für die übrigen Lagen benutzt. Ausgestanzt habe ich das Motiv mit der passenden Stanze.
Außerdem habe ich mich dazu entschieden, die geöffnete Blüte ein weiteres Mal in den selben Farben abzustempeln, per Hand auszuschneiden und mit 3D Tape auf das große Motiv zu kleben. So erhält das Motiv noch mehr Tiefe.
Das Motiv habe ich dann mit 3D Tape auf den Hintergrund geklebt.

As the image I picked the flowers from the Bountiful Bouquet die. I didn't want the outlines to be too hard so I used some brown ink to stamp them. Then I filled the flowers with apricot, coral, Worn Lipstick and dark brown - and used a wild mix of all brands of ink pads.
In the inspiration picture there's a plant with bright yellow-green leaves. I used this tone to stamp the base layer of my leaves, than stamped the other layers with darker tones of green on top. Then I cut the image out with the matching die.
I also decided to stamp just the fully opened flower again in the same colors, cut it out by hand and glued it onto the large image using foam tape. This way the image gets even more depth.
I attached the image onto the background with foam tape.


Beim Text bin ich teilweise fremdgegangen - ich habe tatsächlich nicht einen Geburtstagstext in meinen Altenew Stempelsets! Also habe ich das Sending Big Hugs aus dem Bountiful Bouquet Stempelset weiß auf braunen Cardstock embosst, in zwei Teile geschnitten und dazwischen ein gestempeltes und ausgestanztes birthday aus dem Big Scripty Words Stempelset von LawnFawn gesetzt. Das habe ich mit mehreren Lagen weißem Cardstock hinterlegt, unter dem "Birt"  mehr Lagen als unter dem "hday", so dass ich es quer über den Hintergrund und das Motiv kleben konnte. Die kleinen Textteile sind wieder mit 3D Tape aufgeklebt.

For the text I had to add a stamp from a different brand - I actually don't  have one birthday text in all of my Altenew stamp sets! So I white heat embossed the text Sending Big Hugs from the Bountiful Bouquet stamp set onto some brown cardstock, cut it apart and put a stamped and die cut word birthday from the Big Scripty Words stamp set by LawnFawn between the two text parts. I put a few layers of white cardstock behind the die cut word - more layers under the "birt" and just two under the "hday" - and glued it across the background and the image. The smaller texts are again glued down with foam tape.


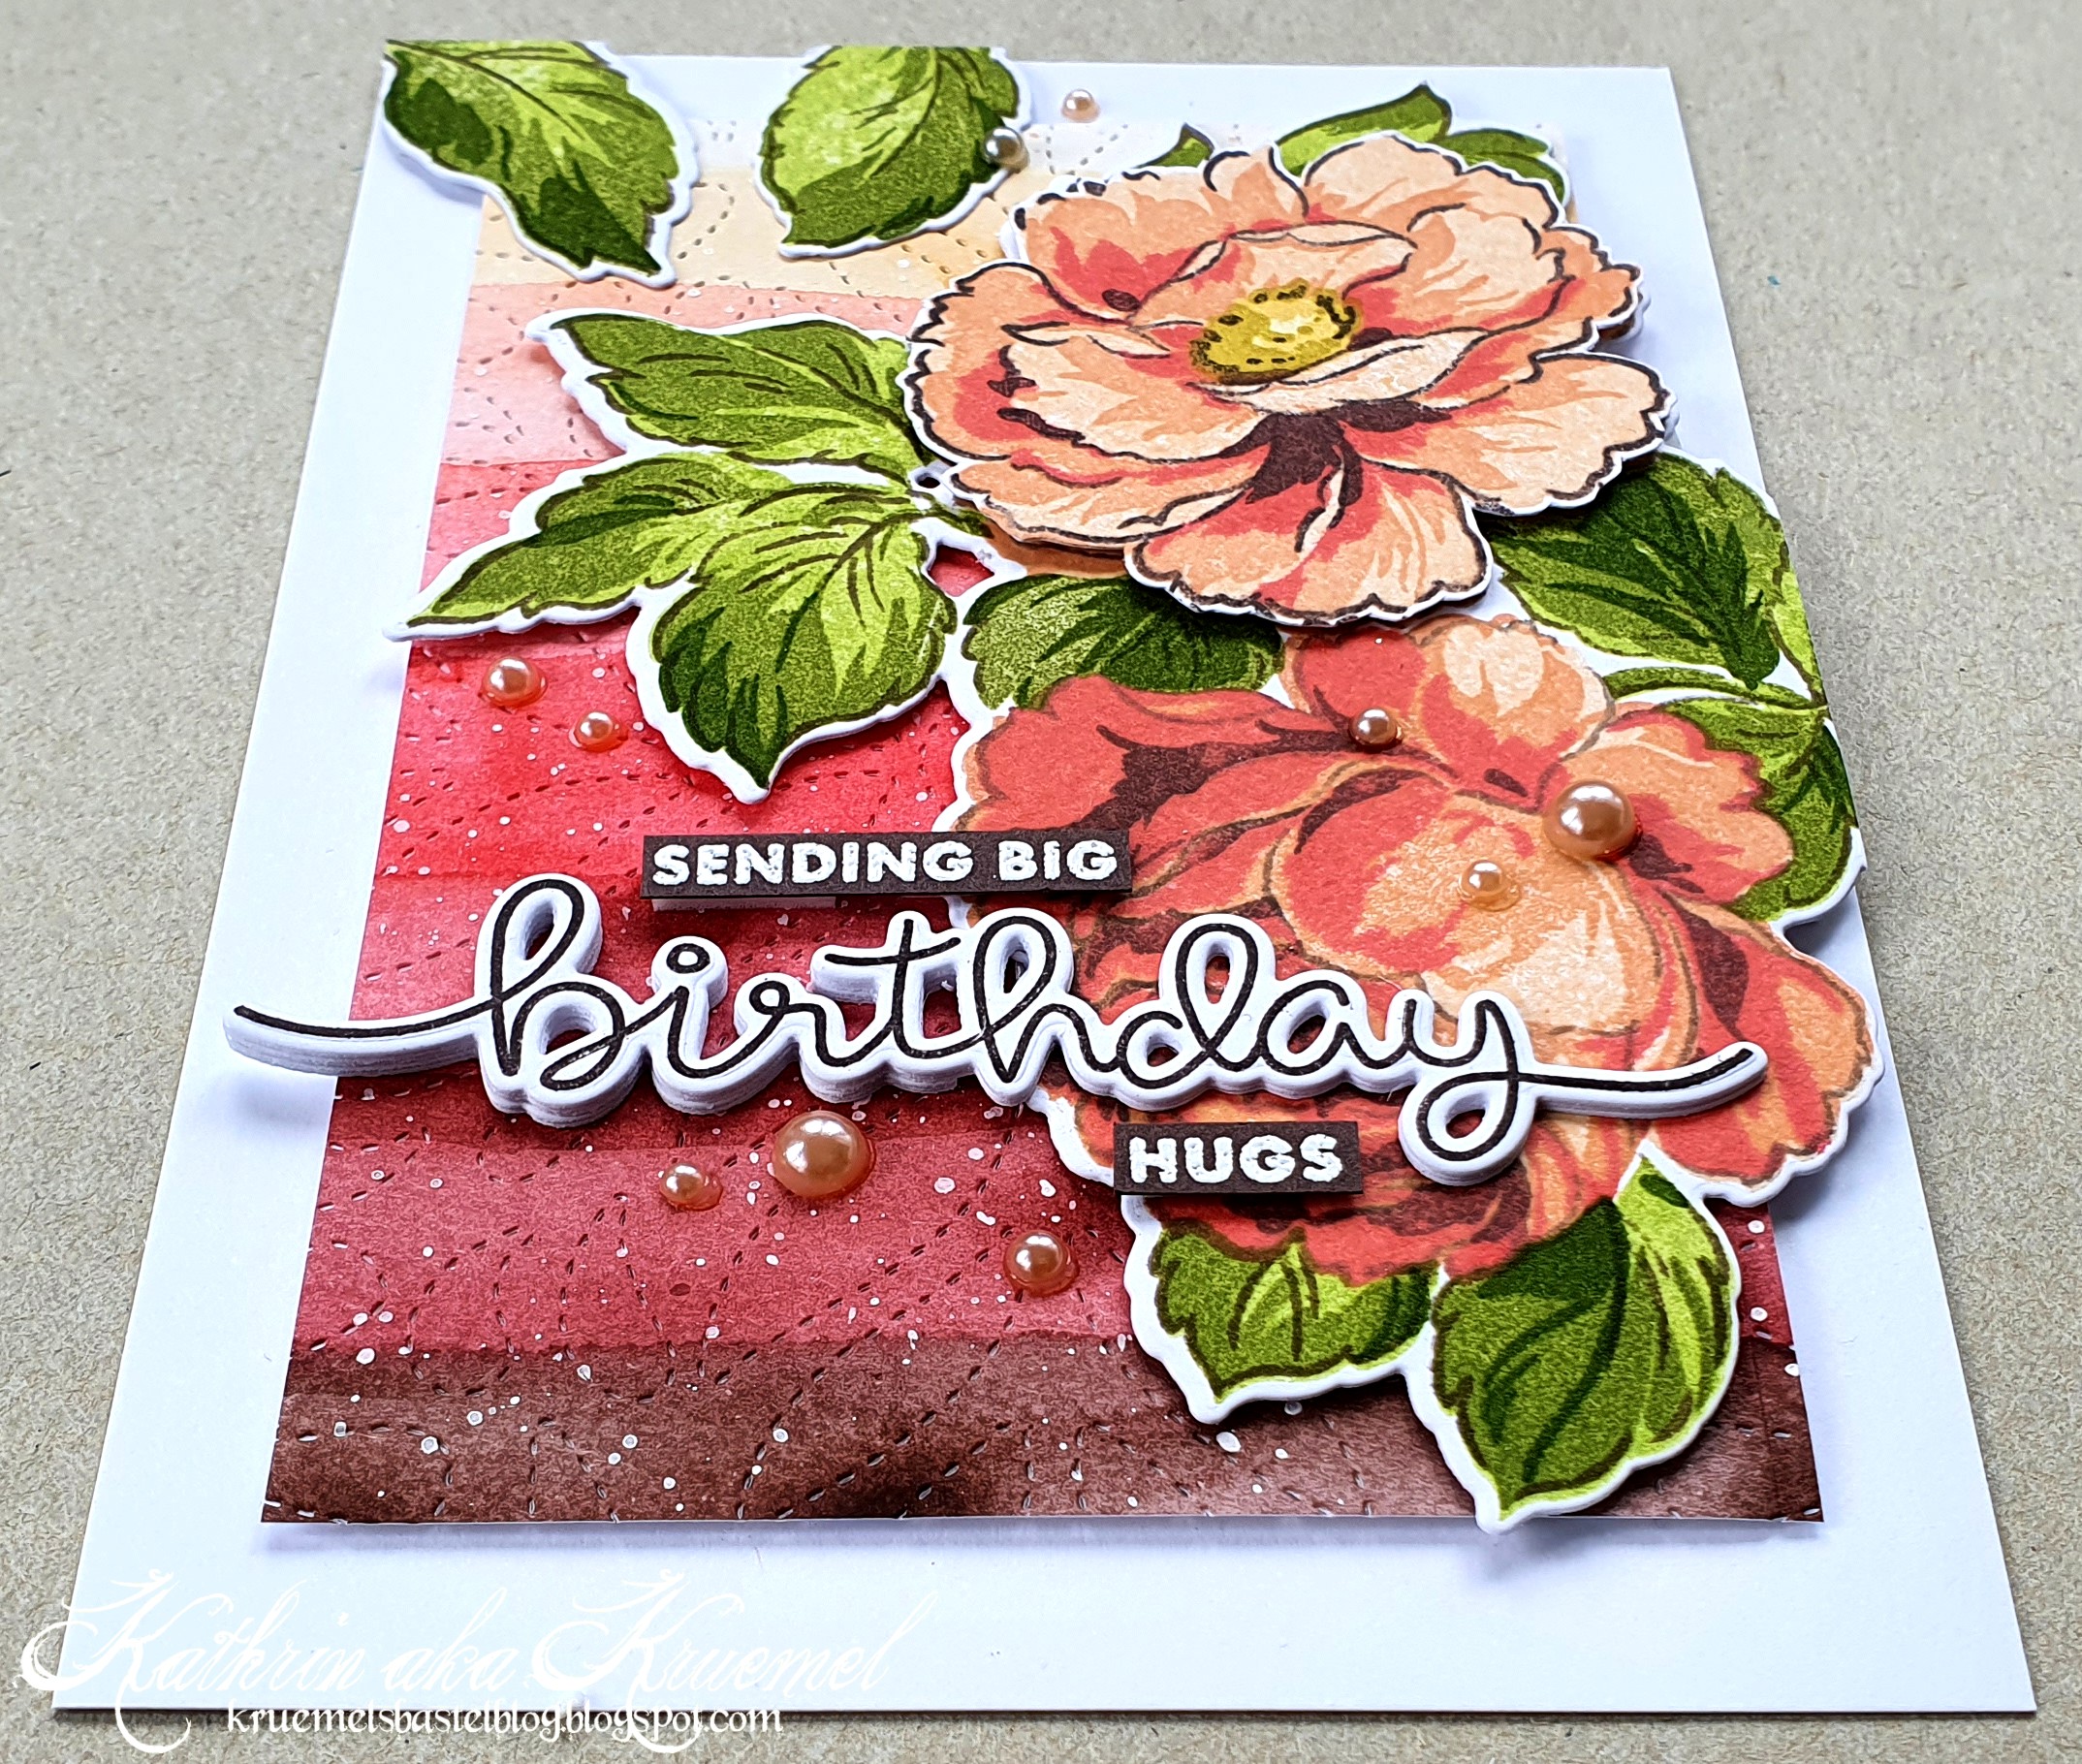
Dann habe ich den Hintergrund mitsamt dem Motiv und Text mit 3D Tape auf einen weißen Kartenrohling geklebt. Die rechts über den Rand der Karte überstehenden Blätter habe ich weggeschnitten und dann geteilt oben an den Rand der Karte geklebt. So kamen auch die zum Einsatz, auch wenn ich sie im Nachhinein gesehen eventuell nicht hätte auseinanderschneiden sollen.
Als Deko habe ich dann noch einige lachsfarbene Perlen auf der Karte verteilt.

Then I glued the background with the image and text onto a white note card, again using foam tape. I cut off the leaves that were hanging over the right edge of the card and glued them to the top edge of the card so they don't go to waste. Well, looking at the finished card now I'm not sure if it was such a good idea to cut the two leaves apart....
As embellishments I added a few salmon colored pearls to the card.

Montag, 15. August 2022

Ein Flamingo-Tag

 
Hallo Ihr Lieben!
Gestern habe ich Euch ja eine Geburtstagskarte gezeigt - heute liefere ich den Tag, der das Geschenk verziert hat, dazu. 

Hello everyone!
Yesterday I've shared  a birthday card for  a friend with you - today I have the tag that went on the gift to show to you.

Kennt Ihr die kleinen Schwimmringe, in die man ein Getränk stellen kann, so dass es neben einem im Pool schwimmt? So eines habe ich hier in Flamingo-Form nachgebaut. Und einfarblich passender Cocktail durfte darin natürlich auch nicht fehlen!
Für den Flamingo habe ich die Teile mit der Flamingo Floatie Stanze von LawnFawn aus farbigem Cardstock gestanzt und dann vor dem Zusammenkleben mit Copics ein wenig schattiert. Ich weiß nicht, wie Ihr das seht, aber für mich ist der Flügel im Set verkehrt herum - eigentlich ist die gewellte Seite oben. Weil mich das total irritiert, habe ich den Flügel einfach umgedreht. So liegt zwar die nicht so schön geprägte Seite oben, aber das finde ich nicht so schlimm.

Do you know those little floaties that you can use to put your drink in so it floates besides you on the water? That's what I re-did in a flamingo shape here. And of course I had to put a matching cocktail inside!
For the flamingo I've die cut the Flamingo Floatie die by LawnFawn from colored cardstock and shaded it with my Copics before putting it together. I don't know if I'm the only one, but for me the wing is upside down in this set - usually the scalloped edge is on the top. That really bothers me so I turned my wing around. This way I have the less pretty and not so nicely pierced side on top but it still looks better to me this way.


Für den Cockatil und den Text habe ich das Set Auf Uns! von Create a Smile verwendet. 
Die Zitronenscheibe und das Schirmchen sind mit No-Line Coloring und Copics coloriert und ausgeschnitten.
Den Strohhalm habe ich mit Saltwater Taffy Distress Glaze auf rosafarbenes Vellum embosst, für die Eiswürfel und den Umriss des Glases habe ich Salvaged Patina auf Acetate benutzt.
Für die Flüssigkeit im Glas habe ich ein Stück Vellum lagenweise mit dunkel-, mittel- und hellpinken Alcohol Inks eingefärbt und hinter das Glas geklebt. Dahinter habe ich dann den Strohhalm, die Eiswürfel und auch Zitrone und Schirmchen gesetzt, so dass man sie durch das eingefärbte Vellum noch etwas sehen kann. Anschließend habe ich ein weiteres auf Acetate embosstes Glas von hinten dagegen geklebt, so ist der Abschluss auch hinten sauber.
Dann habe ich noch mit einer dicken Lage klar trocknendem Kleber und Distress Glitter einen Zuckerrand an das Glas gemacht. 
Den Flamingo habe ich mit 3D Tape zusammengesetzt, das Glas ein wenig in den Schlitz geschoben und von hinten noch das Oval aus dem Set gegen den Flamingo geklebt, so hält das Glas besser. 
Zum Schluss habe ich noch den Text weiß auf schwarzen Carstock embosst und ebenfalls mit 3D Tape aufgeklebt.

For the cocktail and the text I used a stamp set by Create a Smile.
I did the slice of lemon and the little umbrella with a no-line coloring with Copics and cut them out.
The paper straw is heat embossed with Saltwater Taffy Distress Glaze onto some pink vellum, for the ice cubes and the outline of the glass I used Salvaged Patina on acetate.
For the liquid  inside the glass I colored a piece of vellum with  dark, middle and light pink Alcohol Inks, creating three seperated layers of color so it looks like a layered cocktail. I glued the vellum behind the glass cut from acetate, then put the paper straw, the ice cubes and also the lemon and the umbrella behind it, so those are still visible behind the drink. Then I put another glass cut from acetate to the back to get a smooth surface there.
I used a thick layer of clear drying glue and some Distress Glitter to create the sugared brim on the glass.
I used foam tape to put the flamingo together, put the glass in the slit and then glued the oval from the die set behind the flamingo to secure the glass.
In the end I white heat embossed the text onto black cardstock and glued it down using foam tape again.

Sonntag, 14. August 2022

Tierische Geburtstagsgrüße

 
Hallo Ihr Lieben!
In unserer Mädelsgruppe haben wir vor kurzem den Geburtstag einer von uns nachgefeiert - und da habe ich diese im wahrsten Sinne des Wortes tierische Geburtstagskarte gemacht. "Party Animals" passt einfach zu gut auf uns... ;) Nicht, dass wir pausenlos feiern würden, aber wenn, dann richtig!

Hello everyone!
A few days ago we celebrated the birthday of one of our "ladies circle" members - and so I made this birthday card for her. "Party animals" just describes es perfectly.... ;) Not that we're making party every day, but when we do, we do it thoroughly!

Ich habe hier seit langem mal wieder viele Produkte von MFT verwendet. 
Für den Hintergrund habe ich die Balloon Party Stencil mit Distress Ink Candied Apple und Fired Brick auf ein Stück weiße Cardstock gewischt. Da der Kontrast ein wenig zu hart war, habe ich dann von den Rändern her noch ganz leicht Candied Apple Richtung Kartenmitte aufgewischt. 
Anschließend habe ich ein wenig schwarzes Distress Spray Stain über die Karte gespritzt und den Cardstock schwarz gemattet.
Vom oberen Rand der Karte habe ich dann einige Luftschlangen hängen lassen. Die sind mit der Curly Q Stanze von Taylored Expressions aus silberfarbenem Hologrammcardstock gestanzt und erstmal auf dem Rahmen um das Motiv aufgeklebt. Das habe ich dann später mit 3D Tape auf den Hintergrund geklebt und dabei auch hinter die Luftschlangen 3D Tape aufgebracht.

Since a long time I've made a card using nearly MFT products only.
For the background I've inked some balloons using Distress Ink Candied Apple and Fired Brick and the Balloon Party stencil onto some white cardstock. The contrast was a bit hard so I lightly added more Candied Apple ink from the edges towards the center of the card. 
Then I spritzed some black Distress Spray Stain over the balloons and matted the background with black cardstock.
From the top edge of the background I've hung a few streamers. I've die cut those with the Curly Q die by Taylored Expressions from silver holographic cardstock and first attached them to just the frame around the image. Later I glued that down onto the card with foam tape and also put some of onto the back of the streamers.


Das süße Motiv ist aus dem Stempelset Happy Birthday Herd. Das fand ich einfach perfekt - und es war richtig schwer, eines der Motive für die Karte auszuwählen. Ich habe es mit Copics in Grautönen mit einigen roten Akzenten coloriert, den Bereich um das Motiv schwarz eingefärbt und ein paar Highlights mit einem weißen Gelstift gesetzt. Alle roten Partyakzente - bis auf die Konfetti im Hintergrund, die waren einfach zu klein - habe ich dann mit Glossy Accents überzogen.
Das Polaroid habe ich aus grauem Cardstock gestanzt. Eigentlich gibt es einen fast passenden Polaroidrahmen von MFT - bei dem ist der Ausschnitt aber kleiner als das Motiv und ich wollte einfach nichts davon abdecken. Deswegen habe ich ein Rechteck aus dem grauen Cardstock gestanzt und daraus dann ein Qudarat ausgestanzt. Das war dann wiederum ein klein wenig größer als das Motiv, aber der weiße Rand drumherum stört mich nicht.
Mit den #Captions Alphabet Stanzen habe ich dann die Buchstaben für die Worte Happy Birthday aus rotem und schwarzem Cardstock gestanzt und die Buchstaben leicht versetzt aufeinander geklebt. Das Birthday habe ich dann unten direkt auf den Rahmen geklebt, die Buchstaben für das Happy sind nur auf den Luftschlangen aufgeklebt. So konnte ich sie mit dem 3D Tape auf die selbe Höhe wie den Rest der Motive bringen, ohne jeden einzelnen Buchstaben mit 3D Tape versehen zu müssen - die sind ja doch relativ dünn. 
Unter den Rahmen habe ich dann noch einen Streifen schwarzen Cardstocks geklebt, auf den ich weiß den Rest des Textes aufembosst habe. Dafür habe ich ebenfalls einen Stempel aus dem Happy Birthday Herd Stempelset verwendet und nur die Anordnung auf einzeilig gegändert und das Happy Birthday nicht mit abgestempelt, das habe ich ja schon mit den gestanzten Buchstaben geschrieben.

The cute image is from the Happy Birthday Herd stamp set. I thought this was perfect - and I really had a hard time picking one of the images for my card. I colored the image with Copics in greys with some red accents, colored the area around the image black and added some highlights with a white gel pen. All red pieces - except for the confetti in the background, those were just too small - are also covered with a layer of Glossy Accents.
I've die cut the polaroid frame from grey cardstock. Actually there is a polaroid frame die by MFT - but there the cut out for the image is smaller and that would have cut off quite a bit of the image, but I didn't want to cover any of it. So I've die cut a rectangle from grey cardstock and then cut a square out of it. Well, my square was a bit larger, but the white around the image doesn't bother me.
With the #Captions Alphabet die set I've die cut the letters for the words happy birthday from black and red cardstock and glued the letters on top of each other just a bit offset. I glued the word birthday directly onto the bottom area of the polaroid frame, the letters for the word happy are only glued on top of the streamers. This way I was able to bring them up to the same height as the rest of the images without having to put tiny pieces of foam tape behind each letter - they are quite thin.
Under the frame I've added a black strip of cardstock, onto which I've white heat embossed the rest of my text. I used another stamp from the Happy Birthday Herd stamp set for it, only changed it to a single line text and skipped the happy birthday words since I already had written those with the die cut letters.


Hier kann man erkennen, wie alle Motive mit etwas Abstand auf dem Hintergrund sitzen. 
Als Deko habe ich noch einige silber-holografische Pailetten als Konfetti auf der Karte verteilt und außerdem mit einem schwarzen Fineliner einen Rahmen auf den Hintergrund gemalt.

Here you can see how all the elements on this card are glued down with some distance to the background.
To decorate my card I added a few silver holographic sequins as confetti and then used a black fineliner to draw a thin frame onto my background.

Samstag, 13. August 2022

Und noch ein Sneak

 
Hallo Ihr Lieben!
Gestern habe ich Euch ja bereits ein Sneak auf eines der beiden neuen Stanzensets, die es ab Montag bei Stampcorner geben wird, gegeben. Heute zeige ich Euch auch das zweite Set.

Hello everyone!
Yesterday I've shared a sneak of one of the two new die sets, that will be available on monday over at Stampcorner. Today I am also sharing the second die set.

Das Set enhält mehrere Banner-Stanzen, in verschiedenen Längen und wieder mit den tollen gestitchten Details. In diesem Set ist auf jeden Fall für jeden Text die passende Länge enthalten!
Ich habe hier eine Geburtstagskarte in pastelligen Regenbogenfarben gemacht. Dafür habe ich ein Stück weißen Cardstock erst mit einem Embossingfolder von Action mit Konfetti geprägt. Dann habe ich den Hintergrund mit Distress Ink Tattered Rose, Dried Marigold, Old Paper, Shabby Shutters, Bundled Sage und und Speckled Egg gewischt und anschließend noch hellgoldene Metallic Watercolor darüber gespritzt.

The set includes several banner dies, all in different lengths and again with the great stitched borders. This set contains a banner, the perfect length for each sentiment you want to stamp.
Here I made a birthday card in soft rainbow colors. I used a confetti embossing folder to dry emboss a piece of white cardstok. Then I used Distress Inks Tattered Rose, Dried Marigold, Old Paper, Shabby Shutters, Bundled Sage and Speckled Egg to color the cardstock and then also splattered some light golden metallic watercolor on top.


Dann habe ich endlich mal meine Wish Big Stanze von MFT eingeweiht und habe Kerzen aus farblich passenden, ebenfalls pastelligen Cardstocks gestanzt. Die Flammen habe ich aus mattgoldenem Metallic-Cardstock gestanzt. Unter den Kerzen befinden sich jeweils noch drei weitere Kerzen, die ich aus weißem Cardstock gestanzt habe, so dass die Kerzen etwas höher auf der Karte rauskommen.
Quer über die Karte habe ich die beiden hier verwendeten Banner geklebt. Ich habe sie ein wenig mit Copics schattiert - äh ja, das hätte ich vielleicht schon vor dem Bestempeln machen sollen, denn die verwendete Tinte ist nicht alkoholmarker-tauglich  und desewgen ist die Schattierung ein wenig rudimentär - und mit Teilen des Stempels Konfetti mit schwarzer Tinte bestempelt. 
Für das Wort Konfetti habe ich die Handlettering Alphabet Lowercase Stanzen von CraftEmotions benutzt. Die Buchstaben sind ebenfalls aus mattgoldenem Metallic-Cardstock gestanzt und jeweils mit 4 weiteren Buchstaben, die ich aus schwarzem Cardstock gestanzt habe, hinterlegt. 
Da die Kerzen fast ein wenig kurz waren, um beide Banner und den Text schön so darauf zu kleben, dass trotzdem noch etwas von den Kerzen sichtbar war, habe ich sie jeweils in drei Teile geschnitten und auf die Karte geklebt. Die kleinen Lücken - so viel war es dann gar nicht - habe ich mit den Bannern überdeckt und das gestanzte Wort Konfetti zwischen die beiden Banner gesetzt.

Then I finally used my Wish Big die by MFT to die cut candles from also soft colored cardstock matching the colors I used for the background. The flames are cut from matte gold metallic cardstock. I put three more candles, cut from white cardstock, behind each candle to add some dimension to my card. 
I put the two banners from the set I used here across the card. I shaded them a bit with my Copics - and yes, I should have done that before stamping the text onto them because the ink I used isn't Copic friendly so the shading is very simple - and stamped the text, which means something like "I let confetti rain for you" onto the banners using black ink. I left out the word confetti here and die cut the letters from matte golden metallic cardstock again, using the Handlettering Alphabet Lowercase die set by CraftEmotions. Again I put four more die cut letters, this time cut from black cardstock, under each letter.
Since the candles were a tad bit to small to still be visible nicely when the banners and the die cut letters are glued on top I simply cut those into three pieces and those onto my card. I covered the little gaps, that really weren't that large, with the banners and glued the die cut word confetti between them.


Um die Karte fertigzustellen, habe ich mattgoldene Pailetten als Deko rund um die Kerzen verteilt, den Cardstock schwarz gemattet und auf einen weißen Kartenrohling geklebt.

To finish my card I put some matte gold sequins around the candles, matted the cardstock black and then glued it onto a white note card.

Freitag, 12. August 2022

Stampcorner Mid Month Release Sneak

 
Hallo Ihr Lieben!
Am 15. August wird es von Stampcorner zwei neue Stanzensets geben - und hier bekommt Ihr eine Vorschau auf eines der Sets. Und da ja doch noch Hochsommer ist, habe ich wieder ein maritimes Thema aufgegriffen.

Hello everyone!
On august 15th Stampcorner is having a mid month release of two die sets - and here I'm giving you a sneak at one of the sets. Well, we're still in the middle of summer, so I made a maritime card again.

Könnt Ihr schon erraten, was das neue Set ist? Richtig, es ist ein Set mit vielen Fähnchen, die von schmal und kürzer bis breit und richtig lang variieren. Außerdem haben sie einen tollen gestitchten Rand. 
Ich habe mich hier mal für eine andere Verwendungsart entschieden. Ich habe die drei kleinesten der Stanzen aus dem Set verwendet und sie aus verschiedenen Designpapieren aus den Paper Pads 01 und 04 sowie Cardstock in verschiedenen Blautönen gestanzt. Dann habe ich die Teile mit 3D Tape so auf ein Stück weißen Cardstock geklebt, dass die Fishtail-Enden ineinander greifen. Bei einigen Teilen habe ich dabei auch die eine Spitze schräg weggeschnitten, so dass das nächste Banner eingesetzt werden konnte. Durch die verschiedenen maritimen Muster strahlt auch dieser etwas ungewöhnliche Hintergrund maritimes Flair aus, finde ich.

Can you guess what the dies look like? Right, it's a set with lots of fishtail banners - varying from quite thin and shorter to wide and and really long. They also have great stitched edges.
Here I decided to use the dies a bit differently. I used the three smallest ones from the set and die cut them from different patterned papers from Stampcorner's paper pads 01 and 04 and also from some solid cardstock in different shades of blues. Then I glued the pieces with foam tape onto a piece of white cardstock, putting the fishtail ends together interlocking. I had to cut off one of the tails from a few smaller pieces so the next banner would fit in. I think, due to the different maritime patterns in the paper this card screams ocean without the usual images.


Da der Hintergrund so doch recht unruhig ist, habe ich hinter das Motiv und auch hinter den Text je eine Lage Vellum gesetzt. 
Das süße Papierschiffchen ist aus dem Set Matrosen Freunde 2 und mit Copics coloriert. Dahinter sitzt ein Kreis aus Vellum.
Die Buchstaben für das Wort Ahoi habe ich aus dunkelblauem Cardstock gestanzt. Für die Highlights auf den Buchstaben habe ich einen weißen Gelstift benutzt - und mit dem  habe ich auch einen Rand auf den Kreis aufgemalt.
Als Untertext habe ich noch ein "das Meer hat gerufen" weiß auf dunkelblauen Cardstock embosst.

Since the background is quite busy I decided to put vellum behind the image and the die cut letters.
The cut paper boat is colored with Copics and I put a circle cut from vellum behind it.
The letters for the word ahoy are die cut from dark blue cardstock. I used a white gel pen for the highlights and also drew a frame close to the edge of the vellum circle.
The sub text means "the sea is calling". It's white heat embossed onto dark blue cardstock.


Der Kreis, das Schiff darauf, die gestanzten Buchstaben und auch das Banner mit dem aufembossten Text sind wieder mit 3D Tape auf das Hintergrundmuster geklebt.
Und als Deko habe ich noch ein paar silberne Pailettensterne aufgeklebt.
Dann habe ich alles schwarz gemattet und auf einen weißen Kartenrohling geklebt.

The circle, the paper boat, the die cut letters and also the banner with the embossed text are glued onto the background with more foam tape.
As embellishments I added a few silver star shaped sequins.
Then I matted the card panel black and glued it onto a white note card.

Donnerstag, 11. August 2022

Ein Lesezeichen mit Bücherwurm

 
Hallo Ihr Lieben!
Bereits letzte Woche habe ich Euch ja eine Karte mit einem der neuen Stempel von Oma Plott gezeigt. Aber ich konnte einfach nicht anders und musst ein weiteres der Motive aus dem Set verwenden - den süßen Bücherwurm! Dafür habe ich heute mal keine Karte, sondern ein Lesezeichen im Gepäck, und das zeige ich heute auf dem Stampcorner Blog.

Hello everyone!
I've already shared a card with one of the new images by Oma Plott last week. But I just couldn't resist and just had to use another image from the set - the cute book worm! So for a change I didn't make a card this time, but put him onto a bookmark, and that I'm sharing over at the Stampcorner Blog today. 

Das Lesezeichen an sich ist aus schwarzem Cardstock gemacht. Dafür habe ich einfach ein Rechteck ausgeschnitten und habe die obere Kante per Hand halbrund zugeschnitten. In die Rundung habe ich dann ein Loch gestanzt und einen "Lochverstärker" daraufgeklebt. Den habe ich mit einer kleinen Kreisstanze und der Crop-a-Dile aus einem Reststück des Cardstocks gestanzt, den ich für den Hintergrund der Mauer gestaltet habe.
Durch das Loch habe ich einen langen Streifen grünes Twine gezogen. Die Enden habe ich auf dem Cardstock nach unten laufen lassen und unten je eine Perle angebunden. Außerdem habe ich ein kleineres Stück Twine oben als Schleife angebunden.

I've made my bookmark from black carstock. I simply cut a strip from black cardstock and used my scissors to cut the round shape at the top edge. Into the round area I've punched a hole and glued a reinforcement ring on top. I've made this from a piece of cardstock I had left over from the background that I created for my wall by simply punching a small circle from it and punching an even smaller hole into the center with my Crop-a-Dile. 
Through the hole I've put a long strip of green twine, letting the ends hang down the center of my black cardstock and tying a pearl to each of the ends. To the top I also added a little bow, made from a smaller piece of the same twine.


Für die Mauer habe ich ein Stück Watercolor Cardstock mit Distress Ink Fired Brick und Rusty Hinge eingefärbt. Ich habe die Farben mit je ein wenig Wasser vermischt und mit einem Pinsel aufgetragen. Dann habe ich ein paar Wassertropfen sowie ein klein wenig schwarze Metallic Watercolor und weißes Copic Opaque White darüber gespritzt.
Das Ziegelsteinmuster habe ich mit der Brick Wall Cover Stanze von MFT aus weißem Cardstock gestanzt. Das musste ich für mein Lesezeichen natürlich etwas kleiner schneiden, dann habe ich es auf den roten Hintergrund geklebt.
Der süße Bücherwurm ist mit Copics und einem weißen Gelstift coloriert, ausgeschnitten und mit 3D Tape auf die Mauer geklebt. 
Der Text ist ebenfalls aus dem Stempelset von Oma Plott. Ich habe ihn mit weißem Embossingpulver auf schwarzen Cardstock embosst und mit 3D Tape aufgeklebt. Weil mir noch etwas Deko fehlte, habe ich hinter den Text einen nach unten zeigenden Pfeil, ebenfalls aus schwarzem Cardstock gestanzt, aufgeklebt.
Als Deko habe ich dann nur noch ein paar schwarze Enamel Dots aufgeklebt.

For the wall I've inked up a piece of watercolor paper with Distress Ink Fired Brick and Rusty Hinge. I mixed the colors with a bit of water and applied them with a brush. Then I spritzed some drops of water, some black metallic watercolor and some Copic Opaque White onto it.
The brick pattern is made from white cardstock with the Brick Wall Cover die by MFT. Of course I had to cut it down to fit onto my bookmark, then I glued it onto the red background.
The cut bookworm is colored with Copics and a white gel pen, cut out and glued on top of the wall with foam tape.
The text means bookworm and is from the same stamp set as the image. I've white heat embossed it onto black cardstock and glued it onto the card with foam tape. Since the top seemed pretty empty I also added an arrow, die cut from black cardstock.
To embellish my bookmark I only used a few black Enamel Dots.

Mittwoch, 10. August 2022

Create a Smile August Moodboard Challenge

 
Hallo Ihr Lieben!
Bei der neuen Create a Smile Challenge, die heute startet, gibt es heute das August Moodboard. Und es sind viele Bilder passend zum Hochsommer darin "verbaut". Eines hat sofort meine Aufmerksamkeit auf sich gezogen - und ich wusste, mit ein wenig Um-die-Ecke-Denken kann ich dieses Bild mit Create a Smile Produkten in eine Karte verwandeln. Na, von welchem Bild spreche ich wohl?

Hello everyone!
The new Create a Smile Challenge, that starts today, has the august moodboard for you. And it includes lots of pictures with a summer theme included. One of them immediately catched my eyes - and I knew, with some thinking outside the box I could use Create a Smile products to turn this picture into a card. So, can you guess which picture I'm talking about?


Das ist wohl nicht schwer zu erkennen...

It shouldn't be hard to spot....


Es gibt die Fruit Stencil von Create a Smile, mit der auch eine Melonenscheibe gestencilt werden kann. Die war mir aber für meine Karte zu klein. Deswegen habe ich die Basic Ovals Stencil verwendet und mir erstmal die zweitgrößten Ovale mit melonenfarbener Tinte auf weißen Cardstock gewischt. Mit der Stencil werden auch die herausgeschnittenen Teile geliefert. Damit habe ich dann den rot gewischten Teil jeweils abgedeckt und ein wenig hellgrüne Tinte außen um das Oval gewischt. Die Schale habe ich dann einfach frei Hand mit Copics dazugemalt und alles per Hand ausgeschnitten. Dann habe ich jedes Oval mit dem Papierschneider in Melonenspalten geschnitten und dabei jeweils etwas weniger als die Hälfte eines Ovals benutzt, so dass die Spalten nicht so rund wurden. So habe ich mehrere Melonenspalten gemacht. Nur bei der Scheibe mit mehr Schale habe ich ein wenig anders gearbeitet. Auch hier habe ich mit einem rot und hellgrün gewischten Oval gestartet, dann aber die Schablone für das größte Oval versetzt angelegt und mit die Kante mit einem Bleistift abgemalt und diese Fläche dann mit Copics gefüllt. Die weißen Streifen sind dann mit einem Gelstift gemacht.
Für die Melonenkerne habe ich mir einen der kleinen Regentropfen der Raindrops Stencil ausgesucht, die Tropfen rundherum mit Tape abgedeckt und dann jeden Kern einzeln mit schwarzer Tinte auf die Melonenspalten gewischt. Dabei habe ich die Stencil immer ein wenig gedreht, so dass sich die Kerne der Rundung der Melone anpassen. 
Die Minzeblättchen und Eiswürfel sind dann aus dem Stempelset Auf Uns!. Sie sind mit Copics coloriert und ausgeschnitten. Die Eiswürfel habe ich außerdem mit einer dicken Schickt Glossy Accents überzogen. 

There's the Fruit stencil by Create a Smile that also has all the parts to make a melon slice. But it was too small for what I had in mind. So I used the Basic Oval stencil and started with inking a few of the second largest ovals with melon red ink onto some white cardstock. With the stencil you also get the cut out pieces. I used the piece matching my oval to cover the red inked area and put a ring of light green ink around the red stenciled oval. Then I simply used my Copics, drew the skin by hand and cut each oval out. With my paper trimmer I cut each oval apart, making sure my slices were a bit smaller than half an oval, so my slices didn't turn out too round. I created a few slices of melon that way. I only changed that a bit for the one slice where you see more of the skin. Here I started with a red and green oval just like before, but then laid the largest oval opening on top at an angle, drew the edge with a pencil and then inke up the wider strip with Copics again. For the white lines I used a gel pen.
For the melon seeds I picked a small raindrop from the Raindrops stencil, covered the ones around it with tape and then stenciled each seed individually with black ink onto the slices, turning the stencil a bit for each seed so their orientation matches the round shape of the slices.
The mint leaves and the ice cubes are from the Auf Uns! stamp set. I colored them with Copics and cut them out. Onto the ice cubes I also put a thick layer of Glossy Accents.


Über den Text musste ich ein wenig grübeln. Ich wollte etwas sommerliches, am liebsten mit dem Wort Cool, aber da fiel mir nichts passendes ein. Also habe ich mich für "sweet summertime" entschieden. Dabei habe ich die Worte Sweet und Time mit dem Clear Letters Stempelset weiß auf schwarzen Cardstock embosst und ausgeschnitten. 
Das Wort Summer ist mit dem Cherry Alphas Lowercase Stanzenset gemacht, dabei habe ich nur die inneren Buchstaben, ohne die extra Außenlinien, verwendet. Die Buchstaben sind dreimal aus schwarzem Cardstock gestanzt, die letzten drei Buchstaben musste ich insgesamt je sechsmal ausstanzen, um Höhenunterschiede auf der Karte auszugleichen. Die Buchstaben sind jeweils aufeinander geklebt und ebenfalls mit Glossy Accents überzogen.

I had to think about the text for a bit. I wanted something summer-ish and would have loved to include the word cool. But my brain didn't come up with an idea I liked so I went with "sweet summertime" instead. 
I used the Clear Letters stamp set to white heat emboss the words Sweet and Time onto strips cut from black cardstock.
The word Summer is made with the Cherry Alphas Lowercase die set. I only used the inner letters here, leaving out the extra outlines the die cuts as well. I've cut them three times each from black cardstock, to even out some different heights on my card I cut the last three letters six times. Then I stacked them all and also added a layer of Glossy Accents on top.


Für den Hintergrund habe ich ein Stück türkisblauen Cardstock zugeschnitten und darauf meine Melonenscheiben, Eiswürfel und Minzblätter arrangiert. Dabei habe ich teilweise 3D Tape zum Aufkleben der Teile verwendet. Mittig auf die Motive habe ich dann den Text geklebt.
Als Deko habe ich ein paar klare Pailetten auf der Karte verteilt - die erinnern mich an Wassertropfen -, außerdem  habe ich mit einem schwarzen Fineliner einen Rahmen aufgemalt. Zum Schluss habe ich dann noch alles auf einen weißen Kartenrohling geklebt.

As the background I picked a piece of turquoise cardstock and glued the slices of melon, ice cubes and mint leaves onto it, using foam tape on a few of them. Then I glued the text centered on top of the images.
To decorate my card I added a few clear sequins - they remind me of water drops. I also drew a frame with a black fineliner and then glued everything onto a white note card.

Dienstag, 9. August 2022

LawnFawnatics Challenge #130

 
Hallo Ihr Lieben!
Das Thema der LawnFawnatics Challenge #130 ist ein Sketch. Der ist relativ einfach gehalten und somit lässt er Raum für eigene Interpretationen. Meine Karte ist trotzdem eher einfach ausgefallen. Und irgendwie war ich in Halloween-Karten-Stimmung, ich weiß, es ist recht früh...

Hello everyone!
The theme of LawnFawnatics Challenge #130 is a sketch. It's a pretty simple one and that leaves a lot of room for creativity. Still I created a more simple card. And I felt like making a Halloween card, I know, it's early!

Für den Hintergrund habe ich weißen Cardstock mit Distress Oxide Salvaged Patina, Mermaid Lagoon, Peacock Feathers, Uncharted Mariner und Black Soot gewischt - hell in der Mitte, dunkel außen am Rand. Anschließend habe ich Wasser und glitzernd-silberne Metallic Watercolor darüber gespritzt.

For the background I've inked up some white cardstock with Distress Oxide Salvaged Patina, Mermaid Lagoon, Peacock Feathers, Uncharted Mariner und Black Soot gewischt - light in the center, dark on the edges. Then I spritzed some water and some glittery-silver metallic watercolor over the ink.


Der kleine Geist auf meiner Karte freut sich so, dass er endlich rumspuken und fröhliche Kreise am Sternenhimmel ziehen kann! Er ist aus dem Set Spooktacular. Der Hexenhut ist aus dem Set Happy Howloween, der Besen und sein Kürbiseimer aus dem Set Costume Party. Alles habe ich mit Copics in Türkistönen, für die dunklen Teile gemischt mit schwarz und dunkelgrau, coloriert. Dann habe ich die Motive ausgeschnitten, zusammengesetzt und mit 3D Tape auf die Karte geklebt. 
Ich wollte den Spaß, den er da so am Himmel hat, darstellen. Deswegen habe ich mit silber-glitzerndem Embossingpulver den Schnörkel, eigentlich eine Eisspur einer der Mäuse aus dem Mice on Ice Set, auf weißen Cardstock embosst, ausgeschnitten und hinter den Geist geklebt.
Der Text ist ein Mix aus Stempeln aus den Sets Tiny Halloween - kleine Texte - und Spooktacular - der große Text. Sie sind weiß auf schwarzen Cardstock embosst und ebenfalls mit 3D Tape auf die Karte geklebt.

The little ghost is so happy to finally be able to spook around freely and is making loops in the starry sky! He's from the Spooktacular set. The hat is from the set Happy Howloween, the broom and his little pumpkin buckt are from the Costume Party set. I colored all images in turquoise with my Copics, for the darker images I mixed in some black and dark grey. Then I cut the images out, put them together and attached them on the background with foam tape.
I really wanted to show the joy he's having up there in the sky. So I heat embossed the trail, that's originally an ice trail from the Mice on Ice stamp set, with some glittery-silver embossing powder onto white cardstock, cut it out and put it behind the ghost. 
The text is a mix of stamps from the sets Tiny Halloween - the smaller texts - and the Spooktacular set - the large spooktacular word. I white heat embossed them onto black cardstock and then used foam tape again to glue them onto the card.


Und dann konnte der kleine Geist natürlich nicht so ganz alleine da am Himmel unterwegs sein. 
Die kleinen Fledermäuse aus den Sets Tiny Halloween und Spooky Village sind mit schwarzer Stempelfarbe direkt auf den Hintergrund gestempelt. Die größeren sind mit einer der Stanzen aus dem Build a House Halloween Add-On Set aus schwarzem Cardstock gestanzt und mit dünnerem 3D Tape auf die Karte geklebt. 
Zwischen die Fledermäuse habe ich dann verschieden große Sterne aus den Sets Spooky Village, Spooktacular und Happy Howloween mit dem Glow-in-the-Dark Embossingpulver von LawnFawn auf den Hintergrund embosst. Da ich damit öfter das Problem habe, dass ein Motiv nur mit einem fluoreszierenden "Staub" überzogen sind, der sich dann nicht embossen lässt, habe ich diesen Trick entwickelt: ich embosse erst einmal mit dem Glow-in-the-Dark Pulver, dann einmal mit klarem Embossingpulver darüber und anschließend noch zwei weitere Lagen des leuchtenden Embossingpulvers. So erhält man eine schön dicke Lage, beim Schmelzen der oberen Lagen schmilzt auch das klare Pulver mit an - so wird selbst der feine "Staub" im Motiv gebunden und die Motive leuchten dann auch toll.
Und weil ich noch ein paar kleinere Sterne wollte, habe ich noch silberne Pailettensterne mit dem Glow-in-the-Dark Pulver überzogen und aufgeklebt.
Zum Schluss habe ich den Hintergrund schwarz gemattet und auf einen weißen Kartenrohling geklebt.

And then the little ghost needed a few friends that join him up there in the sky. 
The small bats from the sets Tiny Halloween and Spooky Village are stamped with black ink directly onto the background. The larger ones are die cut from black cardstock using one of the dies from the Build a House Halloween Add-On set and glued onto the card with some thinner foam tape.
Between the bats I stamped a few different sized stars from the sets Spooky Village, Spooktacular and Happy Howloween and heat embossed them with LawnFawn's glow in the dark embossing powder. Since I sometimes have the problem that the images are only covered with some kind of glowing dust that isn't embossable, I came up with this trick: I first heat emboss it with the glow in the dark powder, then put a layer of clear embossing powder on top. Onto that I add two more layers of the glow in the dark one. When you heat the top layers, also the clear powder starts to melt and traps even the "dust" in the images. Those do not only look very dimensional, but they also glow wonderfully.
And since I wanted a few smaller stars inbetween, I covered some small silver starshaped sequins with the glow in the dark powder and glued them onto the card.
In the end I matted my background with black cardstock and glued it onto a white note card.

Montag, 8. August 2022

Eine Hintergrundstanze, zwei Karten

 
Hallo Ihr Lieben!
Am Samstag habe ich Euch ja bereits zwei Karten mit dem selben Stempelset gezeigt. Heute nun sind zwei Karten mit der selben Hintergrundstanze dran. Diesmal war es allerdings so, dass mir meine eigentliche Idee nicht mehr gefallen hat, als ich sie so vor mir liegen hatte. Also habe ich die Teile kurzerhand auf zwei Karten verteilt - natürlich noch mit dem ein oder anderen Zusatzelement. Soweit nicht anders erwähnt, sind alle Stanzen und Stempel von Altenew, die passten vom Stil her einfach super zusammen.

Hello everyone!
On saturday I've shared two cards using the same stamp set. Today I have two cards on which I used the same background die. But this time it's because I simply didn't like my original idea anymore once I had it all laying together. So I simply split the elements onto two cards - of course with using a few extra pieces. If not mentioned otherwise I used dies and stamps by Altenew, they just went so perfectly together.


Angefangen hat alles mit diesem Hintergrund. Ich habe die Scallop Cover Stanze von Altenew verwendet und wollte sie ähnlich eines Regenbogens gestalten. Ich habe mich für helles Gelb, Grün und Grau-Türkis entschieden. Ich habe die Stanze einmal aus jedem der Cardstocks gestanzt und einmal zusätzlich aus weißem Cardstock. Dann habe ich drei der Stanzen aufeinander geklebt, die weiße Lage zuoberts, und in den Hintergrund dann die ausgestanzten Bögen in Gelb in die größten, in Grün in die mittleren und in grau-türkis in die kleinsten Bögen eingeklebt. Mit dem Ergebnis war ich bis dahin super zufrieden. Dann wollte ich den Regenbogen eingentlich durch blaue und lilafarbene Blumen fortsetzen - und da verließen sie mich. Es hat mir einfach nicht gefallen...
 
It all started with this background. I used the Scallop Cover die by Altenew and wanted to create some kind of rainbow background with it. I went with a light yellow, green and greyish turquoise, die cut the background once from each color and in addition to that also once from white cardstock. Then I stacked three of these, using the white die cut as my top layer, and then glued the small inlay pieces into the stacked outline background. I used the yellow for the largest bows, green for the second largest and turquoise for the smallest. And I really liked that background! I had planned to continue the rainbow colors with blue and purple flowers - and that's when I realized that I simply didn't like that.


Also habe ich mich kurzerhand umentschieden und die Circled Greetings Hello Stanze einige Male aus weißem Cardstock gestanzt. Mit einer etwas größeren Kreisstanze habe ich die Außenlinie gestanzt und außerdem einen Kreis aus hellblauem Cardstock gestanzt. Diese Teile habe ich dann alle aufeinander geklebt. 
Als Deko habe ich oben rechts einen Schmetterling, gemacht mit dem Dream Big Stempelset, aufgeklebt. Dabei ist der Körper direkt oberhalb des L auf den Kreis geklebt, hinter den oberen Rand der Flügel habe ich 3D Tape geklet, so bekommt der ansonsten flache Schmetterling etwas mehr Dimension. 
Als Deko kamen noch ein paar Blumen auf die Karte. Die Blätter sind mit Stempeln aus dem Airbrushed Flowers Stempelset gestempelt, für die kleinen Blüten habe ich eine der Stencils aus dem Lush Garden Kit verwendet. Um schwarze Außenlinien zu erhalten, habe ich einfach entlang der größten Lage mit einem schwarzen Fineliner die Außenlinien nachgemalt. Klar, sieht nicht aus wie gestempelt, aber so gefällt es mir trotzdem besser. 
Die Texte sind aus dem Snapdragon Stempelset und weiß auf schwarzen Cardstock embosst.
 
So I changed my mind and die cut the Circled Greetings Hello die several times from white cardstock.  I used a larger circle die to cut the outer circle shape and used the same day to cut a background layer - just a plain circle - from light blue cardstock. Then I glued all of them on top of each other.
To decorate this card I glued a butterfly to the top right of the circular text, made using the Dream Big stamp set. I glued the body directly onto the background circle, making it look like it's sitting on the loop of the L, and used foam tape behind the tips of the wings. This adds some dimension to the otherwise flat image.
I also added a few flowes to the card. The leaves are made with the Airbrushed Flowers stamp set, for the blossoms I used one of the stencils from the Lush Garden Kit. To get the black outlines of the flowers I simply used a black fineliner and followed the outlines of the largest flower image on the stencil. Of course you see that those aren't stamped, but I still like them better with the black outlines than without any lines.
The texts on this card are from the Snapdragon stamp set and white heat embossed onto black cardstock.


Wie fast immer habe ich alle Lagen mit 3D Tape aufeinander geklebt. Als Deko kamen noch ein paar hellblaue, irisierende Glitzersteine auf die Karte.
 
As so often I glued the layers together with foam tape. Then I added a few light blue iridescent rhinestones to the card.


Auf der zweiten Karte habe ich dann die Blumen verarbeitet, die ich eigentlich auf den Regenbogen-Hintergrund setze wollte. 
Ich hatte noch das hellgelbe Scallop Cover Stanzteil von der ersten Karte übrig - dort hatte ich ja nur drei Lagen des Hintergrunds aufeinander geklebt. Den habe ich dann hier verarbeitet und auf ein Stück hellblauen Cardstock geklebt.
 
On the second card I used the flowers that I had planned to use on the rainbow-like background. 
I had the light yellow Scallop Cover die cut left from the first card - as mentioned I only used three layers there. So I used the yellow one here and glued it onto a piece of light blue cardstock.


Die tollen Lupinen sind mit lilafarbenen Tinten mit dem Stempelset Snapdragon gemacht und mit der passenden Stanze ausgestanzt.
Die Blätter und blauen Blüten sind mit Stempeln aus dem Set Airbrushed Flowers gemacht und per Hand ausgeschnitten - da habe ich die Stanzen (noch) nicht.
Für den Text habe ich dann Stempel aus dem Set Spring von HoneyBeeStamps benutzt und mit einem ausgestanzten Und-Zeichen kombiniert. Die Texte sind weiß auf schwarzen Carstock embosst. Das Und-Zeichen habe ich mit einer Stanze aus einem Set von StudioLight mehrmals aus schwarzem Cardstock gestanzt und wieder aufeinander geklebt. 
Als Deko habe ich wieder einige Glitzersteine aufgeklebt, diesmal in blau-irisierendem Schwarz.
 
Those beautiful snapdragons are stamped with different tones of purple using the Snapdragon stamp set, then I cut them out with the matching dies.
The leaves and blue flowers are made with the Airbrushed Flowers set and cut out by hand - I don't have the matching outlines (yet).
For the text I combined some words from the Spring stamp set by HoneyBeeStamps and combined them with a die cut ampersand. The texts are white heat embossed onto black cardstock. The ampersand is die cut several times from black carstock using a die by StudioLight and then stacked again.
To embellish this card I used some rhinestones again, this time in a blue iridescent black.
 

 Auch hier kam wieder 3D Tape beim Zusammenkleben der Karte zum Einsatz. Außerdem sieht man hier, dass ich auf den hellblauen Cardstock im Hintergrund ganz am Anfang noch Liquid Pixie Dust von InkOn3 aufgespritzt habe - eine fast durchsichtige aber toll schimmernde Glitzerfarbe.
 
And once again I used foam tape to put the card together. On this picture you can also see, that I spritzed some Liquid Pixie Dust by InkOn3 onnto the light blue cardstock before glueing the Scallop Cover down - a nearly clear but wonderful shimmery liquid glitter/color.

Samstag, 6. August 2022

Ein Stempelset, zwei Karten

 
Hallo Ihr Lieben!
Heute zeige ich Euch zwei Karten, für die ich jeweils das selbe Stempelset verwendet habe. 
 
Hello everyone!
Today I am sharing two cards with you, that I used the same stamp set for.
 
Ich wollte eine Hochzeitskarte machen und dafür das Bountiful Bouquet Stempelset von Altenew benutzen. In dem enthaltenen Layering Guide sind immer verschiedene Kartenideen abgedruckt, dabei war eins, bei dem das Layering Set ohne die Outlines benutzt wurde. Und ich war hin- und hergerissen. Dann fiel mir aber ein, dass ich, um zu wissen, wo ich die Layering Stempel positionieren muss, sowieso einen Abdruck mit Linien brauchte, habe ich einfach zwei Motive gestempelt. Einmal habe ich die Lagenstempel an den Linien ausgerichtet und abgestempelt. Dann habe ich jeweils ein zweites Stück Cardstock in mein Misti gelegt und die Lagen auch dort abgestempelt, diesmal ohne Outlines. 
Da ich dann zwei Motive hatte, habe ich auch gleich zwei Karten gemacht, denn wegwerfen wollte ich dann doch keines. 
Beide Motive habe ich mit der passenden Stanze ausgestanzt.
 
 I wanted to make a wedding card and use the Bountiful Bouquet stamp set by Altenew for it. In the stamp layering guide included in the set they also share pictures of card ideas with the set, and on one of them the stamp set was used without the outline stamp. I was torn. But then I realized, that I needed the outline image to know where to put the layering stamps, so I simply made two images. For the first one I stamped the outlines, used them as a guide for where to put the layer images and stamped them. Then I simply put a second paper into my Misti and stamped the layers again, this time without the outlines. 
And since I ended up with two images I decided to make two cards, because I just couldn't throw away one of them.
I've cut out both image using the matching die.


Für die ja eigentlich geplante Hochzeitskarte habe ich tatsächlich zu dem Motiv ohne Outlines gegriffen. 
Das Brautpaar ist bereits in seinen Vierzigern und ich fand das Motiv wunderbar passend.
Für den Hintergrund habe ich erst die Dotted Tiles Debossing Cover Stanze von Altenew verwendet und aus - bzw. hier wohl eher in - weißen Cardstock gestanzt. Da das deutsche und das amerikanische Kartenformat ja unterschiedlich sind, habe ich seitlich jeweils einen Streifen weggeschnitten. Mit zwei Mattungen kann man die amerikanischen Formate dann auch super auf Karten nach deutschem Maß nutzen. 
Von der rechten Seite her habe ich mit einem Blending Brush Distress Ink Tattered Rose aufgewischt und die Farbe nach links hin heller werden lassen. Die Farbe passte perfekt zu den von mir für das Motiv verwendeten Stempelfarben. Und durch das Aufwischen der Farben, kommt das eingeprägte Muster noch bessers zur Geltung. Anschließend habe ich noch gold-gelbe Metallic Watercolor auf den Hintergrund gespritzt.
Aus goldenem Spiegelcardstock habe ich dann noch einen der Stitched Rectangle Frames von Create a Smile gestanzt und auf den Hintergrund geklebt. Dann habe ich ihn rosafarben gemattet und auf einen weißen Kartenrohling geklebt.

For the wedding card I had originally planned to make I actually used the image without the stamped outlines.
The wedding couple is in its forties and I thought, this image is perfect.
For the background I first die cut the Dotted Tiles Debossing Cover die by Altenew from - or in this case into - some white cardstock. Since the german card size is different than the american one I've cut off a strip from both sides of the die cut. When using two cardstock layers behind it using a background die made for an american card size works perfectly fine.
I used a blending brush and Distress Ink Tattered Rose to ink up my background panel from the right to left side, fading it out on the left side. This color works perfectly with the colors I had used to stamp the image. And with the ink on top the details cut into the cardstock get more prominent. Then I spritzed some golden-yellow metallic watercolor on top.
I've die cut one of the Stitched Rectangle Frames by Create a Smile from golden mirror cardstock and glued it onto the background. Then I added some rose matting and glued everything onto a white note card.


Hier könnt Ihr das tolle Motiv und die Lagen besser sehen. Ich habe es mit den Ink Pads von SU gestempelt - da habe ich jahrelang gesammelt und so die größte Auswahl an Farben zur Verfügung. Auch wenn mich die ganzen Ink Pads anderer Firmen natürlich sehr reizen, habe ich in die bisher nicht investiert. 
Die Blüten habe ich in zwei hellen Rosa- sowie zwei kräftigeren Rottönen gestempelt. Für die Blätter habe ich mich für eher bläuliche Grüntöne entschieden.

Here you get a better look at the image and its layers. I used ink pads by SU to stamp the layers - I have been collecting those for years and so have the largest assortment of colors here. Of course I'm pretty tempted to buy some ink pads by one of the many brands offering them, made especially for layering, but I didn't invest in those - yet.
I used two light pinks and two stronger reds for the flowers and went with some blue-ish greens for the leaves.


Das Brautpaar ist im Englischen jetzt nicht so doll bewandert, deswegen habe ich mich für deutsche Texte entschieden. 
Das Ja ist mit der Ja mit Herz Stanze von Rayher gemacht. Ich habe es viermal aus weißem Cardstock sowie für die oberste Lage einmal aus goldenem Spiegelcardstock gestanzt und alle Lagen aufeinander geklebt. 
Der Text Ihr traut Euch ist aus dem Stempelset von Create a Smile und mit dem helleren Rotton aus dem Motiv gestempelt.
Und der kleinere Text darunter ist mit einem Stempel von SU gemacht. Dabei habe ich das tiefer eine Zeile höher gestempelt und die mittlere Zeile ausgelassen - sonst hätte der Text zu viel Raum auf der Karte eingenommen.

The wedding couple doesn't speak english so I went with some german texts.
I've die cut a Ja - which is the german way of saying I do - four times from white and once from golden mirror cardstock for the top layer and then stacked the die cuts.
The larger text means "you say I do" and is stamped using the lighter one of the red tones I used for the flowers. 
The smaller text means "may your love grow and happiness grow with each year". 


Ich habe die verschiedenen Lagen mit 3D Tape aufeinander geklebt und zum Schluss ein paar goldene Glitzersteine als Deko auf der Karte verteilt. 

I glued the different layers down with foam tape and then added a few golden rhinestones as embellishments.


Und das ist die Karte, auf der ich das zweite Motiv verarbeitet habe. Mit den gestempelten Linien bekommt es einen ganz anderen Look, finde ich.
Hier habe ich die Chevron Quilt Top Cover Stanze von Concord and 9th aus weißem Cardstock gestanzt und wieder auf passend für das deutsche Kartenmaß zugeschnitten. Hier habe ich rosafarbene Metallic Watercolor aufgespritzt.

And this is the card I made with the second image. I think, the image gets a completly different look when using the outlines.
Here I've die cut the Chevron Quilt Top Cover die by Concord and 9th from white cardstock, then cut it down to fit the german card size again. On this background I used some light pink/coral metallic watercolor. 
 

 Im Hintergrund habe ich den vollflächigen Stempel aus dem Silk Art Stempelsest von Altenew mit hellgrüner Tinte auf den ausgestanzten Hintergrund gestempelt und dann mit dem dazugehörigen Embossinfolder embosst. Da ich das große Motiv so aufgestempelt habe, wie es mir mit dem Motiv darüber gefällt, ihn aber zuvor schon ausstanzen musste, passte das Papier nicht mehr in den Embossingfolder. Deswegen habe ich oben einen kleinen Schlitz in den Hintergrund geschnitten und konnte da Papier hier dann durch den mittigen Schlitz im Embossinfolder stecken. So ging auch das Embossen des bereits ausgestanzten Papieres. Später habe ich den Schlitz beim Matten einfach wieder zusammengeklebt und man sieht ihn nur noch, wenn man ganz genau schaut.
Für das Motiv habe ich die selben Farben wie für das ohne Outlines benutzt.

In the background I stamped down the solid image from the Silk Art stamp set by Altenew using light green ink, then dry embossed it with the matching embossing folder. Since I had stamped the image down where I liked it under the flower image, and also had to die cut the background first, it didn't fit into the embossingfolder anymore. So I've cut a little slit into the top of my background and was able to put the too much of cardstock through the slit at the fold of the embossingfolder. Later when matting the background I simply glued the slit back together and you only see it when you know about it.
For the image I used the same colors of ink as for the one without the outlines.


Diesmal habe ich das Motiv mit silberfarbenem Spiegelcardstock kombiniert. Ich habe die Circled Greetings Hello Stanze von Altenew wieder vier mal aus weißem Cardstock und einmal aus dem silberfarbenem Spiegelcardstock gestanzt und die Teile aufeinander geklebt. Um den Ring um den Text, der eigentlich kreisförmig in ein größeres Stück Cardstock gestanzt wird, zu erhalten, habe ich einfach eine etwas größere Kreisstanze verwendet. 
Den Linien des h und o folgend, habe ich den unteren Teil des Rings weggeschnitten, der hätte nicht mit auf die Karte gepasse. Dann habe ich da Motiv durch den oberen Teil des Rings geschoben, so dass der nur teilweise zu sehen ist.
Die kleinen Texte auf der Karte sind ebenfalls aus dem Bountiful Bouquet Stempelset und weiß auf schwarzen Cardstock embosst.

This time I combined the image with some silver mirror cardstock. I've die cut the Circled Greetings Hello die by Altenew again four times from white cardstock and once from the silver mirror cardstock and stacked them. To end up with a ring around the text, that gets cut in a circle out of a larger piece of cardstock, I simply used a slightly larger circle die.
Following the lines of the h and o I've cut off the bottom part of the ring - it just didn't fit onto my card. Then I put the image through the top of the ring so this is only partly visible.
The smaller texts on this card are again from the Bountiful Bouquet stamp set and white heat embossed onto strips of black cardstock.


Die verschiedenen Lagen der Karte habe ich wieeder mit 3D Tape aufeinander geklebt und einige silberfarbene Perlen als Deko verwendet.
Auf der linken Seite habe ich die überängenden Spitzen der Blätter stehenlassen, an den anderen beiden Seiten habe ich den Überhang des Motivs bündig mit dem Hintergrund abgeschnitten. Dann habe ich alles schwarz gemattet und auf einen weißen Kartenrohling geklebt.

Again I used foam tape to glue the different layers of the card onto the background and then added some silver pearls as embellishments.
On the left side I've kept the two tips of the leaves overhanging the background, on the other sides I've cut the overhang off along the edge of the background. Then I matted everything black and glued it onto a white note card.