Dienstag, 13. April 2021

Glückwünsche zum neuen Heim

 
Hallo Ihr Lieben!
Auf dem Stamping-Fairies Blog zeige ich heute eine Karte für ein befreundetes Paar, das sein Traumhaus gefunden hat. Und die Karte zeigt, dass man mit eigentlich cuten Stempeln auch prima etwas nüchternere Karten machen kann.

Hello everyone!
Over at the Stamping-Fairies Blog I am sharing this card today, that I've made for friends that just bought their dream house. And this cards shows that you can make more adult cards using your cute stamp and die sets.

Ich habe hier hellgrauen Cardstock für den Hintergrund benutzt und darauf eine Straße in Grautönen aufgeklebt. Dafür habe ich die Color Blast Stanze von MFT benutzt. Die ist eigentlich dafür gedacht, einen Regenbogen zu stanzen. Ich habe ihn einfach auf den Kopf gestellt. Und da ich das tolle Streifendesign doch irgendwie nutzen wollte, habe ich die Straße aus drei verschiedenen Grautönen gestanzt und per Hand mit einem weißen Gelmarker einen Mittelstreifen hinzugefügt. 
Dann habe ich den Hintergrund auf einen weißen Kartenrohling geklebt. Der Regenbogen ist relativ breit und da ich ihn fast komplett genutzt habe - auch, um meine Szene gut auf der Karte unterzubringen - hat meine Karte ein für uns hier in Deutschland ungewöhnliches Format. Aber das finde ich auch mal spannend.
Der Text, den ich im oberen Bereich auf die Karte geklebt habe, ist aus dem Stempelset Hanging with my Gnomies. Ich habe ihn schwarz auf weiß gestempelt, ausgeschnitten und mit kraftfarbenem Cardstock gemattet.

Here I've used a piece of light grey cardstock for the background and glued a street cut from different shades of grey on top of it. I used the Color Blast die by MFT for that street. Originally it's made to create a rainbow, I simply turned it upside down. And since I didn't want to use that great stripe design I've die cut my street from three different tones of grey and added the middle line by hand with a white gel marker. 
Then I've glued the background onto a white note card. I used nearly all the width of that rainbow, also because I needed that space for my scene. So the card has a totally unusal size, at least for us here in Germany. But I really like the different look it adds to my card.
The text that I've glued onto the top area of the card is from the Hanging with my  Gnomies stamp set. I've stamped it with black ink onto white cardstock, cut it out and matted it with craft colored cardstock. 
 

 Als Hauptelement auf meiner Karte habe ich das tolle Carpool Stanzenset benutzt. Ich habe den Bus aus Beige- und Grautönen gestanzt und die großen Teile mit Copics ein wenig schattiert. Dann habe ich ihn auf die Straße geklebt.
Als Umzugskisten habe ich die tollen Holzkisten aus dem Mice Day to Celebrate Stempelset - das ja eigentlich absolut cute ist - verwendet. Gerade für zerbrechliche Sachen sind solche Kisten bei einem Umzug perfekt! Drei Kisten stehen fertig gepackt nebem dem Auto, eine weitere ist schon aufs Dach befunden. Dort ist auch ein Stuhl auf die Kiste gestapelt, der zweite steht noch neben dem Auto. Auch der Stuhl ist aus dem Mäuse-Stempelset. 
Und weil Kiste und Stuhl natürlich nicht vom Dach des Autos fallen sollen, habe ich sie festgebunden. Ich habe einfach ein Stück Twine auf die Straße geklebt, darauf Kiste und Stuhl geklebt und an die Enden der Schnur noch zwei Schleifchen angebracht.

For the main element on my card I've used the great Carpool die set. I've die cut the van from different creams and browns and added some shading with my Copics to the large pieces of the car. Then I've glued it onto the street.
For the moving boxes I used the great wooden crates from the Mice Day to Celebrate stamp set - which is a really "cute" stamp set. Especially for all those breakable things these crates are perfect during a move! Three of the crates are standing next to the car, readily packed, a fourth one is already tied to the roof of the van. And on top of that one there's a chair, the other one is standing on the street with the other crates. Also the chair is from the mice stamp set.
And since crate and chair shouldn't fall off the van I've fixed them with a rope. I've simply glued a piece of twine onto the road, added the crate and chair and then glued two small bows to the ends of the twine.

Samstag, 10. April 2021

Stempeleinmaleins - Ausgabe vom 10. April 2021

 
Hallo Ihr Lieben!
Beim Stempeleinmaleins zeigen wir Euch heute eine Geburtstagskarte. Aber natürlich nicht irgendeine - diese hier kommt mitsamt Geburtstagskerzen!

Hello everyone!
Over at Stempeleinmaleins we are sharing a birthday card idea today. But it's not just a birthday card - this one comes with birthday candles inside!


Von außen  ist es erstmal eine - zwar recht dicke - aber doch normale Karte.
Ich habe die Front mit türkisarbenem Designpapier mit "Cracks" beklebt, die Karte selbst ist aus weißem Cardstock gewerkelt. 
Auf die Klappe der Karte habe ich einen gewellten gelben Kreis geklebt, auf den kam erst ein Kreis aus weiß-gelb gestreiftem Designpapier und darauf dann ein weiterer türkisfarbener Kreis. Auf dem habe ich dann endlich auch mal einen meiner neuen LawnFawn Stempel benutzt. Das Happy habe ich gelb coloriert, durch das türkisfarbene Papier passt der Farbton prima zu dem eher "schmutzig-gelben" Cardstock, den ich benutzt habe. 
Auf dem untere Teil der Karte habe ich den Text dann noch mit zwei weiteren Stempel aus dem Offset Sayings Birthdays Set von LawnFawn ergänzt.
Als Deko habe ich eine Schleife an den gewellten Kreis geklebt und ein paar schwarze sowie kupferfarbene Glitzer Enamel und Nuvo Dots aufgeklebt.
Unter dem gewellten Kreis habe ich übrigens einen Magneten versteckt, der die Karte geschlossen hält.

From the outside it seems to be a - quite thick - regular card with a flap.
I covered the front with a turquoise designer's paper with cracks, the card itself is made from white cardstock.
Onto the flap of my card I've glued a yellow scalloped circle, then a regular circle die cut from yellow and white striped designer's paper on top and on top of that another turquoise circle. On that I finally used one of my new LawnFawn stamps. I colored the "happy" yellow with my Copics - due to the turquoise paper underneath it looks as "muddy" as the yellow cardstock I used.
On the lower part of my card I finished the saying with two more words, stamped with stamps from the Offset Sayings Birthdays stamp set by LawnFawn.
To decorate the front I tied a bow to the scalloped circle and added some black and copper glittery Enamel and Nuvo Drops.
Under the scalloped circle I've hidden a magnet that holds the card closed.


Aber wenn man die Karte öffnet, zeigt sich ihr tolles Innenleben!
Auch hier habe ich das türkisfarbene Designpapier benutzt, um die Flächen zu bekleben.
Auf die hintere Seite der Karte habe ich ein gelbes Banner, von dem ein paar Fähnchen mit dem gelb-weiß gestreiften Papier hinterlegt sind - sowie einen "make a BIG wish" Text aufgeklebt. Die Stempel dazu kommen wieder aus dem Offset Sayings Birthdays Stempelset.

But when you open the card you can see the great inside!
Also here I used the turquoise designer's paper again to cover all areas.
Onto the back panel I've added a yellow banner, behind a few of them I've added the yellow and white striped desinger's paper again. I also added a "make a BIG wish" text here, stamped again with stamps from the Offset Sayings Birthdays stamp set.


In der Mitte der Karte befindet sich ein Halter für Geburtstagskerzen. Ich habe ihn mit dem gestreiften Designpapier beklebt und mich für weiße Kerzenhalter mit gelben Kerzen entschieden.
Klar muss man beim Abbrennen der Kerzen aufpassen. Die Rückseite der Karte lässt sich aber ebenfalls komplett aufklappen, so dass die Gefahr sich in Grenzen hält. Aber mit heruntergeklappter Rückseite wäre die Karte auf dem Foto nicht so schön gewesen.
Auf diesem Kerzenhalterstreifen habe ich einen weiteren Text aufgeklebt.

In the middle of the card there's a panel for birthday candles. I've covered this with the striped designer's paper and went with white candle holders and yellow candles.
Of course you have to take care when burning the candles. But the back panel of the card can also be opened up completly to lay on the table. That reduceds the chances that it catches fire. But with the back laid flat the card wouldn't have looked that pretty on the picture. 
I added another text to the candle holder.


Und ein Motiv darf auf meiner Karte natürlich auch nicht fehlen. Seit Ewigkeiten habe ich mal wieder eines der süßen Mäuse-Motive von Lili of the Valley herausgeholt. Ich liebe die!
Beim Colorieren habe ich mich an die Farben auf der Karte gehalten: weiß, schwarz, türkis und gelb. 
Das Motiv habe ich schwarz gemattet und unter die Mattung zwei Sterne, gestanzt aus dem gelb gestreiften Designpapier, geklebt.
Um die Ecke oben links habe ich noch die Worte Sending Smiles aufgestempelt.
Und zum Schluss habe ich mehr Enamel und Nuvo Drops über der Karte verteilt.

Of course this card also needed an image. I brought out one of those cute mice stamps by Lili of the Valley after a very long time. I just love those!
For the coloring I sticked to the colors I had used so far: black, white, yellow and turquoise.
I matted the image black and put two stars, cut from the striped designer's paper, under the matting.
Around the top left corner I stamped a "sending smiles".
And in the end I added more of the Enamel and Nuvo Drops to the inside of my card.

Donnerstag, 8. April 2021

Kuh müsste man sein...

 
Hallo Ihr Lieben!
Ach ja, Kuh müsste man sein! Die können kein Corona kriegen und dürfen so frei reisen. Und weil sie sonst immer ein wenig schief am Strand angeschaut wird, hat die Kuh die Chance auf fast leere Strände genutzt und ist in den Süden geflogen! Und von dort hat sie diese Karte geschickt, die ich heute auf dem Stampcorner Blog zeige. 

Hello everyone!
Well, I wish I was a cow! They can't catch the corona bug and so they are allowed to travel wherever they want. The cows always get some strange looks at the beach so this one here grabbed her chance of mostly empty beaches and flew south! And from there she sent me this card, that I'm sharing over at the Stampcorner Blog today. 

Naja, das ist natürlich alles nur ein Witz und ich habe mit dieser Karte ein wenig meinen Traum von einem Strandurlaub ausgelebt.
Für den Hintergrund habe ich den Sunburst Backdrop von LawnFawn aus weißem Cardstock gestanzt und dann mit Distress Oxide Squeezed Lemonade, Wild Honey, Broken China und Blueprint Sketch gewischt. Die Flecken sind mit einfachen Wassertropfen gemacht. 
Vor den Sonnenhintergrund habe ich zwei Lagen Wellen, gemacht mit den Stitched Waves Borders, geklebt, eine dunkel- und eine hellblaue. 
Am Himmel schweben noch zwei der Simple Puffy Cloud Frames.
Darüber kam dann der Tropical Backdrop. Ich habe ihn aus kraftfarbenem Cardstock gestanzt und die Palmen dann einzeln nochmal aus dunkelbraunem und grünem Cardstock gestanzt. Die Teile der Bäume habe ich mit Copics ein wenig schattiert, auf den Sandboden habe ich Distress Ink Ground Espresso und Gathered Twigs sowie weiße Acrylfarbe aufgespritzt.

Of course that's all meant to be funny. I simply transfered my dream of a vacation at the beach onto this card.
For the background I've die cut the Sunburst Backdrop by LawnFawn from white cardstock and inked it up with Distress Oxide Squeezed Lemonade, Wild Honey, Broken China and Blueprint Sketch. The speckles are made by adding a few drops of water.
In front of the sun I added two rows of waves, made with the Stitched Waves Borders, one die cut from light blue, the other one die cut from dark blue cardstock.
In the sky two of the Simple Puffy Cloud Frames are floating.
On top of that I've added the Tropical Backdrop. I've die cut it from craft colored cardstock and then die cut the palm trees again from dark brown and green cardstock. I used my Copics to shade these palm tree parts and spritzed some Distress Ink Ground Espresso and Gathered Twigs and also some white acrylic paint onto the sandy ground.


Und hier ist die "kuhle" Kuh. Sie hat sich sogar extra einen neuen Bikini gegönnt! Und so liegt sie nun mit Sonnenbrille unter einer Palme im Sand und wedelt sich kühle Luft zu. Sogar die Fliegen, die sie immer umschwirren, hat sie mit in den Urlaub genommen! 
Ich finde diese Kuh einfach super genial. Ich habe sie mit Copics coloriert, die Gläser der Sonnenbrille sind mit Glossy Accents überzogen. 
Für die Highlights habe ich einen weißen Gelmarker benutzt.
Zum Schluss habe ich noch den Text, der ebenfalls im Kuh-Set enthalten ist, abgestempelt und zweigeteilt auf der Karte verteilt.

And here's the cool cow. She even bought a new bikini! And so she's lying under the palm tree in the sand, trying to use a small towel as a fan. She even brought the flies, that usually fly around her, with her!
I just think this cow is super amazing. I colored her in with Copics, the glasses of the sun glasses are covered with Glossy Accents.
For the highlights I used a white gelpen.
In the end I added the saying "wishing you a cool time" - the cool is written kuhl because kuh is the german word for cow.

Mittwoch, 7. April 2021

MFT Sketch Challenge #536

 
Hallo Ihr Lieben!
Mit diesem Post darf ich es Euch verraten - ich darf diesen Monat das Designteam von MFT mit einigen Karten unterstützen. Los geht es mit dieser Karte, die nach dem Sketch der Sketch Challenge #536 entstanden ist.

Hello everyone!
With this post I am able to tell the news - I was asked to join the MFT designteam as a guest this month and support them with a few cards. I'm starting with this card, that I made for the new Sketch Challenge #536.
 
Das ist der Sketch zur Challenge:
 
This is the sketch for this challenge:


Ich habe den Sketch etwas freier interpretiert. Den Querstreifen über die Karte habe ich durch die Wolken im Hintergrund dargestellt.
Für den Hintergrund habe ich ein Stück schwarzen Cardstock mit silberner Metallic-Wasserfarbe und mit weißer Acrylfarbe bespritzt und dabei  möglichst wenig der Farbe auf dem unteren Teil des Cardstocks aufgebracht.
Den Cardstock habe ich dann auf einen weißen Kartenrohling geklebt.

I interpreted the sketch a bit loosely and glued some clouds across the card as the bigger strip that is shown in the sketch.
For the background I took a piece of black cardstock and flicked some silver metallic watercolor and white acrylic paint over it to create a starry sky, trying to add as little color as possible to the bottom of the cardstock.
Once it was dried I glued the background onto a white note card.


Und hier ist meine Szene mit den süßen Nachtschwärmern in ihrem Ballon.
Für den Mond habe ich den 2,5" Kreis aus dem A2 Circle Stax Stanzenset aus weißem Cardstock gestanzt und dann mit Distress Oxide Pumice Stone und Hickory Smoke von außen her eingefärbt. Dann habe ich die Mondkrater mit Polychromos aufgemalt. Für die weißen Highlights habe ich einen Gelpen von Sakura benutzt.
Die kleinen Wolken auf der Karte sind aus dem Stempelset High Flying Adventure, die großen Wolken hinter dem Mod aus dem Set Fox and Friends.
Und das Hauptelement sind natürlich Bär und Hasen im Heißluftballon. Es scheint fast so, als wären sie selbst ein wenig erschrocken darüber, wie hoch sie schon geflogen sind. Das süße Motiv ist aus dem Stempelset Sky High Friends und ist, genauso wie die Wolken auf der Karte, mit Copics coloriert. 
Die verschiedenen Lagen der Karte sind jeweils mit 3D Tape auf den Hintergrund und aufeinander geklebt, so dass die Szene eine schöne Tiefe erhält.
Zum Schluss habe ich noch einen der Texte aus dem Stempelset Sky High mit schwarzer Tinte auf einen Streifen weißen Cardstocks gestempelt und unter die Szene aufgeklebt.

And here's my scene with the cute night owls in their hot air balloon.
For the moon I've die cut the 2,5" circle from the A2 Circle Stax die set from white cardstock and then inked it up with Distress Oxide Pumice Stone and Hickory Smoke, getting lighter towards the center of the circle. Then I used my Polychromos to add the craters to the moon. For the white highlights I used a white gel pen by Sakura.
The small clouds on the card are from the High Flying Adventure stamp set, the big ones behind the moon from the Fox and Friends stamp set.
Of course the main element here are the bear and bunnies in their hot air balloon. It seems like they are a little shocked themselves about how high they have gone. The cute image is from the Sky High Friends stamp set and colored with Copics, as are also all the clouds on my card.
I used dimensionals to glue the different elements onto the background and on top of each other to give the scene a nice depth.
In the end I stamped one of the sayings from the Sky High stamp set onto a strip of white cardstock and glued it under the scene.

Glücksmomente

 
Hallo Ihr Lieben!
Die April-Neuheiten von JM-Creation sind da. Und ich zeige Euch heute eine Karte mit einigen davon.

Hello everyone!
The april new release by JM Creation is available and I am sharing a card on that I've used a few of them.

Hier habe ich für den Hintergrund ein Stück weißen Cardstock mit Distress Oxide Mermaid Lagoon und Tumbled Glass gewischt und etwas Wasser darübergespritzt. 
Dann habe ich den Cardstock so zugeschnitten, dass er auf die größte der Briefmarkenstanzen passt. Diese beiden Lagen habe ich dann auf einen hellblauen Kartenrohling geklebt.

Here I've inked up a piece of white cardstock with Distress Oxide Mermaid Lagoon and Tumbled Glass and spritzed some water over it.
Then I've cut the background to a size to make it fit onto the largest of their stamp dies.
Both layers are glued onto a light blue note card.


Den tollen Heißluftballon habe ich aus weißem Cardstock gestanzt und die inneren Teile sowie auch den Außenrand des Korbes mit Copics coloriert. 
Die Wolken sind ebenfalls aus weißem Cardstock gestanzt, Augen und Mund schwarz hinterlegt und mit Copics habe ich die Bäckchen hinzugefügt. 
Den Regenbogen habe ich aus silberfarbenem Glitzercardstock gestanzt und jeden der Bögen in einem anderen Pinkton ebenfalls mit Copics eingefärbt. So habe ich einen glitzernde, rosafarbenen Regenbogen erhalten, den ich hinter Heißluftballon und Wolken geklebt habe.
Unter den Heißluftballon habe ich noch ein Banner mit dem Wort Glücksmomente, ein Stempel aus einem ebenfalls neuen Stempelset, geklebt.
Zum Schluss habe ich kleine rosafarbene Herzpailetten sowie kräft-pinke runde Pailetten als Deko auf der Karte verteilt.

I've die cut the great hot air balloon from white cardstock and then colored the inner parts and also the outlines of the basket with my Copics.
The clouds are also die cut from white cardstock. I put some black cardstock behind the eyes and mouth and added some cheeks with my Copics.
The rainbow is die cut from silver glitter cardstock. Then I used different pink Copic markers over the silver glitter cardstock to end up with a glittery pink rainbow that I've glued behind the clouds and hot air balloon. 
Under the balloon I've added a banner with a "happy moments" text stamped onto it.
As a finishing touch I've glued some small heartshaped sequins and bigger round ones in a bright dark pink to my card.

Dienstag, 6. April 2021

You were made for me

 
Hallo Ihr Lieben!
Heute zeige ich auf dem Stamping-Fairies Blog diese Karte. Die Vögel zwitschern nun schon so schön, auch abends, was mich zu dieser Karte inspiriert hat.

Hello everyone!
Today I am sharing this card over at the Stamping-Fairies Blog. Outside the birds are singing so nicely, also in the evenings, that I had to make a card with some love birds.


Hier habe ich eine Maske für den Mond erstellt, indem ich einen Kreis aus einem Blatt Papier ausgestanzt habe. Dann habe ich von außen her ganz zart Distress Oxide Pumice Stone und Hickory Smoke aufgewischt, die Mitte des Kreises habe ich weiß gelassen.
Mit Copics habe ich dann noch ein paar Krater frei Hand aufgemalt. 
Für den Himmel habe ich den fertigen Mond mit dem zuvor ausgestanzten Kreis abgedeckt und, nach außen dunkler werdend, den Himmel mit Distress Oxide Tumbled Glass, Broken China, Blueprint Sketch und Chipped Sapphire aufgewischt. Dann habe ich silberne Glitzer-Wasserfarbe und weiße Acrylfarbe auf den blauen Himmel als Sterne aufgespritzt. 
Für den unteren Bereich der Karte habe ich den Himmel mit der Drifts and Hills Stencil abgedeckt und den unteren Bereich deckend mit Distress Oxide Black Soot gewischt. Dann habe ich am Übergang von Hügel zu Himmel noch einige der Herzblumen und Gras aufgestempelt.
Den Zweig habe ich dann quer über den Mond mit schwarzer Tinte aufgestempelt und mit Polychromos in Schwarz und ein wenig dunkelgrau "ausgemalt" - ich denke, coloriert kann man das nicht wirklich nennen. Ebenso habe ich die Blumen im Gras eingefärbt.
Die süßen Vögel aus dem Stempelset Being with You von MFT sind extra auf weißen Cardstock gestempelt, mit Copics coloriert, ausgeschnitten und auf den Ast aufgeklebt. Natürlich hätte ich sie auch direkt aufstempeln können, dann wäre aber das Wischen des Mondes und Himmels um einiges schwieriger gewesen. So konnte ich sie schön leuchtend colorieren.
Das Herz, ebenso wie alle Motive auf dieser Karte auch aus dem Stempelset Being with You, ist rosa coloriert, ebenfalls ausgeschnitten und über die Vögel geklebt.

Here I created a mask for the moon by simply die cutting a circle from a piece of copy paper. Through this stencil I inked up the moon with Distress Oxide Pumice Stone and Hickory Smoke. I only added a small amount of color and left the center of the moon white.
I used my Copics to hand draw a few craters to the moon.
For the sky I covered the finished moon with the circle I cut from the copy paper earlier, then inked up the white cardstock around the moon. I started close to the moon, getting darker towards the edges of the cardstock. To create the sky I used Distress Oxide Tumbled Glass, Broken China, Blueprint Sketch and Chipped Sapphire. To create the stars I flicked some silver shimmer waterpaint and some white acrylic paint onto the night sky.
For the lower area of the card I covered the sky with the Drifts and Hills stencil and inked up the whole lower area with Distress Oxide Black Soot. To the top of the the hill I added a few heartshaped flowers and grass.
Then I stamped the branch across the moon using black ink and "colored" it with Polychromos. I used a black and a dark grey pencil here and used them also to color the flowers in the grass.
The cute birds from the Being with You stamp set by MFT were stamped onto white cardstock, colored with Copics, cut out and glued onto the branch. Of course I could have stamped them directly onto the background cardstock but that would have made creating the moon and sky a lot harder. By stamping them onto white cardstock I was able to color them dark but quite bright.
The heart, as are all the images from the stamp set, is from the Being with You stamp set also. I colored it pink, cut it out and glued it over the birds' heads.


Zum Schluss fehlte meiner Karte noch ein Text. Ich habe das You aus dem Stempelset Love you Big Time mit weißem Embossingpulver auf den schwarz gewischten Hügel embosst, darunter kam der Rest des Textes. Auch der ist weiß embosst, der Stempel stammt wieder aus dem Stempelset Being with You. Das You am Anfang dieses Stempels habe ich einfach nicht mit abgestempelt, da ich es ja bereits durch das große You ersetzt hatte.
Neben das Y von You habe ich dann noch ein weiteres Herz, gestanzt aus rosafarbenem Cardstock, aufgeklebt.

In the end my card needed a text. I white heat embossed the You from the Love you Big Time stamp set onto the black hill, then added the rest of the text under it. Also this is white heat embossed, using another stamp from the Being with You stamp set. I simply left out te You at the beginning of this stamp since I had already used the large one.
Next to the Y I glued another heart, cut from pink cardstock.

Samstag, 3. April 2021

Stempeleinmaleins - Ausgabe vom 3. April 2021

 
Hallo Ihr Lieben!
Bei Stempeleinmaleins wird heute gehüpft! Und nein, wir sind nicht zu Osterhasen mutiert, es geht um die springende Explosionbox! Die sieht im ersten Moment aus wie eine normale Box, nach dem Abziehen des Deckels springt sie aber fröhlich in die Luft und steht dann innen-nach-außen vor Euch und die Deko wirkt, wie auf ein Podest gestellt. Und wenn die Box vor dem Verschließen auch noch mit Konfetti oder kleinen Streuteilen gefüllt wurde, ist der Effekt noch toller, denn die fliegen dann fröhlich durch die Luft.

Hello everyone!
Over at Stempeleinmaleins we're jumping today! And no, we didn't change into easter bunnies, it's the jumping exlosion box that we're making today that's jumping (as the name indicates). First the box looks like a regular box but after the lid gets pulled off the box jumps up into the air and is landing inside out. The decoration on the inside is like put up on a podest. And when the box was filled with confetti oder some small die cut pieces the effect is even better because those get thrown out when the box jumps.

So sieht das dann aus: 

And this is the box jumping:


Meine Box ist weiß und mit rosa-weiß kariertem Designpapier beklebt. Oben auf den Deckel habe ich die schönen Blumen von MamaElephant auf ein Doily geklebt und einen Text dazwischen angeordnet. Ein paar hellblaue Halbperlen runden die Deko ab.

My box is white and covered with a pink and white checked patterned paper. I've glued those beautiful flower images by MamaElephant onto a doily to decorate the lid. Between the flowers I've added a "congratulations" text and added a few light blue pearls here.


Die tollen Blumen am unteren Rand der Box sind auf das Designpapier gedruckt und reichten mir hier als Deko. 
Um den Deckel habe ich etwas hellblaue Spitze sowie hellblaues Satinband geklebt, das ich vorne dann zu einer Schleife gebunden habe.

Those beautiful flowers at the bottom edge of the box were printed on my designer's paper - and for me those were enough of decorations here.
Around the lid I've glued some light blue lace and also some light blue ribbon that I've tied to a bow on the front.


Und so sieht meine Box nach dem Springen aus. 
Auf die Seitenteile habe ich wieder Spitze und Halbperlen geklebt. Außerdem befindet sich auf jeder der vier Seiten ein Teil eines "Alles Liebe und Gute zum Geburtstag für Dich!" Textes und ein ausgestanztes dunkelpinkes Herz.
Vor dem endgültigen Verschenken werde ich noch dunkelpinke Herzen in die Box streuen, so dass diese beim Springen herausgeschleudert werden.

And this is my box after it jumped.
Again I've glued lace and pearls onto the sides. On each of the sides is a part of a "all the best wishes for you on your birthday" text and I've also glued down a dark pink heart here.
Before I will give the box to its recipient I will put quite a few small die cut dark pink hearts into the box so those get thrown out when the box jumps.


Als "center piece" für diese Box eignen sich super 3D Objekte. Ich habe hier einen Espresso-To-Go Becher mit Designpapier beklebt und hellblaues Satinband um die oberen Rand geklebt, das ich vorne zur Schleife gebunden habe. In den so entstandenen Blumentopf habe ich dann eine halbe Styroporkugel geklebt. Und auf der habe ich einen Blumenstrauß aus vielen bunten Blumen arrangiert. Rund um den Blumentopf habe ich dann noch pinkfarbene Papier-Shredderstreifen angebracht.

3D objects are perfect for the inside of this box. I've covered an Espresso-To-Go cup with designer's paper and wrapped some light blue ribbon around the brim, again making a bow with it at the front. Then I've glued half a styrofoam ball into this flower pot and arranged a bouquet from lots of colorful flowers on this ball.
Around the flower pot I've glued down lots of pink strips of paper.

Donnerstag, 1. April 2021

Happiness

 
Hallo Ihr Lieben!
Heute zeige ich auf dem Stampcorner-Blog eine Karte mit dem süßen Gnom in der Tasse. Und da bot sich generell das Thema Kaffee natürlich an!

Hello everyone!
Today I am sharing this card with the cute gnome in a cup over at the Stampcorner Blog. And with this image the theme coffee was like indicated.

Ich habe hier ein Stück weißen Cardstock schwarz gemattet und auf einen weißen Kartenrohling geklebt. 
Im Hintergrund habe ich mit der Radiating Sunrise Stencil von MFT und Distress Oxide Tumbled Glass ein paar Strahlen aufgewischt, die hinter dem Gnom leuchten.
Unter der Tasse habe ich zwei Streifen Designpapier aufgeklebt, die ich aus zwei Bögen des tollen Designpapierpack von Stampcorner geschnitten habe. 
Den Text auf der Karte habe ich am PC geschrieben und das Wort Coffee mit einer Stanze geschrieben. Das habe ich je einmal aus schwarzem und weißem Cardstock gestanzt und leicht versetzt übereinander geklebt, so dass es sich gut genug vom dunklen Designpapier abhebt.

Here I've matted a white piece of cardstock black and glued both layers onto a white note card.
In the background I've added a few rays using the Raditating Sunrise Stencil by MFT and Distress Oxide Tumbled Glass. Now it looks like they are coming from the gnome in the cup.
Under the cup I've added two strips of patterned paper that I've cut from two sheets of the great desinger's paper pad by Stampcorner.
The text on the card is written on the PC and printed with my printer. I've used a die cut for the word coffee. I've die cut it once from black and once from white cardstock and glued them on top of each other just a tad bit off so there is enough contrast to the strip of dark designer's paper.


Hier ist der süße Gnom! Ich habe ihn mit Copics in blau und rosa coloriert und ein paar Highlights mit einem weißen Gelpen hinzugefügt.
Zum Schluss habe ich noch kleine, rosafarbene Herzen-Pailette auf der Karte verteilt.

Here's the cute gnome. I've colored him with Copics in blue and pink and added some highlights with a white gelpen.
In the end I've added some light pink, small heart-shaped sequins to the card for decorations.
 

Dienstag, 30. März 2021

A Mice Day to Celebrate

 
Hallo Ihr Lieben!
Es war mal wieder Zeit, meinen Geburtstagskarten-Vorrat ein wenig aufzustocken. Und so ist diese Karte entstanden, die ich heute auf dem Stamping-Fairies Blog zeige.

Hello everyone!
It was time to add to my stock of birthday cards. And so I made this card, that I'm sharing over at the Stamping-Fairies Blog today. 

Die kleine Maus auf meiner Karte staunt nicht schlecht, als sie, bewaffnet mit Luftballon und Partyhut, in den Wald geht und dort ihre eigene Überraschungsparty mit bunten Lampions vorfindet...
Hier habe ich ein Stück weißen Cardstock mit Distress Oxide Stormy Sky, Faded Jeans, Chipped Sapphire und ein wenig Black Soot zum Nachthimmel umfunktioniert. Mit weißer und silberner Metallik-Aquarellfarbe habe ich die Sterne aufgespritzt. 
Im unteren Bereich habe ich mit der Grassy Edges Stencil von MFT und Distress Oxide Black Soot einen Grashügel aufgewischt. Darüber, etwas nach unten versetzt, habe ich eine weitere Lage Gras geklebt, die ich mit einer der Grassy Hills Stanzen aus dunkelgrauem Cardstock gestanzt habe.
Auf den fertigen Hintergrund kamen ein paar Birch Trees, die ich aus grauem Cardstock gestanzt und mit einem weißen Gelmarker mit ein paar Details versehen habe.
Und darüber habe ich dann den neuen Balloon Cover-Up Hintergrund benutzt. Hier allerdings nicht als aufsteigende Luftballons, sondern auf den Kopf gestellt als hängende Lampions. Dazu gleich mehr. Den Balloon Cover-Up Hintergrund habe ich dann nocheinmal aus schwarzem Cardstock gestanzt, die Ballons herausgeschnitten und nur den Rahmen auf den Rahmen darunter geklebt. Dann kam alles auf einen weißen Kartenrohling.

The little birthday mouse on my card is really surprised when she walks into the woods to find out that her friends organzized a surprise birthday party with colorful lanterns.
Here I've inked up a piece of white cardstock with Distress Oxide Stormy Sky, Faded Jeans, Chipped Sapphire and a hint of Black Soot to create a night sky. The stars are made from silver metallic watercolor and white paint that I've flicked onto the background with a paint brush. 
In the lower area of the cardstock I used the Grassy Hills stencil and Distress Oxide Black Soot to create a hill. On top of that, a little down from the inked edge, I've glued down another layer of grass, die cut with one of the Grassy Hills Edges from dark grey cardstock. 
Onto the finished backbround I've glued a few birch trees that I've die cut from grey cardstock. Then I added a few deatils with a white gel marker.
And then I've put the new Balloon Cover-Up on top of the background. But here I didn't use it as a frame with raising balloons, instead I've turned it upside down and used it as hanging lanterns. More about that soon. I've die cut the Ballon Cover-Up die again from black cardstock, cut off the balloons and glued that frame on top of the Cover-Up die cut. Then I've glued everything onto a white note card.


Und hier sind die bunten, leuchtenden Lampions. Man kann wirklich nicht auf den ersten Blick erkennen, dass es eigentlich Luftballons sind, oder?
Ich habe diese Lage des Balloon Cover-Ups aus weißem Cardstock gestanzt und die rot colorierten Lampions/Luftballons noch einmal extra aus weißem Cardstock. Dann habe ich sie mit Copics coloriert und die roten Lampions mit dünnem 3D Tape aufgeklebt. 

And here are the colorful, glowing lanterns. You really can't tell right away that these are balloons turned upside down, right?
I've die cut this layer of Balloon Cover-Up from white cardstock and then die cut the lanterns/balloons that I've colored red again individually from white cardstock. Then I've colored all of them with Copics and glued down the red ones with thin dimensionals.


Die kleine Maus und der Text sind aus dem Stempelset Mice Day to Celebrate.
Der Text ist mit weißem Embossingpulver auf schwarzen Cardstock embosst.
Die Maus  habe ich mit Copics coloriert, ausgeschnittenund hinter die graue Lage Gras geklebt.

The little mouse and the text are from the Mice Day to Celebrate stamp set.
The saying is white heat embossed onto black cardstock.
The mouse is colored with Copics, then I've cut her out and glued her behind the layer of grey grass.

Sonntag, 28. März 2021

Geburtstagsgrüße von Herzen

 
Hallo Ihr Lieben!
Es ist wieder der letzte Sonntag im Monat und heute zeigen wir vom JM-Creation DT, was uns mit den Stempeln/Stanzen, die wir diesmal für das Monatsprojekt erhalten haben, eingefallen ist. Ich habe eine Geburtstagskarte gemacht. 

Hello everyone!
It's the last sunday of the month and that means we from the JM Creation DT are sharing what we made out of the stamps/dies we got for the monthly project. I've made a birthday card from them.

Das Motiv hätte sich auf jeden Fall für eine Frühlingskarte angeboten. Das war auch die ursprüngliche Idee, aber dann hat die sich verselbständigt und wurde zu einer Geburtstagskarte. Farblich hatte ich mich für blau, weiß und schwarz mit ein wenig grün entschieden. Das sah aber irgendwie zu fad aus. Da die Mitte der Blume gelb coloriert und auch die beiden ausgestanzten Blumen goldgelb hinterlegt sind, habe ich kurzerhand mit den Ranger Alcohol Inks Lemonade und Butterscotch einen gelben Alcohol Ink Background gefertigt. So sieht das ganze viel fröhlicher aus.

Well, the image would have been great for a spring card. And that was my original intention, but then the card had its own ideas and turned into a birthday card. As colors I had picked blue, white, black and a hint of green. But that looked a bit plain. Since the center of the flower is colored in yellow and also the two die cut flowers got a golden center I've brought out my Alcohol Inks and used Lemonade and Butterscotch to create a bright yellow alcohol ink background. That looks so much friendlier!


Das Motiv ist aus dem Stempelset Junge und Mädchen. Ich habe ihn hier als schüchternen Überbringer eines selbstgepfückten Geburtstagsblümchens verwendet. Er ist mit Copics coloriert. 
Ich habe ihn nach dem Ausschneiden auf ein Stück weißen Cardstock geklebt, auf den ich mit schwarzer Tinte den Schrift Geburtstag Hintergrund aufgestempelt habe. Dann habe ich den Cardstock blau gemattet.
Das Stanzenset, das wir für dieses Monatsprojekt verwenden, ist das Set Zweig mit Blüten. Den Zweig habe ich aus grünem Cardstock, die Blüten aus blauem Cardstock gestanzt. Und auch der schwarze Aufleger im Hintergrund ist mit einer der Stanzen aus diesem Set gemacht. 
Hinter den blau gematteten Cardstock mit dem aufgestempelten Geburstagstext habe ich ein paar Kreise gesetzt. Die sind mit einem der Stempel aus dem Set Gesprenkelter Kreis mit hellblauer Tinte gemacht und rund ausgestanzt. 
Zwischen die Lagen habe ich noch einige der feinen Sterne, die die Stanze Sternrahmen stanzt, geklebt. Sie sind aus hellblauem Glittercardstock und lagen zufällig noch von einem anderen Projekt auf meinem Tisch. Die Stanze macht mit einem Mal so viele der Sternrahmen, da bleibt auf jeden Fall was für später übrig!
Auch ein Text durfte nicht fehlen. Das Von Herzen ist aus dem gleichnamigen Stempelset. Ich habe ihn mit weißem Embossingpulver auf schwarzen Cardstock embosst. ausgeschnitten und geteilt auf die Karte geklebt.
Zum Schluss habe ich noch ein paar hellblaue Halbperlen auf dem gelben Hintergrund verteilt.

I thought this image would make a cute, shy flower giver. He picked that birthday flower all by himself! I've colored him with Copics.
After cutting him out I've glued him onto a piece of white cardstock onto which I've stamped a birthday text background with black ink. Then I've matted this panel with blue cardstock.
The die set we're using for the march monthly project is a set of a branch and flowers. I've die cut the branch from green cardstock, the flowers from blue cardstock. And also the black rectangle in the background is made with a die from this set.
Behind the blue matted cardstock with the stamped on birthday text I've put a few dotted circles. I've stamped those with light blue ink and punched them out.
Between the layers I've added a few of the thin stars made with the star frame die. They are die cut from light blue glitter cardstock - and were on my desk from a previous project. This die cut so many star frames at once that there are always a few left overs for a future project!
Of course my card needed a text. This one means "from the heart". I've white heat embossed it onto a piece of black cardstock, cut it out and into two pieces and then glued those onto the card.
In the end I've also added a few light blue pearls onto the yellow alcohol ink background.

Samstag, 27. März 2021

Stempeleinmaleins - Ausgabe vom 27. März 2021

 
Hallo Ihr Lieben!
Das ist die Karte, die ich nach der neuen Sketch-Inspiration, die wir heute beim Stempeleinmaleins für Euch haben, gewerkelt habe.

Hello everyone!
This is the card that I made following the new sketch that we're sharing over at Stempeleinmaleins today.

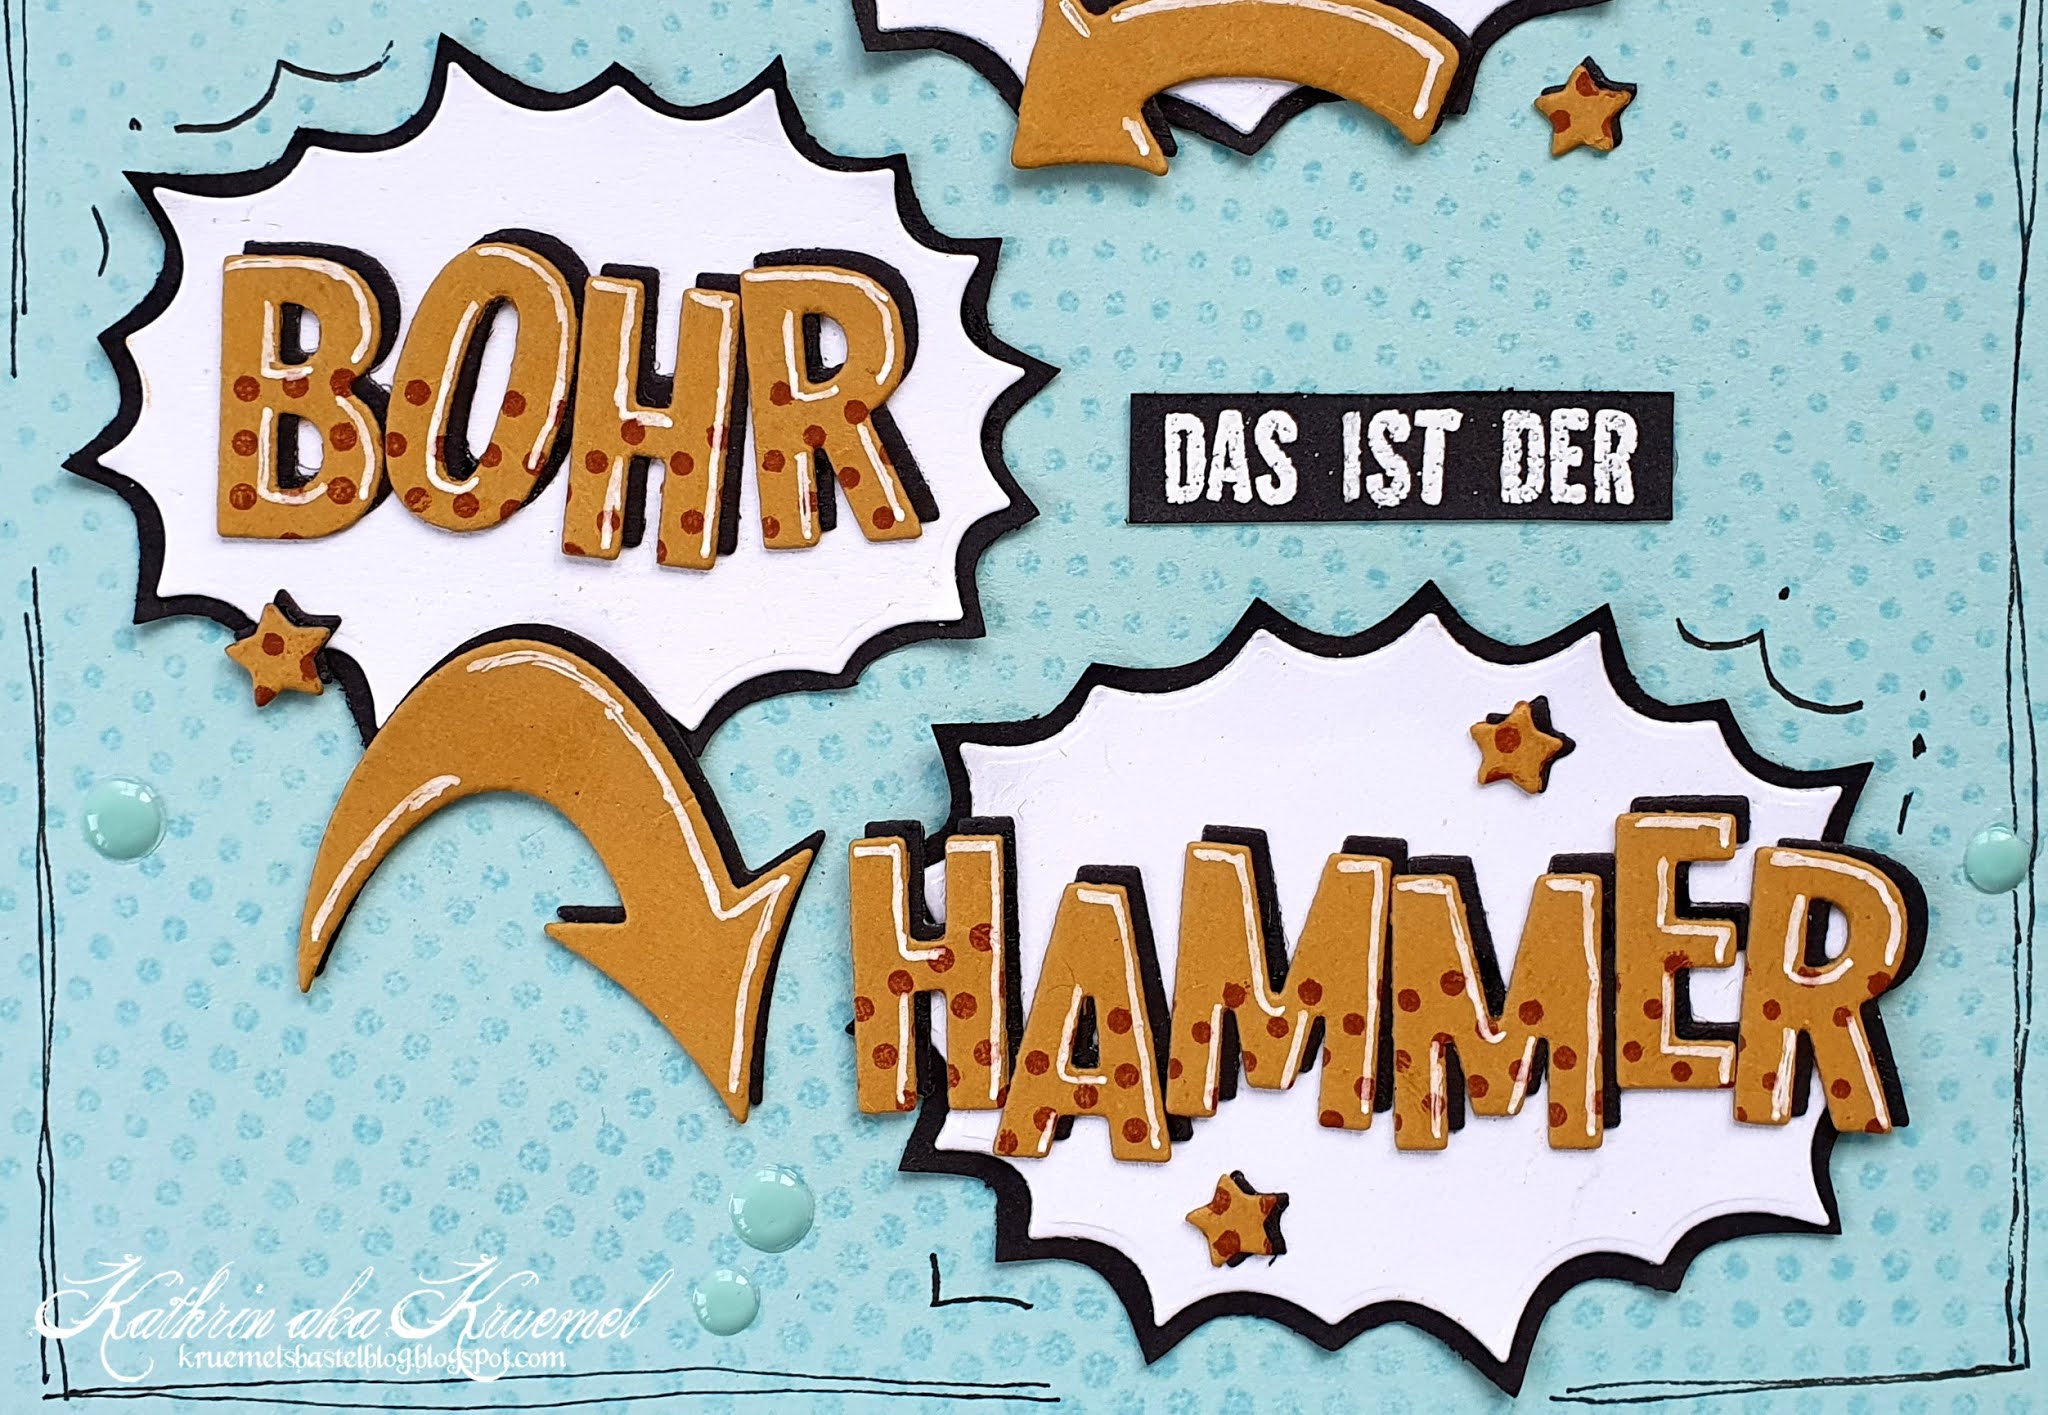
Das ist/war die Geburtstagskarte für meinen Mann. Und bevor Ihr mich jetzt berichtigt - ich weiß, dass man "Boah" eigentlich anders schreibt. Aber beim Gartengroßprojekt letzten Sommer ist der Bohrhammer meines Mannes kaputt gegangen und er hat sich einen neuen gewünscht. Und sorry, aber dieses Wortspiel konnte ich nicht auslassen!
Ich habe hier helltürkisfarbenen Cardstock mit Distress Ink Tumbled Glass und dem Radiating Halftone Stempel von MFT bestempelt. Dann habe ich ihn schwarz gemattet und auf einen quadratischen weißen Kartenrohling geklebt.

This is/was the birthday card for my husband. Well, how to explain that text. Here people say "boah, das ist der Hammer" when they want to express that they are surprised or that something is really amazing. Well, my "boah" is written different. The way I've written it, it gets pronunced the same but a Bohrhammer is a hammer drill. During our big garden project last summer my husband's hammer drill broke and he asked for a new one for his birthday. So this card is saying "it's your birthday - wow, that's amazing", just spelled like "it's your birthday - that's a drill hammer". I have no idea if I explained that in a way that it makes sense, but it does in german. And I just couldn't pass that occassion to use a play with words like that. 
Here I've stamped the Radiating Halftone Background by MFT onto light turquoise cardstock using Distress Ink Tumbled Glass. Then I've matted it black and glued it onto a square white card base.


Die drei Kreise auf dem Sketch habe ich durch diese comichaften "Blasen" ersetzt. Die sind aus weißem Cardstock gestanzt und schwarz gemattet. In die obere habe ich ein gestanztes DU sowie ein "hast Geburtstag" geklebt. 
Die Buchstaben sind aus senffarbenem Cardstock gestanzt und mit einem weiteren Buchstaben, gestanzt aus schwarzem Cardstock, hinterlegt. Außerdem habe ich im unteren Bereich nochmal kleine Punkte mit dem Radiating Halftone Background aufgestempelt. Ebenso habe ich die kleinen Sterne gemacht.
Das "hast Geburstag" ist weiß auf schwarzen Cardstock embosst. 
Quer über diese Blase, unter den Text, habe ich einen Pfeil geklebt, der ebenfalls versetzt schwarz gemattet ist.

I've replaced the three circles that are shown in the sketch with three of those comic style bubbles. I've die cut those from white cardstock and matted them black, Into the upper right one I've added a "it's your birthday" text. 
I've die cut the large letters from mustard colored cardstock and put the same letters cut from black cardstock underneath, moving them just a bit up and to the right. I've also stamped dots onto the lower area of the letters using the Radiating Halftone Background stamp again. Thel little stars are made the same way.
The rest of the text is white heat embossed onto black cardstock.
Across this bubble I've glued an arrow that's also matted black in the same way as the letters.


Die anderen beiden Blasen sind ähnlich gestaltet. Den Streifen mit dem Text "das ist der" habe ich zwischen den Blasen aufgeklebt. Die Idee einer meiner Töchter, den Text "da(s) ist der" zu schreiben kam leider zu spät. Hätte mir fast noch besser gefallen!
Auch hier habe ich weider einen gelben Pfeil integriert.
Zum Schluss habe ich mit einem schwarzen Fineliner einen Rahmen um die Karte gemalt und außerdem ein paar hell-türkisfarbene Nuvo Drops aufgebracht.

The other two bubbles are made the same as the first one. The strip with the "that's" text ist glued in the middle of the three bubbles. One of my daughters had the idea to write that part with the s in brackets, which would have turned it into another saying again. With the s it would have meant "wow, that's amazing", without it would have meant "here's the drill hammer". Unfortunately the card was already finished - I would have loved her version even a tad bit better!
Also here I've added a yellow arrow.
In the end I've drawn a frame around the card with a black fineliner and glued a few light turquoise Nuvo Drops onto it.

Donnerstag, 25. März 2021

Ostergnome

 
Hallo Ihr Lieben!
Ostern steht vor der Tür! Und im Fall meiner Karte, die ich heute auf dem Stampcorner-Blog zeige, sitzen die Ostergnome vor der Tür bzw. dem Pilzhaus. Ich finde die Gnome genial und mal was anderes als "immer nur Hasen". 

Hello everyone!
Easter is just around the corner. And on this card, that I'm sharing over at the Stampcorner Blog today, the easter gnomes are waiting with some beautifully decorated eggs in front of their house for the easter bunny to come by. I love these gnomes and they are something different than the usual easter bunny.

Hier habe ich für den Hintergrund die neue Sunburst Backdrop Stanze von LawnFawn benutzt und aus weißem Cardstock gestanzt. Dann habe ich von der Mitte her Distress Oxide Worn Lipstick und Spun Sugar aufgewischt und mit weißer Acryl- und pinkfarbener Metallic Watercolor Spritzer auf dem Hintergrund verteilt. 
Dann habe ich das süße Mushroom House von LawnFawn zum Gnomhaus gemacht. Es ist größtenteils durch die Gnome verdeckt, dennoch sieht man, dass es nicht nur ein normaler Pilz ist, und das nicht nur durch den Schornstein am Pilzhut.
Die nächste Lage davor bildet ein Grashügel, gestanzt aus grauem Cardstock. Dafür habe ich die Slimline Grassy Hills Stanze benutzt und mir den Teil des langen Stanzteils für meine Karte ausgesucht, der für mich am besten passte.
Ihr seht schon, farblich habe ich mich hier an Grau, Rosa und Rot gehalten. Trotzdem finde ich die Karte schön fröhlich und frühlingshaft. 

Here I used the new Sunburst Backdrop die by LawnFawn to create my background. I've die cut it from white cardstock and then inked it up with Distress Oxide Worn Lipstick and Spun Sugar. With white paint and pink metallic watercolor I've added some splatters to the background.
Then I've glued the cute Mushroom House by LawnFawn onto the background and turned it into a gnome's home. It's mostly covered by the image but you can still tell that it's no regular mushroom, and that not only because of the chimney I've added to the mushroom's hat.
The next layer is a grassy hill, die cut from grey cardstock. I've used one of the Slimeline Grassy Hills dies and simply picked the part of the long die cut paper that I liked best on my card.
As you can tell I picked grey, pink and red as the color scheme of this card. And nontheless I thinks it's a happy and spring-ish one.


Und hier sind die tollen Gnome mit den Hasenohren. Ich finde, sie haben einen grandiosen Job beim Bemalen der Eier gemacht!
Coloriert habe ich sie mit Copics, dann habe ich sie ausgeschniten und vor den grauen Grashügel geklebt. 
Nun fehlte noch ein Text. Dafür habe ich die Worte Frohe Ostern aus weißem und rotem Cardstock gestanzt. Ich habe dafür ein Alphabet-Stanzenset von MFT benutzt, das dem Bitty Banners Alphabet Set sehr ähnlich ist, auch von der Größe her. 
Ich habe die roten auf die weißen Buchstaben geklebt, die Worte vor bzw. teilweise auf den Gnomen aufgebracht und um Schluss mit einem weißen Gelpen Highlights gesetzt.

And these are the cute gnomes with their bunny ears. I think they did a great job coloring the easter eggs!
I used my Copics to color the image, then cut it out and glued the gnomes in front of the grey grassy hill.
Now all that was missing was a text. I've die cut the letters for the words "happy easter" from white and red cardstock. I used a Alphabet die set by MFT here, that is pretty equal to the Bitty Banners die set, also in size.
I've glued the red letters on top of the white ones, put the words together in front of and also on top of the gnomes and then added a few highlights with a white gel pen.

Mittwoch, 24. März 2021

Häschen Hüpf!

 
Hallo Ihr Lieben!
Heute habe ich ein weitere Osterprojekt für Euch: eine kleine Box mit Hasenohren.

Hello everyone!
Today I have another easter projekt to share: a little box with bunny ears.


Für die Box habe ich teilweise die Explosionbox Mini Stanzen von JM-Creation benutzt. Teilweise deshalb, weil ich nur die Stanze für den Deckel sowie die Schmetterlinge im Set verwendet habe. Die Box selbst habe ich aus Chipboard gemacht und auch die Größe verändert, deswegen habe ich diesen Teil per Hand geschnitten.
Oben in die Box habe ich Hasenohren eingearbeitet. Auch die sind mit einer Stanze gemacht. In den Deckel habe ich einen Schlitz geschnitten, die Ohren von oben hindurchgeschoben und die unteren Teile geknickt und von innen in den Deckel geklebt.
An die Ohren  habe ich ein kleines Schleifchen gebunden und davor einen Schmetterling gesetzt.

For the box I used the Mini Explosionbox die by JM-Creation. Well, at least partly. I only used the lid die and the butterflies from this set. The box itself is made from chipboard and I also changed the heigth, so I cut this by hand.
To the lid I've glued some bunny ears that I've also made with a die. I've cut a slit into the lid, put the ears through it from the top, folded the bottom pieces over and glued them to the inside of the lid.
I've tied a little bow to one of the ears and also glued a little butterfly to the lid.

Naja, und was so ein echter Hase sein will, der muss natürlich auch hüpfen können. Kann er!

Well, a real bunny needs to jump, right? It does:


Ist die springende Explosionbox nicht genial? Und auch das Gewicht der Schokoeier war kein Problem.

Isn't this jumping explosion box genius? And even the weight of the chocolat eggs wasn't a problem.


Die Innenteile der Box sind, genauso wie die Außenseiten, mit rosafarbenem Designpapier mit hellrosafarbenen Flecken beklebt. Außerdem habe ich drei der Seiten mit Schmetterlingen, gestanzt aus weißem Cardstock, dekoriert.

The inner sides of the box, as well as the ones on the outside, are covered with a soft pink patterned paper with light pink dots. I also glued little butterflies, die cut from white paper, to three of the inner sides.


Oben auf die Box - oder besser gesagt innen hinein, denn dort ist diese Lage wenn die Box geschlossen ist, habe ich geshredderte Papierstreifen in Kraft aufgeklebt und sie als Nest für zwei Schokoladeneier benutzt.
Außerdem habe ich auf die vierte der inneren Seiten noch gestanzte "Süße Grüße" aufgeklebt.

On top of the box - or better inside since this is where this platform is located when the box is closed - I've glued some shredded craft colored paper strips and used those as a nest for my two chocolat eggs. And I als die cut the words "sweet greetings" and glued them on the 4th of those inner sides.