Sonntag, 20. August 2023

Stampcorner August-Challenge

 
Hallo Ihr Lieben!
Auch im August haben wir eine neue Stampcorner-Challenge für Euch - diesmal mit dem Thema Designpapier. Ob Ihr es als Fokus, Grundlage Eurer Karte oder nur als schmückendes Beiwerk verwendet, bleibt dabei Euch überlassen.

Hello everyone!
Also this month there is a new Stampcorner Challenge - this time with "patterned paper" as the theme. You can use it as a focal point, as the base or even as a background or embellishment, it's totally up to you.

Nun, meine Karte war mal wieder ganz anders geplant - ich wollte eine grafische Karte mit Designpapier-Elementen und einem Text. Aber irgendwie kam es mal wieder anders.
Für den Hintergrund habe ich in einen Stück weißen Cardstock Linien geprägt. Ich habe dafür einen alten Embossingfolder von Sizzix verwendet, man kann aber genauso gut den Cardstock in ein Scoring Board legen, in regelmäßigen Abständen Falzlinien ziehen und den Cardstock dann umdrehen. Der Look ist fast identisch, mit dem Scoring Board dauert es nur ein klein wenig länger.
Im unteren, hauptsächlich linken Bereich des weißen Cardstocks habe ich dann noch etwas schwarze Metallic Watercolor aufgespritzt.

Well, my card was once again planned completly different - I had planned to make a very graphic card with elements of patterned paper. But then everything turned out differently.
For the background I dry embossed strips into a piece of white cardstock. I used an old embossing folder by Sizzix here, but you can as well put the cardstock into a scoring board, make fold lines with even spaces inbetween and then turn the cardstock over. The look is nearly the same, it just takes a little bit more time.
Onto the lower, mainly left area of the cardstock I then spattered some black metallic watercolor.


Aus Bögen aus dem Paper Pack 02 von Stampcorner habe ich mit dem Triangle Stax Stanzenset von MFT drei Dreiecke in verschiedenen Größen gestanzt und außerdem noch einen Streifen aus einem weiteren Papier geschnitten. Dabei habe ich darauf geachtet, dass die Papiere aufeinander liegend vom Muster her fortlaufend sind. Das mittlere Dreieck  habe ich dann schwarz gemattet und sie aufeinander geklebt, den Designpapierstreifen habe ich dahinter gesetzt. Das kleinste Dreieck ist übrigens mit 3D Tape befestigt.
Aus schwarzem Cardstock habe ich dann fünfmal das Wort Danke gestanzt und gestackt. Als Untertext hae ich einen der Texte aus dem Set Kleine Worte weiß auf schwarzen Cardstock embosst. Und als Akzent habe ich noch einen gebogenen Pfeil aus schwarzem Cardstock gestanzt.
Und dann fehlte mir auf der Karte doch ein Motiv. Also habe ich in meinen Stampcorner-Sets geschaut, was passen könnte und mich für den "schlauen Fuchs" aus dem Stempelset Klugscheißer entschieden. Den konnte ich auch farblich annähernd passend colorieren, ohne dass er komisch aussieht. Dafür habe ich Copics benutzt, die Highlights sind mit einem weißen Gelstift gemacht. Außerdem habe ich die Brillengläser mit Glossy Accents überzogen.

I die cut triangles in three differents sizes from papers from the Paper Pack 02 by Stampcorner, using dies from the Triangle Stax die set by MFT. I also cut a strip from a different design of the pack. When die cutting the triangles I made sure, the pattern would be continuous once I put my triangles on top of each other. I put a black mat behind the middle sized triangle, then put the triangles on top of each other and the strip behind them. To attach the smallest triangle I used foam tape.
Then I die cut the german word thanks five times from black cardstock and stacked the words. As a subtext I white heat embossed a "you're amazing" onto a strip of black cardstock and as an accent piece I also die cut a bended arrow from black cardstock.
An then it just felt like there was an image missing on my card. So I went through my Stampcorner sets to see what might fit and decided to go with this cute fox. Also because I knew I'd be able to color him in quite matching colors without him looking strange. I used Copics for the coloring and a white gel pen for some highlights. I also covered the glasses with Glossy Accents.


Dann habe ich den Fuchs hinter das Wort Danke gesetzt und den Pfeil sowie den kleinen Textstreifen wieder mit 3D Tape darunter geklebt.
Als Deko habe ich einige schwarze Glitzersteine sowie zwei rote Herzen über dem Fuchs angebracht. Dann habe ich alles schwarz gemattet und auf einen weißen Kartenrohling geklebt.

Then I put the fox behind the word thanks and arranged the arrow and the small text strip under it, using foam tape.
To decorate the card I added a few black rhinestones and also two red hearts above the fox's head. Then I matted the cardstock black and attached it to a white note card.

Samstag, 19. August 2023

Oh happy day

 
Hallo Ihr Lieben!
Heute zeige ich Euch mal eine Karte mit Vogel und Nest. Die ist irgendwie und absolut ungeplant etwas winterlich ausgefallen - dabei legen Vögel im Winter doch gar keine Eier! Liegt es an den Farben, den Tannenzweigen? Ich weiß es nicht, aber finde die Karte trotzdem schön.

Hello everyone!
Today I am sharing this card with a nest and a bird. And somehow, totally unintentionally, it turned out kind of winter-ish - and I know that birds don't lay eggs in winter! Is it the colors, the pine branches? I have no idea, but I still really like this card.

Für den Hintergrund habe ich ein Stück Watercolor Cardstock durch Ink Smooshing mit Distress Oxide Salvaged Patina etwas hell-aqua farben eingefärbt. 
Die Tannenzweige sind aus dem Stanzenset Beautiful Boughs von StampinUp. Auch die habe ich aus Watercolor Cardstock gestanzt, diesmal mit Evergreen Bough und Rustic Wilderness durch Ink Smooshing eingefärbt und nach dem Trocknen mit einem braunen Polychromo die Äste nachgemalt. Dann habe ich sie auf meinem Hintergrund arrangiert. Ich war mir nicht sicher, ob das Nest auf diesen Zweigen oder einem anderen, den ich auch noch zur Auswahl hatte, besser aussehen würden. Also habe ich aus meinem Mülleimer irgendein Papier gegriffen und beide Varianten probegestanzt. Das, was ich da erwischt hatte, war eine Butterbrottüte. Und da die fast wie Vellum ist und hinter den grünen Zweigen noch etwas fehlte, habe ich kurzerhand diese Zweige hinter die Grünen gesetzt. Und ich kann verraten: durch das Butterbrotpapier sieht man den Kleber nicht! 

For the background I did some ink smooshing with Distress Oxide Salvaged Patina to add a bit of  a light aqua onto a piece of watercolor cardstock.
The pine branches are from the Beautiful Boughs die set by SU. Again I die cut them from watercolor cardstock and did some ink smooshing, this time using Evergreen Bough and Rustic Wilderness. After the ink had dried, I used a brown Polychromo to color the branches and arranged everything onto my background. Well, I wasn't sure if these branches or a different one, that I also had in my stash, would look better with the nest. So I grabbed some paper from my wastebin and die cut both from this paper, just to try it out. Turned out, that what I had grabbed was a bag made from sandwich paper (many stamp shops here in Germany use these to put their stamps in for mailing). Since this paper looks a lot like vellum and I felt like something was missing behind the green branches, I simply used those sandwich paper branches and put them behind the green ones. I also can tell you, that you don't see any liquid glue through this material!


Das Vogelnest und der Vogel sind beide Lovely Layers Dies von HoneyBee Stamps - der Vogel aus dem Set Winter Birds, das Nest aus dem Set Nest. In dem sind auch die Eier und Federn enthalten. Ich habe alle Teile aus weißem Cardstock gestanzt und mit Copics coloriert. Nur die Eier sind mit Distress Oxide Salvaged Patina gewischt und anschließend mit Distess Ink Hickory Smoke bespritzt.
Bei dem Vogel konnte ich mir die mittlere Lage des Körpers sparen - die kürzeren Schwanzfedern dieser Lage sieht man hier eh nicht, da sie vom Nest verdeckt wird. Nachdem ich alles zusammengeklebt habe, habe ich es auf dem größten Zweig befestigt. Zuvor habe ich weißes Acrylfarbe über den Hintergrund und die Zweige gespritzt.
Der Text meiner Karte hat mich einige Nerven gekostet. Irgendwie fand sich nichts passendes. Ich habe mich dann für ein "celebrate all the good things" aus dem Little Line Agenda Set von MamaElephant entschieden und es oben rechts direkt auf den Hintergrund gestempelt.

The nest and bird are both made using Lovely Layers die sets by HoneyBee Stamps - the bird is from the Winter Birds set, the nest from the Nest set. In this there are also the eggs and feathers included. I die cut all pieces from white cardstock and colored them with Copics. Only the eggs I ink blended with Distress Oxide Salvaged Patina and then flicked some Distress Ink Hickory Smoke onto the ink.
With the bird I was able to skip the middle layer of the body - the shorter tail feathers are covered by the nest on my card. After I had put together everything, I attached it to the largest nest. Before I flicked some white acrylic paint onto the background with the branches.


Und dann hatte ich noch diesen gestanzten Text ausgesucht. Er ist aus einem Stanzenset von Action, und ich habe es wegen genau dieses Textes gekauft. Es kam mit einem Pferdekopf - mal sehen, ob ich den jemals verwenden werde.... Ich habe den Text zweimal aus schwarzem Cardstock gestanzt und die Worte aufeinander geklebt. Und dann war ich absolut unsicher - ist der Text zu viel für die Karte, schaut es ohne besser aus?  Sogar meinen Mann habe ich zu Rate gezogen, aber wie das in solchen Fällen öfter ist, hat mich seine Antwort nicht wirklich befriedigt. Meist haben wir unsere Wahl ja bereits getroffen und wollen nur Bestätigung, richtig? Nach langem hin und her habe ich ihn dann doch aufgeklebt und bereue es nicht.

And then I had picked this die cut text. It's from a die set by Action and this text was actually, why I bought the set. It came with the head of a horse - no idea, if I will ever use this.... I die cut the text twice from black cardstock and stacked the  words. And then I was totally unsure - is this text too much on this card, does it look better without? I even went and asked my husband, but as it happens so often when we ask our men, his answer wasn't what I wanted to hear. Most times we already have made our choice and just need confirmation, right? After a lot of debating with myself I decided to glue it down and really don't regret it.


Zum Schluss habe ich noch einige hell-aqua farbene Perlen auf der Karte verteilt und alles auf einen weißen Kartenrohling geklebt.

I finished the card by added a few light aqua pearls and attaching everything to a white note card.

Donnerstag, 17. August 2023

Popcorn!

 
Hallo Ihr Lieben!
Eigentlich hatte ich ja mal den Plan, mindestens einmal im Monat einen älteren Stempel zu verwenden. Aber auch hier ist es so, wie mit den guten Vorsätzen für das neue Jahr - sie geraten zu schnell in Vergessenheit. Irgendwie fiel es mir wieder ein, und so habe ich für diese Karte, die ich heute auf dem Stampcorner Blog zeige, einen zumindest etwas älteren Stempel benutzt.

Hello everyone!
A little ago I had the plan, to use an older stamp at least once a month. But it went as it goes with those new year's resolutions - too soon we forget about them. It came back to my mind and so I used not an old, but at least an a little older stamp on this card, that I'm sharing over on the Stampcorner Blog today.

Im Hintergrund kam dann doch noch ein Stempel aus dem August-Release zum Einsatz: der Strahlenstempel. Ich habe ihn mit goldenem Embossingpulver auf ein Stück blauen Cardstock embosst und dann die Ränder des Cardstocks ein wenig mit Distress Ink Chipped Sapphire gewischt. Dann habe ich aus dem Hintergrund einen Flat Shaker gemacht - ein Stück Folie rund um den Cardstock "gewickelt" und vor dem Verkleben der letzten Seite mit kleinen goldenen Sternchen gefüllt. Diese Art von Shaker Card ist nicht nur sehr viel flacher als ein normaler Shaker, er ist auch viel schneller gemacht. 

In the background I still used a stamp from the august release: the rays image. I gold heat embossed it onto a piece  of blue cardstock and then inked the edges with Distress Ink Chipped Sapphire. Then I turned that background into a flat shaker - a piece of thin acetate wrapped around the cardstock and, before closing the fourth side, filled with tiny gold star confetti. I love this type of shaker card - it's not only a lot thinner than a regular one, it's also made a lot faster.


Als Motiv habe ich mich für den Popcorn Sensemann von letztem Dezember entschieden. Ich liebe den einfach - in jeder Version. Hier habe ich ihn mit Copics coloriert und dann per Hand ausgeschnitten. Für die Highlights habe ich einen weißen Gelstift benutzt.

As the image for my card I went with the Popcorn Sensemann from last december's release. I just love him - in every way he comes. I colored him with Copics and fuzzy cut him out. To add some highlights I used a white gel pen.


Und was passt zu diesem Motiv besser als eine große Popcorn-Box, auf der sich der Text befindet? Diese hier habe ich frei hand aus einem Bogen aus dem Paper Pack #02 von Stampcorner geschnitten - mit den roten und weißen Streifen war es einfach perfekt. 
Das Popcorn in - und neben - der Box ist ganz einfach mit einer Wolkenstanze aus weißem Cardstock gestanzt und mit Copics ein wenig eingefärbt. Dann habe ich die vielen Popcorns hinter die Box geklebt.
Für den Text habe ich ein Oval aus weißem Cardstock gestanzt und mit roter Tinte einen der Texte aus dem Popcorn Sensemann Set daraufgestempelt. Den Rahmen habe ich mit einem schwarzen Fineliner dazugemalt. Und dann dachte ich mir, dass ein weiterer Text darunter auch passen würde. Also habe ich noch das "das wird lustig" aus dem selben Set weiß auf schwarzen Cardstock embosst und quer über das Oval geklebt. Im oberen Bereich habe ich als Deko noch einen goldenen Stern aufgeklebt.

And what goes better with this image than a large popcorn box with the text on it? I cut this free hand from a sheet of Stampcorner's paper pack #02 - it was perfect with the red and white stripes.
The popped corn in - and beside - the box is simply made using a small cloud die. I cut a bunch of them from white cardstock and added a bit of shading with Copics. Then I filled the box with them by glueing them to the back of the box.
For the text I die cut an oval from white cardstock and stamped the "I'm here for the Popcorn" text onto it with red ink. Then I drew a frame with a black fineliner. And then  I decided another text would look good. So I white heat embossed a "this is going to be fun" onto a strip of black cardstock and glued it across the oval. Above the red text I added a gold star sequin.
 

 Die Popcornbox habe ich dann mit dünnem 3D Tape auf den Shaker geklebt, und darauf, wieder mit dünnem 3D Tape, den süßen Tod. Dann habe ich den Shaker schwarz gemattet und alles auf einen weißen Kartenrohling geklebt.

I used thin foam tape to attach the popcorn box to the shaker, then used the same tape to put the - not so - grim reaper on top. I matted the shaker with black cardstock and adhered it to a white note card.

Dienstag, 15. August 2023

you're apple-solutely awesome

 
Hallo Ihr Lieben!
Die Karte, die ich Euch heute zeige, ist ganz von einem Stencil inspiriert. Äpfel passen ja auch super zum anstehenden Herbst.

Hello everyone!
The card I'm sharing with you today is all inspire by a stencil. But apples also go great with the upcoming fall season.

Nun, ich muss erst ein wenig ausholen. Alles begann damit, dass ich den Apfel-Layering-Stencil aus dem August-Release von Simon Says Stamp gesehen habe. Nun, der kostet 20 Dollar, zusammen mit 16 Dollar Versand, Zoll- und Postgebühren hätte mich der etwa 45 Dollar gekostet - viel zu viel um den Kauf eines Stencils zu rechtfertigen, den ich wohl auch nicht sonderlich oft verwenden würde. Denn klassische passt der ja auf Karten für Lehrer, die brauche ich aber nicht mehr. Also kam mir die Idee, einen ähnlichen Layering Stencil einfach selbst zu machen. Gesagt, getan. Ich habe in ein Stück Mylar-Folie in regelmäßigen Abständen die Äpfel in versetzen Reihen gestanzt und dafür eine Stanze von Magnolia benutzt. In ein weiteres Stück habe ich dann die Stile und Blätter  so gestanzt, dass sie an der richtigen Stelle sitzen und ich die Stencils einfach nur gleich auflegen brauche. Für die Schattierung der Äpfel habe ich mir einen kleinen Stencil gemacht, hier muss ich jeden Apfel einzeln wischen, aber das geht recht fix. Und da Stile und Blätter je ein zusammenhängender Teil ist, decke ich jeweils den Teil, den ich gerade nicht wischen will, ab. Aber es klappt super und ich bin sehr zufrieden mit meinem Stencil. Nun, ist mein Stencil pefekt? Nein, aber perfekt genug für mich. Ging es schnell? Nein, ich bin etwa 3 Stunden am Stencil gesessen. Aber es war es wert und ich habe schon weitere Ideen.
Nun aber zur Karte. Ich habe erst die Äpfel mit Distress Ink Barn Door auf weißen Cardstock gewischt und dann die schattierte Hälfte mit Lumberjack Plaid darübergewischt. Für die Stile habe ich Brushed Corduroy, für die Blätter Mowed Lawn benutzt.
Mit Distress Oxide Lost Shadow habe ich dann den Best Friends Background von MFT über den kompletten Cardstock gestempelt. Da die Farbe so hell ist, ist er nur ganz dezent zu sehen. Dann habe ich noch schwarze Metallic Watercolor aufgespritzt.

Well, I have to begin at the start here. Everything started when I saw the apple layering stencil from Simon Says Stamp's august release. I costs 20 Dollar. With me being in Germany add 16 Dollars of shipping, tax and postal fees and the one stencil set would have cost me about 45 Dollars. That's too much for a stencil that I might not even use that often. Because it's typically used for teacher's cards, and I no longer need any of those. So I got the idea of making a similar designed layering stencil myself. I die cut the rows of apples into a piece of Mylar using a die by Magnolia. Into another piece I die cut the stems and leaves, making sure to create a real layering stencil so the stems and leaves are in the right spot when I put both stencils into the same position. To create a shadow layer I cut a small stencil so I have to ink each apple individually, but that's pretty quickly done. And since the stems and leaves are connected pieces here I have to cover the one part when inking the other. But it works great and I am very happy with my stencil. Well, is it perfect? No, but perfect enough for me. Was it done quickly? No, it took me about three hourse to have everthing lined up and cut. But it was really worth it and I already have more ideas for the use of this stencil set.
But now back to the card. First I inked the apples with Distress Ink Barn Dorn onto a piece of white cardstock, then added the shadows with Lumberjack Plaid. For the stems I ued Brushed Corduroy, the leaves are made with Mowed Lawn.
Then I used Distress Oxide Lost Shadow to the stamp the Best Friends Background by MFT over the complete cardstock. Since the color is so light the text is very subtle. And I decided, to also spatter some black metallic watercolor onto the cardstock.


Wie gesasgt, Karten für Lehrer brauche ich nicht mehr. Aber dann fiel mir das Apple-Solutely Awesome Stempelset von LawnFawn ein, und darin fand sich der passende Text zu den Äpfeln, mit dem ich dann eine Dankeskarte machen konnte.
Der große Apfel ist mit einer der Stanze aus dem Set Build a Barrel Apples von LawnFawn gemacht. Den Apfel habe ich aus hellrotem Cardstock gestanzt und mit einer Lage Distress Glaze Lumberjack Plaid überzogen, damit er schön glänzt. Dann habe ich nur die rechte Hälfte mit zwei weiteren Lagen des Glazes überzogen, damit diese Seite, so wie die Äpfel im Hintergrund, hier einen Schatten haben. Stil und Blatt sind aus weißem Cardstock gestanzt und mit Distress Ink Brushed Corduroy und Mowed Lawn eingefärbt. Dann habe ich noch einige Highlights mit einem weißen Gelstift gesetzt.
Die Buchstaben für das Wort Thanks sind mit den Tall Skinny Alphas Stanzenset von Scarpbook.com gemacht. Ich habe die Buchstaben viermal aus normalem schwarzem und einmal aus glänzendem schwarzem Cardstock gestanzt und die Lagen aufeinander geklebt. So glänzt das Wort genauso schön wie der Apfel.
Den Text aus besagtem LawnFawn-Stempelset habe ich weiß auf schwarzen Cardstock embosst.
Und weil irgendwie der Hintergrund zu sehr mit dem Apfel über dem Text verschmolzen ist, habe ich noch ein Rechteck aus Vellum als Zwischenlage verwendet.

As I said already, I don't need cards for teachers anymore. But then I remembered the Apple-Solutely Awesome stamp set by LawnFawn and in that I found the perfect text to go with the apples and make this a thank you card.
The big apple is made with a die from the Build a Barrel Apples die set by LawnFawn. I die cut the big apple from light red cardstock and then covered it with a layer of Distress Glaze Lumberjack Plaid to make it nice and shiny. Then I added a shadow layer to its right side by adding two more layers of the Glaze there, so the apple has the same shadow as the apples in the background. Stem and leave I've die cut from white cardstock and then inked them with Distress Ink Brushed Corduroy and Mowed Lawn. Then I added some highlights with a white gel pen.
The letters for the word thanks I die cut with the Tall Skinny Alphas die sets by Scrapbook.com - four times from regular black cardstock and once from glossy black cardstock, then stacked them. This way the word thanks is as shiny as the apple.
The text from said LawnFawn stamp set I white heat embossed onto a strip of black cardstock. 
And since the big apple melted too much into the background I added a layer of vellum inbetween.


Glänzen der Apfel und der Text nicht toll?
Apfel und gestanztes Wort habe ich dann direkt auf das Vellum geklebt, zum Befestigen des Textstreifens habe ich 3D Tape benutzt. Das habe ich dann auch hinter das Vellum gesetzt, um die komplette Lage etwas nach oben zu bringen. Als Deko habe ich ein paar schwarze Perlen auf dem Vellum verteilt.
Dann habe ich den Cardstock schwarz gemattet und alles auf einen weißen Kartenrohling geklebt.

Doesn't the shine on the apple and text look amazing?
I glued the apple and the die cut word directly onto the vellum, to attach the text strip I used some foam tape. I also put foam tape behind the vellum to bring up that layer a bit. To decorate the card I added five black pearls to the vellum.
Then I matted the cardstock black and adhered it to a white note card.

Montag, 14. August 2023

Mal wieder was Hochzeitliches

 
Hallo Ihr Lieben!
Es war wieder soweit - eine Explosionbox zur Hochzeit wurde benötigt. Und hier ist sie.

Hello everyone!
It was that time again - an explosionbox for a wedding was needed. So here it is.
 
Ich habe hier meine Box aus weißem Cardstock gewerkelt und die Seitenteile mit rotem Cardstock, aufgeklebt mit 3D Tape, dekoriert. Daraus habe ich jeweils einen Kreis ausgestanzt und da hinein mit dünnnem 3D Tape ein ausgestanztes rotes Herz geklebt. Dekoriert habe ich jedes der Herzen mit einer weißen Perle.
 
I made my box from white cardstock and covered the sides with red cardstock that I attached with foam tape. I die cut a circle from each of the red sides and put a heart, attached with thin foam tape, into each circle. I decorated each heart with a white pearl.
 

 Da der Deckel recht üppig dekoriert ist, habe ich auf mehr Deko an den Seitenteilen der Box verzichtet.
Den Deckel habe ich aus weißem Cardstock gewerkelt und um den Rand weißes Band gebunden, das ich vorne zur Schleife gebunden habe.

Since the lid is decorated quite a lot, I decided to not add anything else to the sides of the box.
The lid I made from white cardstock again and wrapped a piece of white ribbon around it, tying it to a bow at the front.


Ein hoher Aufbau als Deko auf dem Deckel war gewünscht - kann ich. Ich habe hier den Deckel zuerst ebenfalls mit rotem Cardstock beklebt, darauf kam ein Stück Vellum, in das ich einen Strahlenkreis gestanzt habe.
Auf dem Deckel steht eine halbe Rosette, gemacht aus weißem Cardstock. An der Rückseite habe ich ein Gerüst mit  Herz-Girlande sowie einen gezackten Kreis aus silbernem Spiegelcardstock angebracht.
Vorne auf die Rosette habe ich die Initialen des Brautpaares sowie ein Und aufgeklebt.
Vor der Rosette befinden sich einige Blüten, mehr Perlen und ein Banner, auf das ich mit roter Tinte ein "zur Hochzeit" gestempelt habe.

I was asked to make a tall decoration for the lid - I surely can do so! I first covered the lid with more red cardstock, then put a piece of vellum with a ray circle cut into it, on top.
On the lid I put up half a white paper rosette. To the back I attached two sticks with a heart garland and a spirograph circle, cut from silver mirror cardstock. On top of the rosette I added the brides and grooms initals with an ampersand inbetween.
In front of the rosette I added a few flowers, more white pearls and a banner, onto that I stamped a "to your wedding" with red ink.


Hier ist die geöffnete Box - zum "center piece" erfahrt Ihr gleich mehr.
Die Seitenteile links und rechts enthalten kleine Taschen. Das linke mit Lasche, um ein Geldgeschenk hineinzustecken, rechts befindet sich eine kleine Karte für persönliche Glückwünsche darin.
Auf das vordere Seitenteil habe ich weiß Glückwunschtexte aufembosst und mit einigen weißen Perlen dekoriert.

Here's the opened box - more about the "center piece" in a little bit.
The sides on the left and right are little pockets. I put a flap on the left one to be able to put some money into it, in the right one there's a little card for some personal words.
Onto the front flap I white heat embossed some wishes and decorated it with a few white pearls.


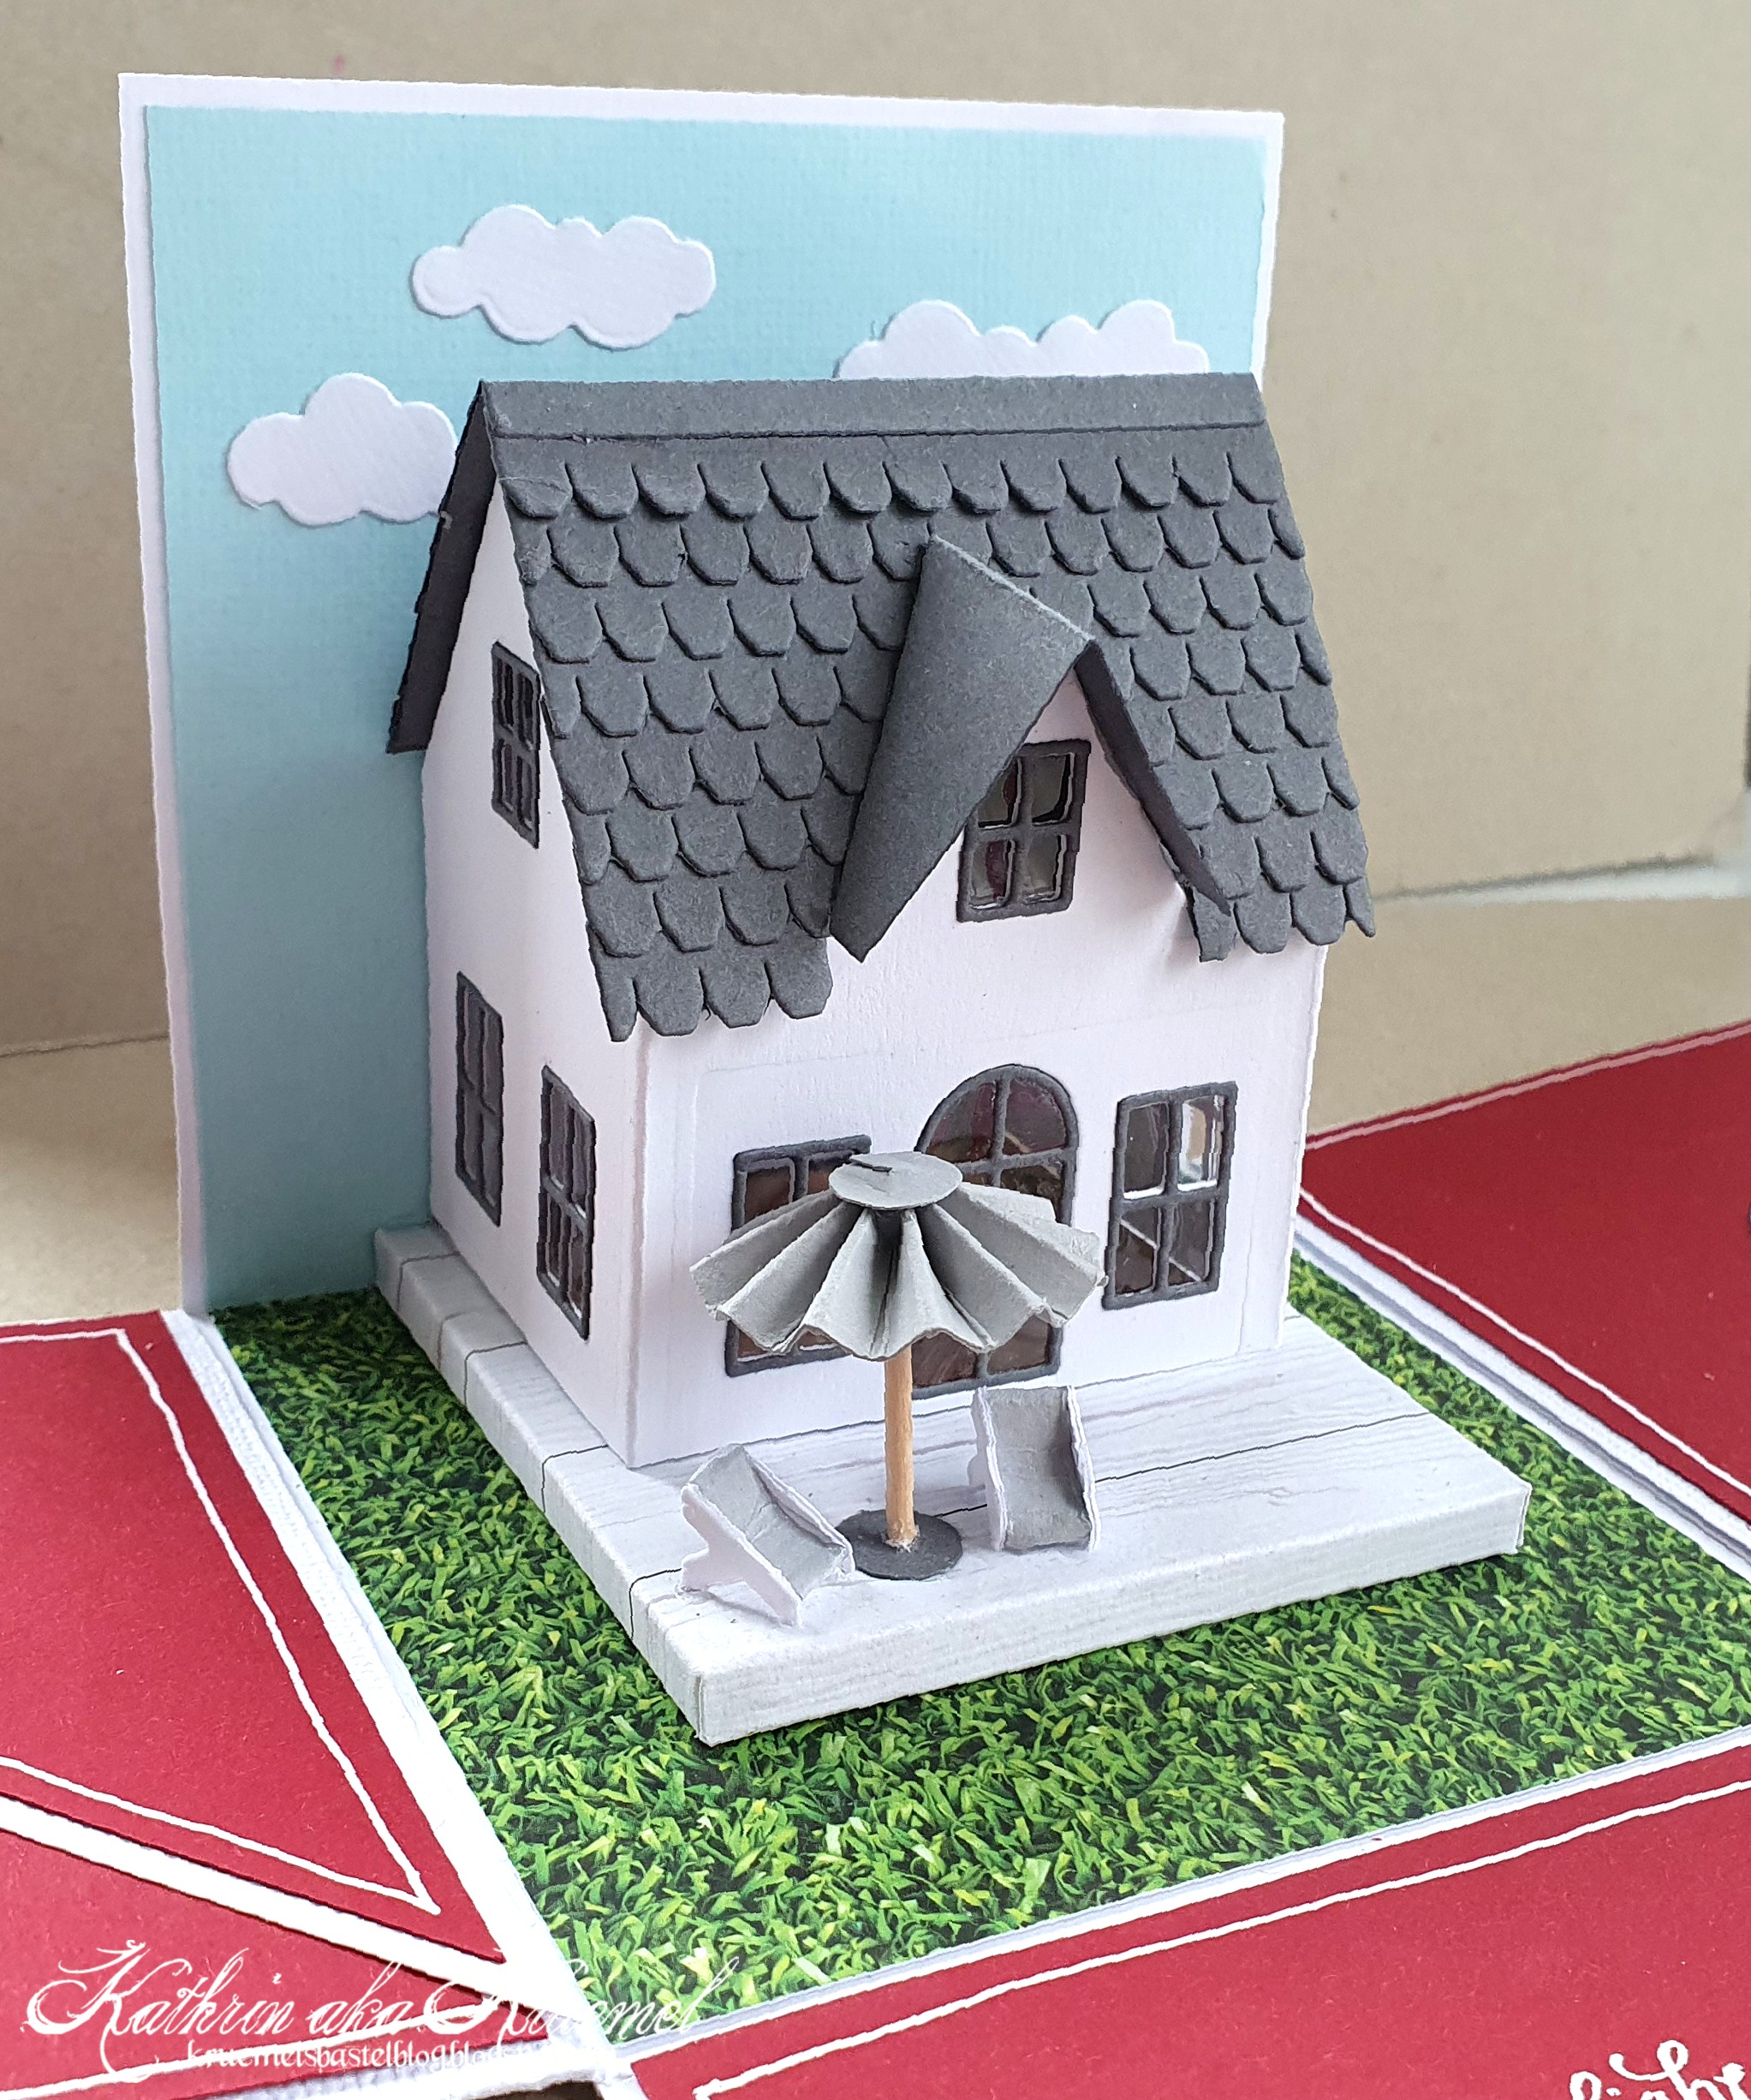
Neben den Namen des Brautpaares war meine einzige Info, dass es "davon träumt, ein Häuschen mit einem kleinen Garten zu kaufen und dort unter einem Sonnenschirm in Liegestühlen auf der Terrasse zu sitzen". Also habe ich diesen Traum im Inneren der Karte Wirklichkeit werden lassen.
Die Rückseite habe ich mit hellblauem Cardstock beklebt und drei kleine Wolken angebracht. Den Boden der Box habe ich mit Designpapier mit Grasdruck beklebt.
Für das Haus habe ich das Village Set von Sizzix verwendet. Die Fenster sind mit Folie hinterlegt und da man durch sie ins Innere des Hauses schauen kann, habe ich innen noch Designpapier mit Parkettmuster aufgeklebt.
Aus weißem Cardstock mit Holzprint habe ich eine Terrasse gebaut. Auf der steht der Sonnenschirm mit den Liegestühlen. Für den Sonnenschirm habe ich eine kleine Rosette aus hellgrauem Cardstock gemacht und an einem Stück Zahnstocher befestigt, den ich in die Terrasse gesteckt habe. Für die Liegestühle habe ich kleine X gestanzt, einen der Arme weggeschnitten und jeweils zwischen zwei dieser X einen Streifen hellgrauen Cardstocks geklebt. Die Stühle sind gerade mal 1 x 1 cm groß....

Besides the name of the bridal couple all the information I had was that they are "dreaming of buying a house with a little garden and sit on its porch in some deck chairs in the shade of an umbrella". So I decided to build that dream house inside the box.
I covered the back flap with light blue cardstock and added three small clouds. Onto the bottom of the box I attached some patterned paper with a grass print.
For the house I used the Village Set by Sizzix. I put some acetate behind the windows and since you can see through them to the inside of the house, I also put some patterned paper with a wooden floor print inside the house.
From white cardstock with a wooden pattern I built the deck. On it there's the umbrella with the deck chairs. I created a small rosette for the umbrella, attaching it to a piece of a skewer that I stuck into the deck. For the deck chairs I die cut little Xs, cut off one of the arms of each and then put a strip of light grey cardstock between two of those Xs. Those chairs are just 1 x 1 cm in size....
 

 An der Rückseite des Hauses - in die ich keine Fenster eingebaut habe - habe ich den Dachüberstand weggeschnitten. So konnte ich das Seitenteil am Haus und der Rückseite der Terrasse festkleben und sie klappt beim Öffnen der Box nicht mit auf.

I cut off the part of the roof, that hangs over the house, at the back of the house, I also didn't add any windows to the back. This way I was able to glue the back flap to the back of the house and also the back of the deck so it stays upright and doesn't open when the lid is taken off.

Sonntag, 13. August 2023

Geburtstagskarte mit Kamera

 
Hallo Ihr Lieben!
Ende Juli war ich in Duisburg im Laden von Create a Smile, die Sachen so in der Hand halten und ausprobieren zu können ist doch einfach ein anderes Shopping-Erlebnis. Von der tollen und liebevoll gestalteten Atmosphäre und den netten Menschen dort fange ich erst gar nicht an. 
Eines der Stempelsets, das es an diesem Tag in mein  - echtes! - Körbchen geschafft haben, ist das kleine Set Bitte Lächeln mit der süßen Kamera. Und die habe ich hier eingeweiht.

Hello everyone!
End of july I visited the Create a Smile store in Duisburg. It still is a totally different shopping experience to be able to touch and try out stuff, not to mention the cozy and with a lot of love created atmosphere in the shop and the lovely people.
One of the stamp sets that made it into my - actual! - cart this day is the Bitte Lächeln stamp set with the cute camera. And here I used it for the first time.

Ich habe mir mit einem Stück cremefarbenem Cardstock gestartet und etwas nach oben verschoben mittig mit Distress Oxide Wild Honey einen nach außen hin auslaufenden Kreis aufgewischt. 
Mit der Focal Stanze habe ich mir einen Stencil gemacht und dann, ebenfalls mit Wild Honey, die Strahlen aufgewischt. Hier habe ich die Farbe richtig satt aufgetragen.
Anschließend habe ich noch goldene Metallic Watercolor und weiße Acrylfarbe aufgespritzt.

I started with a piece of white cardstock and inked the center, moved a bit up,  lightly with Distress Ink Wild Honey, letting the color fade towards the edges.
Using the Focal die I made myself a stencil and then used Wild Honey again to add the rays to the background, laying the color down heavily.
On top I spattered some gold metallic watercolor and white acrlyic paint.


Hauptdeko ist natürlich die kleine Kameria. Ich habe sie mit Copics coloriert und ausgeschnitten. Die Linse habe ich ein weiteres Mal gestempelt, coloriert und mit dünnem 3D Tape aufgeklebt. Sie, der Sucher und der Blitz-Stern sind mit Glossy Accents überzogen, damit sie schön glänzen.
Die Texte auf der Karte sind weiß auf türkisfarbenen Cardstock embosst. Der obere ist aus dem Stempelset Alles über Dich, der untere aus dem Set Wunschkonzert. Ich habe jeweils verschiedene Stempel zusammengesetzt. Dann habe ich die Streifen mit dünnem 3D Tape auf den Hintergrund geklebt.

Main element is the little camera. I colored it with Copics and cut it out. I stamped the lense a second time, colored it and adhered it with thin foam tape. The lense, the viewfinder and the flash are covered with Glossy Accents to make them siny.
The texts on this card are white heat embossed onto dark turquoise cardstock. They mean "it's your birthday" and "congratulations". Again I used the thin foam tape to attach the text strips to the background.


Vielleicht habt Ihr auf den oberen Bildern schon das kleine schwarze Dreieck entdeckt - es ist ein Zieh-Tab, denn hinter dieser Karte versteckt sich noch mehr. Zieht man am Tab, kommt aus der Kamera ein Polaroid. Auf dem sind drei kleine Gratulanten sowie ein weiterer Text. 
 
Maybe on the pics above you've already discovered the little black triangle - it's a pull tab, because there's more on this card than just the camera. When you pull the tab, a polaroid comes out of the camera. And the photo shows three little coalas and another text. 
 

Der Polaroid-Rahmen ist aus dem Stempelset Beweisfoto. Die kleinen Koalas sind aus dem - eigentlich schon in Rente geschickten - Stempelset Wagen voller Schätze, das es im Retro-Release Ende Juli neu gab. Eigentlich sind es vier, aber es haben nur drei aufs Foto gepasst. Unten auf den breiten Streifen des Polaroid-Rahmens habe ich mit Distress Ink Wild Honey noch einen weiteren Text aus dem Set Für jede Gelegenheit aufgestempelt.
Um das Foto hinter der Kamera verschwinden zu lassen, habe ich die Kamera auf den Hintergrund geklebt und dann mit dem Cutter einen Schlitz in beide Lagen geschnitten. Damit das Polaroid auch durchpasst, musste ich es so ausschneiden, dass die Außenlinien etwas dünner geworden sind - den Schlitz konnte ich nicht breiter machen, sonst hätte er nicht mehr auf die Kamera gepasst. Das Polaroid habe ich mit schwarzem Cardstock hinterlegt, um es etwas stabiler zu machen, und unten das Dreieck mit angeklebt. Der schwarze Cardstock ist etwas länger als das Polaroid und hat oben rechts und links kleine Nasen. Die verhindern, dass das Foto ganz aus der Kamera rutscht. Dann habe ich den Streifen von hinten durch den Schlitz geschoben und den Hintergrund mit dünnem 3D Tape auf die schwarze Mattung geklebt. So hat das Foto etwas mehr Bewegungsfreiheit. 
Ganz zum Schluss habe ich noch ein paar türkisfarbene Pailetten als Deko aufgeklebt und dabei natürlich darauf geachtet, dass sie das Foto nicht beim Herausgleiten behindern, aber auch, dass sie bei eingeschobenem Foto nicht irgendwie komisch wirken.

The polaroid frame is from the Beweisfoto stamp set. The little koalas are from the Wagen voller Schätze stamp set - a set, that has long been retired but was one of the sets that was re-released during the retro release in july. There are acutally four of the little cuties, but only three fit inside the frame. Onto the wider bottom I stamped another text, meaning "from all of us", using the Distress Ink Wild Honey again.
To let the picture disappear behind the camera, I glued it onto the background, then used my Exacto Knife to cut a slit through both layers. To make the polaroid fit through the slit, I had to cut it a smitch smaller, that's why the outer lines are a bit thinner. But cutting the strip wider wasn't possible because it would have gone outside the camera. I put some black cardstock behind the polaroid to make it a bit sturdier, and attached the black triangle to the bottom edge. The black cardstock I used behind the polaroid is a bit longer than the photo and I cut the top in a t-shape so make sure the picture doesn't slide out of the camera completly. Then I put the picture through the slit and adhered the background with thin foam tape to the black cardstock I used as a mat. Due to the foam tape the picture slides in and out a bit easier.
To finish the card, I added a few turquoise sequins, making sure they don't get in the way when the picture gets pulled out, but also that they don't look strangely arranged when the photo isn't visible. 

Samstag, 12. August 2023

August Technique Throwback Thursday Challenge

 
Hallo Ihr Lieben!
Ein neuer Monat hat begonnen und somit gibt es auch eine neue Technique Throwback Thursday Challenge in der Share Handmade Kindness Gruppe. Und diesmal wollte ich meine Karte nicht wieder auf den letzten Drücker machen. 
Thema ist diesmal das Video "Creative Use of Sentiments", in dem Jennifer aus einzelnen Textstempeln einen Hintergrund zusammensetzt. Eigentlich dachte ich, das Zusammensetzen würde ewig dauern, aber so wild war es gar nicht. Da hat das Zurückordnen der einzelnen Stempel in ihr passendes Stempelset fast genauso lang gedauert! ;)

Hello everyone!
A new month has started and so there's also a new Technique Throwback Thursday challenge in the Share Handmade Kindness group. And this time I didn't want to enter my card last minute.
Theme this month is the "Creative Use of Sentiments" video, where Jennifer uses a lot of small text stamps to create her own background. Honestly I thought that putting together the background will take forever. But it wasn't that hard - and putting back the stamps into each of their stamp sets took nearly as long. ;)
 
Hier habe ich im Hintergrund erstmal Geburtstagskerzen auf ein Stück craft farbenen Cardstock gestencilt. Dafür habe ich die Birthday Candles Layering Stencil von PrettyPinkPosh und Distress Oxide Broken China, Wild Honey sowie Hickory Smoke benutzt. Da das mit Hickory Smoke auf die Kerzen gewischte Muster irgendwie unterging, habe ich dann noch ganz leicht Black Soot obenauf gewischt. 
Und dann kam das Zusammensetzen des Hintergrund-Textes. Ich habe ihn mit Stempeln aus den Sets Itty Bitty Birthdays, Itty Bitty Celebrations, Little Birthday Notes und Bitty Birthday Wishes von MFT sowie für die größeren Worte dem Offset Saysings Birthday von LawnFawn zusammengesetzt. Dann habe ich ihn mit dem weißen Yeti Stempelkissen von LawnFawn auf den gestencilten Cardstock gestempelt. Mein craft farbener Cardstock saugt recht stark, deswegen habe ich mehrere Lagen aufeinander gestempelt und die Tinte zwischendurch immer Trocknen lassen. Und die Tatsache, dass ich mir nach den ersten zwei Lagen nicht sicher war, ob das Weiß gut genug sichtbar ist, und deswegen den Text einmal mit Distress Oxide Salvaged Patina auf den bereits weiß gestempelten Text gestempelt habe, war nicht gerade hilfreich. Das Salvaged Patina war auf den Kerzen so gut wie gar nicht sichtbar. Also habe ich noch ein paar weiße Lagen darüber gestempelt, um das helle Türkis wieder zu überdecken. Aber irgendwann war es dann lesbar. 
Um das Gelb der Flammen nochmal aufzugreifen habe ich dann ein wenig gelb-goldene Metallic Watercolor aufgespritzt. 
 
Here I first inked some birthday candles onto a piece of kraft colored cardstock. I used the Birthday Candles Layering stencilset by PrettyPinkPosh and Distress Oxide Broken China, Wild Honey and Hickory Smoke. Since the patterns on the candles, that I inked with Hickory Smoke, were hardly visible, I put a bit of Black Soot on top.
And then I had to put my background text together.  I did it with stamps from the sets Itty Bitty Birthdays, Itty Bitty Celebrations, Little Birthday Notes and Bitty Birthday Wishes by MFT and - for the larger words - the Offset Sayings Birthday stamp set by LawnFawn. Then I stamped it with the white Yeti ink onto the stenciled candles. My kraft colored cardstock soaked in the ink quite a bit, so I had to put down several layers of the white ink, letting the ink dry inbetween. Well, it didn't help that I wasn't sure if the white would be visible enough so after having stamped two layers of white I switched to Distress Oxide Salvaged Patina. But the light aqua wasn't visible on the darker aqua candles - and I had to do a few more layers of white to cover the light aqua again. But then I was finally happy with the result.
To pick up the yellow of the flames again, I flicked just a bit of yellow-ish gold metallic watercolor onto the background.


Als Motiv habe ich mich für den süßen Bären aus dem Set Happy Day von ColoradoCraft verwendet. Allerdings hält er hier statt der Blume den Luftballon, den eigentlich der Hase aus dem Set Birthday Wishing hält. Ich wollte unbedingt einen Luftballon auf der Karte, der Hase hat aber irgendwie nicht richtig gepasst. Also habe ich den Bären gestempelt, dabei die Blume abgedeckt und dann stattdessen den Luftballon - diesmal mit abgedecktem Hasen - abgstempelt. Dann habe ich das Motiv mit Copics coloriert, farblich passend zum craft farbenen Cardstock.
Aus dunkel grau-braunem Cardstock habe ich dann noch einen der Oval Shadows von MFT gestempelt und unter dem Bären als Boden/Schatten aufgeklebt.

As the image I picked the cute bear from the Happy Day set by ColoradoCraft. But instead of the flower I let him hold a balloon, that's from the bunny from the Birthday Wishing set. I really wanted to have a balloon on my card, but the bunny just didn't fit. So I stamped the bear, covering the flower he's holding, and then stamped the balloon - this time covering the bunny - in its place. I used Copics to color the image, trying to make the color match the kraft cardstock in the background.
From some dark greyish-brown cardstock I die cut one of the Oval Shadows by MFT and put it as a ground/shadow under the bear.


Der Text ist wieder aus dem Set Birthday Wishing. Ich habe ihn mehrfach mit der weißen Tinte auf ein weiteres Stück des grau-braunen Cardstocks gestempelt und dann in Streifen geschnitten. Zum Embossen war der Text zu fein - ich habe es probiert, er war nicht mehr lesbar. 

The text is again from the Birthday Wishing stamp set. I stamped it several times with the white ink onto another piece of the grey-ish brown cardstock, then cut it into strips. The text was too fine to heat emboss it - I've tried it and it was hardly legible. 


Den Bären sowie die Textstreifen habe ich dann mit dünnem 3D Tape auf dem Hintergrund befestigt und als Deko ein paar ebenfalls dunkelbraune Pailetten aufgeklebt. Dann habe ich den Cardstock dunkelbraun gemattet und alles auf einem weißen Kartenrohling angebracht.

I used thin foam tape to attach the bear and the text strips to the background and added a few dark brown sequins as decoration. Then I matted my cardstock dark brown and adhered everything to a white note card.

Freitag, 11. August 2023

LawnFawnatics Challenge #154 - Into the Woods

 
Hallo Ihr Lieben!
Das Thema der LawnFawnatics Challenge #154 ist "into the woods" - also im Wald. Da das aktuelle Wetter ja alles andere als sommerlich ist, fiel mir zu diesem Thema sofort Herbst ein. Und so ist diese herbstliche Szene aus dem Wald entstanden, bei der die Eichhörnchen schon fleißig Vorräte für den Winter sammeln.

Hello everyone!
The theme of the current LawnFawnatics Challenge #154 is "into the woods". Since the weather really hasn't been summer-ish lately, I immediately thought of fall. And so I made this fall-ish scene in the woods, where the little squirrels are busy collecting acorns and nuts for the winter.

Hier habe ich, wie fast immer, einige Stempel- und Stanzensets kombiniert. LawnFawn hat da aber auch ein Händchen für, alles aufeinander abzustimmen.
Im Hintergrund befindet sich ein Stück hellblauer Cardstock, den ich mit der Stitched Windy Backdrop Stanze ausgestanzt und dann von unter her ein wenig mit Distress Oxide Broken China gewischt habe. Darauf befindet sich eine von drei Grasbordüren - diese hier aus dunkelgrünem Cardstock gestanzt. Und wiederum darauf habe ich die Bäume des Waldes gepflanzt - die Birken mit dem Birch Stanzenset aus weißem Cardstock gestanzt, die dicken aus taupe farbenem Cardstock mit der Lift the Flap Tree Backdrop. Dann habe ich beide mit Copics sowie einem weißen Gelstift coloriert.

Here  - like I do most times when making a card with stamps and dies by LawnFawn - I combined a few stamp and die sets. They really know how to make everything work with each other!
In the background there's a piece of light blue cardstock, that I first cut with the Stitched Windy Backdrop, then inked it from the bottom with a bit of Distress Oxide Broken China. On top I put one of in total three grass borders, this one die cut from dark green cardstock. And on top of that I planted the trees of my woods. I die cut the birch trees from white cardstock using the Birch die set, the larger trees I die cut from taupe cardstock with the Lift the Flap Tree Backdrop. Then I used my Copics and a white gel pen to color them. 


Auf der linken Seite der Karte springt ein Eichhörnchen mit einer Nuss im Mund durch die Bäume. Wie fast alle Motive der Karte ist es aus dem Set Let's Go Nuts. Die kleine Eichel - die noch ein paar weitere Male auf der Karte erscheint - ist aus dem Set Cheery Christmas. 
Und hier seht Ihr auch den Text der Karte. Den habe ich aber erst ganz zum Schluss aufgeklebt, weil ich mir nicht sicher war, ober auf der Karte überhaupt Platz für einen Text ist. Und jetzt ist er sogar direkt in der Mitte der Karte untergekommen. Ich habe ihn mit weißem Embossingpulver auf dunkelbraunen Cardstock embosst. Auch der Text ist aus dem Set Let's Go Nuts.

On the left side of the card a little squirrel is jumping between the trees, carrying a little acorn in his mouth. Most of the images here are from the Let's go Nuts stamp set. This acorn - that will appear a few more times on this card - is from the Cheery Christmas stamp set.
And you can also see the text of the card on this picture. I added this as the very last step of making this card, because I wasn't sure if there will be any room at all for a text. Now it is even placed right in the center. I white heat embossed it onto some dark brown cardstock. Also the text is from the Let's go Nuts stamp set.


Auf der rechten Seite hört der Wald auf - hier haben die Eichhörnchen ein Eichelhaus gebaut. Es ist mit dem Big Acorn Stanzenset gemacht, allerdings habe ich das Fenster des Pumpkin Houses benutzt. Der Zaun ist aus dem Stanzenset Build a House Spring Add-On, dahinter wachsen Sonnenblumen aus dem Set Happy Harvest. Und oben auf dem Dach freut sich eines der Eichhörnchen wahnsinnig über die vielen Eicheln, die schon gesammelt wurden. Das sieht man an der kleinen Sprechblase mit dem Herz, ebenfalls aus dem Cheery Christmas Stempelset.

On the right side the woods end - and here the squirrels built their acorn house. It's made using the Big Acorn die set, but I used the window from the Pumpkin House set. The fence is from the Build a House Spring Add-On set, behind it are growing some sunflowers from the Happy Harvest stamp set. And on the roof a little squirrel is over the moon over all those acorns that have been collected already. You can tell that from the little speech bubble with the heart, that also comes from the Cheery Christmas stamp set.


Unten quer über die Karte ist am meisten los. Zwischen zwei weiteren Lagen Gras - aus leicht unterschiedlich hellen Grüntönen gestanzt - sind viele Eichhörnchen unterwegs. Die vorderste Lage Gras habe ich mit ein wenig Distress Oxide Bundled Sage gewischt und mit grüner Metallic Watercolor bespritzt.
Der Baumstumpf mit dem Loch ist aus dem Stanzenset Lift the Flap Meadow Stanzenset hat praktischerweise ein Loch, das die Eichhörnchen als Vorratskammer nutzen können. Die Klappe habe ich abgeschnitten und das Loch dunkel hinterlegt.
Oben auf dem Baumstumpf schläft ein erschöpftes Eichhörnchen zwischen einigen der gesammelten Eicheln. 
Im Gras bzw. um die Bäume herum wachsen einige Pilze. Die sind mit den Stanzen Mushroom Border sowie dem Pilz aus dem Build a Tree House gemacht. 
Außerdem sind hier noch weitere Eichhörnchen fleißig am Werk - eines mit Bollerwagen samt kleinem Freund und eines zu Fuß.
Alle Motive auf der Karte sind mit Copics coloriert, ebenso wie die Stanzteile, die ich fast alle aus farbigem Cardstock gestanzt habev.

At the bottom, across the card, there's going on the most. Between two more layers of grass, cut from green cardstock in just slightly different tones, a lot of squirrels are working hard to prepare for winter. I inked the top layer of grass a bit with Distress Oxide Bundled Sage and flicked some green metallic watercolor onto it.
The tree trunk with the hole is from the Lift the Flap Meadow die set - it has a hole that comes pretty handy so the squirrels can use it as a pantry. I cut off the flap and put some dark colored cardstock behind it.
On top of the tree trunk a tired squirrel is taking a nap between a few acorns.
In the grass, around the trees, there are growing some mushrooms. I used the Mushroom Border die set and the little mushroom die from the Build a Tree House die set here.
And there are a few more squirrels working hard - one with a cart and his little friend, the other one is on foot.
All images on the card are colored with Copics, as are the die cuts, that I nearly all cut from colored cardstock.


Ich habe alle Lagen und Elemente aufeinander und dann auf den Hintergrund geklebt. Dafür habe ich 3D Tape benutzt, so dass die Szene eine tolle Tiefe bekommt. Dann habe ich noch einige bunte Herbstblätter auf der Karte verteilt. Die sind mit den Ranken-Stanzen aus dem Set Pumpkin House gestanzt, coloriert, dann habe ich sie von den Ranken abgeschnitten. Für die etwas größeren Blätter habe ich eine Stanze aus dem Set Acorn House gemacht.
Dann habe ich alles nur noch auf einem weißen Kartenrohling befestigt.

I put all the layers and elements together and onto the background using foam tape. This adds a nice depth to the card. Then I added a few colorful leaves - made using the vine die from the Pumpkin House die set. I die cut and colored them, then cut them off the vines. The few slightly larger leaves are made with dies from the Acorn House die set.
Then I mounted everything onto a white note card.

Donnerstag, 10. August 2023

Hip hip hurra, ein Junge!

 
Hallo Ihr Lieben!
Heute darf ich wieder ein Werk auf dem Stampcorner Blog zeigen - und ich habe natürlich noch einmal eines der tollen Stempelsets aus dem neuen Release verwendet. Diesmal ziert der süße Mäuse-Junge eine Babykarte, mit dem Teddy in der Hand finde ich ihn dafür perfekt.

Hello everyone!
Today it's my turn to share another card over on the Stampcorner Blog - and of course I used one of the stamp sets from the latest release again. This time this cute boy mouse is the star of a baby card, with the teddy in his hand I think he's just perfect for this kind of card.

Die Idee für den Hintergrund kam mir, als ich für eine meiner Sneak-Karten das Wort Hello mehrfach aus einem Stück Cardstock gestanzt habe. Als ich die Worte dann so untereinander sah, fand ich, das würde auch einen tollen Hintergrund geben. Also habe ich es hier dreimal aus craft farbenem Cardstock gestanzt und dabei darauf geachtet, dass die Abstände zu den Rändern und zwischen den Worten gleich waren. 
Mit nur ein wenig dunklerer brauner Tinte habe ich dann den Best Friends Background von MFT darauf gestempelt. Der Stempel ist schon älter, Ihr könnt natürlich jeden anderen Hintergrundstempel genauso verwenden. 
Hinterlegt habe ich den braunen Cardstock dann mit hellblauem Cardstock. Auf den habe ich mit dunkelblauer Tinte den ebenfalls neuen Strahlenstempel aufgestempelt. 
Auf beide Cardstockstücke habe ich dann noch etwas mit Wasser verdünntes Copic Opaque White aufgespritzt.

I got the idea for the background when I die cut the word hello several times from a piece of cardstock for one of my sneak cards. When I looked at the cardstock with the cut out words, I decided, this would make a great background. So I die cut the words three times from kraft colored cardstock, making sure to have the same spaces between the words and to the edges. 
Using a slightly darker brown ink I stamped the Best Friends Background by MFT onto the cardstock. It's a quite old stamp but of course you can use any kind of background stamp here.
Then I put a piece of light blue cardstock behind the brown one. Before I stamped the also new rays stamp with dark blue ink onto the light blue cardstock.
Onto both cardstock pieces I spritzed some Copic Opaque White, that I had mixed with a bit of water.
 

 Den süßen Mäusejungen habe ich passend zu den Farben auf meiner Karte in graubraun, hell- und dunkelblau coloriert, die Highlights sind mit einem weißen Gelstift gemacht. Dann habe ich ihn ausgeschnitten. Und weil er auf dem Hintergrund doch irgendwie unterging - und ich zufällig noch die mittlere Ausstanzung des Wonky Stitch Window aus Vellum auf meinem Tisch liegen hatte, habe ich das dahinter gesetzt. So fällt er viel besser auf, man kann den Hintergrund aber noch gut lesen.
Die Texte auf meiner Karte sind aus den Stempelsets Kleine Worte und Kleine Worte 2. Ich habe sie mit weißem Embossingpulver auf dunkelblauen Cardstock embosst und ausgeschnitten.
Die Maus habe ich mit dünnem 3D Tape auf das Vellum und das dann wieder mit dünnem 3D Tape auf den Hintergrund geklebt, für die Textstreifen habe ich dickes 3D Tape verwendet.
Als Deko habe ich dann noch ein paar kleine Holzsterne auf der Karte verteilt.

The cute mouse I colored matching the colors on my card in a brown-ish grey, light and dark blue, for the highlights I used a white gel pen. Then I cut him out. And since he kind of got lost on the busy background - and I literally had the center cut out of the Wonky Stitch Window cut from vellum laying in front of me - I put that behind him. Now he's better noticable, but still the background is legable as well.
The texts on this card mean "hipp hipp hooray, it's a boy" and "welcom from the bottom of my heart". I white heat embossed them onto dark blue cardstock and cut them out.
I attached the mouse with thin foam tape to the vellum and then used thin foam tape again to adhere it to the background. To attach the text strips I used thick foam tape.
To decorate my card I added a few small wooden stars.


Hier kann man die verschiedenen Ebenen der Karte nochmal besser sehen.
Zun Schluss habe ich alles nur noch auf einen weißen Kartenrohling geklebt.

Here you can see the different layers of the card a bit better. 
To finish it, I just put everything onto a white note card.