

Hallo Ihr Lieben!
Es war wieder soweit - eine Explosionbox zur Hochzeit wurde benötigt. Und hier ist sie.
Hello everyone!
It was that time again - an explosionbox for a wedding was needed. So here it is.
Ich habe hier meine Box aus weißem Cardstock gewerkelt und die Seitenteile mit rotem Cardstock, aufgeklebt mit 3D Tape, dekoriert. Daraus habe ich jeweils einen Kreis ausgestanzt und da hinein mit dünnnem 3D Tape ein ausgestanztes rotes Herz geklebt. Dekoriert habe ich jedes der Herzen mit einer weißen Perle.
I made my box from white cardstock and covered the sides with red cardstock that I attached with foam tape. I die cut a circle from each of the red sides and put a heart, attached with thin foam tape, into each circle. I decorated each heart with a white pearl.

Da der Deckel recht üppig dekoriert ist, habe ich auf mehr Deko an den Seitenteilen der Box verzichtet.
Den Deckel habe ich aus weißem Cardstock gewerkelt und um den Rand weißes Band gebunden, das ich vorne zur Schleife gebunden habe.
Since the lid is decorated quite a lot, I decided to not add anything else to the sides of the box.
The lid I made from white cardstock again and wrapped a piece of white ribbon around it, tying it to a bow at the front.

Ein hoher Aufbau als Deko auf dem Deckel war gewünscht - kann ich. Ich habe hier den Deckel zuerst ebenfalls mit rotem Cardstock beklebt, darauf kam ein Stück Vellum, in das ich einen Strahlenkreis gestanzt habe.
Auf dem Deckel steht eine halbe Rosette, gemacht aus weißem Cardstock. An der Rückseite habe ich ein Gerüst mit Herz-Girlande sowie einen gezackten Kreis aus silbernem Spiegelcardstock angebracht.
Vorne auf die Rosette habe ich die Initialen des Brautpaares sowie ein Und aufgeklebt.
Vor der Rosette befinden sich einige Blüten, mehr Perlen und ein Banner, auf das ich mit roter Tinte ein "zur Hochzeit" gestempelt habe.
I was asked to make a tall decoration for the lid - I surely can do so! I first covered the lid with more red cardstock, then put a piece of vellum with a ray circle cut into it, on top.
On the lid I put up half a white paper rosette. To the back I attached two sticks with a heart garland and a spirograph circle, cut from silver mirror cardstock. On top of the rosette I added the brides and grooms initals with an ampersand inbetween.
In front of the rosette I added a few flowers, more white pearls and a banner, onto that I stamped a "to your wedding" with red ink.

Hier ist die geöffnete Box - zum "center piece" erfahrt Ihr gleich mehr.
Die Seitenteile links und rechts enthalten kleine Taschen. Das linke mit Lasche, um ein Geldgeschenk hineinzustecken, rechts befindet sich eine kleine Karte für persönliche Glückwünsche darin.
Auf das vordere Seitenteil habe ich weiß Glückwunschtexte aufembosst und mit einigen weißen Perlen dekoriert.
Here's the opened box - more about the "center piece" in a little bit.
The sides on the left and right are little pockets. I put a flap on the left one to be able to put some money into it, in the right one there's a little card for some personal words.
Onto the front flap I white heat embossed some wishes and decorated it with a few white pearls.

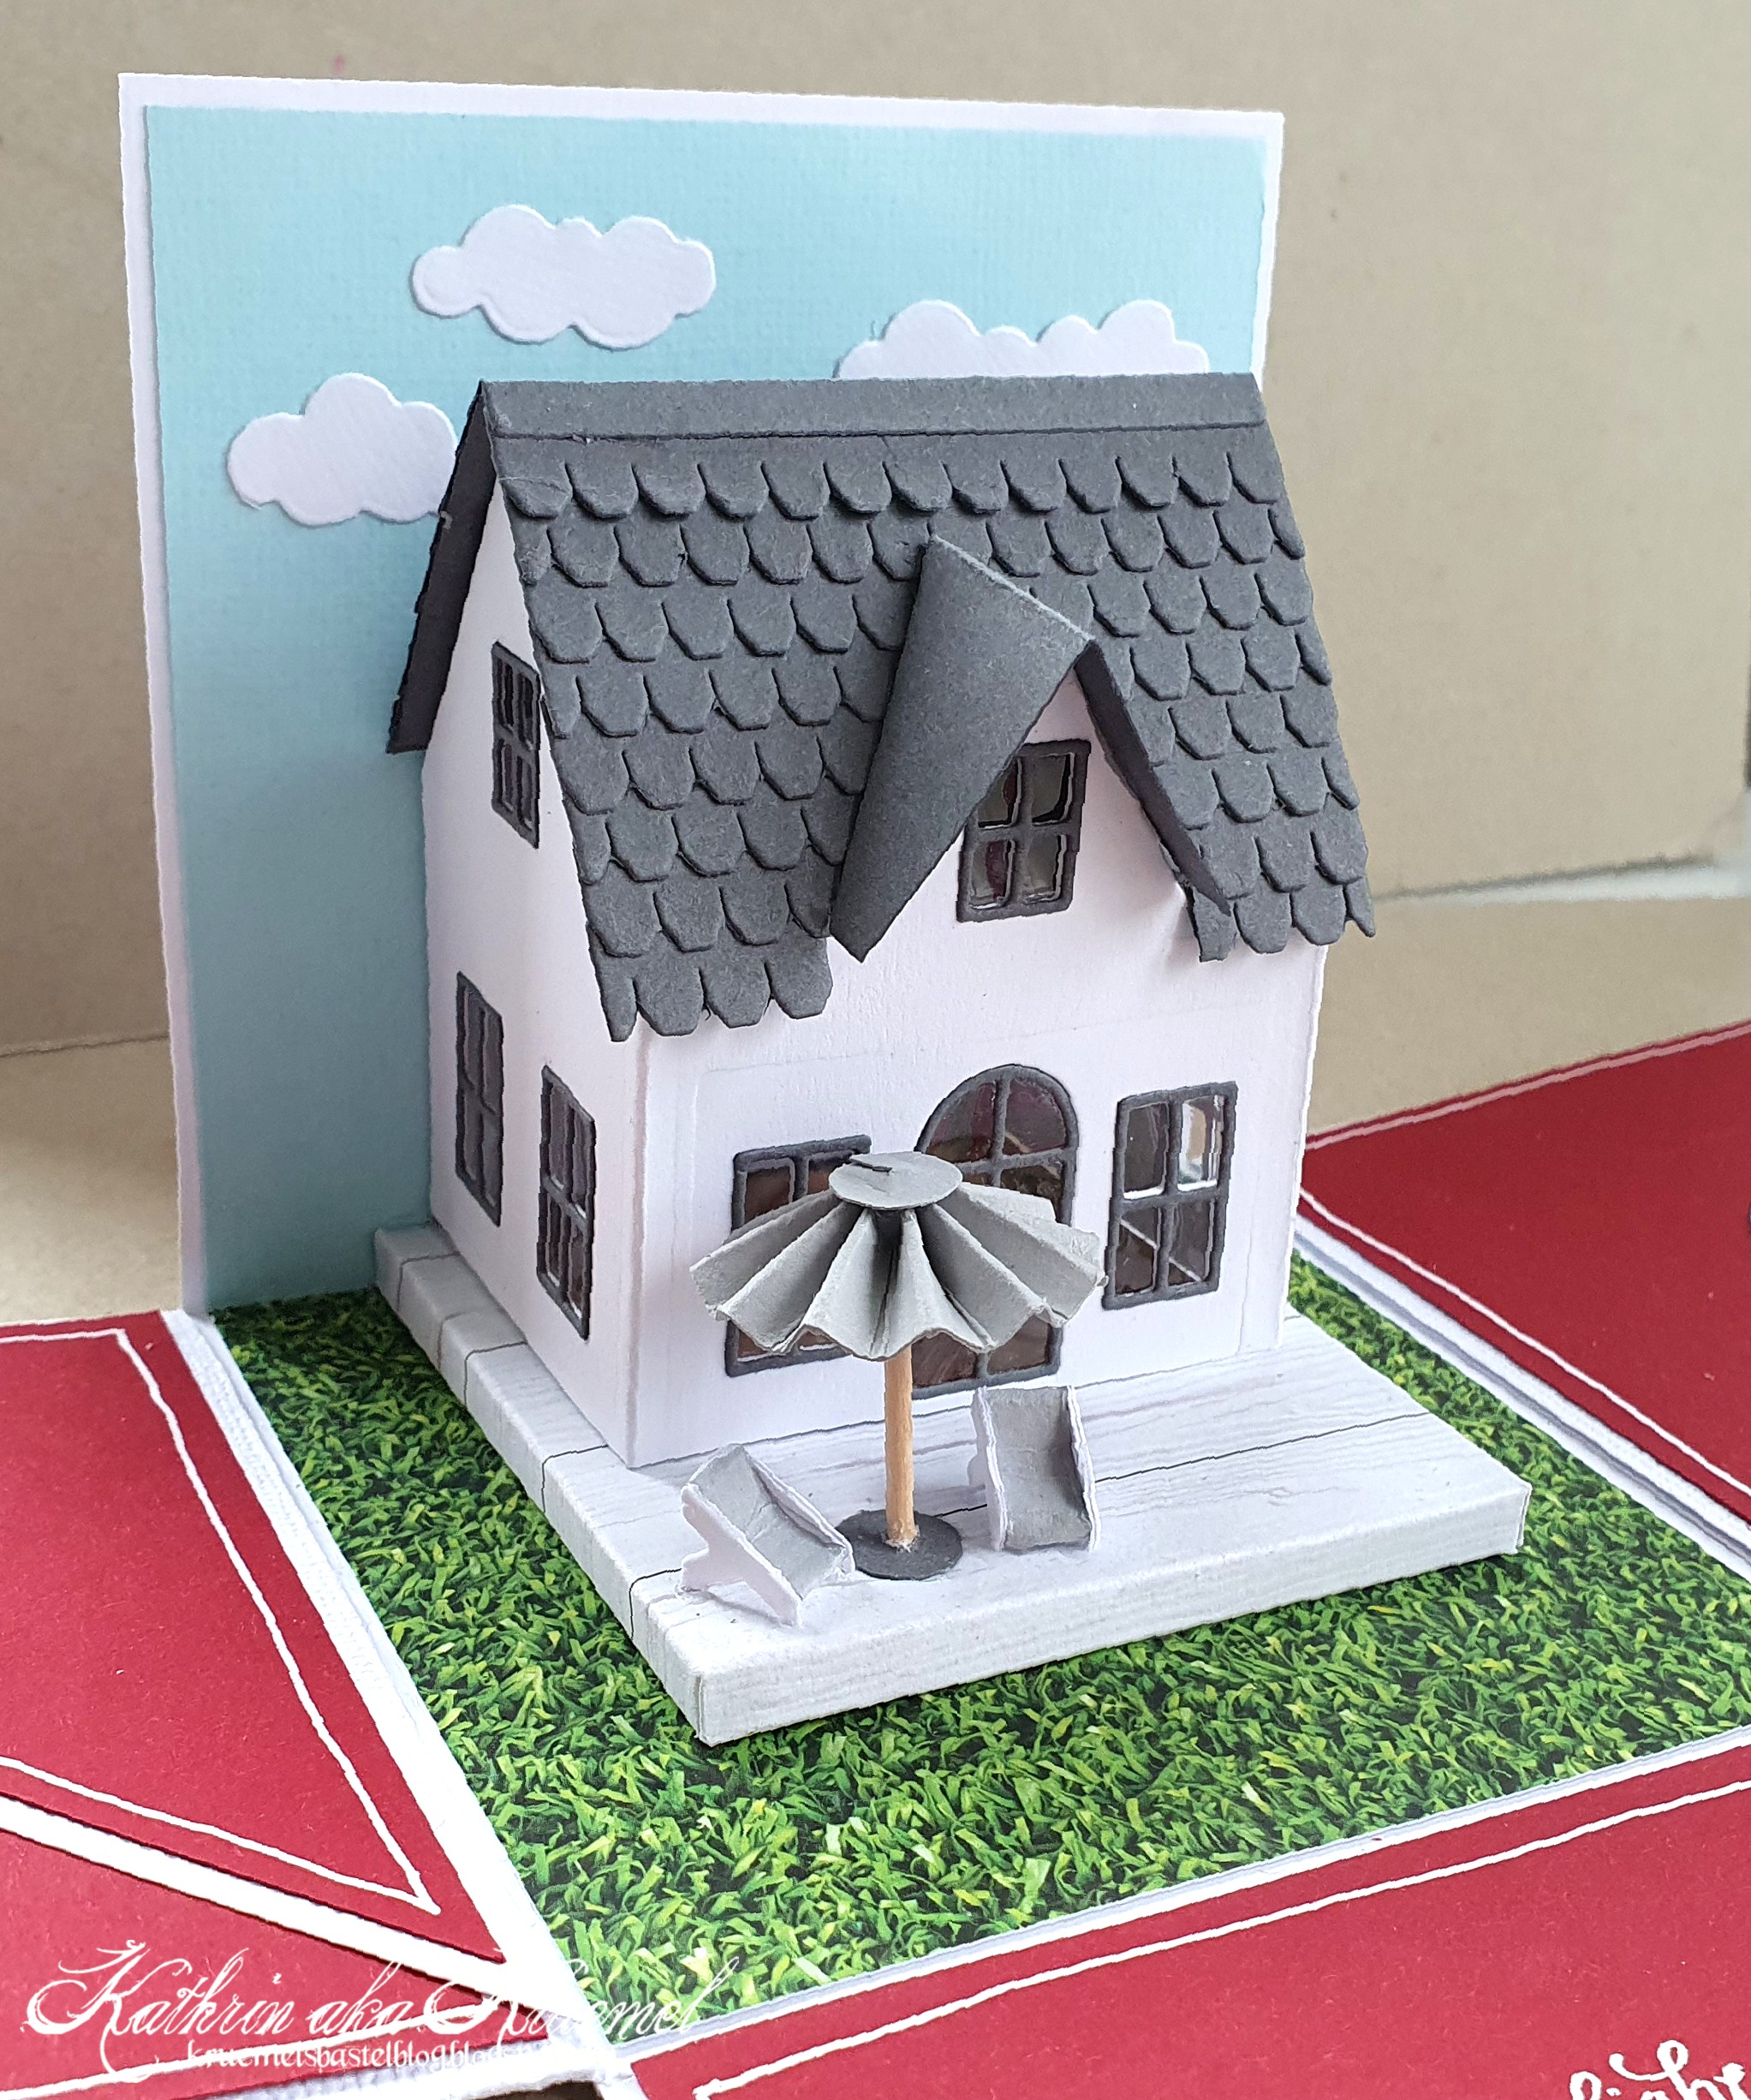
Neben den Namen des Brautpaares war meine einzige Info, dass es "davon träumt, ein Häuschen mit einem kleinen Garten zu kaufen und dort unter einem Sonnenschirm in Liegestühlen auf der Terrasse zu sitzen". Also habe ich diesen Traum im Inneren der Karte Wirklichkeit werden lassen.
Die Rückseite habe ich mit hellblauem Cardstock beklebt und drei kleine Wolken angebracht. Den Boden der Box habe ich mit Designpapier mit Grasdruck beklebt.
Für das Haus habe ich das Village Set von Sizzix verwendet. Die Fenster sind mit Folie hinterlegt und da man durch sie ins Innere des Hauses schauen kann, habe ich innen noch Designpapier mit Parkettmuster aufgeklebt.
Aus weißem Cardstock mit Holzprint habe ich eine Terrasse gebaut. Auf der steht der Sonnenschirm mit den Liegestühlen. Für den Sonnenschirm habe ich eine kleine Rosette aus hellgrauem Cardstock gemacht und an einem Stück Zahnstocher befestigt, den ich in die Terrasse gesteckt habe. Für die Liegestühle habe ich kleine X gestanzt, einen der Arme weggeschnitten und jeweils zwischen zwei dieser X einen Streifen hellgrauen Cardstocks geklebt. Die Stühle sind gerade mal 1 x 1 cm groß....
Besides the name of the bridal couple all the information I had was that they are "dreaming of buying a house with a little garden and sit on its porch in some deck chairs in the shade of an umbrella". So I decided to build that dream house inside the box.
I covered the back flap with light blue cardstock and added three small clouds. Onto the bottom of the box I attached some patterned paper with a grass print.
For the house I used the Village Set by Sizzix. I put some acetate behind the windows and since you can see through them to the inside of the house, I also put some patterned paper with a wooden floor print inside the house.
From white cardstock with a wooden pattern I built the deck. On it there's the umbrella with the deck chairs. I created a small rosette for the umbrella, attaching it to a piece of a skewer that I stuck into the deck. For the deck chairs I die cut little Xs, cut off one of the arms of each and then put a strip of light grey cardstock between two of those Xs. Those chairs are just 1 x 1 cm in size....
An der Rückseite des Hauses - in die ich keine Fenster eingebaut habe - habe ich den Dachüberstand weggeschnitten. So konnte ich das Seitenteil am Haus und der Rückseite der Terrasse festkleben und sie klappt beim Öffnen der Box nicht mit auf.
I cut off the part of the roof, that hangs over the house, at the back of the house, I also didn't add any windows to the back. This way I was able to glue the back flap to the back of the house and also the back of the deck so it stays upright and doesn't open when the lid is taken off.