
Hallo Ihr Lieben!
Letzte Woche kam das neue Release von LawnFawn heraus - und ja, ich war wieder verliebt. Vielleicht bin ich auch ein ganz klein wenig - hüstel - eskaliert und stand dann, nachdem meine Sachen ankamen, vor der Qual der Wahl: was wollte ich zuerst verwenden. Ich laufe dann ja immer Gefahr, alles auf einmal benutzen zu wollen. Also habe ich mich hauptsächlich auf das Carrot 'Bout You Stempelset konzentriert und damit, und natürlich dem ein oder anderen Neuen und auch Altem, diese Frühlingskarte gewerkelt.
Hello everyone!
Last week LawnFawn came out with their new release - and yes, I was once again in love with it. Maybe I also escalated a bit - cough - and after my order arrived I was once again overwhelmed and had a hard time deciding what to use first. I always want to use everything right away and at once. But then I decided to go with the Carrot 'Bout You stamp set and with it and of course some more new and older items I made this spring card.
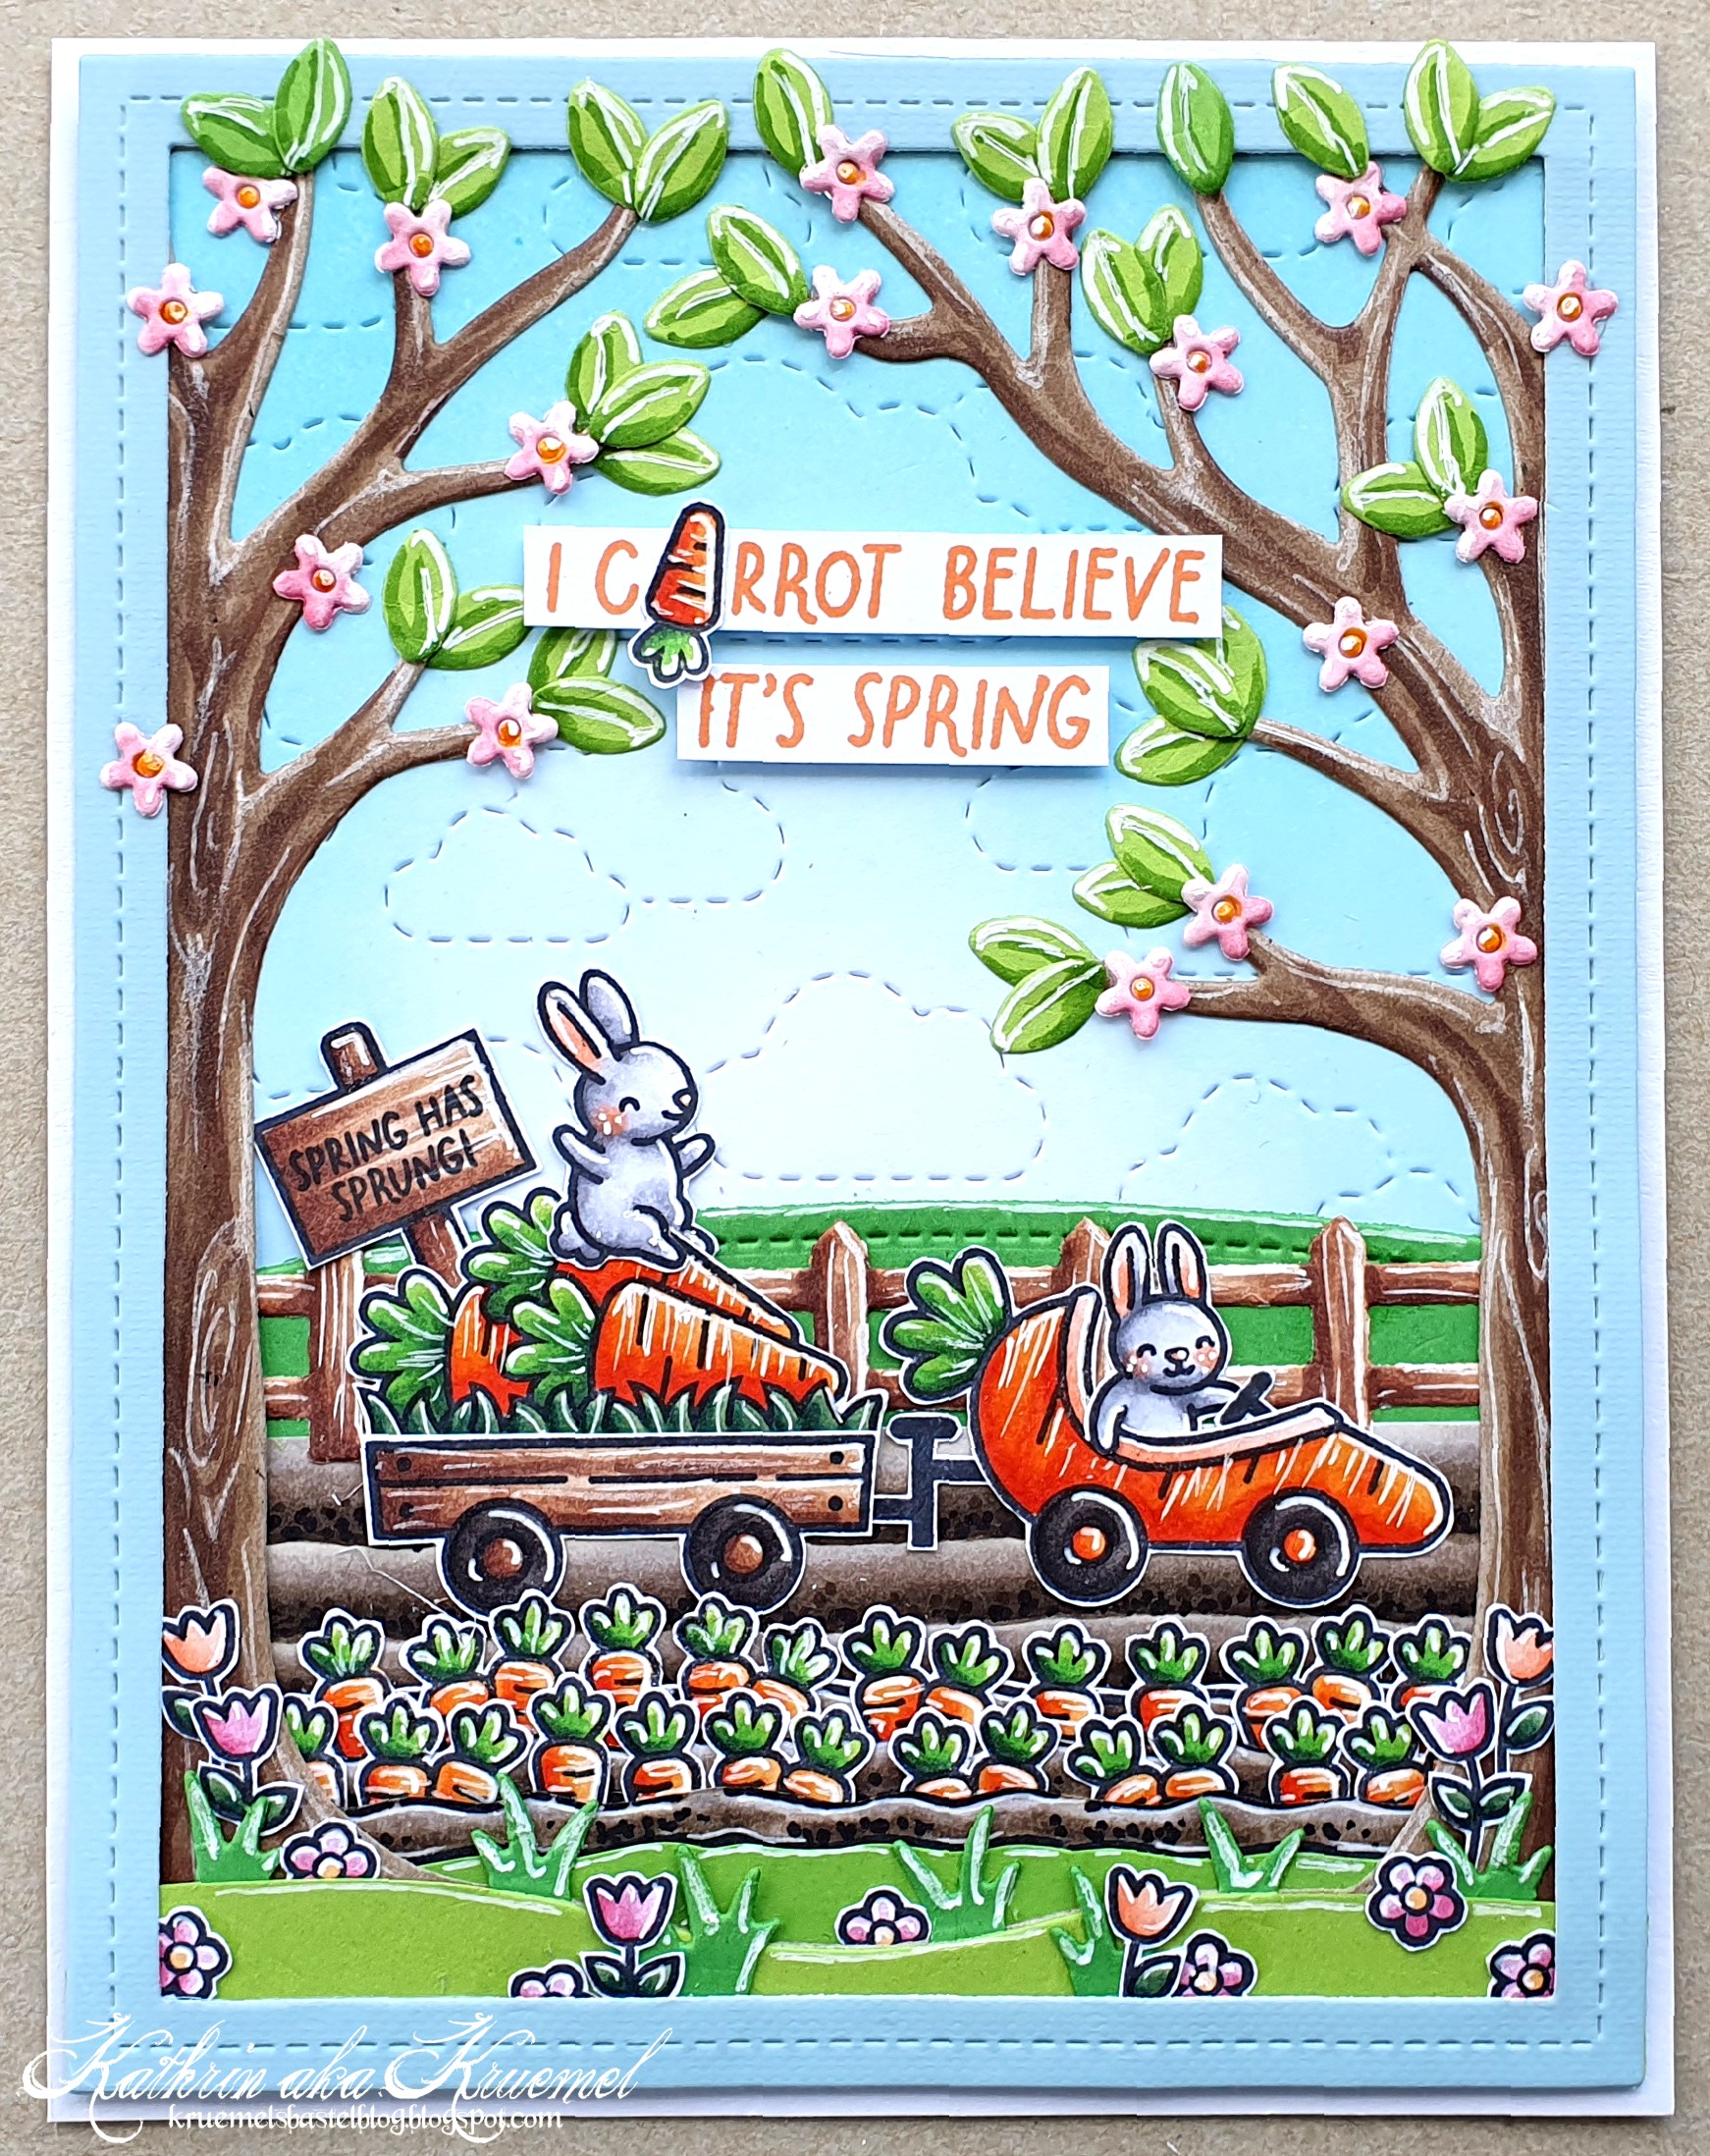
Im Hintergrund habe ich erst den Stitched Clouds Backdrop aus weißem Cardstock gestanzt. Ich habe hier nur den in Landscape Format, aber da ich wusste, dass der untere Teil sowieso von anderen Elementen verdeckt wird, habe ich per Partial DieCutting zumindest im oberen Bereich die Wolken gestanzt. Dann habe ich den Cardstock mit Distress Oxide Salvaged Patina gewischt.
Als Rahmen für meine Szene habe ich den Spooky Forest Backdrop verwendet, der sich super auch für andere Jahreszeiten abwandeln lässt. Ich habe ihn aus hellbraunem Cardstock gestanzt und den Bäumen mit Copics Sturktur verliehen. Später habe ich dann noch einen der Stitched Rectangle Frames aus hellblauem Cardstock gestanzt und aufgeklebt.
In the background I used the Stitched Clouds Backdrop to cut the clouds into a piece of white carsddtock. I only have the landscape orientated one but since I knew that the lower part will be covered by other elements I did some partial die cutting to at least cut the clouds in the upper area. Then I inked the cardstock with Distress Oxide Salvaged Patina.
I used the Spooky Forest Backdrop to frame my scene. This one can easily be changed to fit any other season. I die cut it from light brown cardstock and then used Copics to add some structure to the trees. Later I also die cut one of the Stitched Rectangle Frames from light aqua cardstock and glued it around the scene.

In dem bereits erwähnten Carrot 'Bout You Set sind zwei Karotten-Autos enthalten. In die war ich sofort verliebt und ich wusste, dass davon mindestens eines auf die Karte musste. Es ist dann das kleinere Auto geworden, an das ich den Anhänger aus dem selben Set gehängt habe. Der ist beladen mit den großen Karotten aus dem Hay There Hayrides Bunny Add-On Set. Auf ihnen sitzt ein kleiner Hase, außerdem steckt dort ein Schild mit dem Text "Spring has Sprung".
Im Karotten-Auto sitzt ein weiterer Hase, wieder aus dem Hay There Hayrides Bunny Add-On Set. Er lässt ganz lässig den rechten Arm herunterhängen. Und weil das kleine Auto kein Lenkrad hat, ich aber natürlich nicht wollte, dass die beiden Hasen unkontrolliert über die Felder fahren, habe ich das Lenkrad aus dem größeren Auto angesetzt.
Hinter den Fahrzeugen befindet sich ein grüner Hügel, davor ein Zaun. Der ist mit der ebenfalls neuen Farm Fence Border aus weißem Cardstock gestanzt und wieder mit Copics coloriert.
Und dann begann die Karotten-Eskalation. Ich habe ganz viele Karotten aus dem Carrot 'Bout You Set abgestempelt und ausgeschnitten. Mit dem "Feld" aus dem Veggie Happy Set habe ich dann die welligen Pflanzreihen gestempelt. Dabei habe ich den Stempel dreimal - jeweils um 180 Grad gedreht - abgestempelt und die Enden maskiert, so dass ich ein langes Feld erhalten habe. Entlang der welligen Linien habe ich mit einem Cutter Schlitze in den Cardstock geschnitten und die einzelnen Karotten hineingesteckt.
Zwischen Karottenfeld und Zaun habe ich dann einen Feldweg gesetzt, auf dem das Auto samt Hänger fährt. Der besteht einfach nur aus einem Streifen weißen Cardstocks, den ich mit den selben Farben wie auch die Erde des Karottenfeldes coloriert habe. Es sollte ein wenig so aussehen, als wären zwei tiefe Fahrrinnen eingegraben, in denen die Reifen laufen.
Vor dem Feld sind dann noch zwei Lagen Wiese - eine ist passend zu der welligen Kante des Feldes geschnitten, die Lage davor habe ich mit dem Spooky Forest Backdrop gemacht. Davon habe ich übrigens die hohen Gräser weggeschnitten. Stattdessen habe ich mit der Cattail Stanze kleinere Grasbüschel gestanzt und dazwischen Tulpen und kleine rosa Blumen gesetzt.
There are two carrot cars in the Carrot 'Bout You stamp set. I immediately fell in love with those and knew, that I wanted to use at least one of them. I went with the smaller one here and put the trailer from the same set behind it. This is loaded with the large carrots from the Hay There Hayrides Bunny Add-On set. A little bunny is sitting on them. And there's also a sign saying "spring has sprung" tucked between the carrots.
In the carrot car there is another bunny sitting, again from the Hay There Hayrides Bunny Add-On set. He's cooly letting his right arm hang out of the "window". And since the smaller of the carrot cars has no steering wheel but of course I didn't want those two bunnies go uncontrollable over those fields I added the steering wheel of the larger car to the small one.
Behind the car there's a green hill and a fence. It is made with the also new Farm Fence Border die, cut from white cardstock and then again colored with Copics.
And then the carrot escalation started. I stamped a lot of carrots from the Carrot 'Bout You set and cut them out. Using the "field" image from the Veggie Happy set I stamped wavy plant rows. I stamped the image three times - turning it 180 degrees each time - and masked off the ends to get one long field. With my cutter I cut along the wavy stamped lines and put the carrots in the slits.
Between the carrot field and the fence I added a dirt road on which the car can drive. It's simply made from a strip of white cardstock, that I colored using the same colors as I did for the soil of the carrot field. I wanted it to look like there are two trails in the dirt in which the wheels run.
In front of the row I added two layers of grass - one is cut matching the wavy outline of the carrot field, the top layer is made with the Spooky Forest Backdrop. I cut off the high grass of it and added smaller bushels of grass instead that I made with the Cattail die. Between the grass I put some tulips and small pink flowers.

Damit die Bäume zum Frühling passen, habe ich sie mit Blättern und Blüten versehen. Die Blätter sind mit einer Stanze aus dem Stitched Strawberry Frame Set aus grünem Cardstock gestanzt. Ich habe mit Copics einfach ein Ende der Blätter ganz leicht eingefärbt und eine Mittelachse aufgemalt.
Die Blüten sind mit einer Stanze aus dem Pumpkin House Stanzenset aus rosafarbenem Cardstock gestanzt und ebenfalls ein wenig schattiert. Blätter und Blüten habe ich dann an den Bäumen verteilt.
Mittig am Himmel habe ich dann meinen Text platziert. Der ist mit Stempeln aus dem Set Carrot 'Bout You gemacht und mit orangefarbener Tinter abgestempelt. In der Vorschau auf eines der Create With Us Events habe ich gesehen, dass dort ein gestanztes Carrot aufgeklebt wurde und dabei das A durch eine Karotte ersetzt ist. Die Idee fand ich so toll, dass ich sie nachmachen musste. Ich habe erst das I C abgestempelt, dann den Cardstock etwas verschoben und den Rest des Textes gestempelt. So war genug Platz für eine weitere ausgeschnittene Karotte. Ich habe die allerdings umgedreht, da sie so von der Form her eher with ein A aussieht.
To give the trees a spring look I added some leaves and blossoms to them. The leaves I die cut from green cardstock using a die from the Stitched Strawberry Frame set. I used a green Copic marker to draw a line along the center and one end of each leave.
The blossoms I die cut from light pink cardstock using a die from the Pumpkin House set and again shaded them a bit. Then I glued the leaves and the blossoms to the trees.
Onto the sky, in the center of my card, I added the text. I made it using stamps from the Carrot 'Bout You set and stamped it with orange ink. In the preview of one of the upcoming Create With Us Events I saw a card with a word Carrot, made from die cut letters, on it where the A is replaced with a carrot. I liked this idea so much that I had to include it on my card. I first stamped the I C, then moved the cardstock a bit and stamped the rest of the text. This way there was enough room between the letters for another cut out carrot. I turned it upside down because this ways it looks more like a letter A.

Normalerweise nutze ich für solche Karten ja 3D Tape zwischen den einzelnen Lagen - hier waren es aber so viele Elemente, dass ich mich schwer getan hätte. Also sind alle Lagen direkt aufeinander geklebt, nur hinter dem Text befindet sich etwas 3D Tape.
Zum Schluss habe ich meine Szene auf einen weißen Kartenrohling geklebt.
Usually I use foam tape between the layers of such scene cards - but here I had so many elements that it would have been really hard to do it. So I glued all layers directly on top of each other and only used some foam tape behind the text.
Then I adhered my scene to a white note card.