Dienstag, 15. Dezember 2020

Santa is coming to town

 
Hallo Ihr Lieben!
Kennt Ihr die Colorize Stanzen von Sizzix? Dabei werden verschiedene Teile eines Motives aus farblich abgestuftem Cardstock gestanzt und so ergibt sich ein toller "colorierter" Effekt, ganz ohne wirklich coloriert zu haben. Mich hatten die vielen Stanzteile bisher immer ein wenig abgeschreckt, aber dem süßen Santa konnte ich doch nicht widerstehen und habe ihm eine Chance gegeben. Und ich liebe ihn! Und so habe ich ihn gleich auf dieser Weihnachtskarte, die ich heute auf dem Stamping-Fairies Blog zeige, verarbeitet. 

Hello everyone!
Do you know the Colorize dies by Sizzix? Different parts of an image are die cut from different tones of one color and so you end up with a "colorized" look without having to really do any coloring. I was always a bit intimidated by all the small pieces these get put together from. But that Santa is so cute, I had to have him and gave him a chance. I just love it! And I've used him on this christmas card, that I'm sharing over at the Stamping Fairies Blog today. 

Für den Hintergrund habe ich ein Stück des Happy Holidays Designpapieres aus der Very Merry Serie von Simple Stories verwendet. Mit den großen, wie handgeletteret aussehenden Worten ist das einfach traumhaft. 
Ich habe die Ränder des Papieres noch mit Distress Ink Aged Mahogany und Gathered Twigs ein wenig gewischt.
Dann habe ich das Papier schwarz gemattet und auf einen weißen Kartenrohling geklebt.

For the background I've used a piece of the Happy Holidays patterned paper from the Verry Merry series by Simple Stories. I just love those big, handlettered words on these sheets!
I used Disterss Ink Aged Mahogany and Gathered Twigs to darken the edges a bit.
Then I've matted it black and glued it onto a white note card.


Ist der Santa nicht süß! So schön vintage und mit einem so schön freundlichen Gesicht. 
Für Bart, Mützenrand und Co, die aus drei Lagen bestehen, habe ich weißen, cremefarbenen und hellgrauen Cardstock benutzt. Ich hatte mir vorsichtshalber ein "Aufbauvideo" von Sizzix zu der Stanze angesehen - hätte ich gar nicht gebraucht, denn die Farbvorschläge sind auf die Rückseite der Stanzen gleich mit aufgedruckt. Genial! 
Auf meinen weißen Gelmarker konnte ich trotzdem nicht verzichten - nur für ein paar kleine Highlights. 
Das Wort Santa habe ich mit den Stanzensets Handletter Alphabet Uppercase und Lowercase von CraftEmotions aus schwarzem Cardstock gestanzt und mit 3D Tape auf den Bart geklebt. 
Darunter befindet sich ein kleines Banner, auf dem der Text fortgeführt wird. Dafür habe ich einen Stempel aus dem Stempelset Happy Pawlidays von MFT benutzt und denText mit weißem Embossingpulver auf das schwarze Banner embosst.

Isn't this Santa the cutest! I love the vintage look and the friendly expression on his face.
For the beard, fur brim of the hat etc, that are all made from three layers, I've used white, cream and light grey cardstock. I watched a video by Sizzix on how to put the layers on top of each other to know which one to cut from which color. Well, I wouldn't have to do that since the colors and layers are printed onto the back of the dies. Genius!
I still had to use my white gel marker, just for a few small highlights.
The word Santa is die cut from black cardstock with the die sets Handletter Alphabet Uppercase and Lowercase by CraftEmotions. Then I've glued it onto the beard with dimensionals. Under the Santa theres a little banner on which the text continiues. I used a stamp from the Happy Pawlidays stamp set by MFT here and white heat embossed it onto a black banner.


Und hier habe ich noch eine Detailaufnahme des Gesichtes. Ich habe die Brille aus goldenem Spiegelcardstock gestanzt und dann noch ein weiteres Mal aus irisierendem Vellum. Die Innenteile der Brille aus dem Vellum habe ich dann als Gläser benutzt. Das sieht wirklich klasse aus - ein wenig wie eine verspiegelte Brille.

And here I've a detail picture of Santa's face. I've die cut the glasses from golden mirror cardstock and then again from an iridescent vellum. I've used the inner pieces of the glasses then and glued them into the frames. It looks great - a tad bit like those mirrored glasses.

Montag, 14. Dezember 2020

Weihnachtswichtel

 
Hallo Ihr Lieben!
Nur noch 10 Tage bis Weihnachten - und so langsam ist die Weihnachtskartenproduktion abgeschlossen. Aber eine habe ich noch! Und auf der tummeln sich zwei kleine Wichtel.
 
Hello everyone!
Only 10 more days til christmas - and that means I am coming to an end with my christmas cards. But I have another one for you - this one shows two little christmas gnomes.

Angefangen hat hier alles mit der Quilt Square Cover Up Stanze von MFT. Die ist ja eigentlich recht alt, wurde aber vor kurzem wieder aus dem Tresor geholt. Das Muster ist recht unruhig, aber trotzdem wollte ich sie unbedingt für diese Weihnachtskarte benutzen. Ich habe die Außenteile aus weißem Cardstock gestanzt - zweimal, denn die Linien sind aufgedoppelt, so entsteht mehr Tiefe im Muster. Die inneren Teile habe ich aus verschiedenen Designpapieren aus dem Let It Shine Papierblock und dem Snow Days Remix Petit Block von LawnFawn in veschiedenen Rot- und Rosatönen gestanzt. 

This card stareted with the Quilt Squre Cover Up die by MFT. It's a really old one but MFT just took it out of their vault to re-release it for  short time. The pattern is pretty busy but I still wanted to use it for this christmas card. I've die cut the outlines from white cardstock - twice to double it up and add more depth to the pattern. The inner parts were cut from different papers from the Let it Shine and the Snow Days Remix Petit paper pads by LawnFawn, using different tones of reds and pinks.

    
 Als Deko habe ich zwei der Little Agenda Gnomes von MamaElephant benutzt. Die Kerlchen sind einfach zu putzig! Hier kommen sie in Weihnachtslaune daher - mit Lichterkette und Weihnachtskranz. Sie sind mit Copics coloriert.
Der Text ist teilweise mit dem Dymo geschrieben bzw. aus goldenem Spiegelcardstock gestanzt. Das Gnome habe ich aus einzelnen Buchstaben gestanzt und aufgeklebt. Für das schön geschwungene Christmas habe ich die Stanze von WhimsyStamps benutzt.
Als Deko kamen noch ein paar schwarze Pailetten sowie kleine schwarze Sternchen aufgeklebt.

To decorate my card I've used two of the Little Agenda Gnomes by MamaElephant. Those little ones are just too cute! These two are in a christmas mood - with lights and a wreath. They were both colored with Copics.
Part of the text is written with my Dymo, the other part die cut from golden mirror cardstock. The Gnome is die cut from individual letters and glued onto the card. For the scripty christmas I used a die by WhimsyStamps.
To decorate the card I've added a few black sequins and tiny black stars.


Und auf diesem Bild seht Ihr den Spiegelcardstock noch besser - den von oben zu fotografieren ist ja immer nicht so einfach. Aber er passt perfekt zu dem roten Papier mit den goldenen Folienpünktchen. 
 
And here you get a better look at the mirror cardstock - it's always hard to get this looking good on pictures taken from above. But it goes perfectly with the red paper with the tiny golden speckles. 


Samstag, 12. Dezember 2020

Stampcorner Adventskalender Tag 12

 
Hallo Ihr Lieben!
Heute darf ich Euch eine Karte mit dem Stempel, der sich hinter Türchen Nr. 12 des Stampcorner Adventskalender befindet, zeigen. Und ich fürchte, mit dieser Karte oute ich mich als alt. So alt, dass ich sogar noch Schallplatten kenne (und sogar noch einige habe, inklusive dem dazugehörigen Plattenspieler).

Hello everyone!
Today I am sharing a card using the stamp that is behind shutter no. 12 of the Stampcorner advent calendar. And I'm afraid I'm outing me as old with this card - old enough to know record (and I even still have some, including the player).

Wie gesagt, auf meiner Karte sind Schallplatten zu sehen. Die sind ganz einfach aus zwei Kreisen hergestellt. Ein größerer aus schwarzem Cardstock unten, ein kleinerer farbiger - ich habe grün, hellblau, türkis und dunkelblau - benutzt und dann noch ein Loch in der Mitte. Mit einem weißen Gelmarker habe ich ein paar weiße Linien aufgemalt, außerdem habe ich den schwarzen Bereich aller Platten mit Glossy Accents überzogen. Die glänzten doch immer so toll. Auf das Label jeder Platte habe ich dann noch jeweils ein kleines Herz, gestanzt aus goldenem Spiegelcardstock, geklebt. 
Mit den Schallplatten habe ich ein Stück weißen Cardstock gefüllt (die überstehenden Teile habe ich einfach abgeschnitten), den ich dann schwarz gemattet und auf einen weißen Kartenrohling geklebt habe.

As mentioned, these are records on my card. Those can easily be made from two circles. A larger one from black cardstock, a smaller on from colored cardstock - I've used green, light blue, turquoise and dark blue - on top and then a small hole in the middle. With a white gel marker I've added some white lines and I've also covered all the records with Glossy Accents. I've always loved their shine! Onto the label of each record I've also glued a small heart, die cut from golden mirror cardstock.
Then I've covered a piece of white cardstock with all those records, cutting off the parts that went over the edges, matted the cardstock black and glued it ont a white note card.


Und hier seht Ihr den Text aus dem heutigen Türchen. Ich habe beide Teile schwarz auf türkisfarbvenen Cardstock gestempelt, ausgeschnitten und golden gemattet. Ob die Idee, mit einem weißen Gelmarker ein paar Highlights in den Text zu setzen, so toll war, sei jetzt mal dahingestellt.
Die Cardstockstücke habe ich dann mit 3D Tape auf den Hintergrund geklebt und zudem ein paar weiße Enamel Accents aufgeklebt.

And here's the text that's hidden behind today's shutter. It means - "music on - world off". I've stamped both parts with black ink onto turquoise cardstock, cut them out and matted them golden. I'm not sure if the idea of adding some highlights with a white gel marker was the best I've ever had...
I've then glued both pieces onto the background with dimensionals and also added a few white Enamel Accents to them.


Und hier habe ich noch ein Bild, auf dem man den Glanz der Schallplatten schön sehen kann.

And here I've a picture that shows the shine of the records.

Stempeleinmaleins - Ausgabe vom 12. Dezember 2020


Hallo Ihr Lieben!
Beim Stempeleinmaleins zeigen wir Euch heute ein Impossible Box. Und weil Weihnachten ja kurz bevorsteht und man immer eine Kleinigkeit hat, die man verpacken möchte, ist meine Variante weihnachtlich ausgefallen.

Hello everyone!
Over at Stempeleinmaleins we are sharing a tutorial for this Impossible Box. And since christmas is really close now and I there's always a little treat that needs a nice packaging I've made a christmas version of this box.
 

 Ich habe meine Box aus hellrosafarbenem Cardstock gemacht und die Seiten mit einem schräg rosa gestreiftem Designpapier aus dem Let it Shine Papierblock von LawnFawn beklebt. 
Und auch für die Deko kamen wieder mal LawnFawn Stempel zum Einsatz. Ich habe an der unteren Kante der Box eine Reihe aus Lebkuchenmännern, Zuckerstangen, Lebkuchenherz und -tannenbaum aufgeklebt. Die Zuckerstangen sind mit dem Glitzerstift von LF beglittert. Die Stempel stammen aus den Stempelsets A Creature was Stirring, Tiny Gingerbread, Sprinkled with Joy und Holiday Helpers. Die vorderen Motive habe ich dabei mit 3D Tape aufgeklebt.
Für den Text habe ich Stempel aus den Sets Holiday Helpers und Sprinkled with Joy kombiniert - teilweise habe ich hier  nur jeweils einen Teil eines Textes abgestempelt - und in weiß bzw. rosa auf kraftfarbenen Cardstock embosst. Dann habe ich ihn ausgeschnitten und auf die Vorderseite der Box geklebt. 
Um den Deckel der Box habe ich noch etwas Twine gewickelt und zur Schleife gebunden.

I've made my box from light pink cardstock and covered it with pink and white striped designer's paper from the Let it Shine paper pad by LawnFawn.
And also for the images I've used some LawnFawn staps again. I've created a border from gingerbread men, candy canes, gingerbread heart and -tree. The candy canes are covered with glitter from the glitter pen by LF. The stamps are from the A Creature was Stirring, Tinty Gingerbread, Sprinkled with Joy and Holiday Helpers stamp sets. I've used dimensionals to glue down the images in the front.
For the text I've combined stamps from the sets Holiday Helpers and Sprinkled with Joy - only using parts of stamps for individual words - and white and pink heat embossed them onto some craft colored cardstock. Then I've cut the parts out and glued them to the front of the box.
I've wrapped some twine around the lid of the box and tied it to a bow.


Die übrigen Seiten der Box sind ebenfalls mit der Bordüre aus Lebkuchen und Zuckerstangen dekoriert.

Also the other sides of the box are decorated with the gingerbread and candy canes border.

Und warum heißt diese Box jetzt Impossible Box?

And why is this one named Impossible Box?


Das "unnögliche" ist der Deckel. Der ist nämlich gar kein Deckel im eigentlichen Sinne, sondern Teil der Seitenteile der Box, die Teile oben klappen beim Nachobenschieben des Deckels nach innen in die Box hinein. 

The "impossible" part about this box is the lid. Actually it isn't a traditional lid but part of the sides . The top parts of the lid slide inside the box when the lid slides up.

Mittwoch, 9. Dezember 2020

Stampcorner Adventskalender Tag 9


 Hallo Ihr Lieben!
Heute öffnet sich das Türchen Nr. 9 des Stampcorner-Adventskalenders - dahinter versteckt sich dieser süße Roboter. Und ich darf Euch eine Inspiration damit zeigen.

Hello everyone!
Shutter Nr. 9 of the Stampcorner advent calendar was opened today - and there was this cute robot stamp behind it. And I'm sharing an inspiration with you.

Ich habe hier einen Nachthimmel mit Distress Oxide Stormy Sky, Blueprint Sketch und Black Soot gewischt und Wasser für den Fleckeneffekt darauf gesprenkelt. 
Die geniale Skyline ist mit dem Stanzenset Slimline Cityscapes von Whimsy Stamps gemacht. Darin ist eine Skyline mit Fenstern sowie eine ohne enthalten. Die habe ich hintereinander geklebt und die Fenster zuvor blau hinterlegt. 
Den Hintergrund habe ich dann schwarz gemattet und auf einen weißen Kartenrohling geklebt.

Here I've created a night sky with Distress Oxide Stormy Sky, Blueprint Sketch and Black Soot and added a few waterdrops for the speckle effect.
The great skyline is made with the Slimline Cityscapes die set by Whimsy Stamps. There's a solid skyline and one with windows that get cut out of it in this set. I've put those behind each other and added some blue cardstock behind the cut out windows.
Then I've matted that piece of cardstock black and glued it onto a white note card.


Und hier ist der Roboter in Großaufnahme - ich finde den klasse!
Ich habe ihn mit Copics coloriert und mit 3D Tape auf den Hintergrund geklebt. Zuvor habe ich noch mit goldener Schimmerkreide und der Radiating Rays Stencil von MFT Strahlen aufgewischt, so dass es so aussieht, als gingen die vom Roboter aus.
Bei dem Text habe ich ein wenig überlegen müssen, aber dann fiel mir die Liedzeile "ich muss nur kurz die Welt retten" ein. Und ich finde, die passt hier perfekt! Da ich dafür keinen Stempel habe, habe ich den Text kurzerhand am PC gedruckt, in Stücke geschnitten und aufgeklebt.

And here's a close up of the robot - I think he's great!
I've colored him with Copics and glued him onto the background with dimensionals. Before I glued him down I used some golden shimmer chalk and the Radiating Rays stencil by MFT to add the rays. I wanted it to look like they are radiating from the robot.
The saying means "I just quickly have to save the world" - which is a line in a german song. I think it is perfect for this card. I've printed it with my home printer, cut it into pieces and glued it onto the card.

Dienstag, 8. Dezember 2020

Believe in the magic of christmas

 
Hallo Ihr Lieben!
Auf dem Stamping-Fairies Blog zeige ich heute diese Weihnachtskarte im Slimline Format.
 
Hello everyone!
Over at the Stamping-Fairies blog I am sharing this christmas card in a slimline size today.
 
Ich habe hier für den Hintergrund Distress Oxide Salty Ocean, Blueprint Sketch und Black Soot benutzt. Für den Mond habe ich zuvor einen aus Masking Tape gestanzten Kreis aufgeklebt, so dass diese Stelle weiß bleibt. Auch für die Glitzerspur, die der Schlitten des Weihnachtsmannes zieht, habe ich Maskiertape benutzt. Das habe ich einfach per Hand wellenförmig ausgeschnitten und aufgeklebt. Mit kleinen Wassertropfen habe ich den Fleckeneffekt gemacht. Und dann habe ich noch goldenes Perfect Pearls, gemischt mit ein wenig Wasser, über die Karte gespritzt um die Sterne zu gestalten. 
 
Here I've inked up the background with Distress Oxide Salty Ocean, Blueprint Sketch and Black Soot to create a night sky.  To create the moon I've die cut a circle from masking tape and glued it onto the white cardstock to keep that area white. Also for the glitter that Santa's sleigh is leaving behind I've used masking tape. I've simply hand cut it in a wavy shape and glued it onto the white cardstock. The lighter speckles are made with water, then I've also added some golden stars by flicking golden Perfect Pearls, mixed with a tad bit of water, onto the sky background.


Nachdem der Hintergrund getrocknet war, habe ich die Maskierungen wieder abgenommen und Santa in seinem Schlitten mit schwarzem Embossingpulver vor bzw. auf den Mond embosst. 
Mond und Glitzerspur sind mit Copics gemalt. Die Glitzerspur habe ich dann noch mit Spica Glitter Pens sowie einem weißen Gelmarker mit feinen Pünktchen gefüllt, so dass sie glitzernd wirken - und durch die Spica Pens auch wirklich glitzern. Außerdem  habe ich feine Glitzerspuren von der großen Spur nach unten Richtung Erde aufgetupft. 
Das Ho-Ho-Ho ist aus dem Stempelset Ho-Ho-Holidays von LawnFawn. Ich habe es mit schwarzer Tinte auf weißen Cardstock gestempelt, schwarz gemattet und mit 3D Tape auf die Karte geklebt.

After the background had dried I've taken off the masking tape and black heat embossed Santa in his sleigh onto/over the moon.
The moon and the trace of glitter Santa is leaving behind are colored with Copics. After coloring I've used Spica Pens and a white gel marker to fill the trace of glitter with tiny dots to give it a glitter look. And due to the Spica Pens it actually glitters. I've also drawn small traces of glitter towards the bottom of the card so it looks like the glitter falls towards earth.
The Ho-Ho-Ho is from the Ho-Ho-Holidays stamp set by LawnFawn. I've stamped it with black ink onto white cardstock, matted it black and glued it onto the card with foam tape.


Unten auf der Karte habe ich eine schlafende Stadt aufgeklebt. Dazu habe ich den City Block Background von MFT mit schwarzem Embossingpulver auf grauen Cardstock embosst. Der Hintergrund ist ja eigentlich kartenfüllend und hat oben keinen klaren Abschluss, also keine komplett endede Häuserlinie. Also habe ich die einfach per Hand aus- und die oberen Häuser weggeschnitten. Dann habe ich mit Distress Oxide Hickory Smoke die Häuser ein wenig schattiert. 
 Die Fenster habe ich mit einem grauen Copics ausgemalt, so dass es so aussieht, als würde jeder in der Stadt schlafen. Außerdem habe ich die Hausdächer mit weißer Strukturpaste bestrichen - schließlich gehört Schnee zu Weihnachten dazu.
Für den Text habe ich aus türkisfarbenem Glitzercardstock das Wort believe ausgestanzt. Ich habe einzelne Buchstaben mit dem Alphabet Handlettering Lowercase Stanzenset von Crafts Emotions ausgestanzt, sie auf schwarzem Cardstock zusammengeklebt und dann per Hand ausgeschnitten. Durch den Glittercardstock sieht man die Übergänge der einzelnen Buchstaben kaum.
Unter dem Wort believe habe ich den Text auf einem Streifen fortgeführt. Dafür habe ich einen Stempel aus dem Stempelset Bitty Holiday Wishes von MFT verwendet. Das Banner, auf das ich den Text gestempelt habe, ist ebenfalls schwarz gemattet. Beide Texte habe ich dann mit 3D Tape auf die Häuser geklebt.

Onto the bottom of the card I've glued a town. I've black heat embossed the City Block Background by MFT onto some grey cardstock. This is a full card size stamp that has no roof line as the top of the stamp. So I've simply cut around the roofes by hand and cut off the upper houses. Then I've added some shadows to the houses with Distress Oxides Hickory Smoke. 
I've used a grey Copic marker to color all windows dark. I wanted it to look like everyone in this town is asleep. I also added some white modelling paste to the roofs of the houses - what's christmas without snow?
For the text I've die cut a believe from turquoise glitter cardstock. It's actually made from individual letters, die cut with the Alphabet Handlettering Lowercase die set by Crafts Emotions, glued them together on some black cardstock and then hand cut around the whole word. Due to the glitter cardstock I've used you can barely see that these are individual letters.
I've completed the text on my card on a banner. I've stamped it with black ink using a stamp from the Bitty HOliday Wishes stamp set by MFT, then matted the banner black and glued both parts of the text onto the houses with foam tape.

Sonntag, 6. Dezember 2020

Nikolaus-Goodies

 
Hallo Ihr Lieben!
Zum Nikolaustag habe ich für meine Kollegen kleine Goodies gebastelt: Schornsteine! Grundlage war ein Video von Frisch Gestempelt auf YouTube, ich habe aber die Maße abgewandelt.

Hello everyone!
I made some treats for my co-workers since it's Nikolaus day today here in Germany.
 

 Ich habe den Schornstein aus rotem Cardstock gemacht, den ich mit einem Mauer-Embossingfolder dry embosst habe. Bevor ich den Embossingfolder durch meine BigShot gekurbelt habe, habe ich weiße Stempeltinte auf die Teile des Folders aufgetragen, die später eingedrückt - also nicht erhaben - sind. So sind die Fugen zwischen den Mauern gleich mit eingefärbt.
Der Text auf meinem Schornstein ist aus dem Stempelset Gruß vom Nikolaus von JM-Creation. Ich habe ihn mit roter Tinte auf weißen Cardstock gestempelt und den dann schwarz gemattet. Und ein wenig Deko musste dann doch noch mit auf den Schornstein. Also habe ich noch den Ilex aus dem Set Christbaum und Co - ebenfalls von JM Creation - gestempelt, coloriert und auf ds Banner mit aufgeklebt. 

I've made the chimney from red cardstock and dry embossed it with a brick pattern. Before running it through my BigShot I've inked up the areas that get debossed with a white ink pad. Now the mortar between the bricks is white, all in just one step.
The saying means "have you been nice?". I've stamped it onto a strip of white paper using red ink and matted it black. And then I felt like the chimney needed at least a bit of decorations. So I've also stamped and colored that holly leaves and glued them onto the strip with stamped on text.


Nun wäre es natürlich doof, einen Schornstein zu Nikolaus zu verschenken.  Aber eigentlich ist es ein Nikolaus-Aufzug.
Innen befindet sich eine kleine Schachtel sowie ein ausgestanzter Kreis im Boden. Drückt man den Finger durch dieses Loch, fährt langsam ein Schoko-Nikolaus aus dem Kamin heraus. 

Well, it would be pretty strange to give someone a chimney for St. Nikolaus day. Usually he fills the boots with candies. But this is a Nikolaus elevator!
There's a little box inside the chimney and a cut out circle in the bottom. When you push your finger through it, a chocolat Nikolaus rides up in that elevator


Bis er dann schließlich ganz oben angekommen und sichtbar ist.
Da dieses Jahr alles anders ist, habe ich statt des klassischen Nikolauses diese rockige Version benutzt. Die finde ich echt cool. Aber er ist etwas dicker als sein klassischer Kollege, deswegen habe ich die Maße des Schornsteins angepasst.

Until he reaches the top and can be fully seen.
Everything is different this year. So I've decided to use that kind of rock-style Nikolaus instead of the classical version. I just love the cool look of this one. 


Der Schnee verdeckt auch den "Eingang" in den Schornstein, so dass der herausfahrende Nikolaus eine echte Überraschung ist. Drückt man ihn wieder nach unten, schließt sich auch die Öffnung wieder.

The snow covers also the opening of the chimney so Nikolaus coming out of it is a real surprise. When you push him back down also the opening closes again.


Und hier der Vollständigkeit halber noch alle meine Nikolaus-Aufzüge. Da nicht alle Kollegen da sind kam ich mit fünf Stück aus.

And to complete this post here are all the Nikolaus elevators I've made. Since not all my co-workers are on duty I only needed to make 5 of these.
Samstag, 5. Dezember 2020

Stempeleinmaleins - Ausgabe vom 05. Dezember 2020

 
Hallo Ihr Lieben!
Morgen ist Nikolaustag - falls Ihr noch auf der Suche nach einer kleinen, schnell gemachten Nikolaus-Geschenk-Idee seid, zeigen wir Euch beim Stempeleinmaleins heute diese Schokoladen-Nikolaus-Verpackung.
 
Hello everyone!
St. Nikolaus Day will be here tomorrow - and for all of you that are looking for a small, quickly done gift idea we from Stempeleinmaleins are sharing this gift tag with a chocolat Nikolaus today.  


Ich finde ja diese rockigen Mini-Nikolause total cool. Also habe ich sie hier benutzt - auch, weil durch das viele Schwarz ein wenig Kontrast ins Spiel kommt.
Meine Basis habe ich aus rotem Cardstock gewerkelt und die Vorderseiten mit rotem Designpapier mit weißen Punkten beklebt.
Oben habe ich ein Loch eingestanzt, durch das ich weißes Organzaband gezogen habe.

I just love these rock'n'roll mini versions of St. Nikolaus. So I've used them today - also because of the black there's some contrast to all the red.
I've made my base from red cardstock and glued some red designer's paper with white dots onto the two front pieces.
Into the top of cut a circle and put some white organdy paper through it.


Außerdem habe ich oben mit schwarzem Twine eine weiße Schleife, ebenfalls aus Organza, angebunden und dort auch zwei rote Glöckchen mit befestigt.
Der Text, ein Stempe, den ich mir vor Jahren mal selbst gemacht habe, ist schwarz auf weißen Cardstock gestempelt, schwarz gemattet und quer über das Rückteil der Verpackung geklebt.

I've also used some black twine to tie a bow, also from the white organdy, to the top of my gift tag and added two little bells here.
The text means "greetings from St. Nick". I've black stamped it onto white cardstock, matted it black and glued it across my tag.

Donnerstag, 3. Dezember 2020

Eine weitere Weihnachtskarte


Hallo Ihr Lieben!
Es ist Dezember - und die Weihnachtskartenproduktion läuft auf Hochtouren. Eine weitere zeige ich heute auf dem Stampcorner Blog.
 
Hello everyone!
It's december already - and my christmas card making is at a high peak. This one I am sharing over at the Stampcorner Blog today.
 
Ich habe zur Abwechslung mal wieder eine Slimline Karte gemacht. Mal ehrlich, hätte mir vor einem Jahr jemand gesagt, dass ich die so toll finden würde, hätte ich ihm nicht geglaubt. Aber man hat einfach so viel mehr Platz in der Breite - oder Höhe, je nachdem.
Die Karte selbst ist aus weißem Cardstock  mit aufgeklebtem Aufleger.
Für den Himmel habe ich hier mal Distress Oxide Speckled Egg, Hickory Smoke und Black Soot benutzt. Mir war mal nicht nach dunkelblau. Ich habe ein paar Wassertropfen darauf gespritzt und anschließend noch goldene Perfect Pearls als Sterne.
 
For a change I've made a slimline card again. Honestly, if you'd have told me a year ago that I'd enjoy these so much, I wouldn't have believed you. But there's so much more room on those, and sometimes that's exactly what you need.
The card itself is made from whtie cardstock with a glued on decorated piece of cardstock.
For the sky I've used Distress Oxide Speckled Egg, Hickory Smoke and Black Soot. I didn't want a dark blue sky for this card. I've flicked some drops of water onto the color and then added golden speckles as stars with gold Perfect Pearls.
 

 Hier fliegt Santa in seinem Schlitten über den Himmel. Ich habe hier die Stempelsets Little Santa Agenda und Little Reindeer Agenda von Mama Elephant kombiniert. Ich hatte ein paar Rentiere mehr coloriert, aber das sah zu voll aus. Also haben es nur fünf vor den Schlitten geschafft.
Coloriert habe ich wie immer mit Copics.
Für die Highlights habe ich einen weißen Gelmarker benutzt, die Dekoration am Schlitten ist mit einem goldenen Glitzergelmarker gemacht. 
Unter den Schlitten habe ich noch eine Glitzerspur aufgetupft.

Here Santa is flying over the city in his sleigh. I've combined the stamp sets Little Santa Agenda and Little Reindeer Agenda by Mama Elephant here. I had colored a few more reindeer but they filled up the sky too much so only those five made it onto the card.
Coloring was done with Copics again.
For the highlights I've used a white gel marker, the decorations on the sleigh are made with a golden glitter gel marker.
Under the sleigh and reindeer I've added a trace of glitter, made from small dots.


Für die Skyline habe ich eine der Stanzen aus dem Slimline Cityscapes Stanzenset von Whimsy Stamps benutzt. Sie ist aus schwarzem Cardstock gestanzt, die Fenster habe ich bewusst nicht hinterlegt, so dass der Hintergrund hindurch zu sehen ist.
Die tolle Christmas Stanze ist ebenfalls von Whimsy Stamps. Ich habe sie aus goldenem Glitzercardstock gestanzt und über die Skyline geklebt.
Ergänzt habe ich den Text dann mit einem "wishing you a wonderful merry", das ich mit weißem Embossingpulver auf schwarzen Cardstock embosst und gold hinterlegt habe. Ich habe keine Ahnung, ob man das so sagen kann. Aber für eine Slimline Card braucht man eben einen langen Text. Ich habe hier zwei Stempel aus den Stempelsets Reveal Wheel Sentiments und Offset Sayings Christmas von LawnFawn kombiniert.

For the skyline I've used one of the dies from the Slimline Cityscapes die set by Whimsy Stamps. I've die cut it from black cardstock and didn't put another color behind the windows on purpose so the sky shines through them.
The great christmas word die is also by Whimsy Stamps. I've die cut it from golden glitter cardstock and glued it across the skyline.
Then I've used two stamps from the Reveal Wheel Sentiments and the Offset Sayings Christmas stamp sets by LawnFawn to complete the text. I have no idea if you can wish someone a "wonderful merry christmas" but well, for a slimline card you need a long text. I've white heat embossed it onto black cardstock and matted it gold.

Mittwoch, 2. Dezember 2020

JM-Creation Adventskalender Tag 2

 
Hallo Ihr Lieben!
Auch von JM-Creation gibt es einen Adventskalender - und der ist ein wenig anders. Es gibt für jeden Tag mehrere Stempel und/oder Stanzen und jeder, der sich den entsprechenden Kalender bestellt hat, kann selbst wählen, welches der Produkte er hinter dem Türchen finden möchte. Die Idee finde ich genial. Man hat die Sachen dann zwar nicht sofort, kann aber sicher sein, dass sie wirklich gefallen und benutzt werden. Und mal ehrlich - im Dezember ist eh nicht so viel Zeit zum Basteln. 
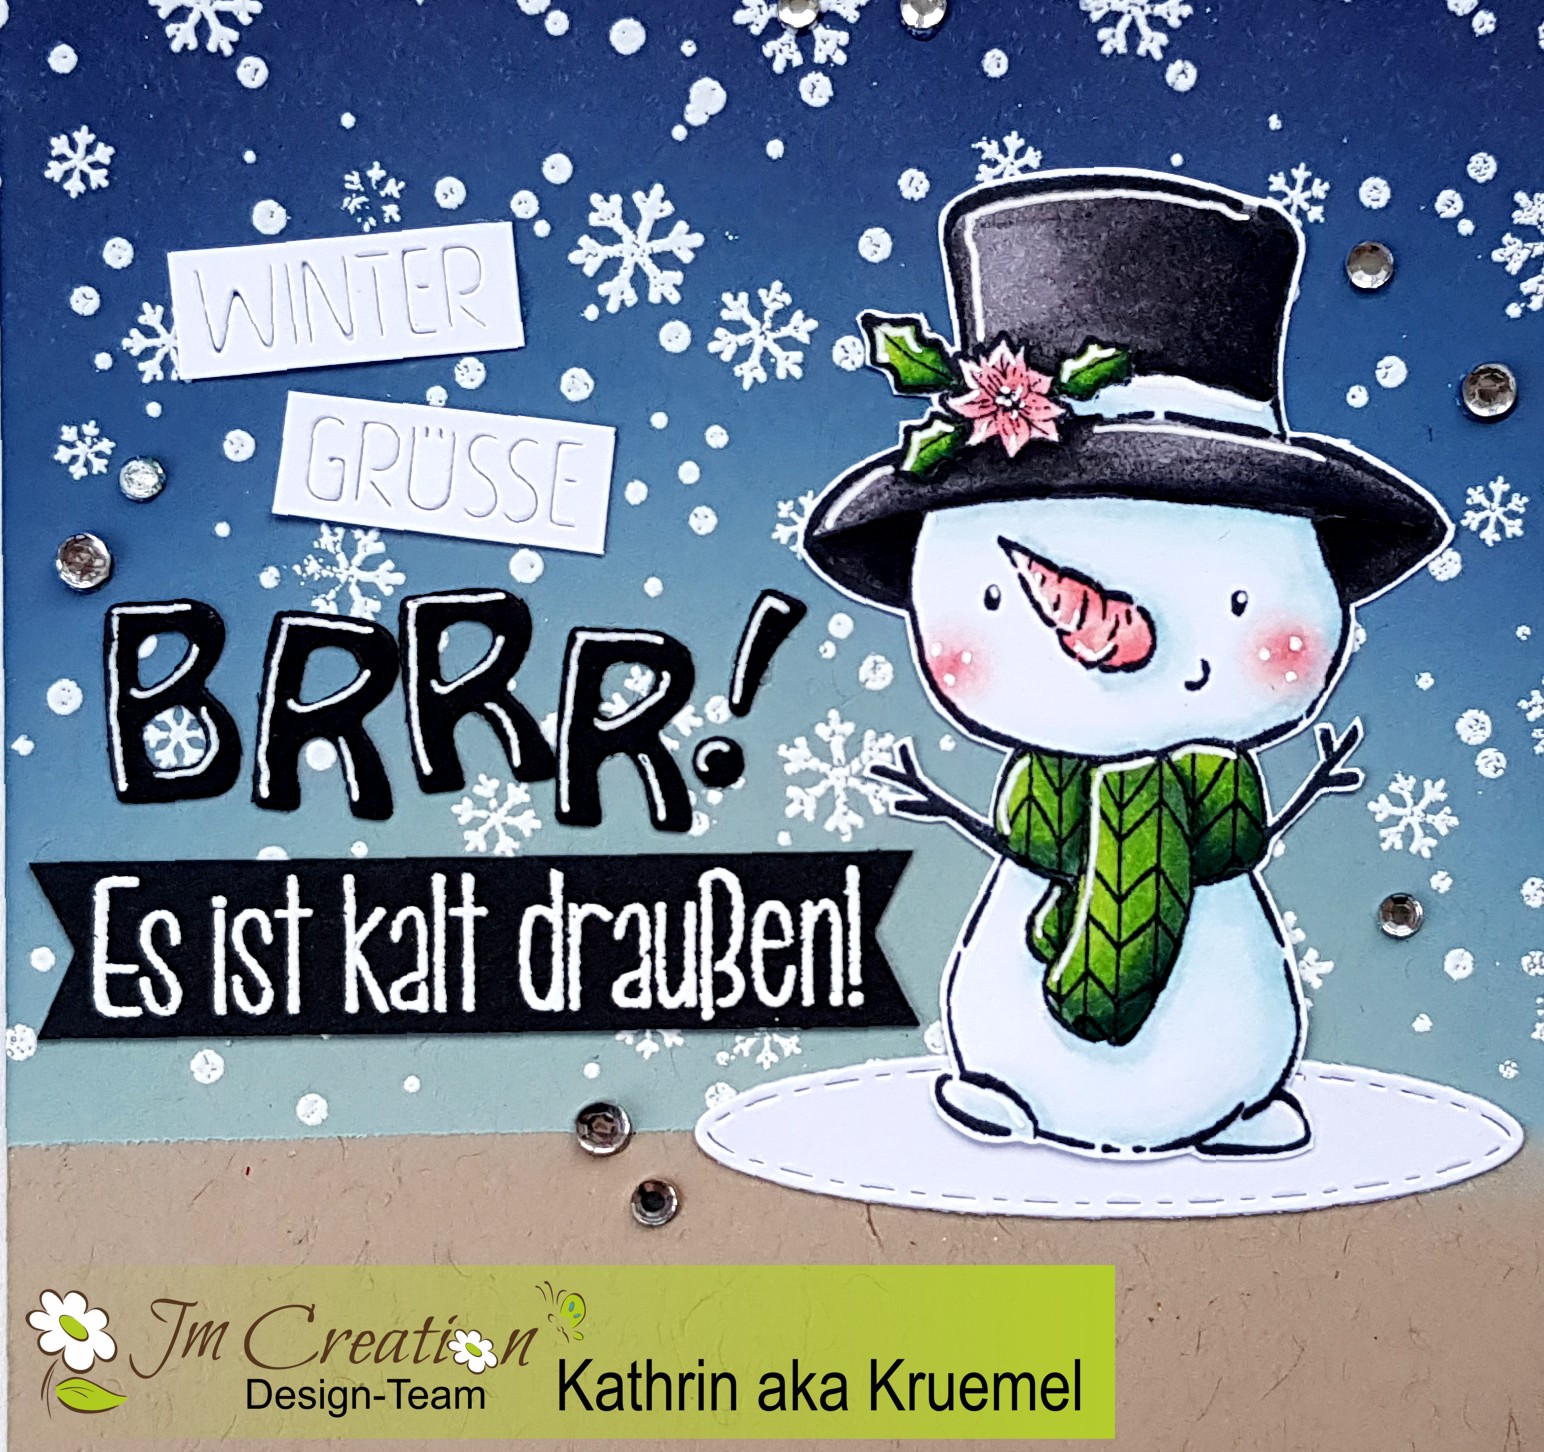
Um Euch bei der Entscheidung zu helfen, haben wir vom DT auch mit einigen der Stempeln und Stanzen Projekte zur Inspiration gewerkelt. Und hier ist mein Werk mit einigen der Möglichkeiten von Tag 2.

Hello everyone!
Also JM-Creation has come out with an advent calendar for stampers - but this one is a bit different. There are several stamps and/or dies for each day and everyone who bought the calendar can decide, which product he wants. I just love that idea. You won't have the things immediately but you can be sure that you really like and will use them. And to be honest - we all don't have a lot of time for crafting in december so it's worth the wait.
To make the decision easier - at least we hope so - we from the DT used a few of the stamps and dies to make some cards as inspiration. And this my card with some of the contents of day 2.

Ich habe hier eine Stanze und ein Motiv aus dem Kalender mit älteren Motiven kombiniert. 
Als Basis habe ich ein Stück kraftfarbenen Cardstock genommen und den nach dem Dekorieren auf einen weißen Kartenrohling geklebt.

Here I've used a die and a stamp from day 2 of the calendar and combined it with older images.
As the base I've used a piece of craft colored cardstock and glued it onto a white note card - after I've decorated it.


Auf den kraftfarbenen Cardstock habe ich mit weißem Embossingpulver den Schneeflockenhintergrund aufembosst und dann den Cardstock mit Distress Oxide Speckled Egg, Faded Jeans und Chipped Sapphire gewischt.
Der süße Schneemann ist eines der Tagesmotive. Den habe ich auf weißen Cardstock gestempelt, coloriert, ausgeschnitten und auf den Hintergrund geklebt. Und damit er nicht so in der Luft schwebt, habe ich das kleinste der Stitched Ovale als Boden unter den Schneemann geklebt.
Der Winter Grüße Text ist ebenfalls hinter Türchen 2. Hier wird der Text in den Cardstock hinein- aber nicht ausgestanzt. Ich finde, das sieht klasse aus! Ich habe die beiden Teile links neben den Schneemann geklebt. 
Darunter kam ein BRRR!, gemacht mit dem ABC 1 Stanzenset und schwarzem Cardstock.
Und wiederum darunter habe ich noch ein Banner aus schwarzem Cardstock geklebt, auf den ich mit weißem Embossingpulver einen der Texte aus dem Stempelset Es ist kalt draußen aufembosst habe.
Zum Schluss habe ich noch ein paar klare Glitzersteine auf der Karte verteilt.

I've white heat embossed the snowflakes onto the craft colored cardstock, then used Distress Oxide Speckled Egg, Faded Jeans and Chipped Sapphire to ink up the sky.
The cute snowman is one of today's images. I've stamped him onto white cardstock, colored him, cut him out and glued him onto the card. Since it looked like he was floating on the card I've used a small stitched oval as the ground.
The text on the white cardstock pieces are also behind shutter number 2. Here the words get cut into the cardstock instead of being cut out. This one here means "winter greetings". I've glued those to the left of the snowman. 
Under it I've added a BRRR!, die cut from black cardstock.
And under that I've glued a banner cut from black cardstock onto which I've white heat embossed a "it's cold outside" text.
In the end I've added a few clear rhinestones to my card.

Dienstag, 1. Dezember 2020

Meowy Christmas

 
Hallo Ihr Lieben!
Inzwischen hat es sich ja schon fast eingebürgert, dass ich meine "jeden-Monat-ein-älterer-Stempel"-Karte gleich am Anfang des Monats poste. Ihr wisst ja wie das ist, erledigt man es nicht sofort, dann gerät es in Vergessenheit. Nun ist es ja so, dass jeden Monat hunderte toller neuer Stempel auf den Markt kommen - und so kann ein Stempel, der gerade mal ein Jahr als ist, schon zum "alten Eisen" gehören. Und so passt diese Karte, die ich heute auf dem Stamping-Fairies Blog zeige, zwar zu meiner Serie, die Stempel sind teilweise aber noch nicht wirklich alt. 

Hello everyone!
It has become a tradition for me to post my "use a older stamp at least once a month" card right at the beginning of each month. Well, I guess you know what I mean when I say if I don't do it I might forget about it. Each month hundreds of amazing new stamps are brought onto the market - and so a stamp that's only one year old can become an "old" stamp as well. And so this card, that I'm sharing over at the Stamping-Fairies Blog today, fits great into my card series, even if most of the stamps used for it aren't really old. 

Ich habe mich hier wieder für eine für Weihnachtskarten eher unübliche Farbkombi entschieden: hellblau und rot. Ich habe ein Stück hellblauen Cardstock als Grundlage benutzt, den schwarz gemattet und auf einen weißen Kartenrohling geklebt.

Here I've picked a quite unusual color combo - at least for a christmas card: light blue and red. I've used  a piece of blue cardstock, matted it black and glued it onto a white note card.
 

 Auf den blauen Cardstock habe ich die Rectangle Trio Stencil von MFT aufgelegt und durch ihn hindurch dann den Ho-Ho-Ho Background mit Versamark Tinte abgestempelt. Dann habe ich den Text mit weißem Embossingpulver bestreut und embosst. Durch den Stencil ist der Abdruck an den Rändern nicht 100 % perfekt, das hat mich aber nicht gestört.
Das Meowy habe ich mit dem Dymo geschrieben. Eigentlich wollte ich dafür einen Stempel aus dem Set Meowy von CC Designs verwenden, der war mir aber einen Tick zu klein und wäre optisch wohl untergegangen. Also habe ich mir so beholfen. 
Das Christmas habe ich mit der Merry Christmas Stanze von MFT aus rotem Cardstock gestanzt. Er ist mit 3D Tape auf die Karte geklebt - wie übrigens alle Elemente auf dieser Karte. Der I-Punkt war aber so klein, dass ich dahinter das Tape einfach nicht verstecken konnte. Also habe ich ihn durch einen Holzstern ersetzt. Weitere Sterne habe ich dann als Deko auf der Karte verteilt.

I've put the Rectangle Trio stencil by MFT onto the blue cardstock and then stamped the Ho-Ho-Ho Background through it onto the cardstock, using Versamark ink. Then I've put white embossing powder on it and heat embossed it. Since I stamped through the openings in the stencil the edges of my embossing/stamping didn't turn out perfectly but I don't really care in that case.
I've written the word meowy with my Dymo. Originally I wanted to use a stamp from the Meowy stamp set by CC Design but it was too small and would have gotten lost on the card. So I went with the Dymo instead.
The word christmas is die cut from red cardstock with the Merry Christmas die set by MFT. I've glued it onto the card with foam tape - as I did with all the elements on this card. Well, the i-dot was just too small to hide any amount of tape behind it, no matter how small I've cut it. So instead I used a small wooden star as the dot and added more of those stars onto the card for decorations.


Das Motiv der Karte ist aus Stempeln aus verschiedenen Stempelsets zusammengesetzt. 
Erkennt Ihr die Katze? Es ist die Einhorn-Katze aus dem Stempelset Caticorn. Ich dachte mir, das Einhorn-Horn sieht doch fast aus wie eine lange stehende Mütze. Also habe ich es rot coloriert, oben einen kleinen weißen Bommel aufgeklebt und den Fellrand unten an der Mütze mit einem Plusterpen aufgebracht.
Die Katze selbst habe ich eher hell coloriert und ihr dabei ein tolles Streifenmuster verpasst.
Am Schwanz habe ich noch eine Weihnachtskugel aus dem Stempelset Holiday Penguins angebunden. So wirkt sie gleich viel weihnachtlicher. Aus diesem Set ist übrigens auch die Zuckerstange, die ich hier verwendet habe.
Das Regalbrett, auf dem die Katze sitzt, ist aus dem wirklich alten Set I Knead You, ebenso die Fische in der Weihnachtssocke. 
Die anderen Motive sind alle aus dem Set Secret Santa. Das Mädchen, das eigentlich die Weihnachtssocke in der Hand hält, habe ich einfach weggeschnitten. 

The scene is put together with stamps from different stamp sets. 
Do you recognize the cat? It's one of the unicorn cats from the Caticorn stamp set. I thought, the horn looks like a long, standing hat. So I've colored it red, added a small white pompom to the top and added some white color to the bottom edge to create the felt brim. This pen kind of fluffs up when heated after drying and so it's perfect for a felt brim.
The cat itself is colored in light colors and I gave it some fun stripes. 
To the tail I've tied a christmas bauble from the Holiday Penguins stam pset. Now the cat looks even more christmas-sy. Oh, and the candy cane I've put in the stocking is from the same stamp set.
The board the cat sits on is from the really old I Knead You stamp set, also the fish in the stocking.
All the other images are from the Seret Santa stamp set. I've cut off the girl that originally holds the stocking.

Samstag, 28. November 2020

Stempeleinmaleins - Ausgabe vom 28. November 2020


Hallo Ihr Lieben!
Heute ist der letzte Samstag des Monats, das bedeutet, es gibt eine neue Sketch Inspiration beim Stempeleinmaleins. Und das ist meine Karte, die danach entstanden ist.

Hello everyone!
It's the last saturday of the month and that means we have a new inspirational sketch over at Stempeleinmaleins. And this is the card I made using it.

Ich habe hier ganz helles und nur ganz dezent gemustertes Designpapier verwendet, und daraus einen Kreis ausgestanzt. Dann habe ich es schwarz gemattet und auf einen weißen Kartenrohling geklebt. 
Unter den Kreis habe ich ein aus silberfarbenem Glitzercardstock gestanztes winter, ein wenig überlappend mit dem Motiv darüber, aufgeklebt. Und wiederum darunter kam ein let it snow, geschrieben mit dem Dymo, auf die Karte.

Here I've used a very light and very soft patterned designer's paper and die cut a circle from it. Then I've matted it black and glued it onto a white note card.
Under the circle, overlapping a bit with the image, I've glued down a die cut winter, cut from silver glitter cardstock. And again under that I've added a let it snow text, written with my Dymo.


Das Motiv besteht aus vielen verschiedenen Lagen. Direkt in den ausgestanzten Kreis habe ich einen weiteren Kreis geklebt, auf den ich zuvor eine der Snow Globe Scenes von Mama Elephant gestempelt habe. Die Schneehügel vor der Winterstadt sind von LawnFawn, auch dieses Stempelset heißt Snow Globe Scenes. Aus diesem Set von LawnFawn sind auch die Sterne und der Mond, die ich am Himmel verteilt habe. Dann habe ich alles mit Copics coloriert. 
Der süße Wintervogel auf dem Ast ist aus dem Set Winter Sparrows von LawnFawn. Ich habe ihn mit 3D Tape auf den Hintergrund aufgeklebt.
Außen habe ich 8 Ringe aus Cardstock aufgeklebt, um schön Höhe zu bekommen. Darauf kam ein Stück Laminierfolie, in das ich kleine Glitzerplättchen in irisierend, silber und türkis einlaminiert habe. Die sitzt jetzt ein ganzes Stück höher als der Spatz und vertieft somit die 3D Wirkung. Und ich finde das eine tolle Alternative zu einer Shaker Card. Hier wollte ich das einfach nicht. Und ja, eine ähnliche Idee habe - mal wieder - auf dem YouTube Channel von Jennifer McGuire gesehen.
Auf die Folie kamen dann zwei der tollen Snowflake Medallions von Hero Arts, gestanzt aus weißem Cardstock und obenauf nochmal eines, das ich aus türkisfarbenem Glitzercardstock gestanzt habe. 
Unten links auf den Schneeflockenkreis habe ich noch ein BRRR, ebenfalls mit dem Dymo geschrieben aufgeklebt. Und auf dem Querstrich des T sitzt ein weiterer Spatz, damit der innerhalb des Kreises in der kalten Winternacht nicht so alleine ist.
Zum Schluss habe ich noch ein paar klare Gltzersteine auf der Karte verteilt.

The image is built up from a lots of layers. I've glued a matching circle into the cut out in the designer's paper. Before glueing it down I've added the scene using the winter town from the Snow Globe Scenes set by Mama Elephant. The snowy hills in front of town are by LawnFawn, and also their set is named Snow Globe Scenes. From this set I've also used the moon and stars to stamp onto my night sky. Then I've colored the whole scene with Copics.
The cute winter bird on the branch is from the Winter Sparrows stamp set by LawnFawn. I've glued it onto the background scene with dimensionals.
Around the image I've glued 8 rings of cardstock that are stacked on top of each other. Then I've glued a circle cut from laminating foil onto the rings. Before cutting the circle I've put some iridesent, silver and turquoise glitter pieces in the laminating pouch and run that through my MINC. This circle is not sitting directly on top of the bird and that makes the scene even more 3D. And I think this piece of laminated glitter is a great alternative to a shaker card. I just didn't want to make one here. And yes, I've seen a similar idea once again on Jennifer McGuire's You Tube channel. 
On top of the foil circle I've glued two of those amazing Snowflake Medallions by Hero Arts, die cut from white cardstock, then added a third one cut from turquoise glitter cardstock on top. 
To the bottom left of this medallion I've glued a BRRR text, again written with my Dymo. And to give this little bird a friend in this cold winter night I've glued another sparrow onto the horizontal line of the T from winter. 
In the end I've added a few clear rhinestones to my card.

 
Und hier habe ich noch versucht, Euch die Tiefe des Motivs und den Glitzer in der Laminierfolie besser zu fotografieren.
 
And here I've tried to take a picture where you can see the depth of the images and the glitter in the laminating pouch a bit better.