Samstag, 8. April 2023

Stempeleinmaleins - Ausgabe vom 08. April 2023

 
Hallo Ihr Lieben!
In der heutigen Ausgabe des Stempeleinmaleins zeigen wir Euch eine Sechseckige Explosionbox, die perfekt als Verpackung für eine kleine Flasche  Sekt ist. Da ich keine zur Hand hatte, habe ich die Größe meiner Box etwas verkleinert und sie so passend für eine Dose Sekt gemacht.

Hello everyone!
In today's issue of  Stempeleinmaleins we are sharing a tutorial for a Hexagon Explosion Box, that is perfect to put a little bottle of champagne inside. Well, I didn't have one at home so I changed the measurements a bit to make it smaller and the right size for a small can of champagne.


Da ja das Osterwochenende ist, fand ich, die Boxen würden sich gut als kleines Goodie beim Osterbrunch machen. Deswegen habe ich meine Box ganz im Osterlook gestaltet.
Die Box habe ich aus weißem Cardstock gewerkelt. Die Außenseiten habe ich von unten her leicht mit Distress Oxide Lost Shadow und Hickory Smoke gewischt. 

Since it's the easter weekend I though, these be cute little gifts for our  family easter brunch. And so I created a bunny themed box.
I made my box from white cardstock. I lightly inked up the sides from the bottom with Distress Oxide Lost Shadow and Hickory Smoke.


Am Deckel habe ich zwei Hasenohren angebracht. Die sind ebenfalls aus weißem Cardstock gemacht und mit Distress Oxide Picked Raspberry ein wenig rosa eingefärbt. Außerdem habe ich meinem Hasen einen kleinen Zylinder aufgesetzt - der überdeckt eine Klebestelle. Den Zylinder habe ich aus schwarzem Cardstock gemacht, ein Band aus grünem Cardstock drumgewickelt und außerdem ein kleines rosafarbenes Blümchen mit Perlenmitte daran befestigt.
Um den Deckel habe ich ein Stück rosafarbenes Organzaband gewickelt und vorne zur Schleife gebunden. Daran habe ich ein doppeltes Banner - aus rosa gemustertem Designpapier, das ich auch im Inneren der Box verwendet habe, und hellgrünem Cardstock - angebunden, auf das ich mit grüner Tinte "Gruß vom Osterhasen" gestempelt habe.

To the lid I attached two bunny ears. I die cut those from white cardstock again and inked them a bit with Distress Oxide Picked Raspberry. I also gave my bunny a black hat - it covers a seem and some glue. I made the hat from black cardstock, tied a ribbon made from green cardstock around it and decorated it with a little pink flower with a white pearl in the center.
I tied some pink organdy ribbon around the lid and tied it to a bow on the front. I also tied two banners - one cut from pink patterned paper, that I also used on the inside of the box, and one cut from light green cardstock - that I had stamped a "greetings from the easter bunny" text with green ink onto to the bow.


Außerdem habe ich noch einen weißen Pompon als Schwänzchen an die Rückseite der Box geklebt.

I also attached a white pompom as a bunny's tail to the back of the box.


Und hier nochmal ein Bild der geöffneten Box. Drei der Seitenteile sind feststehend, die anderen drei öffnen sich, wenn man den Deckel abnimmt. 

And here I have the picture of the opened box for you again. Three of the sides stay standing, the other three pop open when the lid is taken off.


Ich habe eine knallig-pink farbene Sektdose in meine Box gestellt. 
Den Boden der Box habe ich aus grünem Cardstock gemacht, an die feststehenden Seitenteile habe ich Gras, gestanzt aus grünem Cardstock, angebracht. Dieselbe Bordüre habe ich auch einmal rund um die Dose gewickelt. So sieht es ein wenig aus wie ein Osternest. 
Die Seitenteile im Inneren habe ich alle mit rosa-weißem Designpapier mit Holzmuster beklebt. An den Seiten des Designpapiers waren Blumenranken - jeweils eine davon habe ich auf die linke und rechte aufklappende Seite geklebt.
 
I put a bright pink can of champagne inside my box.
The bottom of my box is made from green cardstock, I also attached some grass, die cut from green cardstock, to the bottom of the three sides that stay standing. I wrapped some of the same border around the bottom of my champagne can. Now it looks a bit like a easter basket.
I attached pieces of white and pink patterned paper with a wooden pattern to the insides of my box. There were flower borders at the edge of the patterned paper - I used these on the left and right opening panels.
 

 Auf das mittlere, sich öffnende Cardstockstück wollte ich eigentlich nur einen Gruß aufbringen. Das war mir dann aber irgendwie zu nackig. Und so habe ich hier doch noch ein kleines Motiv mit aufgeklebt. 
Die Ostereier sind aus dem Set Simply Celebrate Spring von LawnFawn, hinter das mittlere Osterei habe ich einen der Hasen aus dem Little Bunny Agenda Stempelset von MamaElephant gesetzt. Und hinter den Motiven befindet sich ein Reststück der Grasbordüre.
Darüber habe ich ein Stück weißen und rosa gematteten Cardstock geklebt, auf den ich mit grüner Tinte und Stempeln aus dem Set Schöne Ostern von Create a Smile einen Ostergruß gestempelt habe. 
Als Deko kamen dann noch ein weiteres Blümchen sowie drei weitere weiße Perlen zum Einsatz.

Onto the middle opening panel I only wanted to attach a greeting. But that looked way too plain. And so I decided, to add a little image here.
The easter eggs are from the Simply Celebrate Spring stamp set by LawnFawn, behind the center egg I put one of the bunnies from the Little Bunny Agenda by MamaElephant. And behind the images I placed a left over piece of the grass border.
Above that I adhered a white banner, matted pink, onto that I had stamped a "happy easter" with green ink.
To add a bit of decoration I used another little flower and three more pearls here.

Freitag, 7. April 2023

Eine interaktive Geburtstagskarte

 
Hallo Ihr Lieben!
Heute zeige ich Euch eine Geburtstagskarte, auf der mehr Stanzteile als Stempelmotive zum Einsatz kamen. Aber die habe ich zumindest aus weißem Cardstock gestanzt und coloriert, so dass sie fast ein wenig wie no-line gecolort aussehen. 

Hello everyone!
Today I am sharing a birthday card, that I used more die cuts than stamped images on. But at least I've die cut them from white cardstock and colored them, so they nearly look like no-line colored images.

Für den Hintergrund habe ich ein Stück weißen Cardstocks von unten her mit Distress Oxides Milled Lavender, Shaded Lilac, Blueprint Sketch und Chipped Sapphire gewischt und anschließend etwas Wasser sowie silberne Metallic-Watercolor aufgespritzt.

For the background I inked a piece of white cardstock from the bottom up with Distress Oxide Milled Lavender, Shaded Lilac, Blueprint Sketch and Chipped Sapphire, then flicked some water and some silver metallic watercolor onto the cardstock. 


Aus dem getrockneten Hintergrund habe ich dann für den Mechanismus mit der Quintuple Slider Stanze von SimonSaysStamp die Schlitze für die Slider gestanzt. Die Stanze ist super praktisch, denn sie stanzt gleich alle auf einmal - und mit einer weiteren Stanze aus dem Set kann man ganz einfach das passende Gegenstück  ausstanzen. Dazu aber gleich mehr.
Auf die einzelnen Slider-Elemente habe ich Luftballons geklebt. Wie schon erwähnt, habe ich sie aus weißem Cardstock gestanzt und anschließend mit Copics coloriert. Ganz untypisch für mich, habe ich dabei zu Lilatönen gegriffen. Aber die passten zu den Lilatönen im Hintergrund. Aus weißem Cardstock habe ich noch Ballonschnüre ausgestanzt und jeweils ans Ende eines Ballons geklebt. Die habe ich dann mit dickem und dünnem 3D Tape auf dem Mechanismus befestigt.

Into the dried cardstock I die cut the slits for the slider mechanism, using the Quintuple Slider die by SimonSaysStamp. This die is amazing, it cuts all the slits in one pass through the BigShot - and with another die from the set you can easily cut the perfectly matching counter part. But more about the mechanism a little later.
I attached balloons to the slider. As mentioned above, did I die cut those from white cardstock and colored them with my Copics. Completly different to the colors I normally choose, I went with purples here. But they went with the purples I used for the background. I also die cut some balloon strings from whtie cardstock and attached those to the balloons, then adhered those to the mechnism using thick and thin foam tape. 


Am unteren Rand der Karte habe ich den Text und Hände, die die Ballonschnüre halten, aufgeklebt.
Die Hände sind mit dem Stanzenset Crafty Hands von MFT gemacht und ebenfalls mit Copics coloriert. Dann habe ich die beiden Teile, aus der jede Hand besteht, aufeinander geklebt und dabei den Daumen mit 3D Tape befestigt, so dass ich die Ballonschnüre zwischen beide Teile schieben konnte, ohne sie festzukleben. Dann habe ich die Hände auf dem Hintergrund befestigt.
Für den Text habe ich ein happy happy happy aus dem Stempelset Itty Bitty Birthdays silbern auf schwarzen Cardstock embosst und mit 3D Tape über den Händen aufgeklebt.
Das Birthday habe ich dreimals aus schwarzem Cardstock und einmal aus silbernem Spiegelcardstock gestanzt und dann quer über die Hände aufgeklebt. Dabei habe ich die schwarz gestanzten Teile nur hinter die silbernen Wortteile geklebt, die nicht auf einer Hand aufliegen, um den Höhenunterschied auszugleichen. Für den I-Punkt habe ich einen silbernen Pailetten-Stern benutzt.

To the lower edge of my card I added the text and some hands, that hold the balloon strings.
The hands are die cut with the Crafty Hands die set by MFT and also colored with Copics. Then I glued both pieces, each hand is made of, together, putting some foam tape only behind the thumb to be able to put the strings between both parts of the hands without glueing them down. Then I adhered the hands to the background.
For the text I silver heat embossed a happy happy happy from the Itty Bitty Birthdays stamp set by MFT onto black cardstock and adhered it above the hands to the card.
The birthday I've die cut three times from black cardstock and once from silver mirror cardstock and then attached it across the hands. I only put the black die cuts behind the areas of the silver word, that won't be attached directly to one of the hands. This way I was able to even out the difference in height. As the tittle on the i I used a star shaped silver confetti.


Und nun zum interaktiven Teil - zieht man oben am Tab, dann fliegen die Ballons nach oben. Deswegen habe ich auch die Ballonschnüre länger gelassen - so halten die Hände die Ballons auch noch, wenn die nach oben geflogen sind, und die Schnüre rutschen beim Zurückschieben des Tabs wieder zwischen die beiden Handteile.
Den Tab habe ich aus lilafarbenem Cardstock gestanzt und den Aufleger mit ausgestanztem Pfeil aus schwarzem Cardstock. 

And now to the interactive part - when you pull the tab at the top of the card, the balloons fly upwards. That's also why I kept the balloon strings quite long - this way the hands hold them, even when they are up, and when the mechanism is put back the strings slide back between the two parts of the hands.
I die cut the tab from purple cardstock and the little circle with the cut out arrow from black cardstock.


Zum Schluss habe ich dann den Aufleger mit 3D Tape auf einen weißen Kartenrohling geklebt und als Deko noch einige silberne Sternchen zwischenden Motiven verteilt.

To finish the card, I attached it to a white card base using foam tape and added a few silver star confetti to the card.

Donnerstag, 6. April 2023

Eine Oster-Shaker Card mit Ernst


 Hallo Ihr Lieben!
Nur noch wenige Tage bis Ostern. Zeit also, nochmal den süßen Oster-Ernst auf einer Karte zu verwenden. Ich habe ihn auf dieser Shaker Card, die ich heute auf dem Stampcorner Blog zeige, verbastelt.

Hello everyone!
Only a few more days till Easter. Time, to use the cute hippo bunny one last time for this year. I did that on this shaker card, that I'm sharing over at the Stampcorner Blog today. 

Ich habe hier nochmal meinen selbstgemachten Karotten-Stencil verwendet und die Karotten - diesmal etwas zarter - wieder mit Distress Ink Twisted Citron und Mowed Lawn sowie Spiced Marmalade und Rusty Hinge aufgewischt. Dann habe ich dunkelgrüne Metallic Watercolor aufgespritzt.
Aus der Mitte des Hintergrunds habe ich dann ein Fenster ausgeschnitten und die Größe und Position des Fenster auch auf eine dunkelgrüne Mattung und die Front meines Kartenrohlings übertragen. Hier habe ich dann den Shaker eingebaut. Der ist mit kleinen hellblauen Kügelchen und klar-irisierenden Folien-Blümchen gefüllt. 

I used my homemade layering carrot stencil again and inked the carrots - this time a bit softer - onto some white cardstock again using Distress Ink Twisted Citron and Mowed Land and Spiced Marmalade and Rusty Hinge. Then I flicked some dark green metallic watercolor on top.
From the center of the background I've cut a rectangle and then cut the window again in the same size and position from a dark green mat and my white card base. This is where I put in my shaker. It's filled with tiny light blue beads and some clear iridescent foil blossoms.


Schüttelt man die Füllung des Shakers komplett nach unten, dann schaut Oster-Ernst durch das Fenster.
Oben auf den Shaker, um das 3D Tape zu überdecken, habe ich aus dunkelgrünem Cardstock ein Rechteck mit nach innen gewelltem Rand und darauf einen schmalen weißen Rahmen aufgeklebt.

When you shake all the shaker fillings to the bottom, then Ernst ist looking at you through the window. To hide the foam tape I used to create the shaker I die cut a scalloped rectangle from dark green cardstock and put a thin white frame on top.


Unter dem Shaker habe ich dann mit 3D Tape noch ein dunkelgrünes Banner aufgeklebt, auf das ich den Text gestempelt habe. Der ist, ebenso wie der süße Ernst, aus dem Stempelset Möhrchenhafte Ostern und mit weißem Embossingpulver embosst.

Under the shaker I attached a banner cut from dark green cardstock that I had stamped my text on. It means "happy easter" and is white heat embossed.


Und so sieht die geöffnete Karte aus. Hier kann man erkennen, dass der Shaker komplett durchsichtig ist und sich Ernst auf der Innenseite der Karte befindet. Deswegen war er auch auf dem vorherigen Bild so dunkel - durch zwei Lagen Folie geschaut passiert das eben.
Auf der Rückseite des Shakers habe ich wieder den nach innen gewellten Rahmen aufgeklebt, damit der Shaker auch von dieser Seite sauber aussieht.

And this is the opened card. Here you can see that the shaker is completly see through and the images are actually on the inside of the card. That's also why the scene looked so dark on the previous pictures - it happens when you look through two layers of acetate.
Onto the back of the shaker I glued another scalloped rectangle frame so it looks nice on the inside of the card as well.


Auf der Innenseite der Karte habe ich den Bereich, der durch den Shaker sichtbar ist - und ein wenig darüber hinaus - mit Distress Oxide Tumbled Glass gewischt. 
Der süße Oster-Ernst ist mit Copics coloriert. Die Highlights habe ich mit einem weißen Gelstift gemacht und das Motiv dann ausgeschnitten. Außerdem habe ich noch Ostereier aus demselben Stempelset mit verwendet. Die habe ich erst mit heller Tinte abgestempelt und großflächig in blau und orange coloriert. Anschließend habe ich die Ostereier noch einmal mit Versamark obenauf gestempelt und weißes Embossingpulver aufgetragen. So erhält man ganz einfach weiß-bunte Ostereier, ohne beim Colorieren Angst haben zu müssen, dass man das Embossingpulver mit anmalt. 
Ernst und Ostereier habe ich dann auf den blauen Hintergrund geklebt und zwei kleine weiße Wolken am Himmel mit aufgeklebt.
Mit einer der Grassy Hills Stanzen von MFT habe ich einen Streifen hellgrünen Cardstocks in eine Grasbordüre verwandelt, sie leicht mit Distress Ink Mowed Lawn schattiert und vor Ernst und die Ostereier geklebt.
Zum Schluss habe ich auch auf der Innenseite der Karte noch einen Text untergebracht. Den habe ich mit dunkelgrüner Tinte direkt auf die Karte gestempelt.

On the inside of the card I inked up the area, that's visible through the shaker - plus a bit around it -, with Distress Oxide Tumbled Glass. 
The cute bunny hippo is colored with Copics. I used a white gel pen to add some highlights, then cut the image out. I also added some easter eggs from the same stamp set here. I first stamped them with very light ink and completly colored them blue and orange. Then I stamped the outlines again with Versamark and put white embossing powder on top. This way you can easily create a white and colored pattern without having to be afraid to stain the melted embossing powder with your Copics when coloring them. 
I adhered the hippo and the easter eggs onto the background and added two white clouds to the sky. 
Using one of the Grassy Hills dies by MFT I cut a grass border from light green cardstock and lightly shaded it with Distress Ink Mowed Lawn. Then I glued it in front of the images.
In the end I decided to also add another text to the inside of the card and stamped it with dark green ink directly onto the card base. The text here means "greetings from the easter bunny". 

Mittwoch, 5. April 2023

Create a Smile April Sketch Challenge

 
Hallo Ihr Lieben!
Heute startet die neue Create a Smile Challenge mit einem neuen Sketch. Und meine Karte führt uns direkt an einen Tatort, mitten hinein ins Verbrechen.

Hello everyone!
Today a new Create a Smile challenge is starting. My card is taking us to a crime scene, right in the middle of the "job". 


Aber erstmal zeige ich Euch den Sketch, der Thema der neuen Challenge ist und nachdem die Karte entstanden ist.

But first I show you the sketch that is the theme of the new challenge and that I used for my card.


Im März-Release war ja das Set "Hände Hoch" enthalten - und ich liebe diese "bösen Buben" mit ihren grimmigen Gesichtern. 
Für den Hintergrund meiner Karte habe ich die Windows Stencil verwendet. Ich habe von dem Teil mit den kleinen Fenstern zwei der fünf Reihen mit Tape abgeklebt und die übrigen drei Reihen mit Distress Oxide Hickory Smoke auf die Front eines weißen Kartenrohlings gewischt. Dann habe ich die Stanze eine Reihe nach oben und ein wenig zur Seite geschoben, so dass die Mittelstege der Reihe darüber und darunter mittig auf einem der "Steine" lag und dann die nächsten drei Reihen aufgewischt. Das habe ich wiederholt, bis, bis auf einen Streifen unten auf der Karte, die komplette Front mit Mauersteinen gewischt war. 
Den freien Streifen unten habe ich komplett mit Hickory Smoke und ein wenig Black Soot gewischt. Dann habe ich noch weiße, silberne und schwarze Metallic Watercolor aufgespritzt, um der Mauer etwas Struktur zu geben.

In the march release there was the set "hands up" included. I love those "bad ass critters" with their grumpy faces.
For the background I used the Windows stencil. I covered three of the five rows of small windows with tape, then used Distress Oxide Hickory Smoke to stencil the "bricks" onto the front of a white card base. Then I moved the stencil up one row and a bit to the side, so the middle of one "stone" meets the space between two in the other row and added the next three rows. I did that until all my card front - except for a small strip on the bottom - was covered with "bricks". 
The bottom I inked up completly with Hickory Smoke and a bit of Black Soot. Then I spritzed some white, silver and black metallic watercolor onto the cardstock to add some texture to my wall.


Im unteren Bereich der Karte ist einer der bösen Buben gerade dabei, einen Tresor auszuräumen. Dafür haben sie einen Mauerdurchbruch geschaffen und weil das nicht an einem Tag abgeht, haben sie das Lock zwsichendrin immer wieder mit Brettern vernagelt. Die haben sie nun wieder abgenommen, sich widerrechtlich Zutritt zur Bank verschafft und sind mittendrin, den Tresor auszuräumen. 
Ich habe das Holzbrett aus dem ebenfalls neuen Set Hammer einige Male abgestempelt, mit Copics coloriert und ausgeschnitten. Auf die Mauer habe ich ein Stück schwarzen Cardstocks geklebt und die Bretter rundherum angeordnet, so dass in der Mitte eine Öffnung blieb.
Auch der Hase und die Geldsäcke, alles aus dem Set Hände Hoch, sind mit Copics coloriert. Vor dem Aufkleben, habe ich noch einige Schatten, aus schwarzem Cardstock mit der Shadows and Flowers Stanze gestanzt, unter die Geldsäcke und den Hasen geklebt. Ich finde diese schmalen Ovale so genial, sie "erden" irgendwie jedes Motiv.

In the lower right corner one of the bad guys is robbing a bank. They created a hole in the brick wall, and since that isn't done in one day, they covered the hole with planks for the time inbetween working on the hole. Now they took off the planks and are bringing out all those bag full of money.
I stamped the wood plank from the also new set Nailed It several times, colored them with Copics and cut them out. I attached a piece of black cardstock to the wall and then arranged the planks around it, leaving an opening in the center. 
Also the bunny and the sacks are colored with Copics - they are all from the set "hands up". Before attaching those to the card I put little shadows, cut from black cardstock with the Shadows and Flowers die, under the bunny and the sacks. I love those narrow ovals, they ground every image.


Nun, hätte der Kollega draußen mal lieber nicht nur die Geldsäcke angenommen, sondern auch ein wenig aufgepasst, was rundherum so passiert. Hat er nicht - und da ertönt aus dem Hintergrund ein lautes "Hände hoch!". Mist, sie sind auf frischer Tat ertappt...
Ich finde die Szene genial, aber ich bin mir nicht sicher, ob Euch das auch so geht, oder ob das bei mir ein wenig verquerer Berufshumor ist. Und nein, ich arbeite nicht als Einbrecher....
Hier habe ich den Text "Hände hoch!" mit weißem Embossingpulver auf eine der Speech Bubbles, gestanzt aus schwarzem Cardstock, aufembosst. Die kleine Spitze an der Sprechblase habe ich dann aus dem Megaphon, ebenfalls aus dem Set Hände Hoch, kommen lassen. Und weil das ja nicht einfach in der Luft schweben kann, habe ich hier noch den Flügel des Küken-Bösen-Buben abgestempelt und ihm das Megaphon in die Hand gedrückt. 
Alle Motive auf der Front der Karte sind übrigens mit 3D Tape aufgeklebt.

Well, the guy on the outside should not have just taking all the sacks of money, but also should have watched the area around them. Well, he didn't - and there's a voice from behind of him screaming "hands up". Well, they are caught in the act....
I just love this scene but am not sure if you all do, too, or if it's just my a bit twisted sense of humor due to my job. And no, I don't work as a robber...
Here I white heat embossed the "hands up!" onto one of the Speech Bubble dies, cut from black cardstock. I let the small tip come out of the megaphon, also from the Hands Up set. Andn since that can't float in the air, I stamped just the wing of the bad guy chicken and let it hold the megaphon.
By the way, all images on the front of the card are adhered with foam tape.


Ein Einbruch in der Größenördnung ist natürlich nicht von einer Person alleine zu bewerkstelligen. Deswegen geht die Szene im Inneren meiner Karte weiter.

Well, a job that big can't be done by just one person. So the scene continues on the inside of my card.


Hier steht der Komplize des Hasen mit Taschenlampe im Dunkel des Tresorraums und reicht die Geldsäcke durch die Maueröffnung nach draußen. Nun, er hat die Stimme aus dem Megaphon natürlich auch gehört und weiß, der Job ist schief gegangen. Aber er hat keine Chance zu entkommen.
Das Innere der Karte habe ich im unteren Bereich mit Distress Oxide Black Soot gewischt und darauf das Eichhörnchen sowie einige Geldsäcke, alles wieder auf ovalen Schatten, aufgeklebt. Dem Eichhörnchen habe ich die Taschenlampe in die Hand gegeben und mit gelber Chalk den Lichtkegel der Taschenlampe hinzugefügt. 

Here's the bunny's accomplice with his flashlight in the dark of the vault, handing out the bags of money through the hole in the wall. Well, of course he also heard the voice coming out of the megaphon, and he knows, the job went wrong. But he has no chance to escape.
I inked part of the inside of the card with Distress Oxide Black Soot and then arranged the squirrel and more sacks, all again grounded by those oval shadows, onto the cardstock. I let the squirrel hold the flashlight and added the light coming from it with yellow chalk.


Und hier im Inneren habe ich dann auch den eigentlichen Text meiner Karte untergebracht.
Der Teil "wenn's mal wieder..." ist aus dem Set Scheiß Drauf und mit schwarzer Tinte abgestempelt. Darunter habe ich dann noch ein "ich bin für dich da" aus dem Set Keine Sorge, diesmal mit roter Tinte, gestempelt.  Dann habe ich noch drei kleine Pailetten-Herzen aufgeklebt.
Und der Text "ich bin für dich da" bedeutet natürlich nicht, dass ich der Komplize wäre, der die Geldsäcke nach außen reicht. Er steht für ein "ich bin der Freund, der Dir eine Torte mit eingebackener Feile in den Knast bringt" Angebot.

And here on the inside I also stamped the text of my card. 
The first row means "when life goes wrong..." and is stamped with black ink. With red ink I stamped "I am here for you" under it and then arranged three red heart confetti around the text.
And the text "I am here for you" is not meant to be understood as "I am that friend that's robbing a bank with you". It's meant to be understood as "I am that friend, that will visit you in jail and bring a cake with a fail in it with me". 

Dienstag, 4. April 2023

Am Ende wird alles gut - oder nicht

 
Hallo Ihr Lieben!
Ist es Euch auch schon mal so gegangen - Ihr fangt eine Karte an und sie will einfach nicht schön werden. Irgendwann habt Ihr sie so oft auseinander genommen, neue Lagen aufgeklebt etc., dass Aufgeben auch keine Option mehr ist. Und dann ist sie irgendwann fertig, aber so richtig zufrieden seid Ihr nicht. So ging es mir mit dieser Karte, die ich bereits Anfang März angefangen hatte... Ich hatte sie zwischendurch zwecks Hilfestellung sogar bei einem Stempeltreffen dabei, aber niemandem fiel eine Idee zur Rettung der Karte ein. Also lag sie weitere 2,5 Wochen als UFO auf meinem Schreibtisch.

Hello everyone!
Did that ever happen to you - you start a card and it just doesn't look right. You come to a point, where you've ripped it apart so often and added so many layers, that giving up isn't an option anymore. And then, one day, it is done, but you're really not happy with it. That's what happened to me with this card, that I actually started the beginning of march.... Inbetween I even took it with me to a craft day with friends, hoping to find help there. But none of my friends had an idea for how to save this card. And so it laid another 2,5 weeks as an UFO (UnFinished Object) on my craft desk.

Anfgefangen hatte alles mit der Technique Throwback Thursday Challenge - diesmal sollte ein Hintergrund aus Papierstreifen zur Resteverwertung gemacht werden. Die Idee fand ich klasse, Reste habe ich jede Menge. Also habe ich einen Streifenhintergrund in verschiedenen Blau- und Türkistönen gemacht. Als ich dann aber die Deko draufgelegt hatte, sah es aus, als schaue man durch ein Fenster auf eine blau gestrichene Wand. Da ich das Fenster - gleich mehr dazu - bereits gemacht hatte und als Shaker geplant hatte, habe ich alles wieder auseinander genommen und eine Lage Vellum direkt hinter die Folie des Shakers gesetzt - ich dachte, das würde den Hintergrund etwas abschwächen. Naja, hat es, aber vom Shaker hat man auch nur noch gehört, aber nichts mehr gesehen. Also habe ich wieder alles auseinander genommen und das Vellum wieder herausgerissen. Stattdessen habe ich dann hellblauen Cardstock verwendet und Wolken aus irisierendem Vellum und hellblauem Cardstock aufgeklebt. Das Vellum hatte ich durch meine Xyron gedreht, um es vollflächig mit Kleber zu versehen. Das führte dann dazu, dass die feinen Kügelchen, die ich als Shakerfüllung verwendet habe, teilweise am Rand der Vellum-Wolken festklebten.... Von all den Lagen weißen Cardstocks, die sich auf der Karte stapeln, weil ich beim Auseinandernehmen etwas eingerissen oder anschließend schief zugeschnitten habe, wollen wir mal erst gar nicht reden. Ich sags ja, ich hätte längst aufgeben sollen. Aber ich war bockig - Du wirst eine fertige Karte, und wenn es das Letzte ist, das ich tue!

It all started with the Technique Throwback Thursday challenge - this time the theme was to use paper strips to use up scraps. I loved the idea, I have lots of scraps in a drawer. So I created a striped background in different tones of blues and aquas. But once I put the decoration on top it seemed like your looking through a window onto a blue painted brick wall. Since I had already created the window - more about that later - and had planned to use it for a shaker, I took everything apart. I thought, a layer of vellum behind the acetate would help to tone the background done. Well, it did. But all you got from the shaker now was a funny sound - none of the filling was visible. So I took the card apart again and ripped out the vellum. Instead I created a background from light blue cardstock and put some clouds, cut from iridescent vellum and light blue cardstock, on top. I had run the vellum through my Xyron to completly cover it with glue. But once I had everything put back together, I realized, that the tiny beads I used as the filling for my shaker, partially stuck to the - obviously sticky - edges of the clouds... And I don't want to start talking about all the layers of white cardstock that are stacked on this card because I had ripped the edge while taking the card apart, or didn't cut it straight after having it put back together. As I said - I should have stopped a long time ago. But I got stubborn - you are going to be a finished card, and if it's the last thing I'll do!


Hier seht Ihr das Shaker-Fenster mal genauer, über den Hintergrund habe ich ja schon ein wenig geschrieben. Die Wolken habe ich mit Stanzen aus den Sets Platform Pop-Up Cloud Wrap-Around und Platform Pop-Up Cloud Inserts von LawnFawn gestanzt. Von denen sind übrigens alle Stempel und Stanzen auf der Karte.
Aus weißem Cardstock habe ich die beiden Teile des Secret Garden Windows gestanzt und beide Lagen mit 3D Tape aufeinander geklebt. Die Zweige im kleineren Fenster habe ich mit Copics coloriert. Dann habe ich die kleine Blüte im Set mehrfach aus dunkelblauem Cardstock gestanzt, mit Copics schattiert und auf die entsprchenden Stellen im Fenster geklebt. Außerdem habe ich kleine Perlen in die Blumenmitten sowie auf einige der Zweige geklebt.
Die Pilze sind aus dem Stempelset  Gleeful Gardens, die Ostereier aus dem Set Easter Before 'n Afters, das Gras und die Schmetterlinge aus dem Set Butterfly Kisses. Ich habe alles mit dem Fade-Out Stempelkissen von InkOn3 gestempelt und mit einer Mischung aus Copics und Polychromos coloriert. Dannn habe ich alles ausgeschnitten und zwischen die beiden Fensterlagen - bzw. die Schmetterlinge auf die Folie des Shakers - geklebt.

Here you get a closer look at the shaker window, I already talked about the background inside the window. The clouds I've die cut using dies from the sets Platform Pop-Up Cloud Wrap-Around and Platform Pop-Up Cloud Inserts by LawnFawn. All stamps and dies on this card are by them.
From white cardstock I've die cut both pieces of the Secret Garden Window and glued both layers together with foam tape. I colored the branches in the smaller window with Copics. Then I've die cut the small flower from this set several times from dark blue cardstock, shaded them with Copics and adhered them to their places in the flower pattern. I also put tiny pearls onto the flower centers and the ends of a few of the branches.
The mushrooms are from the Gleeful Gardens stamp set, the eggs from the Easter Before 'n Aters set, the grass and the butterflies from the Butterfly Kisses set. I stamped all the images with the Fade-Ou ink pad by InkOn3 and then colored them with a mix of Copics and Polychromos. Then I cut them out and put them between the two layer of the window - the butterflies I put onto the acetate used for the shaker. 


Und dann war die Karte viel zu weiß. Also habe ich das größere der Fenster noch einmal aus dunkelblauem Cardstock gestanzt und dann mit der Schere die gepunkteten Linien ebenfalls weggeschnitten. Dass beim Stanzen das Tape, das ich zum Fixieren der Stanze verwendet hatte, zu fest auf den Cardstock gepresst wurde und den Cardstock beim Ablösen etwas eingerissen hat - was sonst nie passiert - passt in die Katastrophen-Reihe dieser Karte.
Unten auf den dunkelblauen Cardstock habe ich dann noch zwei Texte aus dem Stempelset Window Scene Spring weiß aufembosst, den Cardstock aufgeklebt und oben am Fenster einen dritten Schmetterling aufgebracht.
Normalerweise mache ich die schräg aufgenommenen Bilder ja, um Euch die Tiefe und das Dreidimensionale meiner Karte zu zeigen. Hier stellt es eher ein Negativ-Beispiel dar: durch all die Lagen ist meine Karte extrem hoch geworden und man kann außerdem zwischen dem Aufleger und dem Kartenrohling, auf den ich alles geklebt habe, hineinschauen. Aber das war mir dann auch schon egal, ich war einfach froh, die Karte endlich irgendwie fertiggebracht zu haben....

And then there was way too much white on this card. So I've die cut the larger of the windows again from dark blue cardstock and then cut off the dotted lines with my scissors. That the tape I used to hold the die in place was pressed too hard into the cardstock and ripped off the top layer of my cardstock when I took it off - something that never happens - only fits the row of catastrophies that happened while making this card.
To the bottom of the dark blue cardstock I white heat embossed two texts from the Window Scene Spring stamp set, adhered the cardstock as my top layer and then added a third butterfly to the top right of the window.
Usually I take those angled pics to show you the dimensions and depth of my card - here it is more of a negative sample: due to all the layers I used my card turned out extremly high. And you can also see a bit into the gap between the top layer and the card base I mounted everything onto. Well, it didn't bother me anymore. I was just happy to finally have finished some kind of card here....

Montag, 3. April 2023

Eine Mädchen-Babykarte


 Hallo Ihr Lieben!
Eine Babykarte für ein Mädchen wurde gebraucht. Und da sie etwas vor dem errechneten Geburtstermin entstanden ist, musste ich sie ohne genauere Daten wie Namen und Geburtstag machen. Aber das ist doch auch mal schön.

Hello everyone!
A friend needed a card for the birth of a little baby girl. I made this quite a bit before the due date, so I didn't have any specifics like the name or the date of birth. But I actually like this more general card.

Im Hintergrund habe ich hellrosafarbenes Papier mit kleinen weißen Punkten verwendet. 
Einige Details - vor allem die Idee mit den versetzt wieder aufgeklebten Wolken - ist aus einem Video von Nichol Spohr aus 2018. Die Idee hat mir so gut gefallen!

I used some light pink patterned paper with tiny white dots as the background.
Some of the  details - especially the idea of re-attaching the clouds a bit off - are inspired by a video by Nichol Spohr back from 2018. I really loved that idea!


Für die Deko auf der Karte habe ich das Rock-a-Bye Baby Stanzenset von HoneyBeeStamps verwendet. Ich habe die Teile aus weißem, hell- und dunkelgrauem und rosafarbenem Cardstock gestanzt und mit Copics etwas schattiert. Das Schaukelpferd aus dem selben Set hat es dann aus Platzgründen nicht mehr auf die Karte geschaffft. 
Ich habe alle Teile zusammengesetzt und hinter das Bett noch eine hellgrau schattierte Lage gesetzt, da ich es doof fand, dass man komplett durch den Betthimmel durchschauen konnte. Für den Hasen und auch das Mobile habe ich die Stanze jeweils aus zwei verschiedenen Farben gestanzt und einige Details - wie z. B den Bauch des Hasen und die Deko des Mobiles - ausgeschnitten und auf das andersfarbige Stanzteil geklebt. 
Aus einem Stück Designpapier in rosa und grau mit weißen Herzen habe ich drei kleine Wolken ausgestanzt, mit Vellum hinterlegt und anschließend, wie schon erwähnt, weiß gestanzte Wolken mit dünnem 3D Tape etwas versetzt wieder aufgeklebt. Darauf kam, wieder mit 3D Tape, das Babybett samt Teppich und Hasen.
Das Herz-Papier habe ich dann für etwas Kontrast noch grau hinterlegt.

For the main elements on my card I used the Rock-a-Bye Baby die set by HoneyBeeStamps. I die cut the pieces from white, light and dark grey and pink cardstock and added some shading with my Copics. The rocking horse from the same set just didn't fit onto this card anymore.
I glued all pieces together and added a light grey shaded layer behind the curtain because I didn't like that you could see through it. To create the bunny and the mobile, I've die cut the dies twice from two different colors of cardstock and cut some details - like the bunny's belly and the small decoration pieces of the mobile - out of one color and attached it to the die cut made from the other color. 
I die cut three little clouds from the top of a piece of pink and grey patterned paper with white hearts, put some vellum behind it and then, as mentioned above, glued down some white clouds with thin foam tape just a bit off. Then I adhered the baby crib, the carpet and the bunny onto the hearts background. Then I matted it with grey cardstock to add some contrast to the card.


Für den Text habe ich aus rosafarbenem Cardstock dreimal das Wort baby mit einer Stanze von Memorybox ausgestanzt und die Stanzteile aufeinander geklebt. Dann habe ich per Hand noch eine weiße Schattenlage geschnitten. 
Der Rest des Textes ist mit Stempeln aus den Sets Kleine Worte und Kleine Worte 2 von Stampcorner gemacht. Damit der Text nicht zu sehr raussticht, habe ich ihn mit weißem Embossingpulver auf dunkelgrauen Cardstock embosst.  
Damit der Text die gleiche Höhe wie die Motive darüber haben, habe ich zum Aufkleben wieder 3D Tape benutzt.

For the text - hello baby, so happy you're here - I die cut the word baby three times from white cardstock using a die by Memeorybox and than stacked the words. The white shadow layer behind it I've cut with my scissors. 
The rest of the text is white heat embossed onto strips of dark grey cardstock. Black seemed to hard here.
To make the text the same height as the images above I used foam tape again to attach it to the card.


Ich habe alle Teile auf das gepunktete Designpapier und dann auf einen weißen Kartenrohling geklebt.

I adhered all the elements onto the dotted patterned paper and then attached it to a white note card.


Im Inneren der Karte sollte gleich ein bestimmter Text stehen. Da mir täglich mindestens einmal gesagt wird, wie unleserlich meine Handschrift ist - dabei finde ich sie nur besonders, nicht unleserlich - habe ich mir hier mit dem PC beholfen.

There should be special text already put on the inside of the card. Since I get told at least once daily that my handwriting isn't legable - I just think it's special though - I used my computer to write it.


Um zu verhindern, dass man den Rand des ausgeschnittenen Textes sieht, habe ich aus rosa Cardstock mit einer der Stitched Rectangle Frames von Create a Smile diesen dünnen Rahmen gestanzt - um ihn passend zu machen, habe ich zu Partial Diecutting gegriffen - und ihn direkt auf die Kante des ausgedruckten Texts geklebt. 

To avoid that the edges of the cut out text is visible, I've die cut this thin frame from pink cardstock, using one of the Stitched Rectangle Frames by Create a Smile. I had to do some partial diecutting to make it fit. Then I glued the frame exactly over the edges of the printed text.

Sonntag, 2. April 2023

Ostern - gestreift und gepunktet

 
Hallo Ihr Lieben!
Ich glaube, ich habe Euch meine große Craftastrophen-Karte noch nicht gezeigt, das kommt dann irgendwann demnächst. Ich hatte versucht, an der Technique Throwback Thursday challenge teilzunehmen, in der ein älteres Video von Jennifer McGuire mit Ideen zum Aufbrauchen von Papierresten als Thema gestellt war. Naja, auf der Katastrophen-Karte war von der Technik nichts mehr zu sehen. Ich bin aber gerne mal ein wenig bockig und mag es zudem nicht, wenn mir etwas nicht gelingen mag. Also habe ich nochmal von vorne angefangen und diese Karte mit Papierstreifen gemacht. Und ja, diesmal hat es geklappt!

Hello everyone!
I don't think I have shared "the big craftastrophy card" with you yet, I will one of the next days. I had tried to take part in the Technique Throwback Thursday challenge, where and older video by Jennifer McGuire about how to use up paper strips was given as the theme. Well, on that "everything went wrong" card not one single strip was visible left. But I can e very stubborn and also don't like giving up. So I started fresh and made this card with paper strips. And yes, this time it worked!

Ich habe hier Streifen von gepunkteten Designpapiers zugeschnitten und in Regenbogenordnung aneinander geklebt. Gerade bei gepunktetem Designpapier wird bei mir (fast) jeder Schnipsel aufgehoben und ich war so froh, endlich einige der Reste aufbrauchen zu können.
Die jetzt zusammenhängenden Streifen habe ich etwas kleiner als einen Standard-Kartenrohling zugeschnitten.
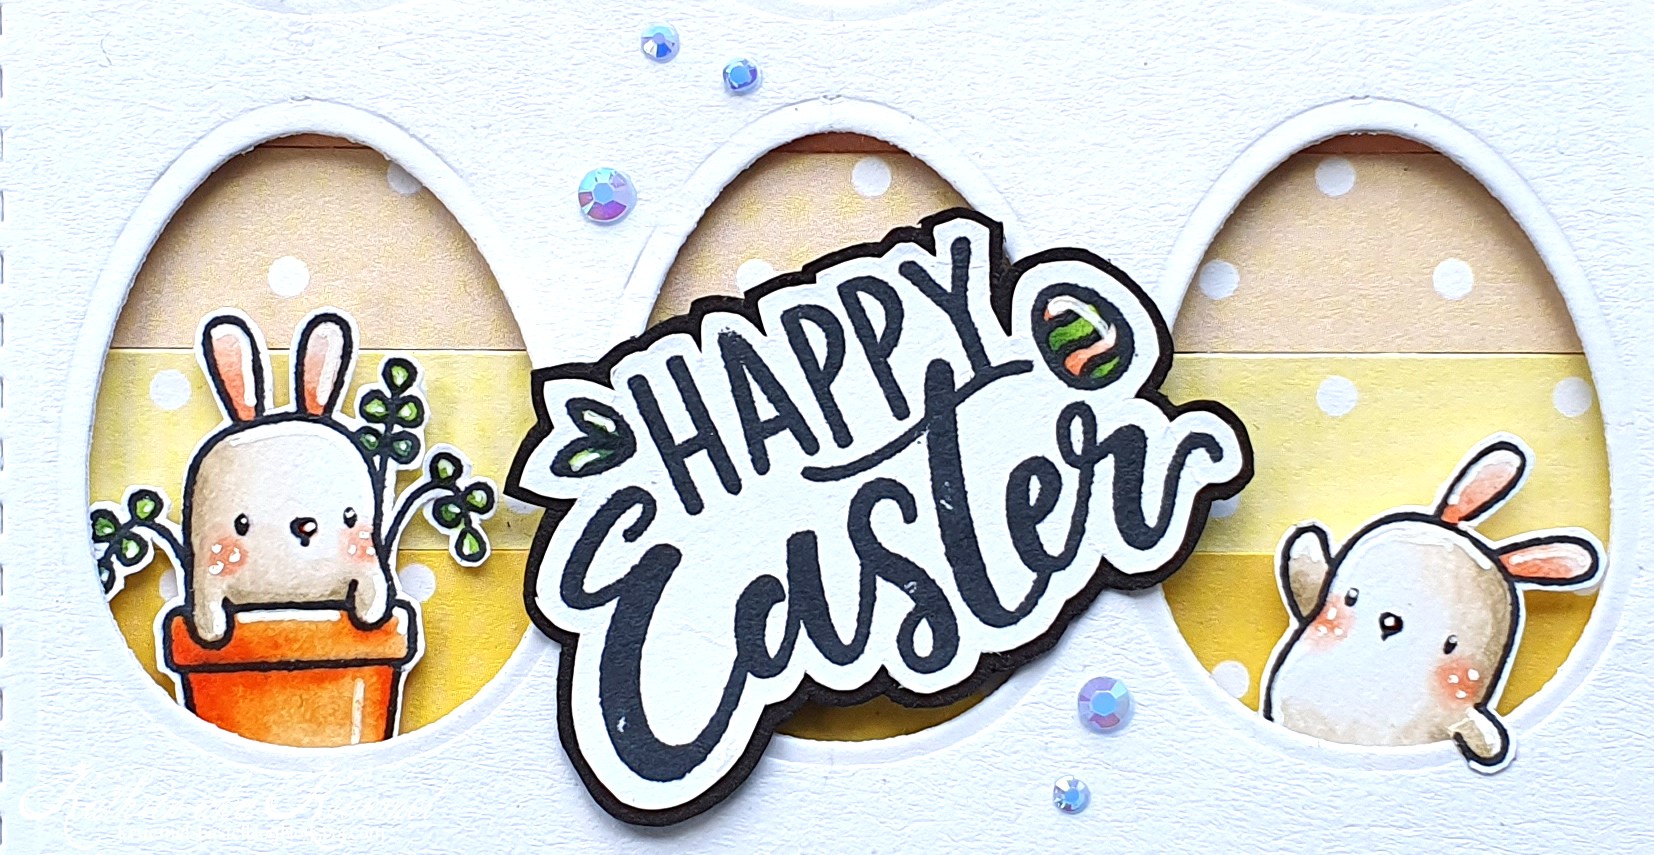
Mit einer der Double Stitched Rectangles Stanzen von Create a Smile habe ich aus weißem Cardstock ein Rechteck mit gestitchtem Rand ausgestanzt und dann mit einer Eierstanze Fenster aus dem Cardstock gestanzt. Dabei habe ich sie so genau wie möglich unter- und nebeneinander gesetzt. Im Nachhinein finde ich, ein Ei schräg gestanzt hätte bestimmt auch toll ausgesehen...
In die Eier-Fenster habe ich dann meine Motive geklebt.

Here I cut strips from dotted patterned paper and put it together in a rainbow order. Especially with dotted patterned paper I keep (nearly) every scrap and I was really happy to finally use up some of it here.
I put two strips of white cardstock behind the cardstock strips and glued the dotted strips to them to connect them. Then I cut the whole piece slightly smaller than a standard note card.
With one of the Double Stitched Rectangles dies by Create a Smile I cut a rectangle with a stitched edge from white cardstock and then used an egg die to cut windows into the rectangle. I tried, to work as precise as possibe, cutting the eggs with even distances and in straight lines. Afterwards I though, maybe one egg cut slanted would have looked great, too.
Into those egg shaped windows I put my images.


Ich habe hier die Hasen aus dem Little Bunny Agenda Stempelset von MamaElephant verwendet und beim Colorieren bewusst wenige und vor allem helle Farben gewählt. Bei einigen der Hasen habe ich die Accessoires wie Luftballons, Kleeblatt etc weggeschnitten. Aber der Hase rechts durfte seine Möhre behalten.

I used the bunnies from the Little Bunny Agenda stamp set by MamaElephant here and went with very few and light colors for my coloring. I also cut off most of the accessoires the differents bunnies were holding - like balloons, a clover etc. But the bunny on the right got to keep his carrot.


In der mittleren Eier-Reihe habe ich nur hinter das linke und rechte Fenster ein Motiv gesetzt - über das Ei in der Mitte habe ich den Text platziert. Der ist aus dem Magic Messages Spring Stempelset von LawnFawn. Ich habe ihn schwarz auf weißen Cardstock gestempelt und mit der Schere ausgeschnitten. Dabei habe ich einige der Deko, die rund um den Text angeordnet ist, so dass er einen Kreis ergibt, weggeschnitten - nur zwei Blätter und ein Osterei durften bleiben. Dann habe ich den Text auf schwarzen Cardstock geklebt und ebenfalls mit der Schere als Schattenlage ausgeschnitten.
Oh, und den Hasen im Blumentopf musste ich auch einfach als komplettes Motiv behalten.

In the middle row of eggs I only placed bunnies behind the egg on the left and right - over the center one I placed my text. It's from the Magic Messages Spring stamp set by LawnFawn. I stamped it black onto white cardstock and cut it out with my scissors. When cutting it out, I cut off most of the elements, that are placed around the text to give it a circle shape - I just kept two leaves and one easter egg. Then I attached the text to some black cardstock and used my scissors again to cut the shadow layer.
Oh, and I just had to keep whole bunny in the flower pot and use it completly, because it's too cute.
 

 In den Fenstern der unteren Reihe befindet sich wieder hinter jedem Fenster ein Motiv. Im Stempelset gibt es zwei verschiedene Hasen mit Karotten, die durften beide auf die Karte. Und dem tanzenden Hasen links habe ich sein Röckchen gelassen, nur die Krone habe ich weggeschnitten. 
Die Motive sind übrigens mit Copics coloriert und per Hand ausgeschnitten.
 
In the bottom row there's again one bunny behind each window. There are two different bunnies with carrots included in the stamp set, so I used both on my card. And the dancing bunny on the right was allowed to keep his tutu - I just cut off the crown.
All images are colored with Copics and cut out by hand.
 

Die Hasen, die ihre Hände oben auf dem weißen Cardstock haben, sowie den Hasen im obersten linken Fenster habe ich hinten an den weißen Cardstock angeklebt und den dann mit dickem 3D Tape auf dem Streifenhintergrund befestigt. Die anderen Hasen sind mit dünnerem 3D Tape in die Fenster geklebt.
Zum Schluss habe ich alles auf einen weißen Kartenrohling geklebt und zudem fünf kleine blaue Glitzersteine rund um den Text angebracht.

The bunnies, that have their hands on top of the white cardstock, and the bunny in the top left window I attached directly to the white cardstock, then adhered it with thick foam tape to the background made from paper strips. The other bunnies I adhered inside the windows using thin foam tape.
To finish the card, I attached everything to a white note card and also added five small blue rhinestones next to the text.

Samstag, 1. April 2023

When life gives you a rainy day...

 
Hallo Ihr Lieben!
Passend zum ersten April, habe ich heute eine Karte zu zeigen, die das Wetter zum Thema hat. Naja, zumindest indirekt. Und im April wird man da ja manchmal böse überrascht....
 
Hello everyone!
Here in Germany we have a saying that means "in april, the weather follows no rules". You really can get surprised by the quick changes the weather makes. So matching the first day of april I have a weather themed card to share today - at least it is some kind of weather related.
 
 Ich hatte mir schon länger keine Stempel oder Stanzen von MamaElephant mehr gekauft. Aber die Raindrop Cover Stanze musste ich dann doch haben. Und da ist mir doch glatt noch das dazu passende Rainy Days Stempelset mit in den Warenkorb gehüpft....
Den Raindrop Cover Hintergrund habe ich aus weißem Cardstock gestanzt und eine Stencil mit großer Welle aufgelegt. Den oberen Bereich habe ich dann mit Distress Oxide Stormy Sky und Faded Jeans gewischt, den unteren mit Bundled Sage und Mowed Lawn. Dann habe ich rundherum ein klein wenig Black Soot aufgetragen.
Den Hintergrund habe ich mit hellbauem Glittercardstock hinterlegt, der durch die ausgestanzten Regentropfen sichtbar ist.

I hadn't bought any stamps or dies by MamaElephant for quite some time. But the Raindrop Cover die was a must have for me. And - I don't know how that happened - but I also ended up with the matching Rainy Days stamp set in my basket...
I die cut the Raindrop Cover die from white cardstock and then put a stencil with a large wavy hill on top. I inked up the upper part with Distress Oxide Stormy Sky and Faded Jeans, the bottom with Bundled Sage and Mowed Lawn. Then I added a hint of Black Soot all around to the edge.
I put some light blue glitter cardstock behind the background, that is now visible through the cut out raindrops.

 
Mit den Wolkenstanzen aus dem Spring Showers Stanzenset von LawnFawn habe ich die Wolken aus weißem Cardstock gestanzt und oben auf den Hintergrund geklebt - die beiden äußeren Wolken mit dünnem 3D Tape. Schließlich müssen die Regentropfen irgendwo herkommen.
Die Motive aus dem Rainy Days Stempelset sind mit Copics coloriert. Der kleine Frosch ist aus dem Beary Rainy Day Stempelset von LawnFawn - der passte so schön dazu. Die Pfützen habe ich aus den beiden halben Pfützen aus dem Set gestempelt und dann mit einem schwarzen Copic Multiliner verbunden. So kann man sie schön in der Größe so anpassen, wie sie auf die Karte passen. Ich habe sie und die Wassertropfen außerdem mit Glossy Accents überzogen. 
Dann habe ich die Motive ausgeschnitten und aufeinander geklebt.

Using the cloud dies from the Spring Showers die set by LawnFawn I've die cut some clouds from white cardstock and then attached them to the top of my background, using thin foam tape for the two smaller clouds. All those raindrops have to come from somewhere.
I colored the images from the Rainy Days stamp set with Copics. The little frog image is from the Beary Rainy Day stamp set by LawnFawn - it fitted the scene so wonderfully. I stamped the puddles using the two half puddles from the stamp set and then connected the ends with a black Copic Multiliner. This way I was able to make them the size I needed. I also covered those and the raindrops with some Glossy Accents.
Then I cut the images out with my scissors and put them together. 


Für den Text habe ich zu einer Kombi aus Stempeln und gestanzten Buchstaben gegriffen. Der gestempelte Text kommt ebenfalls aus dem Set Rainy Days. Eigentlich ist er mehrzeilig - ich habe ihn auf zwei Zeilen abgeändert, damit er auf meine Karte passt. 
Die gestanzten Buchstaben habe ich mit dem Henry's ABCs Stanzenset von LawnFawn gemacht - viermal aus weißem Cardstock, einmal aus gelbem. Die gelben Buchstaben habe ich dann mit Copics ein wenig schattiert und leicht nach rechts versetzt auf die aufeinander geklebten weißen Buchstaben geklebt. Für die Highlights habe ich, ebenso wie bei den Motiven, einen weißen Gelstift verwendet.

For the text I used a combination of stamps and die cut letters. The stamped text is also from the Rainy Days stamp set. It is stamped in several lines - when stamping it, I moved my cardstock to end up with just two lines, that fit my card.
The die cut letters are made with the Henry's ABCs die set by LawnFawn - four times from white cardstock, once from yellow. I lightly shaded the yellow letters with my Copics, then glued them, moved slightly to the right, onto the stacked white letters. For the highlights I used a white gel pen, like I did for the images.


Die Motive und gestempelten Texte habe ich dann mit dünnem 3D Tape, die gestanzten Buchstaben direkt auf den Hintergrund geklebt. Dann habe ich alles auf einem weißen Kartenrohling angebracht.

I adhered the images and stamped texts with thin foam tape to the background, the letters I glued down directly onto it. Then I attached everything to a white card base.