Sonntag, 19. Mai 2019

Einladungen zum Kindergeburtstag


 Hallo Ihr Lieben!
Bevor Ihr Euch wundert - nein, ich habe Euch keine Kinder "vorenthalten", und auch meine eigenen Kinder verschicken natürlich keine Einladungen mehr zu ihren Parties. Nein, letzte Woche klingelte mein Telefon. Es war mein Bruder, der mich fragte, ob ich Lust hätte, für meine Nichte die Einladungen zu ihrem Kindergeburtstag machen zu wollen. Natürlich gerne! Gewünschtes Thema: Zirkus - kein Problem. Der Satz "bei Dir bewegt sich immer so toll was" hat mich dann ein wenig unter Druck gesetzt, man will ja keinen enttäuschen. Aber ich hatte sofort eine Technik von Laura Dovalo im Kopf, zu der sie auch eine Anleitung gepostet hat. Ich habe den Mechanismus dann ein wenig vereinfacht, schließlich wollten 12 Stück gemacht werden - und da sind 5 sich bewegende Tiere dann doch ein wenig viel. Aber die Robbe hat es drauf geschafft und ist nun der Star der Vorstellung.

Hello everyone!
Before you ask - no, I don't have any more kids. And my own ones don't send out invitations anymore. No, last week my phone rang. It was my brother calling, asking if I want to make invitations for my niece's 7th birthday party. Of course! The theme was circus - not a problem there. When he said "on your cards there's always someting moving and that's so great" slightly put me under pressure. I didn't want to disappoint her. But nearly immediately I had a technique in mind I've seen in a video by Laura Dovalo. I've simplified her technique a bit because I needed to make 12 of these - so five moving animals on each card seemed a bit overwhelming. But the seal made it onto the card and is the star of the show.

Ich habe blauen Cardstock als Basis benutzt und mit weißem Versacraft und der In the Spotlight Schablone von MFT einen Lichtkegel aufgewischt. Dann habe ich ein paar weiße und goldene Punkte auf dem Hintergrund verteilt.
Für die Manege habe ich hellbraunen Cardstock leicht gebogen zugeschnitten und unten auf den Hintergrund aufgeklebt. Den Vorhang habe ich mit der Take the Stage Stanze von MFT aus rotem Cardstock ausgestanzt und ebenfalls aufgeklebt.
Oben auf den Tab habe ich ein "hier ziehen" aufgestempelt.
Unten in die Manege kam noch ein ausgestanztes Einladung, für das ich eine Stanze von Kulricke verwendet habe.

I've used blue cardstock for the base and added a spotlight using white Versacraft ink and the In the Spotlight stencil by MFT. Then I've added few white and golden dots.
For the ground I've cut a piece of light brown carstock slightly curved and glued it onto the background. The curtain was cut using red cardstock and the Take the Stage die by MFT  and also glued onto the background.
Onto the tab I've stamped a "pull here". The word at the bottom of the card means invitation. I've die cut this from blue cardstock and glued it in place.


Auch die tolle Robbe ist von MFT - und mit dieser "Kartenbestellung" hatte ich endlich einen Grund, mir das Set zu kaufen. ;)
Ball und Robbe sind jeweils einzeln ausgeschnitten und mit Copics coloriert. Anstatt des kleinen Balls, den die Robbe auf der Nase balanciert habe ich einen kleinen Kreis aus goldenem Glitzercardstock ausgestanzt. Glitzer darf bei Mädchen doch nicht fehlen!

Also this cute seal is by MFT - and this "card order" finally gave me a reason to order this set. ;)
Ball and seal were both stamped/cut out individually and colored in with Copics. Instead of the smaller ball the seal is balancing on its nose I've used a small circle cut from golden glitter cardstock. There has to be some glitter on a girls' card!


Und wenn man genau hinschaut, dann sieht man auf diesem Bild schon, was passiert, wenn man am Tab zieht. Die Robbe schubst den Ball mit der Schnauze in die Luft, während sich gleichzeitig der große Ball, auf dem sie sitzt, dreht.
Aber hier kann man das viel besser sehen:

And if you look closely you can already see what happens when you pull the tab. The seal is throwing the smaller ball up in the air while the bigger one she's balancing on is rotating. 
But here you can see that much better:


Ich weiß, es wackelt ein wenig. Aber ich denke, Ihr könnt es trotzdem sehen. Meine Nichte war auf jeden Fall vollends zufriedengestellt.

I know, it's a bit wobbly. But I think you can still see it. And my niece was completly satisfied.


Samstag, 18. Mai 2019

Stempeleinmaleins - Ausgabe vom 18. Mai 2019


Hallo Ihr Lieben!
Beim Stempeleinmaleins zeigen wir Euch heute die - deutsche - Anleitung der Beaded Raindrops Card, bei uns verdeutscht "Perlenregenkarte". Ich habe bereits einige dieser Karten gemacht und finde sie einfach klasse!

Hello everyone!
Over at Stempeleinmaleins we are sharing a german tutorial for a Beaded Raindrops Card today. I've already made a few of them and you love this type of interactive card!

Aus einem Stück hellgrauem Cardstock habe ich einen Kreis mit nach innen liegenden Wellen und gestitchtem Rand gestanzt. Darauf kam gestreiftes Designpapier, aus dem ich einen etwas größeren Kreis passend (naja, fast - hüstel) gestanzt habe. Später habe ich das Motiv auf schwarzen Cardstock geklebt, darüber die beiden Lagen mit den ausgestanzten Kreisen und alles auf eine weiße Kartenbasis geklebt.

From a piece of light grey cardstock I've die cut a circle with inward scallops and a stitched border. On top of that I've put some striped designer's paper, from which I've die cut a slightly larger circle at the same spot - well almost. Later I've glued the colored image onto black cardstock, put the two layers with the cut out circles on top and glued it all to a white card base.


Und hier die Motive und Texte.
Ich habe hier die tollen Stempelsets Piggie Pebbles und Scene Builders von MFT verwendet. Im Hintergrund habe ich eine Landschaft mit Hügel, Baum und Wolken zusammengesetzt und mit Copics coloriert. Da es ja ein regnerischer Tag ist, habe ich den Himmel ebenfalls grau coloriert. 
Das süße Schweinchen ist ebenfalls mit Copics coloriert, ausgeschnitten und mit 3D Tape auf die Karte geklebt. Die Nase habe ich nochmal extra aufgeklebt.
Die Texte sind aus aus dem Stempelset Rain or Shine und mit weißem Embossingpulver auf Streifen aus schwarzem Cardstock embosst.
Zum Schluss kamen, als zusätzliche Farbtupfer, noch einige rosafarbene Enamel Accents. 

And here's the images and text.
I've used the great stamp sets Piggie Pebbles and Scene Builders by MFT here. In the background I've created a landscape with hills, a tree and clouds and colored it in with Copics. Since it's a rainy day I've also used grey to color the sky. 
The cute piggy is also colored with Copics, cut out and glued onto the card using dimensionals. A second nose was glued on with dimensionals as well for some depth.
The saying is from the Rain oder Shine stamp set and white heat embossed onto strips cut from black cardstock. 
In the end I've added some pink Enamel Accents for some extra color.

Und weil diese Karte mal wieder interaktiv ist und auf den Bildern der Effekt einfach nicht so toll gezeigt werden kann, habe ich wieder ein kurzes Video für Euch:

And since this is an interactive card and the effect can't really be shown on pictures I've once again made a short video for you:


Freitag, 17. Mai 2019

Jedem das Seine


Hallo Ihr Lieben!
Heute geht es weiter mit einem Projekt zu den Geburtstagswochen von SF Stamps, und die steht unter dem Motto "alt trifft neu". 

Hello everyone!
Today I have another project made for the birthday weeks at Scrapbook Forever. And here it's "old meets new", since I've mixed an older set with a newer one.

Der süße Elefant wollte unbedingt mitfeiern - und dann ist er einfach gemütlich im Gras eingeschlafen. Aber das ist eben, was er unter dem Text auf dem Schild versteht. Die Spinne hat da so ganz andere Ideen. Der Text auf dem Schild ist übrigens im selben Stempelset wie der Elefant.

The cute elephant wanted to join the party - and then he fell asleep in the grass. Well, the saying on the sign reads "the world belongs to those who enjoy it". Sleeping seems to be his way of enjoying life. The spider has other ideas.

Ich habe hier hellblauen Cardstock für den Hintergrund benutzt und darauf den Baum und seine "Blätter" geklebt. Davor kamen Schild, Elefant und das Gras.
Die Spinne ist aus dem Halloween-Set - und baumelt hier an ihrem Faden vom Baum. Naja, nicht ganz - sie schaukelt eher fröhlich hin und her. Dafür habe ich die Interactive Swing Stanze von MFT verwendet, den Schaukelmechanismus aus Folie gestanzt und darauf ein Stück weißen Faden angebracht. Ans untere Ende kam die Spinne.

Here I've used some light blue cardstock for the background and then added the tree and its "leaves". In the front I've added the sign, the elephant and the grass.
The spider is from the Halloween Set - and is dangling from the branches. Well, not really. Actually she's  happily swinging in the air. I've used the Interactive Swing die by MFT and cut the mechanism from acetate. Then I've glued a piece of white twine on it and then added the spider.


Und sie schaukelt wirklich wild!

She's really having fun!


Und auch diesmal habe ich von der Karte "in Betrieb" ein Video gemacht:

Also this time I've taken a video of the card "in action":


Donnerstag, 16. Mai 2019

Zeit für Meer


Hallo Ihr Lieben!
Die Tage werden immer länger, die Sonne immer wärmer - Zeit, vom Meer zu träumen! Der kleine Felix auf meiner Karte, die ich heute auf dem Kulricke-Blog zeige, ist da schon einen Schritt weiter. Naja, was will ein Pirat auch sonst machen.

Hello everyone!
The days get longer, the sun gets warmer - time to dream of the sea! The little Felix on my card that I am sharing over at Kulricke Blog today is one step ahead of that. Well, what else is there a pirat can do?

Ich habe hier eine Slider Card gemacht - damit Felix nicht nur auf dem Meer herumdümplet, sondern auch vorwärts kommt. Wobei die Insel im Hintergrund nicht sein Ziel zu sein scheint. Vielleicht ist sie im zu einsam. Ich habe für Euch ein Video von seiner Reise gemacht:

I've made a slider card - to avoid Felix being tossed by the waves in one spot but getting further. The island in the background doesn't seem to be his place to go. Maybe he'd feel too lonely there. I've taken a video of Felix on his journey:


 Und weil das alles ein wenig schnell ging, habe ich natürlich auch Fotos für Euch.

And since that might have been a bit fast I've also taken some pictures for you.


Im Hintergrund habe ich mit Distress Ink Squeezed Lemonade und Tumbled Glass sowie einer der Sonnen-Schablonen von MFT den Himmel mit der gerade aufgehenden Sonne aufgewischt. Drei Reihen Wellen liegen davor - zwischen den hinteren beiden die kleine, einsame Insel. Den Boden der Insel habe ich frei Hand gemalt, die beiden Palmen daraus sind mit der Palme aus dem Kaktus-Stempelset gemacht.
Oben am Himmel habe ich das Wort Ahoi als Banner aufgehängt. Dafür habe ich die neuen ABC Banner Stanzen verwendet.
Der süße Felix ist natürlich Felix Ahoi. Er ist mit Copics coloriert und anschließend ausgeschnitten.
Damit der auf dem Wasser schwimmen und von den Wellen gewiegt werden kann, habe ich eine der Wellen Movers and Shapers Stanzen benutzt.

In the background I've used Distress Ink Squeezed Lemonade and Tumbled Glass with one of the sun stencils by MFT to create a sky with a rising sun. There are three rows of waves in front of it - the little island is between the second and the third. The island itself is hand drawn, for the two palm trees I've used a stamp from the cactus set.
To the sky I've atttached a die cut Ahoi, cut using the new ABC Banner dies.
The cute Felis is Felix Ahoi. He's been colored with Copics and then cut out. To make him able to swim on the water I've used one of the Wellen Movers and Shaper dies.


Auf die vorderste Reihe der Wellen habe ich noch ein Just be Happy aufgeklebt. Das habe ich zweimal aus weißem Cardstock gestanzt und dann die eigentlich auf dem Happy sitzenden Worte Just Be per Hand weggeschnitten. So konnte ich die Worte in einer Reihe aufkleben und es passte alles auf meinen Wellenstreifen.

Onto the front row of wavves I've glued a die cut Just be Happy. I've cut it twice from white cardstock and then cut off the words Just be, that originally sit on top of the happy. That gave me the chance to glue the words into one line and make them fit on my wave border.


Mittwoch, 15. Mai 2019

Geburtstagswoche(n) bei SF Stamps


Hallo Ihr Lieben!
Scrapbook Forever feiert Geburtstag. Und weil man die Feste feiern soll, wie sie fallen, wird der 3. Geburtstags gleich drei Wochen lang gefeiert. Und das mit tollen Rabatten im Shop. 
Es wird im Juni keine Neuheiten geben. Daher zeigen wir vom DT Euch während der Geburtstagswochen jede Menge Ideen mit alten und neuen Sets. Und ich starte heute mit dieser Karte.

Hello everyone!
Scrapbook Forever is celebrating its 3rd birthday - with a celebration over three weeks. Of course with great discounts in their shop.
There won't be any new release in june. So during their birthday weeks we from the DT are sharing lots of ideas using both old and new stamps. And I am starting with this card today.

Für die Karte habe ich mit verschiedenen Grautönen die Pinselstriche aus dem Stempelset Wirbelwind #2 untereinander auf weißen Cardstock gestempelt. Dazwischen kamen noch ein paar Farbkleckse aus dem Set Dahlien.

For the card I've used different shades of grey to stamp the brush strokes under each other onto white cardstock. Inbetween I've added a few splots.


Zwischen den grauen Pinselstrichen habe ich einen Streifen weiß gelassen und dort den Pinsel aus dem Stempelset Du bringst Farbe aufgeklebt. Der ist per Hand auschgeschnitten und mit Copics coloriert.
Über und unter den Pinsel habe ich den Text aus dem selben Stempelset aufgestempelt. Ich habe ihn in zwei Teile aufgeteilt, so dass der Pinsel dazwischen ist.

Inbetween the grey brush strokes I've left a white strip and glued on a brush here. It's been colored with Copics and cut out by hand.
Over and under the brush I've stamped a saying meaning "you color my world".


Ihr habt sicher schon das Fenster gesehen, das in die Karte geschnitten ist. Zieht man am Tab rechts, gleitet der Pinse über die Karte und zieht einen türkisfarbenen Streifen. So macht jetzt auch der Text Sinn, oder?

I'm sure you've already seen the window cut into the card. If you pull the tab on the right the brush goes across the card and "draws" a turquoise brush stroke. Now the saying makes sense, right?

Und ich habe das für Euch auch auf einem Video festgehalten:

And I've also taken a video showing the "brush in action":


Und weil der Monat momentan zu wenig Tage für all meine Karten hat,  habe ich eine weitere Karte mit dem neuen Sonnenbrillen-Wichtel zu zeigen. Außerdem  habe ich hier noch einen neuen Hintergrundstempel verwendet.

And since the month has not enough days for all the cards I am  making at the moment I have another card using the new gnome with the sunglasses to share. I've also used a new background stamp here.


Als ich den Hintergrund sah, musste ich sofort an tropische Sonnenuntergänge denken. Also habe ich weißen Cardstock mit Distress Oxide Candied Apple, Spiced Marmelade und Squeezed Lemonade Sonnenuntergang-mäßig eingefärbt. Darauf habe ich dann mit schwarzer Tinte den Hintergrundstempel abgestempelt.

When I first saw this background stamp I immediately had to think of tropical sunsets. So I've used some Distress Oxide Candied Apple, Spiced Marmelade and Squeezed Lemonade to ink up some white cardstock. Then I've stamped the background using black ink.


Den Wichtel habe ich hier schwarz auf Aquarellpapier embosst und mit ZIG Real Color Brush Marker coloriert. Dann habe ich ihn ausgeschnitten und mit 3D Tape auf den Hintergrund geklebt.

I've black heat embossed the gnome onto watercolor paper and colored him in using my ZIG Real Color Brush markers. Then I've cut him out and glued him on the card using dimensionals.


Oben habe ich in den freien Bereich im Hintergrund "chillen", das mit dem Wichtel kommt, aufgestempelt und mit einem weißen Gelmarker ein paar Highlights eingezeichnet. 
In die Ecke oben rechts habe ich noch ein paar Muscheln aufgeklebt. Die habe ich auf weißen Cardstock gestempelt, den ich vorher mit Distress Oxide eingefärbt habe, und ausgeschnitten.

Onto the free area in the background I've stamped "chill" and added a few highlights with a gelly marker. 
To the top right corner I've added a few sea shells. Those were stamped onto white cardstock that I've inked up with Distress Oxide prior to stamping.


Dienstag, 14. Mai 2019

Wischi-Waschi

Hallo Ihr Lieben!
Nein, keine Angst, ich nehme das hier natürlich ernst. Aber in der Stamping-Fairies Produktwoche im Monat Mai möchten wir Euch zeigen, wie vielseitig Washi-Tape ist. 

Hello everyone!
In the product spotlight of the month of may we from the Stamping-Fairies DT want to show you ideas of how to use your washi tapes.

Ich gebe es zu, Washitape kam bei mir bisher hauptsächlich zum Fixieren von Stanzen zum Einsatz. Aber es gibt so viele süße Motive, und die sind dafür natürlich viel zu schade. Also habe ich es auch mal auf Karten verwendet. Und da Washitape vor allem für schnelle Karten ideal ist, habe ich heute gleich 3 dafür aber recht einfache Karten zu zeigen.

I admit it - so far I've used washi tape mainly to fix my dies onto my paper to avoid the die from moving before I run it through my Big Shot. But there are so  many cute designs that are truly way too beautiful to be used for this. So I've used it on cards here - for the very first time, I think. And since washi tape is great for quick cards I have 3 cards to share today that are all quite simple.


Für die erste Karte habe ich ein paar Kaffeebecher auf weißen Cardstock gestempelt und darüber dieses süße Tape mit Kaffeebechern und -bohnen geklebt. Unter das Tape habe ich noch Platz für einen Text gelassen, den ich direkt aufgestempelt  habe. Den weißen Cardstock habe ich dann schwarz gemattet und auf einen weißen Kartenrohling geklebt.  

For this first card I've stamped some coffee cups onto white cardstock and then glued some of this cute washi tape with a coffee cups and coffee beans design across my cardstock. Under the tape I've left enough room to add a saying which was stamped directly onto the white cardstock. Then I've matted this piece of cardstock black and glued it onto a white card base.


Mit 3D Tape habe ich dieses süße Motiv aus dem Friends at first Sip Stempelset von MFT, aus dem auch die Becher und der Text sind, über das Tape geklebt. Darunter kam etwas schwarzes Garn. Als zusätzliche Deko reichten ein paar schwarze Enamel Accents. 

Using dimensionals I've glued this cute image from the Friends at first Sip stamp set by MFT, from which also the coffee cups and the saying comes from, on top of the washi tape, putting some black yarn under it. Then I've only added a few black Enamel Accents and the first card was done.


Auf der zweiten Karte habe ich das Washitape direkt auf weißen Cardstock geklebt. Bei dem leckeren Motiv auf dem Tape war klar, dass auch das Motiv irgendetwas mit Essen zu tun haben muss. Also habe ich zum Koch aus dem Recipe for Happiness Stempelset gegriffen.
Auch hier ist der weiße Cardstock schwarz gemattet und auf eine weiße Kartenbasis geklebt. Zuvor habe ich allerdings ein Herz aus dem Hintergrund ausgestanzt.

On this second card I've taped the washi directly onto some white cardstock. With these yummy designs I knew the card also needed a food-related image. So I've used this chef from the Recipe for Happiness stamp set.
Also here I've matted the white cardstock black and then glued it onto a white card base. But before I've die cut a heart from the background.


Das Herz habe ich noch 4mal aus schwarzem Cardstock ausgestanzt, aufeinandergeklebt, das aus dem Hintergrund gestanzte Herz obenauf und dann alles in die Ausstanzung im Hintergrund geklebt. Quer über Herz und Hintergrund kam dann ein Streifen schwarzen Cardstocks, auf den ich mit weißem Embossinpulver einen Text aufgebracht habe. 
Der Koch und Salz- sowie Pfefferstreuer sind dann auf dem schwarzen Streifen befestigt.

I've die cut the heart four more times from black cardstock, stacked them, glued the heart cut from the background on top and then glued the stacked hearts back in the space where I've cut the heart from the background. 
Across the heart and background I've glued a strip of black cardstock onto which I've white heat embossed a saying.
The chef and salt and pepper shaker were then glued onto the black strip across the card.


Bei der letzen Karte habe ich aus einem Stück weißen Cardstocks ein Kreuz ausgeschnitten. Auf den roten Cardstock, den ich zum matten verwendet habe, habe ich Washitape mit Pflasterprint sowie einfarbig cremefarbenes Washi geklebt. Diesmal eher etwas kreuz und quer und nicht so gerade. 
Unter das Kreuz habe ich einen Text gestempelt und auf der Karte ein paar rote Enamel Accents verteilt.

For this last card I've cut a cross from a piece of white cardstock. Onto the red cardstock that I've used to mat the white one I've glued some washi with a bandaid print and plain creme colored washi. This time I've went a bit wilder and did not glue it down just straight.
 Under the cross I've stamped a saying onto the white cardstock and also added a few red Enamel Accents.


Den weißen Cardstock habe ich dann mit 3D Tape auf den roten Cardstock geklebt, so dass das Washi nun durch den kreuzförmigen Cardstock zu sehen ist. 
Also Deko habe ich noch zwei Arzneiflaschen und einen Löffel aufgeklebt. Alle Motive hier sind aus dem Feel Better Stempelset. 

Then I've used dimensionals to glue the white cardstock onto the red one - the washi can now be seen through the cut out cross only. 
For decorations I've added two medicine bottles and a spoon. All images here are from the Feel Better stamp set.

I guess I won't use washi on all my cards now but when I'm in a hurry I will definately use it as a quick way to decorate a card.


Sonntag, 12. Mai 2019

Ein kleines Muttertagsgeschenk


Hallo Ihr Lieben!
Heute ist Muttertag! Meine Mom wohnt ja ein gutes Stück entfernt und so habe ich Ihr eine selbstgemachte Kleinigkeit geschickt. 

Hello everyone!
It's mother's day today. My mother lives a 3 hours drive away from ours so I've sent her a handmade gift.

Meine Mutter liebt Hortensien. Da ich eine echte Pflanze schlecht verschicken konnte und die sowieso nach einigen Monaten wieder zurück zu mir in unseren Garten kommen würde - meine Mom hat keinen Garten und im Topf überleben sie den Winter nie - habe ich eine aus Papier gewerkelt.

My mother loves hydrangeas. Since I hardly could send a real plant and if I did it would come back in our garden after a few months - she doesn't have a garden and in a pot they never really make it through winter - I've made one out of paper.


Natürlich steckt auch die in einem Topf. Ich habe hier als Grundlage eine SVG Datei von Dreaming Tree verwendet und abgewandelt. Eigentlich ist es ein Tablett mit 3 solcher Pflanzen. Mir hat aber eine einzelne Pflanze besser gefallen. Außerdem habe ich die Blüte runder gemacht und einige Verzierungen am Deckel entfernt.

Of course this one comes in a pot as well. I've used a SVG file from Dreaming Tree here and changed it slightly. Usually this is a tray with three of those flowers. But I liked a single one better. I've also made a bigger and more round flower and removed a few details from the lid.


Den unteren Teil habe ich aus weißem Cardstock geschnitten und mit einem Aufleger aus grünem Designpapier mit Holzdruck dekoriert. 
Auf den Pflanztopf habe ich zwei Label, weiß auf Vellum embosst, geklebt. Die sind so mit Brads zusammengesetzt, dass das obere Label mittig aufsteht. Gesehen so übrigens im letzten Magnolia DooHickey Kit Magazin. Dahinter habe ich etwas Cheesecloth angebracht. Auf das vordere Label habe ich ein aus weißem Cardstock gestanztes MOM sowie ein kleines grünes Herz geklebt.

The lower part of the flower is cut from white cardstock and decorated with a panel cut from green designer's paper with a wooden print.
Onto the pot I've glued two labels, white heat embossed onto Vellum. They are attached to each other with brads, the top one standing up in the middle. That's something I've seen in the latest Magnolia DooHickey Kit Magazin. Behind the labels I've put some Cheesecloth. Onto the top label I've glued a die cut MOM, cut from white cardstock, and a small green heart.


Der Blumentopf ist übrigens eine Box. In die kamen vor dem Versand noch die leckeren Batons von Lindt. Die mag sie sehr gerne, sie sind aber wirklich schwer zu kriegen. Als ich sie dann in einem Supermarkt hier gesehen habe, musste ich sofort zuschlagen.

The flower pot is a box. Before sending it out I've filled it with Batons by Lindt. She really loves those but they are very hard to find. So when I saw them in a local grocery store I just had to get some.


Für die Blüte habe ich einen kleinen Teil einer Styroporkugel abgeschnitten und die Kugel mit grüner Acrylfarbe eingestrichen. Dann kamen ca. 60 Blüten darauf. Ich habe sie aus hellgrünem Cardstock geschnitten und mit Distress Oxide Faded Jeans teilweise eingefärbt. So erhält man den tollen Farbeffekt, den ich an Hortensien so liebe. Die Blüten sind mit Stecknadeln in die Styroporkugel gedrückt, auf die ich vorher noch eine kleine Perle aufgefädelt habe. 
Bei der Originalbox liegen Blätter und Blüte direkt auf dem Deckel auf. Das hat mir aber nicht so gut gefallen. Darum habe ich in den Deckel ein Stück Kerzendraht, der sehr stabil ist, gesteckt. Das untere Ende des Drahtes habe ich zu einer 8 gebogen, mit Heißkleber im Deckel befestigt und darüber ein Quadrat aus weißem Cardstock geklebt, um Kleber und Draht optisch zu verstecken. Darauf habe ich dann von oben erst die Blätter gefädelt und mit 3fach aufeinander geklebtem 3D Tape auf den Deckel geklebt. Dann habe ich mittig ein Loch in der Größe des Drahtes eingestochen, mit Kleber gefüllt und die Styroporkugel mit den Blütenblättern aufgesteckt. 

For the flower I've cut off a small part of a styrofoam ball and covered it with green acrylic paint. Then I've put about 60 single flowers on it. Those were cut from light green cardstock and then I've used Distress Oxide Faded Jeans to ink the edges. That way I've ended up with the great color change I so love about hydrangeas. The flowers are attached to the ball using needles on which I've put a small bead first.
With the original box the leaves and flower are attached directly to the lid. I didn't like that too much so I've put some really sturdy wire through the top of the lid. The other end was bent into an 8 and glued to the lid with hot glue. Then I've put a square of white cardstock onto it to  cover the glue and wire. On top I've put the leaves, glueing them to the lid with 3 layers of dimensionals. Then I've made a hole about the diameter of the wire in the styrofoam ball, filled it with glue and put the ball with the flowers on top.

Ich wünsche allen Mamas einen tollen Muttertag!
All mothers out there have an amazing mother's day!


Samstag, 11. Mai 2019

Stempeleinmaleins - Ausgabe vom 11. Mai 2019


Hallo Ihr Lieben!
Heute zeigen wir Euch beim Stempeleinmaleins eine Sliding Pop-Up Card. Und da morgen ja Muttertag ist, zeige ich Euch die Karte, die ich dieses Jahr für meine Mom gemacht habe.

Hello everyone!
Today we are sharing this Sliding Pop-Up Card over at Stempeleinmaleins. And since we're celebrating mother's day tomorrow here in Germany I am sharing the card I made for my mom this year.


So sieht die geschlossene bzw. flache Karte aus. 
Ich habe zu einem Mix aus grün, blau/türkis und weiß gegriffen. 

This is the closed/flat card. 
I went with a mix of green, blue/turquoise and white.


Für diese Karte habe ich seit langem mal wieder eine Tilda benutzt - und somit diesen Stempel hier eingeweiht. Ich habe das Motiv mit dem Ink On 3 Fade Out Stempelkissen gestempelt und mit einem Mix aus Polychromos und Prismacolors coloriert. Die Schmetterlinge sind von MFT.
Nach dem Austesten der Karte, wusste ich, wo ich Deko unterbringen kann, ohne den Mechanismus zu stören. So habe ich den 3D Blumenkasten von Magnolia mit aufgedoppeltem 3D Tape auf das Motiv geklebt. Oben habe ich eine Sprechblase angebracht.
Hinter dem Motiv befindet sich ewas Cheesecloth und auf dem Panel darunter etwas Spitze und die Hearts Entwined Stanze von MFT.

For this card I've used a Tilda - the first since a long time. And I've also used this stamp for the very first time. The image was stamped with Ink On 3 Fade Out ink and colored with a mix of Polychromos and Prismacolors. The butterflies are by MFT.
After trying the movement of the card I knew where to put the embellishments without it getting the way of the mechanism. So I've glued the 3D flower box to the piece with the image, using doubled up dimensionals. To the top I've added a speech bubble with a text meaning "thanks for everything".
Behind the image there's some cheesecloth and on the piece under it some lace and the Hearts Entwined die by MFT.


Und so sieht die aufgestellte Karte aus. Beim Öffnen wird ein weiteres Stück Cardstock sichtbar, auf das ich "world's best mom", gestempelt und gestanzt, aufgebracht habe.
Auf den Bereich, der sich beim Öffnen bewegt, habe ich noch eine Blume aufgeklebt und ein Stück Band darum gewickelt, das ich zur Schleife gebunden habe.

And this is the opened/standing card. When opening it, another piece of cardstock gets visible. To this piece I've added a "world's best mom", both stamped and die cut.
To the area, that slides when the card gets opened, I've glued a flower and wrapped some ribbon around it that I've tied to a bow.


Freitag, 10. Mai 2019

Aloha!


 Hallo Ihr Lieben!
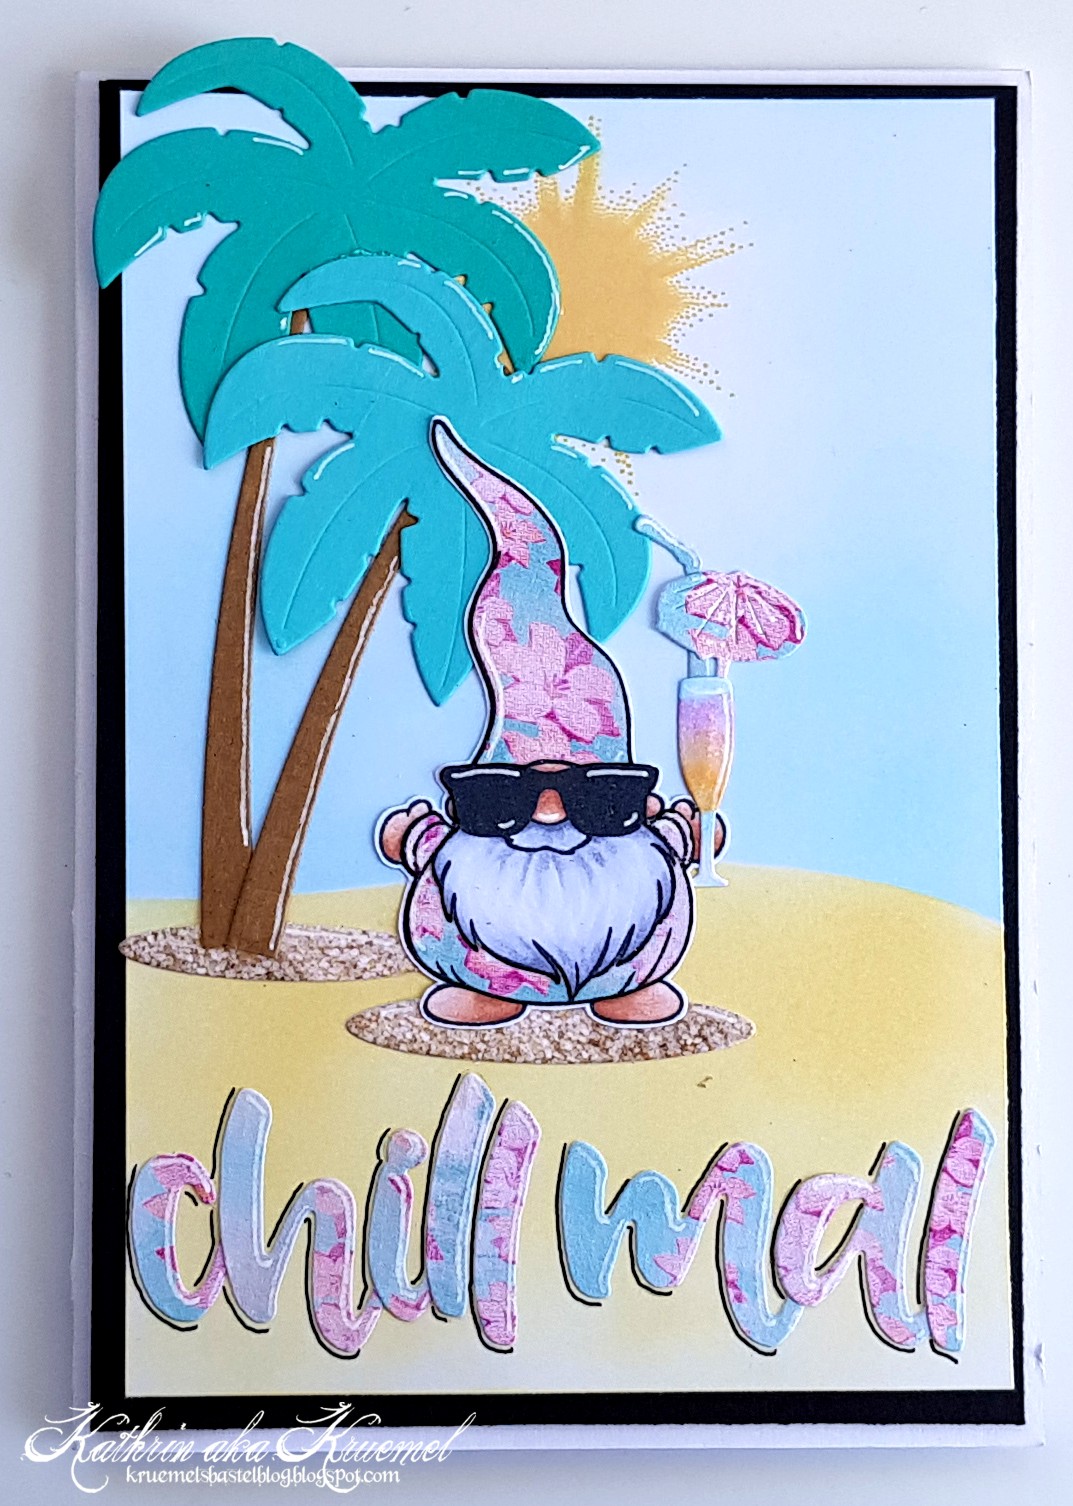
Den süßen neuen Wichtel von Scrapbook Forever habe ich Euch noch gar nicht gezeigt. Oh, ich meinte natürlich coolen, nicht süßen. 

Hello everyone!
I haven't presented you this cute gnome by Scrapbook Forever yet. Oh, sorry, I wanted to say cool, not cute.

Mit seiner Sonnenbrille gehörte der definitiv an den Strand. Also habe ich weißen Cardstock mit Distress Oxide Scattered Straw unten und Tumbled Glass oben gewischt. Die Palmen sind ausgestanzt und auf ein Oval, gestanzt aus Designpapier mit Sanddruck, aufgeklebt. In den Hintergrund habe ich den tollen Strahlenhintergrund aus dem Schmetterlingsset als Sonne aufgestempelt.

With its sunglasses he definately belonged to the beach. So I've used Distress Oxide Scattered Straw on the upper half and Tumbled Glass on the lower to ink up the white cardstock. The palm trees are die cut and glued onto an oval cut from designer's paper with a sand  pattern. In the background I've stamped a ray background as the sun.


Der kleine Wichtel gehörte für mich nicht nur an den Strand, er brauchte auch definitiv ein Hawai-Hemd! Also habe ich seit langem mal wieder Paper Piecing gemacht. Dafür habe ich hellblaues Designpapier mit rosafarbenen Blüten verwendet. Außerdem habe ich ihm einen leckern Cocktail in die Hand gegeben.

The little gnome did not only belong to the beach, he also needed a hawai shirt. So I've done some paper piecing here - for the first time in a really long time. I've used some light blue cardstock with soft pink flowers on it. I also gave him a yummy drink in one of his hands.


Natürlich durfte auch ein passender Text nicht fehlen. Da ich eine Hochkant-Karte gemacht habe, war der Platz etwas begrenzt. Darum habe ich einfach nur aus demselben Designpapier, das ich auch fürs Paper Piecing verwendet habe, chill mal aus einzelnen Buchstaben gestanzt und unten auf die Karte aufgeklebt. Mit einem weißen Gelmarker habe ich Highlights gesetzt, mit einem schwarzen Fineliner ein paar Schatten.

Of course the card needed a matching saying. Since this us an upright card there wasn't much room. So I've used the same designer's paper I've also used for the paper piecing to cut out some individual letter to write "let's chill" and glued them to the bottom of the card. I've used a white gelly maker for some highlights and a black Sharpie to add some shadows.


Donnerstag, 9. Mai 2019

Eine Muttertags-Karte non-cute


 Hallo Ihr Lieben!
Ich bastle ja sehr gerne cute. Aber dieser Stil liegt nicht jedem. Darum zeige ich heute auf dem Kulricke-Blog eine Muttertagskarte mal ohne niedliches Motiv. 

Hello everyone!
I really love to do cute stuff. But not everyone likes this type of cards. So I am sharing this mother's day card over at Kulricke-Blog today where I didn't use a cute image for.

Ich habe den neuen braunen Kraftcardstock von Faltkarten für meinen Hintergrund gewählt und mit der GoPress einige goldene Streifen aufgebracht. Den Bereich in der Mitte hatte ich dabei abgedeckt, damit ich dort einen Text aufstempeln konnte. 

I've used some brown kraft cardstock for my background and foiled some golden stripes on it using my GoPress. I've covered the area in the middle while doing this to be able to stamp a text there.


Ebenfalls vor dem Folien habe ich den Lilien Stempel von Kulricke weiß auf den Cardstock aufembosst. Die Blüten sind nochmal auf den Aquarellcardstock von Faltkarten embosst und mit den ZIG Markern lila und gelb coloriert. 
Den Danke Kreis habe ich aus Transparentpapier ausgestanzt und aus der Mitte ebenfalls einen Kreis gestanzt, um einen Ring zu erhalten. 
Für das Mama habe ich die Do More Stanze aus weißem  Cardstock gestanzt, mir die einzelnen Buchstaben daraus ausgeschnitten und sie ebenfalls golden foliert. 
Dann habe ich die colorierten Büten und die Buchstaben auf dem Danke-Kreis aufgeklebt. 
Das "für meine wunderbare" stammt aus dem Stempelset Familie.
Zum Schluss habe ich noch ein paar goldene Pailetten auf der Karte verteilt.

Also before foiling the background I've white heat embossed the Lilly background. The flowers were also heat embossed again on white watercolor paper and then colored in using ZIG markers in purple and yellow.
The text around the circle reads thank you. I've cut it from Vellum and cut another circle from the middle to end up with a ring.
The Mama is made using a text die saying "do more of what makes you happy". I've cut it from white cardstock, then cut out the individual letters and also foiled them golden. 
Then I've glued the colored flowers and the letters onto the ring.
In the middle I've stamped a "for my wonderful".
In the end I've added some golden sequins to the card.


Dienstag, 7. Mai 2019

#Smile


Hallo Ihr Lieben!
Kennt Ihr die Picture Perfect Stempel aus dem April-Release von MFT? Die hatten es mir sofort angetan. Denn in diesem Set sind eben auch mal Tiere wie Hamster, Faultier, Affe. Trotzdem haben es auf meine zweite Karte mit dem Set, die ich auf dem Stamping-Fairies Blog zeige, die Hunde geschafft.

Hello everyone!
Do you know the Picture Perfect stamp set from MFT's april release? I fell in love immediately because there are also animals like hamsters, sloths, monkeys in this set. And stil - the animals that made it on this second card I made with the set and that I am sharing over on the Stamping-Fairies Blog today are dogs.

Aus einem Stück schwarzem Cardstock, das ich etwas kleiner als meine weiße Kartenbasis zugeschnitten habe, habe ich verteilt das #smile aus dem Stanzenset #Captions ausgestanzt und den Hintergrund dann mit rotem Cardstock hinterlegt. Da nur das rot ausgestanzte #smile ein wenig fad wirkte, habe ich dazwischen noch einige Male click weiß aufembosst. Dafür habe ich einfach nur das letzte Wort eines der Texte aus dem Picture Perfect Set abgestempelt. 

From a piece of black cardstock, cut slightly smaller than my white card base, I've die cut the #smile from the #Captions die set several times and then put some red cardstoc behind the black. Since only the red #smile looked a bit plain I've also white heat ambossed several "click" inbetween them. Therefor I've simply only stamped the last word from one of the sayings of the Picture Perfect stamp set.


Irgendwie fiel mir bei den Motiven sofort eine Wasserfallkarte ein. Habe ich schon ewig nicht mehr gemacht, aber hier war mir einfach danach.
Auf dem Wasserfallmechanismus, den ich hier ganz faul mit der Flip Slider Stanze von Mama Elephants gemacht habe, habe ich dann vier Polaroids aufgeklebt. Die neue Polaroidstanze war mir für meine Idee zu groß, darum habe ich eine der Stanzen aus dem älteren Perfect Polaroids Stanzenset dafür benutzt. 
Hinter die Ausschnitte in den Polaroids kamen dann unterschiedliche Teile des Hundemotivs. Die Motive in dem Set sind wirklich groß und so verwendet erinnern sie mich an die Fotos, die ich früher mit Freundinnen in diesen Fotoständen gemacht habe. Jeder versuchte verzweifelt mit auf dem Bild zu sein....
Die Motive habe ich wieder in No-Lines Technik coloriert und einen zum roten Cardstock passenden Hintergrund dazugestaltet.
Auf das letzte Polaroid habe ich einen der Texte aus dem Stempelset Easter Bunny, aufgeteilt auf drei Zeilen, weiß aufembosst. Auf diesem Polaroid habe ich auch noch ein kleines ausgestanztes Herz aufgeklebt.
Unten auf den Tab, an dem gezogen werden muss, habe ich noch zwei der Worte aus dem Interactive Labels Stempelset aufgestempelt.

When I saw those images from the set I immediately thought of a waterfall card. I haven't done on in ages but here it just felt right.
Onto the waterfall base, for which I've lazily used the Flip Slider die by Mama Elephants here, I've glued four polaroids. The new polaroid die by MFT seemed a bit too big for my idea so I've simply used one of the dies from the Perfect Polaroids die set here.
Behind the cut outs in the polaroids I've glued different parts of the dog image. The images in this stamp set are really big and used like this they remind me  of those pictures you took with your friends as teenagers in one of the fotobooths. Everyone tried desperately to get on the picture....
Again I've done some no-line coloring here and also created a background matching the red cardstock.
Onto the last polaroid I've white heat embossed one of the sayings from the Easter Bunny stamp set, divided in three lines. Onto this polaroid I've also glued a die cut heart.
Onto the tab I've stamped two words from the Interactive Labels stamp set.

Von den einzelnen Polaroids habe ich keine Bilder gemacht, dafür gibt es ein Video, in dem man sie auch gut erkennen kann:

I didn't take individual pictures of the different polaroids but made a video in which you can see them nicely as well: