Dienstag, 11. Juni 2019

Lasst uns über Alkohol reden!


 Hallo Ihr Lieben!
Nein, ich möchte mit Euch natürlich keine Cocktailrezepte austauschen - wobei ich zu einem leckeren Cocktail hin und wieder natürlich nicht nein sage!
Nein, in der Stamping-Fairies Produktwoche möchten wir Euch diesen Monat die Alcohol Inks vorstellen.

Hello everyone!
Let's talk about alcohol! And no, I don't want to swap cocktail recipes with you - allthough I can't say no to a yummy drink every now and then.
In this month's product spotlight we are talking about alcohol inks. 

Bei dieser Karte habe ich nur eine einzige Farbe verwendet: Mermaid. 
Basis ist Yupo Paper - und auch das kann man embossen. Das Ergebnis ist vielleicht nicht ganz so detailreich wie bei Cardstock, aber da ich einen 3D Embossingfolder (Mosaic Gems von Sizzix) verwendet habe, habe ich trotzdem ein tolles Relief. Hier habe ich die Rückseite verwendet, denn es sieht klasse aus, wenn sich die Tinte in den Vertiefungen sammelt.
Wie gesagt, ich habe erstmal nur flächig mit Alcohol Ink und der Blending Solution gearbeitet. Dann habe ich ein wenig goldenes Mixativ aufgetragen und auch das schön verteilt. 
Ein wenig des Mixatives habe ich mit Blending Solution gemischt und die Farbe dann gezielt mit einem kleinen Pinsel in einige der Vertiefungen gefüllt.
Ganz zum Schluss habe ich dann noch etwas Patina Alcohol Ink auf ein Alcohol Ink Applicator Felt gegeben und hauptsächlich außen am Rand aufgetragen. 

For this card I've only used one color: Mermaid.
For the base I went with Yupo Paper - and also that can be dry embossed. The result may not be as detailed compared to cardstock but since I've used a 3D Embossing Folder (Mosaic Gems by Sizzix) I still got a great result. Here I've used the back side with the debossed areas because it just looks great when the colors sets into those debossed areas.
As mentioned, I've only covered the whole paper with Alcohol Ink and Blending Solution. Then I've added some golden Mixative and also spread this by adding more Blending Solution.
In the end I've put some Patina Alcohol Ink onto an Alcohol Ink Applicator Felt and added it mainly to the edges.


Auf diesem Foto habe ich versucht, das Embossing etwas besser zu zeigen.

On this picture I've tried to get a better look at the dry embossing.


Als Deko habe ich erst den Mandala Background von MFT aus weißem Cardstock gestanzt und aufgeklebt. Darüber kamen zwei Fähnchen aus schwarzem Cardstock, auf die ich einen der Texte aus dem Anyting but Basic Friendship Stempelset golden aufembosst habe. Ich habe in die obere Zeile eine Lücke gestempelt - und das Wort Friend hier durch ein aus goldenem Spiegelkarton gestanztes Wort ersetzt. Das ist viermal mit weißem Cardstock hinterlegt, um es etwas anzuheben.
Zum Schluss habe ich  noch ein paar schwarze Enamel Accents auf der Karte aufgeklebt.

For decorations I've die cut the Mandala Background by MFT from white cardstock and glued it onto the alcohol ink background. Then I've added two black banners onto which I've golden heat embossed one of the sayings from the Anything but Basic Friendship stamp set. While stamping I've moved the strip a bit to get some free space in the first line. I've also not stamped the word friend there and replaced this with one die cut from golden mirror cardstock. To add some depth I've stacked four "friend" die cuts cut from white cardstock and then put the golden one on top.
In the end I've added a few black Enamel Accents to the card.
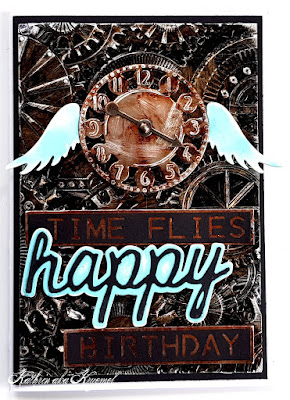

Hier habe ich eine weitere Alkohol-Karte. Und ja, ich habe tatsächlich freiwillig eine Männerkarte gemacht! Ich finde, die Alcohol Inks sind perfekt dafür.

Here I have another card. And yes, I really made a men's card - without any pressure! I think, alcohol inks are perfect for that type of card.


Auch hier habe ich wieder mit einem 3D Embossingfolder gearbeitet, diesmal dem  Mechanics Folder. Der hat tolle Zahnräder, die wirklich super plastisch wirken. Aber diesmal habe ich nicht mit Yupo Paper gearbeitet. Ich wollte unbedingt die Alcohol Inks auf  Metallic-Paper probieren. Es gibt extra eines von Ranger, das hatte ich aber nicht. Alufolie hat für mich nicht wirklich funktioniert. Also habe ich mir Plumber Tape besorgt. Das ist eine Art Alufolie mit klebender Rückseite, das es auf der Rolle gibt. Damit habe ich normalen weißen Cardstock beklebt und anschließend dry embosst.
Mit einem Alcohol Ink Felt Applicator habe ich dann zuerst Alkoholtinte der Farbe Pitch Black aufgetragen, darüber dann Sepia aufgetragen und ein klein wenig Blending Solution mit dazugenommen. Dadurch läuft die Tinte wunderbar in die Vertiefungen des embossten Hintergrundes.
Nach dem Trocknen habe ich noch die Ränder und ein paar der erhabenen Stellen vorsichtig mit einem Sanding Block bearbeitet. Die Tinte lässt sich ganz leicht abschmirgeln und das silber der Metallfolie kommt darunter zum Vorschein.

Also here I've used an 3D Embossing Folder again, this time the one called "Mechanics". This gives a great impression of gears that really look like they'd be stacked onto each other. But this time I didn't work with Yupo Paper. I really wanted to try the alcohol inks on metallic paper. There are special metallic sheets by Ranger but I didn't have those at hand. Tin foil didn't work too well for me so I got myself some plumber tape. It's a roll of some kind of tin foil with a selfadhesive back. I've simply covered some regular white cardstock with it.
I've used an Alcohol Ink Felt Applicator to first add some Pitch Black ink, then added some Sepia on top of it. I've also added a tiny bit of Blending Solution which makes the ink run into the debossed areas of the background.
After drying I've used a sanding block to take off some of the ink around the edges and from a few of the raised areas. The ink goes off pretty easy and the silver of the foil can be seen in those areas.


Als Deko habe ich dieses Ziffernblatt gewählt. Dafür habe ich es aus einem weiteren Stück mit Metallfolie beklebtem Cardtsock ausgestanzt und die Zahlen und Punkte außen herum geprägt (die Stanze ist so gestaltet). Dann habe ich Rust Alcohol Tinte wieder mit einem Stück Filz aufgetupft und auch hier die Fläche mit einem Sanding Block bearbeitet.
Statt der Zeiger habe ich hier einen drehbaren Pfeil benutzt.
Und um eine Verbindung zum Text darunter herzustellen, habe ich hinter das Ziffernblatt zwei Flügel aus hell-türkisfarbenem Cardstock geklebt. Auch die Flügel sind mit einem Sanding Block auf alt getrimmt.

For decorations I went with this clock face. I've simply cut it from another piece of cardstock that I've covered with the Plumber Tape and embossed the numbers and dots (the die is designed that way). Then I've covered it with Rust Alcohohl Ink, dabbing it on with another piece of felt, and again used the sanding block.
Instead of hands I went with this arrow that spins around.
And to make a connection to the saying underneath I've die cut some wings from light blue cardstock, sanded those as well and glued them behind the clock face.


Für die beiden Banner mit den Texten "time flies" und "birthday" habe ich mein Word Punch Board von We'R'Memory Keepers und schwarzen Cardstock verwendet. Die Cardstockstreifen habe ich mit mehr des Metallbandes auf weißem Cardstock hinterlegt und es vorher wieder mit Rust Alcohol Ink eingefärbt.
Das Happy ist eine der Stanzen aus dem Shadow Script #2 Stanzenset von Tim Holtz. Ich finde es toll, dass es einen passenden Untereger für den Text gibt. Das Wort an sich ist aus einfachem schwarzen Cardtsock gestanzt, der Unterleger wieder aus türkisfarbenem Cardstock, an dem ich wieder den Sanding Block angesetzt habe.

For the two banner's with the texts "time flies" and "birthday" I've used my Words Punch Board by We'R'Memory Keepers and black cardstock. I've matted the black strips with some more of the Plumber Tape glued onto white cardstock that I've colored with some Rust Alcohol Ink again.
The happy is one of the dies from the Shadow Script #2 die set by Tim Holtz. I just love that there's a matching matting. The word itself was cut from plain black cardstock, the shadow again from light turquoise cardstock that again was sanded.

Und dann habe ich eine dritte und letzte Karte für Euch:

And then I have a third and last card for you today:


Ja, auch diese Karte ist hauptsächlich mit Alcohol Inks gemacht, auch der Hintergrund. Ich erkläre Euch gleich mehr dazu.

Yes, also this card was made using mainly alcohol inks, even for the background. I'll tell you how in a second.

Den Hintergrund habe ich auf weißen Cardstock gestaltet, den ich dann helltürkis gemattet und auf eine weiße Kartenbasis geklebt habe.
Ich wollte keinen großen Text, irgendwie fehlte aber doch eine Botschaft auf der Karte. Also habe ich wieder das Word Punch Board genommen, damit das Wort Bloom aus türkisfarbenem Cardstock gestanzt und es mit einem Stück Yupo Paper, das ich mit Sandal Alcohol Ink eingefärbt habe, hinterlegt.

I've created the background on white cardstock, matted it light turquoise and then glued it onto a white card base.
I didn't want a big saying here but felt like a message is missing. So I've used the Word Punch Board again, punched the word bloom from turquoise cardstock and matted it with a piece of Yupo paper that I've covered with Sandal alcohol ink.


Nun zum Hintergrund. Ich habe hier mit der Gelli Plate gearbeitet. Ich gestehe, ich hatte mir bereits vor Jahren eine gekauft und sie, nachdem sie zwei Jahre unbenutzt in der Schublade lag, wieder verkauft. Als ich dann auf der Stempelmesse Süd gelernt habe, dass die auch mit Alcohol Inks zu verwenden ist - ja, Ihr ahnt es sicher, habe ich mir eine neue gekauft. Diesmal kam sie aber auch zum Einsatz!
Für den Hintergrund verteilt Ihr mit einem Brayer Alcohol Ink auf der Gelliplate. Ich habe dann eine Schnörkelschablone daraufgelegt und zusätzlich mit Noppenfolie noch ein paar Abdrücke in den freien Bereichen gemacht. Zieht die Schablone ab und Ihr könnt das Ergebnis schon erahnen. Um die Alcohol Inks wieder anzulösen, tragt Ihr mit einem anderen Brayer normale Acrylfarbe auf. Nicht zu dick, nur so, dass die Gelli Plate komplett bedeckt ist. Ich habe weiße Acrylfarbe benutzt, es geht auch farbige. Dann sieht man natürlich die Farbe, die Ihr verwendet habt neben/zwischen der Alkoholtinte, also den Bereichen "zwischen den Schnörkeln".

Now on to the background. I've used my Gelli Plate here. I have to admit, years ago I've bought one and sold it after not having used it once after two years. So when I've learned at a stamp fair that you can use it with alcoho inks - yes, you already guessed it, I've bought another one. But this time I've used it right away!
For the background you simply use a brayer to cover the Gelli Plate with alcohol ink.  Then I've put a flourish stencil on top of the ink and also used some bubble wrap to add some more texture to the flourishes. Pull of the stencil and you can already guess what the result may look like. To re-activate the alcohol ink simply use a different (clean) brayer to add a thin layer of acrylic paint onto the alcohol ink. I went with white paint, you can also used colors here. Of course then you'll see that color next to/between the alcohol ink, in my case the areas between the flourishes.

Und auch für das Motiv habe ich Alcohol Ink benutzt. Dafür habe ich den Fresh Cut Flowers Background von MFT mit weißem Embossingpulver auf Yupo Paper embosst. Das geht, Ihr müsst aber sehr vorsichtig fönen und den Fön immer in Bewegung halten. Da Yupo Paper ja nichts anderes als Plastik ist, schmilzt es natürlich, wenn es zu sehr erhitzt wird.
Dann habe ich die selben Farben, die ich auch für den Hintergrund benutzt habe (übrigens Sandal, Meadow und Aqua) vorsichtig zwischen die embossten Linien verteilt. Mit einem dünnen Plastik- oder Metallstäbchen kann man in den kleinen Bereichen nachhelfen. Auch mir ist die Farbe an einigen kleinen Stellen ein wenig übergelaufen (vor allem am doch sehr dünnen Stängel), aber ich finde, das macht hier gar nichts. Dann habe ich mit einem Pinsel etwas mit Blending Solution gemixtes goldfarbenes Mixative aufgespritzt und mit dem Pinsel noch ein paar wenige kleine Flecken mit reiner Blending Solution aufgetupft.
Dann brauchte ich das Motiv nur noch entlang der embossten Linien ausschneiden und mit 3D Tape auf den fertigen Hintergrund kleben.

Also for the image I've used alcohol inks. Therefor I've white heat embossed the Fresh Cut Flowers Background by MFT onto Yupo Paper. Yes, that's possible, you only have to use the heat gun with care and always move it around. Since Yupo Paper actually is some kind of plastic it melts/wraps when it's getting too hot.
Then I've used the same colors that I've used for the background also (in my case Sandal, Meadow and Aqua) to carefully fill in the areas inbetween the embossed lines. With a thin plastic or metallic stick you can help the ink to spread into the fine/small areas. Also my color went out of the lines in a few spots, especially the quite thin stem. But I think with this technique it doesn't matter too much. Then I've used a paint brush to sprinkle on some golden Mixative mixed with Blending Solution and after that also added a few tiny drops of pure Blending Solution with my brush.
Then I only needed to cut out the image around the embossed lines and glue it onto the card. I've used dimensionals here to add some more depth.


Samstag, 8. Juni 2019

Stempeleinmaleins - Ausgabe vom 08. Juni 2019


Hallo Ihr Lieben!
Schon wieder ist eine Woche rum - und somit gibt es heute auch eine neue Ausgabe des Stempeleinmaleins. Diesmal haben wir uns des Themas ATCoins angenommen - also Artist Trading Coins. Man meint immer, die kennen alle schon. Aber an den Fragen, die gestellt werden, merkt man doch, dass das nicht der Fall ist.

 Hello eveyone!
Another weeks has passed and so there is a new issue of Stempeleinmaleins today. In this week's post we are talking about ATCoins - Artist Trading Coins. You think everyone know all about it. But when you see the questions asked about them you realize that it isn't like that.

ATCoins sind wie Artist Trading Cards - nur eben in rund. Die einzige Vorgabe hier ist die Größe: sie MÜSSEN 2,5 Inch groß sein. Ansonsten sind der Phantasie keine Grenzen gesetzt, erlaubt ist, was gefällt. 
Da die Coins, ebenso wie die Cards, meist in Serien produziert werden, habe auch ich eine kleine Serie von 3 Stück gemacht.

ATCoins are like Artist Trading Cards - just in a circular shape. The only must here is: they HAVE TO BE 2,5 Inches in diameter. The rest is all about what you like, let your creative juices flow and see where you end up.
Since the coins, like the cards, are mostly done in series I have made a little series of 3 individual coins for today.


Den 2,5 Inch Kreis habe ich jeweils aus weißem Cardstock gestanzt, darauf kam ein 2,25 Inch großer Kreis aus Yupo, den ich mit Alcohol Inks verziert habe. Bei diesem ersten Coin here habe ich Aqua benutzt. Darauf kamen kleine Sterne mit Strukturpaste und ein Streifen gelbes Washi Tape. Als Motiv habe ich mich jeweils für eines aus dem Stempelset Big News von Mama Elephant entschieden, in diesem Fall der Bär. Auf das Schild habe ich einen kleinen Gruß gestempelt. Und weil mir irgendwie noch etwas fehlte und ich an den Hintergrund, den ich eigentlich  noch aufstempeln wollte, erst wieder nach dem Auftragen der Strukturpaste gedacht habe, habe ich einfach einen weiteren Text aus dem Mama Elephant Set verwendet und mit Archival Ink verteilt ein XOXO aufgestempelt. Damit liegt man immer richtig, oder?

For all the coins I've die cut the 2,5 Inches circle from white cardstock and glued a circle of 2,25 Inches cut from Yupo on top of it. Before glueing it down I've used Alcohol Inks to ink up the Yupo, in this case I went with Aqua. Then I've added some small stars using a stencil and modelling paste and a piece of yellow Washi tape. For each of the coins I went with one of the images from the Big News stamp set by Mama Elephant, here I've used the bear. I've stamped a text on the sign it's holding. And since the coin looked a bit too plain to me and I thought of the background I wanted to stamp onto the Yupo only after applying the modelling paste I've simply used another text from the Mama Elephant stamp set and Archival Ink to stamp XOXO several times onto my coin. I guess you can never go wrong with that.


Bei dem zweiten Coin habe ich Denim Alcohol Ink verwendet, silber-graues Washi Tape und statt der Sterne Punkte auf dem Coin verteilt. Diesmal hält der süße Elefant ein Schild mit einem anderen Text. 

For this second coin I've used Denim Alcohol Ink, silver grey Washi tape and instead of the stars I've added dots to the background. This time the cute elephant is holding the sign onto which I've stamped a different saying.

Für das dritte Coin dieser Serie habe ich Shell Pink Alcohol Ink benutzt, das Washi Tape is korallefarben, die XOXO sind mit pink aufgestempelt. Und der kleine Hase mit Schild kam auch zum Einsatz.

For the third coin of this series I've used Shell Pink Alcohol Ink, a coral colored Washi tape and pink Archival Ink to stamp the XOXOs. And of course the little bunny from wanted to join its friends.


Wie auch bei den ATCards wird auch die Rückseite der Coins mit diversen Informationen bestückt. Ich habe hierfür einen Stempel von Efco verwendet - solche Stempel gibt es aber von verschiedenen Firmen und natürlich könnt Ihr es auch komplett mit der Hand schreiben. 

As with the ATCards several informations are added to the back of the coins as well. I've used a stamp here which is available from different stamp producers, but of course you can also write these completly by hand.


Donnerstag, 6. Juni 2019

Eine Babykarte


 Hallo Ihr Lieben!
Schaukelkarten erleben ja momentan ein Revival - und es hat so viel Spaß gemacht, die Karte für unsere Anleitung beim Stempeleinmaleins zu machen, dass ich gleich noch eine gewerkelt habe. Und so zeige ich heute diese Babykarte auf dem Kulricke-Blog.

Hello everyone!
Those rocking cards are coming back big right now - and making one for our tutorial over at Stempeleinmaleins was so much fun that I went ahead and made another one. So I am sharing this baby card today over at Kulricke Blog.


Die Basis meiner Karte ist aus dem Jeans-Cardstock von Faltkarten gestanzt. Der hat ein wenig Struktur und so sieht der Kreis nicht zu fad aus. 
Darauf kam ein kleinerer Kreis aus weißem Cardstock, den ich dann mit einem der Papiere aus dem Pirat Junge Designpapierset beklebt habe. Da mein Boot in den Wolken gleitet, passte das Papier mit den Sternen perfekt. 
Oben auf den Kreis habe ich noch ein ausgestanztes "Baby" geklebt.

I've cut the base of my card from jeans colored cardstock with a bit structure which doesn't make this part of the card look too plain.
Then I've added a smaller circle cut from white cardstock onto which I've glued a circle of designer's paper. Since my boat is floating in the clouds the paper with the stars print was perfect. 
To the circle I've also added a die cut "baby".


Für das Schiff habe ich einen der Stempel aus dem Stempelset Ahoi erst auf weißen Cardstock abgestempelt und mit der passenden Stanze ausgestanzt. Dann habe ich die verschiedenen Teile nochmal auf roten bzw. craft braunen Cardstock, alle ebenfalls von Faltkarten, sowie auf einen weiteren Bogen Designpapier aus dem Block (hellblaues mit weißen Punkten) gestempelt, ausgeschnitten und auf das weiße Boot geklebt.
Der Anker ist das Teil, das aus der Ahoi mit Anker Stanze ausgestanzt wird - und der passte von der Größe her perfekt zum Schiff. Also habe ich ihn ebenfalls aus craft braunem Cardstock gestanzt, etwas Twine am unteren Ende befestigt und das obere Ende ins Boot geklebt.
Das Boot habe ich dann zwischen zwei Wolkenbordüren geklebt, die ich ebenfalls rund zugeschnitten und mit 3D Tape aufeinander geklebt habe. Das alles kam auf das untere Ende meiner Karte.

For the boat I've stamped a stamp from the Ahoi stamp set on white cardstock first and then cut it out using the matching die. Then I've stamped the different parts on red and craft colored cardstock and on another sheet of designer's paper from the same paper block (ligth blue with white dots), cut all the parts out and glued them onto the white boat.
The anchor is part of an Ahoi die and usually isn't used. But it was perfect in size here. So I've cut it from craft colored cardstock as well, added some twine to the anchor and fixed the other end in the boat.
Then I've glued the boat between two cloud borders that I've also cut in a circle shape and glued onto each other using dimensionals. Then I've added all of this to my card.


Da mir die Karte noch etwas zu fad war, habe ich noch das Willkommen Banner aus hellblauem Cardstock gestanzt und unten an die Rundung meiner Karte angepasst. Die Linie über dem W habe ich weggeschnitten, bei den restlichen Buchstaben verschwindet sie unter den Wolken und war super, um den Text anzukleben. In das O habe ich noch ein kleines rotes Herz geklebt.

Since it felt like the card was something missing I've also die cut a welcome banner from light blue cardstock and glued it onto the card, make it match shape of my circle. There's a small line on top of the letters - I've cut it off of the W and used the part above the other letters to glue the word under the clouds. Into the O I've added a small red heart.


Dienstag, 4. Juni 2019

Wenn Bären handwerken


 Hallo Ihr Lieben!
Für meinen heutigen Post auf dem Stamping-Fairies Blog habe ich die Builder Bears von MFT eingeweiht. Bei diesem Stempelset war es Liebe auf den zweiten Blick, aber je mehr ich es angesehen habe, desto mehr Ideen kamen mir. Eine davon habe ich hier umgesetzt.

Hello everyone!
For today's post over at Stamping-Fairies Blog I've used the Builder Bears by MFT. With this stamp set it was love at second sight, but the more I've looked at it the more ideas came to my mind. One of them I've done here.

Hier habe ich weißen Cardstock hellgrün gemattet und auf einen weißen Kartenrohling geklebt. Den oberen Teil des weißen Cardstocks habe ich mit Distress Oxide Pumice Stone ganz leicht eingefärbt und dann mit Hickory Smoke und der English Brick Wall Schablone stellenweise Steine aufgewischt.

Here I've used some white cardstock, matted it with light green cardstock and glued it all onto a white card base. I've used Distress Oxide Pumice Stone to lightly ink up the upper part of the white cardstock, then used Hickory Smoke and the English Brick Wall stencil to add some bricks to a few areas.


Für alle Motive habe ich hier wieder die No-Lines Technik angewendet. Sie sind jeweils mit Copics coloriert und anschließend ausgeschnitten.
Den Tree Branch habe ich ebenfalls aus weißem Cardstock gestanzt und mit Copics coloriert, so dass sie ins Gesamtbild passen. 
Den Ast habe ich oben quer über die Karte geklebt und darüber noch eine kleine Schnecke kriechen lassen. Die Bären sind ans untere Ende der Mauer geklebt, darunter habe ich dann etwas Gras aufgemalt. 

For all the images I've done the no-lines technique again. They are all colored in with Copics and then cut out.
I've also used white cardstock to die cut the Tree Branch from and then colored it with Copics as well to make it match the images.
I've glued the branch across the top of my card and also added a little snail here. The bears are glued to the lower end of the wall, then I've added some grass here.


Und da ich weiß, dass Ihr den Kreisausschnitt bereits auf dem ersten Bild gesehen habt - ja, auf der Karte tut sich wieder was. 
Dreht man am Rad seitlich, malt der Bär ein I love you auf die Mauer.  Das hat man nun davon, wenn man Bären Pinsel und Farbtopf gibt! Wir alle wissen, dass man das nicht tut! Aber die Geste ist doch irgendwie süß.
Für die Technik habe ich einen Kreis aus weißem Cardstock gestanzt und auf Höhe der Ausstanzung einen Teil daraus herausgeschnitten. Auf dem grünen Cardstock befindet sich ein Stück weißer Cardstock mit dem Text, den ich aus dem Birthday Bears Stempelset genommen habe. Den Arm des Bärenmädchens habe ich einmal extra abgestempelt und einzeln ausgeschnitten, ebenso den Ärmel des Pullovers. Unter dem Ärmel befindet sich ein Brad, das durch die Mitte des Drehrads geht, darüber befindet sich der Ärmel. Der verdeckt das Brad nun perfekt. Den Pinsel habe ich so aufgeklebt, dass er genau an der Kante zum Ausschnitt im Kreis sitzt. Dreht man nun am Rad, drehen sich Arm und Pinsel mit und gleichzeitig wird der Text sichtbar. 
Das könnt Ihr hier besser sehen:

And since I know you've already seen the part of the circle cut from the wall - yes, you're right. That's an interactive card again.
When you turn the wheel through the tab on the right, the bear draws a I love you onto the wall. Well, I guess that's what you get for letting a bear play with paint and a brush. We all know that's something you don't do - but don't you agree that it's such a sweet gesture?
For this technique I've die cut a circle from white cardstock and cut a window in it matching the cut out in the card. On the green cardstock I've used for the matting there's a piece of white cardstock onto which I've stamped the text from the Birthday Bears stamp set. The arm of the bear is stamped individually and cut out, so is the sleeve. Under the sleeve there's a brad that also goes through the middle of the wheel. Then I've glued the single sleeve on top to hide the brad. I've glued the brush to the wheel, directly on the edge of the cut out. So if you turn the wheel now, arm and brush move and reveal the saying.
You get a better look at that here:


Oh je, wie schauen meine Finger denn da aus?!?! Naja, wir sind ja unter uns und jeder Bastler kennt das, oder?
Unten auf die Karte habe ich noch einen Text aus dem Stempelset Sweet Sentiments aufgestempelt, kombiniert mit der Sweet Stanze.

Oh well, my fingers look awful. But I guess you all know those days where you wash them like thousand times and there's still some ink left.
To the bottom of the card I've stamped a saying from the Sweet Sentiments stamp set, combined with the Sweet die.


Samstag, 1. Juni 2019

Stempeleinamalein - Ausgabe vom 01. Juni 2019


Hallo Ihr Lieben!
In letzter Zeit sieht man sie wieder häufiger - die Schaukelkarten. Und so haben wir beim Stempeleinmaleins uns entschlossen, diese in unsere Anleitungs-Sammlung mit aufzunehmen. Sie sind wirklich schnell gemacht und trotzdem nicht 08/15.

Hello everyone!
Lately you can see them quite often again - the rocking cards. And so we from Stempeleinmaleins have decided, to add these to our list of tutorials. They are quick to make and still something special. 

Mir war nach Sommer, Sonne, Strand und Meer - und so habe ich eine Karte gemacht, die schon ganz extrem nach Urlaub aussieht. 
Die Basis meiner Karte ist aus weißem Cardstock geschnitten. Darauf kam ein Nicht-Ganz-Halbkreis aus hellem kraft farbenem Cardstock als Strand und darüber eine Wellenlinie aus türkisblauem Cardstock. 
Hinter die Wellenlinie habe ich eine aus gelbem Cardstock geschnittene Sonne mit Strahlen aufgeklebt. Und da die ohne Hintergrund etwas komisch aussah, habe ich noch hellblauen Cardstock dahinter gesetzt.

I felt like summer, sun, beach and sea - and so I've made a card that looks quite a bit like vacation.
I've die cut the base of my card from white cardstock. Then I've put a not-quite-half circle cut from light craft colored cardstock on top of it  to create a beach and a strip of turquoise cardstock whose top edge I've cut in a waves shape behind it.
Behind the waves I've added a sun with rays cut from yellow cardstock. And since it looked kind of odd without a sky I've also added some light blue cardstock behind it.


Als Deko wollte ich unbedingt die neuen Hammock and Trees Stanzen von LawnFawn benutzen. Da ich das passende Stempelset dazu nicht habe, habe ich in die Hängematte einfach einen der Pinguine von MFT gelegt. Aus diesem Stempelset sind auch der Wasserball und der Cocktail. 
Das Surfbrett ist aus dem Stempelset Beach Life von Stampabilities. Das passte hier einfach perfekt. Wasserball, Surfbrett und Cocktail sind hinter kleine Sandhügel geschoben, für die ich die Sandy Beach Accents Stanzen von LawnFawn benutzt habe.
Zum Schluss habe ich noch ein Let's Chill weiß auf türkisfarbenen Carstock embosst und auf die untere Hälfte der Karte aufgeklebt.

For decorations I wanted to use the new Hammock and Trees die set by LawnFawn. Since I don't own the matching stamp set I've simply used one of the beach penguins by MFT. From the same stamp set I've also used the ball and cocktail. The surf board is from the stamp set Beach Life by Stampabilities. It was just perfect here.
Ball, surf board and cocktail are tucked behind some sandy hills - I've used the Sandy Beach Accents dies by LawnFawn here.
In the end I've white heat embossed a text onto a strip of turquoise cardstock and glued it to the lower part of my card.


Donnerstag, 30. Mai 2019

Maritime Grüße


 Hallo Ihr Lieben!
Heute zeige ich auf dem Kulricke-Blog eine weitere Karte mit einem der süßen Delphine. Und klar, dass die dann auch wieder maritim ausfällt!

Hello everyone!
Over at Kulricke-Blog I am sharing another card using one of the cute dolphins today. And of course this one turned out maritime as well.

Die Designpapiere auf meiner Karte sind alles aus dem Pirat Junge bzw. Pirat Mädchen Designpapierblock und hier mit rotem Cardstock hinterlegt.

All the designer's papers on this card are by Kulricke and here matted with some red cardstock.


Auf das große Designpapierstück mit dem Steuerraddruck habe ich ein großes Ahoi geklebt. Dafür habe ich die Ahoi Outline Stanze benutzt und den Schatten aus weißem Cardstock, das Wort selbst aus rotem Cardstock gestanzt. Durch das O spring einer der Delphine aus dem Stempelset Delfin. Der ist mit Copics coloriert und von hinten durch die Aussparung im O geschoben und angeklebt.

Onto the big designer's paper with the steering wheel print I've glued a big Ahoi. I've used the Ahoi Outline die here and cut the shadow from white, the word itself from red cardstock. Through the O a dolphin is springing. He's been colored in with Copics, then put through the O from behind and glued down.


Der Text ist aus dem Stempelset Fox #2. Eigentlich ist er dreizeilig, ich habe ihn hier auf eine Zeile gestempelt und weiß auf roten Cardstock embosst. 
Zum Schluss habe ich noch ein paar klare Glitzersteine auf der Karte verteilt.

The saying means "just relax" and was white heat embossed onto red cardstock.
To finish the card I've added a few clear rhinestones to it.


Mittwoch, 29. Mai 2019

Eine Karte mit Geschichte


 Hallo Ihr Lieben!
Heute wird meine Nichte 7 Jahre alt. Und nach dem Buch, das ich ihr letztes Jahr anstatt einer Karte gebastelt habe, "konnte", respektive wollte, ich auch dieses Jahr etwas besonderes machen. Und so ist diese Karte entstanden.

Hello everyone!
Today my niece is turning 7 years old. And after the book I made her instead of a card last year I couldn't, meaning didn't want to, make a regular card this year. So instead I made this interactive one.

Auf den ersten Blick ist die Karte bis auf Prinzessin und Einhorn sowie Baum und Eichhörnchen recht farblos. Das ist aber nur Fassade.

At first look this card is pretty colorless. Only the princess and unicorn and the tree and squirrel are colored. But that's only at first look.


Zieht man am Tab rechts, gleitet eine kleine Fee über das Bild und coloriert die Karte magisch.

When you pull the tab on the right side, a little fairy is flying across the card and colors it in.


Die Karte wird nicht nur farbig, es verändert sich noch viel mehr. Natürlich ist das hier eine Magic Color Changer Card. Leider habe ich sie hier nicht komplett senkrecht fotografiert, so dass die Linien des Schlosses ein wenig versetzt sind. 
Das Schloss ist hier feierlich geschmückt, dahinter ist ein Regenbogen gespannt. Vor dem Schloss steht ein glitzerndes Happy Birthday im Gras. Und bunte Konfetti fallen ebenfalls vom Himmel. Dafür habe ich eine Beaded Raindrop Card gemacht, hier aber bunte Perlen verwendet. So sieht es aus, als würde es Konfetti regnen.

The card not only gets colorful, there's happening even more. Of course that's a Magic Color Changer Card. Sorry I didn't get that pic directly from the top so the outlines of the castle aren't exactly on top of each other.
The castle is decorated for a party, there's a rainbow behind it. In front of the castle there's a glittering Happy Birthday written in the grass. And colorful confetti are falling from the sky. Here I've made a Beaded Raindrop Card and used different colors of beads instead of clear ones. Now it looks like there's confetti raining down.


Im Baum links sitzt ein Eichörnchen. In seiner Baumhöhle hat es ein Geschenk versteckt. Das kommt zum Vorschein, wenn man unten am schmalen Streifen braunen Cardstocks zieht.

There's a squirrel in the tree on the left. In his home he's hidden a gift. When you pull the small brown strip of cardstock at the bottom of the card, the tree opens and the gift can be seen. 

Das alles habe ich in einem Video für Euch festgehalten:

All of that is shown in the video:


Und weil die Karte wirklich groß geworden ist, habe ich mir für die Innenseite noch eine passende Geschichte über die kleine Prinzessin überlegt:


Since the card turned out quite big I've also made up a story about the little princess. She's turning home from a trip on her birthay, looking forward to the celebrations awaiting her. But when she realizes that the castle isn't decorated she's pretty disappointed. But the castle is decorated, it's only hidden under a spell. So when she comes closer the fairy flys over them and the spell is taken away. Now she can see all the pretty decorations they've put up to surprise her. ;)


Dienstag, 28. Mai 2019

Squeal with Joy


 Hallo Ihr Lieben!
Heute zeige ich Euch eine weitere Karte mit den süßen Schweinchen von MFT. Die taugen definitiv nicht nur als Glücksbringer!

Hello everyone!
Today I am sharing another card using the cute piggies by MFT with you .Those pigs definately are so versatile and definately are not only made to be used on good luck cards.

Für meine Karte habe ich zuerst das neue Fenster von MFT aus einem Stück weißen Cardstock, das ich etwas kleiner als meinen Kartenrohling zugeschniten habe, gestanzt. Ich war mir ja nicht sicher, ob ich noch eine Fensterstanze brauche. Aber nachdem man hier die beiden Fensterflügel öffnen kann, habe ich doch zugeschlagen. Dann habe ich den Rest des Cardstocks mit der Brick Stencil und Distress Ink Scattered Straw mit einem Mauermuster versehen.

For my card I've first die cut the new window die by MFT from a piece of white cardstock that I've cut slightly smaller than my card base. I wasn't sure if I needed another window die. But since you can open both windows here I went ahead and bought it. I've then used the brick stencil and Distress Ink Scattered Straw to add a brick pattern to the rest of the white cardstock.


Hinter den Ausschnitt im Kartenaufleger habe ich ein Stück Cardstock geklebt, auf das ich erst das Schweinchen gestempelt und es coloriert habe. Dann habe ich es mit Masking Tape abgedeckt und auf den Rest blaue Streifen als Tapete aufgestempelt. 
Hinter das Fenster habe ich dann einen Teil der Vorhänge aus dem Take the Stage Stanzenset aufgeklebt, die ich aus blauem Cardstock gestanzt habe. Dann brauchte ich nur noch das Fenster in den Ausschnitt zu kleben. 
Unter dem Fenster habe ich dann den Tree Branch aufgeklebt. Auch der ist aus weißem Cardstock gestanzt, dann habe ich die einzelnen Teile mit Copics coloriert. Auf dem Ast sitzt ein kleines Vögelchen aus dem Sweet Forest Friends Stempelset, die Musiknote ist aus dem Set Tweet Friends. 
Auch über das Fenster habe ich, diesmal von der anderen Seite, einen Teil des Astes geklebt.

Behind the window in the background I've glued a piece of carstock onto which I've first stamped and colored the piggie. Then I've covered it with masking tape and stamped some blue stripes onto the cardstock to create a wallpaper.
Behind the window I've glued a part of the curtains from the Take the Stage die set, cut from blue carddstock. Now I only needed to glue the window with the curtains into the area where I'd cut it from.
Under the window I've glued a branch made using the Tree Branch die set. Also this was cut from white cardstock and colored with my Copics. On the branch a little birdie from the Sweet Forest Friends stamps set is sitting/singing, the music note is from the Tweet Friends set.
I've added part of another branch also over the window, this time it's growing from the right.


Jetzt brauchte ich nur noch einen passenden Text. Da mich irgendwie so nichts richtig überzeugt hat, habe ich einfach zwei verschiedene Texte zusammengesetzt: "you make me sing with joy" aus dem Tweet Friends Set und "Squeal" aus dem Piggie Pebbles Set. Da MFT fast immer die selbe Schriftart und -größe verwendet, ließen sie sich perfekt zusammenstempeln und für mich passt der Text so super zur Karte.

Now all I needed was a matching saying. Since I thought nothing I had really fit I've simply combined two different sayings: "you make me sing with joy" from the Tweet Friends set and "squeal" from the Piggie Pebbles set. Since MFT most time uses the same font and font size they were easy to put together and now the saying goes perfectly with my card.


Montag, 27. Mai 2019

Eine weitere Explosionbox


Hallo Ihr Lieben!
Heute zeige ich Euch eine weitere Explosionbox. Und auch wenn man im ersten Moment denken könnte, es ist dieselbe, wie die zur Hochzeit, die ich vor kurzem gezeigt habe - diese hier ist zur Kommunion. Grün war der Farbwunsch, und weil ich das zarte grün noch auf dem Tisch hatte, sieht sie auf den ersten Blick recht ähnlich aus. Aber nur auf den ersten!

Hello everyone!
Today I have another explosion box to share. And even if you might think it's the same one I've shared only a few days ago - this is one made for a communion. Green was the color I was asked to you and since I ha that soft one still on my table it really looks similar. But only at first sight!


 Auf den Deckel habe ich ein Doily geklebt, darauf kam ein Kranz aus grünem Cardstock. Den habe ich dreimal ausgestanzt, versetzt aufeinander geklebt und mit ein paar kleinen weißen Perlen verziert. Das Kreuz ist von SU, darunter kamen ein paar kleine Blümchen. Den Text, hier eine Kombination aus Stempeln von Kulricke und SF-Stamps, ist silbern auf weißen Cardstock embosst und mit silbernem Spiegelkarton hinterlegt.

Onto the lid I've glued a doily, then put a wreath cut from green carstock on top of it. I've die cut the wreath three times, glued them on top of each other turning each a tad bit before glueing it down, and decorated with a few tiny white pearls.
The cross is by SU and I've put two flowers at its bottom. The saying is silver heat embossed onto white cardstock and then matted with silver mirror cardstock.


Um den Deckel habe ich weißes Organzaband gewickelt. Die Schleife vorne besteht aus Tüll und hellgrünem Twine, an das ich auch noch einen Flügelcharm gebunden habe.

Around the lid I've wrapped some white organza ribbon. The bow is made of tulle and light green twine and I've also attached a wing shaped charm here.


 Und bei der geöffneten Box sieht man dann definitiv, dass es eine andere Box ist.

With a look at the opened Box you can definately see, that it's a different one.


Ich kann Regenbögen auch richtig rum!!! 

I even can do rainbows the right way!!!


Hauptelement des Innenlebens ist natürlich der Regenbogen. Der ist so gestaltet, dass er sich über drei Seiten zieht. Die hintere Seite der Box bleibt beim Öffnen stehen, so dass sich ein kompletter Regenbogen ergibt. Am Regenbogen fliegt eine Taube.
Im Mittelteil der Box kniet das Kommunionskind. Dafür habe ich von einem Stempel von Belles'n'Whistels den Teddybär nicht mit abgestempelt und dem Mädchen ein ausgestanztes Kränzchen auf den Kopf geklebt.
Dahinter steht ein Kreuz aus silbernem Spiegelkarton, weiß hinterlegt, und wieder mit Blumen verziert.

Main element of the box is the rainbow. It's size is made to go over three sides. The back keeps upright when the box is opened so you get a complete rainbow. There's also a dove flying by.
In the middle element a girl is kneeling. Therefor I've used a stamp by Belles'n'Whistles and removed the teddy bear that gets stamped next to the girl. I've also die cut a small wreath and glued it onto her hair. 
Behind the girl there's a cross die cut from silver mirror cardstock and matted white. I've also added two more flowers here.


Kreuz und Mädchen sind auf einem etwas-mehr-als-halben Doily aufgeklebt. 
Davor befindet sich ein silbernes Banner aus Spiegelkarton, aus dem ich mit dem Word Punch Board den Namen des Kommunionskinds ausgestanzt habe. Um ihn besser lesbar zu machen, habe ich das Banner weiß hinterlegt.

Cross and girl are glued onto a little-more-than-half doily.
In front of it I've added a silver banner from silver mirror cardstock from which I've punched the name of the girl using my Word Punch Board. To make it easier to read it I've matted it with some white cardstock.


Die Seitenteile sind natürlich auch dekoriert.
Auf dem vorderen Teil habe ich diesen Rahmen aus silbernem Spiegelcardstock aufgeklebt und dahinein den tollen Spruch geklebt, der dann auch wieder toll zum Flügelcharm passt. Obendrüber kam ein Banner, unten habe ich drei Blümchen angebracht.

Of course the sides are decorated as well.
Onto the front one I've glued this frame cut from silver mirrorcardstock, than glued a piece with a psalm into it. It's about angels and so it goes great with the wings charm on the outside. I've also added a banner with a "god is love" text and three more flowers.


In die anderen beiden Seitenteile habe ich wieder Taschen eingearbeitet und mit einem silbernem Kreis, einer Taube und einer Blume dekoriert. In einer der Taschen steckt ein kleines Kärtchen, in der anderen ist Platz für ein Geldgeschenk.

I've included pockets in the two remaining sides, decorated with a silver circle, a dove and a flower. In one of them I've put a little card to write a note on, the other one holds room for some money.