
Hallo Ihr Lieben!
Wie auch die Jahre zuvor, haben wir beim Stempeleinmaleins auch in diesem Jahr an jedem letzten Samstag im Monat einen Sketch für Euch. Und das ist die Karte, die mir danach vom Tisch gehüpft ist.
Hello everyone!
Just like the previous years, we from Stempeleinmaleins have a new sketch for you every last satuday of the month. This is the sketch I made after our new one.
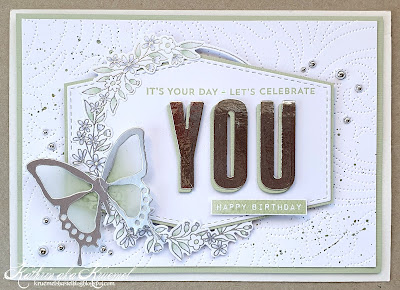
Meine Karte ist schon wieder recht frühlingshaft ausgefallen - ich wäre einfach bereit! Der Sketch ist diesmal ziemlich genau in den Vorgaben, aber da kam mein innerer Rebell raus und ich habe nach einer Möglichkeit gesucht, ihn anders darzustellen.
Für den Hintergrund habe ich ein Stück weißen Cardstock mit der Dotted Swirls Debossing Cover Stanze von Altenew "gestanzt". Die Stanze prägt aber nur ein gepunktetes Schnörkel-Muster in den Cardstock, was wunderbar subtil ist. Dann habe ich grüne Metallic-Watercolor darübergespritzt, von der Ecke unten links zu der oben rechts.
Den weißen Cardstock habe ich hellgrün gemattet und auf einen weißen Kartenrohling geklebt.
Again my card turned out pretty spring-ish - I'm just ready for it! The sketch this time is quite detailed in the items to use on it - but my inner rebell came out and I was looking for a way to use it in a different way.
For the background I've "cut" a piece of white cardstock with the otted Swirls Debossing Cover die by Altenew. The die just debosses some dotted swirls into the cardstock, which is a wonderful subtle touch. Then I spritzed some green metallic watercolor onto the cardstock, from the bottom right to the top left corner.
I matted the cardstock with some light green cardstock and glued it onto a white note card.
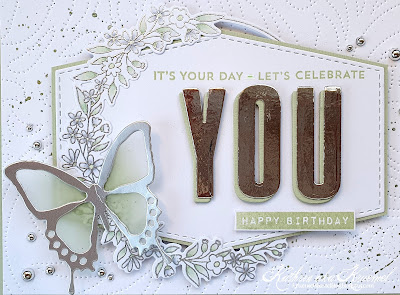
Für die Deko habe ich zuerst mit einer der Label-Stanzen aus dem Blueprint 33 Stanzenset das Sechseck aus weißem Cardstock gestanzt, auch das habe ich hellgrün gemattet.
Der tolle Blumenkranz ist der Spring Wreath von MFT. Den habe ich silbern embosst und dann mit der passenden Stanze ausgestanzt. Dann habe ich die Blumen nur ganz zart mit Copics coloriert - die Blüten weiß, die Blätter in einem ganz hellen grün. Anschließend habe ich das Label in den Kranz hineingeschoben.
Unten am Kranz habe ich einen Schmetterling aufgeklebt. Er ist mit einer ganz alten Stanze von Whiff of Joy gemacht. Die detailierte Lage habe ich aus matt-silbernem Spiegelcardstock, die gefüllte Lage aus Vellum gestanzt. Von hinten habe ich dann auf das Vellum jeweils nach am Schmetterlingskörper ein wenig grüne Stempelfarbe aufgetragen. So ist der Schmetterling nicht rein silber-weiß. Dann habe ich ihn auf den Kranz/das Label geklebt - und mir gefällt es, dass durch die Schmetterlingsflügel der Blumenkranz ein wenig sichtbar ist. Das gibt ihm so einen zarten Look.
Für den Text auf dem Label habe ich oben mit hellgrüner Tinte zwei der Texte aus dem Itty Bitty Birthdays Stempelset von MFT aufgestempelt.
Das You ist mit den Wedding Alphabet Stanzen von XCut gestanzt. Unten befinden sich vier aufeinander geklebt Lagen gestanzt aus hellgrünem Cardstock, darüber, ein wenig versetzt, noch eine Lage gestanzt aus silbernem Spiegelcardstock.
Und das kleine happy birthday unter dem Wort you ist mit einem der Stempel aus dem Occasional Labels Stempelset von MamaElephant gemacht und ich habe ihn ebenfalls mit der hellgrünen Tinte abgestempelt. Nach dem Ausschneiden habe ich ihn mit dünnem 3D Tape auf das Label geklebt.
For the decorations on my card I first die cut the hexagon from white cardstock with one of the label dies from the Blueprint 33 die set by MFT, then matted it with some light green cardstock.
The great flower wreath is the Spring Wreath by MFT. I silver heat embossed it and then cut it out with the matching die. I colored it very softly with my Copics, the flowers in white and the leaves in a very light green. Then I put the label into the wreath.
To the bottom of the wreath I glued a butterfly. I used a very old die by Whiff of Joy for it. The detailed layer is cut from some mat silver mirror cardstock, the solid layer from vellum. I used some green ink to color the back of the vellum, just in the center. Now the butterfly isn't just plain white and silver. Then I glued it onto the wreath/label - and I really like that you can see the wreath through the butterfly wings. This gives it a very soft look.
For the text on the label I stamped two texts from the Itty Bitty Birthday stamp set by MFT onto the top of the label, again using light green ink.
The you is made using the Wedding Alphabet die set by XCut. I stacked four layers of letters, cut from green cardstock, then put one layer cut from silver mirror cardstock on top, putting it just a bit off.
And the little happy birthday under the word you is made using a stamp from the Occasional Labels stamp set by MamaElephant. After cutting it out I glued it onto the label with dimensionals.
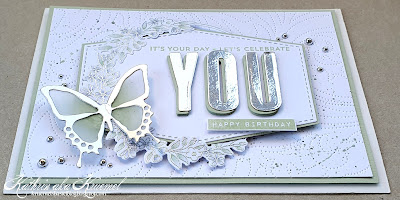
Hier seht Ihr den Glanz auf der Karte etwas besser.
Das Label samt Deko ist mit 3D Tape auf den Hintergrund geklebt. Als Deko habe ich dann noch ein paar glänzend-silberne Perlen auf der Karte verteilt.
Here you get a better look at the shine on my card.
The label is glued onto the background with foam tape. For decorations I added a few shiny silver pearl to my card.