Mittwoch, 10. Juni 2020

Ein Wunscherfüller


 Hallo Ihr Lieben!
Meine Mom hat vor kurzem Geburtstag gefeiert - naja, soweit feiern derzeit eben geht. Wünsche hatte sie mal wieder keine. Eine der Kleinigkeiten, die ich Ihr gewerkelt habe, zeige ich Euch heute.

Hello everyone!
My mom celebrated her birthday only a little ago - well, as much of celebrating is possible at the moment. Again she didn't have any specific wishes. Today I'm sharing with you one of the things I've made for her.

Ja, der Pusteblumen-Hype ist auch an mir nicht vorübergegangen. Eigentlich war ich erst mal neugierig, ob man sie wirklich konservieren kann. Es hat tatsächlich geklappt. Und da sie dann schon mal da war, kam mir die Idee, sie schön verpackt als Wunscherfüller an meine Mom zu verschenken - für Wünsche, die man nicht mit Geld erfüllen kann.

Well, the blowball hype hasn't gotten past me. Originally I was just curious if they really can be preserved in that state. It really worked! And since I had it I've decided to put it in a nice packaging and give it to my mom to use it for any whish that can't be granted with money.


Für die Box habe ich die Sechseckbox von JM Creation abgewandelt. Für den unteren Teil habe ich den unteren Teil der Box aus weißem Cardstock gestanzt, zusätzlich habe ich den Boden ein zweites Mal gestanzt. Ich habe die Box zusammengeklebt und auch den zweiten Boden als Deckel aufgeklebt. Hier habe ich zuvor mittig ein kleines Loch ausgestanzt, außerdem ist die Box mit Styropor gefüllt. Dann habe ich den Aufleger aus grünem Designpapier mit Herzchendruck ausgestanzt und auf den nun Deckel geklebt. Auch die Seiten habe ich mit diesem Designpapier überzogen.
Der Deckel meiner Box musste natürlich um einiges höher sein als der eigentliche Deckel. Um nicht per Hand schneiden oder messen zu müssen, habe ich einfach Partial Die Cutting betrieben. Ich habe den äußeren Streifen für den Deckel aus Folie gestanzt aber nur so, dass er unten nicht abgeschnitten wird. So hatte ich alle Falzmarkierungen und die Grundform bereits in der Folie und musste nun nur mit dem Cutter die äußeren Schneidlinien verlängern. An den geprägten Falzmarkierungen konnte ich die Folie dann ganz einfach falten. Auch den oberen Teil des Deckels habe ich aus Folie gestanzt und dann alles mit einem dünnen Streifen extra stark klebenden Klebeband zusammengeklebt. 

For the box I've used a die by JM Creation and changed it a little bit. For the lower part of the box I've die cut this part from white cardstock and cut the bottom twice. Then I've glued everything together, glueing down also the second bottom as a lid. Before I've punched a hole into the "lid" part and filled the box with styrofoam. Then I've die cut the topper from green designer's paper with a heart pattern and glued it on top of this bottom part. I've used the same designer's paper to cover the sides.
The lid of my box needed to be way larger than the die originally cuts it. To not have to measure, cut and score everything by hand I've done some partial die cutting. I've die cut the long strip that creates the outside of the lid from transparency, making sure to not cut all the way to the end. Now I had all the measurements and even score lines marked in the transparency and only needed to use my cutter to make the strip as high as I needed it to be. Since the score lines were marked at least at the top of the strip it was really easy to fold it. I've also cut the top part of the lid from transparency and then used thin strips of a strong double sided tape to glue everything together.
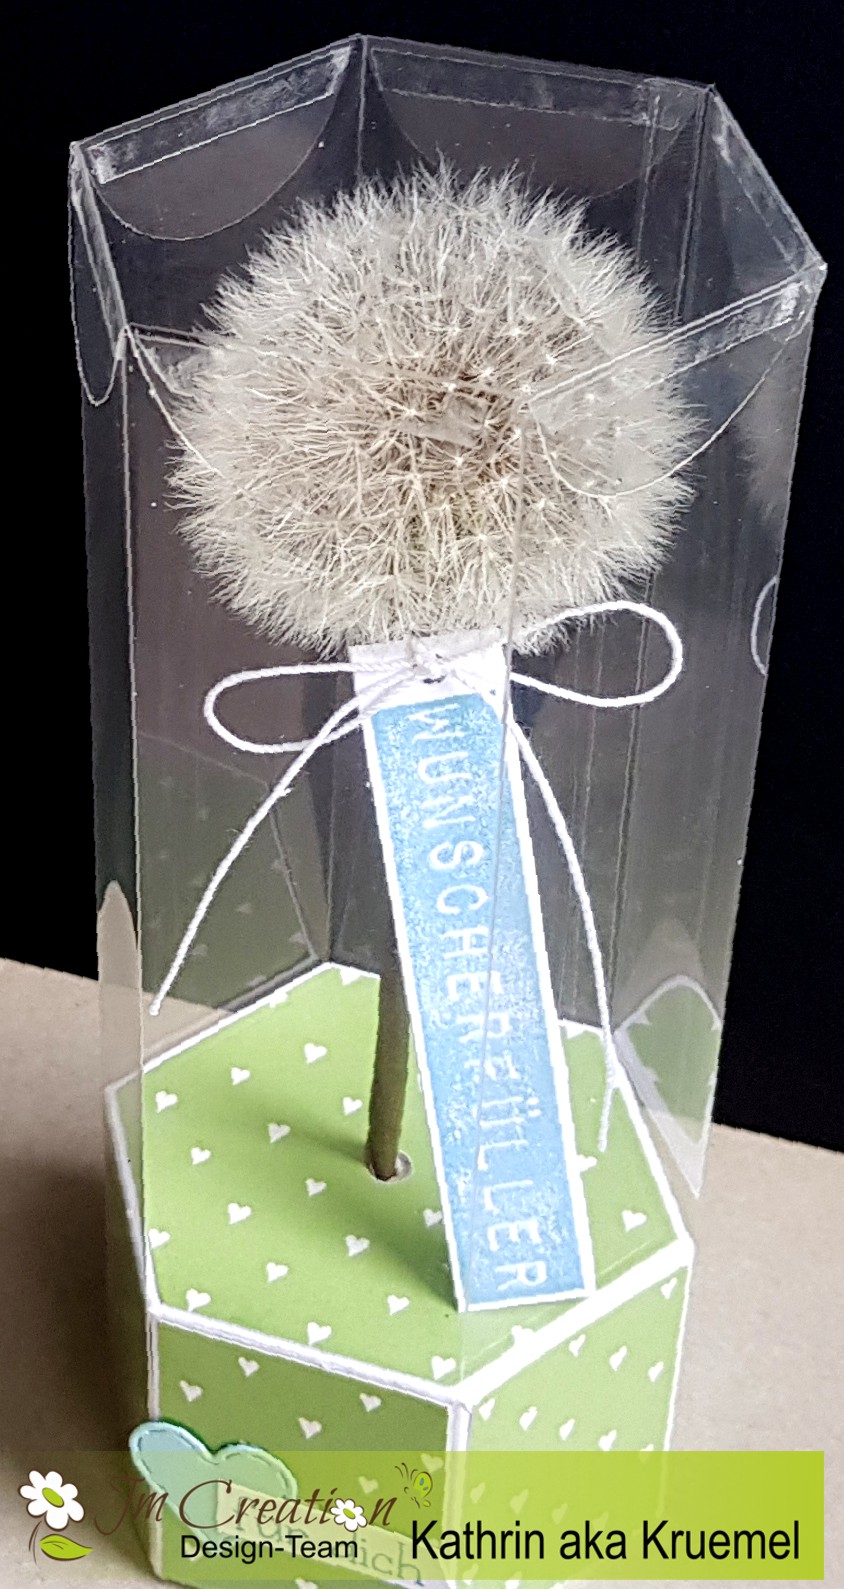

An die Pusteblume habe ich mit einer weißen Schleife ein Tag gebunden. Dafür habe ich das Wort Wunscherfüller aus dem Stempelset Frisch Gedruckt mit hellblauer Tinte auf weißen Cardstock gestempelt und zugeschnitten. Durch die Folie ist das leider etwas schwer zu fotografieren.

To the blowball I've tied a tag. I've stamped "make a wish" onto a strip of white cardstock using light blue ink, then used white twine to tie it to the stemp and make a bow. It's a bit hard to get a decent picture throug the transparency.
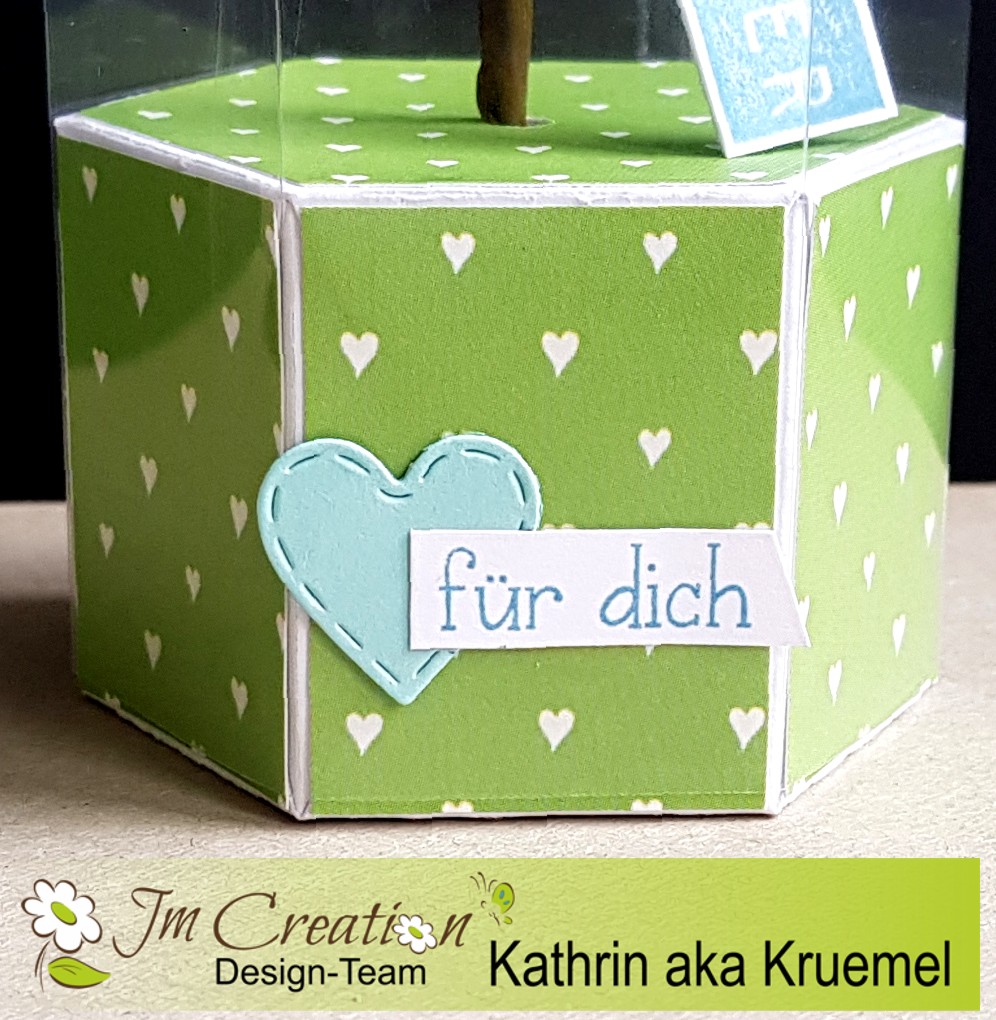

Auf den unteren Teil der Box habe ich noch ein kleines Herz, das mit dem Briefkasten Mini Stanzenset geliefert wird, gestanzt aus hellblauem Cardstock, aufgeklebt. Darauf kam noch ein kleines Banner mit einem aufgestempelten für dich. Hier habe ich einfach nur diese beiden Worte aus einem längeren Text aus dem Stempelset Regenbogen - Sonnenschein abgestempelt. Auf mehr Deko habe ich dann verzichtet, da der Fokus auf der doch recht filigranen Pusteblume liegen sollte. Die Blume habe ich durch das Loch im oberen Teil des Bodens hindurch ins Styropor gesteckt und dann den durchsichtigen Deckel zum Verschließen der Box genutzt. Durch das Designpapier auf dem unteren Teil sitzt der Deckel schön fest und kann somit auch nicht aus Versehen beim Anheben nach unten rutschen und die Blume beschädigen. 

To the lower part of the box I've glued a little heart, cut from light blue cardstock, and a white banner with "for you" stamped onto it. I've decided against adding more decorations since the focus needs to be on the pretty filigree flower. I've put the end of the stem through the hole in the bottom part and stuck it into the styrofoam. Then I've used the clear lid to close the box. Due to the designer's paper on the bottom part the lid fits pretty tight and the lid can't slide down when the box is lifted - and the flower is pretty safe.


Dienstag, 9. Juni 2020

Hello my Gnomie


 Hallo Ihr Lieben!
Heute zeige ich auf dem Stamping-Fairies Blog diese Gnomie-Homie Karte. ;)

Hello everyone!
Over at the Stamping-Fairies Blog I am sharing this gnomie-homie card today. ;)

Eigentlich wollte ich hier eine One Layer Card machen. Ich habe mit der Extraordinaire Square Stencil von MFT das Quadrat auf weißen Cardstock markiert und darin die Szene gestempelt und coloriert. Und dann kam ich auf die - blöde - Idee, rundherum mit Distress Oxide einen leichten Hintergrund in grün und blau zu gestalten, quasi Himmel und Wiese fortzuführen. Wie gesagt, blöde Idee. Dadurch war das Motiv total in den Hintergrund gerutscht. Also habe ich es dann doch ausgeschnitten, schwarz gemattet und auf ein weiteres Stück weißen Cardstock geklebt, den ich ebenfalls schwarz gemattet habe. Ich war schon versucht, hier einen dezenten Hintergrundstempel aufzubringen, aber ich wollte die Karte nicht schon wieder ruinieren. Also habe ich den Hintergrund wirklich weiß gelassen.

I had planned to make a One Layer Card here. I've used the Extraordinaire Square Stencil by MFT to mark the square on a piece of white cardtsock and did some masking to stamp the scene. Then I've colored it in. And then I got the - bad - idea to add some green and blue Distress Oxides around the image to kind of go with the sky and grass. Well, as mentioned - bad idea. The image got completly lost then, even with only adding a very light layer of ink around it. So I've cut the scene out, matted it with black cardstock and then glued it onto a piece of white cardstock that was also matted with black. I really was tempted to stamp a very soft background onto the white cardstock first but really didn't want to mess up the card again. So I've just stuck to a white background here.

Alle Motive, die ich hier verwendet habe, sind aus dem Stempelset Hanging with my Gnomies von MFT. Ich habe sie durch Maskierung zur Szene gestempelt und zum Abstempeln ganz helle Tinte verwendet, da ich mal wieder No Line Coloring machen wollte. Coloriert habe ich dann erst ganz rudimentär mir Copics - jeweils nur zwei Farbtöne als Grundlage, also ohne großartige Schattierungen. Die habe ich dann mit Polychromos und Prismacolors hinzugefügt und ganz zum Schluss Highlights mit einem weißen Gelmarker gesetzt.

All images that I've used here are from the Hanging with my Gnomies stamp set by MFT. I've done some masking to stamp the scene and used very light ink since I had some No Line Coloring planned. For the coloring I've laid down a very basic coloring with Copics, only using two quite light tones of color and without any shading. The shading was done with Prismacolor and Polychromos and with a white gel marker I've added some highlights.


Für das hello habe ich die Sweet Hello Stanze von MFT benutzt. Ich habe das Wort einmal aus schwarzem und einmal aus hellblauem Cardstock gestanzt und leicht versetzt aufeinander geklebt. Auf ein Banner habe ich noch "my gnomie" aufgestempelt und dafür einen weiteren Stempel aus dem Set verwendet, aus dem auch die Motive sind. Der Text ist eigentlich länger, ich wollte aber nur diese beiden Worte nutzen und habe vor dem Abstempeln den Rest des Textes abgedeckt. Das hello habe ich dann leicht ins Motiv hineinragend auf die Karte geklebt und das schwarz gemattete Banner mit dem Text daruntergeschoben.
Zum Schluss kamen noch ein paar grüne Enamel Accents als Deko auf die Karte.

For the hello I've used the Sweet Hello die by MFT. I've die cut the word once from black and once from blue cardstock and then stacked them on top of each other, moving the blue one a tad bit to the right. 
Onto a banner I've stamped the words "my gnomie" using another stamp from the set that also the images are from. The real saying is longer but I only wanted to use those two words and covered the other ones before stamping. Then I've glued the die cut hello onto the card, letting the loops of the larger letters go into the scene, and then tucked the black matted banner under it.
In the end I've added a few green Enamel Accents for decorations.


Sonntag, 7. Juni 2020

Eine Karte zum Abschied


Hallo Ihr Lieben!
Mein Chef ging Ende Mai in Pension - da musste natürlich eine Karte her. Und da er seine freie Zeit entweder beim Holzmachen oder im Garten verbringt, habe ich diese Karte gewerkelt. Das Thema Holzhacken hatte ich für seine Karte zum 60. Geburtstag nur zwei Wochen zuvor schon verarbeitet - aber total vergessen, die Karte zu fotografieren! 

Hello everyone!
My boss retired end of may - so of course I needed a card. He loves to pass his spare time either cutting wood or in his garden. Since I've picked up the cutting wood theme for the card for his 60th birthday only two weeks prior I made this card for his retirement. And can you believe I totally forgot to take a picture of his birthday card?


Wie Ihr oben sehen könnt, habe ich eine Slider Card gemacht - und lasse ihn sprichwörtlich in den Ruhestand gehen bzw. fahren. 
Für den Hintergrund habe ich weißen Cardstock mit Distress Oxide Tumbled Glass und Salty Ocean gewischt. Zuvor habe ich den Baum aus dem Falling for You Stempelset von Avery Elle - die Blätter in der Krone habe ich einfach nicht mit abgestempelt um den Herbst- in einen Sommerbaum zu verwandeln - gestempelt, coloriert und zum Wischen maskiert. 
Die Cute Cloud Outline Stanze von MFT ist für die Wolke genutzt, die Vögel habe ich per Hand dazugemalt.
Unten habe ich zwei Streifen Gras aufgeklebt, am Rand mit den Grassy Hills Stanzen von MFT gestanzt. Eine der Gras-Lagen bildet den Hintergrund, die vordere verdeckt den Slider Mechanismus. 

As you can see on the motion picture at the top of this post I've made a slider card - and so he's literally going/driving into retirement. Don't know if this how you'd say in english, but it's exactly how we do it in german.
For the background I've colored some white cardstock with Distress Oxide Tumbled Glass and Salty Ocean. Before I've added the color I've stamped and colored the tree fron the Falling for You stamp set by Avery Elle - simply not stamping the leaves to turn the fall tree into a summer one - and then covered it with masking tape. 
The Cute Cloud Outline die by MFT was used for the cloud, the birds are drawn by hand.
At the bottom I've added two layers of grass, cutting the top edge with one of the Grassy Hills dies by MFT. One layer of grass creates the background, the other one is used to hide the slider mechanism.


Der geniale Räsenmäher-Mann ist von Art Impressions und heißt "Lawn Ranger". Ich finde den einfach genial - und er sieht meinem Chef sogar ein klitze kleines Bisschen ähnlich. Auch er ist mit Copics coloriert, ausgeschnitten und am Slider Tab befestigt. 
Das Straßenschild im Hintergrund ist von Kulricke. Die Pfeile und den Pfosten habe ich hinzugefügt. Der Pfosten ist aus silbernem Spiegelcardstock geschnitten und hinter das Schild geklebt. Die Pfeile habe ich aufgestempelt, damit das Schild der Bewegungsrichtung des Motivs entspricht.

And this amazing image is by Art Impressions and is called "Lawn Ranger". I just think this one is genius - and he even looks a tiny little bit like my boss. Also this image is colored with Copics, cut out and glued onto the slider tab.
The sign in the background is by Kulricke and reads "work life" (crossed out) and "retirement". This is what street signs look like when you're leaving a town. The name of the town is crossed and there's the name of the next one written on the sign, usually also telling you how many kilometers it is away. I've added the post and also the arrows since those made the sign fit my card design and the direction the image is moving better. The post is cut from silver mirror cardstock and glued behind the sign.


Samstag, 6. Juni 2020

Stempeleinmaleins - Ausgabe vom 06. Juni 2020


Hallo Ihr Lieben!
Beim Stempeleinmaleins zeigen wir Euch heute eine Mehrfachklappkarte. Und beim Vergleichen werdet Ihr feststellen, dass ich wieder ein wenig abgewandelt habe. Aber ich erkläre Euch gleich, warum.

Hello eveyone!
Over at Stempeleinmaleins we are sharing a tutorial for this fancy fold card today. And if you compare my card with the ones from the rest of the team you'll realize that once again I've changed it a bit. I'll tell you why a little later.


Aber fangen wir erstmal mit der Außenseite der Karte an. Ich habe die Basis der Karte aus helltürkis farbenem Cardstock gearbeitet. Gemattet habe ich alle Teile mit hellgrünem Cardstock und dann mit Designpapier beklebt. Die Ränder habe ich mit weißer Strukturpaste bestrichen.

But let's start with the outside of the car. I've made the base of the card from light turquoise cardstock. I've matted all pieces with a light green cardstock and then glued some designer's paper on top. The edges of the designer's paper are covered with white structure paste.


Als Deko habe ich ein weißes Herz mit unregelmäßig gewelltem Rand nur auf die Klappe geklebt, darauf klebt ein kleineres Herz aus dunkeltürkis farbenem Cardstock. Durch beide Lagen habe ich einen Schlitz geschnitten und türkisfarbenes Schleifenband durchgezogen. Das hält die Karte geschlossen. Ich hatte zwar eigentlich zwei Magnete in die Karte eingearbeitet, durch die vielen Mattungen ist die Karte aber zu dick geworden (ich wurde vorher gewarnt, aber ich konnte nicht anders) und so halten die Magneten die Karte nicht mehr geschlossen. Geht auch so, denke ich.
Das Herz habe ich mit Blumen sowie ein paar klaren Glitzersteinen - auch daneben - dekoriert.

For decorations I've added a white heart with a wavy edge to the lid only, on top of it I've glued a smaller heart cut from dark turquoise cardstock. Through both layers I've cut a slit and put some turquoise ribbon through it. The ribbon holds the card closed. I've included two magnets to close the card but because all of my matting (and yes, I was warned beforehand but just couldn't go without) the magnets aren't enough to keep the card closed. I think this works as well.
The heart is decorated with a few clear rhinestones - and there are some next to the heart as well.


So sieht die Karte aus, wenn man die erste Lage öffnet.

This is the card when the first layer is opened.


In der Mitte befinden sich zwei Quadrate. Das linke habe ich mit Blumen - ein Teil eines Stempels von MFT - dekoriert, coloriert in türkis und grün mit Copics. Auf die rechte Seite kam ein mit grauer Tinte gestempeltes "ich drück dich". Dafür habe ich, wie eigentlich überall auf der Karte, diverse Stempel kombiniert. Hier das Ich von SU und das drück dich von Creative Depot. Übrigens habe ich hier für alle Stempelabdrücke, auch die Motive, graue Tinte benutzt, einfach weil es weicher wirkt.

In the middle area there are two squares. The left one is decorated with flowers - part of a stamp by MFT -, colored in turquoise and green with my Copics. On the right side I've stamped a "hugging you". For all the sayings and images on this card I've used grey ink because it's a lot softer than black and that's the look I was after here.


Auf dem Rechteck darunter - die Rückseite der unteren Front - habe ich ein "tausend Dank" (Creative Depot) "für Alles" (Craft Emotion) und eine weitere Blume (der gleiche Stempel wie zuvor) aufgeklebt bzw. -gestempelt.

On the square under it - the back of the bottom front - is decorated with a stamped "thanks a lot for everything" and another flower.


Das ist die komplett geöffnete Karte - und auf diesem Bild zeigen sich zwei Dinge: 
1. Die Karte ist schon vor gut einem Monat entstanden. Ich war auf der Suche nach einer Idee für die diesjährige Muttertagskarte. Wir vom SEME Team legen unsere Themen ja auch einige Zeit im Vorfeld fest. Also dachte ich mir, ich verbinde das "Notwendige" mit dem "Nützlichen".  Oh, und ein wenig größer habe ich die Karte auch gewerkelt... ;)
2. Ich habe ein drittes Feld zu den ausklappbaren Seiten hinzugefügt. Das ergab sich einfach durch das Wort, das ich hier unterbringen wollte. Bionda ist, wie ich meine Mutter seit 1989 nenne - ein Name, der sich während eines Urlaubs entwickelt hat, obwohl sie gar nicht blond ist. Aber er ist hängen geblieben und sie mag ihn. Da kann ich dann ja schlecht Mama auf eine Muttertagskarte schreiben, wenn ich sie nie so nenne. Höchstens mal Mom, aber das wäre sich durch die ungerade Zahl der Buchstaben nicht ausgegangen....

This is the completly opened card - and here you can mention two things:
1. I've made this card about a month ago. I was looking for an idea for this year's mother's day card for my mom. We from the SEME team are planning our themes quite some time ahead so I've decided to combine the "must do" with a "want to do". Oh, and I've also made this card a bit larger, too. ;)
2. I've added a third square to the side panels. That just happened because of the word I wanted to write onto them. Bionda is the name I've given my mom since a holiday in 1989 - it just happened, even if she wasn't/isn't a blondie. It just stuck and she likes it. So I couldn't write Mama (german for mom) onto the card when I never name her that. Mom happends every now and then but with the uneven number of letters that wouldn't have worked either...


Das sind die drei Quadrate links des Haupt-/Mittelteils. Ich habe jeweils einen Buchstaben des Wortes Bionda auf ein Quadrat geklebt, gestanzt mit Stanzen von SU. Unter jeden Buchstaben habe ich ein Stück weißen Cardstock geschoben, auf das ich mit dem Drucker je eine Eigenschaft, die ich mit meiner Mom verbinde, aufgedruckt habe und die mit dem jeweiligen Buchstaben auf dem Quadrat beginnt. Meine Mom ist keine "traditionelle" Oma und so war es bei manchen Buchstaben gar nicht so einfach, etwas passendes zu finden! Dekoriert habe ich die Quadrate zusätzlich mit kleinen klaren Glitzersteinen.

These are the three squares to the left of the middle/main part. I've glued one letter of the word Bionda on each square, cut with an alphabet die set by SU. Under each letter I've tucked a strip of white cardstock onto which I've printed a positive word that fits my mom and that starts with the letter in this square. Well, my mom isn't one of those traditional grandmas and unlike most women her age so with some letters it wasn't easy to find a word with the letter and fitting her. I've also added some clear rhinestones to each square.


Und das sind die anderen drei Quadrate - das D war übrigens so ein Buchstabe! ;)

And these are the other three squares. The D was one of those letters... ;)


Und zu guter Letzt hier noch das Mittelteil. Ich habe in zwei Ecken jeweils einen Teil eines Stempels von SU aufgestempelt und coloriert. In den freien Bereich kam dann der Text. Die gestempelten Worte sind ebenfalls von SU, das gestanzte Muttertag ist von JM Creation. Dazu kam noch ein kleines Herz - äh, von wem weiß ich gar nicht mehr. Mit einem grauen Fineliner habe ich dann die Blumen noch mit einem frei Hand gezogenen Rahmen verbunden.

And last but not least here's the middle part. I've stamped parts of a stamp by SU onto two corners and colored them. Onto the free space I've stamped a "happy mother's day - love you" saying. The word mother's day is replaced with a die cut word. I've also added a little heart here. In the end I've used a grey fineliner to draw a frame, connecting the flowers.


Freitag, 5. Juni 2020

Das Meer hat gerufen


 Hallo Ihr Lieben!
Was machen eigentlich Otter im Sommer? Na, sie fahren ans Meer! Glaubt Ihr nicht? Der Otter auf meiner Karte, die ich heute auf dem Stampcorner Blog zeige, beweist es Euch.

Hello everyone!
What do otters during summer? They take a trip to the ocean! You don't believe me? The otter on this card, that I'm sharing over at the Stampcorner Blog today, is prooving it.

Ich habe hier eine weiße Kartenbasis verwendet und ein etwas kleineres Stück schwarzen Cardstock darauf geklebt. Darauf kam hellblauer Cardstock, wieder ein wenig kleiner, der den Himmel bildet. Darauf kamen im Hintergrund zwei Lagen verschiedenen hellblauen Cardstocks, den ich jeweils mit einer Wellenstanze gestanzt und leicht versetzt aufeinander geklebt habe. Dafür habe ich die Wellenstanze aus dem Pop Up Wiper Card Stanzenset sowie eine der Stanzen aus dem Ocean Waves Set, jeweils von MFT, verwendet. Davor kamenzwei Lagen braunen Cardstocks, die hintere einen Tick dunkler. Auch hier habe ich mit Stanzen aus dem Surf and Turf Stanzenset von MFT die obere Kante in Form gestanzt, so dass es nun wie Sand aussieht.
Unten auf den Sand habe ich mit weißem Embossingpulver einen der Texte aufembosst, die im selben Set wie der Otter enthalten sind.

Here I've used a white note card and glued a slightly smaller rectangle cut from black cardstock on top. Then I've added a rectangle cut from light blue cardstock, again a tad bit smaller, on top to create the sky. 
In the background I've added two layers of different blues, using the wave die from the Pop Up Wiper Card die set and one wave border die from the Ocean Waves set, both by MFT, to cut the top edge in a wavy shape. The next two layers are cut from brown cardstock, one a bit darker than the other. Also here I've used dies, this time from the Surf and Turf die set, to cut the upper edge to end up with a beach/sand look.
With white embossing powder I've heat embossed a "the ocean is calling" saying onto the front beach layer.


Und hier ist der Otter am Strand! Er scheint es zu genießen - wie auch nicht! 
Der Otter ist aus dem Auszeit Stempelset, coloriert mit Copics. Ich habe hier E39, E99, E97, YR23 und E31 verwendet. Der Bauch ist mit C4, C1 und C00, die Backe mit R35 coloriert. Für die weißen Highlights habe ich einen weißen Gelmarker benutzt. 
Der Otter schlüpft gerade durch das O im Wort Sommer. Das habe ich mit dem Wedding Alphabet von XCut aus einem Alcohol Ink Hintergrund gestanzt. Dazu gleich mehr. 
Hinter dem Otter steckt der Sonnenschirm, der natürlich am Strand nicht fehlen darf, im Sand. Hierfür habe ich einfach den Regenschirm aus dem Set Regenbogen benutzt, den Stiel abgeschnitten und durch einen längeren ohne Griff ersetzt - einfach eine Linie mit einem schwarzen Fineliner auf weißen Cardstock gezogen, ausgeschnitten und hinter den Schirm geklebt. 
Zwischen den Buchstaben stecken ein paar Muscheln. Die habe ich aus dem Beach Scene Builder Stanzenset von MFT genommen, aus weißem Cardstock gestanzt und mit YR24, YR23 und Y21 coloriert. Die selben Farben habe ich auch für den Sonnenschirm benutzt. So passen alle  Motive perfekt zusammen.
Am Himmel schweben noch ein paar kleine Wolken, für die ich die Cute Cloud Outline Stanzen von MFT benutzt habe. 

And here's the otter at the beach! He really seems to enjoy his vacation - how couldn't he?
The otter is a stamp by Stampcorner, colored with Copics. I've used E39, E99, E97, YR23 and E31. The belly is shaded with C4, C1 and C00, for the cheek I've used R35. The highlights are made with a white gel marker.
The otter is climbing through the O in the word Sommer - german for summer. I've die cut the word with the Wedding Alphabet by XCut and cut the letters from an alcohol ink background. I'll tell you more about that soon.
Behind the otter a parasol is stuck in the sand. You should always have one with you at the beach - that also counts for otters. I've stamped an umbrella here, cut off the handle and replaced it with a stick. This is simply hand drawn with a black fineliner, cut out and glued behind the parasol. 
Between the letters I've put a few shells. They are from the Beach Scene Builder die set, cut from white cardstock and colored with YR24, YR23 and Y21. These are the same colors that I've also used for the parasol to make sure all images go perfectly together. 
There are a few puffy clouds floating in the sky. I've used the Cute Cloud Outline dies by MFT here.


Und hier könnt Ihr die Buchstaben besser sehen. Wie gesagt, ich habe hier Yupo mit Alcohol Ink eingefärbt. Dafür habe ich nur eine Farbe benutzt: Monsoon. Gemixt habe ich mit dem neuen Foundry Alloy. Das ist auf der Fläche silbern, bildet am Rand aber eine goldene Kante. Das sieht einfach klasse aus! Auch hier kam ein weißer Gelmarker zum Einsatz, um ein paar Highlights auf die Buchstaben aufzubringen.
Zum Schluss kamen noch ein paar glitzernde Nuvo Drops auf die Karte.

And here you get a better look at the letters. As mentioned, I've die cut them from Yupo that I've covered with alcohol inks. Actually, I only used one color here: Monsoon. And I also used some Foundry Alloy here. It's creates a silver look with great golden edges. That looks so amazing! Also here I've added some highlights with a white gel marker.
In the end I've added a few glittery Nuvo Drops to the card.


Donnerstag, 4. Juni 2020

Eine etwas andere Geburtstagskarte


Hallo Ihr Lieben!
Vor ein paar Tagen habe ich Euch die Geburtstagkarte für meine Nichte gezeigt. Aber nicht nur sie hat Geburtstag gefeiert, nein, ein paar Tage zuvor auch meine Mom. Auch sie werde ich nach langem am kommenden Wochende wiedersehen. Die Geburtstagskarte, die ich dieses Jahr für sie gemacht habe, ist keine normale Karte geworden. Von Tonic gibt es eine Rotating Memoirs Stanze, die eine Art Rolodex System stanzt. Nun, die Stanze war - außer bei einem Shoppingsender - derzeit nirgends zu bekommen. Bei dem Sender gab es nur ein komplettes Set für 60 Euro. Das war mir dann doch einen Tacken zu viel. Aber wofür habe ich eine Cameo. Also habe ich versucht, mir eine Schneiddatei selbst zu erstellen, ich gebe zu, in Anlehnung an die Stanze. Ganz identisch ist meine Version aber dann doch nicht geworden. Aber sie funktioniert. Und so bekommt meine Mom dieses Jahr eine rotierende Karte mit vielen Wünschen geschenkt.

Hello everyone!
A few days ago I've shared the birthday card I've made for my niece. But not only she celebrated her birthday just recently, a few days earlier also my mom did so. I am so happy to see her after a long time again next weekend as well. The birthday card I've made for her this year is no ordinary card. There's a Rotating Memoirs die by Tonic that creates some kind of Rolodes system. Well, there was no place - except for a shoppig TV channel - that had that die in stock. And the shopping channel only had it in a set costing 60 Euros, a tad bit too much for just testing it out. So, luckily I own a Cameo and I've tried to make my own version. Of course taking a picture of the finished system made with the die. Of course mine didn't turn out identically, but it works. And so this year my mom gets this rotating birthday card with tons of good wishes. 


Ich habe das Grundgerüst aus weißem Cardstock geschnitten. Da die bestückte Rolle doch recht schwer geworden ist - vielleicht hätte ich nicht so viel matten sollen - musste ich die Seitenteile des Grundgerüsts verstärken. Um ganz sicher zu gehen, habe ich hier die Seitenteile einmal aus dicker Folie geschnitten und dann von beiden Seiten mit weißem Cardstock verkleidet, darauf kamen Mattung und Designpapier. Die Designpapiere, die wirklich auch sehr stabil sind, sind aus der Reihe Songbird von Mintay. Ich hatte ein Reststück eines Bogens übrig, das aber nie für alles gereicht hätte. Aber dann hatte ich mich darauf eingeschossen und konnte tatsächlich noch welches nachordern. Zum Matten habe ich korallefarbenen Cardstock von Bazzil benutzt. 

I've cut the base from white cardstock. Since the rotating part with all the sheets attached to it turned out pretty heavy - maybe I shouldn't  have added a matting - I had to reinforce the side parts. To make sure it will hold the weight, I've cut the side pieces once from thick acetate, then glued pieces cut from white cardstock to both sides of the acetate. Then I've added matting and designer's paper. The designer's papers, that are pretty thick themselves, are all from the Songbird line by Mintay. I had a left over piece from a sheet that would never have been enough for the whole card. But I was lucky enough to find it again online. For the matting I've used coral colored cardstock by Bazzil.


Hier seht Ihr noch die andere Seite. Ich finde das Papier einfach wunderschön. Und als ich das Reststück in der Hand hatte, hatte ich mich schon auf die Farbkombi koralle und türkis eingeschossen - und kein anderes Papier, wovon ich wirklich viel habe, wollte mir gefallen. Die Blumendrucke sind aber auch zu zauberhaft!
Auf Deko habe ich hier, von ein paar kleinen Ausnahmen abgesehen, weitgehend verzichtet, denn die Papier sind Deko genug. Vorne an die Box habe ich ein paar Blümchen und zwei Blätterzweige geklebt. Zu viel Deko geht hier nicht, da sonst die einzelnen Blätter am rotierenden Teil daran hängenbleiben würden. 

Here's a picture of the other side. I just love these papers. And when I had that left over piece in my hands I was already sold to the coral and turquoise color scheme. None of my other papers, and I have a lot!, would fit. Those flower prints are just amazingly beautiful!
Beside a few small exceptions I didn't add any decorations here because the papers themselves are decoration enough. To the front of the box I've glued a few flowers and two branches with leaves. You can't add too much decoration here or the sheets on the rotating part will get stuck.


Ich habe einen Testlauf in der Familie gemacht - fast alle drehten die Griffe nach vorne. Also habe ich die Seiten auch so "bestückt". Man muss also die Texte zuerst unten, dann oben lesen. Wobei das an sich, bis auf die erste und die letzte Seite, egal ist. Auf der ersten Seite steht also "wir wünschen Dir". Ich habe die Texte am PC geschrieben und ausgedruckt. Die Schriftart heißt Dymo, die fand ich hier klasse, weil sie einfach auszuschneiden ist und gleichzeit durch die schwarzen Banner auffällig und klar abgegrenzt ist.
Auf der zweiten Seite habe ich passend zum Text noch einen Regenbogen aufgeklebt. Wobei es kein klassischer Regenbogen ist, ich habe ihn passend zu den Farben des Designpapieres in koralle und türkis gehalten. Der Regenbogenstempel ist von Concord and 9th. 

I gave the system to each in my family - and most of them turned the handles towards themselves. So I've glued the texts down that you can read them in order when you turn the handle that way. Well, actually besides the first and last page it doesn't really matter. So you have to start on the lower page. On the first one I've written "we wish you". The texts are all written on my laptop and printed with my home printer. The font is called Dymo, I liked it here since it is easy to cut out and with the black banner it is in a nice contrast to the patterned papers.
On the second page there's written "a rainbow on a cloudy sky". Matching this text I've added a stamped rainbow. Well, it's no typical rainbow. Making it go with the papers I've used corals and turquoises for it as well. The rainbow stamp is by Concord and 9th.


So ganz ohne weitere Erklärungen zeige ich Euch jetzt die weiteren Seiten. Auf einem weiteren habe ich zwei Texte durch ein Ampersand-Zeichen, gestanzt mit einer Stanze von Creat a Smile Stamps, verbunden. Und einmal habe ich noch eine Sonne, ebenfalls von Concord and 9th aufgestempelt. 

Without further explanations I am sharing the other pages with you. On one of them I've combined two texts with a die cut ampersand, made with a die by Creat a Smile Stamps. And onto another one I've stampe a sun, also by Concord and 9th.


Da man ja jeweils die untere Seite zuerst lesen soll, ist die letzte also mit "Alles Gute zum Geburtstag" beschrieben. Und so wird eine Karte daraus. ;)

Since you have to read the lower pages first, the upper one with a printed "a very happy birthday" is the last one. And that turns this collection of wishes into a birthday card. ;)


Mittwoch, 3. Juni 2020

Lasst uns tanzen!


Hallo Ihr Lieben!
Meine kleine Nichte hatte vor kurzem Geburtstag. Und wie alle kleine Mädchen liebt - und tanzt sie selbst - Ballett. Da kam die neue kleine Ballett-Maus von JM Creation doch gerade recht. Und weil ich meine Nichte in den letzten Jahren kartenmäßig ein wenig "verzogen" habe, sind Karten ohne Bewegung inzwischen eine Enttäuschung. Also tut sich auch hier was.

Hello everyone!
My little niece celebrated her birthday recently. And like all little girls she loves - and dances herselft - ballett. So the little Ballett Mouse by JM Creation just came in handy. I've made some very special cards for my niece those last years - so a regular card is kind of a disappointment by now. Well, I didn't want her to be disappointed so I've added some movement here as well.

Für den Hintergrund habe ich einen Teil eines Stückes Aquarellpapier mit rosafarbener Aqurelltinte eingefärbt, einen Teil darunter mit grau-brauner Farbe. Dann habe ich die Dielenböden per Hand dazugemalt. Für die Sterne habe ich einen Teil des Stempels Hasen auf Häuserdach verwendet und silbern auf den rosa eingefärbten Teil aufembosst.
Den fertigen Hintergrund habe ich auf einer rosafarbenen Katenbasis fixiert und aus beiden Lagen eines der Stitched Rechtecke ausgestanzt. Durch die sowohl innen als auch außen eingestanzten Linien wird auch gleich ein schöner Rahmen mit gestanzt. 

For the background I've colored the upper part of a piece of watercolor paper with pink watercolor, the area under it with a grey-ish brown. Then I've used a fineliner to add the floor by hand. The stars are silver heat embossed onto the pink colored area.
Then I've put the finished background onto a pink notecard and die cut a rectangle from both layers. With the stitches inside and outside the cut lines I've also ended up with a nice frame on both pieces.


Hier ist die süße Ballerina-Maus. Ich habe die Teile aus grauem, pinkem und weißem Cardstock gestanzt und mit Copics ein paar Details auf den Rock gezeichnet. Die Bäckchen sind mit rosafarbener Kreide gemacht, das Gesicht mit Fineliner per Hand aufgemalt. Um die Taille habe ich noch rosafarbenes Band gewickelt und vorne zur Schleife gebunden.

Here's the cute dancing mouse. I've die cut the pieces from grey, pink and white cardstock and used my Copics to add some detail to the tutu. The cheeks are made with pink chalk,  the face was added by hand with a black fineliner. Around the waist I've wrapped some pink ribbon and tied it to a bow on the front of the mouse.

Ich habe Euch ja schon Bewegung angekündigt - bevor ich Euch nun die geöffnete Karte zeige, erst ein kleines Video:

I've already announced some motion in this card - wo before I'm going to share the inside of the card I'll show a little video first: 


Ich habe den inneren Teil des Hintergrundes weiß hinterlegt und passend mit der Ausstanzung innen in die Karte geklebt. Der Rest kam als Rahmen auf die Außenseite. In der Ausstanzung verbirgt sich eine Spinner Card.

I've matted the inner part of the background with white cardstock and glued it to the inside of the card, making the position match with the cut out. The outer part is glued to the outside of the card. Within the frame I've added a spinner element.


So sieht die geöffnete Karte dann aus.

This is the complete opened card.


Um das Garn, das die Maus zum Pirouetten drehen bringt, zu verstecken/fixieren, brauchte ich zwei Mäuse. Die habe ich aufeinander geklebt - und den hinteren Teil auch wie die Maus von hinten dekoriert. Dafür  habe ich hinter die Ausstanzung in den  Schuhen etwas braunen Cardstock als Sohlen geklebt. Außerdem habe ich hier ein kleines Schwänzchen aus Sticktwist aufgeklebt.

To hide the twine that makes the mouse move I've neede two die cut mice. They are stacked on top of each other - and I've decorated the back like the mouse's back. I've put some brown cardstock behind the shoes as soles, and I've also added a little tail here with thicker baker's twine.


Auf der rechten Seite der Karte habe ich noch einenText versteckt - und das im wahrsten Sinne des Wortes. Dafür habe ich einen der Texte der beim Hasen auf Hausdächern Stempel dabei ist in drei Teile geschnitten und so auf den Hintergrund aufgeklebt, dass er bei geschlossener Karte von der Maus verdeckt ist.

Onto the right side of the card I've also added a sentiment. It means "reach for the stars". I've cut the stamped text into three parts and glued them to the background, making sure it's covered by the mouse when the card is closed.


Dienstag, 2. Juni 2020

Es wird lustig!


Hallo Ihr Lieben!
Meine Karte, die ich heute auf dem Stamping-Fairies Blog zeige, ist im wahrsten Sinne des Wortes lustig. Steht ja groß genug drauf, oder?

Hello everyone!
This card, that I'm sharing over at the Stamping-Fairies Blog today, is silly. Because that's what's written on it - lustig is the german word for silly.

Ich fand das Main Squeezer Stempelset von MFT mit all den Zitronen klasse. Nur die Texte passten für mich nicht so toll. Zuerst wollte ich etwas mit "Limonade" oder auch Tequilla machen. Hatte ich doch glatt nicht einen passenden Stempel da! Die sprachen entweder von "limes" oder es passte sonst wie nicht. Da kam mir die Idee, den Spruch "sauer macht lustig" aufzugreifen. Ich muss zugeben, ich dachte immer, der Spruch käme von den lustigen Gesichtern, die die meisten Menschen machen, wenn sie etwas wirklich saures essen. Aber ich habe mal Meister Google gefragt: ursprünglich hieß der Spruch "sauer macht gelüstig", weil saures Essen den Appetit anregt. Im Sprachgebrauch hat sich der Text dann irgendwann gewandelt... So, Deutschstunde abgeschlossen - jetzt wieder zur Karte!
Ich habe hier eine DinLang Karte gemacht. Die sind derzeit ja echt angesagt, bei mir hat es sich aber einfach so ergeben, weil ich die Buchstaben und Zitronen nicht so an den Rand quetschen wollte. 
Mit der Extraordinaire Rectangle Schablone von MFT habe ich den Bereich in der Mitte der Karte ganz leicht mit Bleistift angezeichnet und das Rechteck seitlich verlängert. Dann habe ich die Zitronen und Blätter mit viel Masking in zwei Ecken gestempelt.

I really liked the Main Squeezer stamp set by MFT with all its lemons. I just didn't like the texts that come with it. I would have loved some lemon sayings - like "if life gives you lemon, make lemonade". So I had that in mind and wanted to use the lemons with this saying - or with one about Tequilla. But well, I didn't have a matching one! They were either talking about limes or didn't fit because of something else. So I had the idea of picking the "sauer macht lustig" - sour makes silly -, a german saying. I always thought it comes from the silly faces most people make when they eat something really sour. I asked Mr. Google and guess what - I was wrong. It's a miss"translation" and comes from the fact that sour food/drinks make your apetit bigger. Okay, let's finish this lesson and come back to the card. 
I've made a slime line card here. They are totally up to date but here it was just the better choice since I didn't want to put everything too close to the edges.
I've used the Extraordinaire Recctangle stencil by MFT and a pencil to very lightly draw a rectangle on my card, moving it a bit sideways to make the area larger. Then I've did some masking to stamp the lemons and leafs into two corners.


Dann habe ich die Zitronen und Blätter mit Copics coloriert - und zwar nur innerhalb des aufgezeichneten Rechtecks. Die Motivteile außerhalb des Rechtecks habe ich nicht coloriert.
Dann habe ich die Motive wieder mit meiner Maske abgedeckt und innerhalb des Rahmens ganz leicht Distress Ink Tumbled Glass aufgewischt. Mit derselben Farbe habe ich darüber dann den Marble Background aufgestempelt. So wirkt das Muster dezent und machen den Hintergrund trotzdem interessanter.
In die Mitte habe ich dann das Wort lustig, gestanzt mit dem Impact Alphabet Stanzenset von MFT, aufgeklebt. Ich habe die Buchstaben einmal aus zitronengelbem, einmal aus schwarzem Cardstock ausgestanzt und ein wenig versetzt aufeinander geklebt. Durch den schmalen schwarzen Streifen sind die Buchstaben einfach besser erkenn- und das Wort besser lesbar.

Then I've colored the lemons and leafs with Copics - staying only inside the drawn rectangle. I've left the parts of the images that are outside that rectangle uncolored and white.
Then I've covered the images again with my masks and very lightly added some Distress Ink Tumbled Glass inside the rectangle. Then I've used the same ink pad to stamp the Marble Background by MFT onto the light blue. That way I've ended up with a very subtle background with a visible pattern that just looks more interesting.
In the middle I've added the word "lustig" - silly. I've die cut the letters once from yellow and once from black cardstock with the Impact Alphabet die set by MFT. I've glued the letters on top of each other, just slightly off, and glued them onto the background. The thin black areas just make the letters more visible - and the word better readable. 


Hier sieht man die linke obere Ecke und den Coloration besser. Die klare Linie ist tatsächlich nur durch das Colorieren entstanden..
Hier habe ich mit dem Dymo den Rest des Textes geschrieben und aufgeklebt.
Außerdem kamen noch ein paar grüne Enamel Accents als Deko auf die Karte.

Here you see the top left corner. The crisp line is really only done whith the coloring.
I've written the rest of the text with my Dymo and glued it down to the card.
I've also added a few green Enamel Accents to the card.


Und der Vollständigkeit halber hier auch noch die untere rechte Ecke. 

And just to complete this post here's also a picture of the lower right corner. 

Zum Schluss habe ich den weißen Cardstock schwarz gemattet und auf eine weiße SlimeLine Karte geklebt.

In the end I've matted the decorated cardstock with black cardstock and glued it onto a white slime line card.