Mittwoch, 16. Juni 2021

Ein Sommernachtstraum

 
Hallo Ihr Lieben!
Die Sommersonnwende naht, Gartenparties sind endlich wieder möglich - jetzt müsste nur der Sommer noch ein wenig zulegen. Aber für einen Sommernachtstraum reicht es allemal. Und dieses Thema habe ich heute auf dieser Karte verarbeitet.
 
Hello everyone!
Summer solistice will be here soon, we're finally allowed to have BBQs in the garden again - now the only thing that needs to speed up a bit is summer itself. But it's still enough for a summer night's dream. And this is the theme that I used for today's card.
 
Ich habe hier ein Stück schwarzen Cardstock ein wenig kleiner als meine Slimeline Karte zugeschnitten und mit silberner Metallic-Wasserfarbe ein paar Sterne aufgespritzt.
Dann habe ich den Rahmen aus dem Stanzenset DinLang 3er Quadrate aus hellgrauem Cardstock gestanzt und als Rahmen auf den schwarzen Cardstock geklebt.
 
Here I've cut a piece of black cardstock slightly smaller than my slimline card base and spritzed some silver metallic watercolor over it as stars.
Then I've die cut a inside scalloped slimline frame from light grey cardstock and glued it on top of the black cardstock.
 

 Für den Text habe ich das Wort Sommer aus dem Stanzenset Jahreszeiten aus weißem und aus hellgrauem Cardstock gestanzt und leicht versetzt übereinander geklebt. Dann habe ich den Text durch ein aus einzelnen Buchstaben zusammengesetztes -nachtstraum ergänt. Dafür habe ich die Buchstaben mit dem Stanzenset ABC mit Rand gestanzt - die äußeren Linien aus grauem Cardstock, die Innenteile der Buchstaben aus gelb, weiß und grau gestreiftem Designpapier. 
Unter das lange Wort, das gerade so quer über die Slimline Card gepasst hat, habev ich noch ein "grillen und chillen" aus dem Stempelset Grillmeister geklebt.
Die Sterne sind aus dem neuen Stanzenset Büttenrand Bordüren und Wimpel.

For the text I've die cut the word summer once from white and once from grey cardstock and glued them on top of each other a bit off to have a white shadow under the grey word. Then I finished the word with a die cut "night's dream". I've die cut the outlines of the cardstock from grey cardstock and the inner parts from a grey, yellow and white striped patterned paper. 
Under this long word, that just fit across the slimline card, I glued a stamped "grill and chill".
For decorations I added a few die cut stars.


Passend zur Sommernachtstraum-Gartenparty habe ich oben über die Karte die neue Lichterkette aus dem gleichnamigen Stanzenset aufgehängt. 
Das Kabel sowie die Oberteile der Lichterkette sind aus metallic-silbernem Cardstock gestanzt, die Lämpchen aus gelbem Cardstock. Ich bin nicht so der Typ, der auf bunte Lichterketten steht, deshalb habe ich mich nur für gelb entschieden. Die Lämpchen habe ich dick mit Glossy Accents überzogen. Unter den Lämpchen habe ich jeweils schimmrige Kreide aufgetragen, die als Schein der Lämpchen dienen.
Und zwischen die Lämpchen habe ich noch kleine dreieckige Wimple aus dem Stanzenset Büttenrand Bordüren und Wimpel aufgehängt, die ich wieder aus dem gelb, weiß und grau gestreiften Designpapier gestanzt habe. 

Matching the summer garden party theme I've hung up some party lights across the top of the card.
The string and the top of the lights are die cut from silver metallic cardstock, the lights from yellow cardstock. I don't like those string of lights with lots of different colors so I decided to only cut yellow lights. They are covered with a thick layer of Glossy Accents. Under the lights I've added some shimmery chalk as a halo of the lights.
And between the lights I've hung up some triangle shaped banners that I've cut from the yellow, white and grey patterned paper again.

Dienstag, 15. Juni 2021

I call you home

 
Hallo Ihr Lieben!
Auf dem Stamping-Fairies Blog zeige ich Euch heute diese Karte mit dem süßen Travel Plans Stempelset von MFT. Zumindest auf diese Weise kann man sein Fernweh ein wenig verarbeiten. 

Hello everyone!
Over at the Stamping-Fairies Blog I am sharing this card with the cute Travel Plans stamp set by MFT today. At least that way I can do something like traveling and going places.

Ich wollte einer Karte einen etwas nostalgischen Look verpassen, deshalb habe ich mit gedeckteren Farben gearbeitet. 
Ein Stück Cardstock habe ich im oberen Bereich mit Disterss Oxide Speckled Egg, im unteren Bereich mit Hickory Smoke gewischt. Jeweils so, dass die Farbe zur oberen bzw. unteren Kante hin ins Weiß übergeht. 
Den Hintergrund habe ich schwarz gemattet und auf einen weißen Kartenrohling geklebt.

I wanted to give my card a slightly nostalgic look so I used muted colors for it.
I inked up the upper part of a piece of white cardstock with Distress Ink Speckled Egg and the lower part with Hickory Smoke, letting the ink fade into the white at the top and bottom edges. 
I matted the background with black cardstock and glued it onto a white note card. 


Für das Motiv habe ich die Häuser aus dem Stempelset Travel Plans mit kraftbrauner Tinte auf kraftbaunen Cardstock gestempelt, so dass sie eine Häuserzeile bilden. Dann habe ich sie ausgeschnitten und nur die Hausdächer mit den W-Tönen der Copics ein ganz klein wenig coloiert. 
Die Straßenlaterne, den Koffer und den süßen Bären habe ich ebenfalls mti Copics coloriert, ausgeschnitten und auf die Karte geklebt..
Direkt auf den Hintergrund habe ich dann einen der Texte aus dem selben Stempelstet mit schwarzer Tinte vor den Bären gestempelt und dabei das wort home im Stempel durch ein gestanztes Wort ersetzt. Da ich keine Home-Stanze habe, habe ich dafür das Handletter Alphabet von CraftEmotions benutzt, die Buchstaben aus schwarzem Cardstock gestanzt und aufgeklebt. Als Deko habe ich noch zwei keine türkisfarbene Herzen mit aufgeklebt, die ich noch von einem anderen Projekt übrig hatte.

For the scene I stamped the houses from the Travel Plans stamp set in a row onto craft colored cardstock using craft colored ink and built a row of houses. Then I cut them out and only colored the roofs a tad bit with the W tones of my Copics.
The street lamp, the suitcase and the cute bear are also colored with Copics, cut out and glued onto the card.
Directly onto the background I stamped one of the sayings from the same stam pset next to the bear with black ink. I replaced the word home in the stamp with a die cut one. Since I don't have a home die I used the Handletter Alphabet die set by CraftEmotions to cut the individual letters from black cardstock and then glued them onto the card. As embellishments I added two tiny turquoise hearts to the die cut word - I had those left over from a different project and thought they might fit good.

Sonntag, 13. Juni 2021

Elefanten zum Geburtstag

 
Hallo Ihr Lieben!
Mein Schwiegervater feiert bald Geburtstag - klar, dass ich da eine besondere Karte für ihn gebastelt habe. 

Hello everyone!
My father in law is celebrating his birthday soon, and of course I made him a special card.

Die Idee zu dieser interaktiven Karte stammt nicht von mir. Ich hatte Urlaub und habe etwas unmotiviert auf YouTube herumgescrollt - und bin dann auf einen Kanal von "Der Stempler" gestoßen. Und dort gab es - neben viele anderen tollen Videos - ein Tutorial für diese Karte. Das besondere daran zeige ich Euch gleich. 
Für die Karte habe ich ein Stück weißen Cardstock mit der Cloud Stencil von MFT und Distress Oxide Salvaged Patina gewischt. Dann habe ich silberne Metallic-Watercolor darüber gespritzt. 
Im unteren Bereich der Karte habe ich einen grün gematteten Streifen weißen Cardstocks mit 3D Tape quer über die Karte geklebt. Darauf habe ich ein "wir gratulieren zum Geburtstag" aufgestempelt. Das wir und das zum Geburtstag ist mit "fertigen" Stempeln von SU gestempelt, das gratulieren habe ich mit einem Alphabet von SU zusammengestempelt. 
Neben dem Text ist noch ein dunkeltürkisfarbenes Herz sowie drei Glitzersteine aufgebracht.
Der Hintergrund ist dunkeltürkis gemattet, aus demselben Cardstock habe ich auch den Tab gestanzt, der oben an der Karte angebracht ist. Den brauchen wir gleich noch.
Dann habe ich alles auf einen weißen Kartenrohling geklebt.

The idea for this interactive card isn't my own one. I had a few days off and was scrolling through the playlists in YouTube just for something to do - and then I found a channeld called "Der Stempeler", which means "the stamper". And besides a bunch of other great videos I also came across a tutorial for this type of card. You'll see the special effect in just a bit.
For the card I inked up a piece of white carstock with Distress Oxide Salvage Patina, using the Cloud Stencil by MFT to add some clouds. Then I flicked some silber metallic watercolor paint over the finished background.
In the lower area of the card I glue a strip of white cardstock, matted green, across the card with foam tape. The text means "we're sending our congratulations for your birthday". I used a stamp set by SU for the typed words and put the scripty one together with an alphabet stamp set, also by SU.
Next to the text I glued down a little heart, punched from dark turquoise cardstock, and three clear rhinestones. 
The background is matted with a dark turquoise cardstock and I used the same color to punch the tab that is attached to the top edge. We'll need this soon.
Then I glued everything onto a white note card.


Als Motive habe ich mich für die süßen Elefanten aus dem Stempelset Fly with Me von MamaElephant entschieden. Mit ihren Ballons passen sie nicht nur super zum Thema Geburtstag, sondern auch zu dieser Karte. Aus dem selben Set sind die Wolken, die ich hinter den Elefannten angeordnet habe. Sie sehen ein wenig wirr aus, aber das muss in dem Fall so. 
Die Motive sind mit Copics coloriert.

For the images I picked those cute elephants with their balloons from the Fly with Me stamp set by MamaElephant. With their balloons they not only are perfect for a birthday card but also for this type of card. The clouds, that I arranged around the elephants, are from the same stamp set. They look a bit messy on this card, but that's what I needed them to be.
The images are colored with Copics.

Und hier seht Ihr nun endlich das Besondere an dieser Karte:

And here you finally get to see the special effect on this card:


Zieht man oben am Tab, fliegen die Elephanten an den Ballons in alle Richtungen davon und geben den Blick frei auf einen großen Stapel Geburtstagsgeschenke. Deswegen musste ich auch so viele Wolken mit einbauen - die Geschenke sollten ja erstmal nicht sichtbar sein. Und mit den Wolken unter den Geschenken ist einTeil des Mechanismus verdeckt.

When you pull the tab the elephants fly away in all directions and give free sight on a big pile of birthday presents. That's also why I added so many clouds - the gifts should be hidden first. And with the clouds under the gifts a part of the mechanism is covered.


Und hier habe ich noch ein Bild der Karte mit "beiseite gerückten" Elefanten für Euch. Der Geschenkestampel ist aus dem Stempelset Snow Globe Bitties von MamaElephant, ebenfalls mit Copics coloriert und dann habe ich noch ein paar Details mit einem weißen Gelpen aufgemalt. 
Oben am Tab habe ich ein weitere Herz sowie ein kleines Stückchen Band angebracht. 

And here I have a picture with the elephants flown aside. The pile of gifts is from the Snow Globe Bitties stamp set by MamaElephant, also colored with Copics, then I added a few details with a white gel pen. 
To the tab I glued another heart and added a piece of white string.

Freitag, 11. Juni 2021

LawnFawnatics Challenge #102

 
Hallo Ihr Lieben!
Heute zeige ich Euch meine Karte, die ich für die LawnFawnatics Challenge #102 gemacht habe. Das Thema lautet "all things ocean". Ach, wie gerne wäre ich jetzt am Strand!

Hello everyone!
Today I am sharing the card I made for the LawnFawnatics challenge #102. The theme is "all things ocean". Oh, how I'd love to be at a beach right now!

Aber ich zeige Euch hier nicht nur diese Karte. Ist es Euch schon mal passiert, dass Ihr eine Karte gemacht habt und dann habt ich Euch selbst gescrapliftet - direkt nachdem die erste Karte fertig war? Ja, so ging es mir hier. Ich hatte eigentlich eine Karte für einen der 10K Celebrations FB Contests gemacht. Das Thema dort war "use your oldest stamp" - natürlich von LF. Ich muss gestehen, dass ich nicht mehr genau weiß, welches mein allererstes Set von LF war. Ich kann mich daran erinnern, dass es sommerlich war. Und weil ich mich kenne, habe ich damals bestimmt nicht nur ein Set geordert, sondern mehrere. Also habe ich eine Karte mit der Ananas aus dem Aloha Stempelset gemacht. Und dann fand ich heraus, dass das Thema für die Challenge #102 eben rund ums Thema Meer ist - und meine Karte hätte auch dort perfekt gepasst. Eine Karte für zwei Challenges geht natürlich nicht. Und da ich eh noch alles auf dem Tisch ausgebreitet hatte, habe ich meine Karte zumindest in Teilen eben einfach nochmal gemacht. Nur Motiv und Co sind anders. Ja, so kann es gehen...

But here I'm not only sharing one card. Did it ever happen to you that you made a card and then scrapliftet yourself - right after finishing the first one? Well, that's what happened to me here. I had made a card for one of the 10K Celebrations FB contests. The theme was "use your oldest stamp". I sadly have to admit that I'm not 100 % sure which was my very first LF stamp. I remember ordering something summer-ish - and since I know myself I'm pretty sure it wasn't just one set I ordered. So I made a card using the ananas from the Aloha stamp set. And then I found out that the theme for challenge #102 was about oceans and beaches. The card I just finished would fit there perfectly as well. Of course entering the same card into two contests is a no-go. And since I still had everything left on my table I kind of re-did the same card, just changing images and co. Well, guess things like this happen every now and then...

Nun aber erstmal zur Challenge-Karte. Ich habe hier den Sunburst Backdrop als Hintergrund benutzt und ihn mit Distress Oxide Squeezed Lemonade, Scattered Straw, Tumbled Glass und Broken China gewischt. Nur auf den Bereich der Sonne - und ein klein wenig drum herum - habe ich goldene Schimmer-Wasserfarbe aufgespritzt.
Die Palmen sind mit dem Tropical Backdrop gemacht. Ich habe nur die beiden Palmen und hier den Boden darunter verwendet. Er ist aus hellbraunem Cardstock gestanzt. Dann habe ich die dazugehörigen Stämme und das Oberteil der Palmen noch ein weiteres Mal aus grünem bzw. braunem Cardstock gestanzt, mit Copics schattiert und auf die Palmen des Hintergrundes aufgeklebt.
Rundherum kam einer der Stitched Rectangle Frames, gestanzt aus dunkel-türkisfarbenem Cardstock.
Oben am Himmel habe ich eine Wolke - das Innere eine der Simple Puffy Cloud Frames - aufgeklebt und eine der Möwen aus dem Stempelset Life is Good dreimal aufgestempelt.

Well, but first more about this card. Here I've die cut the Sunburst Backdrop from white cardstock and inked it up with Distress Oxide Squeezed Lemonade, Scattered Straw, Tumbled Glass and Broken China. Only onto the sun and the are close to it I've spritzed some golden metallic watercolor.
The palm trees are die cut with the Tropical Backdrop die. I only used the two palms on the left and the sandy ground here. I've die cut it from light brown cardstock. Then I've die cut the trunks and top of the palm trees from brown and green cardstock, added some shading with my Copics and glued them on top of the background.
Around the scene I've glued one of the Stitched Rectangle Frames, die cut from dark turquoise cardstock. 
To the sky I glued a cloud - the left over inner piece from one of the Simple Puffy Cloud Frames - and stamped one of the doves from the Life is Good stamp set three times into the sky.


Zwischen die Palmen und den Sonnenhintergrund habe ich eine Lage Wellen, gemacht mit einer der Stitched Waves Border Stanzen und türkisfarbenem Cardstock. Das Glitzern auf den Wellen habe ich mit einem weißen Gelpen aufgetupft. 
Auf den Wellen schwimmt noch das Segelschiff aus dem Stempelset Lovable Legends. 
Der Text ist aus dem Stempelset Mermaid for You. Ich habe ihn weiß auf schwarzen Cardstock embosst und den Streifen über die Wolke auf den Himmel geklebt.
Die Sandburg ist aus dem Set Life is Good. Ich habe sie mit dem Fadeout Stempelkissen von Ink On 3 auf hellbraunen Cardstock gestempelt und dann mit Copics in kleinen Punkten coloriert, so dass es wie eine echte Sandburg aussieht. Genauso habe ich auch das Smile "geschrieben" und hier einen der Texte aus dem Scripty Bubbles Sentiments Set verwendet. Ich wollte, dass es so aussieht, als hätte es jemand in den Sand geschrieben. Auch die Fußabdrücke im Sand, gemacht mit einem Stempel aus dem Set Lovable Legends, sind auf diese Weise gemacht.
Den sandigen Boden habe ich mit einer der Stanzen aus dem Set Palm Tree Border aus hellbraunem Cardstock gestanzt und mit den Sandy Beach Accents die Hügel hineingeschnitten. Dann habe ich von außen ein wenig Distress Ink Gathered Twigs aufgewischt und anschließend Distress Ink Gathered Twigs, Vintage Photo und mit Wasser verdünnte weiße Acrylfarbe darübergespritzt.
Hinter die Hügel im Sand habe ich die Sandburg sowie einen Wasserball aus dem Set On the Beach und den Sandeimer aus dem Set Life is Good gesteckt. Also Deko kamen noch drei Muscheln aus den Sets On the Beach und Mermaid for You dazu. 

Between the palm trees and the background I added a layer of waves, die cut with one of the Stitched Waves Border dies from turquoise cardstock. The glistening on the waves I did by making fine dots with a white gel pen. 
Behind the waves I added the sailboat from the Lovable Legends stamp set.
The text ist from the Mermaid for You stamp set. I've white heat embossed it onto black cardstock and then glued the strip on top of the cloud across the sky.
The sand castle is from the Life is Good set. I've stamped it with the Fadeout ink pad by Ink On 3 onto light brown cardstock and then colored it with little dots with my Copics to make it look like made from sand. I did the smile texte the same way, using a stamp from the Scripty Bubbles set. I wanted it to look like someone wrote it in the sand. Also the foot prints, made with one of the stamps from the Lovable Legends set, is made this way.
I've die cut the sandy ground with one of the dies from the Palm Tree Border die set, cutting it from light brown cardstock, and then added the small hills with the Sandy Beach Accents dies. Then I inked up the cardstock with a bit of Distress Ink Gathered Twigs and then spritzed some Distress Ink Gathered Twigs, Vintage Photo and also some white acrylic paint over the cardstock.
Behind the hills in the sand I've stuck the sand castle and added the water ball from the On the Beach stamp set and the sand bucket from the Life is Good set. For decorations I added three shells from the sets On the Beach and Mermaid for You.

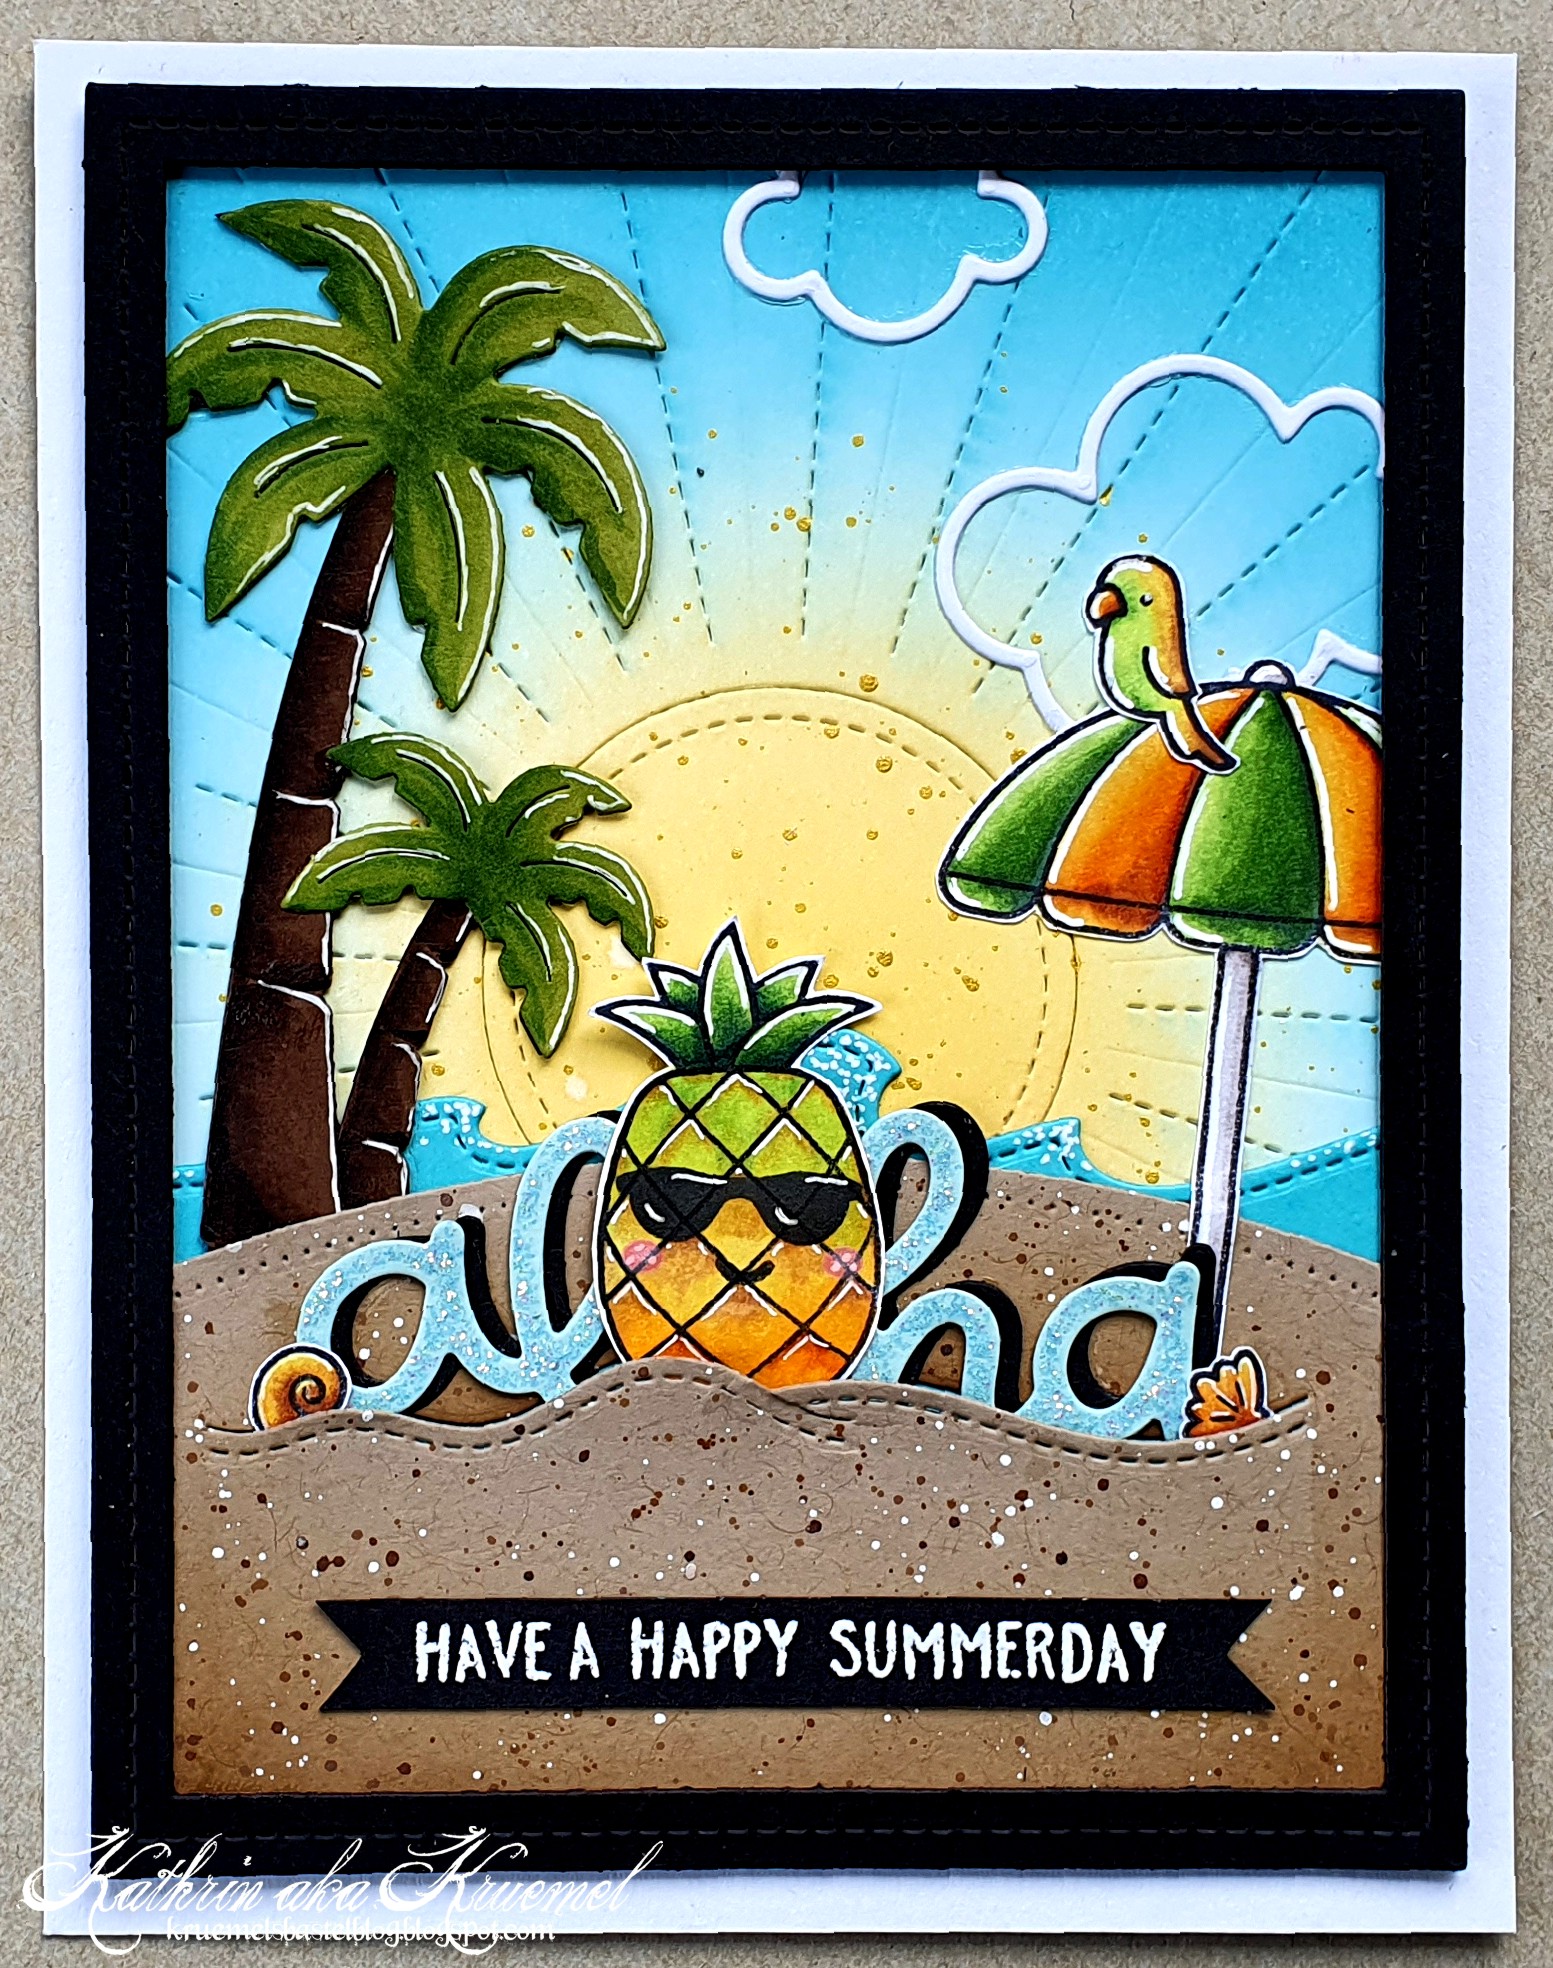
So, das war also meine Karte für die Challenge mit dem Thema "all things ocean". Und hier kommt mein scraplift - bzw. in diesem Fall das "Original", denn diese Karte hatte ich zuerst gemacht:

So, that was my card for the "all things ocean" challenge. And here's my own scraplift - or in this case the "original" since this was the card I'd made first:


Die Ähnlichkeit ist nicht zu leugnen, oder?
Der Sonnenhintergrund ist identisch. Hier habe ich statt des Inneren die Rahmen der Simple Puffy Cloud Frames benutzt - deswegen hatte ich auch noch die Füllung der größeren Wolke für Karte 2 übrig. 
Ich habe eine andere Wellenstanze aus demselben Set sowie andersfarbigen Cardstock für die Palmenblätter benutzt. Auch habe ich hier nur die Palmen, ohne den Strand darunter, verwendet. Der Rahmen ist diesmal aus schwarzem Cardstock gestanzt.
Der Text ist aus einzelnen Stempeln aus dem Stempelset On the Beach zusammengestempelt. Er ist weiß auf schwarzen Cardstock embosst und quer unten über den Sand geklebt.

The similarity is really clear.
I did the background identically. Instead of the inner parts of the Simple Puffy Cloud Frames I used the outlines - and that's also why I had the inner part of the bigger cloud already cut on my table and used it for the other card.
I used a different cloud border die from the same set and a different tone of green for the palm tree tops. I also did only use the palm trees here, without the beachy ground. And the frame on this card is die cut from black cardstock.
The sentiment is put together from different stamps from the On the Beach stamp set. I've white heat embossed it onto black cardstock and glued the cardstock strip across the sandy ground.


Hier habe ich die Ananas aus dem Stempelset Aloha mit Copics coloriert, die Sonnenbrille aufgestempelt und dann mit Distress Oxide Worn Lipstick noch die Bäckchen darüber gestempelt.
Das Wort Aloha habe ich mit der Scripty Aloha Stanze zweimal ausgestanzt - einmal aus schwarzem und einmal aus helltürkisfarbenem Cardstock. Ich habe sie ein klein wenig versetzt aufeinander geklebt, die türkisfarbene Lage mit Stickles Unicorn überzogen und dann hinter die Hügel im Sand gesteckt. Dann habe ich die Ananas so aufgeklebt, dass sie das O im Wort Aloha bildet. 
Der Sonnenschirm, den ich hinter das Wort geklebt habe, ist aus dem Stempelset On the Beach - und oben drauf sitzt der Papagei aus dem Set Ahoy, Matey. Zwei Muscheln durften auch mit auf die Karte. Eines dieser drei Sets war definitiv mein erstes LF Set, also ist die Aufgabe erfüllt. 
Und nun ist es an Euch zu entscheiden, welche Karte Euch besser gefällt - ich glaube, ich mag sie beide!

Here I colored the ananas from the Aloha stamp set with Copics, stamped the sun glasses on top and then added the cheeks with Distress Oxide Worn Lipstick. 
The word aloha is die cut with the Scripty Aloha die. I've die cut it twice, once from black and once from light turquoise cardstock, glued them on top of each other just a bit off and covered the turquoise one with Stickles Unicorn. Then I tucked the word behind the hills in the sand and glued the ananas on top so it creates the O from the word aloha.
The umbrella, that I glued behind the word, is from the On the Beach set - and on top the parrot from the Ahoy, Matey stamp set just sat down. I also added two shells here. One of those three sets was for sure my very first LF set. 
And now it's up to you to decide which card you like better. I guess I like them both.

Donnerstag, 10. Juni 2021

Stay Awesome!

 
Hallo Ihr Lieben!
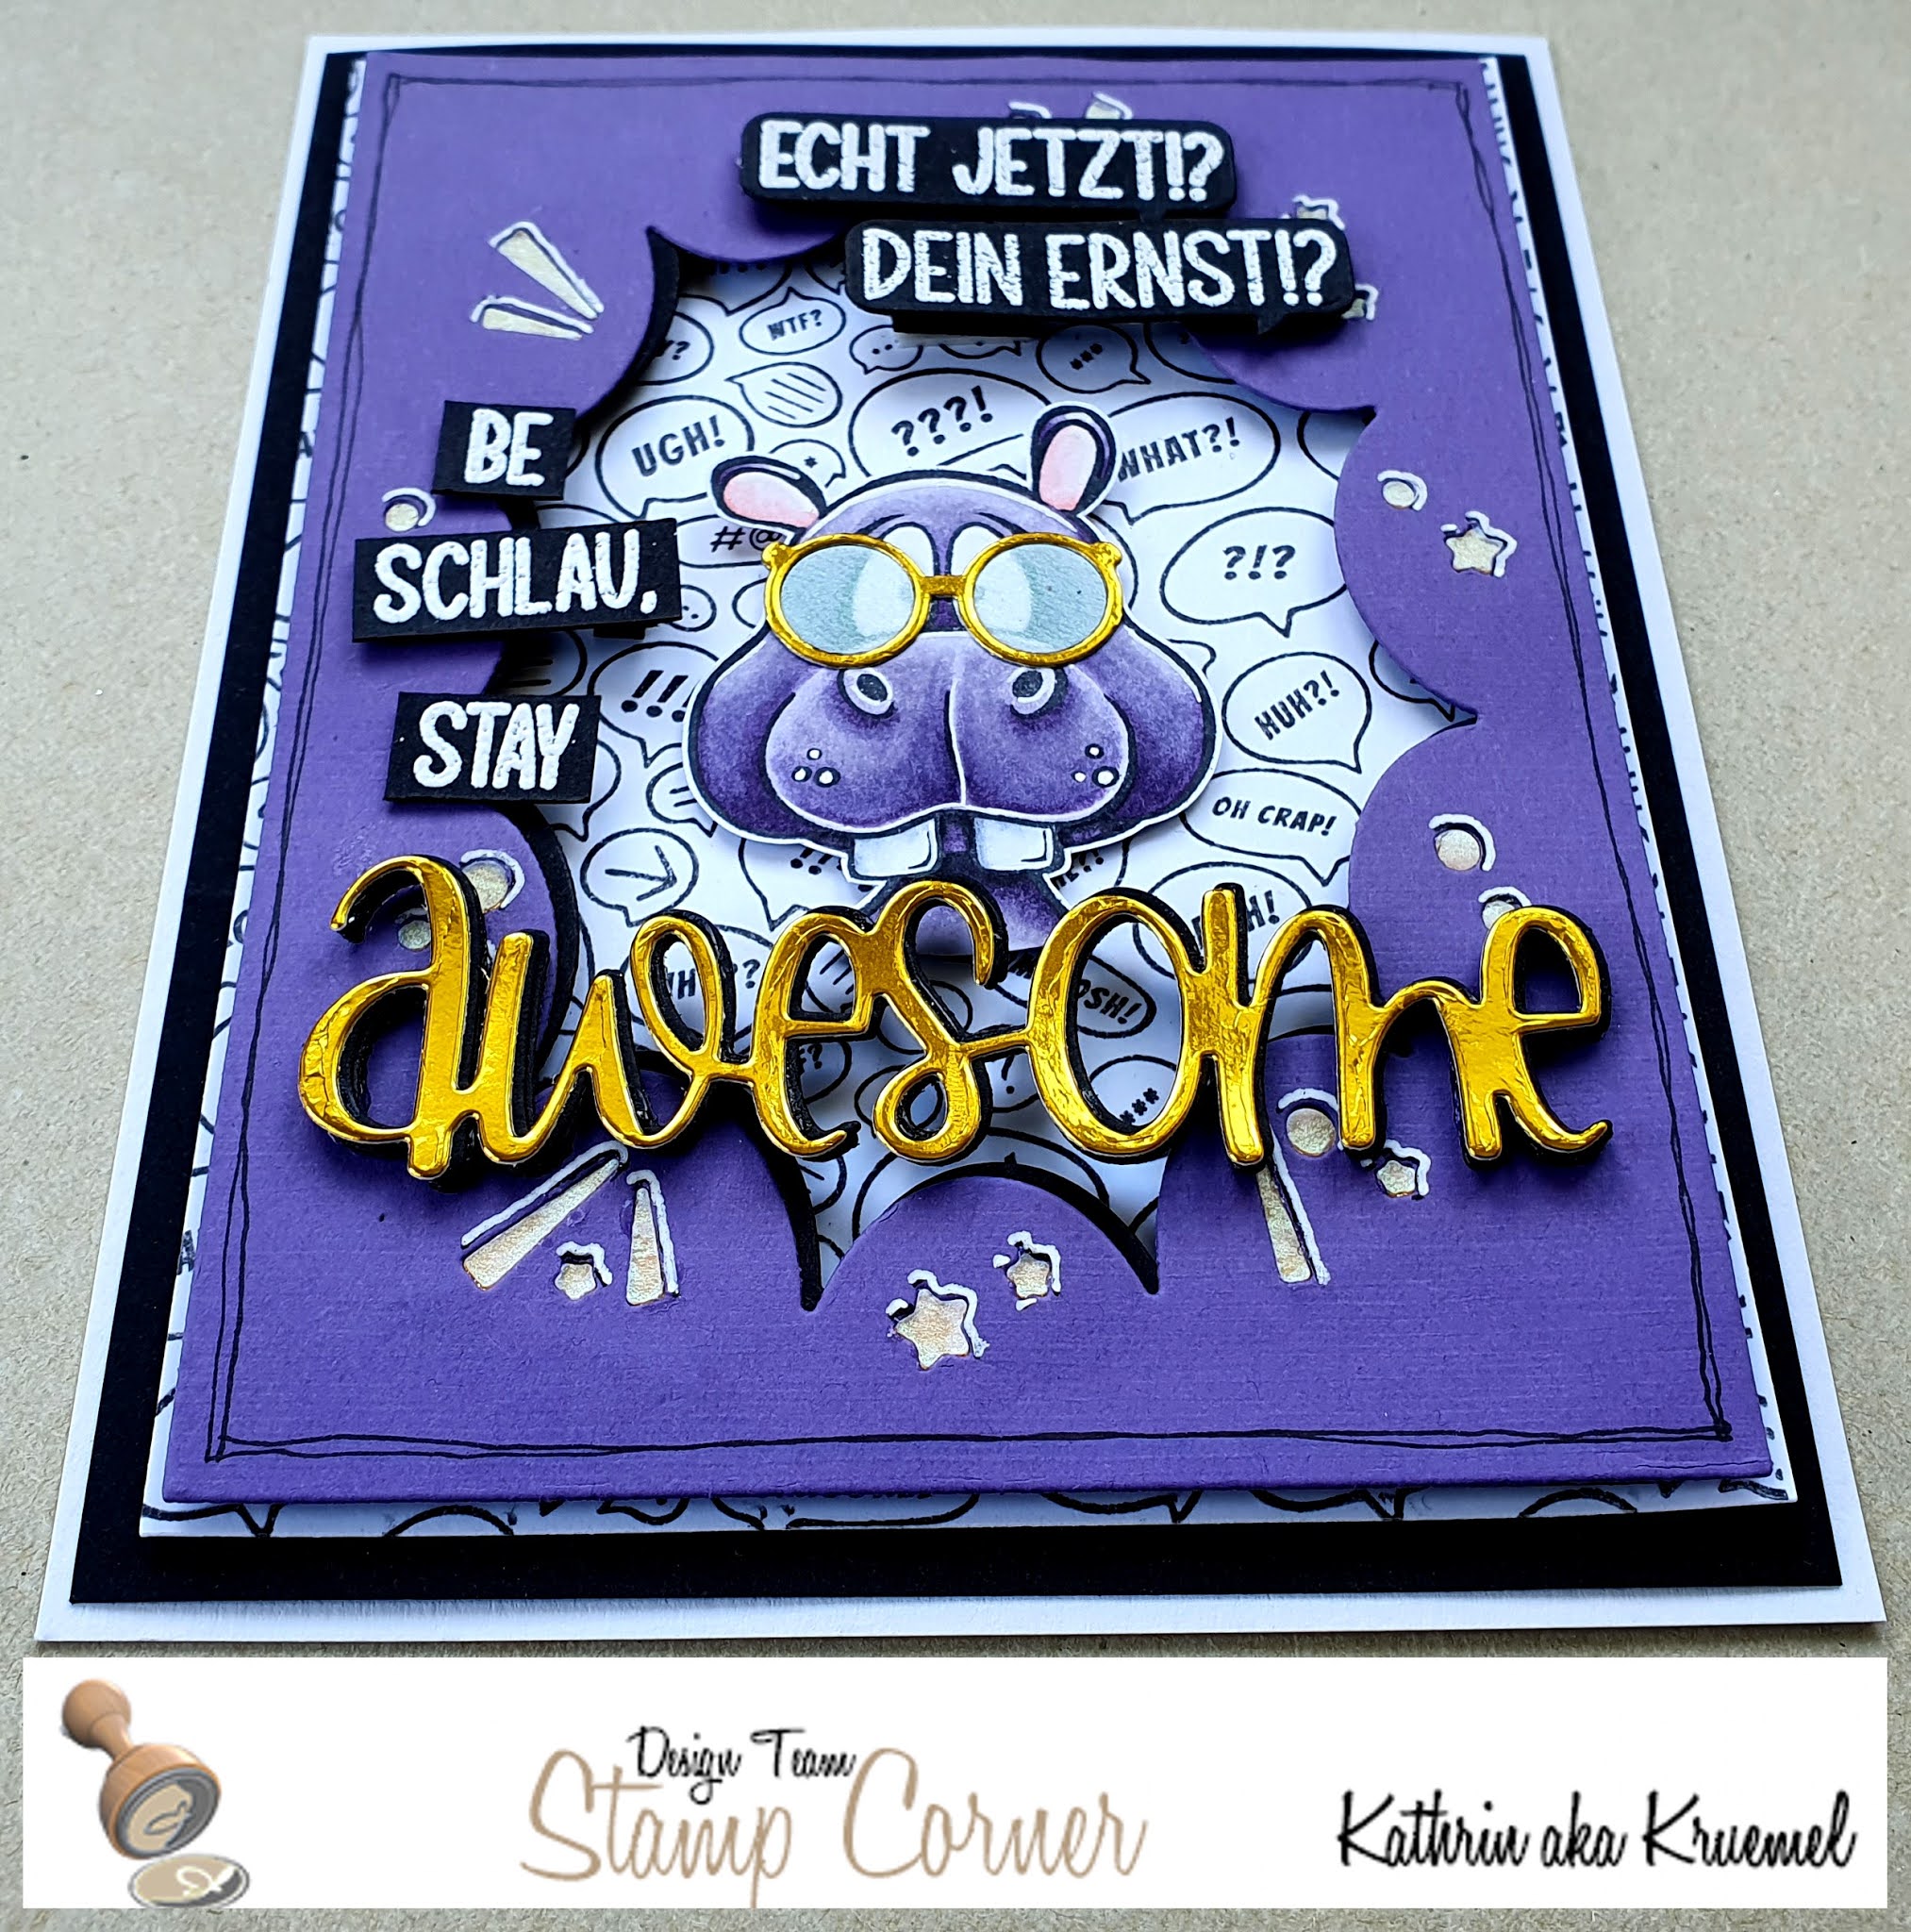
Auf dem Blog von Stampcorner zeige ich heute eine weitere Karte mit dem Hippo aus dem genialen Stempelset designed von Oma Plott. Ich bin verliebt in den kleinen Kerl. 

Hello everyone!
Over at the Stampcorner Blog I am sharing another card using the cute hippo from the great stamp set designed by OmaPlott today. I am in love with this little guy!

Meine Karte ist recht lila-lastig - eine Farbe, die ich sonst quasi nur zu Halloween nutze. Aber ich wollte den Hippo mal in einer anderen Farbe als Grau colorieren, und da bot sich das Lila an. Und ich finde ihn klasse so!
Für den Hintergrund habe ich erst den WTF-Background von WhimsyStamps schwarz auf weißen Cardstock gestempelt. Darüber kam ein Overlay, das ich mit der Comic Burst Stanze von WhimsyStamps gemacht habe. Ich habe es einmal aus lilafarbenem Cardstock und einmal aus schwarzem Cardstock gestanzt. Hinter die kleinen Ausstanzungen des lilafarbenen Aufleger hatte ich erst goldenen Spiegelcardstock geklebt, das war mir aber dann doch zu viel. Also habe ich mit der Stanze die Teile nochmal aus dem irisierenden Vellum von LawnFawn ausgestanzt und in die Ausstanzungen, auf den goldenen Spiegelcardstock, geklebt. Dannn habe ich den schwarzen Aufleger leicht versetzt hinter den lilafarbenen geklebt und die überstehenden Ränder weggeschnitten.
Dann habe ich den Aufleger mit 3D Tape auf den gestempelten Hintegrund geklebt.

My card is pretty purpl-ish - a color I nearly only use for Halloween crafts. But I wanted to color the hippo in a different color than grey and purple seemed perfect. And I like him that way!
For the background I've stamped the WTF-Background by WhimsyStamps with black ink onto a piece of white cardstock. Then I've die cut the Comic Burst die once from purple and once from black cardstock. I first had put some golden mirror cardstock behind the small cut outs in the overlay but that was a bit too much. So I've die cut those small pieces again from the iridescent vellum by LawnFawn and glued them on top of the golden mirror cardstock. Then I glued the black die cut a bit off behind the purple one and cut off the black parts that were visible around the purple.
Then I glued the overlay on top of the stamped background using dimenstionals. 

Den süßen Hippo habe ich mit Copics coloriert. Und um ihm einen besonderen Touch zu geben, habe ich eine der Brillen aus dem Glasses Stanzenset von CCDesigns aus goldenem Spiegelcardstock gestanzt und auf de Hippo aufgeklebt. Die Brillenbügel habe ich einfach weggeschnitten. Außerdem habe ich die Brille noch einmal aus dem irisierenden Vellum von LawnFawn gestantz und nur die Gläser in die Brille eingeklebt. Ich finde, das gibt einen genialen Touch. 
Die Texte sind alle ebenfalls aus dem Stempelset von Oma Plott. Ich habe sie mit weißem Embossingpulver auf schwarzen Cardstock embosst und ausgeschnitten. Für die beiden Texte rechts oben auf der Karte habe ich eine Stanze aus dem Let's Chat Stanzenset von MamaElephant benutzt, dann habe ich sie ganz nah aneinander geklebt.
Bei dem Text links habe ich das Wort "dumm", das eigentlich diesen Text ergänzt, durch ein gestanztes awesome, gemacht mit der Awesome Word Die von WhimsyStamps, ersetzt. Dafür habe ich das Wort ein paar Mal aus schwarzem Cardstock gestanzt und aufeinander geklebt.  Als oberste Lage kam dann ein aus goldenem Spiegelcardstock gestanztes Wort, das ich ein wenig nach links unten versetzt aufgeklebt habe. Dann habe ich es quer über die Karte direkt unter dem Hippo auf die Karte aufgeklebt.

The cute hippo is colored with Copics. And to add a special touch I've die cut one of the glasses from the Glasses die set by CCDesgins from golden mirror cardstock and glued it onto the hippo's nose. I just cut off the handles. I also die cut those glasses again from the iridescent vellum by LawnFawn and only glued the inner parts of the glasses back in place of the golden ones. I think, that makes these even more special. 
The text means "be smart, stay awesome" - and the hippo is saying "What? You're serious?". I've white heat embossed the text onto black cardstock and used one of the speech bubbles dies from the Let's Chat die set by MamaElephant to cut out the two that I glued to the top right of the card. 
The text on the left originally goes like "be smart, stay dumb". But I replaced the dumb with a die cut awesome. I used the Awesome Word die by WhimsyStamps to die cut the words a few times from black cardstock, then I stacked those on top of each other. As the top layer I've die cut it once from golden mirror cardstock and glued it on top of the stacked black ones, putting it a bit to the bottom left to end up with a golden word with a black shadow. Then I glued the word across the card just right under the hippo. 


Und hier habe ich noch ein weiteres Bild, auf dem man den goldenen Spiegelcardstock besser erkennen kann. So könnt Ihr die komplette Karte einmal so sehen, wie sie wirklich ist.

And here I've taken another picture where you can see the golden mirror cardstock better. Now you can see the card like it really is.

Mittwoch, 9. Juni 2021

Ja ist denn schon Halloween?

 
Hallo Ihr Lieben!
Halloween? Nein, zum Glück noch nicht. Das würde ja bedeuten, dass der Sommer vorbei wäre, bevor er richtig angefangen hat! Aber basteltechnisch sind wir unserer Zeit ja gerne ein wenig voraus. Und da es im Juni-Release von JM-Creation auch Halloween-Stanzen gibt, poste ich heute eben mal ein Halloweenprojekt im Juni. 

Hello everyone!
Is it Halloween already? Well, no, luckily not. That would mean summer is over before it really started! But we crafters are always a little ahead of time. And since there are some Halloween dies included in the june release by JM-Creation I'm sharing a Halloween project in june.

Hier habe ich eine kleine Box gestaltet. Für die Box an sich habe ich die neu überarbeitete Universalschachtel verwendet. Eigentlich hat sie auf jeder Seite drei Quadrate, die man dann super praktisch auch an Rundungen anpassen kann. Ich habe einfach zwei der Quadrate weggeschnitten und so eine längliche, aber recht niedrige Box erhalten. Perfekt in der Größe für die beiden Lutscher mit den gruseligen Stielen. Ich bunker mir genau für solche Momente immer ein oder zwei Süßigkeiten zu jeder Feierlichkeit. ;)

Here I made a little box. I used the re-done universal box die here, its design was changed a bit to make it even more versatile. It has one loner are with three squares on both sides so you can also make it fit a rounded shape. I simply cut off two of the squares and now ended up with a long but low box. It was perfect in size for the two suckers with the creepy sticks. For crafty projects like this - out of their time - I always keep a few candies for each festivity. ;)


Die Boo-Stanze und die Spinne sind jeweils aus dem Juni-Release. Ich habe das Boo einmal aus scharzem Cardstock, einmal aus orangefarbenem foliertem Cardstock gestanzt und leicht versetzt aufeinander geklebt. An das hintere O habe ich dann die Spinne geklebt. Die ist aus schwarzem Glitzercardstock gestanzt und die Augen habe ich durch kleine Wackelaugen ersetzt.
Dann habe ich das Wort an einen der Lutscherstiele geklebt, so dass eine der Gruselhände das Wort in der Hand hält. 
Die beiden Lutscher habe ich in die Box gesteckt und mit rotem "Frizzelpapier" drumherum fixiert, so dass sie nicht umfallen. 

The Boo die and the spider are from the june release. I've die cut the word once from black cardstock and once from a orange foiled cardstock and then stacked them just a bit of to end up with a black shadow behind the orange word. To the second O I've glued the little spider. It's die cut from black and silver glitter cardstock and glued two small googly eyes onto the cut out eyes.
Then I glued the word to one of the hands so it looks like the hand is holding it up.
I've put both suckers into the box and put seom red "frizzy paper strips" around them to keep them in their positions.


Vorne auf der Box habe ich eine Grabszene gesetzt - es sollte so aussehen, als kämen die Hände aus einem Grab. 
Direkt auf die Box, für deren Seitenteile ich einfach zwei Rechtecke zugeschnitten habe, habe ich den Gartenzaun, gestanzt aus braunem Cardstock, geklebt. Den hatte ich noch vom Projekt von letzter Woche auf dem Tisch, denn ich war mir erst nicht sicher, welche Zaunfarbe ich dort verwenden wollte. Also habe ich den übrig gebliebenen hier verarbeitet. Ich gebe zu, viel sieht man von ihm nicht.
Vor den Zaun habe ich einen Grabstein gesetzt. Dafür habe ich den zweitkleinsten der Tags 2a aus grauem Cardstock gestanzt. Durch den gestrichelten Rand hat der Tag schon fast ein wenig was von Grabstein. Ich habe die Fledermaus und den Text aus dem Happy Halloween Stempelset auf den Grabstein gestempelt und mit einem schwarzen Fineliner ein paar Risse aufgemalt. Dann habe ich ihn etwas schief auf den Zaun geklebt und schon sieht er aus, als wäre er nie ein Tag gewesen. Hinter den Grabstein habe ich noch das Spinnennetz, das im Set mit der süßen Spinne kommt, aufgeklebt.
Den Kürbis habe ich wieder aus dem orangefarbenen Foliencardstock gestanzt und das Gesicht aus dem Kürbis herausgestanzt. Diese Stanze kommt extra, so dass man auch einen "normalen" Kürbis ohne Gesicht mit dem Set stanzen kann. Das Gesicht habe ich schwarz hinterklebt. Für den Stiel  habe ich grünen Foliencardstock verwendet. Aus dem ist auch die Graslinie, die ich mit einer der Gras Slimline Stanzen gemacht habe.
Ganz zum Schluss habe ich vorne noch die schwarze Katze, ebenfalls aus dem Happy Halloween Stempelset, aufgeklebt. Irgendwie war da so ein leerer Fleck und die Katze wollte auch unbedingt mit auf die Box.

On the front of the box I created a grave scene - I wanted it to look like the hands are coming out of a fresh grave.
Directly onto the box, for which I simply cut two rectangles as the front and back, I glued a fence, die cut from brown cardstock. I had this left over from last week's project because I die cut two of them from different cardstocks, not sure at first which color I wanted to use. So I used the left over one here. I admit, you don't see too much of it. 
Onto the fence I glued a gravestone. I stimply used a tag die for it and cut it from grey cardstock. With the stitched lines it already has a little gravestone look. I stamped the bat and text onto it and added a few cracks with a black fineliner. Then I glued it onto the fence a little croocked and I think you really couldn't tell at first look that this was made from a tag. Behind the gravestone I glued the spiderweb that comes in one set with the cute spider. 
The pumpkin is again die cut from the orange foiled cardstock and die cut the face out of it. The face comes as an extra die so you can also create a regular pumpkin with this set. I glued some black cardstock behind the face cut outs. For the stem I used green foiled cardstock. And I used the same to cut the grass with a grass slimline die. 
In the end I also added a black cat to my box. There was this plain spot - and the cat begged me to let her join the fun. 

Dienstag, 8. Juni 2021

Danke!

 
Hallo Ihr Lieben!
Heute zeige ich auf dem Stamping-Fairies Blog mal wieder eine Slimline Karte. Und auf der habe ich sogar eine kleine Geschichte versteckt. 

Hello everyone!
Over at the Stamping-Fairies Blog I am sharing another slimline card today. And I used the three windows to create a little story with the text inbetween.

Hier habe ich zuerst einmal den Aufleger mit den drei Fenstern gestaltet. Dafür habe ich die Square Peek-a-Boo Window Stanze von MFT mittig aus einem Streifen braunen Cardstocks gestanzt. Die gestitchten Linien ober- und unterhalb des Fensters habe ich dann benutzt, um die Stanze passend wieder auf den Cardstock aufzulegen und die beiden anderen Fenster zu stanzen. 
Mit brauner Tinte habe ich dann den Wood Plank Background von MFT über den kompletten Cardstock gestempelt.

Here I created the topper with the three windows first. I die cut the Square Peek-a-Boo Window die from the center of a strip of brown cardstock. Then I used the stitched lines under and above the window to line up the die with the first window and die cut another two - one above and one under the first. 
Next I stamped the Wood Plank Background by MFT over the whole strip with brown ink.


Im oberen Bild beginnt dann meine Geschichte. 
Der Fuchs - übrigens ein Architekt - sieht zwei Bäume auf einer Wiese und hat die Idee zu einem Baumhaus. Nach dem Entwerfen des Baumhauses in seinem Notizbuch würde er es gerne bauen, aber er weiß, alleine kann er das nicht schaffen...
Die Motive auf der Karte sind alle aus dem Let's Work Together Stempelset von MFT und mit Copics coloriert. Für den Grashügel habe ich eine der Stitched Snow Drifts Stanzen benutzt, den Himmel habe ich mit der Mini Cloud Edges Stencil und Distress Oxide Broken China gewischt. 
Die Szenen sind auf einem Streifen weißen Cardstock, den ich etwas größer als den braunen Streifen geschnitten habe, aufgewischt bzw. aufgeklebt. Zuvor habe ich mir mit einem Bleistift die Fenster auf den weißen Cardstock übertragen. 
Der You Nailed it Text ist aus dem Builder Bears Stempelset. Ich habe ihn mit weißem Embossingpulver auf schwarzen Cardstock embosst und mit 3D Tape aufgeklebt.
Das thanks ist mit einer der Stanzen aus dem Thanks and Hello Stanzenset gemacht. Auch das habe ich aus schwarzem Cardstock gestanzt, mit einem weißen Gelpen ein paar Highlights aufgemalt und es dann wiederum mit 3D Tape auf den Hintergrund geklebt.

In the top window I started my little story.
The fox - he's an architect - saw two trees on a meadow and had the idea to build a tree house in them. He took his note book and made all the plans, but he knows he can't do that alone...
The images on this card are all from the Let's Work Together stamp set by MFT and colored with Copics. For the hills I used one of the Stitched Snow Drifts dies, the sky is made with the Mini Cloud Edges stencil and Distress Oxide Broken China.
The images are put onto a piece of white cardstock that I cut a bit larger than the strip of brown cardstock. I marked the windows with a pencil and then inked up the sky and glued down the other elements.
The You Nailed It text is from the Builder Bears stamp set. I white heat embossed it onto a strip of black cardstock and glued it down with dimensionals.
The thanks is made using one of the dies from the thanks and hello die set. I've cut it from black cardstock, added a few highlights with a white gel pen and glued it down with dimensionals.


Wie gut, dass der Bär gute Freunde hat, die sich auch noch mit Holz auskennen! Und so sieht man im zweiten Fenster Biber und Dachs, wie sie gerade das Baumaterial herbeischaffen. 

It's a good thing that the fox has some good friends that also know all about wood! And so you can see beaver and badger hauling by all the wood they need for the tree house.


Und im letzten Fenster ist dann schon das fertige Baumhaus zu sehen. Ist es nicht toll geworden? Die Tür wurde blau gestrichen und natürlich gibt es auch eine Leiter, um sicher ins Haus hinein und hinaus zu kommen...
Hier habe ich dann den Text Together we can do anyting aus dem Let's Work Together Stempelset angebracht. Den habe ich wieder auf weiß auf schwarzen Cardstock embosst und in zwei Teile geteilt aufgeklebt - einen Teil ober- und einen unterhalb des letzten Fensters.
Zum Schluss habe ich den weißen Cardstock noch schwarz gemattet, alles auf eine weiße Slimline Karte geklebt und ein paar kleine blaue Herzen auf der Karte veteilt.

And in the lowest window you can see the finished tree house. Didn't it turn out great? They painted the door blue and of course there's also a ladder to get save into and out of the house...
Here I used the Together we can do anything text from the Let's Work Together stamp set. Again I white heat embossed it onto black cardstock, cut it into two pieces and glued them down - one above and one under this lowest window.  
In the end I matted the white cardstock black and glued everything onto a white slimline card. I also added a few tiny blue hearts to my card.

Samstag, 5. Juni 2021

Stempeleinmaleins - Ausgabe vom 5. Juni 2021

 
Hallo Ihr Lieben!
Beim Stempeleinmaleins gibt es heute mal wieder ein Tutorial für eine interaktive Karte: die Wechselkarte. Und der sieht man den grandiosen Effekt mal wieder auf den ersten Blick gar nicht an. 

Hello everyone!
Over at Stempeleinmaleins we are once again sharing a tutorial for an interactive card: the changing card. And once again at first sight you can't tell there's this great effect.

Irgendwie liebe ich die Farbkombi Türkis und Gelb zur Zeit - deswegen habe ich sie wohl auch für diese Karte gewählt. 
Auf der linken Seite habe ich einen Luftballon aus gelbem Designpapier mit weißen Pünktchenaufgeklebt. Davor kamen einige Geburtstagskerzen, die ich aus verschiedenen weiß und türkis bzw. blauen Designpapieren gestanzt habe. 
Den Bereich oberhalb des Textfeldes habe ich mit einer Girlande und einigen kleinen Sternen dekoriert. Außerdem habe ich hier einen Tab angeklebt, um den ich eine Schleife gebunden habe. 

I toally love the color combo of turquoise and yellow at the moment- guess that's why I picked it again for this card.
On the left side of the card I glued down a balloon, die cut from yellow patterend paper with small white dots. In front of it I placed a few birthday candles, die cut from different white and blue or turquoise striped paper.
The strip above the text area is decorated with a party banner and a few small stars. I also added a tab here and tied a bow around it.


Für den Text auf dem Bereich unten rechts habe ich gestanzte Buchstaben, gemacht mit dem Mini Alphabet and Numbers Stanzenset von CC Design, und am PC geschriebenen Worten benutzt, um "ich weiß genau, wie alt du geworden bist, aber ich kann schweigen" zu schreiben. 

For the text in the bottom right area of the card I combined die cut letters, cut with the Mini Alphabet and Numbers die set by CC Designs, and some words printed on my laptop. The text means "I know exactly how old you've turned, but I can keep the secret". 


Und hier kommt nun der tolle Effekt der Karte. Dreht man einen Teil der Karte am Tab nach rechts, ändert sich das Motiv!

And here's the great effect of this type of card: when you grab the tab and turn part of the card to the right, the image on the card changes!


Noch ein kleines bisschen...

A little more...


Und hier ist das zweite Motiv komplett zu sehen!
Den Bereich, der vorher von dem Teil mit dem Tab verdeckt war, habe ich ebenfalls mit einem Banner dekoriert. Dadurch, dass der zuvor obere Teil nun nach unten gedreht ist, sieht das Banner hier wie gespiegelt aus. Außerdem habe ich hier ein schockiertes OMG! mit aufgeklebt.

And here's the complete second image!
The are, that was previously covered from the area with the tab, is also decorated with a banner. Since the part, that was at the top first, is now turned upside down the banner looks like mirrored. I also added a shocked OMG! here.


Und hier ist das zweite Motiv in voller Größe. 
Die Zahlenstanzen sind von SU, den Rest des Texte habe ich wieder am PC gechrieben.

And here's the second image in full size. 
I used a die set by SU to die cut the numbers, the rest of the text is once again printed with my laptop and home printer. 

Donnerstag, 3. Juni 2021

Das ist ja nicht zu glauben!

 
Hallo Ihr Lieben!
Heute zeige ich auf dem Stampcorner Blog mal wieder eine Slimline Card. Und hier kamen endlich die genialen Tiere designed von Oma Plott zum Einsatz. Die Idee zu dieser Karte hatte ich sofort, als ich das Set sah.

Hello everyone!
Today I am sharing another slimline card over at the Stampcorner Blog. And here I finally used those funny animals designed by Oma Plott. I immediately had the idea for this card in mind when I saw the set for the first time.

Hier habe ich die Slim Comic Strip Stanze von MamaElephant verwendet, um den Rahmen um die/zwischen den Tierchen zu gestalten. Ich habe ihn aus schwarzem Cardstock gestanzt. Dann habe ich zwei Blätter aus dem Designpapier aus dem Mai-Release mit dem selben Muster an die Schrägen im Rahmen angepasst zugeschnitten und dabei darauf geachtet, dass das Muster auf dem Papier fortlaufend ist. 
Die Designpapierstücke habe ich auf ein etwas größeres Stück schwarzen Cardstock geklebt, darauf kam dann der Rahmen mit 3D Tape. Beide Lagen habe ich dann auf eine weiße Slimline Karte geklebt.

Here I used the Slim Comic Strip die by MamaElephant to die cut the frame around/between the animals. I've die cut it from black cardstock. Then I took two sheets from the Stampcorner paper pad from the may release, picking two with identical patterns, and cut them matching the slanted inner lines of the frame. I also made sure that the pattern of the paper was matching when cutting them.
I glued the patterned papers onto a slightly larger piece of black cardstock, then glued the frame on top with dimensionals. Then I glued both onto a white slimeline card.


Die genialen Tiere passen perfekt in die einzelnen Rahmen.
Ich habe sie mit Copics coloriert und ausgeschnitten. Dann habe ich sie mit dünnerem 3D Tape in die Rahmen geklebt. Ich habe jeweils die grau colorierten Motive auf rotes, die Motive mit roten Akzenten auf graues Designpapier geklebt.
Die gestempelten Texte auf der Karte sind aus demselben Stempelset wie die Tiere. Für die gestanzten Sprechblasen habe ich Stanzen verwendet, die mit der Rahmenstanze zusammen im Set kommen.
 
These funny animals fit perfectly into the individual frames.
I colored them with Copics and cut them out. Then I glued them into the frames using thinner dimensionals. I glued the images with red accents onto grey, the grey colored ones onto red patterned paper.
The stamped texts on the card are from the same stamp set as are the animals. The one with the the hippo means "are you serious?". For the die cut speech bubbles I used the dies that come in a set with the frame die.
 

 Hier sind die beiden anderen Tiere. Auch hier kam jeweils wieder ein gestempelter und ein gestanzter Text zum Einsatz. 
Zum Schluss habe ich noch ein paar silberne Pailetten in die Rahmen geklebt.
Ich habe mich noch nicht entschieden, zu welchem Anlass ich diese Karte verschenken werde - Geburtstag, Ruhestand, Umzug... sie ist so vielseitig einsetzbar, dass ich auf jeden Fall Verwendung dafür finden werde!

Here are the two other animals. Also here I used one stamped and one die cut text. The one with the cow means "really?". 
In the glued I added a few silver sequins into each frame.
I haven't decided yet for which occasion I will send this card out - birthday, retirement, move.... it's so versatile that I surely will find the right moment to send it out!

Mittwoch, 2. Juni 2021

Mach mal Pause!

 
Hallo Ihr Lieben!
Mach mal Pause - das hat sich der Fuchs hier wohl gedacht. Oder sich den Ratschlag eines Freundes zu Herzen genommen. Und so liegt er nun in der Wiese und chillt.

Hello everyone!
Take a break - that's what the little fox might have thought. Or he got that as a good advice from a friend and is now lying in the grass and doing exactly that.

Für den Hintergrund habe ich einen eins Stücks weißen Cardstocks mit Distress Oxide Rustic Wilderness und Speckled Egg gewischt und noch ein paar türkisfarbene Spritzer mit Schimmerwasserfarbe darüber verteilt. Im oberen Bereich habe ich die Farbe auslaufen lassen, unten hatte ich einen Streifen des weißen Cardstocks abgedeckt. Die harte Kante deckt das Gras ab. 
Den weißen Cardstock habe ich schwarz gemattet und auf einen weißen Kartenrohling geklebt.

For the background I've inked up a part of a piece of white cardstock with Distress Oxide Rustic Wilderness and Speckled Egg and then spritzed some turquoise metallic watercolor over it. In the top area I just let the ink fade into the white cardstock, the lower area of the card was covered with a piece of masking tape while inking up the cardstock. The hard edge gets covered by the grass.
I matted the background with black cardstock and glued it onto a white note card.


Für die Deko kamen auch zwei der neuen Produkte aus dem Juni-Release zum Einsatz: die tollen Pilze und der süße schlafende Fuchs. 
Der Fuchs ist mit Copics coloriert und anschließend ausgeschnitten. Die Pilze habe ich aus rotem und grauem Cardstock (Stiele) gestanzt und mit Copics ein wenig schattiert. Dann habe ich die weißen Punkte aus den roten Pilzhüten ausgestanzt und einen kompletten weiteren Pilzhut, diesmal gestanzt aus weißem Cardstock, von hinten gegen den roten Hut geklebt. 
Für das Gras habe ich eine der Slimline Gras-Stanzenbenutzt und ganz schmal zugeschnitten. 
Der Zaun ist wieder aus grauem Cardstock - deswegen musste ich die Pilzstiele auch schattieren, da ich hierfür denselben Grauton benutzt hatte. 
Und oben am Himmel sind zwei kleine Wölkchen unterwegs. 
Das Wort Chillen ist aus dem Grillmeister Stempelset. Ich habe das "und Grillen" nicht mit abgestempelt und das Chillen weiß auf schwarzen Cardstock embosst. Dann habe ich es auf den Zaun aufgeklebt. 
Der Text unter dem Fuchs ist aus einer Kombi aus Stempel und Stanze gemacht. Das "mach' mal" ist aus dem Stempelset Mach Mal Pause. Ich habe den Text erst auf die Karte gestempelt, dann den Fuchs passend dazu aufgelegt und den Strich des L auch auf den Schwanz des Fuchses aufgestempelt. So sieht man keine Linie am Übergang zwischen dem auf die Karte gestempelten Text und dem auf dem aufgeklebten Fuchs. Passiert bei so kleinen Höhenunterschieden ja doch mal gerne.
Für das Pause habe ich das Stanzenset ABC1 benutzt und die Buchstaben aus schwarzem Cardstock gestanzt. Dann habe ich sie einfach neben den gestempelten Text aufgeklebt.
Zum Schluss habe ich noch ein paar antrazith-farbene Enamel Accents als Deko auf der Karte verteilt.

For the scene on my card I used two of the new things from the june release: the great mushrooms and the cute sleeping fox.
I colored the fox with Copics and then cut him out. The mushrooms are die cut from red and grey cardstock, then I added some shading with my Copics. Then I die cut the white dots from the mushrooms and glued some white cardstock behind them. 
For the grass I used one of JM-Creaition's grass slimline dies and cut it to end up with a very fine strip. The fence is also die cut from grey cardstock - that's also why I shaded the mushrooms. I had used the same tone of grey to cut the foots. 
In the sky there are two fluffy clouds. 
The word chill is white heat embossed onto a piece of black cardstock, then glued onto the fence.
The text under the fox means "take a break" and is made from a combination of stamps and dies. I first stamped the first part of the saying directly onto the card, then stamped the parts that overlap with the fox again directly onto the fox. That way I didn't get any white lines like they tend to happen when you stamp onto an area with two different heights. 
For the word break I die cut the letters from black cardstock and glued them next to the stamped text.
In the end I also added a few antrazit colored Enamel Accents as embellishments.

Dienstag, 1. Juni 2021

Heute wirds farbenfroh!

 
Hallo Ihr Lieben!
Heute zeige ich auf dem Stamping-Fairies Blog mal eine richtig farbenfrohe Karte. Kommt bei mir ja nicht allzu oft vor, aber hier hat es einfach perfekt gepasst. Und ich finde, all die Farben heben die Laune automatisch.

Hello everyone!
Over at the Stamping-Fairies Blog I am sharing this really colorful card today. That doesn't happen too often on my cards but here it was just perfect for this great die. And I think all those colors put you in a good mood immediately.

Für den Hintergrund habe ich die Winkel der Strahlen im Herz auf ein Stück weißen Cardstock übertragen, jeweils alle Strahlen bis auf einen mit einer Maske abgedeckt und dann mit Distress Oxide gewischt. Und zwar so, dass die Strahlennach außen ein wenig heller werden. Dabei habe ich jeweils die Farbe verwendet, die - so gut wie möglich - dem Cardstock entspricht, aus denen ich die kleinen Teile im Inneren des Herz gestanzt habe. Im einzelnen kamen hier Squeezed Lemonade, Mustard Seed, Carved Pumpkin, Candied Apple, Fired Brick, Picked Raspberry, Dusty Concord, Wilted Violet, Faded Jeans, Broken China, Cracked Pistacchio und Mowed Lawn verwendet. 
Auf die aufgewischten Strahlen habe ich dann noch Wassertropfen sowie ein wenig silberne Schimmer-Wasserfarbe aufgespritzt.

For the background I traced the rays of the heart onto a piece of white cardstock, covered all but one with a mask and then colored the individual pieces with Distress Oxide. I tried to make the colors lighter towards the edge of the cardstock. And I used a Distress Color matching as much as possible to the cardstock colors that I used to die cut the inner pieces of my heart. I used Squeezed Lemonade, Mustard Seed, Carved Pumpkin, Candied Apple, Fired Brick, Picked Raspberry, Dusty Concort, Wilted Violet, Faded Jeans, Cracked Pistacchio and Mowed Lawn on my card. 
Onto the background I splattered a few drops of water and also some silver metallic watercolor. 


Den fertigen Hintergrund habe ich schwarz gemattet und auf einen weißen Kartenrohling geklebt.
Alle anderen Elemente auf der Karte sind dannn mit 3D Tape aufgeklebt, was man hier ganz gut sehen kann. Und man erkennt hier auch, dass die inneren Teile des Herzes aus Cardstock und nicht ebenfalls gewischt sind.
Die Textstreifen unten auf der Karte sind mit einem der Stempel aus dem Rainbow Greetings Stempelset von MFT gemacht. Ich habe das Wort Friendship, das am Anfang des Satzes steht, weggeschnitten und die Cardstockstreifen auf die Karte geklebt. Zuvor habe ich den Text mit weißem Embossingpulver auf den schwarzen Cardstock aufembosst.

I matted the finished background black and glued it onto a white note card.
All other elements of the cards are glued down with dimensionals, something you can see pretty good on this picture. And you can also tell here that the inner parts of the heart are made from cardstock pieces and not inked up as well.
The cardstock strips with the text are made with a stamp from the Rainbow Greetings stamp set by MFT. I cut off the word friendship, that the sentence starts with, and glued the cardstock strips onto the card. Before I white heat embosst the text onto the cardstock.


Für das Herz habe ich die Heart Burst Stanze von MFT verwendet. Ich habe den "Rahmen" einmal aus weißem und einmal aus schwarzem Cardstock gestanzt, weil ich mir zuerst nicht sicher war, welche Farbe mir besser gefallen würde. Ich hatte auch zuerst den schwarzen Rahmen benutzt, mich dann aber doch umentschieden und den weißen einfach obenauf geklebt. 
Hinter den Herzrahmen habe ich ein Herz gesetzt, das ich grob mit der Hand zugeschnitten hatte. Dann habe ich die inneren Teile des Herzens in Regenbogenfarben gestanzt und auf das Herz im Hintergrund geklebt. 
Das Wort friend ist mit dem Friend Duo Stanzenset gemacht. Ich dachte eigentlich, dass ich auch eine Friendship-Stanze habe, da lag ich aber falsch. Also habe ich das Wort friend gestanzt, ebenfalls einmal aus schwarzem und einmal aus weißem Cardstock und die beiden Worte ein wenig versetzt übereinander geklebt. Um daraus nun das Wort friendship zu machen, habe ich aus einem der Texte aus dem Stempelset Festive Old Friends nur das Wort ship weiß auf schwarzen Cardstock embosst und so das Wort fertiggeschrieben. Man muss sich zu helfen wissen. ;)
Zum Schluss habe ich auf das Herz noch ein paar klare Glitzersteine gesetzt.

For the heart I used the Heart Burst die by MFT. I die cut the "frame" once from black and once from white cardstock since I wasn't sure which color I'd like better. I even used the black one first but then changed my mind and glued the white one on top of the black one.
Behind the heart frame I glued a heart that I hand cut in about the shape of the heart frame. Then I die cut the inner heart pieces in rainbow colors and glued them onto the hand cut heart to fill in the spaces inside the heart.
The word friend is made with one of the dies from the Friend Duo die set. I was sure I have a friendship die but then found out that I was wrong about that. So I simply die cut the word friend, once from black and once from white cardstock and stacked both on top of each other slightly off. To turn that into the word friendship I simply white heat embossed just the word ship from one of the stamps from the Festive Old Friends stamp set onto black cardstock and used that to turn friend into friendship. You just have to find a way... ;)
In the end I added a few clear rhinestones on top of the heart.