Samstag, 16. Dezember 2023

Leuchtende Weihnachtsgrüße

 
Hallo Ihr Lieben!
Auch wenn ich jedes Jahr wieder darüber schimpfe, dass es im Winter so früh dunkel wird, finde ich es doch für die Weihnachtszeit wunderbar. Dann kann man alles mit warmem Kerzenschein beleuchten während es draußen frostig-kalt ist. Und weil man dann ja nie genug Licht aufstellen kann, zeige ich heute auf dem Kulricke-Blog eine leuchtende Weihnachtskarte.

Hello everyone!
Every year I start lamenting that it's getting dark that early in winter. But once christmas time comes, I love it. You can put up candles everywhere that warm the heart with their shine while it's frosty and cold outside. I think you can't have enough of those warm lights during christmas time and I am sharing a lightning christmas card over on the Kulricke Blog today.
 

Weil man darauf einfach mehr sieht und ich so besser erzählen kann, wie ich die Karte gemacht habe, erstmal ein paar bei Tageslicht aufgenommene Bilder. Denn natürlich sollte die Karte auch tagsüber gut aussehen.
Ich habe die Basis aus einem langen Streifen weißen Cardstocks gemacht - die Rückseite und der niedrige Streifen vorne sind jeweils 1 cm tief und lassen sich flach zusammenlegen. Die Deko habe ich zwischen beide Teile geklebt und zur Verstärkung links und rechts jeweils einen schmalen weiteren Streifen Cardstocks eingearbeitet.

Since you can see it better to see and makes more sense when I talk about how I made the card I am sharing a few pics taken with daylight first. Because I wanted the card to look good during the day as well. 
I cut the base from a long strip of white cardstock - the back and the small area in the front are each 1 cm deep and can be put flat. The decorations I put between those two areas, adding another thin strip of cardstock on the left and right to make the decoration a bit more stury. 


Von vorne gesehen sieht man die ganze Konstruktion nicht sondern nur eine nächtliche Winterstadt mit Text davor. 
Der Hintergrund ist aus einem weiteren Stück weißen Cardstocks gemacht, das ich mit Distress Oxide Stormy Sky, Faded Jeans und Chipped Sapphire gewischt habe. Dann habe ich silberne Metallic Watercolor als Sterne aufgespritzt.

Seen from the front you don't see all the construction pieces - only a wintery city in the night with a text in front of it.
The night sky I created from another piece of white cardstock that I had inked with Distress Oxide Stormy Sky, Faded Jeans and Chipped Sapphire. Then I flicked some silver metallic watercolor as stars onto it.


Die meisten Teile meiner Deko habe ich aus Vellum gestanzt, damit das Licht später hindurchscheinen kann. Die Häuser Holland habe ich aus hellblauem Vellum gestanzt und mit weißem Vellum hinterlegt, um die Fenster zu füllen. Davor und dahinter befindet sich jeweils ein verschneiter Hügel, gemacht mit einer der Stanzen aus dem Schneekugel-Stanzenset. Aus dem sind auch die beiden Tannenbäume, die ich, ebenso wie den Stern am Himmel, aus silbernem Glitter-Cardstock gestanzt habe. 

Most elements of my decorations are die cut from vellum so the light can shine through them. I die cut the houses from light blue vellum and put some white vellum behind them to fill in the windows. I attached a snowy hill in front of and behind the houses. On both sides of the houses I added a pine tree. I cut those - and the single star in the sky - from silver glitter cardstock.


Den Text auf der Karte wollte ich bei Tageslicht unbedingt farbig haben, trotzdem sollte auch das Licht hindurchscheinen. Die Lösung war Distress Embossing Glaze. 
Zuerst habe ich das Wort Weihnachten auf Masking Tape gestempelt und mit einem dünnen Rand ausgeschnitten. Die Maske habe ich dann auf Vellum aufgeklebt und erst das Wort Frohe aus dem Set Frohe Festtage mit Versamark gestempelt und anschließend mit Distress Embossing Glaze Peeled Paint embosst. Anschließend habe ich die Maske abgezogen, das Wort Weihnachten auf den nun freien Bereich quer über das Wort Frohe gestempelt und mit Embossing Glaze Hickory Smoke embosst. Dann habe ich den oberen Teil eckig und die Seiten auf Höhe der Schneehügel an den Häusern ebenfalls bogenförmig zugeschnitten.
Den vorderen Teil meiner Karte habe ich zuerst mit silbernem Glitter Cardstock beklebt und ein Stück hellblaues Organzaband darumgewickelt. Vorne habe ich es verknotet und zwei hellblaue Glöckchen mit angebunden. Und um das Grün des Wortes Frohe nochmal aufzugreifen, habe ich einen der Weihnachtssterne aus dem Stanzenset Blumen Set aus grünem Cardstock gestanzt und eines der Blütenblätter weggeschnitten. So sieht es fast aus wie Ilexblätter. Die habe ich dann hinter den Glöckchen auf den silbernen Glitter Cardstock geklebt.

I wanted the text on this card to be colored by daylight but also wanted the light to be able to shine through. Distress Embossing Glaze was the solution here.
First I stamped the smaller word Weihnachten - x-mas - onto a piece of masking tape and cut it out with a thin edge. Then I put it onto a piece of vellum and stamped the larger word Frohe - merry - with Versamarkt over it. I heat embossed it with Distress Embossing Glaze Peeled Paint, pulled off the mask and fit the word Weihnachten into the gap across the word Frohe. Then I stamped that and heat embossed it with Embossing Glaze Hickory Smoke. I cut the top in a rectangle shape and once I hit the height of the snowy hills in the background followed the shape of those hills to the side edges. 
I covered the small area in the front of the card with some silver glitter cardstock, wrapped a piece of light blue organdy ribbon around it and made a knot on the front, then tied two light blue bells to it. To pick up the green of the word Frohe again I die cut one of the poinsettia flowers from the Blumen Set die set from green cardstock and cut off one of the petals to make it look like some holly leaves. I glued those behind the bells onto the silver glitter cardstock.


Und hier habe ich nochmal ein Bild der beleuchteten Karte. Um sie zum Leuchten zu bringen, habe ich eine dieser dünnen Draht Lichterketten in Schlaufen gelegt und hinter den Häuser in den Schlitz am Boden der Karte gesteckt. Den Schalter mit Batteriefach habe ich einfach hinter der Karte platziert. 

And here I have another picture of the lit up card. To make it light up I used one of those wire string of lights, wrapped it up in loops and put behind the houses in the slit at the bottom of the card. The piece with the batteries and switch I simply hid behind the card.

Freitag, 15. Dezember 2023

Stampcorner Dezember Aktion Tag #15

 
Hallo Ihr Lieben!
Heute darf ich auf dem Stampcorner Blog wieder eine Karte mit dem Stempel des heutigen Tages der Dezember Aktion zeigen. Der süße Bär mit den Socken ist von Peaky Needles.
 
Hello everyone!
Today it's my turn again to share a card with today's stamp set from the december specials over on the Stampcorner Blog. The cute bear with the socks is drawn by Peaky Needles.
 
 Ich bin immer noch im Weihnachtskarten-Modus und so habe ich nach einer Idee gesucht, das Motiv weihnachtlich umzusetzen. Naja, und da hier definitiv Socken eine tragende Rolle spielen, habe ich beschlossen, Weihnachtssocken ins Spiel - äh auf die Karte - zu bringen.
Der Hintergrund ist mit der Peppermint Stripes Backdrop Stanze von LawnFawn gemacht. Ich habe sie aus rosafarbenem Cardstock gestanzt und dann die ausgestanzten Streifen dahinter mit weißem, grünem und rotem Cardstock hinterlegt - passend zu dem Look, in dem ich die Socken des Motivs coloriert habe. Da aber der farbenfrohe Hintergrund ein wenig mit den Motiven konkurriert hat, habe ich eine Lage Vellum zugeschnitten und über die Mitte des Hintergrunds gelegt. Davor habe ich etwas Copic Opaque White sowie ein wenig Shimmer-Farbe aufgespritzt.

I am still in a christmas card mood so I was looking for an idea to incorporate the image in a christmas card. Well, since socks are definately a theme here, I've decided, to make stockings the theme of  my card.
The background I created with the Peppermint Stripes Backdrop die by LawnFawn. I've die cut it from pink cardstock and put some white, green and red cardstock strips behind the cut outs - matching the look I colored the socks in the image. Since the colorful background and the images kind of blended into each other, I've cut a piece of vellum and put it onto the center of the backdrop. Before I adhered it, I added some spatters with Copics Opaque White and a shimmery ink. 


Das Motiv habe ich mit Copics coloriert und, wie schon erwähnt, pink, rot, weiß und grün als die Hauptfarben gewählt. Den Bären hatte ich erst weiß coloriert, aber das war mir dann doch zu farblos, also habe ich etwas Braun darüber gelegt. Die Highlights habe ich mit einem weißen Gelstift gemacht, dann habe ich den Bären ausgeschnitten.
Ich wollte noch ein Hintergrundmotiv für den Bären. Also habe ich die Kissen aus dem Merry Christmoose Stempelset von MFT abgestempelt. Damit sie nicht komplett hinter dem Bären verschwinden, habe ich erst nur die eine Hälfte abgestempelt, den weißen Cardstock in meinem Misti verschoben und dann die zweite Hälfte mit etwas Abstand abgestempelt. Die Lücke dazwischen wird vom Bären verdeckt. 
Beim Text habe ich erst ein wenig überlegt, dann kam mir aber diese Idee. Ich habe wieder ein wenig mit den Stempeln aus den Sets Kleine Worte und Kleine Worte 2 gespielt. Zeit zum Beispiel ist das Ende des Wortes Hochzeit, das die habe ich mich einem Teil des Wortes DICH und dem E von EUCH zusammengesetzt. Und für das Weihnachts habe ich den Text Schöne Weihnachten genommen und erst nur das Weihnacht gestempelt, dann habe ich den Cardstock verschoben und das S von Schöne hinten angestempelt. Die Texte sind alle mit weißem Embossingpulver auf roten Cardstock embosst.
Für das Wort Socken habe ich die Buchstaben mit einem Alphabet-Stanzenset aus grünem Cardstock gestanzt. Dabei habe ich jeweils drei Buchstaben aufeinander geklebt, weil ich die Buchstaben etwas höher als das Motiv haben wollte. Nachdem ich das aber später mit 3D Tape aufgeklebt habe, habe das auch hinter die Buchstaben gesetzt.

The image I colored with Copics and, as mentioned, went with pink, red, white and green as the main colors. The bear I had colored white, but that looked boring, so I put some browns on top. I added some highlights with a white gel pen and cut the bear out.
I also wanted a smaller background image behind the bear. So I used the cushions from the Merry Christmoose stamp set by MFT. To make sure the bear isn't covering too much of the cusions I first only stamped half of the image, then moved the cardstock in my Misti and stamped the other half. The gap inbetween is covered by the bear.
It took me a bit of thinking to find out, which text I wanted to add. Then I white heat embossed the "it's time for the christmas" onto strips of red cardstock. The letters word "stockings" I die cut from green cardstock. I had die cut three of each letter because I wanted that word to be a bit higher than the image. But since I put foam tape behind the image later I also had to put some behind the stacked letters.


Und natürlich mussten dann noch ein paar mehr Socken auf die Karte. Also habe ich die Socken-Motive aus dem Merry Christmoose Set abgestempelt, coloriert und ausgeschnitten. Dann habe ich sie über/hinter dem Bären auf das Vellum geklebt und ein Stück Juteschnur darunter entlanggezogen. Die Enden habe ich um die Kanten der Karte herum gelegt und hinten mit etwas Tesa befestigt.

And of course there had to be a few more stockings on my card. I stamped the stockings from the Merry Christmoose set, colored them and cut them out. Then I adhered them above/behind the bear onto the vellum and put a piece of jute yarn behind them. The ends I wrapped around the edge of the card and fixed the ends with some tape to the back.


Die Socken sind mit dünnem, der Rest mit dickem 3D  Tape auf dem Vellum aufgeklebt. Hinter die Buchstaben des Wortes Socken habe ich sogar beide Dicken aufeinander geklebt. Dann habe ich alles auf einem weißen Kartenrohling befestigt.

I adherd the stockings with thin, the other elements with thick foam tape onto the vellum. Behind the die cut letters of the words stockings I even doubled up the tape, using both thicknesses. Then I attached everything to a white note card.

Mittwoch, 13. Dezember 2023

Zwei weihnachtliche Tags

 
Hallo Ihr Lieben!
Heute zeige ich Euch zwei weihnachtliche Tags. Wir haben immer eine Mädels-Weihnachtsfeier, bei der wir auch wichteln. Für mein Wichtel"kind" habe ich einen der Tags gemacht. Und da auch die Gastgeberin des jeweiligen Jahres eine Kleinigkeit extra bekommt, habe ich für sie auch gleich einen Tag gemacht.

Hello everyone!
Today I am sharing two christmas tags. We always have a girls christmas party where we do a Secret Santa. One of the tags I made to tie to the gift I brought. And since also the host of the party gets a little extra gift, I made a tag for her, too.

Für die Tags habe ich einfach Streifen aus weißem Cardstock zugeschnitten und die dekoriert.
 
I simply cut strips from white cardstock for my tags and decorated those.


Auf die Tags habe ich mit dem Layering Poinsettia Stencil Set von LawnFawn ein florales Weihnachtsmuster aufgetragen. Ich liebe weiße Weihnachtssterne mit den grünen Blatteilen.... Also habe ich die Blüten mit Distress Oxide Pumice Stone und Bundled Sage aufgewischt. Für die Zweige und Ilexblätter habe ich Bundled Sage und/bzw. Rustic Wilderness verwendet. Die Beerenzweige sind mit Hickory Smoke gewischt, die Beeren habe ich dann mit einem grün-goldenen Gilding Wax aufgetupft. Die Stencils haben außerdem kleine Sternchen und Punkte. Die und die Blütenmitten habe ich erst mit Versafine gewischt und habe dann weiß-irisierende Perfect Pearls aufgetragen. So sind diese Teile schön dezent und schimmern schön.

Onto the tags I added a floral christmas pattern using the Layering Poinsettia stencil set by LawnFawn. I love white poinsettias with the green and white blooms... So I inked the poinsettias with Distress Oxide Pumice Stone and Bundled Sage. For the branches and holly leaves I used Bundled sage and/or Rustic Wilderness. The berry twigs I inked with Hickory Smoke, the berries I added with a  green-gold Gilding Wax. The stencils also create little stars and dots. Those and the flower centers I first "inked" with Versafine, then put some white iridescent Perfect Pearls on top. This way they are kind of subtle but have a beautiful shine.


Die Anfangsbuchstaben der Namen habe ich aus grau-silbernem Metallic-Cardstock gestanzt und mit vier Lagen weißem Cardstock hinterlegt. Außerdem habe ich einen Weihnachtssternblüte aus cremefarbenem und einige Ilexblätter aus grünem Metallic-Cardstock gestanzt. Die Blüten habe ich mit Bundled Sage leicht gewischt, als Blütenmitten habe ich hier weiße irisierende Glitzersteine verwendet. Die Blüten und eines der Ilexblätter habe ich unten links an die Buchstaben geklebt.
Aus Vellum habe ich mit einem der Essential Modern Ovals von Spellbinders ein Oval gestanzt und die Buchstaben mit der Deko daraufgeklebt. 
Unten quer über das Oval habe ich einen Streifen dunkelgrünen Cardstocks aufgeklebt, auf den ich mit weißem Embossingpulver "merry christmas" aufembosst habe. Der Text ist aus dem Itty Bitty Holidays Stempelset von MFT. 
Die Deko habe ich dann mit dünnem 3D Tape auf den Tag geklebt und ein weiteres Ilexblatt daruntergeschoben. 

I die cut the first letter of each name from grey-silver metallic cardstock and put four layers of white cardstock behind it. I also die cut a poinsettia from cream and some holly leaves from green metallic cardstock. I inked the poinsettia lightly with Bundled Sage and used white iridescent pearls as the center. I glued the flower and one of the holly leaves to the bottom left on the letters.
From vellum I die cut one of the Essential Modern Ovals by Spellbinders and attached the letters with the decorations to it.
Across the bottom of the oval I adhered a strip of dark green cardstock that I had white heat embossed a "merry christmas" onto. The text is from the Itty Bitty Holidays stamp set by MFT.
I attached the oval with the decoration with thin foam tape to the tag and tugged another holly leave under it.


Oben an jeden Tag habe ich eine Schleife geklebt. Die ist mit einer Stanze aus einem der Vintage Kits von Magnolia aus dunkelgrünem Cardstock gestanzt, dann habe ich sie mit Copics etwas schattiert und mit 3D Tape aufgeklebt. Zuvor habe ich ein Loch in den Tag gestanzt und etwas weißes Twine hindurchgezogen. Die Enden habe ich oben am Tag festgeklebt und sie dann mit der Schleife überdeckt. Und weil ich noch jeweils ein Ilexblatt übrig hatte, habe ich das hinter die Schleife geklebt.

To the top of each tag I adhered a bow. I die cut that from dark green cardstock using a die from one of the Vintage Kits by Magnolia, then shaded them with Copics and adhered them with foam tape. Before I had punched a hole into each tag and put some white twine through it. I glued the ends of the twine on top of the tag and then covered them with the bow. And since I had two holly leaves left over, I attached one of them behind each bow.


Als Deko habe ich dann noch ein paar weiß-irisierende Glitzersteine aufgeklebt. Und hier kann man auch ein Schimmer des Cardstocks und der Perfect Pearls ein wenig sehen.

I added some white iridescent rhinestones as decoration. And here you can also see the shimmer of the cardstock and the Perfect Pearls, at least a bit.

Dienstag, 12. Dezember 2023

Joy

 
Hallo Ihr Lieben!
Heute habe ich eine Weihnachtskarte mit Weihnachtsstern und Christrose für Euch, wobei die Christrose eigentlich gar keine ist. Aber man darf ja auch mal was zweckentfremden, richtig?

Hello everyone!
Today I am sharing a christmas card with a poinsettia and a helleborus for you. Well, actually the helleborus is made with a stamp that shows a different flower but if it fits, why not go with it, right?


Ich wollte das grau-blau eines winterlichen Himmels für den Hintergrund, ihn aber nicht einfach nackt lassen. Also habe ich ein Stück hell-aqua farbenen Cardstock zugeschnitten und dann erst mit dem Sternenzweige DinLang Embossingfolder von Charlie und Paulchen die Tannenzweige und Sterne aufgeprägt. Ich wollte keine Slimline Card machen, also habe ich den Cardstock einfach kürzer geschnitten. Dann habe ich den Cardstock an den Rändern mit Distress Oxide Speckled Egg und Weathered Wood gewischt und weiße Acrylfarbe augespritzt.

I wanted the grey-ish blue of a winter sky for my background but didn't want it to be plain cardstock. So I first cut a piece of light aqua cardstock and dry embossed the pine branches and stars into it using the Sternenzweige DinLang embossing folder by Charlie und Paulchen. Since I didn't want to make a slimline card I simply cut the cardstock shorter. Then I inked the edges with Distress Oxide Speckled Egg and Weathered Wood and flicked some white acrylic paint onto the cardstock.


Dann habe ich den Weihnachtsstern und die Ilexblätter aus dem Stempelset Poinsettia and Berries, die "Christrose" aus dem Set Lush Garden sowie die Mistelblätter aus dem Stempelset Very Berry, alle von Altenew, abgestempelt. Ich habe Distress Ink Old Paper, Bundled Sage sowie verschiedene Rot- und Grüntöne von Memento benutzt und zum Schluss für mehr Kontrast einige kleine Bereiche der Motive mit Copics abgedunkelt. Außerdem habe ich ein paar Details mit einem weißen Gelstift hinzugefügt. Dannn habe ich alle Motive ausgeschnitten und auch darauf einige Spritzer weißer Acrylfarbe aufgebracht.
Als Text reichte mir hier ein einfaches Joy - ich habe es mit der Joy Stanze von MFT viermal aus weißem Cardstock und einmal aus silbernem Glittercardstock gestanzt und die Teile aufeinander geklebt. Außerdem  habe ich aus weißem Cardstock noch einige kleine Schneeflocken von Magnolia sowie Sternchen/noch kleinere Schneeflocken von LawnFawn ausgestanzt. 

Then I stamped the poinsettia and the holly leaves from the Poinsettia and Berries, the "helleborus" from the Lush Garden set and the mistletoe leaves from the Very Berry set, all by Altenew. I used Distress Ink Old Paper, Bundled Sage and different reds and greens by Memento and as a finishing touch shaded a few areas with Copics for a bit more contrast. I also added a few details with a white gel pen. Then I cut the images out and added some spatters with white acrylic paint onto the images.
As the text I only wanted a die cut joy - I cut it four times from white cardstock and once from silver glitter cardstock using the Joy die by MFT and glued the pieces together. I also die cut some small white snowflakes with a die by Magnolia and some tiny stars/even smaller snowflakes by LawnFawn. 


Zum Zusammensetzen der Pflanzen habe ich teilweise 3D Tape benutzt, das Wort Joy daran/darauf geklebt und die Schneeflocken und Sternchen drumherum verteilt. Außerdem habe ich noch einige winzige klare Glitzersteine aufgeklebt.
Zum Schluss habe ich den Cardstock auf einem weißen Kartenrohling befestigt.

To put the flowers together I partly used foam tape, put the die cut word joy next/onto the flowers and arranged the snowflakes and stars around them. I also added a few tiny clear rhinestones.
Then I attached the cardstock to a white note card.

Montag, 11. Dezember 2023

Stampcorner Dezember-Aktion Tag #11

 
Hallo Ihr Lieben!
Fast schon Halbzeit bis Weihnachten - und bei der Dezember-Aktion von Stampcorner. Der Stempel des heutigen Tages ist von StuffDeluxe designed und ich habe ihn auf eine winterlich anmutende Karte gesetzt, auch wenn der Text im Set eher auf den Herbst hinweist. Aber Winter ist ja auch nach dem Sommer, oder?

Hello everyone!
Nearly half of the time till christmas is over - and also of the december specials by Stampcorner. Stamp set #11 is designed by StuffDeluxe and I used it on a wintery card, even if the text in the set indicates that it is created with fall in mind. But winter is after summer, too, right?

Ich wollte einen etwas frostigen Look für meine Karte, hatte aber keine Lust auf blau. Also habe ich ein Stück hellgrauen Cardstock erst am Rand mit Distress Ink Pumice Stone gewischt. Dann habe ich das Winter Sprigs Background Stencilset von LawnFawn genommen und die Lagen mit Distress Oxide Rustic Wilderness und Hickory Smoke aufgewischt. Für die dritte Lage mit den Beeren habe ich dann weiße Texture Paste benutzt. 

I wanted a frosty look for my card but didn't feel like using blue. So I inked a piece of light grey cardstock from the outside in with Distress Ink Pumice Stone. Then I took the Winter Sprigs Background stencil set by LawnFawn and inked the layers onto the cardstock with Distress Oxide Rustic Wilderness and Hickory Smoke. To add the third layer with the berries I used some white Texture Paste.


Den süßen Fuchs habe ich passend zu meinem Hintergrund in warmem und kaltem Grau sowie Grün für den Schal coloriert, dann habe ich ihn ausgeschnitten. 
Hinter den Fuchs  habe ich weiße Birkenstämme von JoyCrafts, einen dicken grünen Pinienzweig (der hier eher wie ein Busch wirkt) und grau Äste, die eigentlich Bäume aus einem Halloween-Haus-Set sind, beides von Sizzix, gesetzt. Und damit die Deko auch gegen den Hintergrund ankommt, habe ich noch ein Rechteck aus Vellum geschnitten und hinter die Deko geklebt.
Der Text ist ebenfalls aus dem heutigen Stempelset. Ich habe die obere Zeile mit weißem Embossingpulver auf dunkelgrünen Cardstock embosst. Die untere Zeile habe ich mit grauer Tinte auf weißen Cardstock gestempelt. Dann habe ich beides unter der Deko aufgeklebt.

The cute fox I colored matching my background in warm and cool greys and green for the scarf, then I cut him out.
Behind the fox I put some white birch trees by JoyCrafts, a large green pine twig (that looks more like a bush here) and some grey sticks, originally a tree from a Halloween house set, both by Sizzix. And to make sure my decoration isn't blending too much into the background, I cut a rectangle from vellum and put it behind my image and florals.
The text also comes in today's stamp set. It means "I'm going to be brief: summer is over". I white heat embossed the top line onto some dark green cardstock. The bottom line I stamped with grey ink onto white cardstock. Then I adhered both lines down under the image.


Hinter das Vellum habe ich dünnes 3D Tape gesetzt und damit die Deko auf den Hintergrund geklebt. Dann habe ich als Deko noch einige weiß-irisierende Perlen auf der Karte verteilt und alles auf einen weißen Kartenrohling geklebt.

Behind the vellum I put some thin foam tape and attached the decorations to the background. Then I added a few white iridescent pearls and adhered everything to a white note card.

Sonntag, 10. Dezember 2023

Weihnachtskarte mit Kranz

 
Hallo Ihr Lieben!
Heute habe ich eine Weihnachtskarte in unüblichen Farben, dafür aber mit klassischem Kranz zu zeigen. 

Hello everyone!
Today I have a christmas card in not so usual colors, but with a traditional wreath to share.

Der Hintergrund ist mit einem türkis-grau-blauen Stück Cardstock gemacht. Den habe ich zuerst mit dem Fröhliche Weihnachten Embossingfolder von Charlie und Paulchen geprägt. Dann habe ich ihn von außen her mit Distress Oxide Uncharted Mariner und ein wenig Black Soot gewischt.
Außerdem habe ich weiße Acrylfarbe mit ein wenig Perfect Pearls und Wasser gemischt und auf den Cardstock gespritzt. 

The background I've cut from turquoise-grey-blue cardstock. I first dry embossed "merry christmas" all over it using the Fröhliche Weihnachten embossing folder by Charlie und Paulchen. Then I inked the edges with Uncharted Mariner and a bit of Black Soot.
I mixed some white acrylic paint with a bit of  Perfect Pearls and water and flicked it onto the cardstock.


Der Kranz ist mit dem Mistletoe Wreath Stempelset von Altenew gemacht. Ich habe ihn erst mit schwarzer Tinte gestempelt und dann mit dem zugehörigen Stencilset coloriert. Dafür habe ich Distress Oxide Speckled Egg, Evergreen Bough und Rustic Wilderness für die Blätter sowie Bundled Sage für die dunkleren Beeren benützt. Die hellen Beeren habe ich nur mit Versamark gewischt und dann mit grün-weißlich irisierenden Perfect Pearls betupft. 
Da die Blätter ein wenig zu eintönig waren, habe ich noch jeweils einen zu jedem Farbton passenden, etwas dunkleren Polychromo genommen und die Blätter ganz einfach schattiert. 
Anschließend habe ich den Cardstock zurück ins Misti gelegt, den Kranz erneut, diesmal mit Versamark, gestempelt und die Outlines mit silber-pearl Embossingpulver embosst. 
Ich habe den Kranz ausgeschnitten und die Beeren mit Glossy Accents überzogen.
Die Schleife ist mit einer Stanze aus einem der Vintage Kits von Magnolia gemacht. Ich habe sie aus dem selben Cardstock gestanzt, den ich für den Hintergrund verwendet habe, und ebenfalls mit Uncharted Mariner und Black Soot leicht gewischt. 
Irgendwie sah der Kranz auf dem Cardstock verloren aus. Also habe ich aus silbernem Schimmer-Metallic-Cardstock einen der Stitched Rectangle Frames von Create a Smile gestanzt und aufgeklebt.
Ich habe den Kranz mit dünnem 3D Tape auf den Hintergrund geklebt. Aus silbernem  Schimmer-Metallic-Cardstock habe ich zwei Sterne gestanzt, dünne silberne Schnur daran befestigt und sie in die Mitte des Kreises geklebt - einmal mit dünnem, einmal mit dickem 3D Tape. Die Enden der Schnüre habe ich unter der Schleife versteckt, die ich ebenfalls mit 3D Tape aufgeklebt habe.

The wreath is made with the Mistletoe Wreath stamp set by Altenew. I first stamped it with black ink and then used the matching layering stencils to color it. I used Distress Oxide Speckled Egg, Evergreen Bough and Rustic Wilderness for the leaves and Bundled Sage for the darker berries. The lighter berries I only applied with Versamark and then dabbed some green-white iridescent Perfect Pearls onto them.
Since the leaves looked a bit flat I picked one Polychromos for each color and very lightly shaded the leaves with those. 
Then I put the cardstock back in my Misti and stamped the wreath again, this time with Versamark, then heat embossed them with a silver pearl embossing powder.
I cut out the wreath and covered the berries with Glossy Accents. 
The bow I die cut from the same cardstock that I had also used for the background using a die from one of the Vintage Kits by Magnolia, then shaded it lightly with Uncharted Mariner and Black Soot again.
The wreath looked a bit lost on the background. So I die cut one of the Stitched Rectangle Frames by Create a Smile from a shimmery silver metallic cardstock and glued it onto the background.
I adhered the wreath with thin foam tape onto the background. From the same silver shimmer cardstock I die cut two stars and attached a thing silver string to each. Then I adhered them into the center of the wreath - one with thin, one with thick foam tape. The ends of the strings I've hidden behind the bow, that I adhered with foam tape again.


Eigentlich war das der Plan für die Karte. Aber irgendwie fehlte ihm noch ein Text - der geprägte Text im Hintergrund ist doch recht subtil. Also habe ich ein Frohes Fest mit einer Stanze von Charlie und Paulchen aus grünem Schimmer-Cardstock gestanzt und unter dem Kreis innerhalb des Rahmens aufgeklebt.

That was the original plan for my card. But somehow I was missing a text - the dry embossed text in the background is pretty subtle. So I die cut a "season's greetings" from green shimmer cardstock and adhered it under the wreath inside the frame.


Zum Schluss habe ich den Cardstock nur noch auf einen weißen Kartenrohling geklebt - mehr Deko brauchte die Karte nämlich gar nicht, finde ich.

Then I just adhered the cardstock to a white note card - because I think this card doesn't need any more decorations.

Samstag, 9. Dezember 2023

Weihnachtspost vom Nordpol

 
Hallo Ihr Lieben!
Ich habe den Eindruck, dass die bisherigen Werke, die ich auf dem Kulricke-Blog gezeigt habe, doch recht boxenlastig waren. Heute ändert sich das - mit dieser Weihnachtskarte.

Hello everyone!
I have the feeling, that the projects I shared over on the Kulricke Blog so far have been pretty box heavy. I am changing that today and am sharing this christmas card.

Für den Hintergrund habe ich ein Stück weißen Cardstocks von außen her mit Distress Oxide Faded Jeans gewischt und die Mitte weiß gelassen. Dann habe ich hier die North Pole Air Mail Stanze ausgestanzt und außerdem aus der Mitte des Textes einen Kreis gestanzt. 
Aus hellblauem Cardstock habe ich die Schneeflocken aus dem Schneeflocken 2 Stanzenset mehrere Male ausgestanzt und rundum am Rand auf den Cardstock geklebt. Die überstehenden Teile der Schneeflocken habe ich abgeschnitten. Dann habe ich nochmal etwas Faded Jeans aufgewischt, nur ganz an Rand, so dass die Schneeflocken hier etwas mit dem Hintergrund verschmelzen. Dann habe ich noch silberne Metallic Watercolor auf den Cardstock gespritzt.

For the background I inked a piece of white cardstock from the edge inwards with Distress Oxide Faded Jeans, leaving the center white. Then I die cut the North Pole Air Male from it and also cut a circle from the center of the text.
From light blue cardstock I die cut the snowflakes from the Snowflakes 2 die set several times and adhered them all around along the edge of the cardstock. I cut off the overhanging parts of the snowflakes, then inked some more Faded Jeans onto the snowflakes - just along the edge - to make the snowflakes blend a bit into the background. I also flicked some silver metallic watercolor onto the cardstock.


Star der Karte ist dieser süße Pinguin. Ich weiß, der kommt eigentlich vom Südpol. Aber dieser hier wollte so gerne mal beim Weihnachtsmann arbeiten. Also hat er sich als Rudolph verkleidet und sich so beim Weihnachtsmann beworben. Der hat das ganze natürlich sofort durchschaut, wollte dem Pinguin aber seinen großen Traum nicht zerstören. Also hat er ihn kurzerhand als Austauschstudenten aufgenommen. 
Der Pinguin ist aus dem Set Felix mit Mütze und mit Copic coloriert. Vor dem Colorieren habe ich die Briefe aus dem Set Bärige Weihnachtspost mit ganz heller Tinte unter den Fügel gestempelt - ich war mir im Vorfeld nicht klar, ob ich sie in hellem Blau oder Grau colorieren wollte. Ich habe mich dann für Blau entschieden und später die Linien der Briefe mit einem grauen Fineliner nachgemalt.
Der Pinguin trägt auf dem Kopf den Haarreif Geweih - gestanzt aus weißem Cardstock und ebenfalls mit Copics coloriert. Außerdem habe ich einen kleinen Kreis rot coloriert, den ich als Nase benutzt habe. Den Reifen des Haarreifs und die Nase habe ich außerdem mit Glossy Accents überzogen. 
Nach dem Ausschneiden habe ich dem kleinen Kerl mit weißem Twine noch ein kleines silbernes Glöckchen um den Hals gebunden.
Ich habe den North Pole Air Mail Text samt des Kreises aus der Mitte noch drei weitere Male aus weißem Cardstock gestanzt und dann mit einer größeren Kreisstanze ausgestanzt. Die habe ich auf den in den Hintergrund gestanzten Text geklebt und alles mit hellblauem Cardstock hinterlegt. Darauf habe ich dann den Pinguin-Rudolph geklebt.

Star of the card is this little penguin. I know, he lives at the south pole. But this one had the big dream of working for Santa. So he dressed up as Rudolph and sent a job application to Santa. Of course Santa comprehended immediately that this is no reindeer, but he didn't want to burst this penguin's dream and accepted him as an exchange student. 
The penguin I colored with Copics. Before I did the coloring, I stamped the letters under his wing, using very light ink. I wasn't sure if I wanted to do the letters in light blue or grey. I went with blue and later re-drew the stamped lines with a grey fineliner. 
The penguin is wearing a headband with antlers, that I die cut from white cardstock and colored with Copics. I also colored a small circle white and used it as his nose. The bottom of the headband and the nose I covered with Glossy Accents. 
After I had cut the image out I used some white twine to tie a small silver bell around his neck.
I die cut the North Pole Air Mail text including the center circle three more times from white cardstock and then cut them out with a larger circle die. I stacked them onto the text cut from the background and put some light blue cardstock behind them. Then I glued the penguin rudolph on top.


Für den Text habe ich das Weihnachtspost aus dem Set Frohes Fest Reverse mit Faded Jeans auf weißen Cardstock gestempelt und ausgeschnitten.
Das Für Dich darunter ist mit einer recht alten Stanze gemacht, die es wohl nicht mehr gibt. Ehrlich gesagt war das sogar eine meiner ersten Stanzen von Kulricke. Ich habe den Text dreimal aus weißem Cardstock gestanzt, aufeinander und dann auf die Karte geklebt.

For the text I stamped a "christmas mail" with Faded Jeans onto white cardstock and cut it out. The die cut words mean "for you". I die cut them three times from white cardstock, stacked them and adhered both texts to the background.


Zum Schluss habe ich den dekorierten Cardstock nur noch auf einen weißen Kartenrohling geklebt.

As the last step I just adhered the decorated cardstock to a white card base.

Freitag, 8. Dezember 2023

Stampcorner Dezember-Aktion Tag #8


 Hallo Ihr Lieben!
Das heutige 8. Motive der Dezember-Aktion von Stampcorner stammt aus der Feder von Oma Plott und ich darf es heute auf dem Stampcorner Blog zeigen. 

Hello everyone!
Image #8 of the december special by Stampcorner is designed by Oma Plott, and I am presenting it over on the Stampcorner Blog today. 

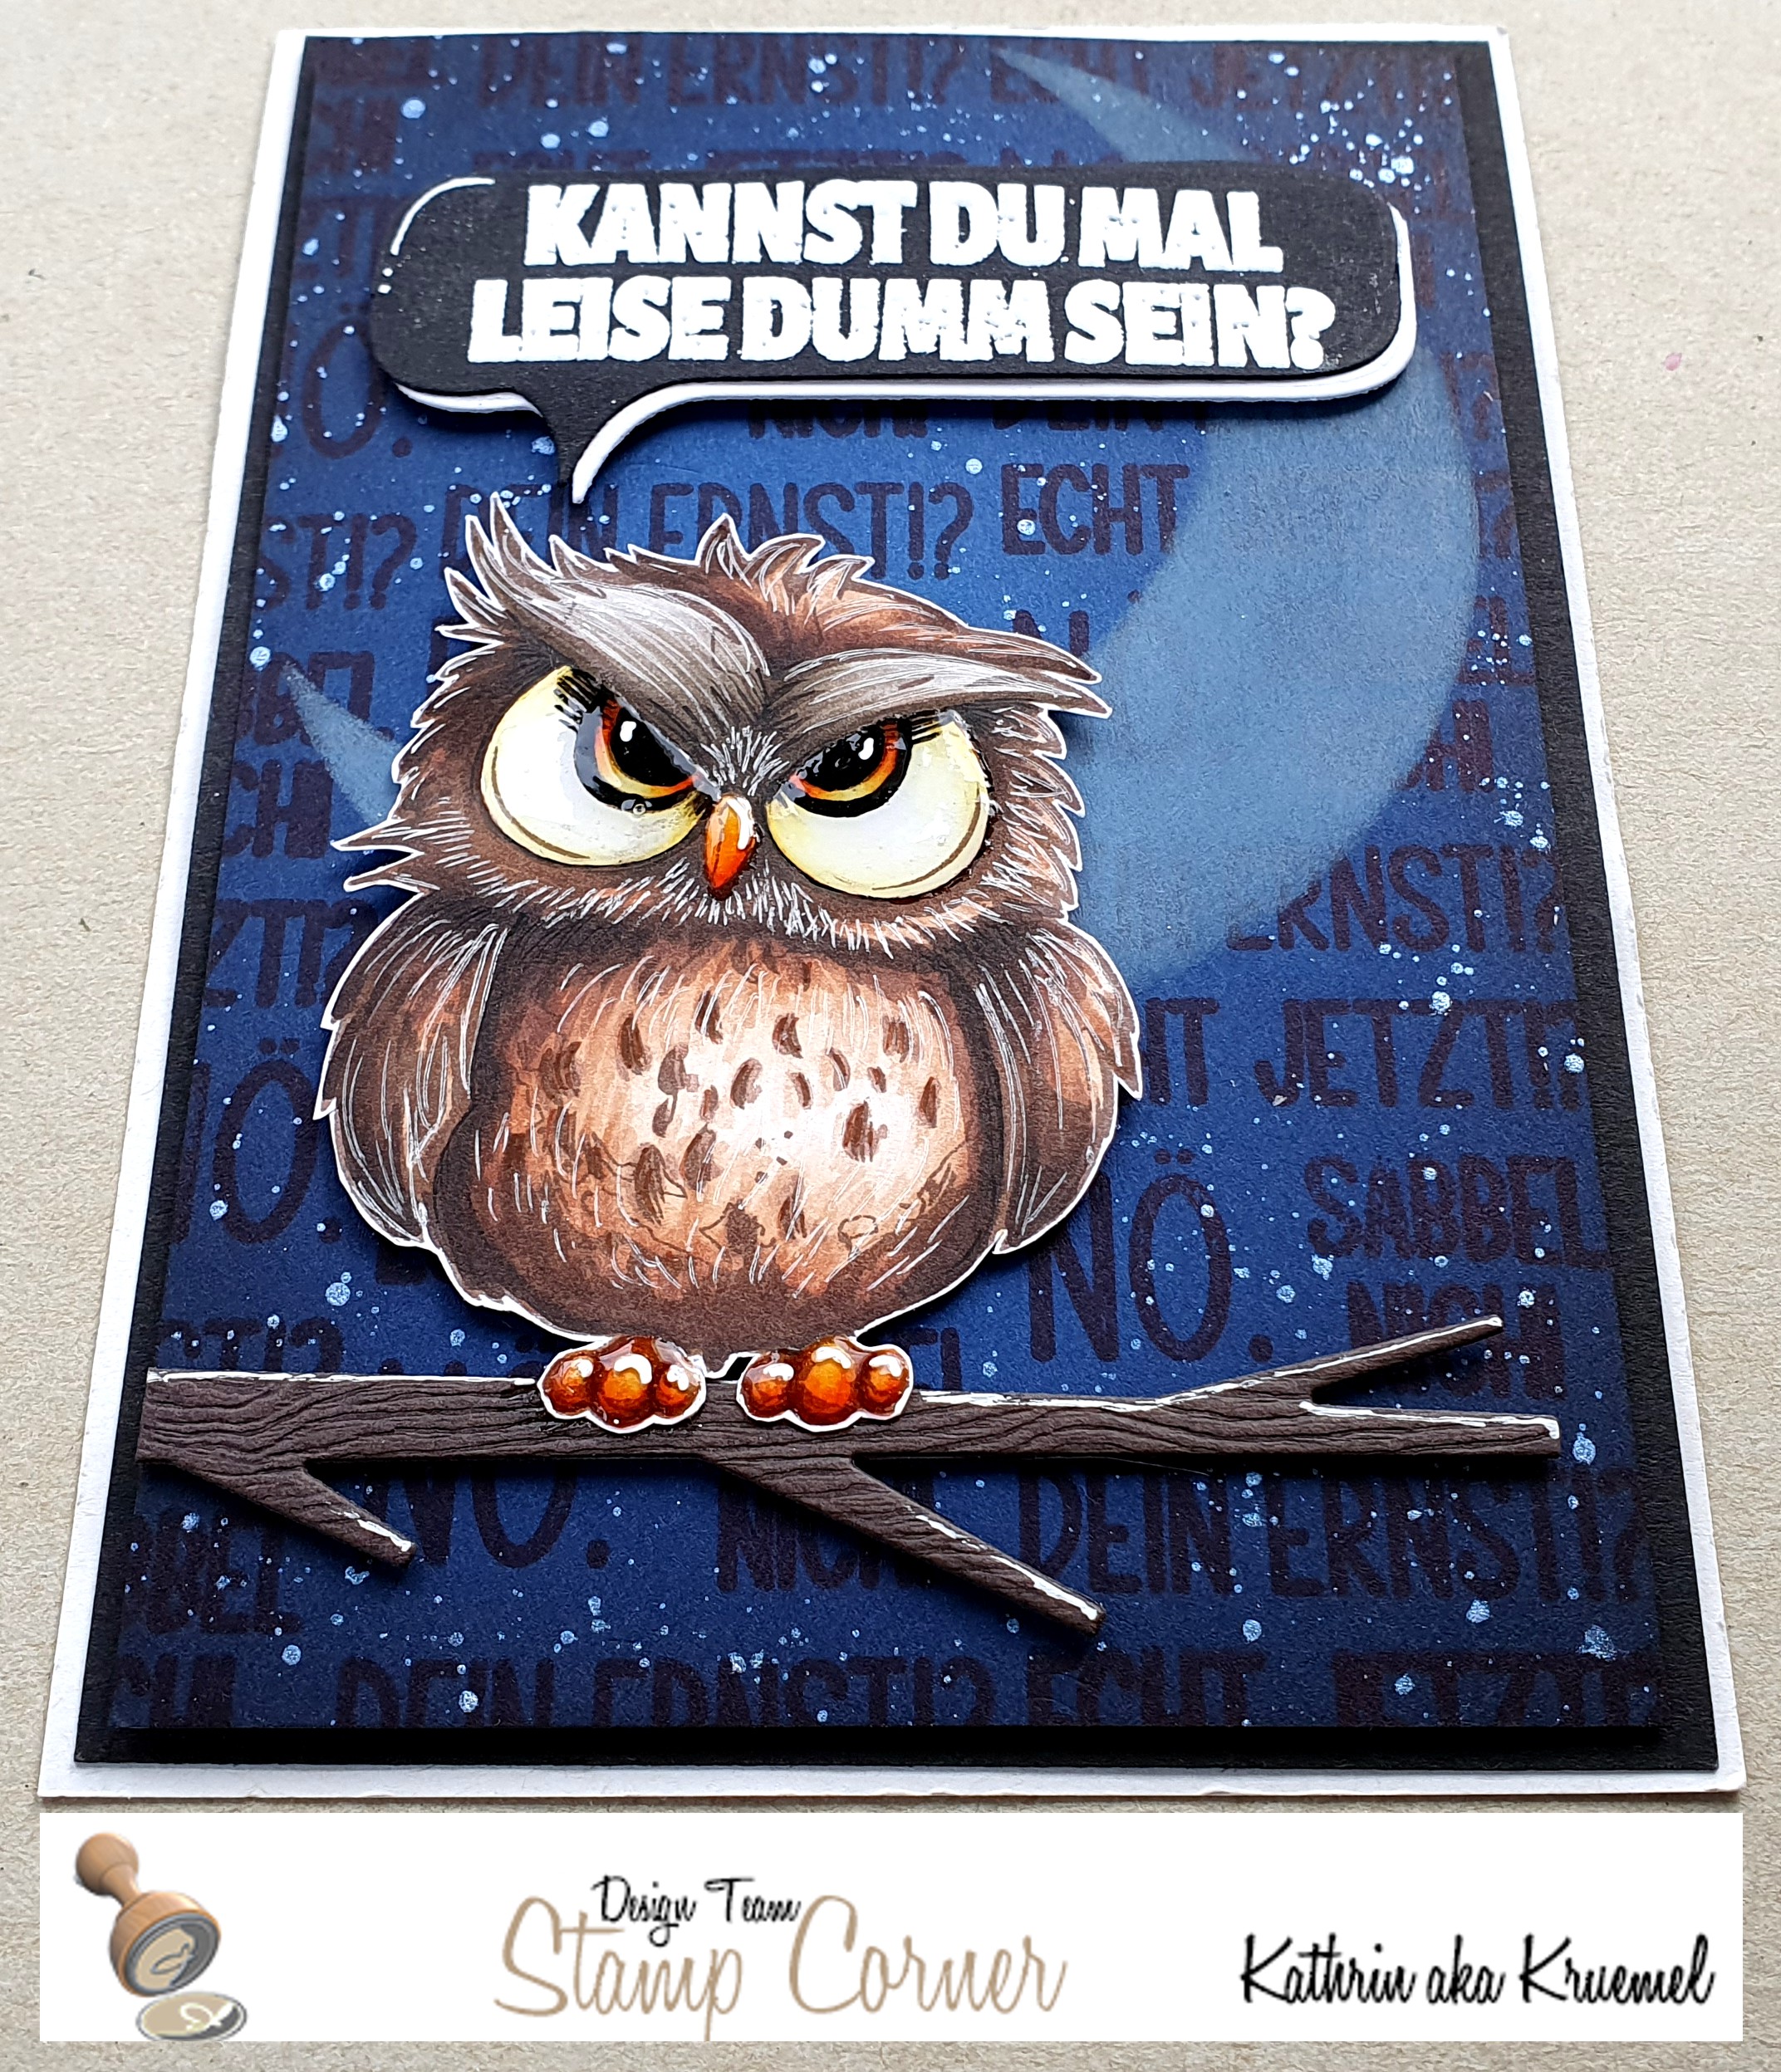
Ich war sofort in diese Eule verliebt - und der Text dazu ist einfach genial.
Für den Hintergrund habe ich die Ränder eines Stücks dunkelblauen Cardstocks mit Distress Ink Chipped Sapphire und Black Soot gewischt. Dann habe ich die Texte Echt Jetzt?!, Dein Ernst?!, Nö. und Sabbel Nicht aus den Stempelsets Echt Jetzt?! und Stay Crazy, ebenfalls von OmaPlott designed, mit Versafine Clair Medieval Blue komplett über den Cardstock gestempelt. Dafür habe ich die Texte in meinem Misti angeordnet und den Cardstock passend verschoben. So wird  auch alles schön gerade.
Für den Mond habe ich mir mit der Over the Moon Stanze von MFT einen Stencil aus Cardstock gemacht und den Mond mit weißer Stempelfarbe aufgewischt. Dann habe ich den gewischten Mond mit dem ausgestanzten Positiv abgedeckt und silberne Metallic Watercolor auf  den Cardstock gespritzt.
 
I immediately fell in love with this owl.
For the background I inked the edges of a piece of dark blue cardstock with Distress Ink Chipped Sapphire and Black Soot. Then I filled the background with some text stamps, that I stamped with Versasfine Clair Medieval Blue. I simply arranged the four different texts in my Misti and then moved the cardstock until it was filled all over.
For the moon I created a stencil from cardstock with the Over the Moon die by MFT and inked the moon with white ink onto the background. Then I covered the inked moon with the die cut moon and flicked silver metallic watercolor onto the cardstock.


Schaut Euch diese Eule an! Sie ist einfach so super. 
Ich habe das Motiv mit Memento Rich Cocoa abgestempelt, weil mir hier schwarze Stempellinien zu hart gewesen wären. Dann habe ich das Motiv mit Copics coloriert und dabei die braunen Stempellinien mit übermalt. So hat das Motiv fast etwas von No-Line Coloring. 
Mit einem weißen Gelstift habe ich einige Details hinzugefügt, die Augen habe ich mit einem schwarzen Fineliner nachgemalt. Dann habe ich sie, die Füße und den Schnabel mit Glossy Accents überzogen.
Aus dem braunen Woodgrain Cardstock von LawnFawn habe ich dann noch einen Ast von MFT ausgestanzt und die Eule daraufgeklebt.
 
This owl is just amazing.
I stamped the image with Memento Rich Cocoa because black lines would have been too hard here. Then I colored the image with Copics and also went over the stamped lines with my markers. This way the image kind of looks like done with no-line coloring.
I added a few details with a white gel pen, the eyes I re-drew with a black fineliner. Then I covered those, the beak and the feet with Glossy Accents.
From LawnFawn's brown woodgrain cardstock I die cut a branch by MFT and put the owl onto it.


Der Text kommt zusammen mit der Eule im Set - ich finde ihn perfekt. Ich habe ihn mit weißem Embossingpulver auf schwarzen Cardstock embosst und weil die Linien doch recht dick sind, zwei Schichten embosst, damit sie auch (fast) perfekt gefüllt sind. Dann habe ich ihn mit einer Sprechblasenstanze ausgestanzt und die Sprechblase mit einer weißen Schattenlage hinterlegt.
 
The text means "can you please be that stupid quietly?" and comes together with the owl in the set. I white heat embossed it onto black cardstock and - just in case - did two layers of embossing to make the solid letters look - nearly - perfectly filled. Then I die cut the text out with a speech bubble die and put a white shadow behind it.


Die Eule samt Ast und die Sprechblase habe ich mit dünnem 3D Tape auf den Hintergrund geklebt. Dann habe ich den Cardstock schwarz gemattet und auf einen weißen Kartenrohling geklebt.

I attached the owl with branch and the speech bubble with thin foam tape onto the background. Then I matted the cardstock black and adhered it to a white note card.

Donnerstag, 7. Dezember 2023

LawnFawnatics Challenge #162

 
Hallo Ihr Lieben!
Heute zeige ich die Karte, die mir zum Thema Coffee, Tea and Treats der aktuellen LawnFawnatics Challenge #162 vom Tisch gehüpft ist.

Hello everyone!
Today I am sharing with you the card idea, that I had for the theme of Coffee, Tea and Treats of the current LawnFawnatics challenge #162.

Ich hatte sofort die schöne amerikanische Tradition, am Abend vor Weihnachten Kekse und Milch für Santa bereit zu stellen, im Kopf. Und so dürfen Milch und Kekse meine Karte zieren.
Ich wollte einen weihnachtlichen aber trotzdem etwas dezenteren Hintergrund. Also habe ich ein Stück craft farbenen Cardstock zugeschnitten und dann mit Distress Oxide Frayed Burlap, Walnut Stain und Ground Espresso die Poinsettia Background Layering Stencil aufgewischt. Dann habe ich noch goldene Metallic-Watercolor aufgespritzt.

I immediately had the american tradition of placing a glass of milk and coookies for Santa in the room the night before christmas. We in Germany don't do this, but I really like the idea. And so mild and cookies are what I used on my card.
I wanted a christmassy background that wasn't too busy. So I cut a piece of kraft colored cardstock and then inked the Poinsettia Background layering stencils onto it with Distress Oxide Frayed Burlap, Walnut Stain and Ground Espresso. I also flicked some gold metallic watercolor onto the cardstock.


 Nun, Santa freut sich bestimmt über ein Glas Milch mit Keksen, aber wenn die Milch so toll daher kommt, schmeckt sie bestimmt nochmal so gut.
 
 Well, I am sure Santa loves a glass of milk and some cookies, but when everthing is arranged like on this card, he enjoys it even more.
 
 
Ich habe hier das Glas aus dem Build-a-Drink Stanzenset benutzt und die Füllung aus weißem Cardstock, die Outlines aus Folie gestanzt. Von der Milch habe ich oben ein Stück weggeschnitten und dann das Folienglas obenaufgeklebt - und zwar nicht nur die Outlines, sondern auch die Füllung. Am oberen Rand des Glases habe ich Sprinkles aus dem I Scream, You Scream Stanzenset in grün und rot angeklebt. Außerdem stecken in der Milch ein Strohhalm aus dem Build-a-Drink Set sowie ein Weihnachtspick aus dem Build-a-Drink Cocktail Add-On Set. Der hat mich so an einen Weihnachtsbaum erinnert, dass ich fand, er passt perfekt. Ich habe ihn mit einer Schleife aus dem Christmas Garland Stanzenset sowie einem goldenen Stern aus dem Skinny Hearts and Stars Tag Set dekoriert. 
Außerdem habe ich dem Glas noch einen Schal aus dem Thanks a Latte Stempelset angezogen. Alle Motive auf der Karte sind entweder gestanzt und mit Copic schattiert oder mit JellyFish Ink von LawnFawn gestempelt und in der No-Line Technik coloriert. 
Hinter das Glas habe ich rechts und links jeweils einen Zweig aus dem Christmas Garland Set und Tannenzweige aus dem Deck the Halls Stempelset gesteckt. Die habe ich erst mit grüner Tinte abgestempelt und dann mit Distress Ink Rustic Wilderness eingefärbt. Dann habe ich den Zweig nochmal aufgestempelt und ein weiteres Mal nur den unteren/innneren Teil mit etwas dunklerer grüner Tinte darüber und habe die Zweige ausgeschnitten.

Here I used the glass dies from the Build-a-Drink die set and cut the filling from white cardstock, the outlines from acetate. I cut off the top of the milk filling and then glued the acetate glass on top - not just the outlines but also the inner pieces. I cut some red and green sprinkles using the I Scream, You Scream die set and attached them to the brim of the glass. I also put a paper straw from the Build-a-Drink die set and a cocktail pick from the Build-a-Drink Cocktail Add-On die set into the milk. The pick reminded me so much of a christmas tree that I thought it was perfect. I decorated it with a bow from the Christmas Garland die set and a golden star from the Skinny Hearts and Stars Tag die set.
I also wrapped a scarf around the glass, made with a stamp from the Thank a Latte set. All images on this card are either die cut and shaded with Copics or stamped with JellyFish ink by LawnFawn and colored no-line.
Behind the glass I put some branches from the Christmas Garland set and some pine branches from the Deck the Halls stamp set. I first stamped them with green ink, then inked the cardstock with Distress Ink Rustic Wilderness. I stamped the branches again and then just the bottom/center with darker green ink on top and cut the branches out.


Die Kekse sind aus dem Stempelset How You Bean? Christmas Cookie Add-On und sind mit weißem Embossingpulver auf braunen Cardstock embosst. Den Zuckerguss des Baumes und Sterns habe ich mit Distress Embossing Glaze Mowed Lawn und Lumberjack Plaid auf weißen Cardstock embosst, ausgeschnitten und auf den Keks geklebt. Das Lebkuchemännchen habe ich mit Stempeln aus dem Sweet Christmas Stempelset mit Haaren, Knöpfen und einer Schleife versehen. 
Aus dem selben Stempelset sind auch die Peppermint-Bonbons, die Makronen habe ich mit dem Sahnhäubchen aus dem Thanks a Latte Stempelset gemacht. Die und die beiden Plätzchen mit Zuckerguss habe ich dann noch mit weiteren Sprinkles dekoriert. 
Und damit Santa auch wirklich weiß, dass die Leckereien für ihn sind, habe ich mit dem Henry Jr's ABCs Stempelset und Lobster Ink noch Santa auf ein Stück weißen Cardstock gestempelt, den wie ein gefaltetes Papier zugeschnitten und ebenfalls mit Copics etwas schattiert. 
Unter der Deko war dann Platz für einen meiner Texte. Der ist aus dem Stempelset Ho Ho Holidays und weiß auf dunkelbraunen Cardstock embosst.

The cookies are from the How You Bean? Christmas Cookie Add-On set and white heat embossed onto brown cardstock. The icing of the tree and star shaped cookies I heat embossed with Distress Emossing Glaze Lumberjack Plaid and Mowed Lawn onto white cardstock, cut them out and adhered them onto the cookies. The gingerbread man I decorated with a lock of hair, a bow and buttons from the Sweet Christmas stamp set.
From the same stamp set are the peppermint candies as well, the white puffy cookies are made using the cream puff from the Thanks a Latte stamp set. These and the cookies with the icing I decorated with more sprinkles.
And to make sure Santa knows that all those goodies were set up for him I stamped Santa with Lobster Ink onto a piece of white cardstock using the Henry Jr`s ABCs stamp set, then cut it into the shape of a folded sheet of paper and shaded it with Copics.
Under the decoration there was room for one of my texts. It's from the Ho Ho Holidays stamp set and white heat embossed onto dark brown cardstock.
 

 Ein zweiter Texte befindet sich oben links auf meiner Karte. Der ist aus dem Set Tiny Christmas und ebenfalls weiß auf dunkelbraunen Cardstock embosst. 
Und weil der obere Teil der Karte noch etwas leer wirkte, habe ich hier noch eine Lichterkette aufgehängt. Die ist mit dem Mini String of Lights Stanzenset aus goldenem Spiegel-Cardstock gestanzt, die Birnen aus weißem Cardstock. Dann habe ich sie etwas schattiert und mit Glossy Accents überzogen. 

Another text I attached to the top left of my card. It's from the Tiny Christmas stamp set and also white heat embossed onto dark brown cardstock.
And since the top of the card looked a bit plain I've hung up some christmas light there. I die cut it with the Mini String of Lights die set from gold mirror cardstock, the light bulbs I cut from white cardstock and shaded them lightly. Then I covered those with Glossy Accents.


Hier könnt Ihr die Folienschicht auf dem Glas besser sehen - und auch, dass ich zum Zusammensetzen der Karte 3D Tape benutzt habe, dickes und dünnes und teilweise sogar aufgedoppelt. 
Als Deko habe ich dann noch einige goldene Pailettenverteilt und alles auf einem weißen Kartenrohling befestigt.

Here you can see the glossy acetate layer of the glass - and also that I used foam tape to put my scene together. I used thin and thick tape and doubled it in a few areas.
I added a few gold sequins as embellishments and then adhered everything to a white note card.

Mittwoch, 6. Dezember 2023

Stampcorner Dezember-Aktion Tag #6

 
 Hallo Ihr Lieben!
Heute ist Tag 6 der Dezember-Aktion von Stampcorner, und heute versteckt sich ein Set mit diesem süßen Bären von StuffDeluxe hinter dem Türchen des Tages.
 
Hello everyone!
It's day 6 of the december special by Stampcorner. Today's special is a stamp set with this cute bear by StuffDeluxe.
 
Ich finde den Bären prima - er kann maritim, herbstlich, winterlich und natürlich für alle möglichen Gelegenheiten eingesetzt werden. Ich habe mich hier für eine "hab dich lieb" Karte in craft und blau-grau entschieden. 
Erst habe ich ein Stück weißen Cardstocks mit Distress Ink Speckled Egg, Stormy Sky und Black Soot gewischt. Dann habe ich den Pinstripe Background von MFT mit Distress Oxide Speckled Egg darüber gestempelt. Das Oxide liegt oben auf den Inks auf und ist überall gut sichtbar, trotzdem passt es farblich perfekt. Und das Muster greift die Streifen im Pulli des Bären wieder auf. 
Dann habe ich einige weiße Sprenkel mit Copic Opaque White aufgespritzt.
 
I love this bear - he can be used maritim, for fall or winter and of course for all kinds of occasions. I decided to make a "love you" card in kraft and grey-ish blue today. 
First I inked a piece of white cardstock with Distress Ink Speckled Egg, Stormy Sky and Black Soot. Then I stamped the Pinstripe Background by MFT with Distress Oxide Speckled Egg onto it. The Oxide lays on top of the ink and is clearly visible on every color of the background. And it matches the colors of the inks perfectly. The pattern also picks up the stripes on the bear's hoodie.
Then I added some spatters with Copic Opaque White.
 

 Den süßen Bären habe ich mit Copics coloriert und einige Highlights mit einem weißen Gelstift aufgemalt.
Über dem Bären habe ich zwei der Love Speech Bubbles von MFT aufgeklebt. Sie sind aus carft farbenem Cardsdtock gestanzt. Hinter die kleinere habe ich weißen Cardstock, hinter die größere ein Stück mit Distress Oxide Speckled Egg eingefärbten Cardstock hinterlegt. 

I colored the cute bear with Copics and added a few highlights with a white gel pen.
Above the bear's head I attached two of the Love Speech Bubbles by MFT. I die cut them from kraft colored cardstock. Behind the smaller one I put some white cardstock, behind the larger one a piece of cardstock that I inked with Distress Oxide Speckled Egg.


Für den Text habe ich die Lieblingsmensch-Stanze von Stampcorner einige Male aus craft Cardstock gestanzt, die Teile aufeinander geklebt und mit einem aus weißem Cardstock gestanzten Wort etwas versetzt hinterlegt. Anstatt der I-Punkte habe ich kleine weiße Herzen aufgeklebt.
Der Text darunter ist aus dem selben Set wie der Bär. Eigentlich ist er zweizeilig mit einem Rahmen drumrum. Ich habe ihn mit Distress Ink Speckled Egg einzeilig abgestempelt und dazwischen etwas Platz für die Schleife des G aus Lieblingsmensch gelassen. Auch das Herz ist im Set enthalten. Ich habe es weiß auf craft farbenen Cardstock embosst und ausgeschnitten.
Außerdem  habe ich noch das Wort Love mit einer Stanze von MFT aus Vellum gestanzt und hinter den Bären geklebt.

For the text I die cut the word Lieblingsmensch - favorite human - a few times from kraft cardstock, stacked the pieces and put one white die cut word a bit off behind the brown words. Instead of the tittle of the i I used small white hearts.
The text underneath is from the same set as the bear. Originally it is divided into two lines and has a frame. I stamped it with Distress Ink Speckled Egg in just one line and left a bit of room for the loop of the G of the die cut word between the stamped words. Also the heart is included in the set. I white heat embossed it onto kraft cardstock and cut it out.
I also die cut the word love with a die from MFT from Vellum and glued it behind the bear.


Die große Sprechblase habe ich mit dünnem 3D Tape aufgeklebt, damit der gestanzte Text nicht der einzig erhabene Teil ist. Dann habe ich als Deko einige weiß-irisierende Perlen aufgeklebt, den dekorierten Cardstock craft farben gemattet und alles auf einen weißen Kartenrohling geklebt.

I attached the larger speech bubble with thin foam tape to make sure, the die cut word isn't the only raised part of the card. Then I added a few white iridescennt pearls, matted the decorated cardstock kraft and adhered everything to a white note card.