Hallo Ihr Lieben!
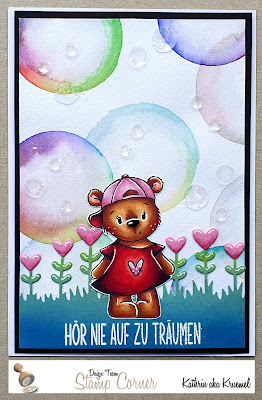
2023 ist gestartet, und es hat neue Stempel von Stampcorner im Gepäck! Eines der süßen Motive zeige ich Euch heute auf dem Stampcorner Blog auf dieser Karte.
Hello everyone!
2023 has started, and it brought some new stamps by Stampcorner! I used one of the cute new images on this card, that I'm sharing over at the Stampcorner Blog today.
Was sich in diesem Jahr auch nicht geändert hat, ist die Tatsache, dass ich im Januar immer erstmal nicht weiß, welches Thema ich basteltechnisch umsetzen soll. Weihnachten und Silvester sind vorbei, der Winter könnte gerne auch schon abziehen.... also was machen? Und dann kam mir die Idee, einfach Seifenblasen für den Hintergrund zu gestalten, die passen auf jeden Fall zum Motiv und sind meiner Meinung nach ganzjahrestauglich.
What hasn't changed in the new year as well is the fact, that I never now what themes to use for my january cards. Christmas and New Year's have passed, I start getting sick of winter... so what to make? And then I had the idea of making a soap bubble background. They go great with this image and are definately something that can be used all year long.
Die Seifenblasen sind super einfach gemacht. Ich habe kreisförmig Watercolors in gelb, rot, lila, blau und grün auf eine Folie aufgetragen und dann den Rand eines Glases in die Farbe gedrückt. Dann habe ich das Glas auf ein Stück Watercolor Cardstock gesetzt, um die Farbe kreisförmig zu übertragen, und anschließend die Farbe mit einem Pinsel und Wasser ein wenig nach innen vermalt. Jede Seifenblase wird ein wenig anders in ihren Farben, ich habe hellere und dunklere Blasen gemacht und sie auch überlappen lassen. Wenn sich die Farben auf der Folie zu sehr mischen, muss man sie neu auftragen, sonst werden die Blasen irgendwann nur noch braun. Aber es ist so einfach, diese tollen Seifenblasen zu machen.
Anschließend habe ich die Farbe trocknen lassen und habe mir dann einen Ausschnitt ausgesucht, den ich für meine Karte benutzen wollte, und habe den etwas kleiner als Kartengröße ausgeschnitten.
Zwischen den Seifenblasen habe ich dann noch einige klare Pailetten verteilt.
These soap bubbles are super easy to make. I just put some yellow, red, purple, blue and green watercolor in a ring onto a piece of acetate, then pressed the rim of a glass into the color. I put the glass onto a piece of watercolor cardstock to transfer the ink and used a wet pencil to move the color a bit towards the center. Each bubble looks a bit different colorwise, I create some brighter and some softer ones. In case the colors mix too much on your acetate you need to put down some new color or your bubbles will turn into a muddy brown. But it's so easy to create soap bubbles this way!
I let the ink air dry and then picked the area I liked the most, cutting it out a bit smaller than a card base.
Between the soap bubbles I adhered some clear sequins onto my card.
Da der Bereich rund um die Seifenblasen weiß ist, wollte ich irgend einen Boden, auf dem mein Motiv stehen kann. Also habe ich die Heart Garden Border Stanze von LawnFawn sowie die dazugehörigen einzelnen Herzen aus weißem Cardstock gestanzt. Die komplette Bordüre habe ich dann von unten her mit Distress Oxide Uncharted Mariner, Pine Needles und Mowed Lawn gewischt, die kleinen Herzen habe ich mit Copics erst pink coloriert und dann auf die Bordüre aufgeklebt.
Und darauf kam dann mein Motiv: dieses süße Bärenmädchen aus dem Stempelset Meerverliebt 2, unverkennbar aus der Feder von StuffDeluxe. Sie ist ebenfalls mit Copics coloriert. Dann habe ich sie ausgeschnitten und so auf die Bordüre geklebt, dass darunter noch Platz für einen Text war. Der ist aus dem Stempelset Sei Mutig, das Teil des Adventskalenders war, das es aber weiterhin zu kaufen gibt. Ich habe den Text mit weißem Embossingpulver aufembosst.
Zum Schluss habe ich alles schwarz gemattet und auf einen weißen Kartenrohling geklebt.
Since the cardstock around the bubbles is white I wanted some kind of ground for my image to stand on. So I die cut the Heart Garden Border by LawnFawn - and the additional indivdual hearts - from white cardstock. I used Distress Oxide Uncharted Mariner, Pine Needles and Mowed Lawn to ink up the border, starting with the darkest color at the bottom. To color the individual hearts pink I used Copics, then attached them to the border.
And then I put my image on top: this cute bear girl, designed by StuffDeluxe. Again I used Copics to color her in, then cut her out and attached her to the border, leaving room at the bottom for a text. This one means "never stop dreaming". I white heat embossed it directly onto the die cut border.
To finish the card I matted the cardstock black and adhered it to a white note card.


