Dienstag, 9. März 2021

Eilige Geburtstagsgrüße

 
Hallo Ihr Lieben!
Letzte Woche habe ich auf dem Stamping-Fairies Blog eine Geburstagskarte für einen Teen gezeigt. Auch heute gibt es eine Geburtstagskarte, auch diese wieder für einen Mann. Der ist aber noch ganz klein. So ist sie auch sehr viel niedlicher ausgefallen, und ist mir dementsprechend leichter von der Hand gegangen.

Hello everyone!
Last week I've shared a teen birthday card over at the Stamping-Fairies Blog. And also today I have a birthday card to share, again for a man. But this one is so much younger that I was able to go way cuter. And that made making this card so much easier to me. 

Ich habe hier eine Slimine Card gemacht - so war jede Menge Platz für meine Szene.

I've made a slimline card here - and that left plenty of room for my scene.


Im oberen Bereich der Karte habe ich die Skyline einer Stadt gestaltet, aus der der Bär im Rennauto gerade kommt.
Ich habe mit der Rolling Clouds Stencil von MFT und Distress Oxide Tumbled Glass eine große Wolkenreihe oben auf die Karte gewischt. Darüber kamen dann mit der Ray of Light Stencil und Distress Oxide Scattered Straw die Strahlen der aufgehenden Sonne.
Die Stadt-Skyline habe ich mit der City Block Stanze von MFT aus schwarzem Cardstock gestanzt und vor den Himmel geklebt.
Wiederum davor kam dann noch ein grüner Hügel. Den habe ich mit einer der Stitched Slimline Snow Drifts Stanzen gemacht.
Oben in die linke Ecke habe ich dann noch den ersten Teil meines Textes aufgestempelt.

I've added a city, from which my little bear in his car is just combing from, to the top of my card.
I've added one row of big white clouds there using the Rolling Clouds stencil by MFT and Distress Oxide. Then I've put the rays of the raising sun on top with the Ray of Light stencil and Distress Oxide Scattered Straw.
The city skyline is cut from black cardstock with the City Block die by MFT. Then I've glued it on top of my finished sky.
Again on top of that I've added a green hill. It's made with one of the Stitched Slimline Snow Drifts dies.
To the top left corner of my card I've stamped the first part of my saying for this card.


Im unteren Bereich der Karte war dann genug Platz für den kleinen Bären und sein Auto. Der Bär, wie übrigens auch die Texte auf der Karte, sind aus dem Stempelset Fast-Track Friends und mit Copics coloriert. Dann habe ich ihn ausgeschnitten und noch zwei Luftballons aus dem Better Together Stempelset ans Auto gebunden. Auf den Hügel neben dem Auto habe ich zwei Beeps und ein Vroom aufgestempelt.
Der Bär fährt auf einer etwas kurvigen Straße, die direkt aus der Stadt hinausführt. Die ist mit der Open Road Stanze aus schwarzem Cardstock gestanzt, den Mittelstreifen habe ich noch mit weißem Cardstock hinterlegt.
Den zweiten Teil meines Textes habe ich auf das Elegant Folded Banner gestempelt, es ein wenig mit hellgrauen Copics schattiert, gefaltet und auf die Karte aufgeklebt.

In the lower area of my card was plenty of room for my little bear in his car. The bear, and also the sentiments and individual words on my card, are from the Fast-Track Friends stamp set and colored with Copics. Then I've cut the bear out and tied two balloons from the Better Together stamp set to the car. Next to the car I've stamped two beeps and a vroom onto the hill.
The bear is driving on a curvy road that leads directly out of town. It's die cut with one of the Open Road dies. I've die cut it from black cardstock and put some white cardstock behind the middle line cut outs.
The seconde part of my saying is stamped onto the Elegant Folded Banner. Then I've added some shadows with light grey Copics, folded it and glued it onto the card.

Samstag, 6. März 2021

Stempeleinmaleins - Ausgabe vom 06. März 2021

 
Hallo Ihr Lieben!
In der heutigen Ausgabe des Stempeleinmaleins zeigen wir Euch einen Explosionbox-Turm. Der schaut auf den ersten Blick aus, wie eine normale Box. Aber das ändert sich nach dem Öffnen.

Hello eveyone!
In today's issue of Stempeleinmaleins we are sharing a tutorial for an explosion box tower. It looks like a regular box - but that changes after you've opened it.


Ich habe eine Box als Willkommensgeschenk für ein kleines Mädchen gemacht. 
Die Box selbst ist aus weißem Cardstock gewerkelt, die Seiten sind mit rosafarbenem Designpapier mit weißen Punkten beklebt. 
Auf allen vier Seiten des Box-Unterteils habe ich den Kinderwagen von Renke aufgeklebt. Um den Deckel habe ich etwas weinrotes Satinband gewickelt und vorne zur Schleife gebunden.

I made a box as a welcome gift for a little baby girl.
The box is made from white cardstock and I've covered all sides with light pink designer's paper with white dots.
On all four sides of the box I've added a die cut stroller. Around the lid I've wrapped some wine red satin ribbon and glued it to a bow at the front.


Auf den Deckel habe ich zuerst einen Kreis aus Vellum auf das Designpapier beklebt. Darauf kam ein aus weinrotem Cardstock gestanzter Babybody, der mit einem weißen Herz, weißen Nähten und einem Glitzerstein dekoriert ist.
Auf das Banner kommt noch der Name des Babys. Da sie aber noch ein wenig Reifezeit braucht, weiß ich den Namen noch nicht und ich kann ihn erst später einfügen.

Onto the lid I've glued a circle, die cut from vellum. Then I've added a baby onesie, cut from wine red cardstock and decorated with a white heart, white stitches and a clear rhinestone.
Onto the white banner I'm going to add the baby's name later. But she isn't due yet and so I don't know the name yet and have to add the name later.


Öffnet man die Box, sieht man erstmal viele Schachteln ineinander. Sorry, davon habe ich gar kein Foto für Euch. In der obersten Box ist eine Schlaufe aus Twine eingearbeitet - zieht man daran, lässt sich der Turm ausziehen und sieht aufgestellt dann so aus.
Auch die Innenteile sind alle mit dem rosafarbenen Designpapier beklebt. Die Seiten der ineinandersteckenden Boxen habe ich nicht weiter dekoriert, aber die vielen kleinen Klappen lassen jede Menge Platz für Deko.
Auf den größten Klappen habe ich verschiedene (Glück-)wünsche aufgebracht.
Die mittlere Lae ist jeweils mit einem "hurra, ein Mädchen" sowie einem kleinen Herz und einem Babygesicht mit Schleife auf dem Kopf dekoriert.
Und auf die kleinsten habe ich weiße Kreise mit weinrotem Herz und Glitzerstein aufgeklebt.

When you open the box, you see a lot of boxes inside each other, like a matroshka. Sorry, I didn't take a photo of that. In the top box there's a loop from twine - when you pull it, the tower can be pulled out of the largest box and looks like that when it's pulled out completly.
Also the inner sides are all covered with the same pink patterned paper that I've used on the outside. I didn't decorate the sides of the smaller boxes any further but all the other flaps leave lots of space for decorations.
Onto the largest ones I've glued different wishes and congratulation texts.
Onto the middle sized flaps I've glued a "hooray, a girl" banner, a small white heart and a little baby face with a bow.
And onto the smalles flaps I've glued a white circle with a wine red heart and a rhinestone.


In der Anleitung befindet sich auf der obersten Lage eine weitere Box, die dann geöffnet und mit einem kleinen Geschenk oder Brief gefüllt werden kann. Da mein Geschenk sowieso nicht hineinpassen würde, habe ich mich ganz spontan für Babyschuhe statt einer weiteren Box entschieden.
Sie sind aus weißem Cardstock gestanzt und mit rotem Twine als Schnürsenkel sowie einem kleinen rosafarbenen Knopf ausgestattet. 

In our tutorial there's another smaller box on the top layer. This box can be opened and get filled with a little gift or a letter. Since my gift won't fit in this box I've decided to add little baby shoes on that layer instead of another box.
I've die cut the shoes from white cardstock, used dark red twine as shoe laces and add a tiny pink button to the sides of the shoes.

Donnerstag, 4. März 2021

Monströse Geburtstagspost!

 
Hallo Ihr Lieben!
Letztens bin ich online mal wieder um das Monsters Stempelset von CC Designs geschlichen. Die sind so genial! Und dann überkam mich ein "Moment mal, hast Du die nicht vor einiger Zeit schon gekauft"-Gefühl. Tja, und tatsächlich. Laut meiner Archivierung im Mai 2020. Oops. Aber dann durften sie gleich auf eine Geburtstagskarte, die ich heute auf dem Stampcorner Blog zeige.

Hello everyone!
A few days ago I was once again looking at the Monsters stamp set by CC Designs online, trying to decide wether to buy them or not. They are just too cute! And then I got a "wait, didn't you buy those some time ago" feeling. Well, my feeling was right. According to the system where I list all my stamps I bought it back in May 2020. Oops. But now I used them for this birthday card that I'm sharing over at the Stampcorner Blog today. 

Hier habe ich auf ein Stück weißen Cardstock mit orangefarbener und helltürkisfarbener Stempelfarbe Kleckse aufgestempelt. Die dafür verwendeten Stempel sind ein Mix aus dem Kleckse Stempelset von Stampcorner und dem Distressed Patterns Stempelset von MFT. In der Mitte der Karte habe ich beide Farben im selben Klecks überlappen lassen, um einen Farbwechsel von orange rechts zu türkis links zu erhalten.
Aus dem Distressed Patterns Stempelset ist auch der Streifenstempel, den ich mit grauer Tinte zweimal über die Karte gestempelt habe.

Here I've used orange and turquoise ink to stamp some ink splots onto a piece of white cardstock. The stamps used here are a mix of the Kleckse stamp set by Stampcorner and the Distressed Patterns by MFT. In the middle of the card I used both colors for the same splot to make the color change from orange on the right to turquoise on the left. 
The image with the thin strips is also from the Distressed Patterned stamp set. I've stamped it twice accross the card with grey ink.


In die Mitte der Karte habe ich ein großes Happy geklebt .Das ist mit der Happy Stanze von Whimsy Stamps aus schwarzem Cardstock gestanzt und dick mit Glossy Accents überzogen.
Für den Rest des Textes habe ich einen der Texte aus dem Stempelset Monsters von CC Designs auf drei Teile verteilt weiß auf schwarzen Cardstock embosst und rund um das Happy geklebt. 

In the center of the card I've glued a large happy. It's die cut from black cardstock with the Happy die by Whimsy Stamps and covered with a thick layer of Glossy Accents.
For the rest of the text I've white heat embossed one of the sayings from the Monsters stamp set by CC Designs, stamping one word only each time, then glued them above and under the happy.


Und hier könnt Ihr meine Monster nochmal besser sehen. Zuerst das Orangefarbene. Beide sind ganz rudimentär mit Copics coloriert, dann habe ich das Fell sowie die Schatten mit Polychromos und einem weißen Gellypen hinzugefügt. 

And here you get a better look at my monsters - first the orange one. Both monsters were colored really basically with Copics, then I used my Polychromos and a white gel pen to add the fur, shadows and more details.


Und hier das türkisfarbene Monster. 
Bei beiden Monstern habe ich auch auf die Augen eine dicke Schicht Glossy Accents aufgetragen.

And here the turquoise colored monster.
Again I used Glossy Accents, adding a thick layer of it to the eyes of both monsters.

Die Pfeile, die ich auf die Karte aufgeklebt habe, sind uralt und noch von Whiff of Joy. Aber sie waren einfach perfekt für meine Karte. Den gebogenen Pfeil habe ich vom Wort Monster zum türkisfarbenen Monster zeigen lassen, der andere unter dem Wort happy hat die Karte einfach schön ausbalanciert.
Zum Schluss habe ich noch ein paar schwarze Enamel Accents auf der Karte verteilt und alles auf eine - ausnahmsweise mal - schwarze Karte geklebt.

The arrow that I've glued onto the card are really old ones by Whiff of Joy. But they were just perfect here. I thought it would be cute to add the curved arrow pointing from the word Monster towards the turquoise monster. The other one under the word happy just balanced the design of the card.
In the end I've added a few black Enamel Accents and glued everything onto a black card base. I don't use those often but here it was just the perfect choice.

Mittwoch, 3. März 2021

Frühlingszauber

 
Hallo Ihr Lieben!
Na, könnt Ihr es spüren? Der Frühling liegt in der Luft! Und auf meiner Karte kann man ihn bei einem Blick aus dem Fenster sogar sehen...

Hello everyone!
Can you feel it? Spring is in the air! And on this card that I'm sharing with you today you can even see it when looking out of the window.

Hier habe ich einige der März-Neuheiten von JM-Creation, die einige sicher schon aus dem Adventskalender kennen, verwendet. 
Als Basis habe ich ein hellblaues Designpapier mit einem zarten und kleinen Mauerdruck verwendet. Rundherum habe ich per Hand einen blauen Rahmen gemalt.
Das Wort Frühlings- sowie auch der Zauber-Stempel sind aus dem Adventskalender. Aber sie passten hier einfach perfekt. Das Frühlings- habe ich aus weißem Cardstock gestanzt und mit Copics ein wenig im Ombre-Look hellblau coloriert. Das Zauber ist blau auf weißen Cardstock gestempelt. Beide Texte habe ich unter meine Deko auf das Designpapier geklebt.
Das fertig dekorierte Designpapier habe ich dann auf einen blauen Kartenrohling geklebt.

Here I've used a few of the march new items by JM Creation that some of you may already know from last year's advent calendar.
As the base I've used a piece of light blue patterned paper that has a very small and sublte brick pattern printed on it. Around the edge of my paper I've hand drawn a frame.
The text means "magic of spring". I've die cut the upper word and colored it in a light blue, giving it an ombre look. The other word is stamped with blue ink. Then I've glued both text parts under onto the designer's paper.
In the end I've glued the decorated piece of paper onto a blue note card.


Als Deko habe ich die grandiose Fenster-Stanze benutzt. Aus dem Designpapier habe ich ein Rechteck, das zusammen mit dem Fenster kommt, ausgestanzt. Dahinter habe ich ein Stück mit Distress Oxide Broken China eingefärbtes Stück Cardstock geklebt, auf das ich den tollen Baum mit Schaukel als Silhouette gestempelt habe. Mein Himmel ist für einen Frühlingshimmel vielleicht ein wenig sehr dunkel geworden. Aber das täuscht, es liegt nur daran, dass die Fenster noch nicht geputzt sind! ;)
In das Rechteck habe ich dann das Fenster an sich geklebt, das ich aus weißem Cardstock gestanzt habe. 
Darüber kamen dann luftig-leichte, hellblaue Vorhänge. Auch die sind aus weißem Cardstock gestanzt und dann mit Copics schattiert. Ich kann fast den frischen Lufthauch spüren, der durchs Fenster hereinweht und die Vorhänge leicht bewegt.... Oh, wie freue ich mich, dass der Winter (fast) vorbei ist!

As the main element I've used the great window die. I've die cut a rectangle that comes with the window die from the patterened paper. Behind this cut out I've glued a piece of cardstock that I've inked up with Distress Oxide Broken China. Then I've stamped the tree with swing silhouette onto it. Well, my sky might be a bit too dark for a spring sky. But actually it isn't, it only looks like that because the windows aren't cleaned yet! ;)
Into the cut out rectangle I've glued the window itself, cut from white cardstock. 
And then I've hung up some curtains. Also these were cut from white cardstock and then shaded with Copics. I can nearly feel the fresh breeze coming through the window and making the curtains slightly move... I'm so happy that spring is - nearly - here!

Dienstag, 2. März 2021

Geburtstagskarte mal anders

 
Hallo Ihr Lieben!
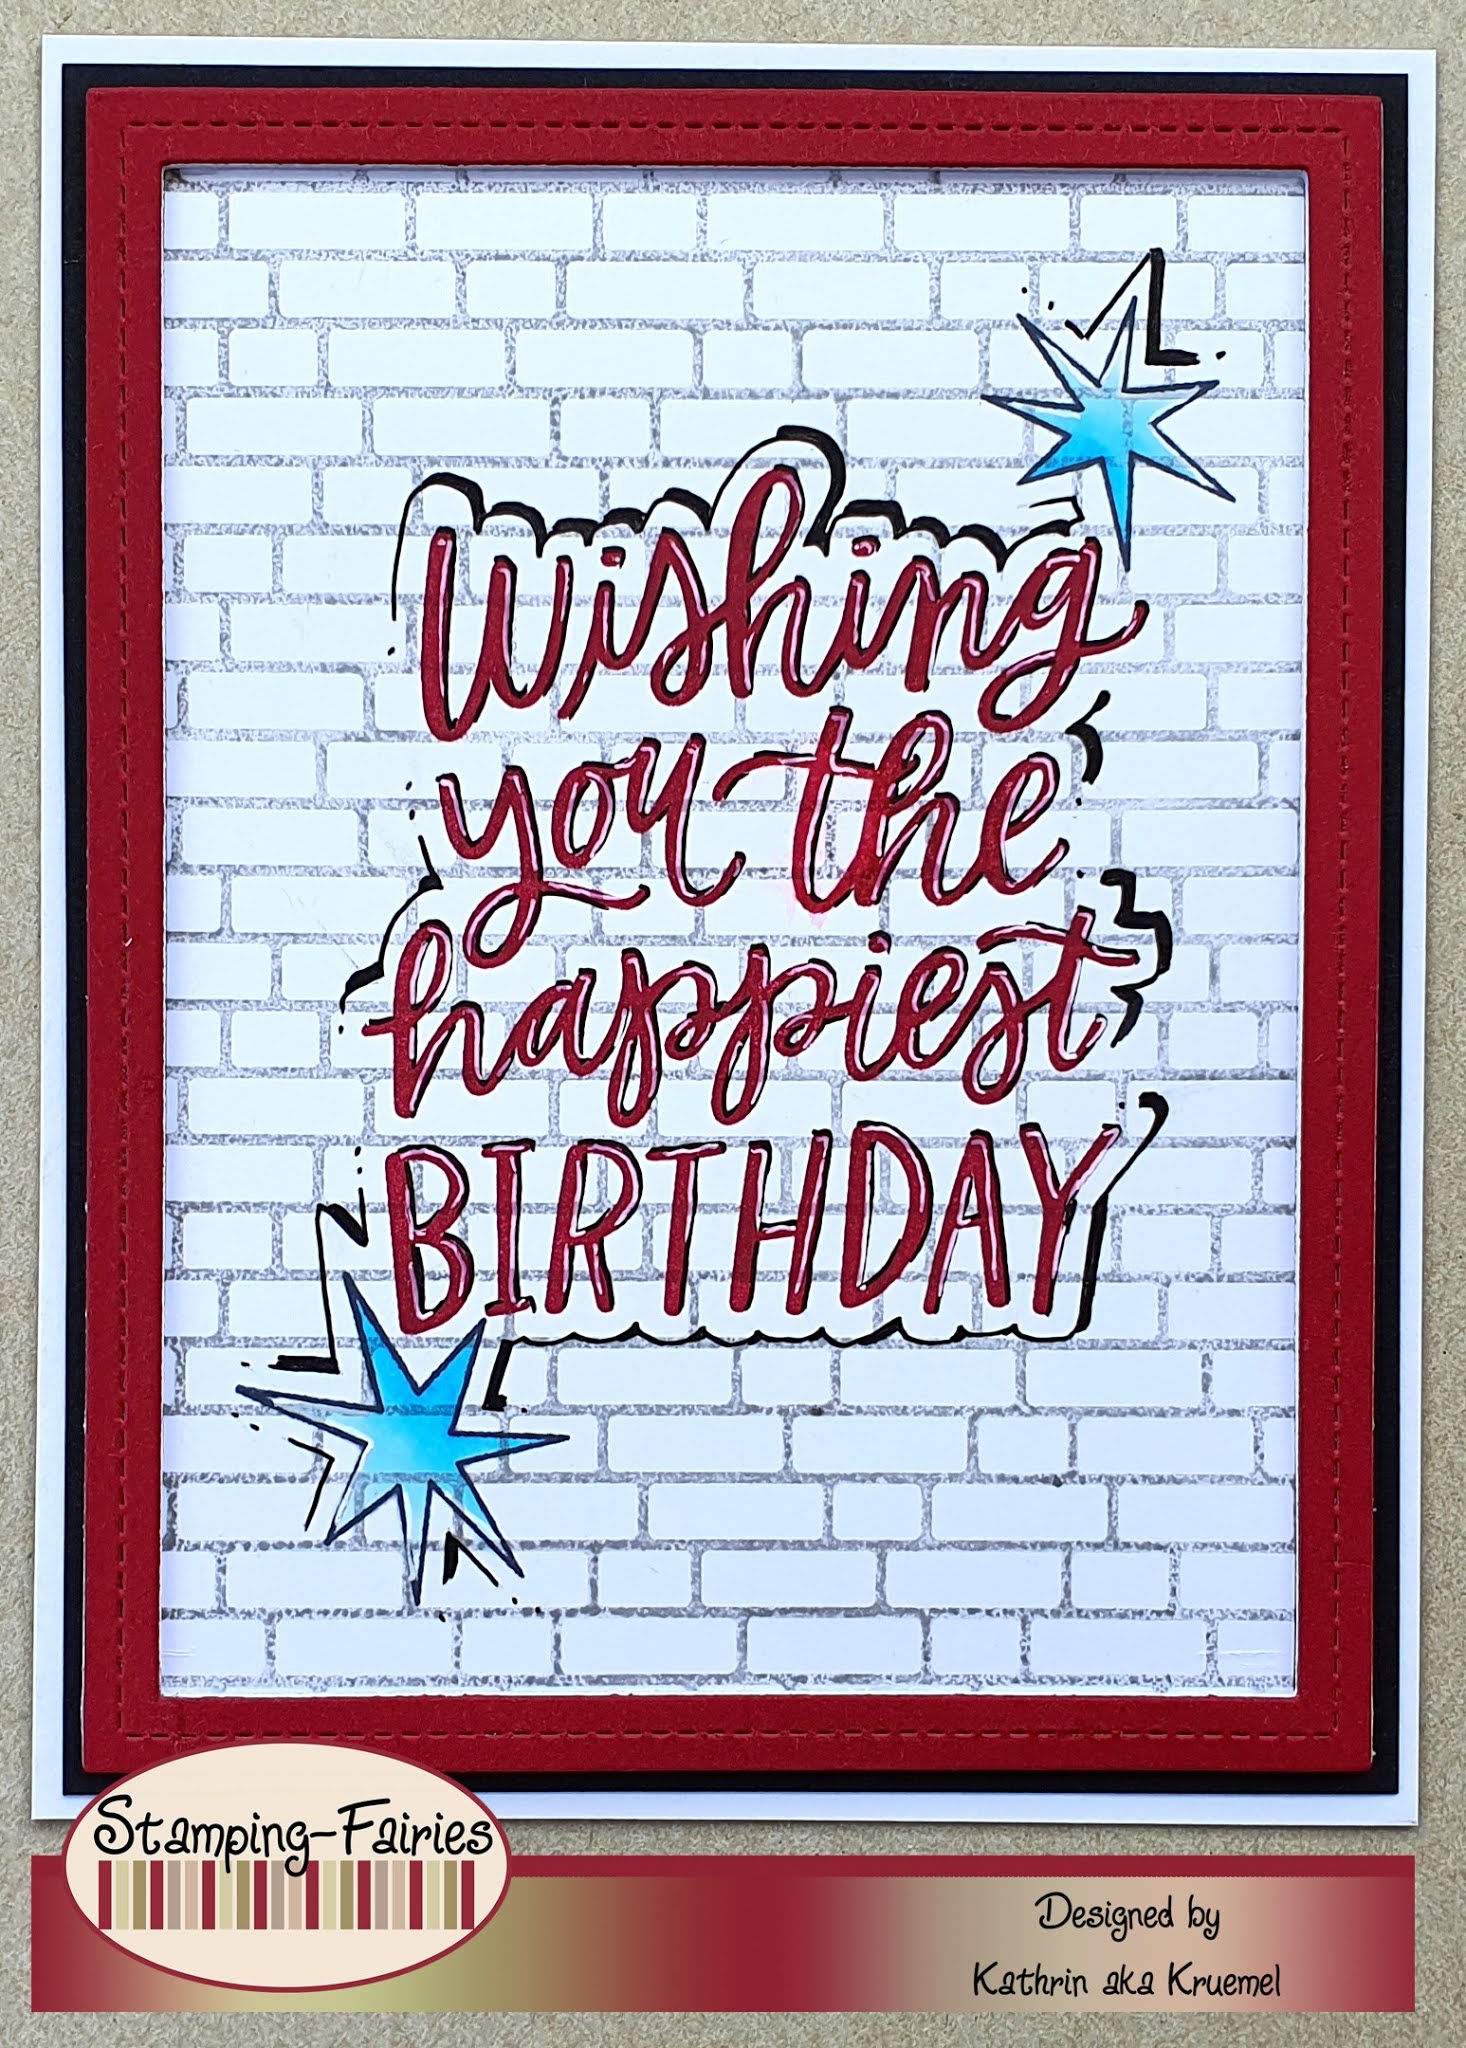
Mit Männerkarten tue ich mich ja schon schwer. Karten für einen männlichen Teen sind nochmal eine ganz andere Hausnummer. So eine brauchte ich jetzt - und war ratlos. Aber dann ist mir doch etwas eingefallen. Und die Karte zeige ich heute auf dem Stamping-Fairies Blog

Hello everyone!
I always have a hard time making cards for men. Cards for a male teen are even harder. I needed one of those - and was clueless. But then I had an idea. And the finished card is what I'm sharing over at the Stamping-Fairies Blog today. 

Ich wollte eine Karte, die ein wenig an ein Graffitti erinnert. Und ich finde, das ist mir ganz gut gelungen. 
Ich habe hier ein Stück weißen Cardstock dekoriert, dann einen Rahmen drumherum gesetzt. Für den Rahmen habe ich mit einer der Single Stitched Rectangle Frames Stanze von MFT diesen erst 3mal aus weißem Cardstock gestanzt, aufeinander geklebt und obenauf noch einen Rahmen aus rotem Cardstock aufgeklebt.
Dann habe ich alles schwarz gemattet und auf einen weißen Kartenrohling geklebt.

I wanted a card that kind of looks like a graffitti. And I think I achieved that look pretty well.
Here I've decorated a piece of white cardstock, then put a frame around it. For the frame I've die cut one of the Single Stitched Rectangle Frames by MFT three times from white cardstock, stacked those on top of each other and then added one die cut from red cardstock on top.
Then I've matted everything with black cardstock and glued it onto a white note card.


Und hier ist mein Graffitti. Ich habe dafür den Happiest Birthday Stempel von MFT mit roter Tinte auf den weißen Cardstock gestempelt. Die weißen Highlights und die schwarzen Schatten um die Worte habe ich per Hand dazugemalt. 
Die Sterne sind aus dem Monster Sized Stempelset. Sie sind mit schwarzer Tinte gestempelt und mit Copics hellblau coloriert.
Dann habe ich mit einem schwarzen Fineliner noch eine Art schattierten Rahmen um die Worte und Sterne herumgemalt. 
Um es so aussehen zu lassen, als wäre das Graffitti auf eine Mauer gesprüht, habe ich ganz zum Schluss den English Brick Wall Background mit grauer Tinte über den gesamten weißen Cardstock gestempelt. 
Ich denke, so sind die Glückwünsche dann auch teen-würdig, oder?

And here's my graffitti. I've stamped the Happiest Birthday stamp by MFT with red ink onto the white cardstock. The white highlights and black shadows were added by hand.
The stars are from the Monster Sized stamp set. I've stamped those with black ink and colored them light blue with my Copics.
Then I've added a kind of shaded frame around the words and stars.
To make it look like the birthday wishes are sprayed onto a wall I've stamped the English Brick Wall Background over the whole cardstock using grey ink.
I think, like this a handmade birthday card is cool enough for a teen boy.

Sonntag, 28. Februar 2021

Cheese!

 
Hallo Ihr Lieben!
Heute zeige ich Euch meine Karte mit den Produkten, die im Februar als Produkt-Highlight bei JM-Creation im Fokus stehen. Es ist das Stanzenset Kartenset sowie das Stempelset Lustige Mäuse. Und das ist mir damit eingefallen.

Hello everyone!
This month's highlights products at JM-Creation are a die set to create a card topper and a stamp set full of funny mice. And this is what I've created with these products.

Hier habe ich mit den Stanzen aus dem Kartenset zuerst den gestitchten rechteckigen Kartenaufleger aus hellgelbem Cardstock gestanzt und daraus dann mit den im Set enthaltenen Kreisen Löcher ausgestanzt. Für die ganz kleinen Löcher habe ich das Tag-Loch aus dem Set Tag für Nuss-Nugat-Portion verwendet.
Mit 3D Tape habe ich diesen Aufleger dann auf ein etwas größeres Stück dunkelgelben Cardstock, dessen Ränder ich mit Distress Oxide Spiced Marmelade etwas abgedunkelt habe. 
Dann habe ich beide Lagen auf einen weißen Kartenrohling geklebt.

Here I've used the card topper set to first die cut the stitched rectangle from a light yellow cardstock, then die cut circles from it using the circles included in the set. For the smallest circles I used a die that originally die cuts the holes in a tag.
I've glued the cheese-y looking cardstock onto a slightly larger rectangle, die cut from a dark yellow cardstock. On this one I used Distress Oxide Spiced Marmelade to darken the edges.
Then I've glued both of these layers onto a white card base.


In die größeren Löcher habe ich dann jeweils eine der Mäuse gesteckt. Die finde ich ja wirklich lustig! Ich habe sie einfach mit schwarzer Tinte abgestempelt und nur die Ohren pink coloriert. Die Körper stecken meist in den Löchern, Ohren und/oder Nasen sind oben auf den Käse aufgeklebt.

Into the larger holes I've glued the mice. I think those are really funny!
I've simply stamped those with black ink and only colored the ears pink. The bodies are stuck behind, the noses and/or ears glued on top of the cheese.


Mit dem ABC Groß Stanzenset habe ich dann aus dunkel orange-braunem Cardstock die Buchstaben für das Wort Cheese ausgestanzt und quer über die Karte geklebt.
Dazu habe ich dann noch einen der Texte aus einem der neuen Banner-Sets geklebt. Der passte einfach perfekt zum "Cheese". Ich habe ihn mit orangefarbener Tinte auf weißen Cardstock gestempelt, ausgeschnitten und schwarz gemattet. Und weil er so einfach besser auf die Karte gepasst hat, habe ich ihn vor dem Matten noch geteilt. So gefiel mir die Aufteilung einfach besser.

Using an alphabet die set I've die cut the letters for the word cheese from dark orange-brown cardstock and glued the word across the card.
Then I've added another saying meaning "luck comes to those who laugh". It's stamped with orange ink onto white cardstock, then matted black. And since I liked the arrangement better that way I've cut the saying in half before matting it.

Samstag, 27. Februar 2021

Stempeleinmaleins - Ausgabe vom 27. Februar 2021

 
Hallo Ihr Lieben!
Es ist wieder Zeit für eine neue Sketch-Inspiration beim Stempeleinmaleins. Und wie immer haben auch wir den Sketch umgesetzt - das hier ist meine Karte dazu.

Hello everyone!
It's time for another sketch inspiration over at Stempeleinmaleins. And as always also we from the team have used it to make cards. This is mine.

Ich habe hier hellgrauen Cardstock verwendet und mit gauer Tinte Dino-Fußabdrücke aus dem Rawrsome Stempelset von LawnFawn in alle Richtungen aufgestempelt.  So hatte ich schnell einen passenden Hintergrund für mein Motiv, denn in meinen Designpapieren war nichts in der Art zu finden.
Den Cardstock habe ich dann schwarz gemattet und auf einen weißen Kartenrohling geklebt.

Here I've used a piece of light grey cardstock and stamped dino foot prints from the Rawrsome stamp set by LawnFawn in all directions with grey ink. This way I quickly had a matching background for my image since I didn't have anything like that in my stash of patterned papers.
I've matted the background with black cardstock and glued it onto a white note card.


Meine Motive habe ich auf ein Oval aufgeklebt. Das Oval habe ich einnmal aus hell-türkisblauem, einmal aus grünem Cardstock gestanzt und etwas weniger als halbe-halbe übereinander geklebt. Dann habe ich es dunkelgrau gemattet. 
Auf das Oval kamen erst ein paar dunkelgraue Berge von MFT, darauf dann der Vulkan, ebenfalls von MFT. Hinter und über dem Vulkan habe ich weiße Wolken aufgeklebt, die wie aus dem Vulkan aufsteigender Rauch aussehen. Die sind ebenfalls aus dem Stanzenset mit dem Vulkan.
Und vor diese Vulkanszene kamen dann meine Motive. Die sind alle aus dem neuen Me and my Dinosaur Stempelset von MamaElephant. Ich habe sie mit Copics coloriert, ausgeschnitten und übereinander arrangiert. Der Flugsaurier oben rechts ist aus dem Set Little Dino Agenda, ebenfalls von MamaElephant. 
Zum Schluss fehlte nur noch der Text. Er ist wieder aus dem Set Me and my Dinosaur. Ich habe ihn schwarz auf weiß gestempelt, halbiert, schwarz gemattet und rechts auf die Karte geklebt.

My images are all glued onto an oval. I've die cut that once from light turquoise cardstock, once from green. Then cut them into two nearly identical pieces and glued them onto a slightly larger oval cut from dark grey cardstock. 
Onto the oval I've first glued some dark grey mountains by MFT, then a volcano, also by MFT Behind and above the volcano I've glued a few clouds that look like they are smoke coming out of the volcano. These are also from the volcano die set.
In front of that volcano background I've glued down my images. They are from the new Me and my Dinosaur stamp set by MamaElephant. I've colored them with Copics, cut them out and arranged them on my oval. The flying dinosaur is from the Little Dino Agenda set, also by MamaElephant.
Now all that was missing was a text. It is again from the Me and my Dinosaur stamp set. I've stamped it black onto white cardstock, cut it into two parts, matted it black and glued it on the right side of my card.

Donnerstag, 25. Februar 2021

Eine Buchgutschein-Verpackung

 
Hallo Ihr Lieben!
Auf dem Stampcorner-Blog zeige ich heute eine Verpackung. Oft ist es schwer, den Überblick zu behalten, welches Buch jemand schon kennt - vor allem, wenn derjenige oft in die Bücherei geht. Also wird lieber ein Gutschein für den  Buchladen verschenkt. Und die Verpackung habe ich, passend zum Gutschein, auch wie ein Buch gestaltet.

Hello everyone!
Over at the Stampcorner Blog I am sharing this gift box today. Often it's hard to keep track of which book someone already knows - especially whenthis someone goes into the library regularily. So I've decided to stay on the safe side and hand over a giftcard for a book store. And so I've matched the box with the gift and created it like a book.


Das Buch habe ich aus dunkelrotem Cardstock gewerkelt und mit goldenen Akzenten dekoriert. An den Ecken habe ich goldene Buchecken aus Metall angebracht. 
Auf dem Deckel habe ich erst einen Rahmen aus goldenem Spiegelcardstock aufgeklebt, darauf kam ein Stück Cheesecloth. 
Das  süße Motiv aus dem Stempelset Freunde 4 habe ich mit Copics coloriert und ausgeschnitten. Dann habe ich es mittig auf einen Kreis aus weißem Cardstock geklebt, den ich vorher von unten her mit Distress Oxide Hickory Smoke und Pumice Stone gewischt habe. Über die beiden Leseratten habe ich dann ein paar Buchstaben aus dem Alphabet Mini Stempelset von WhimsyStamps mit grüner Tinte aufgestempelt. Um den Kreis habe ich dann noch einen Rahmen aus kraftfarbenem Cardstock aufgeklebt.
Der Text ist aus dem Stempelst Cozy Companions von MFT und ebenfalls mit grüner Tinte gestempelt. Dann habe ich ihn mit goldenem Spiegelcardstock gemattet und unterhalb des Motives quer über den Kreis geklebt.

I've made the book from dark red cardstock and decorated it with some golden accents. To the corners I've added some golden metallic book corners.
Onto the top of the book I've glued a frame, cut from golden mirror cardstock, then put a piece of cheesecloth into it.
The cute image by Stampcorner is colored with Copics and cut out. Then I've glued it onto the middle of circle cut from white cardstock that I've inked up with Distress Oxide Hickory Smoke and Pumice Stone. Around the two readers I've stamped a few letters, using the Alphabet Mini stamp set by WhimsyStamps and green ink. I've also glued a frame, cut from craft colored cardstock, around the circle. 
The saying is from the Cozy Companions stamp set by MFT and also stamped with green ink. Then I've matted it with golden mirror cardstock and glued it across the circle.


Im Inneren des Buches befindet sich eine Schachtel, in die der Gutschein passt.
Dafür habe ich die Streichholzschachtel von ModaScrap aus weißem Cardstock gestanzt und die Seiten von Schublade und Hülle mit Distress Oxide Hickory Smoke ein wenig eingefärbt.
Die Matchbox hab ich dann in das Buch geklebt. Das Buch bzw. die Außenseite ist einfach aus einem Streifen Cardstocks gemacht. Ich habe zu Länge und Breite der Box jeweils 2 cm hinzugerechnet, dieses Maß mal zwei genommen und die Höhe der Matchbox verdoppelt. Den mittleren Teil habe ich über die Tischkante gezogen, um ihn ein wenig zu biegen und dann die Box einfach oben und unten innen am Buch angeklebt. So entsteht dann auch der abgerundete Buchrücken. 

Inside the book there's  a box to hold the gift card.
I've die cut the matchbox by ModaScrap from white cardstock and inked up the outer sides of the drawer and the outer part with some Distress Oxide Hickory Smoke.
Then I've glued the matchbox inside the book cover. The cover is simply made from a strip of cardstock. I've added 2 cm each to both the length and width of the matchbox, doubled that and then added twice the height of the matchbox to find out the size of my cardstock strip. I've bend the middle by pulling it over the edge of my craft table and glued the matchbox to the top and bottom inside of the cover. That's how the bended part on the closed side of the book gets created.


Auch den Buchrücken habe ich ein wenig dekoriert. Ich liebe in weinrotes Leder gebundene Bücher mit Golddekor. Also habe ich auch hier zwei Streifen aus goldenem Spiegelcardstock um die Rundung geklebt und mittig ein weiteres Stück längs aufgeklebt.
Und weil ein so schön gebundenes Buch auch ein Lesezeichen braucht, habe ich an der hinteren Außenseite der Matchbox noch ein Stück weinrotes Satinband angeklebt, das ich unten am Buch herausschauen lassen habe.

And also the back of the book is decorated a bit. I just love books covered in wine red leather and with golden details. So also for my book I've added two thin strips of golden mirror cardstock around the bended cardstock and added another, slightly larger piece to the middle.
And since a book that's made so beautifully always has a ribbon as a bookmark I've also glued a piece of red satin ribbon to the back of the matchbox sleeve and let it hang out at the bottom of the book.

Mittwoch, 24. Februar 2021

Eine dekorierte Geschenktüte

 
Hallo Ihr Lieben!
Ein Geschenk musste in einer braunen Papiertüte verpackt werden - und ja, musste. Klar, dass die bei uns Bastlern auf keinen Fall eine einfache braune Papiertüte bleibt! Und so habe ich sie passend zum Inhalt dekoriert.

Hello everyone!
I had to put a gift into a brown paper bag - and yes, had to. But it's clear that we crafters aren't going to use a plain brown paper bag. And so I've decorated it matching the content of the bag.


Ich habe auf die Vorderseite der Tüte ein weißes Doily aufgeklebt und außerdem ein Stück hellblaue Spitze einmal um die Tüte herumgewickelt.
Den oberen Rand habe ich umgeknickt und mit einer blauen Metallklammer verschlossen.

I've glued a white doily to the front of the bag and also wrapped a piece of light blue lace around the bag.
I've folded the top edge and kept is closed with a blue metall clip.


Das Doily diente natürlich nur als Unterlage für die eigentliche Deko auf der Tüte. 
Hier habe ich mich von einer der Schokoldenkarten, die vor ein paar Jahen mal so trendy waren, inspirieren lassen. Dafür habe ich den Qudrate Hintergrund von JM-Creation mit dunkelbraunem Embossingpulver auf braunen Cardstock embosst. So erhält man den Schokotafel-Look in Null Komma Nix. 
Um die Schokoladentafel habe ich zuerst etwas Alufolie gewickelt, die ich im oberen Bereich schräg abgerissen habe. Ich vermisse die in Alu und Papier gewickelten Schokoladentafeln! Diese verschweißten Folien finde ich grauenhaft, da fehlt irgendwie das Schokotafel-Gefühl. Deswegen musste Alufolie um meine Schokotafel! Dann habe ich ein Stück hellbraun-weiß gestreiftes Designpapier ebenfalls um die Tafel gewickelt. Den oberen Bereich habe ich, einigermaßen zur Kante der Alufolie passend, ebenfalls gerissen. Dann habe ich das Designpapier so kurz zugeschnitten, dass unten an der Tafel  noch ein Streifen der Alufolie zu sehen ist.
Dekoriert habe ich die Tafel dann zuerst mit einem hellblauen Glitzerstern, den ich mit der Sternrahmen-Stanze gemacht habe. Darauf kam ein Text. Den habe ich aus Stempeln aus den beiden Stempelsets Schokoladensprüche und Faultier Kaffee zusammengesetzt. Beide sind mit brauner Tinte gestempelt, den unteren habe ich außerdem mit braunem Cardstock gemattet. 

Of course the doily was only there for the decorations to be put onto.
A few years ago everyone seemed to make those chocolat bar cards. These popped up in my mind again I've used these as inspiration for the decoration of this bag. I've used a background stamp that stamps a few rows of squares and dark brown heat embossed it onto a piece of brown cardstock.With this stamp you get the chocolat bar look within a minute.
Then I've wrapped a piece of tin foil around my chocolat, tearing the top edge. I still miss those chocolat bars wrapped in tin foil and paper - the plastic wrapped ones you get today still feel wrong to me. So of course my chocolat needed tin foil and paper! Then I've also wrapped a strip of light brown and white striped patterned paper around the chocolat, trying to tear the top edge kind of matching with the tin foil edge. The bottom is cut short enough for a bit of the tin foil to show at the bottom of the chocolat bar.
Then I've decorated my chocolat with a star frame, die cut from light blue glitter paper and glued a text meaning "chocolat always helps" on top of it. The texts are stamped wtih brown ink, the bottom one is also matted with dark brown cardstock.

Dienstag, 23. Februar 2021

Spring is in the Air

 
Hallo Ihr Lieben!
 Merkt Ihr es auch: der Fühling liegt in der Luft! Morgens zwitschern die Vögel, die Schneeglöckchen blühen - oh wie freue ich mich! Und wie man auf meiner Karte, die ich heute auf dem Stamping-Fairies Blog zeige, sieht, nicht nur ich!

Hello everyone!
Can you feel it: spring is in the air! In the morning you can hear the birds sing again, the first flowers are blooming - oh I am so happy! And as you can see on this card, that I'm sharing over at the Stamping-Fairies Blog today, it's not just me!

Ich weiß nicht, ob ich ein Einzelfall bin, aber nach dem Winter mit seinen eisigen Farben - auf jeden Fall basteltechnisch gesehen - tue ich mich immer schwer damit, wieder Farbe zu verwenden. Fast habe ich ein wenig Angst davor. Und so ist diese Karte auch sehr pastellig ausgefallen. Naja, der Frühling kommt eben langsam. Und das doch eher knallige Schweinchen reißt es zumindest ein klein wenig raus, oder?
Ich habe hier auf den oberen Bereich eines Stückes weißen Cardstocks durch die Radiating Rays Stencil von MFT Versamark aufgetragen und die Strahlen dann hellgolden embosst. Dann habe ich den weißen Cardstock drumherum mit Distress Oxide Tumbled Glass blau gewischt. 
Auf den unteren Teil der Karte kam ein Stück weißen Cardstocks, dessen oberen Rand ich mit einer der Grassy Hills Stanzen mit einem Grasrand versehen und dann mit Distress Oxide Mowed Lawn und Cracked Pistacchio gewischt habe. Dann habe ich ihn auf den Hintergrund mit der Sonne aufgeklebt - so konnte ich beim Aufwischen der Sonne und des Himmels arbeiten, ohne irgendwelche Linien beachten zu müssen.
Den  fertigen Hintergrund habe ich grün gemattet und dann auf einen weißen Kartenrohling geklebt.

I habe no idea if I'm the only one, but after winter with its frosty colors - if not in nature at least on my crafts - I am always having a hard time to use colors again. It's nearly as if I'm afraid of it. And so this card is also very soft in colors. Well, spring is coming slowly. And the pretty bold piggy makes up for it a bit, right?
Here I've used a piece of white cardstock and added some Versamark ink through the Radiating Rays Stencil by MFT. Then I've covered them with a light golden embossing and inked up the white cardstock around it with Distress Oxide Tumbled Glass.
Onto the lower part of the background I've glued another piece of cardstock. I've die cut the top edge into a grass shape using one of the Grassy Hills borders, then inked up the white cardstock with Distress Oxide Mowed Lawn and Cracked Pistacchio. This piece was simply glued on top of the cardstock with the sun and sky, that way I didn't have to take too much care when addid the Versamark ink through the stencil.
I've matted the finished background with some green cardstock and glued both layers onto a white note card.


Und hier könnt Ihr sehen, wie sehr sich Schweinchen und Maus über den nahenden Frühling freuen! Sie hüpfen schon durch die ersten Blumen...
Die Blumen, ebenso wie das Motiv aus dem Stempelset Perfect Couple von MFT, habe ich übrigens vor dem Aufwischen der grünen Farbe gestempelt und coloriert und mit Glossy Accents überzogen, so dass die Blüten rosafarben bleiben. 
Schweinchen und Maus sind mit Copics coloriert, ausgeschnitten und auf die Karte geklebt..
Zwischen Sonne und Motiv habe ich noch ein großes Hurra aufgeklebt. Es ist mit der Hooray Stanze von MFT aus weißem Cardstock gestanzt, dann habe ich es mit Distress Oxide Blueprint Sketch nach oben heller werdend eingefärbt. Und weil mir da dann irgendwie ein wenig Kontrast zum Himmel gefehlt hat, habe ich per Hand noch ein weißes Matting gemacht.
Als Deko kamen ein paar blaue Enamel Accents zum Einsatz.
Und ich wollte unbedingt einen Text "spring is in the air" - und musste feststellen, dass ich den tatsächlich nur in einem 1-Dollar-Stempelset aus den USA habe. Ich habe ihn trotzdem verwendet, aber man sieht, dass die Qualität der Stempel nicht der Hammer ist. Aber wenn man sich etwas vorstellt... Und ich habe wirklich keinen passenden Ersatz-Text finden können...

And here you can see how excited piggy and mouse are about spring being around the corner. They even found a blooming meadow already and are running between the blooming flowers...
The flowers, and also the image, are from the Perfect Couple stamp set by MFT. I've stamped the flowers before I added the green color to the lower background cardstock. I've stamped and colored them, then covered them with a thin layer of Glossy Accents so the flowers would still be a light pink after putting the green color onto the background.
Piggy and mouse are colored with Copics, cut out and glued onto the background.
Between sun and image I've added a large die cut hooray, made with the Hooray die by MFT. I've die cut it from white cardstock, then inked it up with Distress Oxide Blueprint Sketch, getting lighter towards the top of the word. And since it felt like there wasn't enough contrast between the word and the light blue on the letters I've hand cut a white matting for the word.
For decorations I've added a few blue Enamel Accents.
And I had a "spring is in the air" saying in mind for this card - and had to find out that the only one I had was a Dollar stamp set by StudioG that I've bought many years ago in the States. Well, you know how it goes when you've set your mind on something - plus I really wasn't able to find another text that worked so I've used this said stamp. But you can see that the quality isn't the best...

Sonntag, 21. Februar 2021

Stampcorner Februar-Challenge

 
Hallo Ihr Lieben!
Nach der Weihnachts- und Winterpause startet heute wieder eine neue Challenge bei Stampcorner. Wenn man aus dem Fenster sieht, dann ist es ja immernoch sehr winterlich. Aber wenn man genau schaut, dann sieht man schon Schneeglöckchen blühen! Und so haben wir uns für "Frühlingserwachen" als Thema entschieden. Alles, was für Euch mit dem Frühling zusammenhängt, kann thematisch verbastelt werden. Und das ist meine Karte dazu.

Hello everyone!
After our christmas and winter break we are starting a new challenge over at Stampcorner today. When I look out of my window it still looks pretty wintery. But if you take a closer look you can see snowdrops blooming in the snow! And so we've picked "spring is in the air" as our theme for this challenge. Anything that reminds you of spring can be used as a theme for your card.

Ich habe hier aus einem weißen Stück Cardstock einen Kreis ausgestanzt, hinter dem ich meine Frühlingsszene platziert habe. Nach dem Gestalten de Szene - dazu gleich mehr - habe ich ein blaues Designpapier mit weißen Wölkchen hinter den Cardstock geklebt und alles auf einen weißen Kartenrohling geklebt.

Here I've die cut a circle from a piece of white cardstock and created my scene in this circle. After the scene was finished - more about that in a second - I've matted the white cardstock with a piece of blue patterned paper with white clouds and glued everything onto a white note card.


Und hier ist nun meine Frühlingsszene.
Ich habe hier den Korb voller Eier aus dem Easter Before 'n' After Stempelset von LawnFawn mit zwei der Küken aus dem neuen Egg-Tastic Set von MamaElephant kombiniert. Die Motive sind mit Copics coloriert. 
Vor den Korb habe ich eine Reihe gelber Tulpen gesetzt. Dafür habe ich die Fensterdeko aus dem Wonderful Window Stanzenset von LawnFawn aus weißem Cardstock gestanzt und mit Copics coloriert. Hinter dem Korb befindet sich noch eine weitere Reihe Blumen - "normale" und Tulpen gemischt, die eigentlich in den Blumenkasten des Slim Window Dressings Stanzensets von MamaElephant gehören. Auch die sind mit Copics coloriert. Davor kam noch eine Lage Gras, gestanzt mit einer der Stanzen aus dem Grassy Hills Stanzenset von MFT.
Um den ausgestanzten Kreis habe ich dann einen der Stitched Circle Scallop Frames von MFT, gestanzt aus hellblauem Cardstock, geklebt. So finde ich den Abschluss sauberer und die Szene bekommt noch einen schönen Rahmen.
Für den Text habe ich verschiedene Stempel kombiniert. Der obere ist aus dem Pawty Time Stempelset von MFT, für den unteren habe ich zwei Stempel von LawnFawn kombiniert. Spring ist aus dem Reveal Wheel Spring Sentiments Set, is here aus dem Set Jump for Joy. Die Texte habe ich auf das Mittelteil des Boxed-In Banners von MFT gestempelt, die Seitenteile sind grau schattiert. Dann habe ich den zarten Rahmen, gestanzt aus hellgrünem Cardstock, drumherum geklebt und das Banner zusammengesetzt.
Als Deko habe ich dann noch ein paar kleine Blümchen und ein paar Mini-Glitzersteine auf die Karte geklebt.

And here's my spring scene.
I've combined the basket full of eggs from the Easter Before 'n' After stamp set by LawnFawn with two of the chickies from the new Egg-Tastic set by MamaElephant. The images are colored in with my Copics.
In front of the basket I've planted a row of tulips. I've die cut the flower decorations from the Wonderful Window die set by LawnFawn from white cardstock and colored it with Copics as well. Behind the basket there's another row of flowers, here both "normal" ones and tulips, that usually belong into the flower box from the Slim Window Dressings die set by MamaElephant. Also those were colored with Copics. In front of everything I've glued a layer of grass, die cut with one of the Grassy Hills dies by MFT. 
Around the cut out circle I've glued one of the Stitched Circle Scallop Frames by MFT, die cut from light blue cardstock. I think that looks neater than just a cut out circle and also the scene gets kind of framed in.
For the text I've combined differents stamps. The top one is from the Pawty Time stamp set by MFT, for the lower one I combined two sets by LawnFawn. Spring is from the Reveal Wheel Spring Sentiments set, is here from the Jump for Joy set. I've stamped the text onto the middle part of the new Boxed-In Banner by MFT and added some shading to the two side flags. Then I've glued the thin frame, die cut from light green cardstock, onto the white banners and put the banner together.
For decorations I've added a few paper flowers and some tiny yellow rhinestones.

Samstag, 20. Februar 2021

Stempeleinmaleins - Ausgabe vom 20. Februar 2021

 
Hallo Ihr Lieben!
In der heutigen Ausgabe des Stempeleinmaleins zeigen wir Euch diese Kugelschreiber-Verpackung. Wie Ihr gleich sehen werdet, passt die aber auch super für etwas anderes.

Hello everyone!
In today's issue of Stempeleinmaleins we are sharing this box that is made to hold a pen. But as you'll see it is also perfect for other stuff.


Ich habe zum Dekorieren meiner Box die geniale Posteule aus dem Stempelset Special Delivery von LawnFawn benutzt und dazu das Paket aus dem Special Delivery Box Add-On Set kombiniert. Dies hier war nämlich ein Geschenk für unseren Postboten. Die Motive waren als perfekt. Coloriert habe ich sie alle mit Copics.
Die Hülle habe ich aus leicht milchiger Folie gewerkelt. So bekommt man einen kleinen Blick auf den Inhalt, aber eben noch nicht voll. Auf die Box habe ich viele kleine Wolken geklebt.

I've used the great post owl from the Special Delivery stamp set by LawnFawn and combined it with the parcel image from the Special Delivery Box Add-On stamp set. This was a gift for our postie so the images were perfect. Coloring was done with Copics.
The sleeve is made from a milky acetate. That gives a hint of the content but still you won't see it fully until the sleeve is removed.


Die Hülle kann kann nach oben bzw. unten weggeschoben werden. Hier seht Ihr das Milchige der Folie ganz gut. 

The box can be pushed out of the sleeve. And here you get a better look of the milky acetate I've used for the sleeve.


Und hier seht Ihr dann die inenre Box komplett. 
Bevor Ihr fragt - ja, manchmal bin ich ein richtiger Streber und arbeite voraus. Wenn die Themen schon feststehen, warum auch nicht? Deswegen steht auf den Tags am Röhrchen in der Box auch "frohe Weihnachten", sowie auf dem anderen "vielen lieben Dank". Ich habe diese Box nämlich bereits im Dezember gemacht und es war das Weihnachts-Danke für unseren Postboten.
Ich habe hier statt eines Kugelschreibers ein kleines Reagenzglas in die Box gelegt. Die kann man in der Höhe ganz einfach auf die jeweiligen Bedürfnisse anpassen. Ich habe sie also etwas gekürzt. An das Röhrchen habe ich die Tags mit etwas hellblauem Organzaband angebunden.
Die innere Box habe ich aus blauem Cardstock gewerkelt und mit Briefen, ebenfalls aus dem Stempelset von LawnFawn, in etwas dunklerem Blau bestempelt. 
Gefüllt wurde das Röhrchen dann natürlich auch noch.... ;)

And here you see the inner box completly. 
Before you ask - yes, sometimes I am such a nerd and work ahead. Why not, when the themes are fixed that much in advance. So that's why there's "merry christmas" and "very much thanks" stamped onto the tags that are tied to the test tube inside the box. I've made this in december and gave it to our postie as a christmas gift.
Instead of a pen I've put a test tube inside the box. The box can easily changed in height and so make it fit whatever you want to put inside. I've made mine a bit shorter so the test tube won't move inside. To the test tube I've tied the tags with some light blue organdy ribbon.
The inner box is made from blue cardstock and I've stamped letters, also from the LawnFawn stamp set, with a slightly darker blue ink all over the inside.
Well, and of course the tube was filled, but that was after I've taken the pictures.... ;)


Donnerstag, 18. Februar 2021

Beste Freunde

 
Hallo Ihr Lieben!
Für meine heutige Karte habe ich nochmal die genialen Funny Birds von Stampcorner verwendet. Die bringen mich immer zum Lächeln!

Hello everyone!
On today's card I've brought out the great Funny Birds by Stampcorner again. Those always put a smile on my face.

Hier habe ich mal einen 3D Folder für die Gestaltung des Hintergrundes benutzt. Die Vögel sind so schön schräg, dass sie bestimmt auch eine verrückte Tapete an der Wand haben. Ich habe den Staggered Chevron Folder von Sizzix auf schwarzen Cardstock geprägt. Der Cardstock ist nicht voll gefärbt und so habe ich mit einem Sanding Block die schwarze Lage an den erhabenen Stellen etwas abgerieben. Dadurch sieht man das Muster noch besser.
Im unteren Teil der Karte habe ich den Text aufgeklebt. Das Beste ist aus dem Stempelset Freunde 4, das "durch dick und dünn" aus dem Set Freunde 2, beide von Stampcorner. Dazwischen habe ich das Wort Freunde aus gestanzten Buchstaben aufgeklebt. Ich habe sie aus blauem Cardstock gestanzt.

Here I've used a 3D embossing folder to create the background. These birds are so crazy, I'm sure they have a crazy wallpaper on their walls as well. I've embossed some black cardstock with the Staggered Chevron folder by Sizzix. Since my cardstock had a white core I've removed the black top layer from the raised areas which brings out the pattern even better.
In the lower part I've added the text. It means "best friends - through thick and thin". The word friends is written with die cut letters cut from blue cardstock.


Und hier sind die Vögel. Ich denke, jeder von uns hat das schon mal gemacht: sich mit so vielen Freunden wie möglich in einen Fotoautomaten gequetscht und lustige Bilder geschossen. Bei mir ist das noch nicht mal so lange her - im Dezember 2019 während eines Discobesuchs... Und was uns Menschen Spaß macht, mögen diese Vögel auch! Während einer Party ist so dieses Foto entstanden. Und das fanden sie so klasse, dass sie es vergrößert und gerahmt zu Hause aufgehängt haben.
Die Vögel sind maskiert und mit Copics coloriert. Dann habe ich das Bild in einen der Funky Frames von WhimsyStamps gesteckt. Auf den Rahmen habe ich mit Copics ein Holzmuster aufgemalt. 

And here are those birds. I guess we've all done it: getting as many friends as possible into one of those photo booths and take funny pictures. Well, my last time wasn't too long ago: in december 2019 during a visit at a club. And what's fun for us is also fun for these birds. So during a party they took this picture. And they liked it that much that they framed it and hung it into their aparment. 
I did some masking to stamp the birds together and colored them with Copics. Then I've put the image behing one of the Funky Frames by WhimsyStamps. To the frame I added a wood pattern with my Copics.