Montag, 21. April 2025

Das zweite Mail monochrom im April

 
Hallo Ihr Lieben!
Bereits zu Beginn des Monats habe ich Euch mit meiner ersten Karte für die Coloring Club Challenge eine monochrome  Karte gezeigt. Nun, auch für die IG-Challenge von Simon Says Stamp ist das Thema im April monochrom. Deswegen gibt es heute eine weitere monochrome Karte, diesmal in Rosa.
 
Hello everyone!
Beginning of this month I already showed you a monochromatic card when I shared my very first card for the Coloring Club Challenge. Well, turns out that also Simon Says Stamp has chosen monochromatic as the theme for their IG challenge in april. So I am sharing another monochromatic card with you this month, this time I  picked pink as the color of choice.
 
Ein klein wenig weiß musste ich dazu kombinieren, sonst wäre die Karte doch zu eintönig geworden. Deswegen habe ich einen der Essential Arches von Spellbinders aus einem Stück weißen Cardstocks gestanzt und diesen Cardstock für meinen Aufleger benutzt. 
Auf einem weiteren Stück weißen Cardstocks habe ich den Bereich, der später durch das Fenster zu sehen ist, von oben mit Distress Ink Victorian Velvet gewischt und anschließend weiße Acrylfarbe aufgespritzt.
 
I had to add a bit of white for just a bit of contrast.
I die cut one of the Essential Arches by Spellbinders from a piece of white cardstock and used that as my top layer later.
On another piece of white cardstock I inked the area, that will be visible through the window later,  with Distress Ink Victorian Velvet, starting dark at the top and getting ligther towards the bottom. Then I added splatters of white acrylic paint.
 

 Als Deko habe ich die Gießkanne aus dem Watering Can Stanzenset von LawnFawn als Hauptelement benutzt. Drumherum befinden sich Blumen aus den Stanzensets Flower Garden Backdrop (aus dem sind auch die Schmetterlinge) und Magic Iris Floral Frame. Ich habe alle Teile aus weißem Cardstock gestanzt und mit Copics coloriert. Außerdem habe ich einige kleine Details mit Polychromos aufgemalt. Auf der Gießkanne habe ich ein klein wenig Grau ins Rosa gemischt. 
Oben am Fenster wächst ein blühender Kirschzweig aus dem Stempelset Kirschenzeit von Create a Smile ins Fenster. Damit das gestempelte Motiv optisch zu den colorierten Stanzteilen passt, habe ich es mit dem Jellyfish Kissen von LawnFawn abgestempelt und in No-Line Technik coloriert. 
Für die Highlights kam zum Schluss ein weißer Gelstift zum Einsatz.
 
I picked the watering can from the Watering an  die set by LawnFawn as the main element of my decorations. Around it I placed flowers from Flower Garden Backdrop (also the butterflies are from this set) and Magic Iris Floral Frame. I die cut all pieces from white cardstock and colored them with Copics. I also brought in some Polychromos for some fine details. When coloring the watering can I mixed a bit of light grey into the pink.
At the top a cherry branch full of blossoms is growing into the window. It's an image from Kirschzeit by Create a Smile. To make the look of the branch go better with the look of the colored die cuts I stamped it with the Jellyfish ink by LawnFawn and colored it in no-line technique. 
For the highlights I brought in a white gel pen.
 

 Da ich das Fenster nicht mittig aus dem weißen Kartenaufleger gestanzt habe, hat er unten einen etwas breiteren Rand - perfekt, um einen Text aufzustempeln. Ich habe mich für "enjoy your day" aus dem Set Let's Play von LawnFawn entschieden und ihn mit Victorian Velvet aufgestempelt. 
Dann habe ich den Distress Marker in Victorian Velvet benutzt, um einen feinen Rahmen aufzumalen. Ich benutze die Stifte sehr selten und die feine Spitze war fast ausgetrocknet, aber so ist der Rahmen schön zart geworden. 

Since I didn't die cut the window centered from the white card panel there is a bit of a larger white area under the window - perfect to add my text to. I went with "enjoy your day" from Let's Play by LawnFawn and stamped it with Victorian Velvet.
Then I used a Victorian Velvet Distress Marker to draw a frame around the panel. I really use those markers very seldomly and the fine tip had nearly dried out. But that gave me some very soft lines.
 

 Beim Zusammenkleben der Karte habe ich wie fast immer verschiedene Ebenen kreiert. Die Schmetterlinge sind direkt auf den Hintergrund geklebt. Die Gießkanne und die beiden höheren Blumen dahinter sind mit dünnem 3D Tape hinterlegt, die Blumen davor mit dickem. Hinter den Kirschzweig und den weißen Cardstock mit dem ausgestanzten Fenster habe ich dickes und dünnes 3D Tape aufeinander geklebt, so dass dies die höchste Ebene meiner Karte bildet.
Dann habe ich den dekorierten Cardstock auf einem weißen Kartenrohling befestigt.
 
When putting my card together I created different layers, just like I do most of the times. I glued the butterflies directly onto the background. The watering can and the two tall flowers behind it I backed with thin foam tape, behind the flowers in front of the watering can I put thick foam tape. Behind the cherry branch and the white cardstock with the cut out window I stacked thin and thick foam tape, so this is the top most layer.
Then I just adhered the card panel to a white note card. 

Sonntag, 20. April 2025

Abracadabra

 
Hallo Ihr Lieben!
Heute habe ich eine wahrlich "zauberhafte" Karte für Euch, die in die Kategorie "magical creatures" der Coloring Club Challenge passt. Der kleine Zauberer von WhimsyStamps war da perfekt. Und auch wenn er echt lieb schaut - das, was er da so zaubert, ist nicht ganz so lieb....
 
Hello everyone!
Today I have a magical card for you, that fits the "magical creatures" theme of the next Coloring Club Challenge. This little wizard by WhimsyStamps is just perfect for it. And even if he looks quite nice - what he's doing with his magic isn't as nice...
 
Der Hintergrund besteht hier aus einem Stück weißen Cardstocks, den ich mit Distress Ink Twisted Citron, Stormy Sky, Faded Jeans, Chipped Sapphire und Black Soot gewischt habe. Dann habe ich weiße Acrylfarbe aufgespritzt.
Aus dem fertigen Hintergrund habe ich dann den Twinkle Swirl ausgestanzt und beide Teile - auch die eigentlichen Reste - für den Hintergrund benutzt. Damit sich die Sterne in einigen der Swirls gut abheben, habe ich nur diese Bereiche mit einem weiteren Stück Cardstock hinterlegt, den ich mit Squeezed Lemonade, Twisted Citron, Mowed Lawn und Rustic Wilderness gewischt habe. 
Die Swirl-Teile ohne Sterne habe ich auf ein Stück schwarzen Cardstocks geklebt und darauf dann den anderen Teil mit den hinterlegten Sternen mit dünnem 3D Tape aufgesetzt. 
 
The background is made from a piece of white cardstock, that I inked with Distress Ink Twisted Citron, Stormy Sky, Faded Jeans, Chipped Sapphire and Black Soot. Then I splattered some white acrylic paint onto it.
From the finished background I die cut the Twinkle Swirl die and used both pieces, also the "waste", for my background. To make sure the stars, that get cut from half of the swirls, are visible nicely, I backed just these swirls with cardstock pieces that I had inked with Squeezed Lemonade, Twisted Citron, Mowed Lawn and Rustic Wilderness.
I adhered the swirl parts without stars onto black cardstock and then put the other piece with the backed stars around it/on top of it using thin foam tape.
 

 Hier ist der kleine Zauberer, die ja wirklich so aussieht, als könnte er kein Wässerchen trüben. Bei dem kleinen Drachen auf seiner Schulter bin ich ir da nicht so sicher, der schaut schon etwas grimmig.
Ich habe das Motiv mit Copics coloriert und dann per Hand ausgeschnitten. 
Damit die beiden nicht in der Luft hängen, habe ich ein Oval aus schwarzem Cardstock gestanzt und als Boden angeklebt. Und weil ich vom Text noch eine Wolke aus Vellum übrig hatte, habe ich die mit Polychromos ein wenig grünlich schattiert und um das Motiv herum verteilt. Ich finde, so sieht es aus wie grüner Nebel, der natürlich vom Zaubern kommt.
 
Here's the little wizard and he really looks cute. The little dragon on his shoulder not so much, he looks a bit angry.
I colored the image with Copics and cut it out with my scissors.
To make sure, the two aren't floating in the air I die cut an oval from black cardstock and used that as a ground for the image to stand on. And since I had a cloud cut from vellum left from my text I used Polychromos to tint them a bit green and put them down around the image. I think, it looks like some kind of green fog, and of course that's because of the wizard's magic doing.
 

 Das Wort Poof und die Sterne drumherum, die  meinen Haupttext bilden, sind mit dem Poof Word Set gemacht. Beides habe ich aus weißem Cardstock gestanzt und mit Copics coloriert. Das Wort habe ich außerdem mit einem leicht versetzten Poof, gestanzt aus schwarzem Cardstock, hinterlegt.
Und damit das Wort auch ein wenig wie das Ergebnis eines Zaubers aussieht, habe ich es mit einem Wolkenring aus Vellum hinterlegt. Dafür habe ich die Wolken aus dem Set Comic Burst Background benutzt. Ich hatte die Stanzen noch nicht voneinander getrennt und so konnte ich beide gemeinsam durch die Big Shot kurbeln und habe diesen Rahmen erhalten. 
Das Vellum habe ich wieder mit Polychromos grünlich schattiert und dann den gestanzten Text samt Sternen darauf geklebt. Die Highlights sind mit einem weißen Gelstift gemacht.
Die restlichen Texte sind aus dem Set Abracadabra von MFT. Beide sind mit weißem Embossingpulver auf schwarzen Cardstock embosst.
 
The word Poof and the stars around it, that create the main text of my card, are made with the Poof Word Set. I cut all elements from white carstock and colored them with Copics. Just the word Poof I backed with another die cut, made from black cardstock, offsetting it a bit.
To make sure the word looks a bit like the result of some magic being done I put a cloud ring, cut from vellum, behind it. I used the clouds from the Comic Burst Background for it. Since I hadn't cut the dies apart yet it was easy to run both through my Big Shot and end up with this ring.
I used Polychromos again to shade the vellum a light green and glued the die cut text onto it. The highlights are made with a white gel pen.
The smaller texts are from Abracadabra by MFT. I white heat embossed them onto black cardstock.
 

 Wie schon erwähnt, habe ich die Hintergrundteile mit dünnem 3D Tape hinterlegt. Das befindet sich auch hinter dem Wolkenring und den embossten Texten, die übrigen Elemente habe ich mit dickem 3D Tape hinterlegt.
Zum Schluss habe ich alles auf einen weißen Kartenrohling geklebt.
 
As I mentioned already the background is put together using thin foam tape. I used that also behind the ring of clouds and the embossed textes. The other elements I adhered with thick foam tape.
Then I put my card panel onto a white note card.
 

Samstag, 19. April 2025

To somebunny special

 
Hallo Ihr Lieben!
Heute habe ich noch eine Osterkarte für Euch, schließlich ist heute Karfreitag und das Osterwochenende beginnt  offiziell.
 
Hello everyone!
I have another easter card for you today, it's Good Friday after all today and that means, the easter weekend has officially started.
 
Die Karte ist - bis auf einen Teil des Textes - komplett mit Stanzteilen gemacht.
Der Hintergrund besteht aus einem Stück Watercolor Cardstock, den ich von oben her sanft in Distress Ink Peacock Feathers und Salvaged Patina gewischt habe. Dann habe ich weiße Acrylfarbe aufgespritzt.
 
Except for part of the text this card is made completly from die cuts.
For the background I inked a piece of watercolor cardstock with Distress Ink Peacock Feathers and Salvaged Patina, then splattered some white acrylic paint on top.
 

 Am unteren Rand der Karte habe ich meine Deko angebracht. Hier sitzen zwei Hasen in inniger Umarmung vor einem Meer aus Frühlingsblumen.
Für die Blumen habe ich die Osterglocken sowie die kleinen Blümchen aus dem Rainboot Bouquet Stanzenset von Spellbinders aus Watercolor Cardstock gestanzt. Auch die Gräser, eigentlich Blätter, sind aus diesem Set. 
Die beiden Hasen hatte ich vor kurzem entdeckt - sie sind eine No-Name Stanze, aber ich war sofort verliebt. Auch sie habe ich aus Watercolor Cardstock gestanzt.
Dann habe ich erstmal alle Teile per Ink Smooshing eingefärbt: die Osterglocken mit Distress Ink Squeezed Lemonade und Spiced Marmalade für die Blumenmitten, die Gräser mit Twisted Citron und die kleinen Blumen mit Wilted Violett. Für die Hasen habe ich Frayed Burlap benutzt, allerdings hat mir der Farbton mal so überhaupt nicht gefallen, aber dazu gleich mehr.
Nachdem die Teile getrocknet waren, habe ich die Mitten der Osterglocken mit einem hell-orangefarbenen Zig-Marker leicht eingefärbt. Und die Hasen, deren Braun eher ein grau war, habe ich ebenfalls mit einem ZIG-Marker "umgefärbt". Naja, auch das war noch nicht wirklich die Farbe, die mir vorschwebte. Also habe ich meine Polychromos hervorgeholt und sie damit quasi complett übermalt. Durch die Struktur des Watercolor Cardstocks ist die Polychromo-Farbe nicht wirklich eben aufgetragen, aber ich finde, das gibt dem Hasenfell eine tolle Struktur. Mit weiteren Stiften habe ich auf die anderen Stanzteile noch einige Details aufgemalt und dann auch noch welche mit einem weißen Gelstift hinzugefügt.
Den Hasen habe ich als Schwänzchen dann noch einen dicken weißen Pompom angeklebt.
Dann habe ich alle Teile arrangiert.
 
At the bottom of the card I added my decorations. There are two bunnies, sitting in front of a fiel of spring flowers, hugging each other.
For the flowers I die cut the daffodils and the small flowers from the Rainboot Bouquet die set by Spellbinders from watercolor cardstock. Also the grass, originally leaves, is from this set.
I found those little bunnies a little ago - it's an unbranded die but I was hooked. I die cut them from watercolor cardstock, too.
Then I did some ink smooshing to add a soft layer of color to all the pieces. I used Distress Ink Squeezed Lemonade for the daffodils, Spiced Marmalade for the flower centeres, Twisted Citron for the grass and Wilted Violet for the small flowers. For the bunnies I used Frayed Burlap, but I really didn't like their color. We will come back to them.
After the pieces had dried I colored the centers of the daffodils a very soft orange with my ZIG markers. And also the bunnies, that were more a grey than a brown, I colored with a ZIG marker. I still didn't like their color. So I brought out my Polychromos and re-colored them completly with those. I wasn't able to apply the color completly smooth due to the structure of the watercolor cardstock, but I think, that adds some interest to their fur. I used some more colors to also add details to the other elements and then brought in a white gel pen. 
I glued a white pompom onto each bunny butt as their tails.
 Then I arranged all the pieces.
 

Oben auf den Himmel habe ich den Text der Karte angebracht. 
Das Wort Easter besteht aus fünf Lagen weißen Cardstocks, die ich aufeinander geklebt habe. Der Rest des Textes ist aus den Stempelsets Eggstra Amazig Easter und Bubbles of Joy (happy) von LawnFawn und mit weißem Embossingpulver direkt auf den Hintergrund embosst.
Darunter, zwischen den Hasenohren, habe ich noch zwei weiße Herzen aufgeklebt.
 
 On the top of the card I added my text.
The word easter is made from five layers of white cardstock, that I stacked. The rest of the text is from Eggstra Amazing Easter and Bubbles of Joy (happy) by LawnFawn. I white heat embossed them directly onto the background.
Between the two bunny ears I glued two white clay hearts.


Die blauen Blüten ganz oben sind direkt auf den Hintergrund geklebt, die übrigen mit dünne, die Hasen mit dickem 3D Tape hinterlegt. 
Zum Schluss habe ich alles auf einen weißen Kartenrohling geklebt.
 
The blue flowers at the top of the flower field are glued directly onto the background. The other flowers I backed with thin, the bunnies with thick foam tape.
Then I attached the card panel to a white note card.
 

Freitag, 18. April 2025

Ab in die Wüste!

 
Hallo Ihr Lieben!
Ja, die Mäuse von LawnFawn sind schon wieder los... Diesmal machen sie einen Trip in die Wüste und haben jede Menge Spaß dabei.
 
Hello everyone!
Yes, it's the LawnFawn's mice again... This time they are taking a trip into the desert and have lots of fun there.
 
Für den Hintergrund habe ich den oberen Teil eines Stücks weißen Cardstocks mit Distress Oxide Tea Dye, Rusty Hinge, Crackling Campfire und einem Hauch Scorched Timber gewischt. Ich wollte einfach keinen blauen Himmel für diese Karte, da die anderen Farben hauptsächlich gelb und braun sind. Das Blau hätte meiner Meinung nach einfach zu sehr herausgestochen.
Auf den Himmel habe ich mit schwarzer Tinte einige Vögel aus dem Set Life is Good aufgestempelt.
Dann habe ich den Desert Canyon Backdrop aus hellem gelb-braunem Cardstock gestanzt, die beiden vorderen Lagen habe ich außerdem extra nochmal gestanzt, um alles layern zu können. Die Berge im Hintergrund habe ich mit Distress Oxide Tea Dye und Distress Ink Tea Dye gewischt und mit Polychromos einige Details aufgemalt.
Die Sandlagen habe ich mit Distress Oxide Brushed Corduroy und Scorched Timber gewischt. Dann habe ich ganz feine Spritzer weißer Acrylfarbe sowie Distress Ink Brushed Corduroy und Vintage Photo, jeweils vermischt mit etwas Wasser, aufgetragen.
 
For the background I inked the upper part of a piece of white cardstock with Distress Oxide Tea Dye, Rusty Hinge, Crackling Campfire and a hint of Scorched Timber. I just didn't want to use a blue sky here, sind the other colors on my card are mainly yellow and brown. The blue would just have stood out too much, I think.
With black ink I stamped some birds from Life is Good onto the sky.
Then I used the Desert Canyon Backdrop and cut it from light yellow-brown cardstock, the two wavy front layers I also cut extra to be able to layer them on top. I inked the mountains with Distress Oxide Tea Dye and Distress Ink Tea Dye and added some details using Polychromos.
The sand layers I inked with Distress Oxide Brushed Corduroy and Scorched Timber. Then I added very fine splatters of white acrylic paint and Distress Ink Brushed Corduroy and Vintage Photo, both mixed with a bit of water.
 

 Für die Landschaft rund um meine Mäuse habe ich aus weißem Cardstock einige Kakteen, sowohl aus dem Set Desert Canyon Backdrop als auch mit der Cactus Border Stanze, ausgetanzt. Auußerdem habe ich die kleinen Pflanzen aus dem Desert Canyon Backdrop Set ausgestanzt und dann alle Teile, so wie alle Motive auf der Karte, mit Copics coloriert. 
Die beiden Raben aus dem Set Happy Harvest müssen hier als Aasgeier herhalten... Aber ich finde, sie machen den Job ganz gut!
 
For the scene around my mice I die cut some cacti from white cardstock, using the Desert Canyon Backdrop set and the Cactus Border die. I also die cut some of the spikey plants from Desert Canyon Backdrop, then colored them with Copics - like I did with all the images on this card. 
The two crows from Happy Harvest have to be vultures here... But I think, they are doing a great job!
 

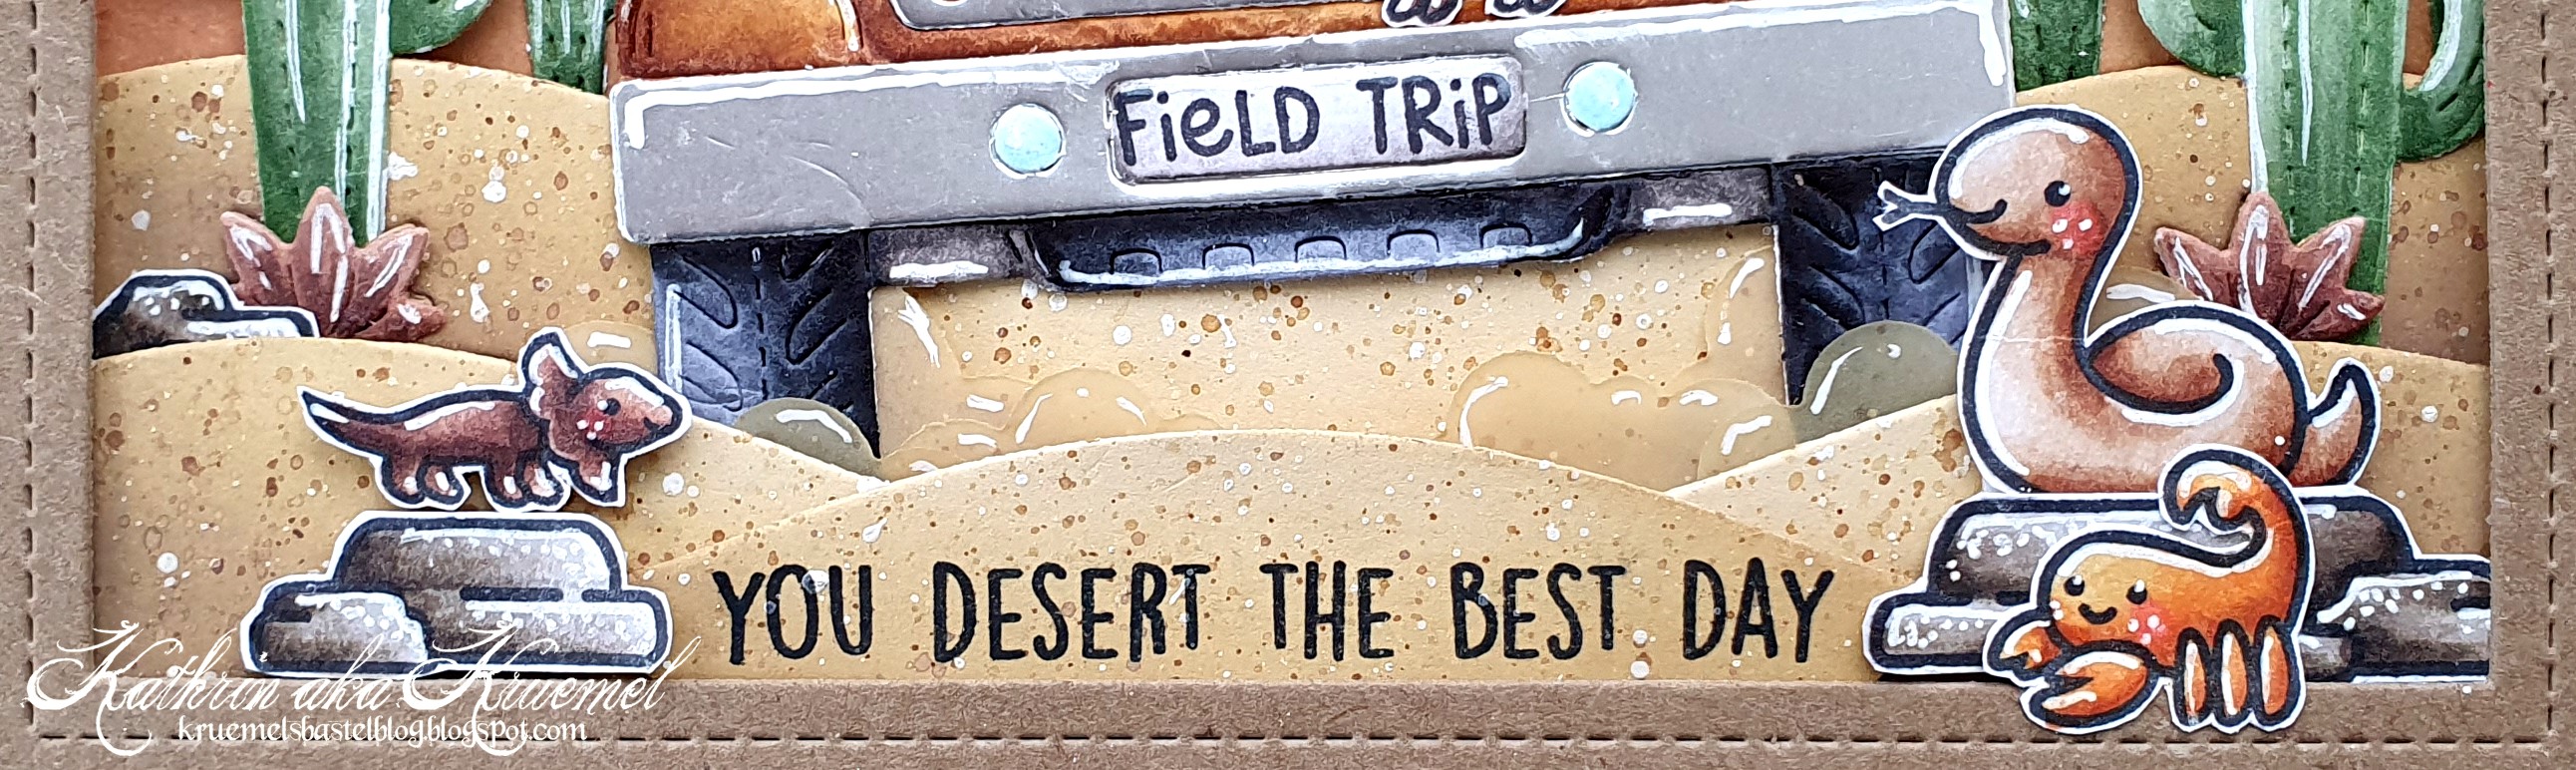
 In der Mitte der Karte sieht man die Mäuse, die aufgeregt die Natur in der Wüste beobachten. Sie haben sich bei der Autovermietung von Gummiapan einen Jeep ausgeliehen - von denen ist nämlich die Jeep-Stanze. Der war dann doch einen kleinen Tacken größer als gedacht, aber so haben die Mäuse zumindest genug Platz.
Auch den Jeep habe ich aus weißem Cardstock gestanzt und mit Copics coloriert. Die Metallteile habe ich dann außerdem aus matt-silbernem Metallic-Cardstock gestanzt und alles aufeinander geklebt. Und weil das Kennzeichen so leer aussah, habe ich dort ein "field trip" aus dem Set Plan On It School aufgestempelt.
Die Mäuse sind aus den Sets It's a Bird, Whoosh Kites und Virtual Friends. Die Maus aus Whoosh Kites hatte natürlich keinen Hut auf, das sah aber zusammen mit den anderen Mäusen komisch aus. Also habe ich einfach den Hut einer der Mäuse aus It's a Bird verwendet - und das samt Ohren. ;) So fällt es gar nicht auf, dass ich hier ein wenig getrickst und den Hut aufgeklebt habe. Nun ist nur noch der Expeditionsleiter und Fahrer des Autos ohne Hut, und das passt dann optisch wieder. 
Und weil so ein Auto bei der Fahrt durch den Wüstensand ordentlich Staub aufwirbelt, habe ich aus Vellum noch einige Wolken aus dem Peek-a-Boo PopUp Set gestanzt, es ebenfalls wie die Sandlagen im Hintergrund gewischt und besprenkelt und die an die Reifen des Autos geklebt. 
Zum Schluss ist ganz fix noch eine der Echsen aus dem Set Kanga-rrific Add-on Set auf die Stoßstange geklettert. Er wollte so gerne auch mal in einem Auto fahren!
 
In the center of my card I placed the mice, that are curiously watching nature in the desert. They went to Gummiapan car rent to rent a Jeep - that's where the jeep die is from. Well, it was a bit larger than I had thought but now the mice have lots of room and nicely fit all in the car.
Also the jeep I cut from white cardstock and colored it with Copics.  The metall pieces I cut again from matte silver metallic cardstock and glued them on top. And since the license plate looked so empty, I stamped "fiel trip" from Plan On It School onto it.
The mice are from It's a Bird, Whoosh Kites and Virtual Friends. The mouse from Whoosh Kites didn't have a had, and combined with the other mice that looked a bit weird. So I simply used the hat from one of the mice  from It's a Bird - including the ears. ;) This way it's nearly impossible to tell, that I was a bit creative here and glued the hat on. Now there's only the expedition leader and car driver without a hat, and I think, that makes sense. 
And since a car raises a lot of dust when driving through the desert sand, I die cut some clouds from Peek-a-Boo PopUp from Vellum, inked and splattered it exactly like I did the sandy layers in the background and adhered those under and behind the tires. 
And then, just when the mice wanted  to start, one of the lizards from Kanga-rrific Add-On jumped onto the bumper. He wanted  to drive in a car once so badly!
 

 Wie schon erwähnt, war das Auto größer als gedacht und so war am Himmel, an dem ich eigentlich meinen Text anbringen wollte, kein Platz mehr. Also habe ich kurzerhand das Reststück des Desert Canyon Backdrops genommen und meinen Text darauf gestempelt. Er ist mit Texten aus Critters in the Desert und Whoosh Kites gemacht. Den Cardstock mit dem aufgestempelten Text habe ich dann einfach ganz vorne auf meine Karte geklebt.
Rechts und links neben dem Text befinden sich noch einige Felsen aus Kanga-rrific Add-On und Critters in the Desert. Aus dem Set sind auch die Schlange und der Skorpion, die zweite Echse ist wieder aus Kanga-rrific Add-On. 
 
Like I already  mentioned was the car larger than I had thought and so there wasn't any room left on the sky, where I had planned to add my text. So I simply used the piece, that the Desert Canyon Backdrop cuts out, and stamped my text onto it. It's made using stamps from Critters in the Desert and Whoosh Kites. Then I used the cardstock with the text as my top layer in the center of the card.
To the left and right of the text I added some rocks from Kanga-rrific Add-On and Critters in the Desert. From this set are also the scorpion and snake, the other lizard is from Kanga-rrific Add-On again.
 

 Natürlich kam beim Zusammensetzen der Szene 3D Tape zum Einsatz.
Zum Schluss habe ich einen Stitched Rectangle Frame, gestanzt aus braunem Cardstock, als Rahmen aufgeklebt und alles auf einem weißen Kartenrohling angebracht.
 
Of course I used foam tape to put the scene together.
I put one of the Stitched Rectangle Frames, cut from brown cardstock, around my scene and then adhered it to a white note card.
 

Donnerstag, 17. April 2025

Hippo aus der Torte

 
Hallo Ihr Lieben!
Heute habe ich eine Karte mit einer besonderen Geburtstagsüberraschung. Dass jemand aus einer Torte springt - meist ja eher leicht bekleidete  junge Damen - ist nicht ganz so selten. Dass das aber ein Nilpferd tut, kommt dann wohl doch eher nicht so häufig vor.
 
Hello everyone!
Today I have a card with a special birthday surprise to share. It's not too rare that someone - most times pretty young ladies with little clothes - jumps out of a cake. But that this someone is a hippo doesn't happen too often.
 
Für die Karte habe ich ein Stück hellgrauen Cardstock genommen und an den äußeren Rändern - bis auf den unteren - etwas Distress Ink Hickory Smoke aufgewischt.
 
For this card I used a piece of light grey cardstock and inked the edges - except for the bottom one - lightly with Distress Ink Hickory Smoke.
 

 Mit einem Stencil und weißer Stencil Paste, Distress Ink Wilted Violett sowie lilafarbenem VersaCraft habe ich dann zwei  Partybanner über den Hintergrund gespannt. Sie sind direkt auf den hellgrauen Cardstock gestencilt. 
Mit einem schwarzen Fineliner habe ich die Schnur aufgemalt und außerdem links neben jedes Banner mit einem hellgrauen Fineliner eine Schattenlinie gezeichnet.
Dann habe ich weiße Acrylfarbe über den Cardstock gespritzt.
 
I used a stencil and white stencil paste, Distress Ink Wilted Violet and purple VersaCraft to stencil two party banners across the card, stenciling them directly onto the light grey cardstock.
I drew the string with a black fineliner and also used a light grey fineliner to draw a shadow line on the left of each banner.
Then I splattered white acrylic paint over the cardstock.

 
Unten auf der Karte befindet sich eine große Torte - die muss auch so groß sein, sonst passt der Hippo ja nicht hinein!
Der schaut oben aus der dicken Schokoschicht samt Cremetupfen.
Die Torte ist mit einer Stanze von Marianne Design, ich habe die Torte per Partial Die Cutting verlängert. Alle Teile sind aus weißem Cardstock gestanzt und mit Copics coloriert.
Und oben der Hippo ist der Hulahippo von Stampcorner. Eigentlich hat er einen Hula Hoop Reifen um die Hüften, ich habe ihn genau bis an den Rand des Reifens in einen Schlitz gesteckt, den ich mit dem Cutter in die Schokoschicht geschnitten habe. Und zur Feier des Tages hat sich der Hippo den Partyhut der Eule aus dem Stempelset Eule ausgeliehen. Auch diese Motive sind mit Copics coloriert.
Rund um den Hippo habe ich dann noch Konfetti verteilt, die er beim Herausspringen der Torte fröhlich in die Luft geworfen hat. Sie sind mit Stanzen aus dem Happy Headlines Set von Concord and 9th aus dunkel-lila farbenem Cardstock gestanzt.
Quer über die Torte habe ich dann meinen Text gesetzt. Das Überraschung ist mit der gleichnamigen Stanze von Stampcorner gemacht und besteht aus zwei lilafarbenen und einer weißen Lage, die ich versetzt aufeinander geklebt habe. Der Text darunter ist aus dem Set Gute Laune und mit schwarzer Tinte direkt auf die Torte gestempelt.
 
On the bottom of the card there's a large cake - it has to be that large or the hippo won't fit into it! He's looking out of the thick chocolate layer with cream puffs.
I used a die set by  Marianne Design for the cake, making it larger by doing partial die cutting. I cut all pieces from white cardstock and colored them with Copics.
The hippo is the Hulahippo image by Stampcorner. Originally he has a hula hoop around his waist. I tucked him exactly to the edge of this hoop into a slit, that I cut with a cutter into the chocolate layer. And because it's a party he's wearing a party hat from the owl from Eule. Again I used Copics for the coloring.
I glued some confetti around the hippo, he had thrown those when he jumped out of the cake. I made those from dark purple cardstock using dies from  the Happy Headlines die set by Concord and 9th. 
Across the cake I put my sentiment. It means "Surprise! I'm here, let's get this party started". I die cut the word surprise from light purple and white cardstock, stacking them a bit offset. The smaller text I stamped directly onto the cake using black ink.
 

 Ich habe die Schokoschicht samt Hippo mit dünnem 3D Tape auf die Torte geklebt und dann auch hinter die Torte 3D Tape gesetzt.
Die Sahnetupfen und die Konfetti habe ich noch ein wenig mit Stickles beglittert und außerdem einen Rahmen mit einem weißen Gelstift aufgemalt.
Zum Schluss habe ich alles auf einen weißen Kartenrohling geklebt.
 
I used thin foam tape to adhere the chocolate layer with the hippo to the cake, then backed the cake with foam tape, too.
I put Stickles onto the cream puffs and the confetti and also drew a frame with a white gel pen around the scene.
Then I adhered it the card panel to a white note card.
 

Mittwoch, 16. April 2025

Yummy!

 
Hallo Ihr Lieben!
Ich habe den Überblick verloren und kann Euch somit nicht sagen, die wievielte Coloring Club Challenge aktuell läuft. Aber das Thema habe ich natürlich parat: yummy. Natürlich habe ich als erstes an Essen gedacht, aber dann kam mir die Erkenntnis, dass Cocktails auch auch ganz lecker sind.... ;) Und so ist diese Karte entstanden.
 
Hello everyone!
I have lost track and can't say, which Coloring Club challenge this is for. But of course I have the theme: yummy. Of course I thought "food" first, but then I remembered, that cocktails are quite yummy, too... ;) And so I made this card.
 
Der Hintergrund ist hier einfach per Ink Smooshing mit Distress Ink Salvaged Patina, Twisted Citron und Squeezed Lemonade  auf einem Stück Watercolor Cardstock gemacht. Eigentlich war der viel größer, aber als ich später alle Motive bereits aufgeklebt hatte, fiel mir auf, dass der Text oben viel besser als unten aussieht. Ablösen ließen sich die Motive nicht mehr, der Text passte zum Glück darüber. Und so habe ich den Hintergrund dann einfach kleiner geschnitten.
 
The background is made simply by doing some ink smooshing with Distress Ink Salvaged Patina, Twisted Citron and Squeezed Lemonade on a piece of watercolor cardstock. It actually was larger, but when I had adhered all the images later I realized, that the text looks a lot better above than underneath them. I wasn't able to pull them off anymore, but luckily the text fit above the images. And so I cut the background smaller.
 

 Ich habe vom Cocktails Mischen so gar keine Ahnunng. Wie gut, dass man sie auf einer Karte nicht probieren muss - lecker aussehen tun sie allemal, finde ich. Und dass in ein Martini-Glas Oliven gehören, das kriege ich dann noch hin. 
Die Cocktailgläser samt Elementen wie Früchten, Oliven, Schirmchen etc. sind alle aus dem Auf Uns Set von Create a Smile. Ich habe die Gläser und Eiswürfel mit hellblauer Tinte gestempelt, ich finde, das sieht bereits toll nach Glas aus. Die anderen Elemente habe ich dann mit Jellyfish Tinte von LawnFawn direkt in/an/auf die Gläser gestempelt. Nur die Minze am Glas rechts ist extra gestempelt, ausgeschnitten und angeklebt. 
Rundum habe ich einige Erdbeeren aus dem How You Bean Strawberry Add-On Set von LawnFawn verteilt. Und dann habe ich zwischen allem zwei Luftschlangen durchgewoben. Die sind mit der Curly Q Stanze von TayloredExpressions gemacht. Ich habe die Luftschlangen aus dem Rahmen geschnitten und Teile davon zwischen den Gläsern verteilt, so dass es wie zwei lange Luftschlangen aussieht.
Für die Coloration habe ich Copics benutzt und dann einige Details wie den Spieß an den Oliven mit Polychromos hinzugefügt. Die Highlights habe ich dann mit einem weißen Gelstift gesetzt. Außerdem habe ich die hellblauen Stempellinien der Gläser mit einem ganz dünnen Gelstift nachgemalt. Der funktioniert nicht mehr einwandfrei, ich wollte die Linien aber auch nicht komplett überdecken. Aber so wirken sie einfach etwas zarter und gläserner. Ausgeschnitten habe ich die Motive mit der Schere.
 
I have absolutely no plan when it comes to cocktail mixing. Luckily you don't have to taste the ones on my card - and they look yummy, if I can say  so myself. And that there have to be olives in a martini glass, that's something even I know.
The glasses and all the elements like fruits, olives, umbrella etc. are  from Auf Uns by Create a Smile. I stamped the glasses and ice cubes with light blue ink, I think, that already gives them a glass like look. Then I used Jellyfish ink by LawnFawn and stamped the other elements right into/onto the glasses. Only the mint leaves I stamped seperately and glued them on later.
Between the glasses I placed  some strawberries from How You Bean Strawberry Add-On by LawnFawn.  And then I've woven two streamers through the glasses and berries. I die cut those with the Curly Q die by TayloredExpressions, cut them out of the frames and arranged pieces between the other images to make them look like two long streamers instead of smaller pieces.
I used Copics for the coloring and then added some details like the skewer through the olives with my Polychromos. For the highlights I used a white gel pen. I also re-drew  the light blue stamped lines with a very thin gel pen. It's one that isn't working perfectly anymore, but I didn't want to cover the lines completly, just making them less  prominent. I think, now they look softer and more glass like. I cut out the images with my scissors.
 

 Wie schon erwähnt, habe ich den Text oberhalb der Motive auf den Hintergrund geklebt.
Das "cheers" ist mit einer Stanze von MFT gemacht. Es besteht aus mehreren Lagen dunkel-türkis farbenen Cardstocks sowie einer Lage eines oragefarbenen holografischem Spiegelcardstock leicht versetzt obenauf.
Das kleine "to you" habe ich dann mit dunkel-türkis farbener Tinte direkt auf den Hintergrund gestempelt. 
 
Like I mentioned already  did I adhere the text above the images onto the background.
The "cheers" is made using a die by MFT.  There are a few layers cut from dark turquoise cardstock with one layer cut from orange holographic mirror cardstock a bit offset on top.
The small "for you" I stamped with dark turquoise ink directly onto the background.
 

Unter den Motiven habe ich dann einen weiteren Text, wieder  mit dunkel-türkis farbener Tinte, aufgestempelt. Beide gestempelte Texte sind aus dem Bitty Birthday Wishes Set von MFT.
 
Under  the images I added another small text, again stamped with dark turquoise ink. Both texts are from Bitty Birthday Wishes by MFT.
 

 Ich habe die Motive teilweise mit 3D Tape hinterlegt und so insgesamt vier Ebenen gebildet. 
Als Deko habe ich dann ein paar kleine, farblose Pailetten, die mich an Blubberblasen erinnert haben, auf der Karte verteilt. 
Den dekorierten Cardstock habe ich dann dunkel-türkis gemattet und alles auf einen weißen Kartenrohling geklebt.
 
I used foam tape behind most of the images and created four different levels on my card.
I added  some small clear sequins, that reminded me of bubbles, as decoration. Then I matted the decorated cardstock dark turquoise and adhered it to a white note card.
 

Dienstag, 15. April 2025

Noch eine Platform Pop-Up Osterkarte

 
Hallo Ihr Lieben!
Heute habe ich eine weitere Platform Pop-Up Osterkarte für Euch. Die von vor einigen Tagen hat mir so viel Spaß gemacht, dass ich gleich noch eine gemacht habe, diesmal fast ausschließlich mit Stanzteilen dekoriert.
 
Hello everyone!
Today I have another Platform Pop-Up easter card for you. The one I made a few days ago was so much fun, that I made another one right away, this time decorated nearly only with die cuts.
 

 Die Basis der Platform Card habe ich wieder aus grünem Cardstock gestanzt - es ist ganz einfach die zweite Hälfte des Bogens, den ich für die vorherige benutzt habe. Auch das Gras der einzelnen Ebenen ist aus diesem Cardstock gestanzt. Dann habe ich alles ein wenig mit grüner Tinte gewischt.
 
Again I die cut the base of the platform card from green cardstock - it's simply the other half of the sheet I used on my last card. Also the grass is cut from this cardstock. Then I shaded everything lightly with green ink.  


Auf meiner Karte sitzt der Osterhase  vor einem Blumenbeet und er hat natürlich auch ein Osterkörbchen voller bunter Eier dabei.
Im Hintergrund stehen Tulpen und Maiglöckchen, gemacht mit den Sets Terrific Tulips und Lovely Lily of the Valley, so wie alle Elemente auf der Karte von LawnFawn. Alle Teile sind jeweils aus farbigem Cardstock gestanzt, dann habe ich sie mit jeweils passender Tinte etwas schattiert. 
Der süße Hase ist mit dem Build a Bunny  Set gemacht. Ich habe ihn aus weißem Cardstock gestanzt und mit Copics coloriert. 
Der Osterkorb ist mit dem Reveal Wheel Spring Basket Set gemacht. Die Eier darin sind aus dem Stempelset Spring Basket. Und weil ich irgendwo einen kleinen Gruß auf der Karte unterbringen wollte, habe ich noch ein Schild mit einem aufgestempelten happy easter in den Korb gesteckt. Das Schild ist aus Carrot 'bout You, der Text aus Tiny Spring Friends.
Am Korb habe ich auch die kleine Schleife aus dem selben Set angeklebt. Die wollte ich ursprünglich aus rosafarbenem Cardstock machen, da ist sie aber irgendwie untergegangen. Also habe ich eine weitere aus dunklerem Cardstock gestanzt und die hellere  einfach dem Häschen ans Ohr geklebt - ohne die herabhängenden Bänder.
Rund um den Hasen und auf die vordere Graslage habe ich dann noch weitere kleine Tulpen und Gänseblümchen aus dem Set Little Flowers.
 
On my card the easter bunny is sitting in front of a flower bed and of course he brought an easter basket full of colorful easter eggs.
In the background there are tulips  and  lili of the valleys blooming, made using the sets Terrific Tulips and Lovely Lily of the Valley, like all elements on this card by LawnFawn. I cut all pieces from colored cardstock and shaded them with a matching ink.
The cute bunny is made with the Build a Bunny set. I cut him from white carstock and colored him with Copics.
The easter basket is made with the Reveal Wheel Spring Basket set. The eggs in it are from the stamp set Spring Basket. And since I wanted to add a little greeting to my card I tucked a sign with a stamped on "happy easter" into the basket. The sign is from Carrot 'bout You, the small text from Tiny Spring Friends.  
I also glued the little bow, that's included  in the Spring Basket die set, to the basket. I had planned to make that from pink cardstock, but it got lost, so I die cut another one from a darker shade of pink and glued the lighter one to the bunny's ear - without the tails.
Around the bunny and onto the front grass layer I added some more small tulips and daisies from the Little Flowers set.
 

 Die großen Blumen im Hintergrund habe ich mit 3D Tape aufeinander geklebt, so dass sie nicht so flach wirken. Und weil die Blumen wirklich hoch aufragen, konnte das kleine T-Stück, an dem die Deko befestigt wird, das Gewicht nicht halten und die Blumen sind gekippt. Deswegen habe ich von hinten eine Brücke angklebt und sie mit dem Rand der Platform verbunden. Damit sie nicht auffällt, habe ich sie aus Acetate geschnitten.
Zwischen den Blumen und dem Hasen mit Korb befindet sich auch noch ein weißer Gartenzaun. Er ist auf den Bildern wirklich kaum zu erkennen. Ich habe ihn aus weißem Cardstock mit der Picket Fence Border Stanze gemacht.
 
The large flowers in the background are glued together with foam tape so this layer doesn't look so flat. And since those flowers stand up really tall the small t-shaped piece, that the decorations get glued to, wasn't able to hold them and they fell over. So I added some kind of bridge to the back of the flowers and connected it with the edge of the platform. To make sure it isn't noticable I made this bridge from acetate.
Between the flower and the bunny with the basket I also added a white fence. I really is hardly visible on the pictures. I cut it from white cardstock using the Picket Fence Border die.
 

 Auch der äußere Teil der Platform brauchte noch ein wenig Deko. Da ich noch einige der kleineren Blumen übrig hatte, habe ich die rund um die Platform verteilt aufgeklebt.
 
The outer part of my platform needed some decoration, too. I had some of the smaller flowers left and glued those around the platform.
 

Montag, 14. April 2025

Halloween?!?!

 
Hallo Ihr Lieben!
Nein, ich habe mich nicht im Monat oder der Jahreszeit vertan. Das Thema der nächsten - ich glaube 5.? - Coloring Club Challenge lautet "your favorite holiday". Nun, ich habe generell nicht wirklich ein Lieblingsfest, es kommt immer darauf an, welchen Aspekt man bewertet. Ich glaube aber, wenn es ums Basteln geht, ist Halloween mein liebstes Fest. Da kann man mal so richtig außerhalb der Norm basteln, ohne schief angeschaut zu werden. Also nicht, dass mich das stören würde, aber trotzdem...
 
Hello everyone!
No, I didn't loose track of the month or season we're in. The theme of the next - I think 5th? - Coloring Club Challenge is "your favorite holiday". Well,  I don't have a farvorite holiday in general, it always depends on which aspect of it I am considering. But I think, when it comes to crafting, then Halloween is my favorite holiday. You can go crazy and a bit weird, outside of the regular, without getting strange looks. Not that I'd really care, but still....
 
Den Hintergrund habe ich hier mal mit den Distress Spray Stains auf Watercolor Cardstock gemacht. Für den Himmel habe ich Salvaged Patina, Peacock Feathers und Uncharted Mariner verwendet, für das Gras habe ich Mowed Lawn und Rustic Wilderness.  Das Gras habe ich auf einem extra Stück Cardstock gemacht und dann mit einer Grasstanze ausgestanzt. 
Beim Auftragen der Farbe habe ich bewusst fleckig gearbeitet - also mit ganz wenig aufgesprühtem Wasser. Gerade für Halloweenkarten mag ich diesen Look gerne.
Auf den Himmel habe ich dann noch goldene Metallic Watercolor und weiße Acrylfarbe aufgespritzt.
 
I used my Distress Spray Stains on watercolor cardstock for the background. I went with Salvaged Patina, Peacock Feathers and Uncharted Mariner for the sky and Mowed Lawn and Rustic Wilderness for the grass. I did the colors for the grass on a separate piece of cardstock and later cut it out with a grass border die. 
When spraying the ink onto the cardstock I kept it kind of splotchy on purpose, misting the cardstock just with a tiny bit of water. I like this look, especially for Halloween cards.
Onto the sky I splattered some gold metallic watercolor and white acrylic paint.
 

 Der so gestaltete Hintergrund war perfekt für meine Gespenster. Ich habe alle Motive mit dem Jellyfish Stempelkissen von LawnFawn gestempelt ujnd mit Copics in No-Line Technik coloriert. Für die Highlights kam ein weißer Gelstift zum Einsatz.
Der Zaun samt Mond ist der Swiss Pixie Halloween Scene von CC Designs gemacht. Eigentlich sind hier noch ein paar Blätter neben dem Zaun, die habe ich weggeschnitten. Und die Fledermäuse vor/auf dem Mond sind vom Geist auf dem Besen verdeckt. Das ging sich einfach nicht anders aus.
Apropos Geister - ich habe zwei davon auf der Karte angebracht, beide sind aus dem Set Ghosts, ebenfalls von CC Designs. Ich liebe dieses Set und die süßen Geister darin, die sehen einfach super gut gelaunt aus. 
 
The finished background was perfect for my ghosts. I stamped all images on the card with the Jellyfish ink pad by LawnFawn and did some no-line coloring with my Copics. For the highlights I used a white gel pen.
The fence with the moon is made with the Swiss Pixie Halloween Scene stamp by CC Designs. There are some leaves next to the fence, that I cut off. And the bats in front of/on the moon are covered by the ghost on the broom. He just looked best there. 
Talking about ghosts - I used two on my card, both from the Ghosts set, also by CC Designs. I just love this set and the cute ghosts in it, that all seem to be in such a great mood.
 

 Unten auf dem Gras befindet sich der zweite Geist. Ich habe beiden zur Abwechslung mal lilafarbene Zungen verpasst - steht ihnen nicht schlecht, finde ich.
Außerdem sind hier unten noch zwei Kürbisse und ein Frosch zu finden - hierfür habe ich das Witch Way is the Candy Set von MFT benutzt. Auch so eines meiner Lieblings-Halloweensets. Alle Motive auf der Karte sind per Hand ausgeschnitten.
Unter die Zaunteile sowie die  Motiv hier unten auf der Karte habe ich jeweils ein schmales, von der Größe her passendes Oval aus schwarzem Cardstock als Schatten geklebt. 

On the grass, at the bottom of the card, there's the second ghost. I gave both some purple tongues for a change - I think, it suits them great.
Here at the bottom of the card there are also two pumpkins and a frog from Witch Way is the Candy by MFT. This is another one of my favorite Halloween stamp sets. I fussy cut out all images with my scissors.  
Under the fence posts and the images down in the grass I put small ovals in matching sizes cut from black cardstock as shadows.
 

 Den Text auf meiner Karte habe ich im oberen Bereich links neben dem Hexen-Geist und dem Mond aufgeklebt. Ich habe dafür Stempel aus den Sets Tiny Christmas, Tiny Halloween und Spooktacular von LawnFawn kombiniert und alles weiß auf schwarzen Cardstock embosst.
Und dann konnte ich nicht anders, als dem Geist auf dem Besen eine Sprechblase mit einem aufembossten Woohoo! zu verpassen. Der Text ist aus dem Celebrations Turnabout Stempelset von Concord and 9th und wieder weiß auf schwarzen Cardstock embosst. Dann habe ich es mit einer Sprechblasen-Stanze von MamaElephant ausgestanzt und außerdem eine Sprechblase dahinter gesetzt, die ich aus einem Reststück des gesprühten Grases gestanzt habe. So setzt sich der Text besser vom ebenfalls dunklen Himmel ab.
 
I placed the text in the top left corber of my card, next to the ghost witch and the moon. I combined stamps from Tiny Christmas, Tiny Halloween and Spooktacular by LawnFawn and white heat embossed them onto black cardstock.
And then I just couldn't resist and put a speech bubble with a heat embossed "woohoo" next to the ghost on the broom. The word is from the Celebrations Turnabout stamp by Concord and 9th and again white heat embossed onto black cardstock. Then I cut it out with a speech bubble die by MamaElephant and put another speech bubble, cut from a left over scrap of my sprayed grass panel, behind it a bit offset. This way the speechbubble is better visible on the also dark sky. 
 

 Gras und Zaun samt Mond habe ich mit Flüssigkleber auf den Hintergrund geklebt. Die Texte und die beiden Kürbisse sind mit dünnem, die Geister, der Frosch und die Sprechblase mit dickem 3D Tape hinterlegt. Dann habe ich den dekorierten Cardstock auf einen weißen Kartenrohling geklebt.
 
I glued the grass and fence with moon with liquid glue onto the background. The texts and two pumpkins I backed with thin, the ghosts, frog and speechbubble with thick foam tape. Then I adhered my card panel to a white note card.
 

Sonntag, 13. April 2025

So ein Müll!

 
Hallo Ihr Lieben!
Es ist kein Geheimnis, dass ich kleine Motive liebe, mit denen kann man so tolle Szenen bauen. Und in die kleinen Waschbären aus dem Little Raccoon Agenda Set von MamaElephant war ich sofort verliebt. Auf dieser Geburtstagskarte kommen sie nun das erste Mal zum Einsatz.
 
Hello everyone!
It's no secret that I have a soft spot for small images, they are great to create wonderful scenes with. And I immediately fell in love with the Little Raccoon Agenda Set by MamaElephant. On this birthday card I used them for the first time.
 
Geburtstagskarte? Ja, auch wenn man es ihr nicht wirklich ansieht. Sie ist für jemanden gedacht, der sich Geld gewünscht hatte. Also eigentlich...
Ich habe hier für den Hintergrund ein Stück hellgrauen Cardstocks mit einem alten Mauer-Embossingfolder von SU geprägt. Dann habe ich die Wand mit Distress Ink Pumice Stone und Hickory Smoke bewusst fleckig gewischt.
Für den Boden habe ich einen Streifen dunkelgrauen Cardstocks mit Black Soot gewischt. 
Anschließend habe ich auf beide Teile schwarze Metallic-Watercolor und weiße Acrylfarbe aufgespritzt. 
Mit einem weißen Gelstift habe ich dann die Mauerfugen nachgemalt um sie besser sichtbar zu machen - auch hier bewusst "unperfekt", damit die Mauer schön alt und etwas ramponiert aussieht, schließlich zeigt die Szene einen Müllabladeplatz, irgendwo in einem dunklen Eck im Hinterhof eines alten Hauses.
Und weil es so schön ins Bild passt - wortwörtlich - habe ich noch ein Abflussrohr aus grauem Cardstock gestanzt und mit Copics coloriert. Das führt nun links an der Mauer herab.
 
Birthday card? Yes, even if you can't really tell when looking at it. I made it for someone who asked for some cash for his birthday. Well, originally...
For the background I dry embossed a piece of light grey cardstock with an old brick embossing folder by SU. Then I inked the wall with Distress Ink Pumice Stone and Hickory Smoke, making it look a bit splotchy.
For the ground I cut a strip from dark grey cardstock and inked it with Black Soot.
Then I splatterd both pieces with black metallic watercolor and white acrylic paint.
 I used a white gel pen to trace the wall joints and make them better visible - again I didn't care for perfecction because I wanted this wall to look old and a bit broken. After all this scene is showing  a trash place somewhere behind an old house.
 And since it just fits the scene so well I added a drain pipe, that I cut from grey cardstock and shaded it with Copics. It now goes down the wall.
 

 Ich wollte unbedingt große Mülltonnen auf meiner Karte, aber tatsächlich hat keine einzige der bekannten Firmen eine im Angebot! Naja, wohl auch nicht unbedingt das am meisten gefragte Stanzenmotiv. Aber ich habe mir dann beholfen und eine No-Name Stanze bestellt. Die enthält die Mülltonne, den Deckel und auch die Müllsäcke. 
Die Mülltonnen habe ich aus silbernem Schimmer-Cardstock gestanzt und mit Copics schattiert. Die Müllsäcke sind aus weißem Cardstock gesanzt und coloriert.
Ich habe zwei große Mülltonnen im Hintergrund auf die Karte geklebt - auf einer liegt eine Bananenschale, auf der anderen sitzt ein Waschbär und freut sich über ein Stück Pizza, das er in einer der Tonnen gefunden hat.
 
I really wanted to put some large trash cans onto my scene, but actually none of the brands I know has one. Well, it might not be the most sought after cutting die. But I went ahead and bought an unbranded set, that has the trash can, the lid and also the sacks.
I cut the trash cans from silver shimmer cardstock and shaded them with Copics. The sacks I cut from white cardstock and colored them in. 
I put two large trash cans in the background - there's a banana peel laying on one, on the other one a little raccoon is sitting, being all excited about the piece of pizza he found in one of the trash cans.
 

 Neben die Mülltonnen habe ich drei Müllsäcke gesetzt und davor noch einige weitere der kleinen Waschbären aufgeklebt. Dazwischen befindet sich allerhand Müll. Alle Motive sind aus besagtem Little Raccoon Agenda Set, mit Copics coloriert und per Hand ausgeschnitten. 
Und weil an so einem dunklen Müllplatz ja auch keiner Unkraut jähtet, habe ich noch etwas hohes Gras vor die Mauer bzw. zwischen die Tonnen gesetzt.
 
I put three sacks next to the trash cans and in front of them added several more of the little raccoons. Between them there's all kind of waste laying around. All images are from said Little Raccoon Agenda, colored with Copics and cut out with my scissors.
And since no one is weeding in such a dark and filthy spot I put some tall grass in front of the wall  and between the trash cans.
 

 Ich wollte unbedingt "Cash? I thought you said trash!" als Text für meine Karte. Den musste ich dann am PC schreiben, so einen Stempel gibt es wohl nicht. Nach dem Ausdrucken habe ich das weiße Papier mit etwas Pumice Stone und Hickory Smoke gewischt, damit er nicht so hervorsticht. Außerdem habe ich die Texte schwarz gemattet.
Ergänzt habe ich den Text dann mit einem gestanzten Oops!, das gleichzeitig wie ein kleines Graffitti an der Wand aussieht. Auch das ist aus silbernem Schimmer-Cardstock gestanzt und mit Copics schattiert. Außerdem habe ich leicht versetzt einen schwarzen Schatten dahinter geklebt.
 
I really wanted to use "Cash? I thought you said trash!" as the text for my card. Well, I had to write that on my computer, I don't think a stamp like this exists. After printing it out I inked the paper with a bit of Pumice Stone and Hickory Smoke so it isn't so bright. I also matted the text strips black.
Then I completed the text wit a die cut Oops!, that also kind of looks like a small Graffitti on the wall. Again I die cut it from silver shimmer cardstock and shaded it with Copics. I also put a black shadow layer behind it. 


Damit es am Geburtstag kein langes Gesicht gibt, kann man den Deckel der linken Mülltonne nach oben ziehen. Und siehe da, da hat doch tatsächlich jemand Geld in den Müll geworfen! ;)
Um den Schein einzubauen, habe ich die Tonne zweimal gestanzt und beide Teile entlang der äußeren Ränder mit 3D Tape aufeinander geklebt, dazwischen kann man dann den gefalteten Geldschein schieben, der ebenfalls mit einem kleinen Stück 3D Tape am Mülltonnendeckel angeklebt ist.
 
Of course I don't want anyone to be disappointed on their birthday. You can slide the lid of the left trash can up and guess what, someone threw some money into the waste bin! ;)
To make the bill fit I cut two trash cans and put them together with thin strips of foam tape, applying them very close to the edges of the die cut. Now the folded bill can be slit into it, I used a small piece of foam tape to adhere the lid to it.
 

 Da die linke Mülltonne durch das eingebaute Geldfach ja schon erhöht ist, habe ich auch unter einige der kleinen gestempelten Motive sowie die Texte 3D Tape gesetzt. Dann habe ich alles auf einen weißen Kartenrohling geklebt.
 
Since the trash can on the left is pretty thick due to the money that I needed to fit into I also backed some of the stamped images and texts with foam tape. Then I adhered the card panel to a white note card.