Mittwoch, 19. Mai 2021

Nochmal ein Geldgeschenk

 
Hallo Ihr Lieben!
Heute möchte ich Euch eine weitere Idee für ein Geldgeschenk zeigen - diesmal wieder in niedlich und für alle Alterklassen geeignet.

Hello everyone!
Today I want to share with you another idea to wrap up some money - this time it's a cute design again and so perfect for all ages.


Als Basis meiner Box habe ich die Mini-Dose rund von JM-Creation verwendet. Ich habe die Teile aus weißem Cardstock gestanzt und dann mit dem Mauerstempel in grau bestempelt. Den kann man prima zusammensetzen, so dass sich eine zwar nicht regelmäßig gemauerte, aber immerhin komplette Mauer ergibt. Damit der Kontrast nicht zu krass ist, habe ich nach dem Stempeln noch Distress Oxide Pumice Stone und Hickory Smoke ganz leicht auf den weißen Cardstock gewischt.
Um den unteren Rand der Box habe ich das große Grasbüschel mit grüner Tinte aufgestempelt und es ebenfalls einfach leicht überlappend aneinander gesetzt.
Auf die Box habe ich dann noch den "ein paar Kröten nur für dich" Text aufgeklebt. Der ist auf weißen Cardstock gestempelt und mit 3D Tape aufgeklebt. Er geht etwas mehr als halb um die Box herum.

As the base I used the round box die by JM Creation. I've die cut the pieces from white cardstock and then used a brick wall stamp to add the pattern. I stamped it with grey ink  - and then lightly added Distress Oxide Pumice Stone and Hickory Smoke so the contrast between the white and grey isn't too hard.
To the bottom edge of the cardstock I stamped some grass with green ink.
Around  the bottom of the box I added a text that means "some money for you" - but here isn't used the word money but "toads" which is a german word for money. And please, don't ask me why! But that also explains the image and overall design of my box to all you non-germans. I stamped the text onto a strip of white cardstock and wrapped it around the bottom of the box - it goes a little more than half around the box.


Aus dem Deckel habe ich einen kleineren Kreis ausgstanzt und von innen einen Kreis aus schwarzem Cardstock dagegen geklebt. Und so wird aus meiner runden Box ein Brunnen. Und auf dem trohnt natürlich der Froschkönig! Die Steinlinien oben auf dem Deckel habe ich frei Hand mit einem grauen Fineliner gemalt und den Ring dann ebenfalls mit Distress Oxide gewischt.
Der Froschkönig ist mit Copics coloriert, ausgeschnitten und auf den Deckel der Box geklebt. Damit er schön aufrecht steht, habe ich hinten einen Streifen Cardstock gegen den Frosch geklebt, den ich unten gefaltet und auf dem Deckel der Box angeklebt habe. So fällt der arme Kerl nicht um.

I've die cut a smaller circle from the lid and put a circle cut from black cardstock behind it. And so my round box turns into a well. And of course the Frog King is sitting on top of it! I used a grey fineliner to freehand draw the stone lines onto the ring on top of the lid, then inked up that with Distress Oxides as well. 
The Frog King is colored with Copics, cut out and glued onto the lid. I used a strip of cardstock that I glued to the back of the frog, folded it at the bottom and glued the other end onto the lid. That way the frog can't fall on his face or back.


Und so sieht der Brunnen mit abgenommenem Deckel aus. In die Box kommen natürlich die angekündigten Kröten, aber was in diesem Fall auf keinen Fall fehlen darf ist die goldene Kugel, die der Frosckönig dann herauftauchen kann. Die werde ich auf jeden Fall mit hineinfüllen, aber aufs Foto darf sie aus bekannten Gründen nicht.

And this is the well with the lid taken off. I will put some money inside the box. But what really needs to get in it as well is the golden ball that the frog king can bring up from the bottom of the well. I will definately put one into it but had to remove it for the picture. The reason why I did explain to you in a post beginning of the month - it's the same chocolat company. 

Dienstag, 18. Mai 2021

I'm hoppy for you

 
Hallo Ihr Lieben!
Heute zeige ich auf dem Stamping-Fairies Blog wieder eine Karte unter der Kategorie "alter Stempel". Wobei ich hier klarstellen möchte, dass das nicht unbedingt bedeutet, dass die Stempel uralt sind. Zumindest mir geht es so, dass ich immer so auf das Neue fixiert bin, dass manchmal schon Stempel, die erst ein Jahr als sind, für mich alt sind. Die Produkte auf dieser Karte sind aber schon wirklich älter als ein Jahr. 
 
Hello everyone! Over at the Stamping-Fairies Blog I am sharing another card using old stamps today. But I want to clarify that old doesn't necesseraily mean that these stamps came out years ago. I'm mostly so concentrated on the new stuff that sometimes stamps that are only a year old seem old to me. But the products I used on this card are older than just a year.
 
Als das Wetter so schön war, stand ich an unserem Gartenteich und habe den Kröten darin zugesehen. Und das hat mich zu dieser Karte inspiriert. Wobei die Frösche auf meiner Karte sich zu benehmen wissen... ;)
Für den Hintergrund habe ich Blending Solution und Aquamarine Alcohol Ink auf ein Stück Yupo aufgetragen und dann mit dem AirBlower verteilt.  So entsteht der Wasseroberflächenlook auf der Karte. 
Das Yupo habe ich dann auf einen weißen Kartenrohling geklebt.

A little ago, when the weather was really warm and nice, I was outside in our garden, standing at our pond, watching the toads. And that inspired me to this card. But the frogs on my card really know how to behave themselves... ;)
For the background I put Blending Solution and Aquamarine Alcohol Ink onto a piece of Yupo and moved it around with the AirBlower. That's an easy way to create a water surface look.
Then I glued the Yupo onto a white note card.


Für den Aufleger habe ich ein Stück weißen Cardstocks benutzt und mit der Stitched Triple Peek-a-Boo Window and Edge Stanze zuerst den Rand gestanzt. Den habe ich nicht gerade, sondern schräg aufgelegt und so ist die Wasseroberfläche hauptsächlich unten rechts in der Ecke sichtbar. Anschließend habe ich noch den gestitchten Kreis dreimal aus dem Cardstock ausgestanzt. 
Die süßen Frösche aus dem Toad-ally Awesome Stempelset habe ich mit Copics coloriert. Dann hab ich sie ausgeschnitten und hinter zwei der Kreise gesetzt. Nun ja, die Unterkörper musste ich ihnen dafür leider amputieren. Aber das tut ihrer Optik keinen Abbruch. Dafür habe ich einige Herzchen über den beiden aufgeklebt.
In den dritten Kreis habe ich die Binsen aus dem Splendid Swans Stempelset gesetzt. 
Für den Text habe ich einen der Texte aus dem Toad-Ally Awesome Stempelset mit weißem Embossingpulver auf einen Streifen schwarzen Cardstocks embosst und auseinander geschnitten. Das Hoppy aus dem Text habe ich komplett herausgeschnitten und durch eines mit dem Captions Alphabet gestanzten ersetzt. Das habe ich dann auch so ein wenig hüpfend neben das mittlere Fenster geklebt und darüber bzw. darunter den Rest des Textes aufgeklebt.
Der komplette weiße Cardstock ist übrigens mit 3D Tape aufgeklebt, ebenso der Textstreifen mit dem "for you". Das Y war zu schmal, um es mit 3D Tape aufzukleben, deswegen habe ich es 7mal aus schwarzem Cardstock gestanzt und aufeinander geklebt, so dass es die selbe Höhe wie die anderen Buchstaben hat.
Zum Schluss habe ich noch ein paar klare Pailetten auf die Karte geklebt, die ein wenig wie Wassertropfen aussehen.

For the card topper I took a piece of cardstock and first die cut its edge with the Stitched Triple Peek-a-Boo Window and Edge die. I didn't use this straight down but put it on the cardstock a bit turned. Now the water surface is mainly visibly on the bottom right area of the card. Then I die cut the stitched circle three times from the white cardstock.
The cute frogs are from the Toad-Ally Awesome stamp set and colored with Copics. Then I cut them out and glued them behind two of the circle cut outs. I had to cut off their bottoms but I guess they are still super cute. And I glued a few hearts above their heads. 
In the third circle I glued the pipe flasks from the Splendid Swans stamp set.
For the text I used another stamp from the Toad-Ally Awesome stamp set and white heat embossed it onto a strip of black cardstock. I cut that apart and replaced the hoppy with a die cut one. I used the Captions Alphabet die set to cut the letters and glued them down like they are hopping a bit themselves. Above and under the letters I put the rest of the text.
The whole white carstock ist glued onto the background with dimensionals, also the little strip with the "for you" embossed on. The Y from hoppy was too small to put dimensionals behind it so I've die cut it seven times, stacked those on top of each other until the Y was on the same level as the rest of the letters. 
In the end I added a few clear sequins onto the card that look a bit like droplets of water.


Und hier habe ich noch ein Bild ein wenig schräg gegendas Licht aufgenommen, auf dem man zum einen die Pailetten besser sehen kann. Zum anderen sieht man hier auch, dass ich die Herzen und die Augen der Frösche mit Glossy Accents überzogen habe.

And here I took another pic where I held the card a bit more into the light so you can see the clear sequins better. But here you can also see, that I covered the hearts and the frogs' eyes with Glossy Accents.

Samstag, 15. Mai 2021

Stempeleinmaleins - Ausgabe vom 15. Mai 2021

 Hallo Ihr Lieben!
Heute haben wir beim Stempeleinmaleins eine Double Slider Card für Euch. Nun ist das inzwischen ja eine Bezeichung für verschiedene Kartenarten mit doppeltem Slidermechanismus, aber wie soll man sie auch sonst immer alle nennen? Das ist auf jeden Fall die Version einer Double Slider Card, die wir Euch heute zeigen.

Hello everyone!
Over at Stempeleinmaleins we are sharing a Double Slider Card with you. Well, there are many different types of Double Slider Cards out there, but it would be impossible to come up with a new name each time for all those cards with a double slider mechanism. So, this is the version of a Double Slider Card we are sharing with you today.

Ich habe meine Karte aus braunem Cardstock gewerkelt. Da nur der Cardstock zu nackig für meinen Geschmack gewesen wäre, habe ich hier den Love Background von Magnolia ein paar Mal mit brauner Tinte am Rand entlang abgestempelt.

I made my card from brown cardstock. Since only the brown cardstock was too plain for my taste I used the Love Background stamp by Magnolia and stamped it several times close to edges of my card using brown ink.


Als Motiv habe ich mal wieder dieses süße Mädel von Sugar Nellie ausgepackt - eines meiner All Time Favorites. Ich habe sie mit Copics in blau und braun coloriert, ausgeschnitten und auf die Karte geklebt. Darunter befindet sich ein Stück Designpapier mit Holzmaserung, das ich weiß gemattet habe. Außerdem geht noch ein Streifen weißer Cardstock quer über dieses Holzpapier, auf das ich wieder ein wenig Designpapier aufgeklebt habe. Außerdem habe ich hier vor dem Aufkleben ein Stück Twine darumgewickelt und zur Schleife gebunden.
In die obere linke Ecke des Holzpapieres habe ich ein Banner mit Text aufgeklebt. Das war hier eigentlich gar nicht geplant, befand sich aber im Stempelset, aus dem auch der Text auf meiner Karte ist. Und alsdas Set auf meine mTisch lag, hat mir irgendwie die Idee, es an dieser Stelle aufzukleben, dann spontan gefallen. Gestempelt habe ich es mit hellblauer Tinte.
Rund um den Cardstock mit der Holzmaserung und das Motiv habe ich kleine Blumen in braun und blau aufgeklebt. Die nutze ich ja nur noch selten, habe aber noch jede Menge. Und hier passten sie endlich mal wieder. Außerdem habe ich hier ein paar Halbperlen mit aufgeklebt.
Äh, habe ich was von Text gesagt? Ja, es gibt einen, aber der ist erstmal versteckt und zeigt sich erst, wenn man an der Schnur oben an der Karte zieht:

As the image I brought out this cutie by Sugar Nellie - one of my all time favorite images. I colored her with Copics, cut her out and glued her onto the card.
Under the image there's a piece of designer's paper with a wooden pattern. It's matted with white cardstock. 
There's also a strip of white cardstock glued across the wooden paper. I glued another piece of cardstock on top of it and, before glueing it down, wrapped some twine around it and tied it to a bow on the front.
To the top left corner of the wood pattern paper I glued a banner with a "you're great" text. I hadn't planned that but it's a stamp that's in the same stamp set like the text I used on my card. And when I had that set lying on my table I spontaneously decided that this would be a good stamp to be used here. I stamped it with light blue ink. 
Around the cardstock with the wooden paper on top and the image I glued some brown and blue flowers. I rarely used those anymore but still have plenty left. Here they fit perfectly. I also glued some small pearls between them.
Did I say something about a text being used on this card? Well, there is one, but it's hidden and only shows when you pull the tab on the top edge:


Zieht man oben an der Schnur, fahren zwei weitere Cardstockstücke aus der Karte heraus. 
Das hintere, größere Panel habe ich mit Designpapier beklebt. Außerdem ist hier ein hellblaues Eyelet angebracht, durch das ich wieder etwas Twine gezogen habe. Dann habe ich daran eine kleine hellblaue Schleife aus dünnem Organzaband angebracht. 
Auf dem weißen Cardstock darunter ist der Text aufgestempelt. Er ist von SU - und eigentlich ist da noch ein "ganz" zwischen der ersten Zeile und "liebe". Dann wäre der Text aber zu hoch gewesen, also habe ich das einfach weggelassen und darunter noch ein kleines Herz in hellblau aufgestempelt. 
Außerdem habe ich mit einem hellblauen Marker einen Rahmen aufgemalt.
Zum Schluss habe ich dann auch noch auf den braunen Cardstock einen Rahmen mit einem weißen Gelpenaufgemalt.

When you pull the tab two more pieces of cardstock get pulled out of the card.
The bigger one in the back is only covered with designer's paper. I also put a light blue eyelet through the top, put some twine through it and then tied a bow from light blue organdy ribbon to it.
Onto the white cardstock that builds the middle layer I added my text. The stamp is by SU and means "I'm sending lovely greetings". There's originally a "very" between the first line of this text and the second word on my cardstock. But this stamp was too tall and so I skipped this one word. Instead I stamped a small heart under the text, using light blue ink. I also drew a thin frame around the text with a light blue marker.
In the end I also used a white gel pen to draw a frame onto the brown cardstock that builds the card front.

Donnerstag, 13. Mai 2021

Honigsüße Grüße


Hallo Ihr Lieben!
Heute zeige ich auf dem Stampcorner-Blog eine Karte, die im wahrsten Sinne des Wortes "süß" ist. Und das ist nicht nur auf den süßen Bären bezogen.
 
Hello everyone!
Today I am sharing this card over at the Stampcorner Blog - and it's literally a sweet card. And I'm not only talking about the cute bear in a honey jar.
 
Hier habe ich für den Hintergrund ein Stück Yupo mit Blending Solution beträufelt, dann Alcohol Ink Sandal und Butterscotch darauf gegeben und alles mit dem Air Blower über das komplette Yupo verteilt. Dann habe ich noch ein paar Tropfen goldenes Mixative darauf gegeben, wieder mit Blending Solution verdünnt und "verblasen". Fertig war ein toller Alkohol-Hintergrund, der farblich perfekt zu Honig passt.
Diesen Hintergrund habe ich dann auf einen weißen Kartenrohling geklebt.
Für die Honigwaben, habe ich die Save the Bees Stanze von ModaScrap aus weißem Cardstock gestanzt und mit 3D Tape auf den Hintergrund aufeklebt. Da ich noch ein Stückchen des eingefärbten Yupo übrig hatte, habe ich noch ein paar Waben daraus ausgestanzt und die so entstandenen Sechsecke, ebenfalls mit 3D Tape, auf den weißen Cardstock geklebt.
 
For the background I added a few drops of Blending Solution onto a piece of Yupo, then added Alcohol Ink Sandal and Butterscotch and moved the color around with the Air Blower until the whole piece of Yupo was covered. Then I added a few drops of the golden Mixative, added a bit of Blending Solution again and then blew the color around. Now I had a great alcohol ink background that goes perfectly with honey colorwise. 
Then I glued the background onto a white note card.
For the honeycomb I die cut the Save the Bees die by ModaScrap from a piece of white cardstock and glued it onto the Yupo with dimensionals. Since I had a small piece of the colored Yupo left I've die cut a portion of the die from it again and then glued the little hexagons onto the white cardstock, using dimensionals again.


Hauptakteur der Karte ist natürlich der süße Honigbär von Stampcorner. Ich habe ihn mit Copics coloriert und dann ausgeschnitten.
Für den Text habe ich verschiedene Stempel bzw. Stempelsets kombiniert. Das Chill Mal ist aus dem Koala-Stempelset, Es wird ein...Tag ist aus dem Set Regenbogen und das süßer ist aus dem Set Gnome. Alle Texte sind mit weißem Embossingpulver auf dunkelbraunen Cardstock embosst. Dann habe ich sie ebenfalls mit 3D Tape auf die Karte geklebt.
Nun fehlte noch das Wort Honig. Dafür habe ich das Mini Alphabet and Numbers Stanzenset von CC Designs verwendet und die Buchstaben aus goldenem Spiegelcardstock gestanzt. Damit er sich besser vom gold-gelben Alcohol Ink Hintergrund abhebt, habe ich die Buchstaben erst auf braunen Cardstock geklebt, per Hand mit etwas Abstand ausgeschnitten und dann auf die Karte geklebt.
Ganz zum Schluss habe ich noch ein paar kleine braune Pailetten auf der Karte verteilt.

Main element on this card is this cute honey bear by Stampcorner. I colored him with Copics and cut him out.
For the text I combined a few different stamps from different stamp sets. The text means "let's chill - it's going to be a day as sweet as honey". I white heat embossed the stamps onto dark brown cardstock and then glued them onto the card with dimensionals.
The word honey is written with die cut words. I used the Mini Alphabet and Numbers die set by CC Designs to die cut the letter from golden mirror cardstock. Since there wasn't enough contrast between the golden cardstock and the golden-yellow alcohol ink background I glued the letters onto brown cardstock first, then cut them out by hand and attached them to the card.
In the end I added a few small brown sequins to my card.


Und weil man den Spiegelcardstock auf den Bildern oben so schlecht sieht, habe ich hier noch ein weiteres Bild für Euch - hier ist er aber wirklich in vollem Schein zu sehen!

And since it's hard to really see the mirror cardstock on the pics above I took another one from a different angle - and here you really can see its shine!

Mittwoch, 12. Mai 2021

Kleine Pause

 
Hallo Ihr Lieben!
Eine kleine Pause brauchen wir alle mal - und die habe ich heute auf dieser Karte thematisch verbastelt.

Hello everyone!
We all need a little break every now and then - and this is what I used as the theme for today's card.

Hier habe ich ein Stück schwarzen Cardstock als Hintergrund benutzt und ihn auf einen weißen Kartenrohling geklebt.

Here I used a piece of black cardstock as the background and glued it onto a white note card.


Für das türkisfarbene Panel mit den schwarzen Punkten habe ich die Lochwand aus dem Werkzeug-Stanzenset zweckentfremdet. Sie ist aus türkisfarbenem Cardstock gestanzt und einfach auf den schwarzen Hintergrund geklebt, den man durch die Löcher durchsehen kann.
Hauptelement auf meiner Karte sind der Kaffeebecher - der hier zum Teebecher mutiert - und die Teekanne. Die Teekanne ist aus weißem Cardstock gestanzt und mit Copics coloriert, auch der Kaffeebecher ist mit Copics schattiert. 
Ans untere Ende der Lcohwand habe ich ein halbes Doily aufgeklebt, auf das ich oben dann den Becher und die Kanne aufgeklebt habe. 
Quer über das Doily habe ich dann das Wort Pause geklebt und dafür das tolle neue Aphabetset benutzt. Das ist absolut klasse, denn es stanzt die Buchstaben und zusätzlich einen Rahmen dazu. Ich habe die Buchstabenselbst aus braunem, die Außenlinien aus türkisfarbenem Cardstock gestanzt und mit einem weißen Gelpen Highlights gesetzt. 
Um den Text zu vervollständigen, habe ich noch ein "kleine" weiß auf schwarzen Cardstock embosst, mit brauner Wellpappe gemattet und auf die Karte aufgeklebt.
Ganz zum Schluss habe ich noch ein paar weiße Enamel Accents auf der Karte verteilt und mit dem weißen Gelpen einen Rahmen auf den schwarzen Cardstock aufgemalt.

For the turquoise piece in the background I simply used a pegboard die. It's die cut from turquoise cardstock and glued onto the black background - through the holes you can see the black cardstock from under it.
Main element on my card are the coffee cup - that turned into a tea cup here - and the tea pot. I've die cut the tea pot from white cardstock and colored it with Copics.  Also the coffee cup is shaded with Copics.
To the lower end of the pegboard I've glued half a doily and then the cup and pot on top.
Across the doily I added a die cut "break" and used a great new alphabet die set for it. It cuts the letters and also a small frame around each. I used brown cardstock for the letters, turquoise for the frames and added some highlights with a white gel pen.
To finish the text I white heat embossed a "have a" onto black cardstock, matted it with brown corrugated paper and glued it onto the card.
In the end I added a few white Enamel Accents and drew a frame onto the black background cardstock with the white gel pen.

Dienstag, 11. Mai 2021

Sprinkling you with Love

 
Hallo Ihr Lieben!
Heute regnet es - aber nur auf meiner Karte, die ich heute auf dem Stamping-Fairies Blog zeige. Und weil es dort "nur" viel Liebe regnet, macht das gar nichts!

Hello everyone!
It's raining today - but only on this card that I'm sharing over at the Stamping-Fairies Blog today. And since it's love, that's pouring down, I'm totally fine with this rain!

Ich habe hier eine fast monochrome Karte gemacht. 
Im Hintergrund kam ein anthrazit-farbenes Papier aus dem Wallpaper Patterns Paperpad von MFT zum Einsatz.
Darauf kam ein schwarz gemattetes Stück Cardstock, das ich als Hintergrund für Motiv und Text benutzt habe.

Here I made a nearly monochrome card.
In the background I used an anthrazit colored sheet from the Wallpaper Patterns paper pad by MFT. 
On top I glued a black matted piece of grey cardstock that I used as the background for my images and text.


Im oberen Bereich der Karte sitzen Bär und Hasen in den Wolken und lassen es "regnen". Alle Motive auf der Karte sind aus dem süßen Sprinkling you with Love Stempelset von MFT. Ich habe sie abgestempelt und ausgeschnitten. Zum Colorieren habe ich die W-, T- und N-Töne von Copic benutzt. Auf den Bildern sieht man den Unterschied nicht so genau, aber sieht man die Karte vor sich, kann man klar erkennen, dass Bär, Hasen und Wolken je einen anderen Wärmgrad an Grau aufweisen. 
Die Wolken ohne Figur darauf habe ich nicht coloriert. 
Die beiden Wolken oberhalb des grauen Cardstocks sind direkt auf das Designpapier geklebt, die anderen uncolorierten direkt auf den grauen Cardstock. Der ist mit 3D Tape auf die Karte geklebt. Auch für den Bären auf der Wolke habe ich dünneres, für die beiden anderen Wolken mit Hasen dickeres 3D Tape benutzt.
Aus der Gießkanne kommt bei mir kein Wasser sondern Liebe. Ich habe kleine, rote, herzförmige Pailetten auf die Karte aufgeklebt. Die haben ein dunkles rot, das man hier leider auch nicht so toll erkennen kann. Pailetten zu fotografieren ist immer eine Herausforderung für mich, weil ich durch das Darüberhalten der Kamera immer einen Schatten darüberlege. Aber ich mag meine Karten am liebsten liegend fotografieren. Zwickmühle!

In the upper area of my card the bear and bunnies are sitting on some clouds and let it "rain". All images on this card are from the cute Sprinkling you with Love stamp set by MFT. I stamped them and cut them out. To color the images I used the Ws, Ts and Ns Copics. It's hard to see on the photos but when you have the card in hands you can clearly tell that the bear, bunnies and clouds each have a different kind of grey. I left the clouds without a character on them uncolored.
The two clouds above the grey cardstock are glued directly onto the patterned paper, the other uncolored ones are glued onto the grey cardstock. This piece is glued to the card with dimensionals. Also for the bear I used thinner, for the clouds with the bunnies thicker dimensionals.
On my card there isn't water coming out of the watering can but love. So I glued some tiny, red, hearshaped sequins onto the card. They have a deep red and great shine which you unfortunately can't see well on the card. Taking pics of sequins is always hard for me because when I hold my camera over it I throw a shadow over their shine. But I like to take my pics from above. Oh well, life can be hard!


Am unteren Ende des grauen Cardstocks befindet sich dann ein weiterer Bär. Den habe ich in den Text mit eingebaut. Auch er ist in Grautönen coloriert, nur sein Regenschirm leuchtet in allen Regenbogenfarben. 
Das Sprinkling you with ist aus demselben Stempelset wie die Motive. Ich habe diesen Teil mit weißem Embossingpulver auf schwarzen Cardstock embosst, in zwei Teile geschnitten und aufgeklebt. Das Love ist aus dem Love You Big Time Set. Ich habe die Buchstaben ausgeschnitten und so aufgeklebt, dass der Bär nicht zu viel vom Text abdeckt. 
Und weil ich beim Basteln der Karte - wohl durch eine Kombination aus dem Bär mit seinem Schirm und dem fast Schwarz-Weiß Look der Karte - Gene Kelly und Singing in the Rain vor Augen und im Ohr hatte, habe ich noch einen kleinen Effekt in die Karte mit eingebaut:

At the lower end of the grey cardstock there's another bear. I built the text around him. Also he was colored with grey tone Copics, only his umbrella is colored in bright rainbow colors.
The Sprinkling you with is from the same stamp set as the images. I white heat embossed it onto black cadrstock, cut it apart and glued it onto the card. The Love is from the Love You Big Time set. I cut the letters out individually and glued them down with some distance between the LO and the VE so the bear doesn't cover too much of the word. 
While making this card I had Gene Kelly performing his Singing in the Rain in the ear and the scene playing in my head - I guess due to the nearly black and white look and the bear with the umbrella - so I included a little special effect in my card:


Klar dass der kleine Bär bei so viel Liebe super gut gelaunt ist - und seinen Schirm braucht er dann auch nicht. Ihr müsst Euch jetzt nur noch vorstellen, wie er singt und dabei einen Steptanz hinlegt!
Für den Mechanismus habe ich einfach beim Abstempeln die Tinte vom Regenschirm gewischt - damit man beim Drehen nicht den Schirm darunter sehen kann - und das Motiv ein zweites Mal abgestempelt. Von diesem zweiten Motiv habe ich nur den Schirm verwendet und ganz nah an den Stempellinien ausgeschnitten. Beim Ausschneiden des Bärs habe ich dort, wo eigentlich der Schirm gewesen wäre, etwas weißen Cardstock stehen lassen. Durch diesen Cardstock sowie den grauen Cardstock samt Mattung darunter habe ich einen kleinen Kreis gestanzt, durch den eine der Spin and Slide Discs gesteckt und von hinten einen kleinen Cardstockkreis, ein wenig größer als das ausgestanzte Loch, dagegen geklebt. Oben kam der Regenschirm darauf. Und schon kann er gedreht werden.

Of course this bear is in his beast mood when there's so much love pouring down on him - and of course he won't need his umbrella! Now you only have to imagine him singing and doing a step dance!
For the mechanism I simply removed the ink from the umbrella before stamping the bear - so you won't see any glimpses of it when the other one is turned - and stamped the image a second time. From this second image I only used the umbrella and cut it out very close to the stamped lines. When cutting out the bear without umbrella I didn't cut off the area where the umbrella would be, then punched a small hole in this area. There's also a hole through both the grey and black cardstock underneath. Through the hole I put one of the Spin and Slide Discs, glued a die cut circle slightly larger than the punched out hole, under the Disc and the colored umbrella on top. And voilà, it can be turned.

Montag, 10. Mai 2021

Geburtstag - das muss gefeiert werden!

 
Hallo Ihr Lieben!
Annett von GroWiDesign feiert heute ihren 5jährigen Geburtstag. Und zu diesem Anlass gibt es ab heute bei Stampcorner ein neues Stempelset, designed von Annett. Und das ist natürlich zum Thema Geburtstag. Ich durfte eine Karte damit machen - und das ist sie. 

Hello eveyone!
Annett is a stamp designer and she's celebrating her 5th birthday as a designer today. So Stampcorner brought out a new stamp set today, designed by Annett, and of course it has  a birthday theme. I got the set and am showing you a card with it - and this is my card.

Ich habe mir einen unterteilten Rahmen als Hintergrund gebastelt. Dafür habe ich eine quadratische und eine rechteckige Stanze in gleicher Breite gewählt und diese untereinander aus einem Stück weißen Cardstock gestanzt. Dann habe ich sie um 180 Grad gedreht und daneben noch einmal aus dem Cardstock gestanzt. Anschließend habe ich eine Rechteckstanze mit gestitchtem Rand benutzt, um den weißen Cardstock auf Kartengröße zu stanzen. Da meine Rechteck-Quadrat-Kombi ein wenig kürzer war als eine normale Karte, habe ich mit Partial Die Cutting das große Recheck ein wenig in der Höhe angepasst und trotzdem rundherum den gestitchten Rand.
Dahinter habe ich einen gepunkteten Hintergrund gesetzt. Dafür habe ich weißen Cardstock mit Distress Oxide Speckled Egg relativ hell eingefärbt und dann die Comic Half-Tone Stencil von WhimsyStamps darübergelegt. Dann habe ich durch die Punkte in der Schablone mehr Speckled Egg aufgewischt und so einen Ton-in-Ton Hintergrund erhalten. Den habe ich dann schwarz gemattet, auf einen weißen Kartenrohling geklebt und darauf mit 3D Tape den vorher erstellten weißen Rahmen geklebt.

I created a frame with individual windows for my card. I've chosen a square and a rectangle die with the same width and die cut them under each other from a piece of white cardstock. Then I turned this combo 180 degrees and die cut it again next to the once I've cut before. Then I used a rectangle die with a stitched border to cut this cardstock piece with the cut out windows in a card size. Since my square and rectangle combo was a bit shorter than a usual card I did some partial die cutting to end up with the perfect size and still have the stitched frame all around.
Behind this frame piece I put a dotted background. I inked up a piece of white cardstock with Distress Oxide Speckled Egg, laying down just a thin layer of color. Then I put the Comic Half-Tone stencil by WhimsyStamps on top and added more Speckled Egg through the wholes in the stencil. That left me with a tone in tone background. I matted that background with black cardstock, glued it onto a white note card and then glued the frame I created before on top with dimensionals.


In die einzelnen Fenster meines Rahmens habe ich dann die Motive verteilt.
Oben links im kleinen Fenster war Platz für ein paar Luftballons sowie ein gestempeltes Alles.
Im Rechteck rechts daneben habe ich das erste der coolen Faultiere gesetzt und ein Herz habe ich dort auch mit untergebracht.
Alle Motive sind mit Copics coloriert, ausgeschnitten und auf den Hintergrund aufgeklebt. Die Texte habe ich direkt in die Fenster gestempelt und mit einem weißen Gelmarker ein paar Linien daneben hinzugefügt.

In the individual windows of my frame I put the images.
To the top left one I added a few balloons and a stamped text.
In the rectangle next to it I glued the first of those cool sloths and a heart.
All images are colored with Copics, cut out and glued onto the background. The words are stamped directly onto the background and I added a few white lines with a gel pen. The text on the card means "happy birthday" - and party as a extra word.


In den beiden unteren Fenstern der Karte war Platz für die beiden anderen Faultiere.
In das größere Fenster kam das Faultier mit dem Eis. Außerdem habe ich hier noch das Wort Party mit ins Fenster gestempelt und von Hand die Schnüre der Luftballons so nach unten verlängert, dass das Faultier die Ballons hält.
Im kleinen Fenster ist das Faultier mit dem Sternen-Zauberstab sowie das Wort Gute untergebracht - zur Abwechslung mal hochkant gestempelt. Das Fenster war zu klein für das komplette Faultier, also habe ich es schräg vom Rand herein ins Fenster schauen lassen.

In the two lower windows I placed the two other sloths.
In the larger one I glued the one with the ice cream cone. I also stamped the word party in this window and used a black fineliner to make the strings of the balloons longer. Now it looks like the sloth is holding them.
In the smaller window I put the sloth with his wand and another word to finish the happy birthday text. For a change I stamped this word vertically. This window was too small for the whole sloth so I glued it down in an angle to make him peek from behind the frame.

Samstag, 8. Mai 2021

Stempeleinmaleins - Ausgabe vom 8. Mai 2021

 
Hallo Ihr Lieben!
Beim Stempeleinmaleins starten wir heute eine neue Kategorie: den Rückblick. Wir haben in den letzten über 11 Jahren so viele Anleitungen für Euch geschrieben, dass selbst wir inzwischen hin und wieder den Überblick verlieren. Und viele der alten Anleitungen geraten irgendwie - auch bei uns - in Vergessenheit. Deshalb machen wir nun einmal im Monat einen Rückblick zu einer dieser alten oder älteren Anleitungen. Wenn wir es schaffen, wird es neue Beispiele dazu geben. Starten tun wir die Rückblicke heute mit der Babybody-Karte. Und diese hier habe ich neu gewerkelt.

Hello everyone!
Over at Stempeleinmaleins we are starting a new series today: the flash backs. During those last more than 11 years we made so many tutorials for you, that also we sometimes loose track. And many of these old tutorials get forgotten - also from us ourselves. So once a month we do a flash back and share one of the old or older tutorials with you. And whenever we find the time we're going to share new cards we made after these tutorials. We're starting with this baby onesie card today. And this is the card I made for today's flash back.

Die Karte ist wunderbar fix gemacht. Ich habe - mal wieder - eine kleine Abwandlung von der Originalanleitung vorgenommen. Wie übrigens auch schon 2011, als wir die Anleitung mit Euch das erste Mal geteilt haben: ich habe die Seiten meines Bodys im unteren Bereich ein wenig abgerundet und zudem die Beinausschnitte nur im vorderen Teil der Karte gemacht. Im hinteren Bereich habe ich die Ecken in die andere Richtung gerundet. Das sieht für mich noch mehr wie ein echter Babybody aus. 
Meinen Body hier habe ich aus weißem Cardstock gewerkelt, die Beinausschnitten, den Halsausschnitt und die Ärmelabschlüsse habe ich mit hellblauem Cardstock eingefasst.
Um die Öffnung eines Bodys nachzuahmen, habe ich am unteren Rand der Karte, zwischen die beiden Beinausschnitten, noch einen schmalen abgerundeten Streifen Cardstock geklebt und dort zwei Mini-Knöpfe aufgeklebt.
Außerdem habe ich rundherum Nähte auf meine Karte gemalt.

This card is really quickly done. Once again I made some changes to the original tutorial - as I also did back in 2011, when we shared this tutorial for the first time. I rounded the side edges of my card a bit in the lower area and also only cut the opening for the legs from the front layer of my card. In the back layer I rounded them - now I think it looks even more like a real baby onesie. 
I made my onesie from white cardstock and used light blue cardstock at the edges of the leg cut outs, the cut out for the head and the edges of the arms.
To mimic the opening of a onesie I glued a small, rounded at the top strip of cardstock between the leg cut outs and glued two mini buttons onto it.
I also used a light blue marker to add stitches all around my onesie.


Als Deko habe ich einen weißen Kreis mit einem hellblauem Kreis gemattet und auch auf den weißen Kreis Nähte aufgemalt. 
Über die Kreise kam dann ein ausgestanzter Wal. Den habe ich mit einer Stanze von Magnolia aus blauem und grauem Cardstock gestanzt, den Bauch aus dem blauen Wal ausgeschnitten und mit dem grauen Wal hinterlegt. Die Wasserfontäne ist von einem anderen Wal, ebenfalls von Magnolia, und mit Glitzer überzogen. Dann habe ich die Deko auf den Body aufgeklebt.
Darunter habe ich noch den Namen des neuen Erdenbürgers gesetzt. Ich habe ihn mit der kleinen ABC Stanze von JM-Creation aus hellblauem Cardstock gestanzt und auf den Body aufgeklebt. Links und rechts war noch Platz für je ein kleines Herz.

To decorate my card I glued a white circle onto a larger light blue one and added more stitches to the white one.
Across the circles I've glued a die cut whale. I used a die by Magnolia here and cut it from both blue and grey cardstock. Then I cut off the belly of the blue one and glued the grey one behind it. The water spout is cut off of another whale die by Magnolia and covered with glitter. Then I glued my decorations onto the onesie.
Under it I wrote the Name of the new baby. I die cut it from light blue cardstock and glued it down. To the left and right of the name was room for a little heart.

Donnerstag, 6. Mai 2021

Mit Freunden schafft man alles!

 
Hallo Ihr Lieben!
Auf dem Stampcorner Blog zeige ich heute mal wieder eine interaktive Karte - und die ist im wahrsten Sinne des Wortes eine wackelige Angelegenheit, wie Ihr oben sehen könnt! 

Hello everyone!
Over at the Stampcorner Blog I am sharing this interactive card today - and it really is a shaky thing as you can see above.


Ich habe hier schwarzen Cardstock für den Hintergrund verwendet. Ungefähr ab der Mitte der Karte abwärts habe ich einen Manegenboden aus Sand, äh gelbem Cardstock, aufgeklebt. Ich habe eine der Slimline Simple Stitched Hillside Borders von LawnFawn verwendet, um die Rundung am oberen Rand des Cardstocks zu stanzen.
Oben aus dem schwarzen Cardstock habe ich mit der kleinsten der Circle Spinner Slider Stanzen von MFT einen gebogenen "Kanal" ausgestanzt, hinter den ich einen Kreis aus schwarzem Cardstock geklebt habe. Und aus dem Manegenboden habe ich einen kleinen Kreis gestanzt. So kann das Motiv später hin- und herwackeln.
Die Vorhänge sind mit dem Take the Stage Stanzenset von MFT gemacht. Ich habe sie aus rotem Cardstock gestanzt und mit Copics schattiert.
Unten auf die Manege habe ich einen der Texte aus dem Stempelset Freunde 2 von Stampcorner aufgestempelt. Der passt zu diesem Motiv einfach perfekt.
Auf den schwarzen Cardstock über der Manege habe ich noch goldene Stern-Pailetten in zwei Größen aufgeklebt.

Here I used a piece of black cardstock as the background. About the lower half of my card is covered with a circus ring, um yellow cardstock. I used one of the Slimline Simple Stitched Hillside Borders by LawnFawn to round the top.
From the black cardstock I've die cut the smallest of the Circle Spinner Slider dies by MFT, that creates a rounded slider channel. I put a circle cut from black cardstock behind this channel. From the circus ring I've cut a small circle. These two cut outs allow the image to move left and right later.
The curtains are cut with the Take the Stage die set by MFT. I've die cut them from red cardstock and added some shading with Copics.
Onto the yellow cardstock, close to the bottom edge, I've stamped a friendship saying. It says something like "with friends there's no limit of what you can achieve". I think this is perfect to go with this image.
Onto the black cardstock in the background I've glued some golden star shaped sequins in two different sizes.


Und hier könnt Ihr das Motiv noch genauer sehen. Es ist das Freunde Minis Motiv aus der Eigenreihe von Stampcorner. 
Ich habe es wieder mit Copics coloriert, mit einem weißen Sakura-Gelmarker ein paar Highlights gesetzt und das Motiv dann aufgeklebt. 
Zwischen dem Motiv und den Kreisen hinter den Cut Outs in der Karte habe ich eine Slider Disc sowie eine Spin and Slide Disc von MFT gesetzt - man kann aber auch mehrere aufeinander geklebte kleine Papierkreise verwenden. Im Kreis unten kann das Motiv sich nur hin und her drehen, im Kanal oben kann es sich weiter zur Seite bewegen. Dadurch sieht es so aus, als würde der Elefantenturm auf dem Ball gefährlich hin und her wackeln. Aber keine Angst, die Freunde fallen nicht um, schließlich können sie zusammen alles schaffen!

And here you get a closer look at the image. It's a new mini stamp from Stampcorner's own line of stamps.
I've colored it again with Copics, added some highlights with a white Sakura gel pen and then glued the image down.
Between the image and the circles behind the cut outs I've put a Slider Disc and a Spin and Slide Disc by MFT - but you can use some stacked up tiny circles cut from cardstock as well. In the circle cut from the yellow cardstock the image can only turn, in the channel cut from black cardstock and it can move further to the left and right. That makes it look like the stacked elephants on the ball are tumbling dangerously. But don't worry, they won't fall - because with friends you can achieve everything!

Mittwoch, 5. Mai 2021

Ein Bargeld-Geschenk in elegant

 
Hallo Ihr Lieben!
Heute zeige ich Euch eine Verpackung für ein Bargeld-Geschenk. Und für ein wenig Schokolade ist auch noch Platz. 

Hello everyone!
Today I am sharing an idea for how to give away some cash. And there's even room for some chocolat.


Ich habe hier die neu aufgeklegte Pizzabox Klein von JM-Creation mit der Küsschenbox kombiniert. Herausgekommen ist diese Handtasche auf einer Pizzabox. Und weil Bargeld nicht immer nur an Teens übergeben wird, ist meine Variante eher elegant ausgefallen.
Die Pizzabox habe ich aus schwarzem Cardstock gestanzt und den Aufleger, einen von zweien im Set, aus matt-silbernem Spiegelcardstock. Den Aufleger habe ich oben auf die Box geklebt und darunter ein wenig Cheesecloth gesetzt.

Here I combined the new and approved small pizza box die by JM-Creation with their little bag die and ended up with this handbag on a pizza box. And since cash is not always gifted to teens my version turned out a bit more elegant.
I've die cut the pizza box from black cardstock and the topper, one of two in the set, from a mat silver mirror cardstock. Inbetween the two layers I've put some cheesecloth.


Und hier ist meine Handtasche. Ich habe die Küsschentasche einmal aus schwarzem und einmal aus braunem Cardstock gestanzt. Von der braunen habe ich dann die Henkel abgeschnitten und den braunen Cardstock mit dem 3D Embossingfolder Veins von Sizzix geprägt. Um die Prägung noch mehr hervorzugeheben, habe ich ein braunes Stempelkissen ganz leicht über die erhabenen Stellen gezogen. Ich finde, so sieht die Tasche aus wie aus geprägtem Leder. 
Die braunen Teile habe ich dann auf die schwarzen geklebt. Im Set ist auch ein kleines abgerundetes Rechteck dabei - ich habe es mittig gefaltet, einen kleinen Stern daraus ausgestanzt und es als Label zwischen die beiden Lagen der Vorderseite der Tasche geklebt.
Für den Taschenverschluss habe ich zwei der Stanzen aus dem ebenfalls neuen Stanzenset Aufhänger und Co benutzt. Die Schnalle ist wieder aus dem silbernen Cardstock, der Riegel aus schwarzem gestanzt. An die Schnalle habe ich dann einen Streifen schwarzen Cardstocks geklebt, der zwischen den beiden Lagen des hinteren Teils der Tasche angeklebt ist. Dadurch, dass der Streifen relativ hoch ist, lässt sich die Schnalle ganz einfach aus dem Riegel ziehen.
Die Tasche habe ich dann oben auf den silbernen Aufleger auf der  Box geklebt.

And here's my handbag. I've die cut the new chocolat bag once from black and once from brown cardstock and cut off the handles off the brown one. Then I used the Veins 3D embossing folder by Sizzix to add some texture to the brown bag and lightly dabbed a brown ink pad over it to add some ink only to the raised areas. I think, now it looks like embossed leather.
Then I glued the brown parts onto the black bag. There's also a little rounded rectangle in the set. I folded it in half, die cut a tiny star from it and put it between the two front layers as a label.
For the closure I used two of the also new closure set. They are die cut from black and silver cardstock, to the silver piece I glued a strip of black cardstock. The other end is tucked between the two layers of the back of the bag. I left the strip quite long so pulling out the silver part is easily possible. 
Then I glued the bag onto the silver topper on top of the box.


Die Handtasche lässt sich aufklappen - eigentlich passt eine Schokopraline hinein. Die Tasche besteht aus zwei idenetischenTeilen. Ich habe in den Boden eines der Teile zwei Schlitze geschnitten, durch die ich etwas schmales, braunes Band gezogen habe. Das habe ich dann benutzt, um einen gerollten Geldschein in der Handtasche zu fixieren.

The handbag can be opened - and originally it's made to put a chocolat inside. The bag is die cut from two identical pieces that are glued on top of each other. I've die cut two slits into one of the bottoms and put some brown ribbon through them. Then I used the ribbon to hold a rolled up bill in place.


Natürlich lässt sich auch die Pizzabox öffnen - und dort wird noch etwas Schokolade ihren Platz finden. Passend dazu habe ich einen ebenfalls neuen Spruch auf den zweiten Aufleger, der mit der Pizzaboxstanze kommt, aufgestempelt. Darunter war noch Platz für ein Herz und zwei Glitzersteine.

Of course also  the pizza box can be opened - and I will put some chocolat in it before I give it away. I stamped a text that means "may contain traces of calories" onto the other label that comes with the pizza box. Under the text there was room for a die cut heart and two rhinestones.

Dienstag, 4. Mai 2021

Ein Haus voller Liebe!

 
Hallo Ihr Lieben!
Heute zeige ich auf dem Stamping-Fairies Blog eine Karte, bei der ich mir noch nicht ganz sicher bin, ob ich sie zur Hochzeit oder zum Einzug in ein neues Heim verschenken werde. Passen tut sie auf jeden Fall für beide Gelegenheiten!

Hello everyone!
Over at the Stamping-Fairies Blog I am sharing a card today, that I'm not sure about weather I'll send it out as a wedding card or as a housewarming card. Well, it fits for both of these occasions!

Hier kamen einige Produkte des April-Release von MFT zum Einsatz. Aber beginnen wir von vorne. Für den Hintergrund habe ich die Brick Cover-Up Stanze von MFT verwendet. Ich habe sie einmal mit dem Impressions Pad und weißem Cardstock durch meine BigShot gekurbelt. Auf diese Weise hatte ich ein geprägtes Mauermuster auf dem Cardstock. Dann habe ich die Stanze aus hellgrauem Cardstock gestanzt. Ich habe die Stanze ganz vorsichtig angehoben, die paar Steine, die dabei mit aus der Mauer herauskamen wieder an ihren Platz gelegt und alles mit viel Washitape fixiert. So konnte ich die komplette Mauer hochheben, auf die Rückseite der Steine Kleber auftragen und sie dann auf die geprägte Mauer aufkleben. So entsteht ein toller 3D Effekt in zwei Farben und die Mauer wirkt realistischer. 
Für den Sockel des  Hauses habe ich einen Streifen dunkelgrauen Cardstocks zugeschnitten, darunter kam dann ein Streifen mittelgrauer Cardstock als Asphalt. 
Ich habe alles von der Größe her passend zugeschnitten und dabei den Rahmen um die Mauer weggeschnitten, alles schwarz gemattet und auf einen weißen Kartenrohling geklebt.

Here I used some items from MFT's april release. But first things first.
For the background I used the Brick Cover-Up die by MFT. I used my Impressions Pad in my Big Shot to only emboss the die into a piece of white cardstock. Then I die cut the cover from light grey cardstock. I lifted the die very carefully, put the few bricks that stuck to the die back in place and then covered it with lots of Washi tape. That way I was able to lift the whole wall, add glue to the back of the bricks and glue them on top of the embossed wall, all in one step. This gave me a great 3D effect and the wall looks very realistic.
For the dado I've cut a strip from dark grey cardstock, then used another strip of a middle grey cardstock as my sideway. 
I cut the whole panel the size I needed it and cut off the frame around the bricks, matted everything black and glued it onto a white note card.


 Ich liebe die Tür aus dem Sittin' Pretty Stempelset - auch ohne Figur davor! Hier habe ich sie weiß mit hellblauen Akzenten coloriert, die Treppe ist steingrau geworden. Neben der Treppe stehen zwei Pflanzgefäße aus dem selben Set. Damit sie besser zu den beiden Turteltauben über der Tür passen, habe ich ein paar herzförmige Blumen aus dem Stempelset Being with You mit dazugepflanzt. Aus diesem Set ist auch der Herzhänger an der Tür. Zum Ausschneiden der Motive aus dem Sittin' Pretty Stempelset habe ich die passenden Stanzen benutzt. Hätte ich die nur für die herzförmigen Blumen auch gehabt!
Und über der Tür fliegen die beiden süßen Vögel mit dem Banner in den Schnäbeln. Ich habe sie, wie alle Motive hier, mit Copics coloriert und dann mit der passenden Stanze ausgestanzt. Auf die Teile des Banners habe ich noch winzig kleine Herzen in fast demselben Farbton wie das Banner aufgestempelt. Dafür habe ich einfach das kleinste Herz der Türdeko benutzt. 

I love the door from the Sittin' Pretty stamp set - even without a character sitting in front of it. Here I colored the door white with some blue accents, the stairs got a nice stone grey. Next to the door I put up two pot plants from the same stamp set. To make them fit my two love birds better I added a few hearshaped flowers from the Being with You stamp set. From the same set is also the doorhanger that I used to decorate the door. For all the images I used the matching dies to cut them out. Wish I had them for the heart flowers as well!
Above the door are the two cute birds holding the banner in their beaks. I colored them with Copics - as I did all the images on this card - and then also used the matching dies to cut them out. Onto the flags of the banner I stamped tiny hearts in nearly the same color as I used for the coloring, simply stamping the smallest of the hearts of the door decoration piece.


Weil die Szene so schön stimmig war und mich ein weiterer Streifen Cardstock quer über die Karte gestört hätte, habe ich den Text direkt auf mit weißem Embossingpulver auf den Gehsteig embosst. Der Text ist, wie die Vögel, aus dem Stempelset Tweet Memories. 

Since I liked my scene a lot and didn't want to add another strip of cardstock across my card I simply white heat embossed my sentiment directly onto the sidewalk. The saying is from the Tweet Memories stamp set, as are the birds.

Samstag, 1. Mai 2021

Stempeleinmaleins - Ausgabe vom 1. Mai 2021

 
Hallo Ihr Lieben!
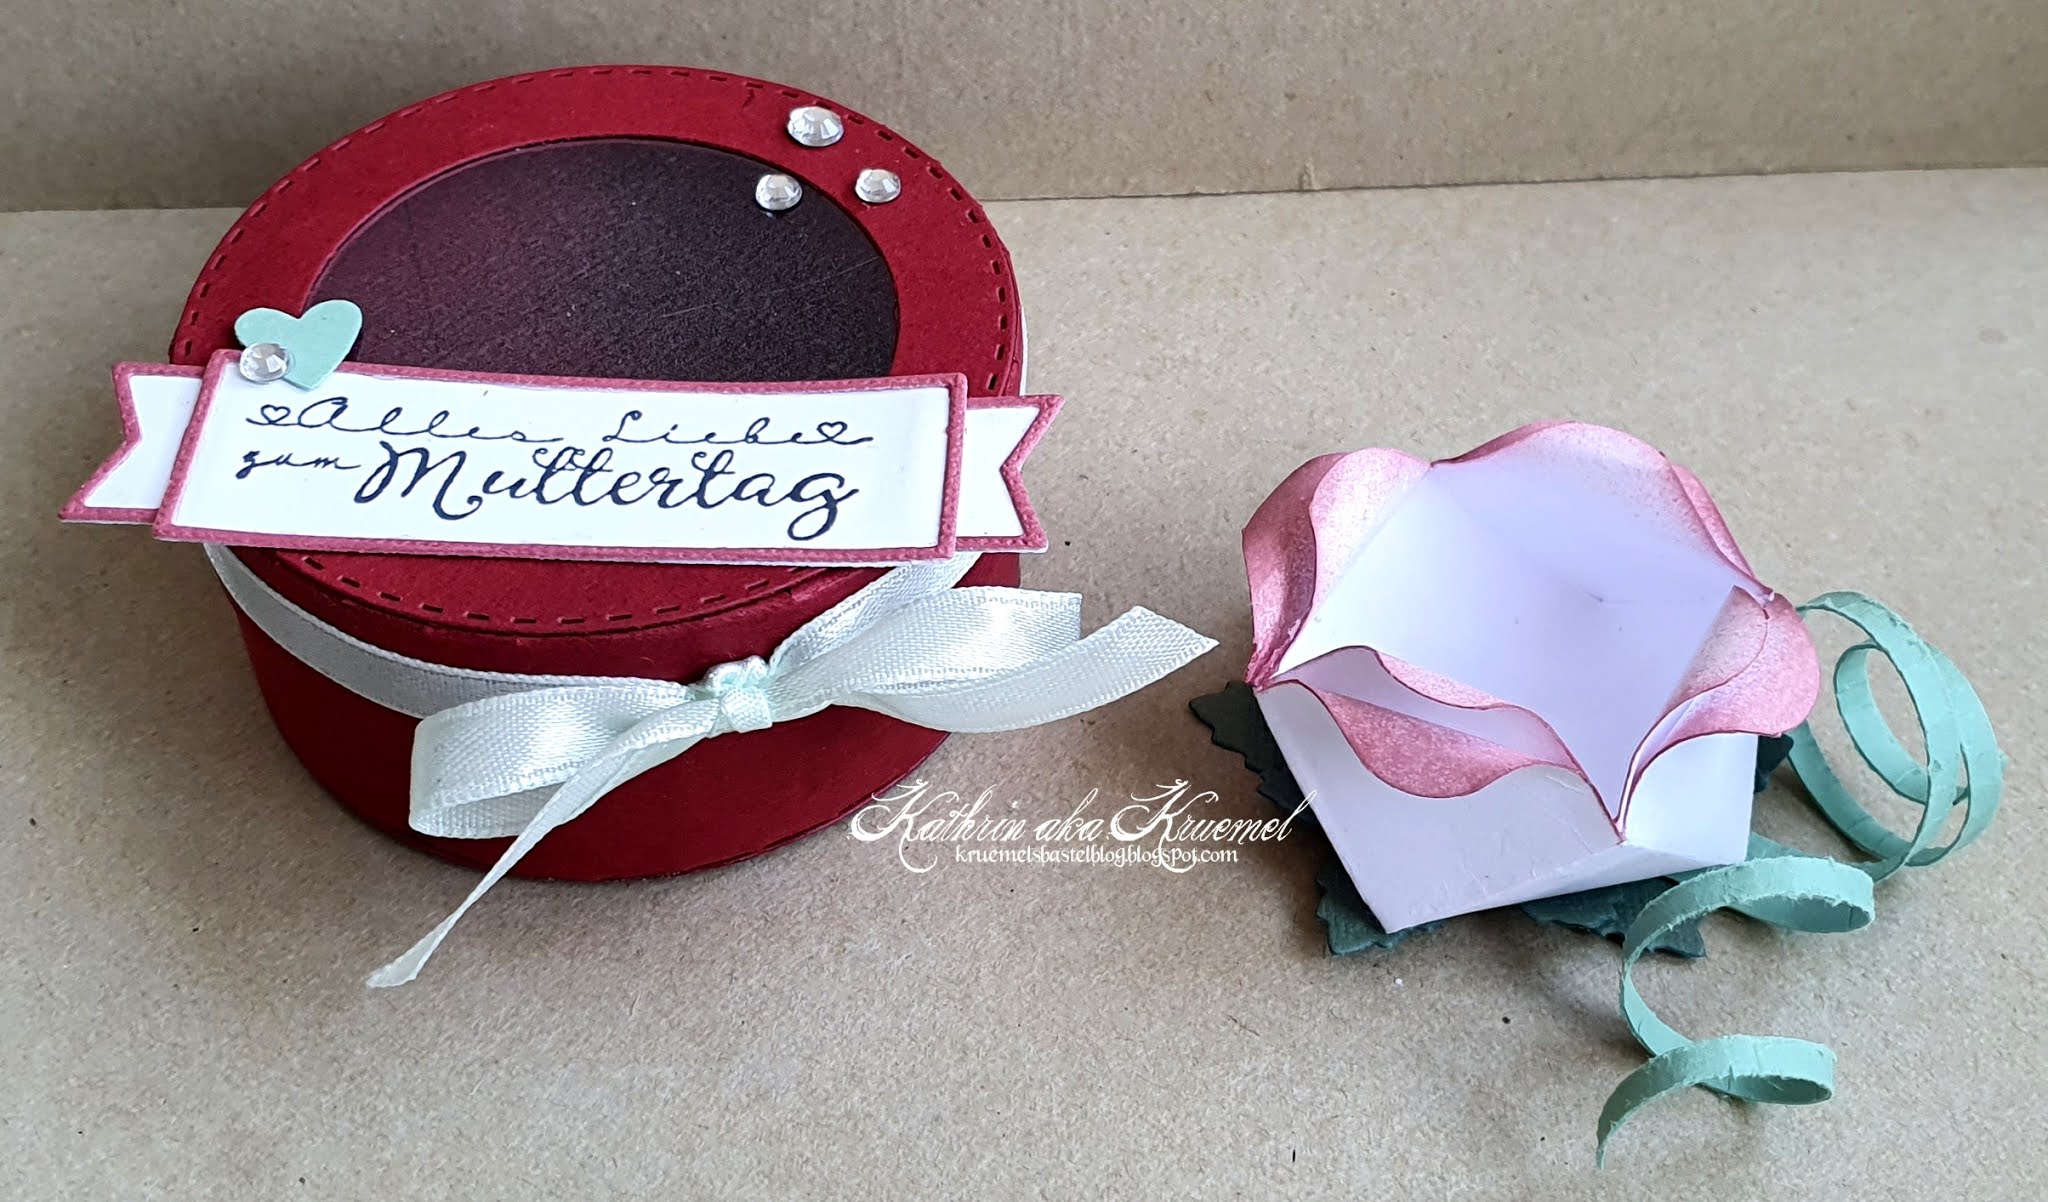
Beim Stempeleinmaleins haben wir heute eine Muttertags-Geschenkidee für Euch: Schokoblümchen. Und wenn Ihr jetzt die Schokolade sucht: die darf nicht mit aufs Foto. Dazu dann unten mehr.

Hello everyone!
Over at Stempeleinmaleins we are sharing a mother's day gift idea today: a paper flower with chocolat. And if you're searching for the chocolat now: it was not allowed on the picture. But I'll tell you more about it later.


In der Originalanleitung auf unserem Blog haben wir vier Blumen zusammen in einer quadratischen Box verpackt. Da ich aber nur ein einzige Blümchen verpacken wollte, habe ich mir mit Kreisstanzen eine runde Box gebastelt, in die genau eine Blume passt. Ich habe dafür einen Kreis mit 2 3/4" Durchmesser benutzt und aus dem Deckel ein rundes Fenster ausgestanzt, durch den man das Blümchen schon sehen kann. Die Öffnung ist mit Folie verdeckt.
Den Spruch, den ich mir, als ich noch meinen Laser hatte, mal selbst gemacht habe, habe ich auf das Banner von MFT gestempelt und es dann auf den Deckel geklebt. Als Deko kam ein kleines Herz sowie ein paar Glitzersteine zum Einsatz.

In the original tutorial on our blog we made four flowers and also a square box to put all of them in. I only wanted a single flower in one box so I've made myself a round box using circle dies. I used a circle die with 2 3/4" in diameter. From the lid I've die cut a circle window through which you can see the flower even when the box is closed. The window is covered with acetate.
The saying means "happy mother's day". I stamped it onto the banner by MFT and glued it onto the lid. To decorate the lid I added a small heart and a few rhinestones.


Um den Deckel habe ich noch ein ganz zart-grünes Band gewickelt und zur Schleife gebunden.

I've put a very soft green ribbon around the lid and tied it to a bow.


So sieht dann die Box aus, wenn man den Deckel abnimmt. Das sieht jetzt so ein wenig fad aus, aber mit der Praline drin ist es wirklich toll. Die ist rot verpackt, daher auch meine Farbwahl für die Box. Für das Foto musste ich die Praline wieder herausnehmen, denn die Firma, die diese Pralinen produziert, kassiert wohl ganz ordentlich ab, sobald einer ihrer Artikel auf einem Blog auftaucht. Das will ich lieber nicht zahlen müssen. Aber als Hinweis: es passt perfekt eine Schnapspraline mit Kirsche hinein. ;)

This is the box when the lid is taken off. It looks pretty plain like that but with the chocolat inside it looks great. It is wrapped in a red paper, that's also why I used these colors for my box and flower. For the picture I had to take the chocolat out. The company, that produces these, is sending you a nice letter from their attorney with a pretty big sum to pay as soon as they discover one of their products on a blog photo. I don't want to pay that. But just as a hin: it's a chocolat filled with alcohol and a cherry. ;)


Und hier endlich mein Blümchen ohne Box. Ich habe meines aus weißem Cardstock gewerkelt und die Blütenspitzen mit Distress Ink Victorian Velvet betupft.
Für das Blatt unter der Blume habe ich eine Weihnachtsstern-Stanze - also die Pflanze - von Marianne Design zweimal ausgestanzt und darunter geklebt. Dann kam nur noch der gekräuselte Papierstreifen daran.

And finally, here's my flower without the box. I made mine from white cardstock and dabbed some Distress Ink Victorian Velvet onto the tips of the petals.
For the leaves I used a poinsettia die by Marianne Design, die cut it twice and glued them under the flower. Then all that was missing was the curled up strip of paper.