Hallo Ihr Lieben!
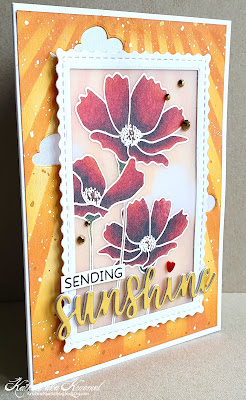
Ich habe ja schon öfter an der Technique Throwback Thursday Challenge in der Share Handmade Kindness FB Gruppe von Jennifer McGuire teilgenommen. Ich finde es einfach spannend, eine "ältere" Technik endlich auszuprobieren oder einfach nochmal umzusetzen, denn man vergisst all die Techniken einfach zu schnell. Im Video, das diesen Monat zum Thema steht, geht es um die Verwendung von Vellum. Und das ist meine Karte.
Hello everyone!
I've joined the Technique Throwback Thursday Challenge in Jennifer McGuire's Share Handmade Kindness FB group a few times before. I just love to finally try an "older" technique - or just do it again, since all of those get forgotten so easily. This month's highlighted video it's all about the use of vellum. And this is my card.
Meine Karte sollte einen sonnigen, sommerlichen, fröhlichen Look bekommen. Also habe ich für den Hintergrund ein Stück hellgelben Cardstocks zugeschnitten und dann die Sonnenstrahlen aufgewischt. Dafür habe ich die Ray of Light Stencil von MFT sowie Distress Oxide Wild Honey und Spiced Marmalade verwendet. Außerdem habe an den Rändern noch ein klein wenig Rusty Hinge aufgewischt. Anschließend habe ich weiße Acrylfarbe und goldene Metallic Watercolor über den Cardstock gespritzt.
I wanted this to be a very sunny, summer-ish and happy card. So I cut a piece of light yellow cardstock for my background and inked some sunrays onto it. I used the Ray of Light Stencil by MFT and Distresx Oxide Wild Honey and Spiced Marmalade. I also added just a hint of Rusty Hinge to the edges of the cardstock. Then I added fine splatters of white acrylic paint and gold metallic watercolor onto the cardstock.
Als Motiv habe ich die Flowers in Bloom von MFT verwendet. Ich habe sie mit weißem Embossingpulver auf Vellum embosst und dann von hinten mit Copics in dunklen Rottönen - durch das Vellum wirkt die Farbe sowieso heller - coloriert. Dabei habe ich die Farbe einfach nur in Punkten aufgetragen.
Aus weißem Cardstock habe ich mit der A6 Wave Stanze von Stampcorner einen Rahmen ausgestanzt, das Vellum - uncolorierte Seite nach oben - von hinten dagegen geklebt und dann den Rahmen samt Motiv mit 3D Tape auf den Hintergrund geklebt.
Das sending - schwarz auf weißen Cardstock gestempelt - ist aus dem Stempelset Spring von HoneyBeeStamps. Darunter habe ich ein ausgestanztes sunshine, gemacht mit der Sunshine Stanze von MFT, geklebt. Für mehr Tiefe habe ich das Wort viermal aus weißem Cardstock und einmal aus goldenem Spiegelcardstock gestanzt und die Worte aufeinander geklebt. Anstelle des kleinen Punktes habe ich ein rotes Herz auf das I gesetzt.
As my image I've chosen the Flowers in Bloom by MFT. I white heat embossed them onto a piece of Vellum and then colored them with Copics in dark shades of red - the vellum makes the color look lighter anyway. I did the coloring on the back of the vellum and only put down lots of dots.
From white cardstock I die cut a frame using the A6 Wave die by Stampcorner and glued the vellum - uncolored side facing up - behind it. Then I attached the frame to the background using foam tape.
The sending - stamped black onto white cardstock - is from the Spring stamp set by HoneyBeeStamps. Under it I put a die cut word sunshine, made using the Sunshine die by MFT. For more depth I die cut the word four times from white cardstock and once from gold mirror cardstock, then stacked them. Instead of the tiny dot I used a red heart as the tittle of the i.
Wie immer in Jennifer's Videos zeigte sie mehr als nur eine Technik darin - und ich konnte mich nicht so recht entscheiden. Also habe ich kurzentschlossen vor dem Aufkleben des Rahmens mit dem Text aus dem Hintergrund und dem weißen Kartenrohling drei Wolken gestanzt. Zwischen die Karte und den gewischten Cardstock habe ich dann irisierendes Vellum geklebt. So ist die Karte, wenn sie geöffnet ist, an diesen Stellen durchsichtig.
As most times in Jennifer's videos she shared more than just one technique in this one - and I was torn which one to use. So I decided to die cut three clouds from both the white card base and the background - of course before attaching the frame and the text. Between the card base and the inked cardstock I put some iridescent vellum. So the clouds are see through when the card is opened.
Hier kann man den Schimmer des Vellums, mit dem ich die Wolken hinterlegt habe, besser erkennen.
Here you get a better look at the shimmer of the vellum I used behind the clouds.
Nach dem Zusammenkleben aller Teile habe ich als Deko noch ein paar goldene Glitzersteine am Rand der Büten verteilt.
After putting the card together I added a few gold rhinestones to the edges of the flowers.


.jpg)