Posts mit dem Label Purple Onion werden angezeigt. Alle Posts anzeigen

Sonntag, 25. Januar 2026

Technique Throwback Thursday Januar 2026

 
Hallo Ihr Lieben!
Die Technique Throwback Thursday Challenge holen mich ja regelmäßig aus meiner Komfortzone - und die erste Challenge im Jahr 2026 ist da keine Ausnahme. 
In dem Video zeigt Jennifer recht schnelle Karten, bei denen die Szene schwarz-weiß, der Himmel/Hintergrund dahinter dafür farbig ist. Wer mich kennt, weiß, wie gerne ich coloriere und ich musste mich hier echt zusammenreißen. Zwischendrin war ich dann schon versucht, alles in die Tonne zu treten, aber ich habe durchgehalten. Und das Ergebnis ist anders als gewohnt, aber es gefällt mir dann doch.
 
Hello everyone!
The Technique Throwback Thursday challenges make me leave my comfort zone nearly every time - and the first challenge in 2026 is no different.
In the highlighted video Jennifer is sharing kind of quick cards, where the scene is black and white, the sky/background colorful. Who knows me, knows, how  much I enjoy coloring and I really had to hold myself back from coloring the scene in. And I was several times tempted to throw the whole thig in the trash but I stuck with it. And the result is different than my usual cards but I am quite happy with it.
 

 Für meine Szene habe ich verschiedene Stempel von Purple Onion kombiniert. Wer die Firma kennt, der weiß, dass sie Gummistempel herstellen und das hat das Maskieren jetzt nicht unbedingt einfacher gemacht. Aber es hat geklappt und ich habe nun eine kleine Szene mit Schlitten, Vogelhaus, Vögelchen, Schneemann und Tannenbäumen. 
Das Vögelchen sitzt eigentlich auf einem Briefkasten, aber es passte so perfekt von der Größe her, dass ich es einfach einbauen musste. Und der Schneemann ist von MamaElephant, aus dem Me  and my Yeti Stempelset. 
So ganz ohne "Coloration" konnte ich dann doch nicht und ich habe einige kleine Elemente für etwas mehr Kontrast mit einem schwarzen Memento-Marker gefüllt. Auf alle Schneeteile habe ich außerdem Stickles aufgetragen. 
Für den Hintergrund im Color Blocking Look habe ich verschiedene Blautöne benutzt und sie schräg aufgetragen. Zwischen einigen der Streifen sind feine weiße Linien sichtbar, aber das stört mich nicht.
Auf alles habe ich dann mit weißer Acrylfarbe Schneeflocken aufgespritzt. 
 
For my scenne I combined different stamps by Purple Onion. Who knows this brands also knows, that they sell red rubber stamps and that made masking the scene not really easier. But it worked out and now I have this little scene with a sleigh, a bird house, a birdie, a snowman and some pine trees.
The bird originally sits on top of a mailbox but it was so perfect in size, that I had to make it fit into the scene. And the snowman is by MamaElephant from their Me  and my Yeti set.
I couldn't go with at least a little bit of "coloring" and filled some smaller elements with a black Memento marker for a bit more contrast.  Onto the snow parts I applies some Stickles.
For the background in a color blocking look I used different shades of blues and applied them at an angle. I ended up with some fine white lines between some of the stripes but I don't mind.
Onto everything I then splattered some snowflakes using white acrylic paint.
 

 Für meinen Text habe ich das Wort Winterzauber mit einer Stanze von Stampcorner einmal aus hellblauem und zweimal aus weißem Cardstock gestanzt. Das habe ich dann in die Szene hineinragend auf den weißen Kartenrohling geklebt und darunter ein Let it Snow aus dem Schnubbis-Set, ebenfalls von Stampcorner, schwarz aufgestempelt.
 
For my text I die cut the word Winterzauber - magic of winter - once from light blue and two times from white cardstock. I adhered the word to the white card base, overlapping the image a bit. Under it I stamped a Let it Snow with black ink.
 

Die Szene habe ich schwarz gemattet.
Und fast nicht sichtbar, habe ich den I-Punkt des Wortes Winterzauber durch ein weißes Herz ersetzt. Ein zweites befindet sich über dem kleinen Vögelchen.
 
I matted the little scene black.
And nearly invisible I used a white clay heart as the dot on the  I. A second one I glued right above the bird's head.
 

Montag, 6. Mai 2024

Bienchen und Blümchen

 
Hallo Ihr Lieben!
Keine Angst, dies ist kein Aufklärungspost! Aber der Titel beschreibt die Karte, die ich Euch heute zeige, doch recht gut. Da konnte ich dann nicht anders.... ;)

Hello everyone!
Today it's all about bees and flowers, but don't worry, I am only talking about the card, I am sharing with you today. 

Draußen fliegen wieder fleißig die Bienen herum, das hat mich hier inspiriert. 
Für den Hintergrund habe ich ein Stück Watercolor Cardstock zugeschnitten und per Ink Smooshing mit Distress Ink Spiced Marmalade in mehreren Lagen einen Klecks in die obere Hälfte aufgetragen.

The bees are once again busily flying around outside, that's what inspired me here.
For the background I cut a piece of watercolor cardstock the size I wanted my card panel to be and then did some ink smooshing with Ditress Ink Spiced Marmalade to add a yellow spot, made from different layers, in the upper half.


Hier kamen tatsächlich mal Stanzen aus einem der allerersten DooHickey Kits von Magnolia zum Einsatz. Die Waben und den Bienenstock habe ich aus weißem Cardstock gestanzt. Die Waben habe ich einfach so auf den Hintergrund geklebt, den Bienenstock habe ich zuvor mit Copics coloriert und mit dunkelbraunem Cardstock hinterlegt.
Die süßen Bienchen sind von Purple Onion und ebenfalls mit Copics coloriert, die Flügel habe ich mit Stickles beglittert. 
Mit der Kleine Blüten Stanze von Create a Smile habe ich kleine Blumen ausgestanzt und die Blütenmitten wieder mit Spiced Marmalade eingefärbt. Hinter den Blumen befinden sich kleine Blätter, die mit einer Stanze aus dem All Seasons Tree Set von WhimsyStamps gemacht sind. 
Der Text, den ich quer über den Cardstock geklebt habe, war ein Überbleibsel, den ich vorsichtshalber mit abgestempelt hatte. Er ist, genauso wie der Text weiter unten, aus dem Hive Five Set von LawnFawn. Ich hatte ein Extrastück Watercolor ebenfalls mit Spiced Marmalade und Ink Smooshing eingefärbt, weil ich daraus eigentlich meine Buchstaben stanzen wollte. Dann habe ich mich aber umentschieden und kurzerhand mit Versafine Clair Acorn die Texte darauf gestempelt.

Here I really used dies from one of the very first DooHickey Kits by Magnolia again - after a very long time. The honeycomb and bee hive I die cut from white cardstock. The honeycomb I let uninked, the bee hive I colored with Copics and put some dark brown cardstock behind it.
The cute bees are by Purple Onion and also colored with Copics. I put some Stickles onto their wings.
Using the Kleine Blüten die by Create a Smile I die cut some small flowers and again used Spiced Marmalade to color the flower centers. Behind the flowers I put some small leaves, made using a die from the All Seasons Tree set by WhimsyStamps.
The text, that I adhered across the cardstock, was a left over that I had stamped just in case. Just like the other texts on the bottom of the card it is from the Hive Five set by LawnFawn. I had done some more ink smooshing with Spiced Marmalade on another piece of watercolor cardstock because I had planned to die cut my letters from it. But then I changed my mind and used Versafine Clair Acorn to stamp the sentiments on it.


Und hier ist der Text, den ich an den unteren Rand der Karte geklebt habe. 
Das Bee habe ich mit Stanzen aus dem Henry's ABCs Set von LawnFawn aus Watercolor Cardstock gestanzt und dann mit einem Pinsel etwas verdünntes Spiced Marmalade aufgetragen, so dass es so aussieht, als würde Honig von der Oberseite der Buchstaben tropfen. Auf dem nächsten Bild sieht man dann, dass ich diese Honig-Bereiche auch noch mit Glossy Accents überzogen habe. Dann habe ich die Buchstaben dunkelbraun hinterlegt und zusammen mit den gestempelten Texten aufgeklebt.

And here's the text, that I adhered to the bottom of the card.
The bee I die cut from watercolor cardstock using dies from the Henry's ABCs set by LawnFawn, then used a paint brush and some Spiced Marmalade mixed with water to color the top of the letters, making them look like honey is dripping down from them. On the next picture you can see, that I also covered those honey areas with Glossy Accents. Then I matted the letters dark brown and attached them with the stamped texts to my card panel.


Hinter die Bienen habe ich dickes, hinter den Text im oberen Teil sowie das "my friend" habe ich dünnes 3D Tape gesetzt. Als Deko habe ich noch einige braune Herz-Pailetten aufgeklebt.
Zum Schluss habe ich den Cardstock schwarz gemattet und auf einen weißen Kartenrohling geklebt.

I put thick foam tape behind the bees and thin one behind the text that I put across the honeycomb and the "my friend". I also added a few brown heart confetti to the card.
Then I matted the card panel black and adhered it to a white note card.

Donnerstag, 20. Januar 2022

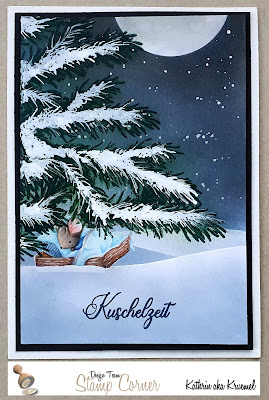
Kuschelzeit

 
Hallo Ihr Lieben!
Im Winter, wenn es früh dunkel wird, macht man es sich gerne in eine warme Decke eingemummt gemütlich. Da sind wir Menschen nicht anders als die Tiere - naja, zumindest als die kleine Maus auf meiner Karte, die ich heute auf dem Stampcorner Blog zeige. 

Hello everyone!
During the winter months it's getting dark early, so getting cozy, wrapped in a soft and warm blanket, is one of the best things to do. Those animals are no different than us humans - well, that counts as least for the little mouse on this card, that I'm sharing over at the Stampcorner Blog today.

Hier habe ich den unteren Teil der Karte mit einem Post It abgedeckt und den Himmel mit Distress Oxide Faded Jeans, Chipped Sapphire und Black Soot gewischt. Oben an den Rand der Karte habe ich einen Cardstock-Kreis gelegt, so dass dort ein Mond entstanden ist. Den habe ich mit Distress Oxide Pumice Stone ein wenig abgedunkelt, dann habe ich einige große Wassertropfen darauf verteilt, damit der Mond auch ein paar Krater bekommt. Dann habe ich silberfarbene Schimmer-Watercolor über den Himmel gespritzt. 
Dann habe ich die Maus auf meinen Cardstock gestempelt und dabei das No-Line Kissen von InkOn3 verwendet. Den Schnee am Boden habe ich mit Distress Oxide Stormy Sky gewischt und es dabei die Maus mit Masking Tape abgedeckt. Es sollte so aussehen, als läge sie in einer mit Schnee gefüllten Kuhle.
Unten auf den Schnee habe ich dann noch mit Versafine Clair Morning Mist das Wort "Kuschelzeit" aus dem Eisbär Stempelset  aufgestempelt.

Here I covered the lower part of some white cardstock with a Post It and then inked the sky with Distress Oxide Faded Jeans, Chipped Sapphire and Black Soot. I've put a circle cut from cardstock over the top edge of my cardstock to create a moon there. I darkened that a bit with Distress Oxide Pumice Stone and then put a few big drops of water onto the ink to create some craters. Next I spritzed some silver metallic watercolor over the night sky.
Then I stamped the mouse onto my cardstock using the No-Line ink pad by InkOn3. I used Distress Oxide Stormy Sky to create the snow and covered the mouse with masking tape while inking the snow. I wanted it to look like the mouse is lying in a snow covered hole. 
I used Versafine Clair Morning Mist to stamp the word "cozy time" onto the snow.


Die süße Maus in der Kiste ist Joyce von PurpleOnion. Ich habe sie mit ZIG Markern coloriert und anschließend ein paar feinere Details mit Polychromos hinzgefügt. Die Highlights sind mit einem weißen Gelpen von Sakura gemacht.
Den Tannenbaum, unter dem es sich die Maus gemütlich gemacht hat, habe ich mit dem Tannenzweig-Motiv aus dem Slimline Pines Stempelset vom WhimsyStamps und Versafine Clair Rain Forest auf den Himmel über der Maus gestempelt. Die Tannennadeln sind bei diesem Stempel nicht gefüllt, so dass man den Himmel hindurch sehen konnte. Deswegen habe ich einen dunkelgrünen Polychromo verwendet und die Nadeln grob gefüllt. Dabei muss man auf keinen Fall jede Nadel einzeln colorieren, einfach grob in Nadelrichtung über das Motiv gehen reicht vollkommen. 
Ich wollte meine Tanne noch mit Schnee bedecken. Das Versafine Clair trocknet so langsam, dass mir der weiße Gelpen immer grünlich verfärbt wird. Deswegen habe ich das Motiv erst etwas mit dem Embossingföhn getrocknet und dann Embossing Glaze von Ranger auf die Zweige aufgetupft, das wie eine Art Versiegelung wirkt. Darauf konnte ich dann mit einem weißen Gelpen den Schnee aufmalen - und er blieb wunderbar weiß.

The cute mouse in the box is Joyce by Purple Onion. I colored it in with ZIG markers and then used Polychromos to add a few fine details. The highlights are made with a white gel pen.
The pine tree, under which the mouse is napping, is stamped using the pine branch image from the Slimline Pines by WhimsyStamps and Versafine Clair Rain Forest. The needles of this image aren't filled so you could see the sky through them. So I took a dark Polychromo and colored them in. There's no need to actually color each individual needle - just doing strokes in the direction towards the tips of the needles will do.
I wanted to cover my pine tree with snow. The Versafine Clair ink dries so slowly that my gel pen always picks up the color underneath. So I first dried the image with my heat gun, then covered the branches with some Embossing Glaze by Ranger. This works as a barrier and I was able to add some perfectly white snow onto the branches with my white gel pen.

Donnerstag, 8. Juli 2021

Make a Wish

 
Hallo Ihr Lieben!
Bestimmt kennen viele von Euch die Stempel von Purple Onion Design. Die musste ich bisher immer in den USA bestellen. Aber das ist vorbei. Bei Stampcorner gibt es die Stempel jetzt auch in Deutschland zu kaufen! Da musste ich natürlich zuschlagen. Ich hatte fast schon vergessen, wie es ist, mit echten Gummi-Stempeln zu stempeln... 
Auf dem Blog zeige ich heute meine erste Karte mit einigen der Stempel - und einen meiner alten Stempel von Purple Onion habe ich auch noch dazu kombiniert. 

Hello everyone!
I'm pretty sure you all know the stamps by Purple Onion Design. I always had to order those overseas - but those times are gone. Stampcorner is now selling those in Germany. And yes, I had to get some - and maybe some more. ;) Oh, I nearly had forgotten what it feels like to stamp with rubber stamps...
On their blog I am sharing my first card with one of those stamps from my order - and I also added an older one I had for quite a while.

Hier habe ich das Motiv Room with a View and Balcony verwendet. Der Balkon ist ein extra Stempel, so dass man das Haus auch ohne verwenden kann.
Ich habe das Haus auf ein Stück weißen Cardstock gestempelt und dann mit Masking Tape abgedeckt, um den Himmel mit Distress Oxide Tumbled Glass drumherum zu wischen. 
Die Wolken am Himmel - ich hatte das Haus zu weit unten positioniert, also musste dort etwas hin - habe ich mit einem weißen Stempelkissen und einer Wolken-Schablone von Dutch Doobadoo aufgetupft. 
Der Text ist eine Kombination eines Stempels aus dem Stempelset Offset Sayings Birthday von LawnFawn und einem gestanzten wish, gemacht mit einer Stanze von HeroArts. Ich habe es aus schwarzem Cardstock gestanzt und dann aus dem runden Rahmen, in dem es eigentlich gestanzt wird, herausgeschnitten. Die gestempelten Worte sind mit weißem Embossingpulver auf ein kleines Stück schwarzen Cardstock embosst.
Ich habe die Szene schwarz gemattet und auf einen weißen Kartenrohling geklebt.

Here I used the Room with a View and Balcony stamp. The balcony is an extra stamp and so you can use the house without it.
I stamped the  house onto a piece of white cardstock and then covered it with masking tape to add the sky with Distress Oxide Tumbled Glass behind it. 
The clouds on the sky - I positioned the house too low and so I needed to add something above the house - is made with white ink and a cloud stencil by Dutch Doobadoo.
The text is a combination of a stamp from the Offset Sayings Birthday stamp set by LawnFawn and a die cut word by HeroArts. I've die cut it from black cardstock and then cut the word out of the round frame that it originally gets cut in. The stamped words are white heat embossed onto a small rectangle of black cardstock.
I matted my scene black and glued it onto a white note card.


Die Szene habe ich mit Copics coloriert. 
Den Bären Jackson with Bubbles habe ich zuerst gestempelt und mit Masking Tape abgedeckt, dann habe ich das Haus gestempelt. Der Balkon ist dann über den Bären - ohne Tape - gestempelt, so dass man den Hintergrund durch die Streben des Balkongeländers sehen kann. 
Die Seifenblasen habe ich ebenfalls schwarz über die Szene gestempelt und da die Blasen direkt an der Hauskante endeten, einen Teil gedreht nochmal daneben gestempelt, so dass die Spur weiterführt. Nach dem Colorieren des Hauses habe ich dann die Seifenblasen nur am Rand ein wenig regenbogenfarben eingefärbt und anschließend die schwarzen Stempellinien mit einem weißen Gelpen übermalt. So wirken die Blasen transparenter. 
Und für mich gehören zu einem Balkon auch Balkonblumen. Nun, ich habe ja schon erwähnt, dass ich hier einen der Stempel mit verwendet habe, den ich schon länger besitze - das sind allerdings fast nur Winter- und Weihnachtsmotive. Also habe ich von einem Blumentopf mit Weihnachtssternen aus dem Set Door Decorations nur die Blumen ausgeschnitten, coloriert und über das obere Ende des Balkongeländers geklebt. Dabei habe ich auch einige der Blütenblätter grün coloriert, so sieht es gar nicht mehr nach Weihnachtsstern aus, finde ich. 

I colored the scene with Copics.
I stamped the bear Jackson with Bubbles first and covered him with masking tape, then stamped the house. The balcony is stamped on top of the bear - without the masking tape - so you can see his legs and the doors behind him through the railing.
I also stamped the soap bubbles on top of the scene with black ink and since they ended directly at the end of the house I turned the stamped and added a few more so they fly further away. After coloring the house I also added a hint of rainbow color to just the inner edges of the bubbles and then used a white gel pen to cover the black stamped lines white. That makes them seem more transparent.
Well, and for me a balcony needs some flowers. As I mentioned before did I use one of the Purple Onion stamps that I had for a while. But those are mostly winter and christmas images. So I used a flower pot with poinsettias in it from the Door Decorations stamp set, cut out the flowers and after coloring them in I glued them to the top of the railing. When coloring them I also colored some of the bigger petals green and now they don't even look like poinsettias anymore.