Posts mit dem Label box werden angezeigt. Alle Posts anzeigen

Samstag, 7. Oktober 2017

Stempeleinmaleins - Ausgabe vom 7. Oktober 2017


Hallo Ihr Lieben!
Heute zeigen wir Euch beim Stempeleinmaleins eine"Verpackung für Minzbonbons" - man darf ja heutzutage gar nichts mehr sagen oder zeigen... Die Anleitung enthält sowohl die Maße für normale, als auch die Mini-IhrWisstSchonWas.

Hello everyone!
Over at Stempeleinmaleins we are sharing a tutorial for a mint gift today. The tutorial give measurements to make a box for both the regular as well as the mini mints.


Meine Verpackung für die normal-großen Mints ist schon mal halloween-ig dekoriert. Denn dafür bietet sich diese Verpackung ja an. 
Auf der Vorderseite habe ich die beiden Kürbisse und den Geist von Magnolia aufgebracht. Dahinter befinden sich ein paar Wolkenschleier, Cheesecloth, ein Grabstein und zwischen den Kürbissen noch etwas Gras. Auch eine kleine Schleife durfte nicht fehlen.

My box for the regular sized mints is decorated as a Halloween gift. This is something those boxes really seem to be perfect for.
To the front I've added those two pumpkins ans the ghost by Magnolia. Behind those there are a few clouds, a gravestone and some cheesecloth. There's also some grass between the pumpkins and I also added some twine here.
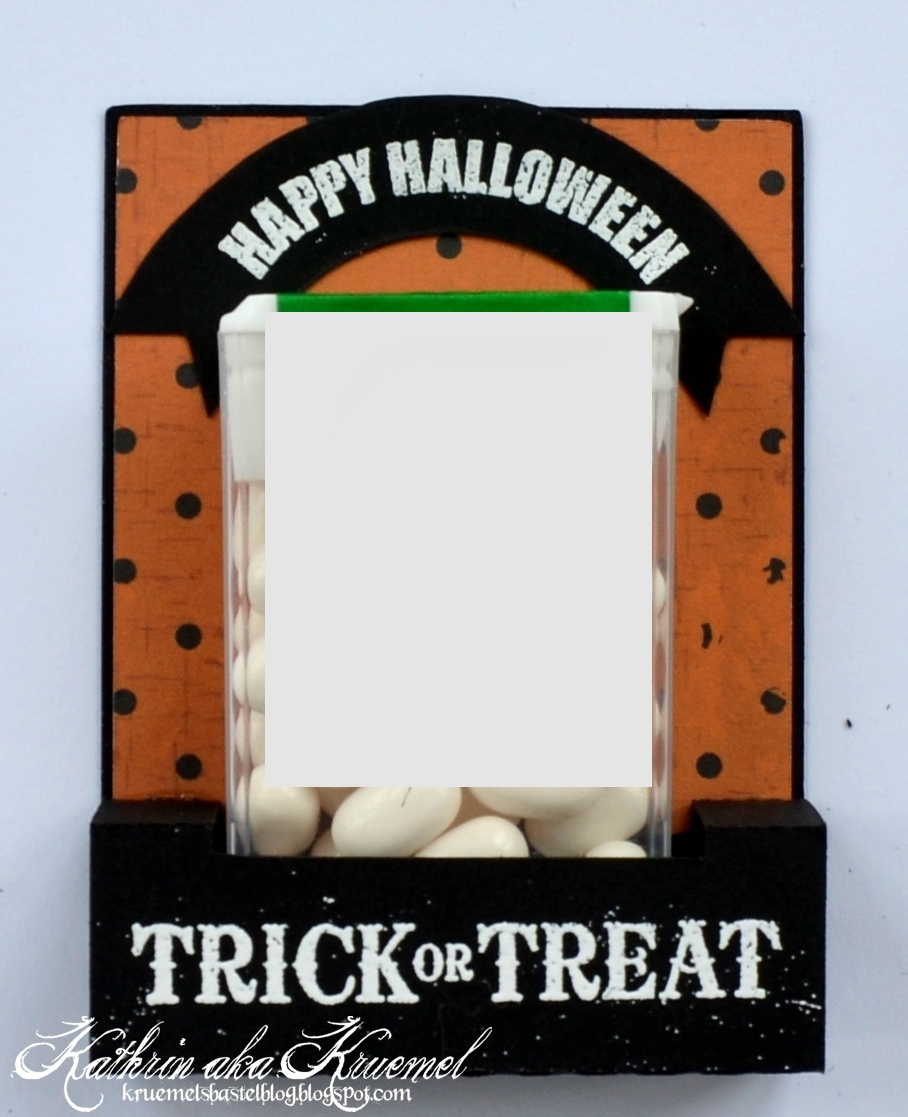

Den inneren Teil habe ich mit "Trick or Treat" bestempelt und weiß embosst. Dass das Embossingpulver hier etwas am Cardstock kleben blieb, finde ich toll, denn das passt zu Halloween, finde ich.
Oben habe ich noch ein Happy Halloween, ebenfalls embosst, auf ein Banner gestempelt und aufgeklebt.

The inner part was decorated with a Trick or Treat saying that is heat embossed using white embossing powder. That there were a few smaller pieces sticking to the cardstock here is something I really like because it goes great with Halloween.
For the top I've stamped - and also heat embossed - a Happy Halloween onto a banner and glued to the inner part.

Und hier habe ich noch meine Version für die Mini-Mints. Das waren die Swaps, die ich dieses Jahr fürs Mekka vorbereitet hatte. Die Mini World Schnecke von Magnolia war geradezu perfekt - es ist hier wirklich nicht viel Platz für Deko. Aber bisschen was geht immer, oder?

And  here is my version of the mini mints box. Actually these are the swaps I made for a stamp fair that was held in September. That cute Mini World snail by Magnolia seemed perfect - there's really not much room for decorations here. But there's always room for some, right?


Samstag, 16. Juli 2016

Stempeleimaleins - Ausgabe vom 16. Juli 2016


Hallo Ihr Lieben!
Beim Stempeleinmaleins zeigen wir Euch heute, wie Ihr aus einer alten Papprolle diese kleine Kommode machen könnt.

Hello everyone!
Over at Stempeleinmaleins we are showing today how to make this mini drawer out of an ald paper roll.


Hier seht Ihr, wie ich die Box oben dekoriert  habe. Mit der kleinen Tilda, die passte so toll zum Papier. Außerdem die üblichen Dinge wie Spitze, Cheesecloth, ein Doily, Blumen. Ein ausgestanztes Herz, ein Tag und ein Schmetterling sind auch noch untergekommen, dazu zwei Perlenstränge.

Here you see what I used to decorate the top of my box. This cute Tilda went so great with the designer's paper. I also went with the usual things like lace, cheesecloth, a doily and flowers. A cut out heart, a tag and butterfly as well  as two pearl strays found a place also.


Auf die Schublade habe ich einen kleinen Spruch aufgebracht - gestempelt auf ein Banner, das ich dann gebogen habe, damit es auf die Schublade passt. Außerdem ist hier ein kleines Herz, passend zum Spruch. Als "Griff" habe ich eine abgeschnittene Perlen-Nadel verwendet.

I put a little greeting on my drawer - stamped on a banner that I bend when glueing down so it fit on the drawer. There's also a little cut out heart, matching the saying "from the heart". As a "handle" I used a pearl pin that I cut the needle part off.


Am unteren Rand der Box habe ich nochmal ein paar Blumen aufgeklebt.
Und jetzt, beim Schreiben des Blogposts, fällt mir auf, dass meine Kommode gar keine Füße hat. Egal, mir gefällt sie trotzdem.

I glued a few more flowers to the bottom part of my drawer.
And now, while writing the blog post, I realize that my drawer is missing the feet. Okay, that's how it is and I still like it.


Rundherum auf die Kommode habe ich kleine Sprüche und Poststempel aufgestempelt und außerdem noch ein paar Mini-Schmetterlinge aufgeklebt.

All around the drawer I stamped some small saying and post stamps and also added a few tiny punched out butterflies.


Und natürlich kann man die Kommode auch öffnen... ;)

And of course you can also open the drawer.... ;)


So, das waren jetzt viele Fotos, aber irgendwie wollte ja alles gezeigt werden.
Bis nächstes Mal!

Okay, that was quite a bunch of pictures but everything wanted to get shown.
See you soon!


Mittwoch, 13. Juli 2016

Eine Bienenbox


 Hallo Ihr Lieben!
Heute zeige ich wieder ein Werk auf dem Stamping-Fairies Blog. Und diesmal habe ich eine Box gewerkelt, mal was anderes. Es ist eine Split Top Box geworden, die wir Euch im Juni beim Stempeleinmaleins gezeigt haben.
  
Hello  everyone! 
Today I am sharing a new creation over at the Stamping-Fairies Blog. And I made a box this time to make something different than a card in between. It's a Split Top Box that we had a tutorial for in june over at Stempeleinmaleins.


Ich habe  hier die süßen Bienen aus dem Bee-Cause Stempelset von CC Designs verwendet. Als ich die unter den Neuheiten im Shop sah, musste ich sie einfach haben... Hier könnt Ihr die beiden süßen in Nahaufnahme sehen. Sie sind mit Copics coloriert.

I used those cute bees from the Bee-Cause stamp set by CC Designs here. When I saw them in the new in category over at the shop I heard them loud and clearly scream my name... Here you get a close-up of those two cuties, colored in with Copics.


Und das ist der Deckel der Box komplett. Auch der Text und die Ballons sind aus dem Set, und es sind noch mehr tolle Stempel dabei, Texte und Motive. 
Auf die Ballons habe ich Glossy Accents aufgetragen.
Die Stanzen aus dem letzten DooHickey Kit von Magnolia passten perfekt zu den Motiven und die Drippy Goo Edge kam auch zum Einsatz.

And this is the box lid shown completly. The saying and the balloons are from the same stamp set and there are even more stamps in it, both texts and images.
The balloons got a coverage with Glossy Accents.
The dies from Magnolia's latest DooHickey Kit were just the perfect match for these images and I also used my Drippy  Goo Edge here.


Und so sieht die offene Box aus, weiter öffnen geht nur, wenn sie nicht steht, denn meine Deko steht an den Seiten über... ;)

And this is the opened box. I wasn't able to take a pic of it opened up wider because my embellishments are wider and so it wouldn't stand anymore.


Sonntag, 12. Juni 2016

Im EM-Fieber


Hallo Ihr Lieben!
Heute abend ist es soweit - "unsere Jungs" treten zu ihrem ersten Spiel an. Alleine schauen ist irgendwie doof, aber Public Viewing ist mir zu viel. Also gibt es heute einen Fußballabend mit Freunden und dazu musste natürlich eine passende Einladung her.

Hello everyone!
Time has come - the german team will have the first match at the soccer european championship tonight. Watching the game alone is only half the fun but I don't like those big public viewings either. So we will have a soccer night with friends at our home tonight and of course I had to make an invitation.

Genau richtig in der Zeit gibt es von Kulricke ein tolles Set mit Fußball-Stempeln, und das habe ich hier verarbeitet. Und es ist so ausgelegt, dass es auch für die nächste WM noch passend ist. ;)

Right in time Kulricke came out with a soccer stamp set which I used here. It also has a matching stamp for the next world championship in 2018. ;)


Grundlage meiner Einladung ist die Matchbox Stanze. Gefüllt ist sie mit Beruhigungstee, Trillerpfeife und einem Klopfer. Inzwischen habe ich viel tollere Füll-Ideen gefunden, aber es gibt bestimmt ein nächstes Mal...
Ich habe einen Aufleger in Form einer Deutschlandflagge gemacht und darauf den Fußball und den EM 2016 Text aus dem Fullball-Stempelset verwendet. Das Wort Party ist aus dem ebenfalls neuen Monsterset.
Und einen passenden Charm in Trikotform habe ich auch noch gefunden.

Base for my invitation is the matchbox die. 
I made a topper like a german flag and added the ball and EM 2016 text from the soccer set to it. The party text is from the also new Monster Stamp Set.
I also found a matching charm in my stash.


Die Seiten der Matchbox sind mit einem weißen Aufleger beklebt. Darauf habe ich dann passende Worte aus dem #Party Stempelset gestempelt. 

The sides are covered with a strip of white cardstock on which I stamped some encouraging words from the #Party stamp set.


Mittwoch, 28. Oktober 2015

Kleine Halloween-Deko


Hallo Ihr Lieben!
Heute darf ich wieder etwas auf dem Cards und More Shop Blog zeigen. Und so kurz vor Halloween konnte ich nicht anders, als das Thema nochmal auf zu greifen. Und so ist diese kleine Laterne entstanden. 

Hello everyone!
Today I am sharing a new creation over at the Cards und More Shop Blog. And that close to Halloween I wasn't able to resist and made another Halloween creation. And so this little lantern was created.

Naja, und hier nochmal ein Foto, auf dem man sie dann auch wirklich sieht:

Well, an here's a picture where you can really see it:


Grundlage für meine Laterne war die Box Art Treatbox von Dutch Doobadoo - ich habe einfach in drei der seitlichen Elemente ein Fenster geschnitten. Die Rückseite habe ich dringelassen, so dass ich dort Designpapier aufkleben konnte. Die Fenster sind mit Folie beklebt, auf die ich dann mit StazOn mit einem Stempel aus dem Scrap and Mixed Media Kit 1 Stempelset von Vildastamps Risse aufgestempelt habe. Auch die Box selbst habe ich mit Flecken aus dem Scrap and Mixed Media Kit 2 bestempelt, zusätzlich habe ich sie noch mit Distress Crackling Paint bestrichen.
Zwei Bordüren - einmal Gras und einmal schleimig - bilden die Abschlüsse meiner Laterne. Und mit der ABC 2 Stanze von Noor!Design habe ich noch ein kleines Boo aufgebracht.

Base for my lantern is the Box Art Treatbox by Dutch Doobadoo - I just cut windows in three of the sides, leaving the backside whole so I could add some designer's paper there. The windows have been covered with transparency. I then used StazOn and a stamp from the Scrap and Mixed Media Art Kit 1 set by Vildastamps to stamp some cracks on them. The lantern itself got some spots from the Scrap and Mixed Media Art Kit 2 and I also added some Distress Crackling Paint here.
Two borders - grass and a slimy one - are used to decorate the top and the bottom. And I used the ABC 2 die by Noor!Design to add alittle BOO.


Vorne habe ich ein Kürbisgesicht aus dem Paperart Bogen Black Halloween aufgeklebt. Damit es mehr heraussticht, habe ich Kürbis und Hut mit Gelatos eingefärbt und auch hier Crackling Paint aufgetragen. Anschließend habe ich die freien Stellen mit schwarzm Cardstock hinterklebt.
Übrigens sind die beiden Bordüren auch mit wenig Farbe des lilanen Gelatos überzogen.

I added a Jack'o'Lantern from the Paperart sheet Black Halloween to the front of my lantern. To make it pop out more I covered it with Gelatos and added more Crackling Paint here. Then I put some black cardstock behind the cutouts.
The two borders are also covered with a thin layer of a purple Gelato.


Da das elektrische Teelicht in der Laterne von unten in die Laterne eingestellt werden kann, habe ich den Verschluss oben einfach zugeklebt und auch hier etwas Deko aufgebracht. Da finden sich Cheesecloth, schwarze Spitze, lilafarbenes Band und eine kleine Rose. Oh, und natürlich die Rosette. Die habe ich mit der Eiszapfenbordüren-Stanze gemacht, dadurch wirkt sie schön stachelig.

Since the electric tealight can be put into the lantern from the bottom I simply glued the top closed and added more decoration here. There's cheesecloth, black lace, purple ribbon and a small rose. Oh, and the rosette. I made this from the icicles border which makes it look kind of spikey.